FOR PS4 - Collective Minds Gaming Co. Ltd.
←
→
Page content transcription
If your browser does not render page correctly, please read the page content below
FOR
      PS4™
Introduction                                                   3
Getting Started
- Attaching the STRIKEPACK F.P.S. Dominator                    4
- Pairing the STRIKEPACK F.P.S. Dominator with Your Console    4
Audio and Headset Usage
- Audio Controls & 3.5mm Headset Usage                         5
Important Terminology                                          6
Modology                                                       7
The STRIKEPACK F.P.S. Dominator Device
- Operating The STRIKEPACK F.P.S. Dominator                    9
- Mapping the Paddles                                         10
- MOD Navigation & Basic Control                              10
Secondary Menu Navigation
- Adjusting Button Layouts – Secondary Menu                   12
- Selecting the Game & Layout                                 13
MOD Control
- Adjustable MOD Controls                                     15
- Adjustable Burst Fire (BOIII)                               15
- Adjustable Button Turbo 2.0                                 16
Main Menu & Device Control
- MOD Classes                                                 16
- Class Use Instructions                                      17
Quick MODS                                                    20
- Additional Quick MODS
- Easy Double Jump
- Auto Hold Breath
- Auto Spot
- Hair Trigger
- Rumble Control
- Sixaxis™ Motion Controlled Reload
Quick Controls                                                21

2      WWW.STRIKEPACK.COM
NOTE: THIS MANUAL HAS BEEN REVISED WITH
    INSTRUCTIONS THAT ARE VALID ONCE THE PS4
    STRIKEPACK HAS BEEN UPDATED.

INTRODUCTION
Thank you for purchasing the PS4 F.P.S. STRIKEPACK Dominator, the most
advanced gaming adapter ever built for the Dual Shock 4™ controller. We have
taken the very best controller MODS available and built them into the device using
our revolutionary technology so that you can focus on gaming and not worry about
complicated PC software. Using that same technology, we give you the gamer, the
ability to map any button on your controller on the fly to either of the paddles on the
device. Again, no app, or PC needed for this. We believe this is a real game changer
and hope you agree. Just as important is the fact that all of the modifications made
possible by the device are done so without voiding the warranty or making any
permanent changes to your controller. The whole team at Collective Minds really
hope you enjoy gaming with it, as much as we have enjoyed designing it for you.
We have spent countless hours, and sleepless nights, pushing the device through
extreme game sessions, ensuring any bugs and issues have been eradicated. However,
if you find any issues or have any difficulty operating the device, please reach out to us
at support@collectiveminds.ca and we will be more than happy to help you out.
Also, there are lots of videos to help you setup and maximize your fun over at
www.STRIKEPACK.com - please check it out!
To check out other Collective Minds products please visit www.CollectiveMinds.ca.

                                                  WWW.COLLECTIVEMINDS.CA                3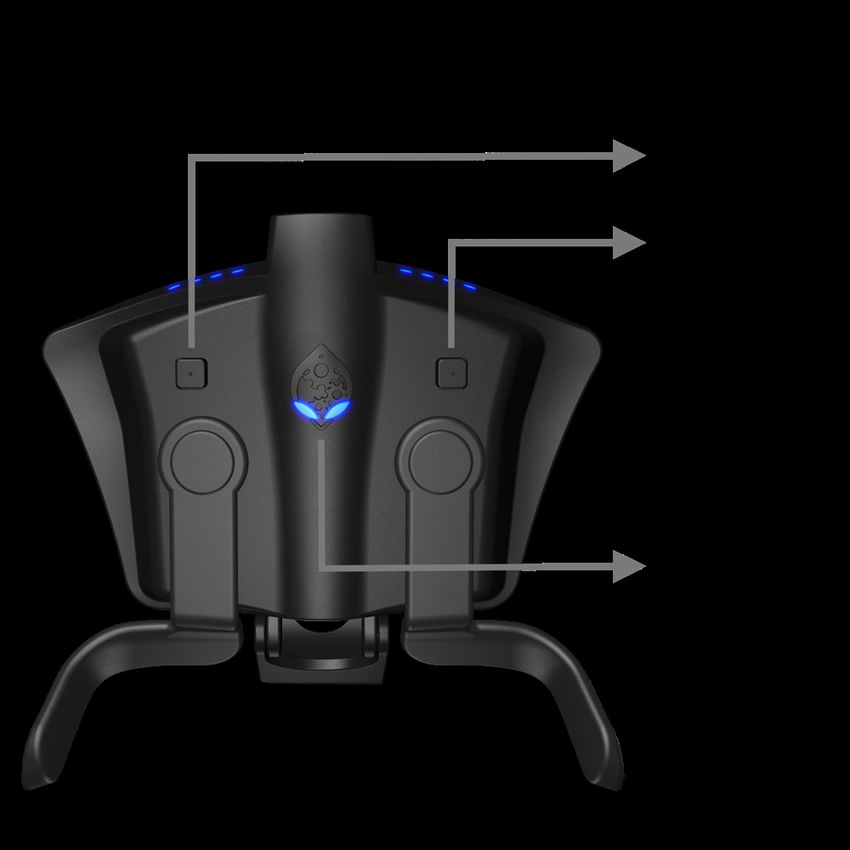
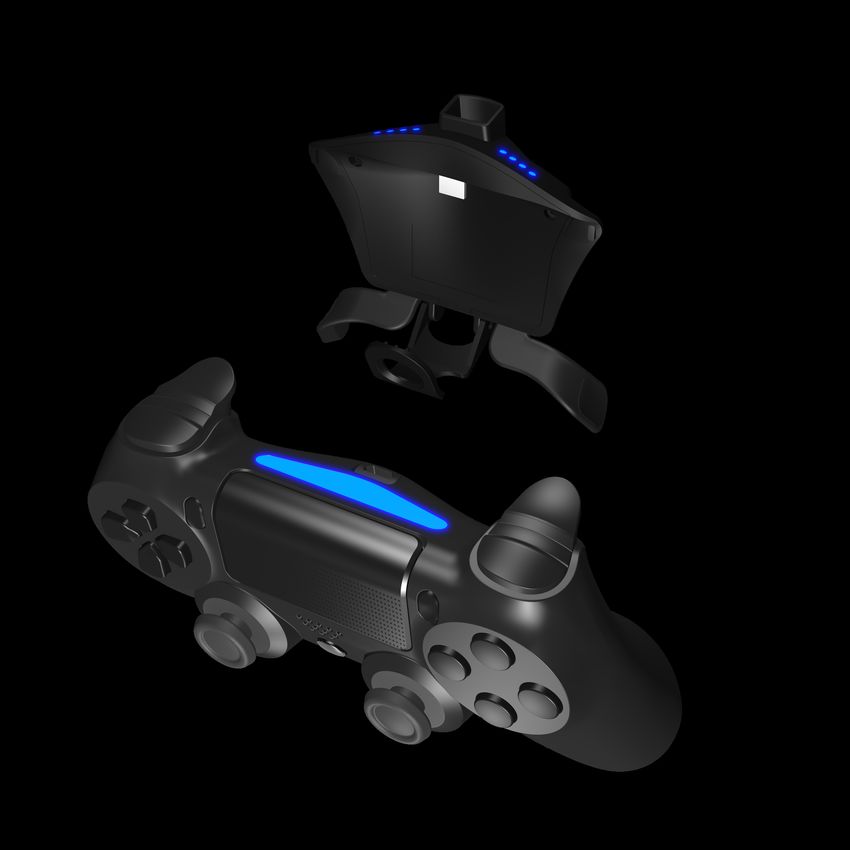
GETTING STARTED
Attaching the STRIKEPACK F.P.S. Dominator
1. Ensure your PS4 controller is off.
2. Line up the USB ports, flip the securing
   arm out of the way, and slide the PS4 F.P.S.
   Dominator onto the back of the PS4 controller.
3. Swing the arm to the front of the controller
   and gently secure the curved arm of the
   device
   by gently pressing it against the front of
   the controller. It should lock into place in the
   speaker holes and you should hear a soft “click”.
4. Your STRIKEPACK F.P.S. Dominator is now ready to be paired to
   your console.

Pairing the STRIKEPACK F.P.S. Dominator with your Console

NOTE: As the STRIKEPACK device is a highly advanced wired adapter, it must be
paired each time the console is turned on or brought out of REST MODE. This is a very
simple process and takes seconds.
1. Ensure your STRIKEPACK device is attached to the controller but NOT plugged in.
2. Turn on your PS4 console via your controller or front power button.
3. At the login screen, you will see the message “DualShock 4 wireless controller
   connected. Who is using this controller?” Press your CROSS (X) button as you
   normally would.
4. You will notice an icon of the controller with a battery symbol appearing on the top
   left of your screen indicating that a wireless controller is now connected.
5. Using the supplied 10FT cable, plug in the standard USB cable end to a free USB port
   on the front of your console.
6. Plug the micro USB end into the USB port on the STRIKEPACK.
7. You will see the wired controller connected message and be asked “who is using this
   controller?” just as you did at login. Select your user and press CROSS (X) again. You
   will notice that there is a controller symbol at the bottom left of your profile.

4      WWW.STRIKEPACK.COM
8. Once again, a controller symbol will appear at the top left of your screen. This
   time however, there will NOT be a battery symbol beside the controller as you are
   now in lag free wired mode and your STRIKEPACK is ready to use.
IMPORTANT NOTE: TIPS FOR REST MODE USERS / USERS WHO WANT TO KEEP
THE STRIKEPACK ATTACHED TO THEIR CONSOLE AT ALL TIMES – For your PS4
console settings, under Power Save Settings > Set Features Available in Rest Mode, we
recommend setting Supply Power to USB Ports to Off. IF you choose to set Supply Power
to USB Ports to On then under Devices > Controllers you must set Communication Method
to Use USB Cable, otherwise you will NOT be able to leave REST MODE with your
controller.
If the device, or your controller, stop working at any time, simply unplug the STRIKEPACK
cable and wait 5 seconds before plugging it back into the device. This should rectify any
issues by resetting the pairing to the PS4 console and your STRIKEPACK will now work as
expected for the rest of your gaming session.

AUDIO CONTROLS & 3.5MM HEADSET USAGE
For 3.5mm Headsets, it is important to set your headset volume control on the PS4
console to the MAXIMUM volume you prefer. The STRIKEPACK device can control
the audio of any 3.5mm headset connected to the controller up to this volume.
Begin HOLDING the RIGHT MAPPING BUTTON, then:
To increase the volume, TAP the RIGHT PADDLE.
To decrease the volume, TAP the LEFT PADDLE.
To mute/unmute the mic, PRESS the LEFT MAPPING BUTTON.
Once you have finished adjusting the 3.5mm audio, RELEASE the RIGHT MAPPING
BUTTON.
IMPORTANT NOTES: 3.5mm headset audio is compatible with the newer controller
model CUH-ZCT2. The original CUH-ZCT1 controller is UNSUPPORTED for 3.5mm
headset audio – a USB headset or USB sound adapter can be used as an alternative.
This is a hardware limitation of CUH-ZCT1 and NOT that of the STRIKEPACK.
The STRIKEPACK increases the microphone sensitivity of any 3.5mm headset that is
connected to your controller so it is recommended to adjust your PS4’s microphone
level to only 1 or 2 notches above negative to prevent other players from hearing an
echo.

                                                 WWW.COLLECTIVEMINDS.CA                5
IMPORTANT TERMINOLOGY Using the most advanced controller adapter ever could be confusing, but we have gone to great lengths to ensure it is as user friendly and intuitive to use as possible. Getting familiar with some basics on the device and some basic terms is very helpful, however. Classes – These are the main controller MOD types that are possible with the STRIKEPACK F.P.S. Dominator device. There are 8 main classes that are counted from left to right on the LED’s of the device, with the leftmost LED position being Class 1. MOD – These are the specific controller modifications possible within a given controller MOD class. Quick MOD – A specific controller MOD, often for a specific game, that is simply turned on or off and does not have adjustable settings. These are activated with combinations of the D-PAD and controller buttons. Menu Navigation – This is the method the user has to navigate through the classes, MODS, and parameters of the device. Primary Menu – This Primary Menu is selected by HOLDING the LEFT D-PAD for 5 seconds. This is the main menu system that you will use to set up and navigate the device. Secondary Menu – This Secondary Menu is selected by HOLDING the RIGHT D-PAD for 5 seconds. This is the secondary menu system that you will use for any supported in-game button layouts. 6 WWW.STRIKEPACK.COM
Primary Weapon Fire (Class 1/LED 1) – This is a series of controller modifications that
affect the primary weapon in common shooters like the Call of Duty™ series.
Secondary Weapon Fire (Class 2/LED 2) – This is a series of controller modifications
that affect the secondary weapon in common shooters like the Call of Duty™ series.
Anti-Recoil Adjustable (Class 3/LED 3) – This is a series of controller modifications
that affect the recoil simulated in common shooters like the Call of Duty™series.
Quick Scope (Class 4/LED 4) – This is a series of controller modifications that affect
the advanced tactic of zooming in quickly and firing a sniper rifle to maximize damage
in common shooters like the Call of Duty™ series.
Auto Run (Class 5/LED 5) – This is a series of controller modifications that affect the
ability to run continuously in common shooters like the Call of Duty™ series.
Drop Shot (Class 6/LED 6) – This is a series of controller modifications that affect the
advanced tactic of dropping prone while firing in common shooters like the Call of
Duty™ series.
Left Paddle MOD (Class 7/LED 7) – This is a series of controller modifications that
can be applied to the left paddle for activation.
Right Paddle MOD (Class 8/ LED 8) – This is a series of controller modifications that
can be applied to the right paddle for activation.

MODOLOGY
Rapid Fire – A MOD that mimics a very high frequency of controller trigger presses,
to enable the gamer to fire faster in the shooter than using the trigger naturally. It is
designed for semi-automatic weapons and is NOT to be used with fully automatic
weapons.
Optimized Rapid Fire – This Rapid Fire is optimized to be as fast as possible but at
the same time ensure that every single shot will be correctly registered by the game.
Rapid Fire Adjustable – With Rapid Fire Adjustable you can always get the optimum
firepower for your favorite weapon by being able to simply and on the fly adjust the
values up or down. See the menu system instructions for more information on how
to adjust your Rapid Fire speed in this mode.
Pulse Fire Adjustable – Pulse Fire Adjustable can reach a faster rate of fire with
burst type weapons. See the menu system instructions for more information on how
to adjust your pulse fire speed in this mode.
Burst Fire Adjustable – Burst Fire Adjustable is designed to turn semi-automatic
and automatic weapons into burst firing weapons.
MW Jitter - This is an advanced MOD for COD: Modern Warfare Remastered that

                                                      WWW.COLLECTIVEMINDS.CA                7
allows the M1014 Shotgun to fire with an enormous fire rate well beyond normal rapid fire. This was designed for COD: Modern Warfare Remastered though it may be effective in future games. JITTER requires certain game exploits. These exploits may be patched rendering this mod ineffective in the future. Anti-Recoil – This MOD compensates for vertical recoil while firing a weapon by automatically moving the control stick in the opposite direction of the one your gun is moving in while firing. Quick Scope – Quick Scope is widely used in shooters. The idea behind quick scope is to use a sniper rifle, scope IN and fire the shot as the gun scopes in. Perfecting the aiming and timing will allow you to become a one-man commando with your sniper rifle maximizing damage in most shooters. Auto Hold Breath – This MOD is specifically designed for sniper rifles in the COD and Battlefield series. It automatically holds the sniper’s breath when scoping in (usually activated by depressing the left thumb stick (L3). Upon activation the MOD will hold the sniper’s breath when scoping. The player no longer has to hold the left thumb stick (L3) to hold breath. Also, the MOD resets every time you fire so a sniper can effectively continue to take out enemies. Auto Hold Breath has been updated to work with most button layouts. In COD: WWII / Infinite Warfare when using the ADS Toggle based Nom4d layouts you must hold the ADS Scope button (default L2) in order to keep the Auto Hold Breath MOD active. As long as ADS is held the player breath will be held and this will be reset every time the player fires. Be careful not to wait too long before firing as the game will only let you hold your breath for so long. Auto Sprint – The perfect MOD if you are tired of constantly pressing the left thumb stick to make your character sprint. Auto Sprint is just what you have been looking for. Double Jump – If this MOD is enabled, simply press and hold the jump button and it will automatically release and hold to activate double jump. This is a COD TM BOIII series specific MOD that allows the player to automatically jump at the maximum height. Auto Spot – This is a BattlefieldTM series specific MOD that automatically keeps targeting the enemy. This is activated by looking at the target with ADS enabled. ADS – This means Aim Down Sights (sometimes known as Scope In or Iron Sights) and is usually performed on default layouts by holding the left trigger. Hair Triggers – This is a very handy MOD for shooters. It automatically sets the triggers to their max value the moment they are registered by the controller as pressed. This allows the gamer to simply tap the trigger instead of pressing all the way down saving time and achieving the same in-game result. Turbo Melee – This MOD allows the Melee attack in most shooters to be rapidly pressed automatically by simply holding the Melee button in the game. 8 WWW.STRIKEPACK.COM
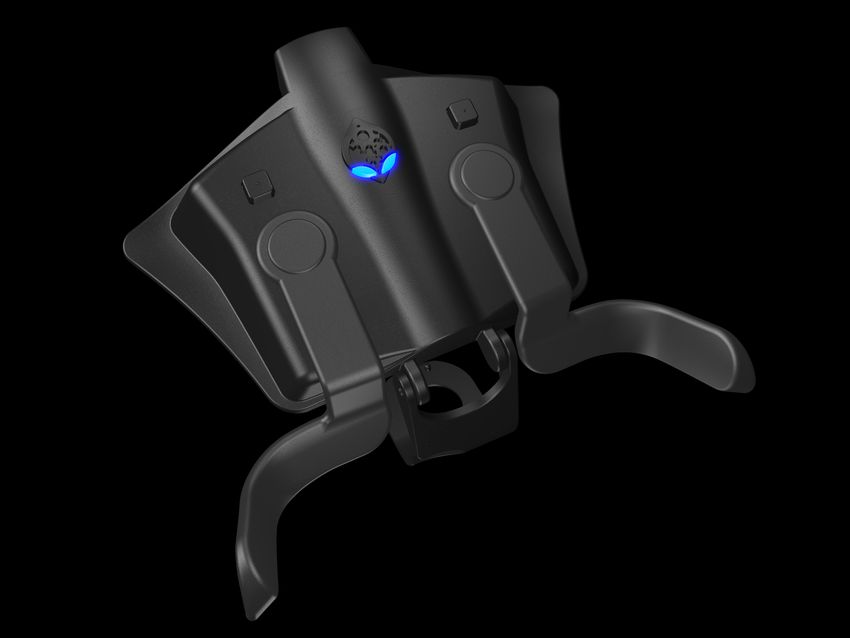
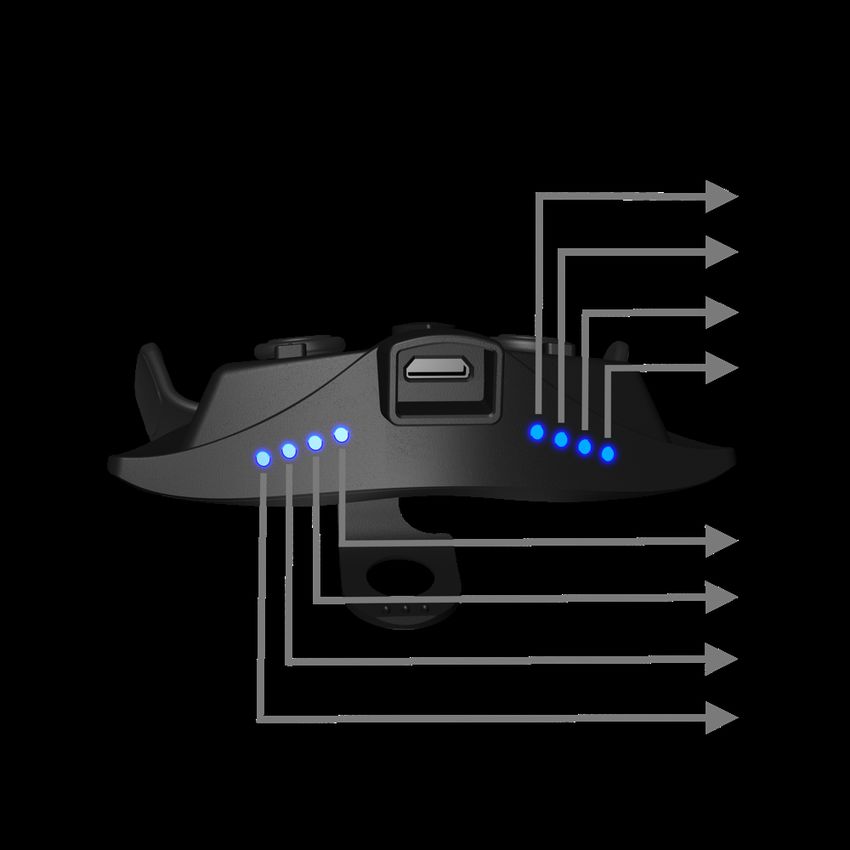
THE STRIKEPACK F.P.S. DOMINATOR DEVICE
Operating the STRIKEPACK F.P.S. Dominator

                         Right Mapping Button
                         Left Mapping Button

                         Gear Head EYE LED – Device
                         Mode (WHITE – Tournament
                         Paddle Mode/ BLUE – MOD Mode)                   LED 5 — Auto Run
                                                                         LED 6 — Drop Shot
                                                                         LED 7 — Left Paddle MOD
                                                                         LED 8 — Right Paddle MOD

                                                                        LED 4 — Quick Scope
                                                                        LED 3 — Anti-Recoil
                                                                        LED 2 — Secondary Weapon
                                                                        LED 1 — Primary Weapon
                          Secure Cable Channel for 10 FT
                          Cable to Connect to Console
                          USB Connection port to
                          connect to PS4TM Controller
                          Front Securing Arm
                          Anti-Scratch Pads

Once your device is paired with the console the first step is to choose which
operation mode you want the device to be in. There are two operation modes;
Tournament Mode and MOD Mode.
Tournament Mode – Each time the STRIKEPACK F.P.S. Dominator is paired it starts
in Tournament Mode by default. This is identified by the fact that the Gear Head Eyes
are glowing WHITE. Tournament Mode allows you full access to map buttons to the
paddles but DOES NOT allow the use of any MODS.
MOD Mode – To enter MOD mode, simply HOLD the top LEFT MAPPING
BUTTON and press the top RIGHT MAPPING BUTTON. You will know you have
correctly entered MOD MODE as identified by the Gear Head Eyes glowing BLUE.
Game Pack Mode – To enter Game Pack mode, simply HOLD the top LEFT MAPPING
BUTTON and press the RIGHT PADDLE. You will know you have correctly entered
GAME PACK MODE as identified by the Gear Head Eyes flashing WHITE and BLUE. It is
important to note that Game Pack Mode is only available with an ACTIVE MODPASS
subscription. For details visit www.modpass.ca.

                                                           WWW.COLLECTIVEMINDS.CA               9
Mapping the Paddles Paddle Mapping is a very simple process that take a fraction of a second and can be done in real time while playing. Choose which paddle you want to assign. To MAP that paddle, simply hold down the appropriate LEFT or RIGHT MAPPING BUTTON and while still holding the button simply PRESS the button you want to assign. To save that button as the designated choice simply LET GO of both buttons. For Example: If say, you wanted to assign the “CROSS (X)” button to the right paddle, just press & hold the top RIGHT MAPPING BUTTON and PRESS the ”CROSS (X)” button. Once you release both buttons, “CROSS (X)” has been assigned to the right paddle. To map the left paddle, follow the same process, but use the top LEFT MAPPING BUTTON instead. Every button can be mapped, even the PS Button, the Touchpad Button and the Triggers. NOTE: Two consecutive buttons can be mapped to any paddle. If say, you wanted to assign the “R1” & “TRIANGLE” button to the right paddle, just press & hold the top RIGHT MAPPING BUTTON and PRESS the ”R1” button and then the “TRIANGLE” button. Once you release the buttons, “R1-TRIANGLE” is assigned to the right paddle. This can be very useful in games that require holding a button and pressing another frequently like MMO’s such as FF14, where you can now use the paddles to swap between two action banks quickly. MOD MODE Navigation & Basic Control To cycle through classes, HOLD LEFT D-PAD and use SQUARE to go UP a Class and CROSS(X) to go DOWN a Class – this is indicated by the small top LED’s. To cycle through MODS in a Class HOLD LEFT on the D-PAD and use TRIANGLE to go UP a MOD number and CIRCLE to go DOWN a MOD number. ORANGE FLASHES on the PS4 LIGHTBAR are used to indicate the selected MOD number. Once you have entered the Mod Mode Menu by HOLDING LEFT on the D-PAD for 5 seconds, keep the LEFT direction on the D-PAD HELD and use SQUARE to go UP a Class and CROSS (X) to go DOWN a Class – this is indicated by the small top LED’s. To cycle through MODS in a Class continue to keep the LEFT direction on the D-PAD HELD and use TRIANGLE to go UP a MOD number and CIRCLE to go DOWN a MOD number. ORANGE FLASHES on the PS4 LIGHTBAR are used to indicate the selected MOD number. To Reset a Class to Default, while HOLDING LEFT D-PAD press TOUCHPAD, 1 RED FLASH on PS4 LIGHTBAR indicates a class reset. 10 WWW.STRIKEPACK.COM
To Reset all Classes and MODS to Default settings and do a master reset: HOLD DOWN
D-PAD for 5 seconds, the LIGHTBAR will flash GREEN, PRESS OPTIONS and the
controller will vibrate to indicate a Master Reset.
NOTE: A MASTER RESET WILL ALSO RESET ALL SECONDARY MENU FEATURES
INCLUDING GAME LAYOUTS AND FLIPPED SETTINGS
LOCK/UNLOCK – To LOCK the PS4 F.P.S. Dominator so that shortcuts and Class/MOD
navigation controls are not enabled simply HOLD the RIGHT direction on the D-PAD
and PRESS TOUCHPAD (PS4 LIGHTBAR flashes RED), to UNLOCK HOLD the RIGHT
direction on the D-PAD and PRESS TOUCHPAD again (PS4 LIGHTBAR flashes GREEN)
Secondary Weapon Fire (Weapon Swap) – Once the Dominator has been updated
Weapon Swap will now be DISABLED as default. Each time the PS4 Dominator is
turned on Weapon Swap will be disabled. In order to enable Weapon Swap you
MUST first have at least Class 1 or 2 enabled, then simply HOLD the RIGHT direction
on the D-PAD for 5 seconds to enter Secondary Menu and PRESS TRIANGLE. The
LED LIGHTBAR will go GREEN to indicate that Weapon Swap is now on. HOLD the
RIGHT direction on the D-PAD for 5 seconds to enter Secondary Menu and PRESS
TRIANGLE again to disable it and the LED LIGHTBAR will go RED to indicate that
Weapon Swap is now off. This setting is not permanently saved.
Understanding Weapon Swap - Your Secondary Weapon Fire is used when the player
TAPS TRIANGLE in the game and the PS4 F.P.S. Dominator uses this button press to
determine weapons are being switched. If the cycle goes out of sync, simply HOLD
RIGHT D-PAD and TAP TRIANGLE while using your primary weapon to reset. You can
do this even if you have enabled LOCK MODE. This is an advanced MOD that can be
used very effectively to have two different fire modes on the Primary and Secondary
weapons (or a fire mode on one weapon and no fire mode on another weapon). When
Weapon Swap is disabled (default) the Secondary Weapon Fire mod has no effect.

                                               WWW.COLLECTIVEMINDS.CA                 11
SECONDARY MENU NAVIGATION Adjusting Button Layouts – Secondary Menu NOTE: IN ORDER FOR ALL THE MODS TO WORK THE BUTTON LAYOUT CHOSEN IN THE GAME MUST MATCH THE BUTTON LAYOUT CHOSEN ON THE STRIKEPACK. IT IS IMPORTANT TO REMEMBER NOT TO CHOOSE A “FLIPPED” LAYOUT IN THE ACTUAL GAME. FLIPPING THE BUMPERS AND TRIGGERS MUST BE DONE ONLY WITH THE STRIKEPACK DEVICE. SEE TRIGGER/BUMPER SWAP FOR MORE DETAILS. CHOOSING FLIPPED LAYOUT IN THE GAME WILL RENDER MANY OF THE MODS USELESS. Selecting the Game for the Button Layouts Secondary Menu Mode has been overhauled in order to simplify the numerous button layouts that are available to players. To select a different button layout, you must first ENTER the SECONDARY MENU by simply HOLDING RIGHT D-PAD for 5 seconds until the PS4 LIGHTBAR goes WHITE to let you know it is in SECONDARY MENU MODE. You must stay holding the RIGHT D-PAD while you are selecting all options. If the PS4 LIGHTBAR is GREEN that means you have entered Secondary Menu mode correctly, but the Bumpers and Triggers are “Flipped”. As there are so many options available, a Quick Check feature of your current Game and Button layout has been implemented. At any time while in SECONDARY MENU MODE you can display what your current Game Selection is by pressing SQUARE. The PS4 LIGHTBAR will flash PURPLE accordingly. Also, you can display what your current BUTTON LAYOUT is for that game by pressing CIRCLE. The PS4 LIGHTBAR will flash ORANGE accordingly. NOTE: Layouts are SAVED. This means that once your favorite layout is chosen, it will be remembered even when you disconnect the STRIKEPACK. Choosing the Game & Layout: Choosing the Game & Layout: First you must select the GAME you are playing to choose the appropriate button layout selection. There are five GAME selections currently available. COD: WWII / COD: Infinite Warfare (Default, 1 Purple Flash), COD: Black Ops III (2 Purple Flashes), Destiny Series (3 Purple Flashes), Battlefield Series (4 Purple Flashes) and Fortnite (5 Purple Flashes). The default layout can often be used to allow some mods in generic shooters. To choose the appropriate game you MUST enter Secondary Menu Mode by HOLDING the RIGHT direction on the D-PAD for 5 seconds until the PS4 LIGHTBAR goes WHITE to let you know it is in SECONDARY MENU MODE. (If the PS4 LIGHTBAR is GREEN that means you have entered Secondary Menu mode correctly 12 WWW.STRIKEPACK.COM
but the Bumpers and Triggers are “Flipped”.) Then simply press the right trigger (R2) to
increase the game number and the PS4 LIGHTBAR will flash PURPLE accordingly. Simply
press the left trigger (L2) to decrease the game number and the PS4 LIGHTBAR will flash
PURPLE accordingly.
Once the game is chosen you can now choose from the below button layouts. Remember
that the button layout chosen here MUST match the button layout in the game settings
for the MODS to work correctly. To choose the layout simply press the OPTIONS button
(you must still be in Secondary Menu mode via holding the RIGHT direction on the D-PAD)
to increase the layout number and the PS4 LIGHTBAR will flash ORANGE accordingly.
To decrease the layout number, press the SHARE button and the PS4 LIGHTBAR will
flash ORANGE accordingly. Once you reach the DEFAULT selection the PS4 LIGHTBAR
will flash RED to let you know you are in the Default setting. REMEMBER THE BUTTON
LAYOUT IS SAVED EVEN AFTER YOU DISCONNECT THE STRIKEPACK DEVICE.

Game 1 (DEFAULT) – COD: WWII / COD: Infinite Warfare
Default – Red Flash
Tactical (One Orange Flash)
Lefty (Two Orange Flashes)
Nomad (Three Orange Flashes)
Nomad Tactical (Four Orange Flashes)
Nomad Lefty (Five Orange Flashes)
Bumper Jumper (Six Orange Flashes)
Bumper Jumper Tactical (Seven Orange Flashes)
Charlie (Eight Orange Flashes)
One-Handed Gunslinger (Nine Orange Flashes)
Stick & Move (Ten Orange Flashes)
Brawler (Eleven Orange Flashes)
Beast (Twelve Orange Flashes)
Game 2 (Two Purple Flashes) – COD: Black Ops 3
Default – Red Flash
Tactical (One Orange Flash)
Lefty (Two Orange Flashes)
Nomad (Three Orange Flashes)
Charlie (Four Orange Flashes)
One-Handed Gunslinger (Five Orange Flashes)
Bumper Jumper (Six Orange Flashes)
Bumper Jumper Tactical (Seven Orange Flashes)
Stick & Move (Eight Orange Flashes)

                                                 WWW.COLLECTIVEMINDS.CA              13
Game 3 (Three Purple Flashes) – Destiny Series Default – Red Flash Green Thumb (One Orange Flash) Cold Shoulder (Two Orange Flashes) Mirror (Three Orange Flashes) Jumper Gunslinger (Four Orange Flashes) Puppeteer (Five Orange Flashes) Game 4 (Four Purple Flashes) – Battlefield Series Default – Red Flash Alternate (One Orange Flash) Lefty (Two Orange Flashes) Lefty Alternative (Three Orange Flashes) Game 5 (Five Purple Flashes) – Fortnite Standard – Red Flash Quick Builder (One Orange Flash) Combat Pro (Two Orange Flashes) Builder Pro (Three Orange Flashes) Trigger/Bumper Swap – Secondary Menu To swap the triggers with L1/R1 Bumpers simply HOLD the RIGHT direction on the D- PAD for 5 seconds until the PS4 LIGHTBAR goes WHITE entering Secondary Menu mode and tap L1 to swap. If activated the LIGHTBAR will go GREEN to indicate they are swapped. Tap L1 again to swap back and the LIGHTBAR will go WHITE to indicate they are swapped back to default. NOTE: THIS SETTING IS SAVED AND WILL REMAIN AFTER DISCONNECTING THE DEVICE. IT IS IMPORTANT TO REMEMBER NOT TO CHOOSE A “FLIPPED” LAYOUT IN THE ACTUAL GAME. FLIPPING THE BUMPERS AND TRIGGERS MUST BE DONE ONLY WITH THE STRIKEPACK DEVICE. CHOOSING FLIPPED LAYOUT IN THE GAME WILL RENDER MANY OF THE MODS USELESS. 14 WWW.STRIKEPACK.COM
MOD CONTROL
Adjustable MOD Controls
For Adjustable MODS keep HOLDING LEFT D-PAD while in that Class and MOD and
use R1 to increase speed (PS4 LIGHTBAR Flashes GREEN) and L1 to decrease speed
(PS4 LIGHTBAR Flashes RED) and the R2 to test. Exceptions include Anti-Recoil as
L1 increases weight and R1 decreases weight and for Quick Scope LT is used to
test. We ONLY recommend the test feature for default layouts and layouts that do
NOT move the location of the expected ADS/Fire buttons, however Anti-Recoil and
Quick Scope will move their test button if you have correctly set the same layout in
the SECONDARY MENU as you have IN-GAME.

Burst Fire Adjustable (BASED ON COD: BOIII)
The current Burst Fire is based on the weapon selection from the Call of Duty: Black
Ops III TM game. Most weapons used in other shooters will fall into one of the five
bundle selections. We will leave it to you to have fun determining the best selection
of what works for new weapons and upcoming games.
For Burst Fire, to select the appropriate weapon that burst will be used on, keep
HOLDING the LEFT direction on the D-PAD while in that Class and MOD and use R1 to
increase the weapon bundle number and L1 to decrease the weapon bundle number.
The PS4 LIGHTBAR Flashes GREEN the number of times to indicate the selected
weapon bundle.
To adjust the burst rounds, keep HOLDING the LEFT direction on the D-PAD while in
that Class and MOD and use R2 to increase the burst rounds (0-6) and L2 to decrease
the number of rounds of burst selected. The PS4 LIGHTBAR Flashes PURPLE the
number of times of burst rounds selected.

Bundle 1                       Bundle 2                       Bundle 5
MR6                            VESPER                         205 BRECCI
L-CAR9
                               Bundle 3
KUDA
                               MAN-O-WAR
VMP
                               BRM
WEEVIL
RAZORBACK                      Bundle 4
KN-44                          SHEIVA
HVK-30                         HAYMAKER 12
ICR-1                          GORGON
DINGO                          DRAKON

                                                 WWW.COLLECTIVEMINDS.CA                 15
Turbo 2.0 Adjustable Turbo 2.0 is the latest breakthrough in turbo technology. Past turbo modes required specific buttons to be locked into a given turbo function. This old scheme proved problematic with today’s new games that use the same buttons for different functions based on the game scenario at the time. Having turbo locked to a button prevented the proper button functionality as the button may need to be tapped once or held in the game, and not turbo’d. Now with Turbo 2.0, the chosen paddle acts as the activator so that any button can be turbo’d at any time in a game simply by holding the appropriate paddle. This is a dream come true for games that use quick time sequence gameplay, or any rapid button press actions. To use Turbo 2.0, simply choose the 7th option in Class 7/LED 7 for left paddle turbo 2.0, or the 7th option in Class 8/LED 8 for right paddle Turbo 2.0. With Turbo 2.0 activated, simply holding the paddle down will cause whatever button you press to turbo (rapidly press automatically) for the duration your paddle and that button is pressed. To adjust the Turbo 2.0 speed keep HOLDING the LEFT direction on the D-PAD while in that Class and MOD and use R1 to increase value (PS4 LIGHTBAR Flashes GREEN to indicate action value) and L1 to decrease (PS4 LIGHTBAR Flashes RED when pressed to indicate action value) Values increase and decrease in increments of 10. Even the triggers can be Turbo’d. MAIN MENU & DEVICE CONTROL MOD Classes – Indicated by 8 top LED’s 1. Primary Weapon Fire 2. Secondary Weapon Fire 3. Adjustable Anti-Recoil 4. Quick Scope 5. Auto Run 6. Drop Shot 7. Left Paddle MOD 8. Right Paddle MOD Class Use Instructions 1. Primary Weapon Fire – LED 1 LIT when on – number of ORANGE LIGHTBAR Flashes indicate MOD number when selecting: a. 1 Flash – Optimized Rapid Fire b. 2 Flashes – Rapid Fire Adjustable 16 WWW.STRIKEPACK.COM
c. 3 Flashes – MW Jitter (M1014 Shotgun)
  d. 4 Flashes – Burst Fire Adjustable
  e. 5 Flashes – Pulse Fire Adjustable
Primary Weapon Class 1 Rapid Fire and Pulse Fire can be assigned to L2 as well
for Primary Akimbo / Dual Wield weapons: HOLD UP D-PAD + L2 – Primary Weapon
Fire Mode is assigned to LEFT Trigger. If Akimbo is active Scope MODS will be
automatically disabled and will be automatically re-enabled once Akimbo is turned off.
Primary Akimbo MUST be assigned while using the Primary weapon. Burst Fire is not
supported with Akimbo.
2. Secondary Weapon Fire – LED 1 LIT when on – number of ORANGE LIGHTBAR
   Flashes indicate MOD number when selecting:
  a. 1 Flash – Optimized Rapid Fire
  b. 2 Flashes – Rapid Fire Adjustable
  c. 3 Flashes – MW Jitter (M1014 Shotgun)
  d. 4 Flashes – Burst Fire Adjustable
  e. 5 Flashes – Pulse Fire Adjustable

If Weapon Swap is enabled, Secondary Weapon Class 2 Rapid Fire and Pulse
Fire can be assigned to L2 as well for Secondary Akimbo / Dual Wield weapons:
HOLD UP D-PAD + L2 – Secondary Weapon Fire Mode is assigned to LEFT
Trigger. If Akimbo is active Scope MODS will be automatically disabled and will
be automatically re-enabled once Akimbo is turned off. Secondary Akimbo MUST
be assigned while using the Secondary weapon. Burst Fire is not supported with
Akimbo.
3. Anti-Recoil Adjustable – LED 3 LIT when on – number of ORANGE LIGHTBAR
   Flashes indicate MOD number when selecting:
  a. 1 Flash – Always On
  b. 2 Flashes – Scope Enable
  c. 3 Flashes – Scope Disable
  d. 4 Flashes – Inverted Y
  e. 5 Flashes – Scope Enable Inverted Y
  f. 6 Flashes – Scope Disable Inverted Y
4. Quick Scope – LED 4 LIT when on – number of ORANGE LIGHTBAR Flashes
   indicate MOD number when selecting:
  a. 1 Flash - Tap 500ms Adjustable
  b. 2 Flashes - Press Sensitive Adjustable

                                               WWW.COLLECTIVEMINDS.CA              17
c. 3 Flashes - Fully Auto Adjustable Tap 500ms Adjustable – if you fully tap down the ADS Scope (default L2) for less than half a second it will Quick Scope upon release. If you hold it instead, it will scope in normally without firing. Press Sensitive Adjustable – if you press straight down on ADS Scope (default L2) it will Quick Scope and if you lightly hold it instead, it will scope in normally without firing. (Notes: Press Sensitive may fire twice with semi-automatic sniper rifles, but you can adjust it to a higher value to avoid this. Press Sensitive will still Quick Scope if using “Hair Triggers” or “Flipped” modes but it will not be Press Sensitive and will always Quick Scope hence this is not recommended. The other two Quick Scope options should be used for either of these two conditions). Fully Auto Adjustable – it will always automatically Quick Scope a single time upon ADS Scope (default L2) and you can stay in scope to continue to snipe afterwards. You can adjust the firing speed of Quick Scope up and down in increments of 50 to suit different sniper rifles that have different ADS Scope delays across various games and to suit your own taste. This setting is shared across all 3 Quick Scope mods. 5. Auto Run – LED 5 LIT when on – number of ORANGE LIGHTBAR Flashes indicate MOD number when selecting: a. 1 Flash – Traditional Auto Run (Most FPS) – this auto run holds in sprint, engaging with minimal forward movement of the stick. Not suitable for some games. b. 2 Flashes – Press Sensitive / CALL OF DUTY Auto Run (Most FPS) – this auto run holds in sprint, engaging at near max forward movement of the stick and is the best fit for the Call of Duty Series or any game where you want better control over your regular movement speed. c. 3 Flashes – DESTINY Series Auto Run – this auto run is designed around games where presses of the sprint button can override virtually everything. This is ONLY officially supported for DESTINY 1 and 2 but it may work with other games with similar gameplay rules. This mod has an adjustable wait time to accommodate the longer reload times of some weapons so that the auto run does not cancel your reload. The default is 3 seconds which is compatible with most of the weapons in the DESTINY Series. When in Menu Mode on this mod, you can use the L1 button to lower the wait time down to the minimum value of 2 seconds. The R1 button is used to increase the wait time up to 8 seconds. The wait value is represented by the number 18 WWW.STRIKEPACK.COM
of PURPLE LIGHTBAR flashes. The wait time is the time the mod waits before it starts
  auto running again after you press the reload button. This allows the reload animation
  to finish. If the wait time is set too low, the reload animation will be cut short and your
  reload will not complete. If the wait time is set too high then upon reloading your gun,
  you may notice an undesirable delay before auto running again which you can also
  override yourself with a sprint button (default L3) press. THE ADJUSTABLE DELAY
  IS NOT SAVED WHEN YOU DISCONNECT THE STRIKEPACK DEVICE OR LEAVE MOD
  MODE AND ALWAYS DEFAULTS TO 3 SECONDS.
6. Drop Shot Button Layout – LED 6 LIT when on – number of ORANGE LIGHTBAR
   Flashes indicate MOD number when selecting:
  a. 1 Flash – Rapid Fire Drop -Activated via Circle Press & Hold or Paddle Hold if
  paddle mapped function – Rapid Fires as you drop prone, stops firing upon release
  b. 2 Flashes – Auto Drop - Activated via Circle Press or Paddle Press if paddle
  enabled – Drop to prone position
7. Left Paddle MOD – LED 7 LIT when on – number of ORANGE LIGHTBAR Flashes
   indicate MOD number when selecting:
  a. 1 Flash – Optimized Rapid Fire
  b. 2 Flashes – Pulse Fire Adjustable
  c. 3 Flashes – MW Jitter (M1014 Shotgun)
  d. 4 Flashes – Rapid Fire Drop Shot
  e. 5 Flashes – Reload & Slide
  f. 6 Flashes – Easy Double Jump
  g. 7 Flashes – Turbo 2.0 Adjustable
8. Right Paddle MOD – LED 8 LIT when on – number of ORANGE LIGHTBAR Flashes
   indicate MOD number when selecting:
  a. 1 Flash – Optimized Rapid Fire
  b. 2 Flashes – Pulse Fire Adjustable
  c. 3 Flashes – MW Jitter (M1014 Shotgun)
  d. 4 Flashes – Rapid Fire Drop Shot
  e. 5 Flashes – Reload & Slide
  f. 6 Flashes – Easy Double Jump
  g. 7 Flashes – Turbo 2.0 Adjustable

                                                   WWW.COLLECTIVEMINDS.CA                  19
QUICK MODS Additional Quick MODS – MODS that have no sub settings just on/off functionality COD - PS4 LIGHTBAR Flashes GREEN ON/ Flashes RED OFF Enable/Disable: Easy Double Jump - TAP DOWN DIRECTION D-PAD + CROSS (X) Game Usage: HOLD CROSS (X) for maximum jump height in COD F.P.S. SNIPER - PS4 LIGHTBAR Flashes GREEN ON/ Flashes RED OFF Enable/Disable: Auto Hold Breath - TAP DOWN DIRECTION D-PAD + L3 Game Usage: When Aiming Down Sights (default LT) breath held. F.P.S. MELEE - PS4 LIGHTBAR Flashes GREEN ON/ Flashes RED OFF Enable/Disable: Turbo Melee - TAP DOWN DIRECTION D-PAD + R3 Game Usage: Press and HOLD the melee button (default R3) for turbo melee. Battlefield - PS4 LIGHTBAR Flashes GREEN ON/ Flashes RED OFF Enable/Disable: Auto Spot - TAP DOWN DIRECTION D-PAD + R1 Game Usage: When Aiming Down Sights (default LT) targets hovered over by the crosshairs will be marked. Hair Triggers - PS4 LIGHTBAR Flashes GREEN ON/ Flashes RED OFF Enable/Disable: Hair Trigger on Right Trigger – HOLD RIGHT D-PAD + R1 Enable/Disable: Hair Trigger on Left Trigger – HOLD RIGHT D-PAD + L1 RUMBLE OFF/ON (Default Rumble ON) - PS4 Controller RUMBLES once to indicate ON when activated Disable/Enable: Turns Rumble OFF/ON – HOLD RIGHT D-PAD + SHARE (controller rumbles when rumble enabled). Do NOT use this if you are disabling rumble yourself via an in-game menu. Sixaxis Motion Control Reload - PS4 LIGHTBAR Flashes GREEN ON/ Flashes RED OFF Enable/Disable: Reload using Sixaxis shake – TAP RIGHT D-PAD + SQUARE Game Usage: Shake controller to activate reload function (default SQUARE) - while this mod has been optimized to work with rumble, we cannot guarantee it will work with every weapon in every situation. Keep in mind that it is important that you hold the controller horizontal when you have this mod enabled as holding it at odd angles will cause it to activate. This mod is also compatible with DESTINY series Auto Run. 20 WWW.STRIKEPACK.COM
QUICK CONTROLS
Quick Controls are some of the most powerful and advanced features of the
STRIKEPACK F.P.S. Dominator. These controls allow the user to instantly suspend
and resume active Class/Mod Menu MODS at will. For example, if the user in a
shooter picks up a new temporary weapon but has rapid fire enabled, using the
quick control of RIGHT D-PAD and RIGHT TRIGGER will quickly suspend the Rapid
Fire mod. Just tap the sequence again to resume. This is a very flexible system
allowing maximum compatibility in gameplay.
Quick Suspend/Resume Class Shortcuts – MOD must first be enabled via Class/Mod
Menu PS4 LIGHTBAR Flashes RED SUSPENDED/ Flashes GREEN RESUMED Class LED
Blinks When Suspended

1. Primary Fire - HOLD RIGHT on D-PAD + R2
2. Secondary Fire - HOLD RIGHT on D-PAD + L2
3. Anti-Recoil - HOLD DOWN on D-PAD + CIRCLE
4. Quick Scope - HOLD DOWN on D-PAD + TRIANGLE
5. Auto Run - HOLD RIGHT on D-PAD + R3
6. Drop Shot - HOLD RIGHT on D-PAD + CIRCLE
7. Left Paddle MOD - HOLD UP on D-PAD + LP
8. Right Paddle MOD - HOLD UP on D-PAD + RP

                                            WWW.COLLECTIVEMINDS.CA           21
You can also read