Getting Started in Project Share: A Guide for Texas Educators The Texas Education Agency
←
→
Page content transcription
If your browser does not render page correctly, please read the page content below
Getting Started
   in Project Share:
      A Guide for
   Texas Educators

     The Texas Education Agency
©2011 Texas Education Agency/University of Texas System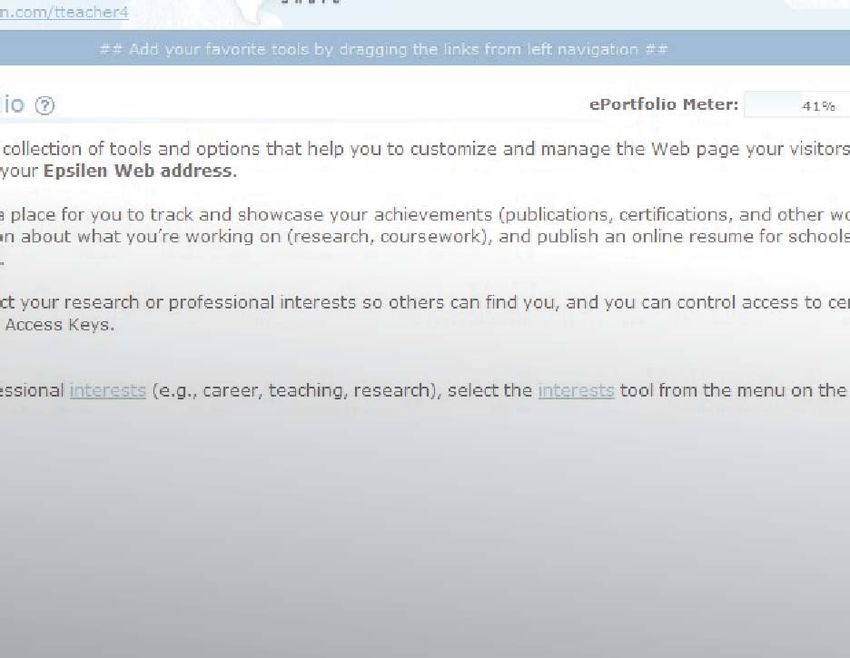
2 |

      This publication serves as an introductory guide for new Project Share members.
      It is not intended to take the place of acceptable use policies currently established
      within an ESC, district, or open enrollment charter. For final decisions regarding
      the use of the tools and resources offered through Project Share, please refer to
      local policies and guidelines.

                              Getting Started in Project Share: A Guide for Texas Educators
                               ©2011 Texas Education Agency/University of Texas System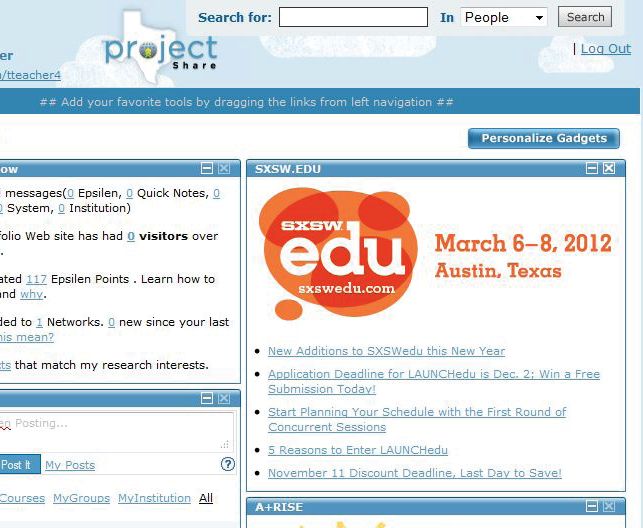
| 3

Contents
1. Introduction ........................................................................................... 5

2. Online Learning .................................................................................... 6

3. Standards for Professional Behavior.............................................. 8

4. Project Share Powered by Epsilen ................................................10

5. My Portal ...............................................................................................12

6. Creating an ePortfolio ......................................................................18

7. Joining a Group in Epsilen ..............................................................23

8. Taking a Course in Epsilen ..............................................................26

9. Course Tools .........................................................................................28

                               Getting Started in Project Share: A Guide for Texas Educators
                                ©2011 Texas Education Agency/University of Texas System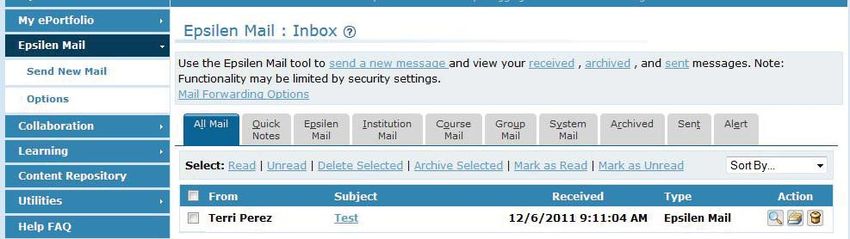
4 |

      Getting Started in Project Share: A Guide for Texas Educators
       ©2011 Texas Education Agency/University of Texas System
| 5

Introduction

A press release issued by the Texas Education Agency on November 13, 2009,
made the following points about the partnership between TEA and Epsilen:

      The Texas Education Agency (TEA), in collaboration with Epsilen LLC, and
      The New York Times Company, is pleased to announce Project Share, a new
      initiative to expand the development and delivery of high quality professional
      development in an interactive and engaging eLearning environment
      and provide access to online resources, online course content, academic
      networking, and professional learning communities.

      Project Share will utilize a single online environment to leverage existing and
      new professional development resources for teachers across the state and
      build professional learning communities where educators can collaborate,
      share, and tailor professional development to meet individual needs. . . .

       “Project Share. . . will also allow the state and its partners to deliver training
      to educators in an interactive and timely manner,” said Robert Scott,
      Commissioner of Education.

      The first phase of Project Share begins with building a community of
      practitioners dedicated to improving teaching and learning through
      collaborative professional development and ongoing support.

This manual will introduce you to Project Share and demonstrate how the online
learning environment can enhance the experience of taking future professional
development courses.

                         Getting Started in Project Share: A Guide for Texas Educators
                          ©2011 Texas Education Agency/University of Texas System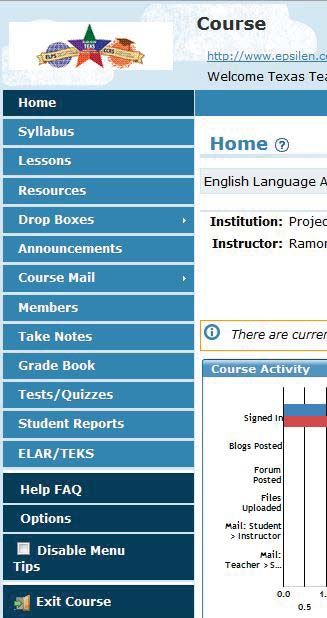
6 |

      Online Learning
      “Online learning” refers to courses taught and taken on the Internet.

      For participants, online courses can be a convenient way to obtain:

         •   Continuing Professional Education units
         •   New teaching skills
         •   Various types of certification

      Additional benefits to participants of online learning include:

         •   Self-paced or flexibly scheduled classes, which allow learning to take
             place at a participant’s own rate and convenience
         •   Classes available wherever there is access to a computer with Internet
             service
         •   No inconveniences associated with commuting, parking, scheduling
             around work hours, or arranging for child care

      The main drawback for course instructors and participants is the absence of the
      kinds of face-to-face discussions that mark a lively classroom.

      To make online courses seem more like traditional classes, instructors can
      enhance the learning experience with the following:

         •   Short videotaped lectures
         •   Links to videos on the Internet
         •   Graphics
         •   Music
         •   Sound effects

      Online courses can be divided into three general types of instruction:

         •   Instructor-led courses
         •   Instructor-facilitated courses
         •   Self-paced courses

                             Getting Started in Project Share: A Guide for Texas Educators
                              ©2011 Texas Education Agency/University of Texas System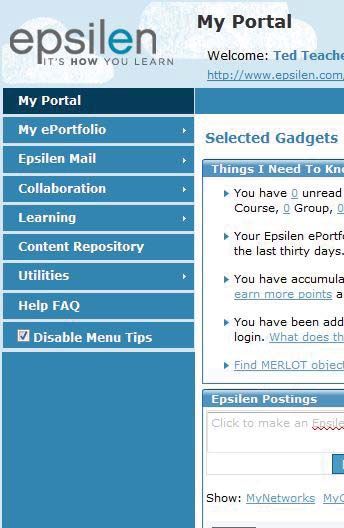
| 7

In an instructor-led course, the instructor:

   •   Develops a curriculum
   •   Leads classes
   •   Makes assignments
   •   Guides discussions
   •   Assigns grades

This type of course is most similar to a traditional classroom setting.

In an instructor-facilitated course:

   •   Participants learn at their own pace by following a course guide.
   •   Course materials are generally videos and online instructional materials.
   •   Online discussions with other participants foster classroom-style ex-
       changes and support.
   •   Instructors evaluate participants’ work and progress and offer feedback.

A self-paced course (independent study) allows participants to study complete-
ly on their own. In this type of class, there is:

   •   No instructor
   •   No start or end date (generally)

For professional development (PD), online learning offers a solution to the con-
straints and challenges sometimes associated with face-to-face training. Instead,
the best online courses:

   •   Are flexibly scheduled
   •   Are interactive
   •   Present new material concisely yet thoroughly
   •   Offer a variety of ways to give and receive feedback
   •   Include videos and links to resources available on the Internet

The goal of Project Share is to make the PD courses offered informative, easy to
use, and tailored to each educator’s unique needs.

                        Getting Started in Project Share: A Guide for Texas Educators
                         ©2011 Texas Education Agency/University of Texas System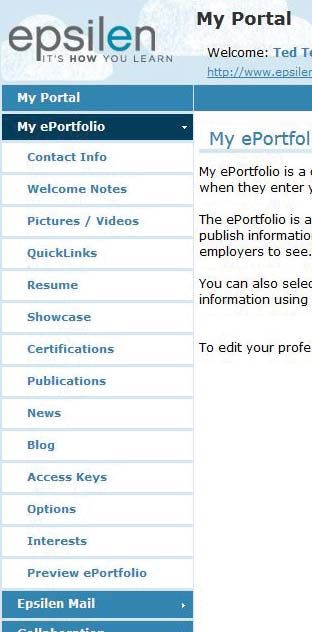
8 |

      Standards for
      Professional Behavior
      As an online learning environment for professional educators, Project Share presents
      a multitude of benefits and opportunities to enrich the professional development
      experience. However, Project Share members must be aware and cautious of the
      kind of behavior that is expected as well as the kind of behavior that is unacceptable
      when participating in the online world.

      Teachers and administrators are often seen as role models no matter what they are
      doing. Students, parents, and the public often scrutinize a teacher’s appearance,
      bearing, attitude, and—perhaps especially—language as indications of competence
      and trustworthiness.

      Because of this, anything an educator does in the electronic/online realm must
      be professional. Electronic communications (e-mail, blog comments, chat-room
      exchanges, tweets, text messages, photographs, videos, etc.) seem impermanent—
      as they are just blips of light on a computer screen—and yet, these forms of
      communication are the most long-lasting of records.

      There is a paradox about physical versus nonphysical forms of communication:

          •   A written letter (a one-of-a-kind material object) can be shredded.
          •   Theoretically, all traditional forms of written communication can be located
              and destroyed.

      But:

          •   Something as negligible as a casual e-mail can be effortlessly copied onto
              countless servers, computers, and websites dispersed across the entire range
              of cyberspace—thus becoming, for all practical purposes, a permanent record.

      Besides their permanence, electronic communications can be searched for and read by:

          •   Law enforcement agencies
          •   Data-mining companies
          •   Current and prospective employers
          •   Curious students and parents

                              Getting Started in Project Share: A Guide for Texas Educators
                               ©2011 Texas Education Agency/University of Texas System
| 9

If found by someone who wishes you harm, the results can be publicized via social-
media tools such as Twitter and Facebook, reaching thousands of people in seconds.

Before committing words to screen and sending them to another person, it is helpful
to ask yourself, “Would I be comfortable if this appeared tomorrow on the front
page of a newspaper?” Unfortunately, the potential for exposure is that great.

This admittedly frightening possibility is not meant to discourage the use of
computers, cell phones, or smart phones for communication. Rather, it is meant to
encourage you to communicate with caution and respect.

The best habit to cultivate is to keep electronic communications neutral to positive.
Users are strongly encouraged to mitigate potential risk by not sending electronic
communications that include a critical, harsh, or threatening tone.

The guidelines for e-mail and other online communications include:

    •   Be respectful
    •   No inappropriate language
    •   No comments that could hurt or offend someone
    •   No photos or videos of alcohol or drug use
    •   No sexual content of any sort
    •   No racial, ethnic, or sexual slurs
    •   Nothing about a peer or student that would allow that person to be identified

In addition, the guidelines for discussions, forums, and other sorts of group
interactions include:

    •   Stay on topic
    •   Try to build on what others have said
    •   Handle sensitive topics with extreme tact, if at all
    •   Be respectful of the differing views and opinions that are often present in
        online discussions

For a helpful list of “dos” and “don’ts” when participating in online discussions,
please visit: http://www.edtechleaders.org/documents/disc_expectations.htm.

In conclusion, it is always in a user’s best—professional and personal—interest
to keep online communication respectful and dignified.

                         Getting Started in Project Share: A Guide for Texas Educators
                          ©2011 Texas Education Agency/University of Texas System
10 |
       Project Share
       Powered by Epsilen
       Epsilen (www.epsilen.com) is a website available through Project Share that provides
       an integrated environment for online learning. On Epsilen:

           •   Instructors can set up groups and courses.
           •   Participants can join groups and take the courses they need.
           •   All site users can interact through e-mail, forums, blogs, course chats, and wikis.

       The Epsilen experience—referred to as the Epsilen Environment—is built around
       three main components:

           •   eLearning
           •   ePortfolios
           •   Networking

       The Epsilen eLearning system includes course-management tools that make it easy
       to create syllabi and lesson plans and to enhance them with multimedia, videos,
       and Internet links. As a bonus, Project Share educators have access to more than 150
       years of New York Times archives through the New York Times Knowledge Network
       Repository. Educators also have access to other repositories, such as McDonald
       Observatory’s StarDate, NASA Education, and PBS Digital Learning Library.

       Collaboration and interactivity. Instructors and participants are given numerous
       ways to keep in touch and work together:

               Epsilen e-mail                                             Course chats
               Calendars                                                  Blogs
               Forums                                                     Wikis
               Post-It messages

       (A wiki, from the Hawaiian word for quick, is a collaborative, easily editable document
       to which members of a group contribute knowledge and expertise. The online refer-
       ence work Wikipedia is a well-known example.)

       Participants can use these tools to work on class projects together and to communi-
       cate outside of class.
                                Getting Started in Project Share: A Guide for Texas Educators
                                 ©2011 Texas Education Agency/University of Texas System
| 11
Security. While the eLearning system is premised on the idea that transparency and
openness stimulate learning, security always remains important. Therefore, the Epsilen
Environment uses “drop boxes” to provide a protected (controlled-access) place for
instructors to post lesson plans and participants to deposit (upload) assignments.
In addition, Epsilen members are subject to a Terms of Service agreement and a
Privacy Policy. Epsilen is mindful of considerations of privacy and security when
educators and students work in online environments. Epsilen is also fully aware of
Family Educational Rights and Privacy Act (FERPA) and Child Online Protection Act
(COPA) guidelines and adheres to those requirements as Project Share participants
are invited into and work within the Epsilen environment.
Assessment. Since all learning involves assessment, Epsilen provides instructors
with many ways to check participants’ progress. Virtually every part of the eLearning
system that can contribute to assessment is linked to an integrated grade book.
The second component of the Epsilen Environment, ePortfolios, is the subject of a
later—more detailed—section of this guide, so only two points will be made here:
• Epsilen gives its users maximum control over who can view specific parts of
a portfolio.
• Participants’ ePortfolios are theirs for life, even if their sponsoring institutions
withdraw from Epsilen or if they change careers.
The online world is a networked world, and Epsilen is no exception. Members can:
• Join existing professional networks (there are currently around 2,000 on Epsilen)
• Start up an unlimited number of new networks and invite people to join them
• Accept invitations to join others’ networks
These networks or groups can be:
• Public (open to all)
• Private
• Invitation only
• Open to invitation requests
This brief overview provides at most a hint of all that Epsilen offers online learners.
How well and to what extent participants utilize these resources is up to them.
Getting Started in Project Share: A Guide for Texas Educators
©2011 Texas Education Agency/University of Texas System12 |
My Portal
Once you log in to Project Share, you will see your My Portal page. The toolbar displays the tools that
will help you navigate through Project Share to get to your courses, ePortfolios, or groups.
Groups
The Groups tool allows
Epsilen members to share
information and collaborate
in a structured environment.
Being part of a group allows
you to work together with
other Project Share members
on projects.
My Networks
Use My Networks to create
and manage lists of contacts
within the Epsilen system.
Share It
You can share your work
with other Project Share
members with the Share It
tool. Other users can use
this tool to collaborate on
the documents you share.
File
Calendar
Manager
The Calendar tool will help
Use the File Manager tool to save
you plan for assignments,
and organize your files.
tests, and personal events. If
you view your calendar from
your My Portal page, you see Time
both your personal events Tracker
and events from all of your Time Tracker can be used to record the
courses. time you spend on a course, project, or
anything else you would like to measure.
Themes
Use the Themes tool to change the color and
style of your My Portal and ePortfolio pages.
Getting Started in Project Share: A Guide for Texas Educators
©2011 Texas Education Agency/University of Texas System| 13
Gadgets
Click Personalize Gadgets to add, remove, and position
Project Share gadgets on your MyPortal page. Gadgets
include Epsilen Postings, which are short messages or links
from other Project Share users; the Things I Need to Know
gadget, which gives a snapshot summary of your Project
Share activity; and the Announcements gadget, which posts
important news and updates to your My Portal page.
Courses
Use this tool to join a new course
or see a list of courses in which
you are enrolled. Courses also
have their own collaboration and
communication tools.
Learning
Matrix
Use this tool from the Learning
menu to present your educational
accomplishments in a grid format.
Rubrics
This tool will help you create
and manage course rubrics.
Getting Started in Project Share: A Guide for Texas Educators
©2011 Texas Education Agency/University of Texas System14 |
My ePortfolio
Your ePortfolio is a page where you can show off your achievements, awards, and professional development.
You can also post news about yourself, future school events, or anything happening around the world.
Contact Info
Use the Contact Info tool to keep your personal Project
Share information up-to-date.
Welcome Notes
Make announcements on your ePortfolio site with the
Welcome Notes tool.
Pictures/Videos
Use the Pictures/Videos tool to upload pictures and create
links to videos in your ePortfolio. This tool also lets you
choose who can see your pictures and images.
QuickLinks
The QuickLinks tool lets you share links to other sites with
visitors to your ePortfolio.
Résumé
Use this tool to manage résumés that you have uploaded or
created using the Résumé Wizard.
Showcase
The Showcase tool lets you display files, videos, images, or
websites that you have created in your ePortfolio.
Blog
Use this tool to share ideas and information.
Access Keys
Use the Access Keys to control permissions for your
ePortfolio, contact information, and file collections
Interests
Use the Interests tool to share information about
yourself and your academic and career goals.
Getting Started in Project Share: A Guide for Texas Educators
©2011 Texas Education Agency/University of Texas System| 15
Epsilen Mail
You can use the Epsilen Mail tool to send and read messages
from other Project Share users You are able to check all of
your mail from your My Portal page, but only messages from
your student when you check your course’s mail.
Getting Started in Project Share: A Guide for Texas Educators
©2011 Texas Education Agency/University of Texas System16 |
Managing a Course
When you begin working in online courses, you can choose Courses from the toolbar on your MyPortal
page to see a list of your current courses or other courses you can join.
Syllabus
The Syllabus tool can provide lesson
descriptions, important dates, class rules,
and how assignments will be graded.
Announcements
Read important information about
assignments, upcoming deadlines, or events
with the Announcements tool.
Members
The Members tool shows who is
in the course. It lists instructors,
students, and guests.
Take Notes
Use the Take Notes tool to record your
thoughts. Every note you take will be
saved so you can review it later.
Grade Book
Use the Grade Book tool to look at
assignment and test grades.
Tests and Quizzes
Use the Test and Quizzes tool to view
tests and quizzes. You can also review
scores and manage the dates of future
tests and quizzes.
Help FAQ
Go to the Help FAQ page to find answers to
frequently asked questions (FAQs). If you need ad-
ditional help, you can click on Help Desk to send
your question to a Project Share expert.
Getting Started in Project Share: A Guide for Texas Educators
©2011 Texas Education Agency/University of Texas System| 17
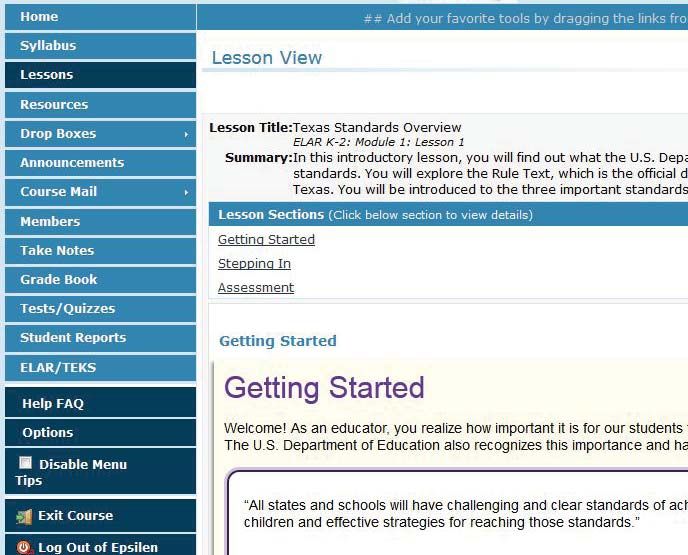
Lesson Sections
The Lessons Sections tell students
what they will learn in each section
in the lesson. Click on the name of a
lesson section to begin.
Resources
Resources are files, links,
or other content that can
help students learn more
in each lesson. Some
courses use this section
to cite their sources.
Getting Started in Project Share: A Guide for Texas Educators
©2011 Texas Education Agency/University of Texas System18 |
My Portal
You will be provided with a user name and password for your Project Share
account. When you log in, you will be taken to a webpage in Epsilen labeled My
Portal.
As the name suggests, this page is a gateway to all of your connections to
Epsilen. When you gain access to your portal, be sure to note the tools available
to you. These tools will be listed on the left-hand menu, or “toolbar,” and may
include any or all of the following:
This toolbar provides access to all parts of
Epsilen. It is the main way to navigate to
anywhere on the site.
One of the tools in the toolbar is My Network. The
My Network page displays a row of tabs:
• Visitors to My Corner
• Added me to Networks
• Similar Teaching Interests
• Similar Research Interests
• Similar Career Interests
• Similar Academic Interests
• ePortfolio Examples
These tabs show other Epsilen members who
have visited your page or share similar interests
of yours.
Getting Started in Project Share: A Guide for Texas Educators
©2011 Texas Education Agency/University of Texas System| 19
Frequently Asked QuesƟons
Q: How do I change my password?
A: Follow these steps:
1. Log in to Epsilen using your Project Share username and password.
2. Select Utilities > Change Password from the left menu of the My Portal
screen. (The symbol “>” means “then click on.”)
3. Enter your current password.
4. Enter a new password.
5. Reenter the new password.
6. Select Update to complete changing your password.
Q: Can I keep my Epsilen account even after I graduate or leave
my institution?
A: Each Epsilen user may maintain his or her account after s/he leaves an
institution. In these cases, the user will be migrated to the general Epsilen
environment rather than continuing to be associated with a specific district or
open enrollment charter.
Q: How do I use the My Networks tool?
A: The My Networks tool allows you to organize your professional networks
of colleagues, peers, or those you meet within the Epsilen community. You can
configure each network to restrict access to your personal contact information
and file collections.
To create a new network:
1. Log in to Epsilen using your Project Share username and password.
2. Select Collaboration > My Networks > Create Network in the left menu of
the My Portal screen.
3. Enter a Network Name and set security permissions for your personal
contact information.
Getting Started in Project Share: A Guide for Texas Educators
©2011 Texas Education Agency/University of Texas System20 |
4. Click Create.
To add Epsilen members to a network:
1. Log in to Epsilen using your Project Share username and password.
2. Select Collaboration > My Networks > Search People in the left menu of
the My Portal screen.
3. Enter text in the boxes under Search For: and click Search.
4. Once you have found the Epsilen member to add, select the icon under
Action.
5. When the Add to Network pop-up appears, select the network to which the
member should be added.
Q: How do I send an Epsilen Mail message?
A: Follow these steps:
1. Log in to Epsilen using your Project Share username and password.
2. Select Epsilen Mail > Send New Mail in the left menu of the My Portal
screen.
3. On the Send Epsilen Mail Message page, select the message recipients.
• Search for Epsilen Members.
• Select Epsilen Members from your networks.
• Enter external e-mail addresses. Note that you will not be able to send
attachments or save a copy of your e-mail when sending Epsilen mail to
external addresses.
4. Enter the message subject.
5. Enter the message.
6. Click Send.
Q: How do I manage my Epsilen Mail forwarding?
A: Follow these steps:
1. Log in to Epsilen using your Project Share username and password.
Getting Started in Project Share: A Guide for Texas Educators
©2011 Texas Education Agency/University of Texas System| 21
2. Select Epsilen Mail > Options in the left menu of the My Portal screen.
3. Select the Mail Forwarding tab to enable or disable all mail forwarding to
your e-mail address or cell phone.
Q: How do I manage my Epsilen Mail?
A: Use Epsilen Mail to send and receive messages to and from members of the
Epsilen community, your institution, groups, courses, and networks.
To manage your Epsilen Mail:
1. Log in to Epsilen using your Project Share username and password.
2. Select Select Utilities > Epsilen Mail from the left menu of the My Portal
screen.
On the Inbox page, your messages are separated by mail type. You will see tabs for:
• All Mail
• QuickNotes
• Epsilen Mail
• Institution Mail
• Course Mail
• Group Mail
• System Mail
You will also see tabs for:
• Archived messages
• Sent messages
• Alerts
When viewing a list of messages, you can select multiple messages at a time to
delete, archive, or mark as read/unread.
You can also sort the list of messages by using the Sort By pull-down menu in
the upper-right corner of your inbox.
Getting Started in Project Share: A Guide for Texas Educators
©2011 Texas Education Agency/University of Texas System22 |
Q: How do I manage and share my files?
A: Use the Files/Folders tool to upload documents, pictures, schoolwork, and
other objects. You can share them publicly or privately.
To manage your files, follow these steps:
1. Log in to Epsilen using your Project Share username and password.
2. Select Utilities > Files/Folders from the left menu. Follow the directions
that state: “To work with your files, start by selecting a folder from the list of
folders on the left or create a folder by clicking Create Folder.” (The Create
Folder button is to the right below the directions.)
3. Use the icons on the page to complete the following actions:
Upload File (looks like a green arrow pointing upward)
• Upload up to three (3) files at a time to the selected folder.
Create Folder (looks like a file folder with a plus sign in the corner)
• Create a new folder inside the selected folder.
Share Folder (looks like a hand holding out a folder)
• Share this folder with others.
Edit Folder (looks like a pencil)
• Edit the name and description of the selected folder.
Delete Folder (looks like a trash can)
• Delete the selected folder.
• Note: You cannot delete a folder if it contains any files or subfolders.
Getting Started in Project Share: A Guide for Texas Educators
©2011 Texas Education Agency/University of Texas System| 23
Creating an ePortfolio
Your ePortfolio is your self-representation in Project Share. After you become
comfortable with the Epsilen environment, you will want to build an ePortfolio
so that other members can find you and begin to connect with you. An
ePortfolio may sound like a personal page on Facebook or MySpace, but there
are big differences between an ePortfolio constructed in Epsilen and social-
media sites:
• Since Project Share is built around online learning, the standards for
what should be posted on an ePortfolio are quite a bit higher than the
anything-goes looseness predominant in social media.
• An ePortfolio is not a way for your family and friends outside the
teaching profession to keep up with your activities.
• Project Share is about education and learning, and your ePortfolio should
reflect that emphasis.
That said, many of the components of an ePortfolio will seem familiar to users
of other social-media platforms. First, setting up your ePortfolio and making
changes to it is done with a set of tools called My ePortfolio. With these tools,
you can do all of the following:
• Publish contact information*
• Post a welcome note to briefly introduce yourself and
greet visitors to your page
• Include a picture of yourself or an avatar (image) to
represent you
• Insert hyperlinks to your school, organizations, or other
things you wish to highlight
• Upload your résumé*
• Display your achievements and accomplishments
through a multimedia showcase*
• Post your credentials and certifications*
• List your publications (books, journal articles, conference
presentations, etc.)*
• Keep a blog*
• Specify your professional interests so that Epsilen can
connect you with those who share your interests
Getting Started in Project Share: A Guide for Texas Educators
©2011 Texas Education Agency/University of Texas System24 |
By the same token, you can remove any of these tools from your
ePortfolio by using the Utilities > Options feature in the My Portfolio menu.
Epsilen recognizes that you probably will not want all potential visitors to your
ePortfolio—students, other teachers, other Epsilen members—to have access to
all parts of your ePortfolio.
• Therefore, built in to each of the features marked with an asterisk (*) in
the above list are access keys which give you the power to limit who can
see the information included in the feature.
• For example, you might allow fellow teachers to read your blog posts,
which could deal with things like classroom-management techniques,
but be less inclined to give students the same access.
In addition, you can customize the look of your ePortfolio (change background
and border colors, configure your ePortfolio menu) with tools called themes and
options.
Important: To see the current state of your ePortfolio, select My ePortfolio >
Preview ePortfolio from the left menu. (The symbol “>” means “then click on.”)
One of the best ways to get an idea of ePortfolio possibilities
is to browse sample portfolios made public by their owners.
• On the My Portal page, click the tab labeled
ePortfolio Examples (under My Network Channel).
• You will see a gallery of Epsilen members whose
ePortfolios are public and available for you to view.
One ePortfolio to view is that of Ali Jafari, the developer of
Epsilen.
• Click on Jafari’s name or photo, and a window called Ali
Jafari’s Corner pops up.
• To see his ePortfolio, click the third icon to the right
of his name and photo (the icon looks like a sheet of
paper with an e on it).
Getting Started in Project Share: A Guide for Texas Educators
©2011 Texas Education Agency/University of Texas System| 25
Jafari’s ePortfolio includes:
• A short biography (About Me)
• A welcome note
• Links to his upcoming talks and recent publications
• QuickLinks (on the right side of the page) to his professional affiliations,
his Epsilen groups, courses he teaches, shared objects, and recent blog
postings
• A photo album of images of himself, his ideas, and his publications
As Jafari’s ePortfolio demonstrates, an ePortfolio can be developed into a very
detailed, complex self-portrait. The extent of that detail and complexity is up to you.
It is important to remember that your district or open enrollment charter may
have guidelines about what may be added to your ePortfolio and what may be
open to public view. Please consult local policy before building your ePortfolio.
And as mentioned earlier, your ePortfolio is yours for life, even if your sponsoring
institution ends its relationship with Epsilen. This makes it an invaluable way to
present yourself and your education interests to colleagues, institutes of higher
education, and future employers.
Frequently Asked QuesƟons
Q: How do I create my ePortfolio?
A: Personalize your ePortfolio by adding your résumé, pictures, blog, shared
files, QuickLinks (bookmarks), contact information, and more.
1. Log in to Epsilen using your Project Share username and password.
2. Select My ePortfolio from the left hand menu of the My Portal screen.
3. Select a tool from the list to edit that piece of your ePortfolio.
Q: How do I create my Showcase?
A: Use the Showcase tool to display examples of your best work and
accomplishments in a multimedia format on your ePortfolio.
Getting Started in Project Share: A Guide for Texas Educators
©2011 Texas Education Agency/University of Texas System26 |
1. Log in to Epsilen using your Project Share username and password.
2. Select My ePortfolio > Showcase in the left menu.
Q: How do I add pictures and videos to my ePortfolio?
A: Follow these steps:
1. Log in to Epsilen using your Project Share username and password.
2. Select My ePortfolio > Welcome Notes in the left menu.
3. Click Add New Welcome Note on the Welcome Notes page.
4. Enter the content of your welcome note and include any of the following items:
Web Link
• To insert a web link or hyperlink, select the icon that looks like a three-link
chain.
• Once the pop-up window appears, enter the URL/web address and select
OK.
Picture
• To insert a picture, select the icon that looks like a picture of mountains.
• Once the pop-up window appears, click the circle next to Select existing
picture, then click the Select Existing box to insert a picture from your
Epsilen Files/Folders.
OR
• Click the circle next to Upload new picture. Then click the Upload Picture
box to upload a picture from your computer.
File Link
• To insert a file link, select the icon that looks like a piece of paper with the
corner folded down.
• Once the pop-up window appears, click the circle next to Select existing
file, then click the Select Existing box to retrieve a file from your Epsilen
Files/Folders.
OR
• Click the circle next to Upload new file. Then click the Upload File box to
upload a file from your computer.
Getting Started in Project Share: A Guide for Texas Educators
©2011 Texas Education Agency/University of Texas System| 27
YouTube Video
• To add a YouTube video, select the icon that reads YouTube.
• Once the pop-up window appears, paste in the HTML code provided by
YouTube for the video.
• Select Insert.
* Please keep in mind that your district or open enrollment charter may have
guidelines about what may be added to your ePortfolio and what may be
open to public view. Please consult local policy before building your ePortfolio.
Q: What is QuickNote?
A: A QuickNote is a form appearing at the bottom of your ePortfolio home
page. It permits visitors to quickly and easily send you messages via the Epsilen
Environment. Senders must provide their name and e-mail address along with
their message.
Quick-Note messages will appear in your internal Epsilen Mail and may also be
forwarded to any e-mail address designated within Epsilen Mail > Options >
Mail Forwarding.
Q: How can I hide the QuickNote form on my ePortfolio home
page?
A: Follow these steps:
1. Log in to Epsilen using your Project Share username and password.
2. Select My ePortfolio > Options in the left menu.
3. Click the QuickNote Hiding tab on the page.
4. Check the box to hide the QuickNote form on your ePortfolio home page.
Getting Started in Project Share: A Guide for Texas Educators
©2011 Texas Education Agency/University of Texas System28 |
Q: Why might I want to hide the QuickNote form on my ePortfolio
home page?
A: While the QuickNote form requires the sender to provide a name and e-mail
address, there is no guarantee that the name or e-mail address used is accurate
or legitimate. Thus, there is the possibility of misuse of the QuickNote form by
anonymous senders.
Q: How do I delete my Epsilen ePortfolio?
A: Your Epsilen ePortfolio may be “parked,” or hidden from public view. Parking your
ePortfolio will not cancel your Epsilen account, but your site will not be visible. You
can still access your account and “un-park” your ePortfolio website at any time.
To park (hide) your Epsilen ePortfolio website:
1. Log in to Epsilen using your Project Share username and password.
2. Select My ePortfolio > Options in the left menu.
3. Select the ePortfolio Parking (Hiding) tab.
4. Check the box next to Park my ePortfolio website.
Getting Started in Project Share: A Guide for Texas Educators
©2011 Texas Education Agency/University of Texas System| 29
Joining a Group in Epsilen
Joining an Epsilen group could not be easier.
• Select My Portal > Groups from the left menu.
• Since you want to join an existing group rather than start a new one,
click the Search Groups box.
On the search page, you can look for groups by:
• The groups’ names (if you know them)
• A short description
• Keywords
For example, to see all groups related to the teaching of English, type English in
the keywords search box. The accessibility icon (a handshake) means that the
group is open to the public, so you can join right away.
That’s really all there is to it.
If the accessibility icon looks like a person reading a document, you will need
to request membership in the group in order to join it. Clicking the icon will
take you to a Request Group Membership form, which allows you to e-mail the
group’s owner.
In addition, a member of a group can invite you to join (unless membership
restrictions, such as enrollment in a particular course, would exclude you).
One of the main goals of Project Share is to promote the formation of professional
learning communities (PLCs). These groups will allow teachers to
• Share their expertise with one another
• Collaborate on teaching strategies and classroom projects
• Discuss matters of professional interest
• Maintain ongoing professional-development (PD) relationships
Getting Started in Project Share: A Guide for Texas Educators
©2011 Texas Education Agency/University of Texas System30 |
PLCs will also be formed between PD participants and Education Service Center
specialists.
As an example of how PLCs will make it easy to maintain ongoing PD
relationships, consider the following example:
• At the end of a face-to-face PD presentation, a group of teachers who
have worked together throughout the training decide to exchange
e-mail addresses so that they can keep in touch about what they have
learned. Pieces of paper are passed around, and everyone writes down
his or her e-mail address. Then, each person has to carefully enter those
addresses manually into an online address book, knowing that even
one wrongly typed letter or symbol will make the address unusable. The
possibility of frustration or disappointment is high.
• By contrast, with an online PLC in the Epsilen platform, PD participants
will immediately be able to exchange e-mail messages, photos, video
links, and other types of electronic files.
In fact, participants in a PD course delivered through Project Share may be
invited to join a PLC organized around that particular training. They can send
and receive updates related to the training, ask questions of the group, and
maintain relationships that will make PD an ongoing activity.
Getting Started in Project Share: A Guide for Texas Educators
©2011 Texas Education Agency/University of Texas System| 31
Frequently Asked QuesƟons
Q: How do I create a group?
A: Epsilen Groups is a tool that allows Epsilen members with mutual interests to
communicate and network online. Members of a group can:
• Send messages to one another using Group Mail
• Engage in discussions using Forums
• Use Drop Boxes to share files
• Communicate live with the Chat tool
• Collaborate on editable web documents using the Wiki
Epsilen members who are given the necessary permissions may create groups.
To create a group:
1. Log in to Epsilen using your Project Share username and password.
2. Select Groups > Create Group in the left menu.
3. Enter at least a Group Name and Description. Your district may want to
standardize group names for easy identification. (Note: Entering a few
keywords will make it easier for prospective members to find your group.)
4. Set the registration requirement.
5. Click Create.
Getting Started in Project Share: A Guide for Texas Educators
©2011 Texas Education Agency/University of Texas System32 |
Taking a Course in Epsilen
Perhaps the easiest way to get a sense of what it is like to take a course in Epsilen
is to watch a demonstration. The School of Continuing and Professional Studies
(SCPS) at New York University uses Epsilen for some of its coursework, and
students and teachers at SCPS have made a series of YouTube videos that show
how to get the most out of the Epsilen website.
A four-minute SCPS video about taking a
course in Epsilen (“Online Course Overview
for NYU-SCPS Students”) is available at: http://
www.youtube.com/watch?v=RYIp0oD70WQ.
While each course will be different in its
specifics, the Epsilen Environment is the same
for all courses. When you log in to a course, the
left-hand menu will contain some or all of the
following tools:
This should be a complete list of all the
resources needed for a course. Navigate with
these features just as you do with those under
My Portal or My ePortfolio.
Important: To leave a course, click Exit Course
either in the left menu or in the upper-right
corner.
Getting Started in Project Share: A Guide for Texas Educators
©2011 Texas Education Agency/University of Texas System| 33
Frequently Asked QuesƟons
Q: How do I join a course?
A: Follow these steps:
1. Log in to Epsilen using your Project Share username and password.
2. At the top of the My Portal page, select the Courses option from the pull-
down menu to the left of the Search button.
3. Enter text related to the course in the Search for box, then click Search.
4. On the search results page, click on the title of the course to view its public
Home page.
5. On the public Home page pop-up, you will see “This course is accessible by
[invitation only, everyone in an institution, all Epsilen members, etc.]” in the
left menu.
6. To join a course, refer to the course’s registration settings to determine how to join.
* After teachers complete state-sponsored face-to-face training, they will
receive additional information regarding future online modules, when they
will be made available, and how to join. This information will be provided
through education service centers and/or approved content development
partners.
Q: How do I log in to a course?
A: Follow these steps:
1. Log in to Epsilen using your Project Share username and password.
2. Select Courses in the left menu.
3. You will see a list of courses that you are a member of.
4. Select the title of a course to enter it.
Getting Started in Project Share: A Guide for Texas Educators
©2011 Texas Education Agency/University of Texas System34 |
Course Tools
From the course features listed in the previous section, we are going to
concentrate on forums, blogs, and chat.
Forums are discussion threads, of the type that may be familiar from other
online discussion groups and Usenet groups. For example, an instructor of an
online course might want to follow up on a topic that seemed to generate a lot
of interest. The instructor could:
• Post a discussion topic
• Ask or require participants to contribute to the conversation about the
topic
• Use their contributions as the basis for a participation grade
As in all of your Project Share activities, forum participation should be professional:
• Stay on topic (if you want to change topics, start a new forum).
• Keep your comments concise.
• Build on—do not just repeat—what others have said.
• Avoid using Internet slang and acronyms (LOL [laughing out loud],
ROTFL [rolling on the floor laughing], etc.).
Blogs are like online journals or diaries. Unlike handwritten journals, blogs can
contain videos, links to websites, and other interactive features. An instructor
can require participants to keep a blog for a particular course, or participants
may keep a course blog on their own initiative.
If you have the necessary permissions (or are required) to keep a course blog:
• Feel free to be informal—but stay within the bounds of professionalism.
• Enhance your blog with pictures, videos, and hyperlinks as appropriate.
If blogging becomes something you enjoy, you might consider writing a public
blog—one available to anyone on the Internet—on a topic you feel passionate
about. Note: To do this, you would not use the Epsilen blogging tool, but a free
blogging website (such as WordPress, Blogger, BlogSpot, or LiveJournal).
Getting Started in Project Share: A Guide for Texas Educators
©2011 Texas Education Agency/University of Texas System| 35
Chat, as the name suggests, is the least formal type of class interaction. Course
chats, which take place in chat rooms, are often informal and loosely organized
collections of comments and musings.
Chats, which are less structured or formal than forums, can be:
• Quick conversations
• Opportunities to informally discuss matters related to coursework
• Conducted in real-time with other participants
Despite this informality, chat participants should always remain professional in
their exchanges.
Frequently Asked QuesƟons
Q: How do I create a blog?
A: Follow these steps:
1. Log in to Epsilen using your Project Share username and password.
2. Select My ePortfolio > Blog from the left menu.
3. Click the Add New Entry box on the Blog page.
4. Provide an Entry Title and type the Entry Body in the given space.
You can also select an Entry Icon from the array of icons below the text box.
5. To display the entry on your ePortfolio site, click the circle beside Show.
To hide the entry from others, click the circle next to Hide.
6. If you would like to start a conversation with your readers, check the box
next to Allow visitors to add comments. Unchecking this box will mean
that readers cannot add comments to your blog.
7. Click Save.
Getting Started in Project Share: A Guide for Texas Educators
©2011 Texas Education Agency/University of Texas System36 |
Q: How do I copy a blog entry from my ePortfolio to a course
blog?
A: Follow these steps:
1. Log in to Epsilen using your Project Share username and password.
2. Select My ePortfolio > Blog from the left menu.
3. In the list of your blog entries, click the Copy icon (looks like two sheets of
paper) to the right of a blog entry.
4. On the Copy Entry pop-up, check the box beside each course to which you
wish to copy the blog.
5. Click Copy.
Q: How do I copy a blog entry from a course to my ePortfolio
Home page?
A: Follow these steps:
1. Log in to Epsilen using your Project Share username and password.
2. Select Courses from the left menu.
3. Enter the course that contains the blog entry you wish to copy.
4. Select Blogs > My Blog Entries in the left menu of your course.
5. In the list of blog entries, select the Copy icon (looks like two sheets of
paper) to the right of the blog entry you wish to copy.
6. On the Copy Entry pop-up, check the box next to My ePortfolio website
(and any other courses you wish to copy to)
7. Click Copy.
Getting Started in Project Share: A Guide for Texas Educators
©2011 Texas Education Agency/University of Texas SystemYou can also read