Hands-on Rust Effective Learning through 2D Game Development and Play - Pragmatic Bookshelf
←
→
Page content transcription
If your browser does not render page correctly, please read the page content below
Extracted from:

                                               Hands-on Rust
 Effective Learning through 2D Game Development and Play

   This PDF file contains pages extracted from Hands-on Rust, published by the
 Pragmatic Bookshelf. For more information or to purchase a paperback or PDF
                                   copy, please visit http://www.pragprog.com.
 Note: This extract contains some colored text (particularly in code listing). This
 is available only in online versions of the books. The printed versions are black
  and white. Pagination might vary between the online and printed versions; the
                                                    content is otherwise identical.
                                     Copyright © 2021 The Pragmatic Programmers, LLC.

                                                                        All rights reserved.

No part of this publication may be reproduced, stored in a retrieval system, or transmitted,
in any form, or by any means, electronic, mechanical, photocopying, recording, or otherwise,
                                               without the prior consent of the publisher.

                                                  The Pragmatic Bookshelf
                                                                       Raleigh, North Carolina

Hands-on Rust
Effective Learning through 2D Game Development and Play

                                     Herbert Wolverson

                              The Pragmatic Bookshelf
                                          Raleigh, North Carolina
Many of the designations used by manufacturers and sellers to distinguish their products are claimed as trademarks. Where those designations appear in this book, and The Pragmatic Programmers, LLC was aware of a trademark claim, the designations have been printed in initial capital letters or in all capitals. The Pragmatic Starter Kit, The Pragmatic Programmer, Pragmatic Programming, Pragmatic Bookshelf, PragProg and the linking g device are trade- marks of The Pragmatic Programmers, LLC. Every precaution was taken in the preparation of this book. However, the publisher assumes no responsibility for errors or omissions, or for damages that may result from the use of information (including program listings) contained herein. For our complete catalog of hands-on, practical, and Pragmatic content for software devel- opers, please visit https://pragprog.com. The team that produced this book includes: CEO: Dave Rankin COO: Janet Furlow Managing Editor: Tammy Coron Development Editor: Tammy Coron Copy Editor: Vanya Wong Indexing: Potomac Indexing, LLC Layout: Gilson Graphics Founders: Andy Hunt and Dave Thomas For sales, volume licensing, and support, please contact support@pragprog.com. For international rights, please contact rights@pragprog.com. Copyright © 2021 The Pragmatic Programmers, LLC. All rights reserved. No part of this publication may be reproduced, stored in a retrieval system, or transmitted, in any form, or by any means, electronic, mechanical, photocopying, recording, or otherwise, without the prior consent of the publisher. ISBN-13: 978-1-68050-816-1 Encoded using the finest acid-free high-entropy binary digits. Book version: P1.0—July 2021
Graphics, Camera, Action
ASCII is a great prototyping tool—even used for some full games such as Rogue
or Nethack. Most games feature graphics, but this early in development isn’t
the right time to find an artist and make beautiful content—you might decide
to change the game and waste hours of the artist’s work. In early development,
it’s a much better idea to use Programmer Art—rough graphics designed to
give you an idea for the feel of a game, but without requiring a significant
time investment if (when) you decide to change things.

In this section, you’ll implement graphical layers—so the player stands on
top of the floor rather than replacing it. The graphics are much larger than
simple ASCII glyphs, so you’ll need to reduce the visible portion of the
map—without sacrificing size or map quality. You’ll solve this issue by creating
a camera.

Programmer Art for the Dungeon
bracket-lib renders terminals by copying glyphs from a font file onto the terminal
window. You can take advantage of this during prototyping by assigning a
symbol to a tile type and replacing that character in the font file with your
chosen programmer art. Any bitmap editor can do the job—I use The Gimp.6

Create a new directory named resources in your project’s root directory. This
directory will hold all graphical resources needed for the game. Copy dungeon-
font.png into this directory. (It’s already present in the example source code.)
Rather than recreate this file throughout the book, the file includes all of the
graphics needed for the game.

The following glyphs are defined:

 Glyph    Graphic    Represents     Glyph   Graphic   Represents   Glyph   Graphic    Represents

     #              Dungeon Wall     @                The Player
                                                                    |                Amulet of Yala

     .              Dungeon Floor    E                  Ettin       !                Healing Potion

     “               Forest Wall     O                  Ogre        {                Dungeon Map

     ;               Forest Floor    o                   Orc        s                Rusty Sword

     >               Down Stairs     g                 Goblin       S                Shiny Sword

                                                                    /                 Huge Sword

The font file with all of the graphic elements defined looks like this:

6.   https://www.gimp.org/

                                                                                • Click HERE to purchase this book now. discuss
•6
The dungeon floor, wall, and adventurer graphics were kindly provided by
Buch for free.7 Potion and scroll graphics are from Melissa Krautheim’s Fan-
tasy Magic Set.8 Weaponry is from Melle’s Fantasy Sword Set.9 Monster
graphics are from the game Dungeon Crawl Stone Soup (CC0 license), packaged
by Chris Hamons.10
Credit Your Artists
Even if you’re using freely provided content, please credit the
artists whose work you use. Making art is difficult work, just like
programming. Be sure to thank the people who are giving it away.
Graphics Layers
Currently, your game renders everything to a single layer. The map is drawn
and then the player is drawn on top of it. This works with graphics but tends
to leave artifacts around the player’s graphic. You can get much better results
7. https://opengameart.org/content/unfinished-dungeon-tileset
8. https://opengameart.org/content/fantasy-magic-set
9. https://opengameart.org/content/fantasy-sword-set
10. https://github.com/crawl/tiles
• Click HERE to purchase this book now. discussGraphics, Camera, Action •7
by using layers. The map is rendered to a base layer, and the player to the
layer on top of it—with transparency, so the floor remains visible. Later in
this book, you’ll add a third layer for game information.
Start with a little housekeeping. Using large tiles makes the window
huge—larger than many screens. Instead, render the game window as a
smaller view of part of the map, centered on the player. Add some constants
to your prelude in main.rs to indicate the dimensions of the smaller viewport
into your world:
BasicDungeonCrawler/dungeon_crawl_graphics/src/main.rs
pub const DISPLAY_WIDTH: i32 = SCREEN_WIDTH / 2;
pub const DISPLAY_HEIGHT: i32 = SCREEN_HEIGHT / 2;
You can introduce layers to bracket-lib by changing your initialization code:
BasicDungeonCrawler/dungeon_crawl_graphics/src/main.rs
❶ let context = BTermBuilder::new()
.with_title("Dungeon Crawler")
.with_fps_cap(30.0)
❷ .with_dimensions(DISPLAY_WIDTH, DISPLAY_HEIGHT)
❸ .with_tile_dimensions(32, 32)
❹ .with_resource_path("resources/")
❺ .with_font("dungeonfont.png", 32, 32)
❻ .with_simple_console(DISPLAY_WIDTH, DISPLAY_HEIGHT, "dungeonfont.png")
.with_simple_console_no_bg(DISPLAY_WIDTH, DISPLAY_HEIGHT,
❼ "dungeonfont.png")
.build()?;
❶ Use new() to create a generic terminal and specify attributes directly.
❷ with_dimensions specifies the size of subsequent consoles you add.
❸ The tile dimensions are the size of each character in your font file, in this
case 32x32.
❹ The directory in which you placed the graphics file.
❺ The name of the font file to load and the character dimensions. These are
usually the same as tile dimensions, but can be different for some
advanced forms of rendering.
❻ Add a console using the dimensions already specified and the named tile
graphics file.
❼ Add a second console with no background so transparency shows
through it.
• Click HERE to purchase this book now. discuss•8
This code creates a terminal with two console layers, one for the map and
one for the player. You won’t be rendering the whole map at once—and to
limit the viewport, you use a camera.
Make a Camera
The camera acts as your game’s window into the world. It defines the section
of the map that is currently visible. Create a new file, camera.rs. Import your
prelude, and create a structure with enough information to define the
boundaries of the camera view:
BasicDungeonCrawler/dungeon_crawl_graphics/src/camera.rs
use crate::prelude::*;
pub struct Camera {
pub left_x : i32,
pub right_x : i32,
pub top_y : i32,
pub bottom_y : i32
}
You need to be able to create a camera and update it when the player moves.
Because the camera is centered on the player, you need the player’s position
for both of these functions:
BasicDungeonCrawler/dungeon_crawl_graphics/src/camera.rs
impl Camera {
pub fn new(player_position: Point) -> Self {
Self{
left_x : player_position.x - DISPLAY_WIDTH/2,
right_x : player_position.x + DISPLAY_WIDTH/2,
top_y : player_position.y - DISPLAY_HEIGHT/2,
bottom_y : player_position.y + DISPLAY_HEIGHT/2
}
}
pub fn on_player_move(&mut self, player_position: Point) {
self.left_x = player_position.x - DISPLAY_WIDTH/2;
self.right_x = player_position.x + DISPLAY_WIDTH/2;
self.top_y = player_position.y - DISPLAY_HEIGHT/2;
self.bottom_y = player_position.y + DISPLAY_HEIGHT/2;
}
}
The new and on_player_move functions are essentially the same: they define the
visible window as being centered on the player. The left-most visible tile is
the player’s x coordinate, minus half of the screen size. The right-most visible
tile is the x coordinate plus one half of the screen size. The y dimensions are
the same, but with screen height.
• Click HERE to purchase this book now. discussGraphics, Camera, Action •9
Add the camera structure to your prelude and module imports in main.rs:
mod camera;
mod prelude {
...
pub use crate::camera::*;
}
Add the camera to your game’s state:
BasicDungeonCrawler/dungeon_crawl_graphics/src/main.rs
struct State {
map: Map,
player: Player,
➤ camera: Camera
}
You also need to update your state’s new function to initialize the camera:
BasicDungeonCrawler/dungeon_crawl_graphics/src/main.rs
fn new() -> Self {
let mut rng = RandomNumberGenerator::new();
let map_builder = MapBuilder::new(&mut rng);
Self {
map : map_builder.map,
player: Player::new(map_builder.player_start),
➤ camera: Camera::new(map_builder.player_start)
}
}
Use the Camera for Rendering the Map
You need to update map.rs with a render function that understands camera
placement:
BasicDungeonCrawler/dungeon_crawl_graphics/src/map.rs
pub fn render(&self, ctx: &mut BTerm, camera: &Camera) {
ctx.set_active_console(0);
for y in camera.top_y .. camera.bottom_y {
for x in camera.left_x .. camera.right_x {
if self.in_bounds(Point::new(x, y)) {
let idx = map_idx(x, y);
match self.tiles[idx] {
TileType::Floor => {
ctx.set(
x - camera.left_x,
y - camera.top_y,
WHITE,
BLACK,
to_cp437('.')
);
• Click HERE to purchase this book now. discuss• 10
}
TileType::Wall => {
ctx.set(
x - camera.left_x,
y - camera.top_y,
WHITE,
BLACK,
to_cp437('#')
);
}
}
}
}
}
}
The function receives a borrowed Camera, and uses the boundaries from the
camera to render just the visible part of the map. Notice that it now calls
in_bounds to make sure that each tile exists. The screen coordinates sent to the
set function have left_x and top_y subtracted from them—moving them to be
relative to the camera. Notice that it calls set_active_console(0)—this tells the
library to render to the first console layer, the base map.
The map will now be centered on the player.
Connect the Player to the Camera
The rendered map center is determined by the player’s position, so you need
to extend the update() function in player.rs to use it. Update the function signature
as follows:
• Click HERE to purchase this book now. discussGraphics, Camera, Action • 11
BasicDungeonCrawler/dungeon_crawl_graphics/src/player.rs
pub fn update(&mut self, ctx: &mut BTerm, map : &Map, camera: &mut Camera)
{
Notice that it receives a mutable camera—it will use it to send updates if the
player moves:
BasicDungeonCrawler/dungeon_crawl_graphics/src/player.rs
if map.can_enter_tile(new_position) {
self.position = new_position;
camera.on_player_move(new_position);
}
Lastly, for the player, you need to update the render() function to take into
account camera placement:
BasicDungeonCrawler/dungeon_crawl_graphics/src/player.rs
pub fn render(&self, ctx: &mut BTerm, camera: &Camera) {
ctx.set_active_console(1);
ctx.set(
self.position.x - camera.left_x,
self.position.y - camera.top_y,
WHITE,
BLACK,
to_cp437('@'),
);
}
Just like the map, this subtracts left_x and top_y from the player’s coordinates
when rendering. Notice the call to set_active_console. This specifies that you want
to use the second layer for the player.
Clear Layers, Connect Functions
Finally, you need to update the tick function in main.rs to send the camera to
the updated functions—and to clear all layers.
BasicDungeonCrawler/dungeon_crawl_graphics/src/main.rs
fn tick(&mut self, ctx: &mut BTerm) {
ctx.set_active_console(0);
ctx.cls();
ctx.set_active_console(1);
ctx.cls();
self.player.update(ctx, &self.map, &mut self.camera);
self.map.render(ctx, &self.camera);
self.player.render(ctx, &self.camera);
}
• Click HERE to purchase this book now. discuss• 12
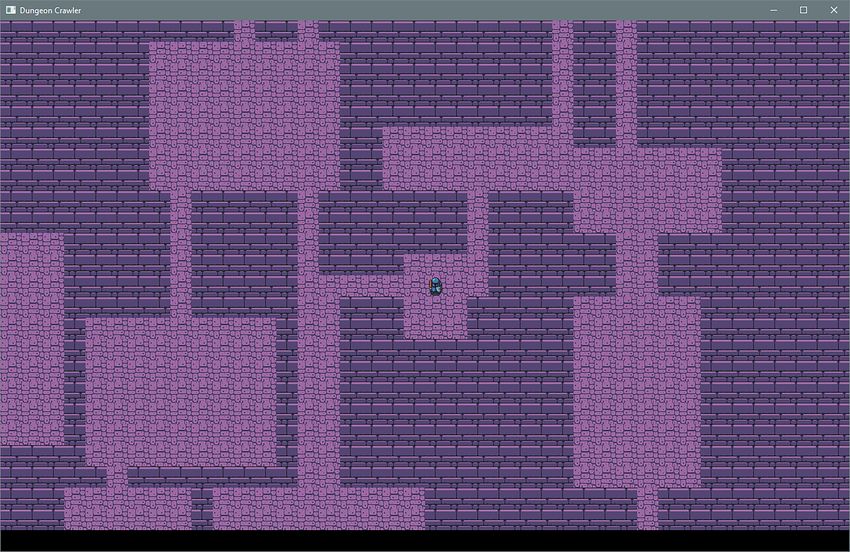
Run the game now and you have a graphical dungeon:
• Click HERE to purchase this book now. discussYou can also read