Hi! Let's get started - 6-Series R646-CA - TCL
←
→
Page content transcription
If your browser does not render page correctly, please read the page content below
Hi! Let’s get started.

                   6-Series
                  R646-CA
DO NOT RETURN TO STORE
WE ARE
READY TO TCL SUPPORT:
HELP contact us first support.tcl.com/ca
with any questions 1-877-300-9509
TAKE CARE WHEN
REMOVING THE TVImportant Information
This symbol indicates that this product incorporates
CAUTION double insulation between hazardous main voltage
RISK OF ELECTRIC SHOCK. and user accessible parts. When servicing, use only
DO NOT OPEN. identical replacement parts.
CAUTION: Neutral fusing. Disconnect mains before servicing.
Caution: To reduce the risk of electric shock, do not remove cover (or back). No user serviceable parts inside.
Refer servicing to qualified service personnel.
This symbol indicates “dangerous voltage” This symbol indicates important instructions
inside the product that presents a risk of accompanying the product.
electric shock or personal injury.
WARNING WARNING
To reduce the risk of fire or electric shock, do The TV is unstable if it is not properly attached to
not expose this product to rain or moisture. the base or mounted to the wall. Please follow the
This product should not be exposed to dripping base or wall mounting instructions provided in the
or splashing. No objects filled with liquids, such User’s Guide to ensure your safety.
as vases, should be placed on the apparatus.
Warning: The batteries should not be exposed to excessive heat, such as prolonged direct
sunlight, open flame, or fire of any kind. Refer to the identification/rating label located on the back
panel of your product for its proper operating voltage.
Cable TV Installer: This reminder is provided to call your attention to Article 820-40 of the National
Electrical Code (Section 54 of the Canadian Electrical Code, Part 1) which provides guidelines for proper
grounding and, in particular, specifies that the cable ground should be connected to the grounding system
of the building as close to the point of cable entry as practical.
Important: This television is a table model and is designed to sit on a firm, flat surface. Do not
place the TV on soft carpeting or on a similar surface as this may cause the ventilation slots located on
the bottom of the unit to be blocked and may result in reduced product lifespan from overheating.
To assure adequate ventilation for this product, maintain a spacing of one (1) inch from the top and
side of the TV receiver and two (2) inches from the rear of the TV receiver and other surfaces.
Make sure the TV stand or base you use is of adequate size and strength to prevent the TV from
being accidentally tipped over, pushed off, or pulled off. This may cause personal injury and/or damage
the TV. Refer to the Important Safety Instructions on the next page.
The Power button on this TV and your remote control puts the TV into a very low-power standby
mode but will not completely turn the power off. In order to completely shut the power off, you will
need to disconnect the power cord from the outlet. The mains plug/appliance coupler is used to
completely turn off the device. If you prefer to completely turn off the device, you should install
the TV in a manner that allows you to disconnect the power cord when desired.
Product Information
Keep your sales receipt to obtain warranty parts and service and for proof of purchase. Attach it here
and record the serial and model numbers in case you need them. These numbers are located on the
product.
Warning: Changes or modifications to this unit not expressly approved by the party responsible for
compliance could void the user’s authority to operate the equipment. Keep the apparatus at least 8
inches away from the human body.
Input Signal Compatibility
Antenna/Cable 480i, 480p, 720p, 1080i (NTSC, ATSC, and QAM formats)
Composite Video 480i
HDMI 1 & 2 480p, 720p/60Hz, 1080p/24/30/60/120Hz,
1440p/60/120Hz, 2160p/24/30/60/120Hz
HDMI 3 & 4 480p, 720p/60Hz, 1080p/24/30/60/120Hz,
1440p/60/120Hz, 2160p/24/30/60Hz
Model No. Serial No.
Purchase Date Dealer/Address/Phone
1Important Safety Instructions
1. Read these instructions.
2. Keep these instructions.
3. Heed all warnings.
4. Follow all instructions.
5. Do not use this apparatus near water.
6. Clean only with a dry cloth.
7. Do not block any ventilation openings. Install in accordance with the manufacturer’s instructions.
8. Do not install near any heat sources such as radiators, heat registers, stoves, or other apparatus (including
amplifiers) that produce heat.
9. Protect the power cord from being walked on or pinched particularly at plugs, convenience receptacles,
and the point where they exit from the apparatus.
10. WARNING: Please refer the information on exterior bottom enclosure for electrical and safety information
before installing or operating the apparatus.
11. WARNING: The main plug is used to disconnect the device and should remain readily operable.
12. When not in use, tie up the power cordset with a cable tie or with something similar. It should not be
near sharp edges as it may cause abrasion of the power cordset. When put into use again, please make
sure the power cordset is not damaged. If any damage is found, please use a replacement power cord
specified by the manufacturer or that is identical to the original one.
13. No open flame sources, such as lit candles, should be placed on, under, or near the apparatus.
14. Unplug this apparatus during lightning storms or when unused for long periods of time.
15. Only use attachments/accessories specified by the manufacturer.
16. Use only with the cart, stand, tripod, bracket, or table specified by the manufacturer,
or sold with the apparatus. When a cart is used, use caution when moving the
cart/apparatus combination to avoid any injury.
17. Refer all servicing to qualified service personnel. Servicing is required when the apparatus has been
damaged in any way, such as power-supply cord or plug is damaged, liquid has been spilled or objects
have fallen into the apparatus, the apparatus has been exposed to rain or moisture, does not operate
normally, or has been dropped.
18. For safe operation of the apparatus, please follow these installation requirements:
Keep at least 2 inches of ventilation space between the rear cover of the apparatus and the wall.
Keep at least 1 inch of ventilation space between the apparatus and all other surfaces. Do not allow
any of the apparatus’ ventilation openings to be blocked by objects that might obstruct them, such
as newspapers, curtains, table-cloths or any other objects. Do not expose the apparatus to any external
heat sources. Do not place any heat sources such as candles, lamps, etc. on the apparatus. Do not expose
the device to high levels of humidity or to any possible sources of moisture. When disposing of used
batteries from the remote control, consult local regulations regarding proper disposal.
19. If an outside antenna or cable system is connected to the product, be sure the antenna or cable system
is grounded so as to provide some protection against voltage surges and built-up static charges. Section
810 of the National Electrical Code, ANSI/NFPA No. 70-2011 (Section 54 of Canadian Electrical Code,
Part 1) provides information with respect to proper grounding of the mast and supporting structure,
grounding of the lead in wire to an antenna-discharge unit, size of grounding conductors, location of
antenna discharge unit, connection to grounding electrodes, and requirements for the grounding electrode.
See following example:
ANTENNA LEAD IN WIRE
GROUND CLAMP
ANTENNA DISCHARGE UNIT
(NEC SECTION 810-20)
GROUNDING CONDUCTORS
(NEC SECTION 810-21)
GROUND CLAMPS
ELECTRIC SERVICE POWER SERVICE GROUNDING
EQUIPMENT ELECTRODE SYSTEM (NEC ART
250, PART H)
2The terms HDMI, HDMI High-Definition Multimedia Interface, and the HDMI Logo
are trademarks or registered trademarks of HDMI Licensing Administrator, Inc.
Dolby, Dolby Vision, Dolby Atmos, and the double-D symbol are registered
trademarks of Dolby Laboratories Licensing Corporation. Manufactured
under license from Dolby Laboratories. Confidential unpublished works.
Copyright © 2012-2021 Dolby Laboratories. All rights reserved.
FCC Information
This equipment has been tested and found to comply with the limits for a Class B digital device, pursuant to Part
15 of the FCC Rules. These limits are designed to provide reasonable protection against harmful interference in a
residential installation. This equipment generates, uses, and can radiate radio frequency energy and, if not installed
and used in accordance with the instructions, may cause harmful interference to radio communications. However,
there is no guarantee that interference will not occur in a particular installation. If this equipment does cause
on, the user is encouraged to try to correct the interference by one or more of the following measures:
Reorient or relocate the receiving antenna.
Increase the separation between the equipment and receiver.
Consult the dealer or an experienced radio/TV technician for help.
This Class B digital apparatus complies with Canadian ICES-003.
This device contains licence-exempt transmitter(s)/receiver(s) that comply with Innovation, Science and
Economic Development Canada’s licence-exempt RSS(s). Operation is subject to the following two conditions:
(1) This device may not cause harmful interference, and
(2) this device must accept any interference received, including interference that may cause undesired operation.
This equipment complies with Canada radiation exposure limits set forth for an uncontrolled environment. This
equipment should be installed and operated with minimum distance 20cm between the radiator & your body.
Battery Caution & Disposal Information
1. For best results, use alkaline type batteries.
2. Install only new batteries of the same type in your product.
3. Failure to insert batteries in the correct polarity, as indicated in the battery compartment, may
shorten the life of the batteries or cause batteries to leak.
4. Do not mix old and new batteries.
5. Do not use Rechargeable (Nickel Cadmium or Nickel Metal Hydride) batteries.
6. Do not mix Alkaline, Standard (Carbon-Zinc) or Rechargeable (Nickel Cadmium or Nickel Metal
Hydride) batteries.
7. Do not dispose of batteries in fire.
8. Batteries should be recycled or disposed of as per state and local guidelines.
9. Replacement of a BATTERY with an incorrect type that can defeat a SAFEGUARD (for example,
in the case of some lithium BATTERY types).
ELECTRONICS & PACKAGING RECYCLING INFORMATION
For information on recycling your old TVs, sound bars, and home comfort products, and to find drop-off
locations in your area, please visit the “Electronics Recycling” area of the TCL website at www.tcl.com.
Click on our convenient interactive map to quickly locate a solution in your community. TCL encourages
consumers to always look for a recycling or reuse alternative to discarding televisions and other electronics,
and in many areas TCL has programs for consumers to drop-off and recycle televisions free of charge.
Look for convenient How2Recycle® labels on the product box for help preparing your new TV packaging for
recycling. These labels show important information identifying the various types of packaging material included
with your new TV along with easy-to-understand recycling instructions.
3What’s in the box
TCL TV Power cable 2 x AAA batteries
for remote
4 x Stand screws TV stands
(M5x20mm)
TV remote
What you need
Make the most of your TV
Phillips head Router + Internet Connection
screwdriver (needed for streaming)
For additional support , please visit support.tcl.com/ca
4Step 1 Set up your TV
Ready for the step-by-step? You’re only minutes away from TV bliss!
Remove your TV from the box
Be careful, it’s heavy!
To use the stand
A To prevent damage to the screen, carefully place your TV on a soft, cushioned surface.
B Put the column of the stands into the TV, align the stands with the screw holes located on
the TV. Secure the stands to the TV with four (4) screws.
Note: Make sure the installation direction of the stand is the same as illustrated.
55’’/65’’/75’’ 65’’/75’’
A A
B B
To use the cable clips
Use the cable clips on the TV stands on the left and right as illustrated below.
B
55’’/65’’/75’’
1 2
Warning:
Never place a television set in an unstable location. A television set may fall, causing serious
personal injury or death. Many injuries, particularly to children, can be avoided by taking simple
precautions such as:
- Using cabinets or stands recommended by the manufacturer of the television set.
- Only using furniture that can safely support the television set.
- Ensuring the television set is not overhanging the edge of the supporting furniture.
- Not placing the television set on tall furniture (for example, cupboards or bookcases) without
anchoring both the furniture and the television set to a suitable support.
- Not placing the television set on cloth or other materials that may be located between the
television set and supporting furniture.
- Educating children about the dangers of climbing on furniture to reach the television set
or its controls.
If your existing television set is being retained and relocated, the same considerations as
above should be applied.
5Optional - To mount on a wall
(wall mount not included)
To mount on a wall
Preparation must be done before mounting your TV on a wall.
Note: Do not place your TV in a location exposed to direct sunlight, heat, fire, or moisture.
Exposure will damage the TV.
1 2
Place your TV on a soft, cushioned surface. Remove the 4 screws from the back of the TV.
VESA screws:
3 M6x20mm
4
Screw the VESA bracket tightly onto the back cover with 4 VESA Follow the instructions that come with the wall mount to hang
screws. the TV on the wall.
If you are mounting your TV to the wall, don’t attach the stands.
To mount your TV to the wall, purchase a VESA wall mount
55” Models Purchase a VESA 300x300, 4 M6x20mm screws
65” Models Purchase a VESA 300x300, 4 M6x20mm screws
75” Models Purchase a VESA 400x300, 4 M6x20mm screws
The VESA number is the horizontal and vertical measurement of the mounting holes. For
example, 200X200 refers to the fact that the mounting measurements are 200mm horizontally
and 200mm vertically.
Follow the instructions that come with the wall mount.
Your wall mount must be able to bear a minimum of five times the TV’s net weight to avoid
causing damage.
6Step 2 Power up
In this step, we’ll make sure all systems are a GO!
Connect your power cable to the TV, then plug
it in to the wall outlet.
Power your TV remote by inserting the included
batteries.
Connect other devices by referencing port label
and descriptions on the next page.
Power Tip! Always replace depleted batteries with two
same brand-new batteries from the same manufacturer.
Never use damaged batteries.
If your remote gets warm/hot during use, discontinue
use and contact customer support immediately at
Insert batteries in the correct polarity as
support.tcl.com/ca.
indicated in the battery compartment.
Step 3 Grab your remote
The TV remote should feel right at home in your hand. We designed it to be
incredibly intuitive for watching TV and navigating on-screen menus.
A OPTIONS View more options when playing media
B POWER Turn TV on and off
C WATCHLIST Open the Watchlist menu or future function
D SETTINGS Display the dashboard on screen E
E REMOTE MICROPHONE Talk to the remote microphone
after pressing the Google Assistant button A B
F GOOGLE ASSISTANT BUTTON Press to activate the
remote’s Google Assistant microphone. Search content C D
through your voice by holding down the button.
F
G VOLUME Raise and lower volume
H HOME Return to home screen G
I BACK Return to previous screen
J ELECTRONIC PROGRAM GUIDE Display the live antenna H
TV channels
I K
K MUTE Press the button to mute the sound. In Google TV,
holding the button down about 3 seconds can display J
the “TalkBack”. L N
L VIRTUAL KEYBOARD Open virtual keyboard on screen M
M QUICK PANEL Display the quick panel
N TCL HOME Open TCL home on screen
Tip! Follow the on-screen guide
to pair the remote control with
the TV when pressing the
button for the first time.
7Step 4 Get to know your TV
A STATUS LIGHT OF HANDS-FREE
VOICE CONTROL Glows when you
activate the hands-free voice control.
(To learn more about the function,
TV FRONT go to page 13.)
IR RECEIVER Receives signal from
the TV remote.
LIGHT SENSOR Analyzes ambient
A light conditions for optional auto
picture adjustment.
B POWER and OPTIONS BUTTON
Press once to open the menu.
Short click to change the menu and
long click to select.
C POWER PORT Connect your TV
to the power source with the
TV BACK included power cable.
TV SIDE
C E
ON
OFF
D
F
ON
OFF
B
D HANDS-FREE VOICE CONTROL MIC SWITCH
Enable or disable the TV’s integrated microphone.
G/H 4K/
120Hz
(e)ARC
E USB PORT Connect a USB device to access photos,
music and movies. Or connect the optional TCL
webcam to chat with friends using supported video 4K/
call apps. 120Hz
F ETHERNET Connect an Ethernet cable to your home
Internet router or switch.
G HDMI PORTS Highest quality audio/video connection.
Connect cable box, Blu-ray player, gaming console,
G 4K/
60Hz
or other devices to your TV using HDMI cables.
HDMI ports 1 & 2: Supports up to 4K/120Hz
HDMI ports 3 & 4: Supports up to 4K/60Hz 4K/
60Hz
H HDMI eARC/ARC PORT Connect HDMI eARC/ARC
(audio return channel) capable audio devices like CABLE/ANT
sound bars or AV receivers.
I ANTENNA/CABLE IN Connect an outdoor VHF/UHF
I
antenna or Cable TV feed.
J AV IN adapter AV Input (analog audio/video).
The AV Input can be used to connect older devices E
that use analog audio/video outputs. Compatible
AV IN
adapter (not included) connects to the RCA cable
(video - yellow and audio - white and red) that you J
normally use to connect to that device.
K HEADPHONE OUT Connect headphones or other K AUDIO OUT
external speakers.
L OPTICAL (DIGITAL AUDIO OUT) Connect an optical
L
cable to an external digital audio system.
8Step 5 Complete guided setup
It’s the final stretch-hurray!
Let’s Connect
Once your language has been selected, you can quickly set up the TV using an Android phone
with the pre-installed Google Home app.
TV interface may vary and is subject to change.
Or you can follow the easy on-screen instructions to setup your TV. If you aren’t ready to
connect your TV to a wireless network, you can still use it as a regular TV.
To enjoy all smart features and services on your TCL Google TV, a free Google account, a
free TCL account, and a reliable broadband internet connection, are required.
And setup is done... Congratulations!
Continue using the remote to personalize your Home screen, streaming apps line-up, stream movies,
and so much more.
Key things to know:
A paid subscription or other payments may be required for some streaming apps. Streaming apps
availability are subject to change and vary by country.
WE ARE READY TO HELP
contact us first with any questions
TCL SUPPORT:
support.tcl.com/ca
1-877-300-9509
9TCL North America Limited Warranty
All TCL LCD/LED Models
What your warranty covers
Defects in materials or workmanship to the original owner of this TCL product when purchased as new from
an Authorized Dealer of TCL brand products in Canada and packaged with this warranty statement.
New LCD/LED Televisions (Non-Commercial Use)
For how long after your purchase:
One (1) year from date of purchase for parts and labor for non-commercial use.
New LCD/LED Televisions (Commercial Use)
For how long after your purchase:
Six (6) months from date of purchase for parts and labor for commercial use.
Commercial use includes, but is not limited to, the use of this product in a commercial or business
environment, the use of this product in an institution or for institutional purposes, or other commercial
purposes including rental purposes.
What we will do
At TCL North America’s discretion, (1) pay an Authorized TCL Service Center for both labor charges and
parts to repair your television, or (2) replace your television with a new or refurbished / remanufactured
equivalent value product. The decision to repair or replace will be made solely by TCL North America.
See “How to get service”.
How to get service
Please have your original purchase receipt or proof of purchase (bill of sale or receipted invoice) which
states that condition of the unit (New, Used, etc.), the unit’s date of purchase, place of purchase and model/
serial number ready. The model/serial number information can be found on the back of your unit.
Call 1-877-300-9509 or visit support.tcl.com/ca
A representative must troubleshoot your problem over the telephone or through e-mail before receiving
service. If it is determined that your unit requires service, the service location will be at the sole discretion
of TCL North America based upon the TCL North America Limited Warranty Statement.
At the sole discretion of TCL North America, television screen sizes 43” and smaller will either be repaired
at an Authorized TCL Service Center or directly exchanged for a new or refurbished/recertified unit. At the
sole discretion of TCL North America, television screen sizes 44” through 75” or larger will either be repaired
or directly exchanged for a new or refurbished/recertified unit at an Authorized TCL Service Center or
repaired in-home. In the event of a service visit where the on-site technician, in his-her sole discretion,
deems the home or property conditions to be hazardous and/or unsafe, TCL North America reserves the
right to cancel or re-schedule the service visit, or opt for an exchange of the in-warranty unit for a
refurbished/recertified unit lieu of the in-home service visit.
If repaired at an Authorized TCL Service Center, TCL North America is not responsible for transportation
costs to the Authorized TCL Service Center. However, TCL North America will pay for return shipping.
TCL North America will provide instructions for packaging and shipping the unit. Units that are improperly
packed and damaged during shipping are not covered under your product warranty.
Proof of purchase in the form of a bill of sale or receipted invoice from an Authorized Dealer which is
evidence that the product is within the warranty period must be presented to obtain warranty service.
In the event that a unit is to be replaced, a picture of the back of the unit showing the model and serial
number and picture of the issue itself may be required.
PRE-AUTHORIZATION MUST BE OBTAINED BEFORE (1) SENDING ANY PRODUCT TO AN AUTHORIZED
TCL SERVICE CENTER, OR (2) OBTAINING ANY IN-HOME REPAIR/REPLACEMENT/ RENTAL SERVICES.
10TCL North America Limited Warranty
What your warranty does not cover
A unit sold in “As-Is”, “Used”, “Factory Reconditioned”, “Factory Re-Certified”, or “Refurbished”, condition
or with faults.
Units physically broken during shipment from a Retailer. Please contact your Retailer for assistance.
Extended Service Plans purchased from Retailers. Please contact your Retailer for assistance.
Customer instruction. (Your Owner’s Manual describes how to install, adjust, and operate your unit. Any
additional information should be obtained from your Authorized Dealer).
Installation and related adjustments, or damage resulting from installation.
Damage resulting from non-approved installation or repair methods.
Signal reception problems not caused by your unit.
Damage from misuse, abuse, neglect, insects, normal wear and tear, cosmetic damage, mishandling,
faulty installation, or power line surges.
Markings or images on the television’s panel resulting from viewing fixed images (including but not limited
to certain 4:3 images on wide screen televisions, or data or images in fixed screen locations from banners,
video games, or certain broadcast networks).
Units that have original factory serial numbers that are unreadable or missing, or that have been changed,
defaced, or altered in any manner.
Batteries.
A television that has been modified or incorporated into other products, or that has had the serial number
removed or altered.
A unit purchased or serviced outside of Canada.
Acts of nature or God, such as but not limited to earthquake or lightning damage.
Special, incidental or consequential damages.
LIMITATION OF WARRANTY
THE WARRANTY STATED ABOVE IS THE ONLY WARRANTY APPLICABLE TO THIS PRODUCT. NO
VERBAL OR WRITTEN INFORMATION GIVEN BY TCL NORTH AMERICA, ITS AGENTS OR EMPLOYEES
SHALL CREATE A GUARANTY OR IN ANY WAY INCREASE OR MODIFY THE SCOPE OF THIS WARRANTY.
REPAIR OR REPLACEMENT AS PROVIDED UNDER THIS WARRANTY IS THE EXCLUSIVE REMEDY OF THE
CONSUMER. TCL NORTH AMERICA SHALL NOT BE LIABLE FOR SPECIAL, INCIDENTAL, OR
CONSEQUENTIAL DAMAGES RESULTING FROM THE USE OF THIS PRODUCT OR ARISING OUT OF ANY
BREACH OF ANY EXPRESS OR IMPLIED WARRANTY ON THIS PRODUCT. THIS DISCLAIMER OF
WARRANTIES AND LIMITED WARRANTY ARE GOVERNED BY THE LAWS OF THE STATE OF CALIFORNIA.
EXCEPT TO THE EXTENT PROHIBITED BY APPLICABLE LAW, ANY IMPLIED WARRANTY OF
MERCHANTABILITY OR FITNESS FOR A PARTICULAR PURPOSE ON THIS PRODUCT IS LIMITED TO THE
APPLICABLE WARRANTY AND WARRANTY PERIOD SET FORTH ABOVE. THIS WARRANTY IS SUBJECT TO
CHANGE WITHOUT NOTICE. PLEASE VISIT WWW.TCL.COM TO VIEW THE MOST CURRENT VERSION.
How State Law relates to this warranty
Some states do not allow the exclusion or limitation of incidental or consequential damages, or limitations
on how long an implied warranty lasts, so the above limitations or exclusions may not apply to you.
This warranty gives you specific legal rights, and you also may have other rights that vary from state to
state.
If you purchased your unit outside Canada or seek warranty coverage outside
Canada:
This warranty does not apply. Contact your dealer for warranty information.
Service calls which do not involve defective materials or workmanship are not
covered by this warranty. Costs of such service calls are the sole responsibility
of the purchaser.
11Broadcasting & Operating Environment
Broadcasting system US System NTSC-M
ATSC standard (8VSB), QAM
Receiving Channels VHF2-13
UHF14-69
CATV 14-36 (A)-(W)
37-59 (AA)-(WW)
60-85 (AAA)-(ZZZ)
86-94 (86)-(94)95-99 (A-5)-(A-1)
100-135 (100)-(135)
01 (4A)
Tuner type Frequency synthesized
Operating Temperature 5°C to 35°C (41°F to 95°F)
Operating Humidity 20% to 80%, non-condensing
Storage Temperature -15°C to 45°C (5°F to 113°F)
Storage Humidity 10% to 90%, non-condensing
12Troubleshooting
Having trouble completing the guided setup? Don’t worry, it’s usually an easy fix.
Cannot connect to wireless network (WiFi)
• Select the correct wireless network name and verify the password entered (case sensitive).
• Relocate the router from objects that interfere with performance (cordless phones, baby monitors, etc.).
• Reboot the router by disconnecting the power for more than 2 minutes and reconnect.
Problems connecting my cable box or antenna through a coax cable
• For best performance, use the HDMI connection. If not available, then:
• Make sure the cable connections to the TV and your device are securely fastened.
• Select cable or antenna input.
• Select the channel scan menu and follow the on-screen instructions to perform a full channel scan.
What is the remote code for programming my Universal or Cable box remote control?
• Please visit https://go.tcl.com/codes
Access parental control
• The initial personal password for your TV is 1234.
• You can change the personal password anytime.
• If you forget your personal password, you can use 0423 to reset.
How to use voice control through the remote control?
• In Google TV mode, press and hold the “HOME” and “OK” buttons on your remote at the same time.
• Keep your remote within 3 ft. of your TV during the pairing process.
• Then, when the TV display shows that the Google Assistant is ready – speak towards the remote
microphone by holding down the Google Assistant button to ask a question or try a suggestion.
How to use hands-free voice control?
Note: Make sure the hands-free voice control mic switch (refer to page 8 for its position) is turned on
before using this function.
• In Google TV mode, press the Google Assistant button on your remote.
• Select “Yes, I’m in”.
• Say “OK Google” or “Hey Google” to activate the hands-free voice assistant without using
the remote control.
• Speak towards the TV to ask a question or try a suggestion.
Follow these steps to enable the always-on hands-free voice control:
• Select “Settings” from the home screen.
• Select “System” > “Power & Energy” > “Quick Start” and turn it on.
• Select “System” > “Power & Energy” > “Screenless Service”.
• Turn on the “Screenless Service” and you can enjoy hands-free voice control
in TV standby mode.
Need more help?
support.tcl.com/ca
1-877-300-9509
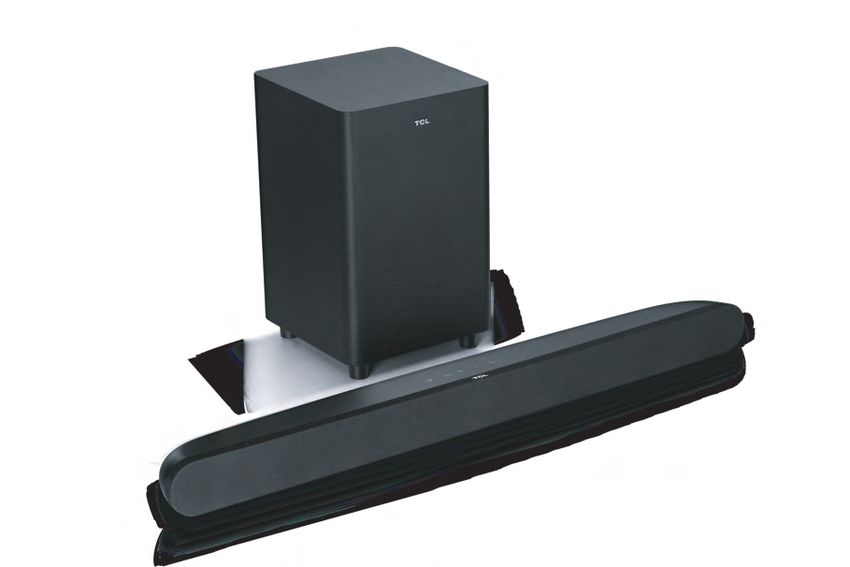
13Complete your Home Theater Experience
with a TCL Sound Bar!
STUNNING SOUND. MADE SIMPLE.
TCL’s Alto Sound Bar Lineup
Alto 6+
are simple to setup and easy to use. With specialized sound modes, available
wireless subwoofers, and everything you need to connect to your TCL TV,
Alto Sound Bars provide stunning sound, made easy.
To learn more visit TCL.com or your favorite retailer.
TCL and the TCL Logo are owned by TCL Corporation
and under license to TCL North America. Other brand and
product names are the trademarks or registered trademarks
of their respective owners.
TCL North America
1860 Compton Avenue, Corona, California 92881, USA
Part No.: 80123-000110Bonjour ! Commençons.
Série 6
R646-CANe pas retourner au magasin
Nous sommes
là pour vous Soutien TCL:
aider
Pour toute question, support.tcl.com/ca
contactez-nous en 1-877-300-9509
premier
Retirer l'appareil avec soinInformation importante
Ce symbole indique que ce produit intègre une
Attention double isolation entre la tension principale
Risque de décharge électrique. dangereuse et les pièces accessibles à
Ne pas ouvrir. l'utilisateur. Lors de l'entretien, n'utilisez que des
pièces de rechange identiques.
ATTENTION: Fusible sur le neutre. Débrancher I’alimentation avant I’entretien.
Attention: Pour réduire le risque de décharge électrique, ne pas démonter le panneau arrière. Aucune
pièce réparable par l'utilisateur à l'intérieur. Confiez l'entretien à un technicien qualifié.
Ce symbole indique une «tension dangereuse» Ce symbole indique les instructions
à l'intérieur du produit, lequel présente un risque importantes accompagnant le produit.
d'électrocution ou de blessure.
Avertissement Avertissement
Pour réduire le risque d'incendie ou d'électrocution, Le téléviseur est instable s'il n'est pas correctement
n'exposez pas ce produit à la pluie ou à l'humidité. fixé à la base ou monté sur le mur. Veuillez suivre les
Ce produit ne doit pas être exposé à l'égouttement instructions de montage de la base ou mural fournies
ou aux éclaboussures. Aucun objet rempli de liquides, dans le Guide de l'utilisateur pour assurer votre sécurité.
tel que des vases, ne doit être placé sur l'appareil.
Avertissement: Les piles ne doivent pas être exposées à une chaleur excessive, telle qu'une exposition
directe et prolongée au soleil, une flamme nue ou à n'importe quel feu. Reportez-vous à l'étiquette
d'identification / de classification située sur le panneau arrière de votre produit pour connaître la tension de
fonctionnement appropriée.
À l'installateur de télévision par câble: ce rappel est destiné à attirer votre attention sur l'article 820-40
du Code national de l'électricité (article 54 du Code canadien de l'électricité, Partie 1) qui fournit des directives
pour une mise à la terre appropriée et spécifie comment le câble de mise à la terre du système doit être connecté
à l'installation de mise à la terre du bâtiment aussi près que possible du point d'entrée du câble.
Important: Ce téléviseur est un modèle de table et est conçu pour être posé sur une surface plane et solide. Ne
placez pas le téléviseur sur un tapis moelleux ou sur une surface similaire, car les fentes de ventilation situées au
bas de l'appareil risquent d'être bloquées et la surchauffe qui en résulterait pourrait réduire la durée de vie du
produit. Pour garantir une bonne ventilation de ce produit, laissez un espace d'un (1) pouce entre le haut et le côté
du récepteur du téléviseur et un espace de deux (2) pouces entre l'arrière du récepteur du téléviseur et les autres
surfaces.
Assurez-vous que le support ou la base du téléviseur que vous utilisez a des dimensions et une résistance
suffisantes pour éviter que le téléviseur ne soit accidentellement renversé, poussé ou tiré. Cela peut entraîner des
blessures corporelles et/ou endommager le téléviseur. Reportez-vous aux instructions de sécurité importantes qui
sont précisées à la page suivante.
Le bouton d'alimentation de ce téléviseur et de votre télécommande met le téléviseur en mode veille de très
faible consommation, sans toutefois le mettre complètement hors tension. Pour couper l'alimentation, vous
devez débrancher le cordon d'alimentation de la prise. Le coupleur de prise / appareil principal est utilisé pour
éteindre complètement l'appareil. Si vous préférez éteindre complètement l'appareil, vous devez installer le tél
éviseur de manière à pouvoir facilement débrancher le cordon d'alimentation si vous l e souhaitez.
Information produit
Conservez votre reçu de vente pour obtenir les pièces et le service de garantie, ainsi que la preuve d'achat.
Attachez-le ici et inscrivez les numéros de série et de modèle au cas où vous en auriez besoin. Ces numéros
sont situés sur le produit.
Avertissement: les changements ou modifications apportés à cette unité qui ne sont pas expressément
approuvés par la partie responsable de la conformité peuvent annuler l'autorité de l'utilisateur d'utiliser
Entrée Compatibilité du signal
Antenne/Câble 480i, 480p, 720p, 1080i (formats NTSC, ATSC, et QAM)
Vidéo composite 480i
HDMI 1 & 2 480p, 720p/60Hz, 1080p/24/30/60/120Hz,
1440p/60/120Hz, 2160p/24/30/60/120Hz
HDMI 3 & 4 480p, 720p/60Hz, 1080p/24/30/60/120Hz,
1440p/60/120Hz, 2160p/24/30/60Hz
No de modèle No de série
Date d'achat Nom du commerçant/adresse/téléphone
1Consignes de sécurité importantes
1. Lire ces instructions.
2. Conserver ces instructions.
3. Tenir compte de tous les avertissements.
4. Suivre toutes les instructions.
5. Ne pas utiliser cet appareil près de l'eau.
Nettoyer uniquement avec un chiffon sec.
7. Ne bloquez pas les ouvertures de ventilation. Installez conformément aux instructions du fabricant.
8. Ne pas installer à proximité de sources de chaleur telles que des radiateurs, des bouches de chaleur,
des poêles ou tout autre appareil (y compris les amplificateurs) produisant de la chaleur.
9. Protégez le cordon d'alimentation afin qu'il ne soit pas piétiné ou pincé, en particulier au niveau des
fiches, des prises de courant et de la sortie de câble de l'appareil
.
10. Attention: Ve uillez consulter les informations sur le boîtier inférieur extérieur pour les informations
électriques et de sécurité avant d'installer ou de faire fonctionner l'appareil.
11. Attention: La fiche principale est utilisée pour débrancher l'appareil et doit rester facilement
accessible.
12. Lorsque vous n'utilisez pas votre téléviseur, attachez le cordon d'alimentation avec un serre-câble ou
un dispositif similaire. Le câble ne doit pas se trouver à proximité d'arêtes vives, car il pourrait s'abîmer.
Lors de la remise en service, vérifiez que le cordon d'alimentation n'est pas endommagé. Si ce dernier
devait être endommagé, utilisez un cordon d'alimentation de remplacement tel que spécifié par le
fabricant ou qui est identique à celui d'origine.
13. Aucune source de flamme nue, telle que des bougies allumées, ne doit être placée sur, sous ou à
proximité de l'appareil.
14. Débranchez cet appareil pendant les orages ou lorsqu'il n'est pas utilisé pendant de longues périodes.
15. N'utilisez que des articles ou accessoires spécifiés par le fabricant.
16. Utilisez uniquement avec le chariot, le support, le trépied, le support ou la table spécifié
par le fabricant ou vendu avec l'appareil. Lorsqu'un chariot est utilisé, faites attention
lorsque vous déplacez le chariot et l'appareil afin d'éviter toute blessure.
17. Confiez toute réparation à un technicien qualifié. Un entretien est requis lorsque l'appareil a été
endommagé de quelque façon que ce soit, par exemple un cordon d'alimentation ou une prise
endommagée, du liquide a été renversé ou des objets sont tombés dans l'appareil, a été exposé à la
pluie ou à l'humidité ou qu'il ne fonctionne pas normalement ou parce qu'il est tombé.
18. Pour un fonctionnement en toute sécurité de l'appareil, veuillez respecter les exigences d'installation
suivantes :
Ne
laissez aucun objet obstruer les orifices de ventilation de l'appareil, tels que journaux, rideaux, nappes ou
tout autre objet. N'exposez pas l'appareil à des sources de chaleur externes. Ne placez pas de sources de
chaleur telles que des bougies, des lampes, etc. sur l'appareil. N'exposez pas l'appareil à des niveaux élevés
d'humidité ou à d'éventuelles sources d'humidité. Lors de la mise au rebut des piles usagées de la
télécommande, veuillez consulter les réglementations locales concernant leur élimination correcte.
19. Si une antenne externe ou un système de câble est connecté au produit, assurez-vous que l'antenne ou
le système de câbles est relié à la terre de façon à fournir une certaine protection contre les surtensions et
les charges statiques accumulées. L'article 810 du Code national de l'électricité, ANSI / NFPA no 70-2011
(article 54 du Code canadien de l'électricité, partie 1) fournit des renseignements sur la mise à la terre du
mât et de la structure portante, la mise à la terre du fil à une antenne/unité de décharge, la taille des
conducteurs de mise à la terre, l'emplacement de l'unité de décharge de l'antenne, la connexion aux
électrodes de mise à la terre et les exigences pour l'électrode de mise à la terre.
Comme dans l'exemple suivant:
Fil conducteur de l'antenne
Collier de mise à la terre
Unité de décharge de l'antenne
(NEC Section 810-20)
Conducteurs de mise à la terre
(NEC Section 810-21)
Colliers de mise à la terre
Équipement électrique Système d'électrode de mise
à la terre de service électrique
(NEC ART 250, PART H)
2Les termes HDMI, HDMI High-Definition Multimedia Interface et le logo
HDMI sont des marques de commerce ou des marques déposées de
HDMI Licensing Administrator, Inc.
Fabriqué sous licence de Dolby Laboratories. Dolby, Dolby Vision, Dolby
Atmos, et le symbole double-D sont des marques de commerce déposées
de Dolby Laboratories Licensing Corporation. Documents confidentiels non
publiés. Droit d'auteur © 2012-2021 Dolby Laboratories. Tous droits réservés.
Information FCC
Cet équipement a été testé et déclaré conforme aux limites d'un appareil numérique de classe B, conformément à
la partie 15 des règles de la FCC. Ces limites sont conçues pour fournir une protection raisonnable contre les
interférences nuisibles dans une installation résidentielle. Cet équipement génère, utilise et peut émettre de
l'énergie radiofréquence et, s'il n'est pas installé et utilisé conformément aux instructions, peut causer des
interférences nuisibles aux communications radio. Cependant, il n'y a aucune garantie que des interférences ne se
produiront pas dans une installation particulière. Si cet équipement cause des interférences nuisibles à la réception
radio ou télévision, ce qui peut être déterminé en éteignant et allumant l'équipement, l'utilisateur est encouragé à
essayer de corriger l'interférence par une ou plusieurs des mesures suivantes:
Réorienter ou déplacer l'antenne de réception.
Augmentez la distance entre l'équipement et le récepteur.
Consulter le revendeur ou un technicien radio / TV expérimenté pour obtenir de l'aide.
Cet appareil numérique de classe B est conforme à la norme canadienne ICES-003.
Cet appareil contient un ou des émetteurs/récepteurs exemptés de licence conformes aux normes RSS
pour les dispositifs exempts de licence en matière d'Innovation, de Sciences et Développement économique.
L'utilisation est soumise aux deux conditions suivantes :
1. Cet appareil ne peut pas produire d’interférences.
2. Cet appareil doit accepter toute interférence, y compris celles susceptibles de provoquer un fonctionnement
non souhaité de l'appareil
Cet équipement est conforme aux limites canadiennes d'exposition au rayonnement établies pour un environnement non
contrôlé. Cet équipement doit être installé et utilisé à une distance minimale de 20 cm entre le radiateur et votre corps.
Précautions concernant la batterie et informations sur l'élimination.
1. Pour une meilleure performance, utilisez des batteries de type alcaline.
2. Installez uniquement de nouvelles batteries de même type dans votre produit.
3. Si vous n'insérez pas dans le compartiment les piles dans la polarité indiquée, cela pourrait
réduire leur durée de vie ou provoquer une fuite.
4. Ne mélangez pas les anciennes piles avec des neuves.
5. N'utilisez pas de piles rechargeables (nickel-cadmium ou nickel-métal-hydrure).
6. Ne mélangez pas les piles alcalines, standards (carbone-zinc) ou rechargeables (nickel-cadmium
ou nickel-métal-hydrure).
7. N'éliminez pas les piles dans un feu.
8. Les batteries doivent être recyclées ou éliminées conformément aux directives locales et nationales.
9. Remplacement d'une PILE par un type incorrect qui peut contrecarrer une mesure de PROTECTION
(par exemple, dans le cas de certains types de PILES au lithium).
Information sur le recyclage d’appareils électroniques pour les consommateurs
Pour obtenir des informations sur le recyclage de vos téléviseurs, barres de son et des produits destinés à
assurer le confort de votre foyer qui sont usagés, et pour trouver les points de dépôt dans votre région,
veuillez consulter la section "Recyclage des appareils électroniques" du site Internet de TCL, www.tcl.com.
Cliquez sur notre carte interactive et utile pour localiser rapidement une solution dans votre localité. TCL
encourage vivement les consommateurs à toujours trouver une solution de recyclage ou de réutilisation
quand il est question de mettre au rebut les téléviseurs et autres appareils électroniques. En outre, TCL a
mis en place dans de nombreuses régions des programmes permettant aux consommateurs de déposer et
de recycler gratuitement leurs téléviseurs.
Vérifiez les étiquettes pratiques How2Recycle® qui ont été apposées sur la boîte du produit pour vous aider à
préparer l'emballage de votre nouveau téléviseur en vue du recyclage. Ces étiquettes contiennent des
informations importantes concernant l'identification des différents types de matériaux d'emballage de votre
nouveau téléviseur ainsi que des instructions de recyclage faciles à comprendre.
3Contenu de la boîte
Téléviseur TCL Câble d'alimentation 2 piles AAA pour la
amovible télécommande
4 vis pour supports Supports de téléviseur
de téléviseu
(M5x20mm)
Télécommande
Ce dont vous avez besoin
Tirez le meilleur parti de votre télé intelligente
Tournevis cruciforme
(Phillips) Routeur + connexion Internet
Pour de l'aide supplémentaire, veuillez lire le manuel utilisateur: support.tcl.com/ca
4Étape 1 Installer votre téléviseur
Prêt pour l'étape par étape? Vous n'êtes qu'à quelques minutes du bonheur
télévisuel!
Retirez votre téléviseur de la boîte
Soyez prudent, c'est lourd!
Pour utiliser le support
A Pour éviter d'endommager l'écran, placez soigneusement votre téléviseur sur une surface
douce et coussinée.
B Placez la colonne des supports dans le téléviseur, alignez les supports avec les trous de vis situés
sur le téléviseur. Fixez les supports sur le téléviseur avec quatre (4) vis.
Remarque: Assurez-vous que la direction d’installation du support est la même qu’elle l’a illustré.
55’’/65’’/75’’ 65’’/75’’
A A
B B
Utilisation d’attache-câbles
Utilisez les attache-câbles sur les supports du téléviseur à gauche et à droite, comme illustré ci-dessous.
B
55’’/65’’/75’’
1 2
Avertissement:
Ne placez jamais un téléviseur dans une position instable. Un téléviseur peut tomber, causant
des blessures graves ou la mort. De nombreuses blessures, en particulier chez les enfants, peuvent
être évitées en prenant des précautions simples telles que:
- Utilisation de meubles ou de supports recommandés par le fabricant du téléviseur.
- N'utiliser que des meubles pouvant supporter le téléviseur en toute sécurité.
- S'assurer que le téléviseur ne dépasse pas les bords du meuble.
- Ne pas placer le téléviseur sur des meubles hauts (par exemple, des armoires ou des bibliothèques)
sans ancrer à la fois le mobilier et le téléviseur à un support approprié.
téléviseur et le meuble de soutien.
- Éduquer les enfants sur les dangers de grimper sur les meubles pour atteindre le téléviseur ou
ses commandes.
Si votre téléviseur existant est conservé et déplacé, les mêmes recommandations que ci-dessus
s'appliquent.
5Optionnel – Le montage mural
(Le montage mural n’est pas inclus)
Pour l’installation au mur
Une préparation doit être effectuée avant de fixer votre téléviseur au mur.
Remarque : ne placez pas votre téléviseur dans un endroit exposé à la lumière directe du
soleil, à la chaleur, au feu ou à l'humidité. Une telle exposition endommagerait le téléviseur.
1 2
Placez votre téléviseur sur une surface souple Retirez les 4 vis situées à l'arrière du téléviseur.
et matelassée.
vis VESA:
3 M6x20mm
4
Vissez fermement le support VESA sur le couvercle Suivez les instructions fournies avec le support
arrière à l'aide des 4 vis VESA. mural pour fixer le téléviseur au mur.
Ne fixez pas le socle si vous installez votre téléviseur au mur.
Pour fixer votre téléviseur au mur, procurez-vous un support mural VESA
Modèles de 55 po Achetez un support VESA 300x300, (exige 4 vis M6x20 mm)
Modèles de 65 po Achetez un support VESA 300x300, (exige 4 vis M6x20 mm)
Modèles de 75 po Achetez un support VESA 400x300, (exige 4 vis M6x20 mm)
Le numéro VESA est la mesure horizontale et verticale des orifices de montage. Par exemple,
200X200 se réfère au fait que les mesures de montage sont 200mm horizontalement et
200mm verticalement.
Suivez les instructions accompagnant le support mural.
Votre support mural doit être capable de supporter au moins cinq fois le poids net du téléviseur
pour éviter de causer des dommages.
6Étape 2 Mettre sous tension
À cette étape, nous vérifierons que tous les
systèmes sont bons!
Connectez le câble d'alimentation au téléviseur,
puis branchez-le à la prise murale.
Insérez les piles dans la télécommande de
votre téléviseur.
Connectez d'autres appareils en faisant
référence à l'étiquette du port et à la
description à la page suivante.
Conseil électrique! Remplacez toujours les piles déchargées par
deux piles neuves du même fabricant. N'utilisez jamais de piles
endommagées.
Insérez comme indiqué dans le
Si votre télécommande devient chaude, arrêtez son utilisation et compartiment les piles dans le
contactez le service clientèle immédiatement sur support.tcl.com/ca. bon sens de polarité
Étape 3 Prise en main de votre
télécommande
Cette télécommande est le lien entre vous et votre téléviseur.
Nous l'avons conçu pour être incroyablement intuitive pour regarder la
télévision et naviguer dans les menus à l'écran.
A Options pour afficher plus d'options lors de la lecture du média
B Alimentation pour allumer et éteindre le téléviseur
C Liste à regarder ouvre le menu de la liste à regarder E
D Paramètres pour afficher le tableau de bord à l'écran
A B
E Microphone de télécommande pour parler avec le
C D
microphone de la télécommande après avoir appuyé sur
le bouton Google Assistant.
F
F Bouton de l’assistant Google appuyez pour activer le
microphone de l’assistant Google de la télécommande. G
Recherchez avec votre voix du contenu en maintenant le
bouton enfoncé.
G Volume monter ou baisser le volume
H
I K
H Accueil pour retourner à l'écran d'accueil
J
I Précédent pour retourner à l'écran précédent
L N
J Programme électronique affichez les chaînes de télévision
M
hertzienne en direct
K Sourdine appuyez sur le bouton pour couper le son
Astuce ! Suivez le guide à l'écran
L Clavier virtuel pour afficher le clavier virtuel à l'écran pour jumeler la télécommande
avec le téléviseur lorsque vous
N
M Panneau rapide affiche le panneau rapide appuyez sur le bouton pour la
première fois.
7Apprenez à connaître votre
Étape 4
appareil télé A Le témoin d’état de la commande
vocale mains libre s’allume lorsque vous
activez la commande vocale mains libre.
(Pour en apprendre davantage sur cette
fonction, allez à la page 13.)
Face avant Récepteur de télécommande reçoit le
signal de la télécommande tv.
Le détecteur de lumière analyse les
conditions de luminosité ambiante pour
A le réglage automatique de l'image en
option.
B Bouton d’alimentation et options
appuyez une fois pour ouvrir le menu.
Cliquez brièvement pour modifier le menu
et cliquez longuement pour sélectionner.
C Alimentation c.a. branchez votre
Face arrière téléviseur à la source électrique avec
le cordon d'alimentation inclus.
Face latérale
C E
ON
OFF
D
ON
F
OFF
B
D Interrupteur de microphone de la commande vocale mains libres
pour activer et désactiver le microphone intégré du téléviseur.
E Port USB pour connecter un appareil USB pour obtenir
G/H 4K/
120Hz
(e)ARC
vos photos, vidéos et musique personnels. Ou vous pouvez
connecter la webcam TCL en option pour discuter avec vos
amis en utilisant des applications qui prennent en charge les
appels vidéo. 4K/
120Hz
F Port Ethernet connectez un câble Ethernet à votre
routeur Internet domestique ou à votre commutateur.
G Les ports HDMI offrent la plus haute qualité de connexion
audiovidéo. Branchez le décodeur câble, le lecteur Blu-ray,
la console de jeux ou d'autres appareils à votre téléviseur à
G 4K/
60Hz
l'aide de câbles HDMI.
Ports HDMI 1 et 2 prennent en charge l’image jusqu’à 4K/120 Hz
Ports HDMI 3 et 4 prennent en charge l’image jusqu’à 4K/60 Hz
4K/
60Hz
H Port HDMI eARC et ARC pour connecter des appareils
audio compatibles HDMI eARC ou ARC (canal de retour audio)
CABLE/ANT
tels que des barres de son ou des récepteurs AV.
I Entrée câble/antenne pour connecter une antenne I
extérieure VHF/UHF ou une source télé par câble.
J Adaptateur d'entrée audiovidéo entrée audiovidéo
(audio/vidéo analogue). L'entrée audiovidéo (AV)
peut être utilisée pour connecter des appareils plus anciens
E
qui utilisent des sorties audiovidéo analogiques. L'adaptateur AV IN
compatible (non inclus) se connecte au câble RCA (vidéo en
jaune, audio en blanc et rouge) que vous utilisez J
normalement pour vous connecter à cet appareil.
K Sortie casque pour connecter un casque d'écoute ou K AUDIO OUT
des haut-parleurs externes.
L Sortie audio optique connectez un câble optique à un L
système audio numérique externe.
8You can also read