How to Crochet Granny Squares - Granny Square 8 FREE
←
→
Page content transcription
If your browser does not render page correctly, please read the page content below
ochet Granny Squares with Crochet Me: 8 Fre

         How to Crochet
          Granny Squares
                with

             8 FREE
             Granny
              Square
                Patterns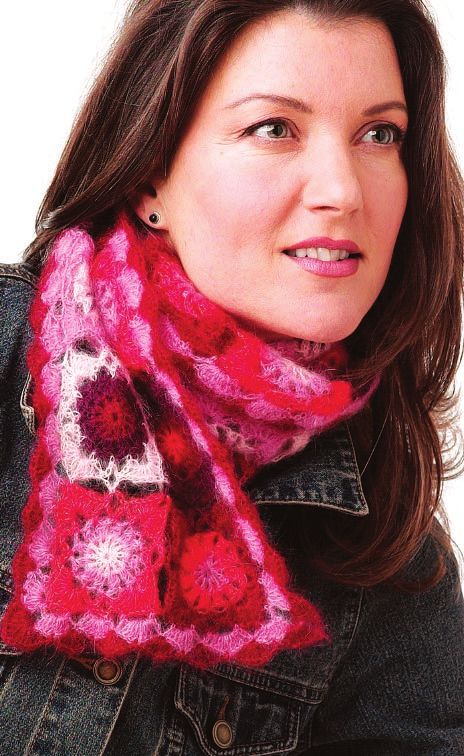
How to Crochet 8 FREE
              Granny Squares Granny
                 with         Square
                                         Patterns

                                                        4
               2
                                   3

1
                          6
         5
                                                                 8

                               7

1 Light     & Shadow Blanket       5 FMKour  Corners Headband
  Judith L. Swartz                        Carroll

2 M  essenger Bag                 6 Bangle Bracelet
   Judith L. Swartz                    Marilyn Murphy

3 C hild's Boho Blocks Pullover 7 Beaux Jestes Socks
   Valentina Devine                 Tracy St. John

4 KJudith
      aleidoscope Scarf            8 G ladiolus Vest
           L. Swartz                  Robyn Chachula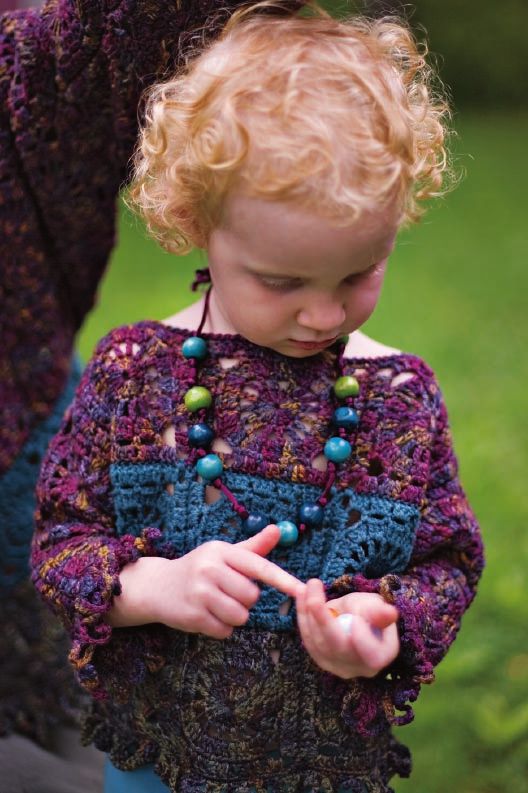
How to Crochet 8 FREE
Granny Squares Granny
with Square
Patterns
Granny squares are the heart of crochet. Crochet granny The Kaleidoscope Scarf by Judith L. Swartz is made up of the Sow
squares are building blocks for all sorts of projects, and the granny square Thistle Square Motif, a circle that blooms into a square.
has endless variations, from solid stitch squares to flowery squares. Here, Tracy St. John’s Beaux Jestes Socks pay homage to two classic
we present you with 8 free granny square patterns, taking you from a afghan patterns: granny squares and ripples. The grannies are tiny
simple bracelet to a classic granny square afghan to a lovely vest. two-round motifs that let you play with color—it’s a great stashbuster
The basic granny square is a series of shells worked with increases at the if you have some sock-weight remnants.
corners to create a square. You’ll find directions for the basic granny In the Child’s Boho Blocks Pullover, Valentina Devine
square motif on page 5 and tips for joining the motifs on page 14. incorporates a spoked wheel in the center of a granny motif. The
If you’re just venturing into granny squares, we have some great starter garment is formed entirely of squares, with some clever folding
projects. The Bangle Bracelet by Marilyn Murphy is a perfect under the arms.
beginner project. Made up of tiny motif squares worked in a light yarn, Grannies step to the next level in Robyn Chachula’s Gladiolus Vest.
this project will give you the basics on how to crochet granny squares. Stitch diagrams clearly show the variations on this elegant granny—full
The granny does what it does best in The Light & Shadow Blanket. motif, half motif, three-quarter motif and quarter motif—and guide you
Judith L. Swartz organizes the usual scrappy look into a color- through joining to create this lovely vest.
shading blanket based on a quilt pattern. We hope you enjoy getting to know your grannies! And we’d love to see
With the Messenger Bag, Judith L. Swartz uses a four-round your finished granny square pattern in the gallery at CrochetMe.com.
granny square as the building block, then joins several for a
classic bag perfect for traveling around town. Styled after a bicycle
messenger bag, it’s great on the bike or off. Best,
Once you have the basics down, you can explore variations on the
granny square.
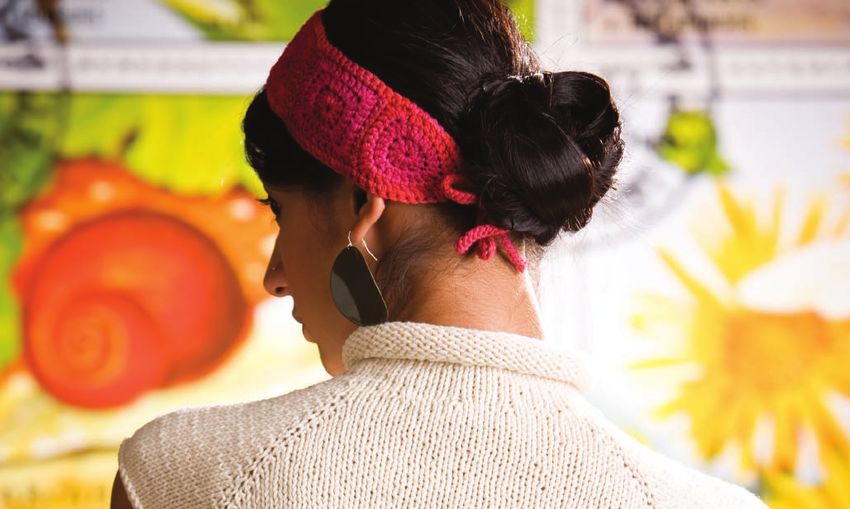
The squares in the Four Corners Headband by MK Carroll are
made up of solid stitches rather than shells, the better to show off Marcy Smith
pretty color-changing yarn. Editor, CrochetMe.com
1 Light & Shadow Blanket
Judith L. Swartz. . . . . . . . . . . . . . . . . . . . . . . . . . . . page 4
2 M essenger Bag how to crochet granny squares with
Judith L. Swartz. . . . . . . . . . . . . . . . . . . . . . . . . . . . page 6
3 C hild’s Boho Blocks Pullover
Crochetme: 8 free granny square
patterns
Valentina Devine. . . . . . . . . . . . . . . . . . . . . . . . . . . page 9
A CrochetMe eBook edited by
4 KJudith
aleidoscope Scarf M arcy Smith
L. Swartz. . . . . . . . . . . . . . . . . . . . . . . . . . . page 12 E d i t o r i a l S ta f f
5 F our Corners Headband
Editor Marcy Smith
project Editor Sarah Read
MK Carroll . . . . . . . . . . . . . . . . . . . . . . . . . . . . . . . page 15 assistant editor Toni Rexroat
6 BMarilyn
angle Bracelet C r e a t i v e se r v i ces
Murphy. . . . . . . . . . . . . . . . . . . . . . . . . . . page 17 Designer Janice Tapia
7 B eaux Jestes Socks photography As noted
Illustration Gayle Ford
Tracy St. John . . . . . . . . . . . . . . . . . . . . . . . . . . . . page 19
8 G
Projects and information are for inspiration and personal use only.
ladiolus Vest
Robyn Chachula . . . . . . . . . . . . . . . . . . . . . . . . . page 22
Stitch Glossary . . . . . . . . . . . . . . . . . . . . . . . . page 26
Table of Contents presented by crochetme! 3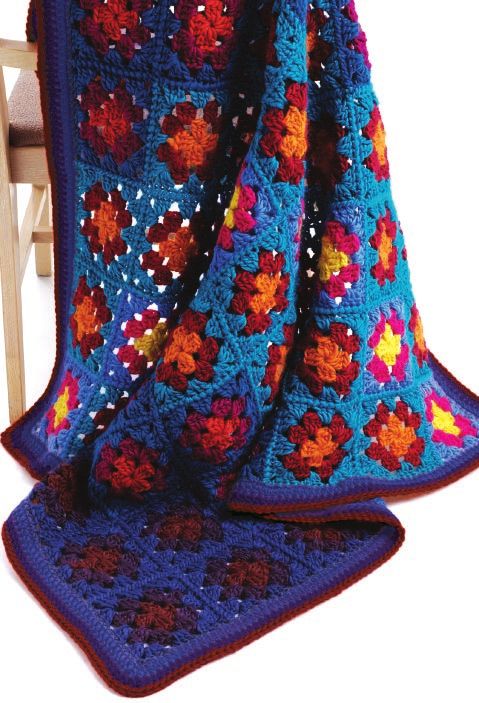
Light & Shadow Blanket
                                                                        design by Judith L. Swartz
                                      Originally published in Getting Started: Crochet (Interweave, 2006)

           The classic granny square afghan has become an icon of comfort and home, but here
           we give it a contemporary look. Bulky yarn allows you to work up this version quickly. Playing with
           four values of the three different colors and viewing the blanket on the diagonal takes your eye from
           night to day and back to night.

                                                                        Finished Size: About 47" square including border.
                                                                        Yarn: Brown Sheep Lamb’s Pride Bulky (85% wool, 15%
                                                                        mohair; 125 yd [114 m], 113 g; ): M75 blue heirloom (I),
                                                                        3 skeins; M83 raspberry (E), M78 Aztec turquoise (F), M29
                                                                        Jack’s plum (K), M85 ink blue (L), 2 skeins each; M155
                                                                        lemon drop (A), M38 Lotus pink (B), M57 brite blue (C),
                                                                        M22 autumn harvest (D), M97 rust (G), M23 fuchsia (H),
                                                                        M89 roasted coffee (J), 1 skein each.
                                                                        Hook: Size K/101⁄2 (6.5 mm). Adjust hook size if necessary to
                                                                        obtain correct gauge.
                                                                        Notions: Yarn needle, for weaving in loose ends; safety pins.
                                                                        Gauge: 1 motif = 51⁄5" square with size K/101⁄2 (6.5 mm) hook.
                                                                        Skill Level: Easy.

                                                                        Blanket
                                                                        Make 64 motifs divided as follows: 8 Motif I, 26 Motif II,
                                                                        18 Motif III, 12 Motif IV (see page 5). Weave in loose ends.
                                                                        Using whipstitch and yarn to match the dominant edge
                                                                        color (this will change from area to area), assemble motifs
                                                                        according to the assembly diagram (see page 5).

                                                                        Border
                                                                        Rnd 1: Starting at any corner with right side of work facing,
                                                                        attach first color (blue heirloom), ch 1, work 1 sc in each dc
Joe Coca

                                                                        or ch, work 2 sc in each corner stitch (the corner stitch is
                                                                        the last stitch on a side and the first stitch on the next side,
                                                                        so you will have two stitches side by side with two stitches

                    How to Crochet Granny Squares with CrochetMe: 8 Free Granny Crochet Patterns
                               ©2010 Interweave Press, LLC | Not to be reprinted | All rights reserved | www.crochetme.com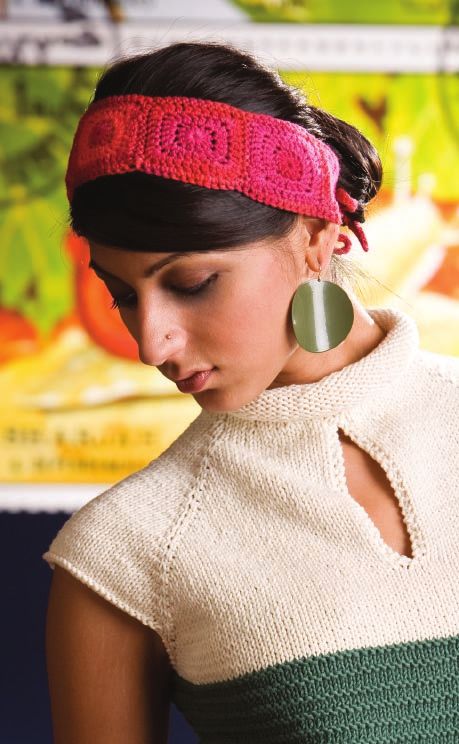
How to Crochet Granny Squares with CrochetMe: 8 Free Granny Crochet Patterns
worked in each one), mark each corner with a safety pin, join
with sl st to beg ch 1. This works out to 15 sc per square or 120 Pattern Stitch
sc per side of blanket for a total of 480 sc.
Rnd 2: Ch 2, work 1 hdc in each sc, working 2 hdc in each corner Granny Square Motif
stitch and moving markers accordingly, join with sl st to top of ch Note: Each motif is made up of three colors. See
2. Fasten off. colorway sequences and diagram and key for motif
Rnd 3: Attach second color (ink blue), work as for Round 2. Fasten placement (group of colors).
off. With first color ch 4, join with sl st to form ring.
Rnd 4: Attach third color (Jack’s plum), ch 1, work 1 sc in each
hdc, working 2 sc in each corner stitch, join with sl st to beg ch 1. Rnd 1: Ch 3 (counts as 1 dc), work 2 dc into ring,
Fasten off. (ch 3, work 3 dc into ring) 3 times, ch 3, join with
sl st to top of beg ch 3. Fasten off.
Finishing Rnd 2: Attach second color to any ch-3 space, ch 3
Weave in loose ends. Steam or block to size. (counts as 1 dc), work (2 dc, ch 3, 3 dc) into same
space, (ch 1, [into next ch-3 sp work 3 dc, ch 3, 3
Judith L. Swartz is the author of the popular Hip to dc ]) 3 times, ch 1, join with sl st to top of beg ch
Crochet, Hip to Knit, and Dogs in Knits (all Interweave Press), 3. Fasten off.
and former editor of Interweave Crochet magazine. She lives in
Rnd 3: Attach third color to any ch-3 space, ch 3
Spring Green, Wisconsin.
(counts as 1 dc), work (2 dc, ch 3, 3 dc) into same
space, (ch 1, work 3 dc into next ch-1 space, ch
GSC, chapter 9, Light and Shadow Blanket
Schematic, Assembly Diagram, & Key 1, work [3 dc, ch 3, 3 dc] into next ch-3 space) 3
times, ch 1, work 3 dc into next ch-1 space, ch 1,
join with sl st to top of beg ch 3. Fasten off.
Motif Placement
GSC, chapter 9, Light and Shadow Blanket I
Motif I Assembly Diagram, & Key
Schematic,
First color: lemon drop (A) I II II III III IV IV IV
Colorway Sequences Diagram
II
Second color: Lotus pink (B)II I II II III III IV IV
Third color: brite blue (C)
II II I II II III IIII Motif
GSC, I—Colors
IV chapter A,and
9, Light B, Shadow
C Blanket
III Motif III—Colors G, H, I
Motif
I II
II II III III IV IIIIV IIIV II I II II III III
Schematic, Assembly Diagram, & Key
First color: autumn harvest (D) II Motif II—Colors D, E, F IV Motif IV—Colors J, K, L
IISecondI color:
II raspberry
II III III(E) IIIIV IIIIV II II I II II III
Third color: Aztec turquoise (F) BORDER I
II II I II
II III
III IV IIIIV III II II I IIIII II
Motif
III II III II I II II IVIII IVIII III III II II I II
I II II III III IV IV IV
II
First color: rust (G) IV
II I II II III III IV IV
III III
Second II
color: II I
fuchsia (H)
II IVII IVIII IV III III II II I
IVThirdIII color: blue heirloom (I)II II II I II II III III IV III
III II II I II
47" (119.5)
BORDER
Motif
IV IV IV III III II II I II
III II II I II II III III
IV
First color: roasted coffeeII (J) II
BORDER
III III II II I II II III
IV IV IV III III I
Second color: Jack’s plum (K)
IV III III II I II II
Third color: ink blue (L) II
IV IV III III II II I II
Border
First color: blue heirloom (I) IV IV IV III III II II I
Second color: ink blue (L) BORDER
Third color: Jack’s plum (K)
47" (119.5)
Light & Shadow Blanket presented by crochetme! 5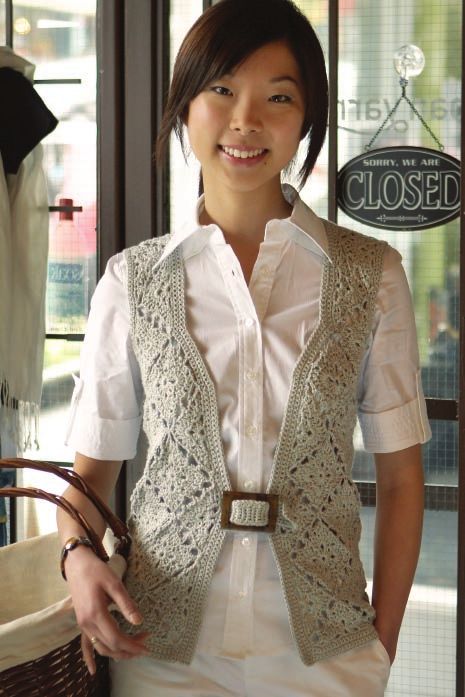
Messenger Bag
                                                                      design by Judith L. Swartz
                                    Originally published in Getting Started: Crochet (Interweave, 2006)

           Constructed from traditional granny squares, this retro-inspired bag looks
           contemporary once again. Wear it crisscrossed over the shoulder and landing at the hip. The
           adjustable strap allows for a personal fit.

                                                            Finished Size: Back and Front: About 12" wide, 11" long (including
                                                            side and bottom panel) Flap: About 10 × 10" square.
                                                            Yarn: Rowan All Seasons Cotton (60% cotton, 40% acrylic; 98 yards
                                                            [90 meters], 50 grams;      ): #213 military (main color), 3 balls; #211
                                                            black currant (A), #214 fern (B), and #218 pansy (C), 1 ball each.
                                                            Hook: Size E/4 (3.5 mm). Adjust hook size if necessary to obtain the
                                                            correct gauge. Note: To create a sturdier fabric, this bag is worked with a
                                                            smaller hook than this yarn would usually require.
                                                            Notions: Yarn needle, for sewing together and weaving in loose ends;
                                                            1 pair of 11⁄2" (3.8 cm) D rings; safety pins.
                                                            Gauge: 16 sc and 16 rows = 4" with size E/4 (3.5 mm) hook; 1 complet-
                                                            ed Granny Square Motif = 41⁄2" square, worked on E/4 (3.5 mm) hook.
                                                            Skill Level: Easy.

                                                            Granny Square Motif
                                                            With C, ch 4; join with sl st to form ring.

                                                           Rnd 1: With C, ch 3 (counts as 1 dc); work 2 dc into ring, *ch 3, work
                                                           3 dc into ring*; repeat from * to * 2 more times, ch 3, join with sl st
                                                           to top of beg ch 3. Fasten off.
Joe Coca

                                                           Rnd 2: Attach A to any ch-3 space, ch 3 (counts as 1 dc), work (2 dc,
                                                           ch 3, 3 dc) into same space, *ch 1, work (3 dc, ch 3, 3 dc) in next
                                                           space*; repeat from * to * 2 more times, ch 1, join with sl st to top of
                                                           beg ch 3. Fasten off.
           Rnd 3: Attach B to any ch-3 space, ch 3 (counts as 1 dc), work (2 dc, ch 3, 3 dc) in same space, *ch 1, work 3 dc
           in next ch-1 space, ch 1, work (3 dc, ch 3, 3 dc) into next ch-3 space*; repeat from * to * 2 more times, ch 1, work
           3 dc into ch-1 space, ch 1, join with sl st to top of beg ch 3. Fasten off.

               How to Crochet Granny Squares with CrochetMe: 8 Free Granny Crochet Patterns
                             ©2010 Interweave Press, LLC | Not to be reprinted | All rights reserved | www.crochetme.com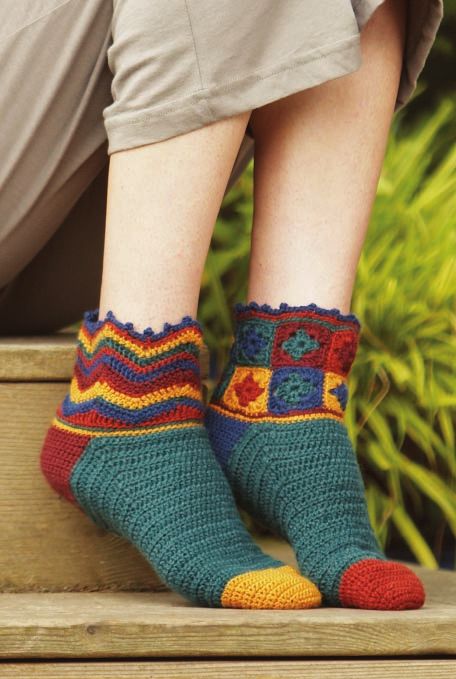
How to Crochet Granny Squares with CrochetMe: 8 Free Granny Crochet Patterns

Rnd 4: Attach main color (MC) to any ch-3 space, ch 3 (counts
as 1 dc), work (2 dc, ch 3, 3 dc) into same space, *(ch 1, work
                                                                                     Finishing
                                                                                     Weave in loose ends being careful to work colors back into
3 dc in next ch-1 space) 2 times, ch 1, work (3 dc, ch 3, 3 dc)                      themselves. Using safety pins, pin long edge of side and bottom
in next ch-3 space*; repeat from * to * 2 more times, work (ch                       panel to 3 sides of front. Using MC threaded on yarn needle,
1, 3 dc in next ch 1 space) 2 times, ch 1, join with sl st to top                    whipstitch one long edge of panel to front sides and bottom. Repeat
of beg ch 3. Fasten off.                                                             with other long edge of side and bottom panel, whipstitching the
                                                                                     panel to back and leaving the top flap free (see schematic). Sew
Bag Front, Back, and Flap                                                            the short edge of the long strap to left hand side of bag (as bag
Make 12 motifs. Using whipstitch and MC, join squares into one                       front faces you), placing the short edge about 1⁄2" down from bag
4-square piece for Front, and one 8-square piece for Back and Flap                   opening, and stitching on the outside of bag. Repeat the sewing
(see diagram). Beg with MC in any corner space of 4-square piece,                    process with short strap on the right-hand side. Slip D rings on
ch 3 (counts as 1 dc), work 1 dc in same space, work 1 dc in each                    to opposite end of long strap and fold end under about 3⁄4", sew
dc and in each space (18 dc per side of each motif), work 2 dc in                    securely in place. Pull short strap through D rings and adjust for
each ch-3 space (at motif joins), and work 3 dc in ch-3 spaces at                    length. With right side of work facing, attach B at right-hand side
corners of joined pieces, join with sl st to top of beg ch 3. Repeat                 edge of flap at the bag opening (this will be the right-hand side of
for 8-square rectangle.                                                              flap as the work faces you), work 1 sc in same space then work 1
                                                                                     sc in each dc around the outer edge of the flap, and working 3 sc
Side and Bottom Panel                                                                in each corner dc. Fasten off. Turn bag around so front faces you,
With MC, ch 113.                                                                     attach B to front bag opening at right-hand edge of front, work 1
Row 1: Work 1 sc in second ch from hook and 1 sc in each                             sc in each dc across. Fasten off. Weave in loose ends.
ch—112 sc. Fasten off.
Rows 2 and 7: Join B, ch 1, 1 sc in each sc across row. Fasten off.                  Judith L. Swartz is the author of the popular Hip to
Rows 3 and 6: Join A, repeat Row 2.                                                  Crochet, Hip to Knit, and Dogs in Knits (all Interweave Press),
Rows 4 and 5: Join C, repeat Row 2.                                                                                     GSC magazine.
                                                                                     and former editor of Interweave Crochet - Chapter 8,She
                                                                                                                                         Messenger
                                                                                                                                             lives inBag
                                                                                     Spring Green, Wisconsin.           Schematic
Row 8: Join MC, repeat Row 2. Fasten off.

Strap (Made in 2 pieces)                                                                                                               10" (25.5 cm)
Short section: With MC, ch 25.
Row 1: Work 1 sc in second ch from hook and 1 sc in each
ch—24 sc.
                                                                                                    Schematic
                                                                                                    GSC - Chapter 8, Messenger Bag

                                                                                                                                     BAG          FLAP
Row 2: Ch 1, work 1 sc in each sc across row.

                                                                                                                                                                                  10" (25.5 cm)
Continuing in MC, repeat Row 2 four more times. Fasten off.
Long section: With MC, ch 173.
Work as for short section on 172 stitches. Fasten off.
                                                      11⁄2" (3.8 cm)

                                                                                                          SIDE AND BOTTOM PANEL

                                                                                                                                                          SIDE AND BOTTOM PANEL

                                                                       SHORT STRAP
                                                                                                                                                                                  11" (28 cm)

                                                                                                                                     BACK AND FRONT
                                                                           6" (15 cm)
  11⁄2" (3.8 cm)

                                    LONG STRAP

                                       43" (109 cm)
                                                                                                                                  SIDE AND BOTTOM PANEL

                                                                                                                                       12" (30.5 cm)

Messenger Bag                                                          presented by crochetme!                                                                                                    7
GSC - Chapter 8, Messenger Bag
          Diagram
                                 How to Crochet Granny Squares with CrochetMe: 8 Free Granny Crochet Patterns

                     Motif 1           Motif 2

                                FLAP

                     Motif 3           Motif 4                         Motif 1       Motif 2

                                                                                 FRONT

                     Motif 5           Motif 6                         Motif 3       Motif 4

                                BACK

                      Motif 7          Motif 8

                                                   RISK-FREE
                                                   TRIAL OFFER
                                                      Interweave Crochet            IS A
                                                      M U S T - H AV E F O R T H O S E W H O
                                                      L OV E TO C RO C H E T !
                                                      Every issue includes scrumptious yarns, the latest
                                                      resources, detailed how-tos, new techniques and
                                                      exclusive contemporary crochet patterns. You’ll find
                                                      lots of exciting new designs you can wear, use in your
                                                      home, or give as gifts. Or, maybe you’ll find so many
                                                      exciting crochet projects, you won’t know where to start!

                                                   interweave.com/kdiwc

Messenger Bag                                    presented by crochetme!                                          8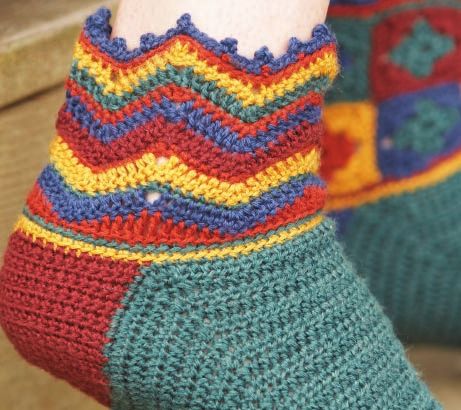
Child’s Boho
                                              Blocks Pullover
                                                                            design by Valentina Devine
                                                                   Originally published in Interweave Crochet, Fall 2006

                 VALENTINA DEVINE DESIGNED THIS DARLING (yet chic!) child’s sweater to match her Boho Blocks
                 Cardigan in the Fall 2006 issue of Interweave Crochet (available at www.interweavestore.com). The pullover
                 is made from strips of square motifs that are slip-stitched together, with a clever underarm gusset created by
                 folding one motif in half. Holding two strands of a variegated yarn together creates a rich marled look—play
                 with colors to make your own unique sweater!

                                                                                Finished Size: 21 (28, 35)" bust circumference. Pullover
                                                                                shown measures 21".
                                                                                Yarn: Lorna’s Laces Helen’s Lace (50% silk, 50% wool;
                                                                                1,250 yd [1,143 m]/4 oz [114 g];  ): mother lode (A), 1 (2, 2)
                                                                                skein(s); Douglas fir (B) and camouflage (C), 1 skein each.
                                                                                Hook: E/4 (3.5 mm). Adjust hook size if necessary to obtain
                                                                                correct gauge.
                                                                                Notions: Yarn needle.
                                                                                Gauge: Each motif = 31⁄2" square with 2 strands of yarn
                                                                                held tog.
                                                                                Skill Level: Easy.

                                                                                Notes:
                                                                                Hold 2 strands of yarn tog throughout. Garment is assembled
                                                                                from squares that are crocheted together.

                                                                                Basic Motif (see stitch diagram, page 11)
                                                                                With 2 strands of yarn held tog, ch 4; join with sl st to form
                                                                                ring.
Chris Hartlove

                                                                                Rnd 1: (RS) Ch 3 (counts as dc), work 15 dc into ring, sl st in
                                                                                top of beg ch-3—16 dc.
                                                                                Rnd 2: Ch 5 (counts as dc, ch 2), sk first dc, *dc in next dc, ch
                                                                                2; rep from * around, sl st in 3rd ch of beg ch-5 to join.
                           How to Crochet Granny Squares with CrochetMe: 8 Free Granny Crochet Patterns
                                       ©2010 Interweave Press, LLC | Not to be reprinted | All rights reserved | www.crochetme.com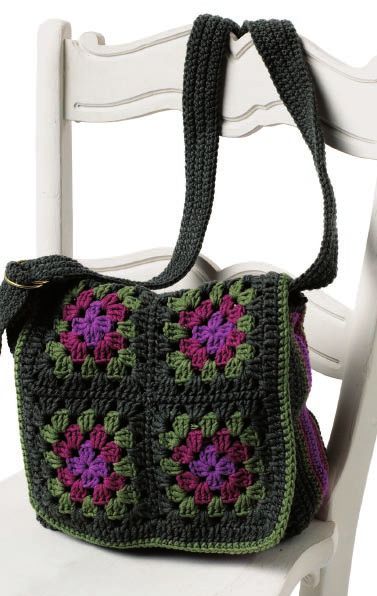
How to Crochet Granny Squares with CrochetMe: 8 Free Granny Crochet Patterns

Rnd 3: Sl st across to first ch-2 sp, ch 3 (counts as dc), 2 dc in        a ch 1 at corner of each motif. Sl st 0 (2, 3) A strips tog for
same ch-2 sp, *ch 1, sk next dc, 3 dc in next ch-2 sp; rep from *,        back. Rep for front. Lining up squares, sl st an A strip to a
ending with ch 1, sl st in top of beg ch-3 to join.                       B strip. Leave front and back A strips separate for armholes.
Rnd 4: Sl st across to first ch-sp, [ch 3, sk 3 dc, sc in next ch-sp]      Secure 1⁄2 (2, 11⁄2) squares tog at shoulders, leaving center open
twice, (ch 6, sk 3 dc) for corner, sc in next ch-sp, *[ch 3, sk 3 dc,     for neckline. Pullover is 3 (4, 5) squares across the back and 3
sc in next ch-sp] 3 times, (ch 6, sk 3 dc) for corner, sc in next         (4, 5) squares down from shoulder.
ch-sp; rep from * twice more, ch 3, sl st in beg sc to join.
Rnd 5: Sl st across to first ch-sp, ch 3 (counts as dc), 2 dc in
same ch-sp, sk next sc, 3 dc in next ch-sp, *sk next sc, (3 dc, ch        Sleeves
2, 3dc) in corner ch-lp, [sk next sc, 3 dc in next ch-sp] 3 times;        Sl st 2 (3, 4) A squares tog into a strip. Make 2 (3, 3) strips for
rep from * twice more, sk next sc, 3 dc in next ch-sp, sl st in top       each sleeve. Sl st 2 (3, 3) strips tog along one long edge for sleeve.
of beg ch-3 to join.                                                      Fold 1 square in half diagonally for gusset. Sl st 1 side of gusset
Fasten off.                                                               square to last motif at one end of sleeve. Sl st adjacent side of
                                                                          gusset square to first motif at same edge of sleeve. Gusset square
                                                                          fits diagonally into end of sleeve and closes sleeve. Sl st rem motifs
Pullover                                                                  of sleeve tog for sleeve seam. Sl st edge of sleeve with gusset to
Make 6 (8, 10) motifs each with B and C. Make 16 (32, 56)                 front and back armhole edges. Rep for opposite sleeve.
motifs with A. Arrange B motifs into a strip of 6 (8, 10). With
RS facing, sl st in each st of both squares to secure tog. Sl st first
and last motif tog along rem edge to make a lp.                           Finishing
Size 21" only:                                                            With RS facing, join A at shoulder edge and sc evenly around
Arrange 3 (4, 5) C squares into a strip and sl st tog. Rep to make        neckline. Work 1 row of rev sc (see Glossary). Fasten off. Bottom
a second C strip.                                                         ruffle: With RS facing and C, sc evenly along bottom edge of
Sizes 28 (35)" only:                                                      pullover. Turn. Next row: *Sl st in next st, ch 20, sl st into same
Arrange C motifs into a strip of 6 (8, 10). With RS facing, sl st         st, sc in next st; rep from * around lower edge of pullover. Fasten
in each st of both squares to secure tog. Sl st first and last motif       off. Sleeve ruffle: With RS facing and A, sc evenly along bottom
tog along rem edge to make a circle.                                      edge of sleeve. Turn. Next row: *Sl st in next st, ch 15, sl st into
All Sizes:                                                                same st, sc in next st; rep from * around lower edge of sleeve. With
Arrange 3 (4, 5) A squares into a strip and sl st tog. Rep to             yarn threaded on a tapestry needle, weave in loose ends.
make 2 (4, 6) A strips. With RS facing, sl st C strips to one
long edge of B band, lining up corners. Do not attach C strips            VALENTINA DEVINE designs colorful crochetwear in New
to each other on smallest size. To keep corners lying flat, work           Mexico.

Child’s Boho Blocks Pullover                                presented by crochetme!                                                         10
How to Crochet Granny Squares with CrochetMe: 8 Free Granny Crochet Patterns
Basic Motif
5
chain (ch)
slip st (sl st)
4
single crochet (sc) 3
double crochet (dc) 2
1
4
7 (101⁄2, 14)" 7"
18 (26.5, 35.5)cm 18 cm
9 (18, 18)cm
31⁄2 (7, 7)"
Fronts & Back
53.5 (71, 89)cm
21 (28, 35)"
7 (101⁄2, 101⁄2)"
18 (26.5, 26.5)cm
101⁄2 (14, 171⁄2)"
26.5 (35.5, 44.5)cm
Child’s Boho Blocks Pullover presented by crochetme! 11K aleidoscope Scarf
design by Judith L. Swartz
Originally published in Hip to Crochet (Interweave, 2004)
You can have it all with this scarf—the intricacy of modular motifs, the softest, most
delicate yarn imaginable, and vibrant color combinations that are both gossamer and bold.
Finished Size: About 7" wide, 60" long after blocking.
Yarn: K1C2 Douceur et Soie (70% baby mohair, 30% silk; 225
yd [205 m]/25 g; ): 1 ball each #8243 soft sunrise (A), #8248
velvet rose (B), #8352 coral (C), #8249 deep garnet (D), #8254
burgundy (E).
Hook: Size B/1 (2.25 mm). Adjust hook size if necessary to
obtain correct gauge.
Notions: Yarn needle.
Gauge: One motif = 2 1 ⁄ " (6.5 cm) square before blocking,
1
4
with size B/1 (2.25 mm) hook.
Skill Level: Easy.
Notes:
The scarf is made up of 40 repeats of the Sow Thistle Square
Motif—8 squares each, worked in five different color combinations.
For each motif the colors are separated as follows: Use the first
color to make the foundation chain and work Round 1. Change
to the second color and work Round 2. Change to the third color
and work Rounds 3 and 4.
See a guide to creating motifs on page 14.
For Motif Colors and
Overall Color Placement
Motif 1—colors A (first color), B (second color), C (third color)
Motif 2—colors B (first color), C (second color), D (third color)
Joe Coca
Motif 3—colors C (first color), D (second color), E (third color)
Motif 4—colors D (first color), E (second color), A (third color)
Motif 5—colors E (first color), A (second color), B (third color)
How to Crochet Granny Squares with CrochetMe: 8 Free Granny Crochet Patterns
©2010 Interweave Press, LLC | Not to be reprinted | All rights reserved | www.crochetme.comHow to Crochet Granny Squares with CrochetMe: 8 Free Granny Crochet Patterns
Sow Thistle Square Motif at each corner; end rnd with 7 dc, ch 3, attach to top of beg
ch with sl st. Fasten off.
Foundation Ring: Use the first color of the motif being worked, Weave in loose ends and block.
ch 4 sts, join with sl st to form a ring.
Rnd 1: Ch 4 (counts as 1 dc and 1 ch), work (1 dc, ch 1) judith L. Swartz is author of Interweave’s Hip to Crochet
11 times into the ring, sl st to third st of ch 4. Fasten off as and Getting Started Crochet.
follows: Cut yarn leaving 4" (10 cm) tail, insert tail through
last lp on hook and pull to tighten.
Rnd 2: With second color, join yarn into ch sp, ch 3, dc2tog
(see Glossary) in same sp (counts as dc3tog), (ch 3, dc3tog (see
Glossary) into next space) 11 times, ch 3, sl st to top of first
cluster. Fasten off.
Rnd 3: With third color, join yarn into ch-3 sp, ch 1, 1 sc in 1 2
same sp, (ch 5, 1 sc into next ch-3 sp) 11 times, ch 2, 1 dc Motif 1: 4 3
into first sc. Colors A, B, C 5 1
Rnd 4: Cont with third color, ch 1, 1 sc into same ch-5 sp, 3 2
*ch 5, sc 1 into next ch-5 sp, ch 1, [5 dc, ch 3, 5 dc] into next 4 5
ch-5 sp, ch 1, sc 1 into next ch-5 sp*; rep from * to * 3 more
1 2
times omitting sc 1 at the end of last rep, sl st to first sc to Motif 2:
join. Fasten off. Colors B, C, D 4 3
Beg at one end of the placement chart, work the motifs 5 1 60"
152.5 cm
following the chart. The motifs are joined together at the 3 2 Measurement
corners and midpoints when working the final round of 4 5 includes
border edging
each motif. Note: First motif is worked in its entirety but Motif 3: 1 2
Colors C, D, E
subsequent motifs are joined during the last round. To join 4 3
motifs, on Rnd 4 attach at corners by inserting the hook 5 1
through corner sp of the previous motif before completing ch
3 2
3, and at the side centers by inserting the hook through ch-5
sp of previous motif before completing ch 5. Motif 4: 4 5
Colors D, E, A
1 2
4 3
Finishing 5 1
Border: Motif 5: 3 2
Colors E, A, B
Rnd 1: With RS of work facing, attach color B at upper right-hand 4 5
corner with sl st. Work 1 sc over sl st, *ch 5, sk 3 ch or sts, sc 1 into 7" 18 cm
next st or ch, working into half of ch or entire st accordingly*; rep
from * to * around edge of scarf, adjusting the chains if necessary
so that there is a ch 1 in each corner, end rnd with ch 2, 1 dc in
first sc.
Rnd 2: Ch 3, work 6 dc in same sp, *ch 1, work 1 sc in next ch-5
sp, ch 1, work 7 dc in next ch-5 sp*; rep from * to * around edge,
bookEXCERPT
working corners as follows: On last ch-5 sp per side work 7 dc, Find more
ch 3, work 7 dc in first ch-5 sp of next side. Cont working as great designs
established around the scarf edge. Complete the rnd by working in Hip to Crochet
ch 1, then 1 dc in top of starting ch. Fasten off.
published
Rnd 3: Attach color D at corner sp. Ch 3, work 6 dc in same
sp, *ch 1, work 1 sc in fourth dc of previous row, ch 1, work by Interweave
7 dc in sc from previous row*; rep from * to * around entire (2004)
edge of scarf, and working (7 dc, ch 3, 7 dc) in the same space
Kaleidoscope Scarf presented by crochetme! 13How to Crochet Granny Squares with CrochetMe: 8 Free Granny Crochet Patterns
Creating Motifs
Motifs form the basis of modular crochet and offer
versatility in design, shape, color, and texture.
From a practical standpoint, motifs make big
crocheted pieces portable without your feeling
engulfed by them. Motifs also provide an easy
way to vary colors and add interest to a total piece.
Although motifs can take on any finished form from
geometric granny squares to organic shapes like flowers,
they all begin from a circle which, within a series of rounds,
is transformed into a square, hexagon, or triangle. For the
designer, the challenge within this shape change is to create
a pleasing pattern that balances increases per round with
decorative stitches to keep the work from rippling or curling
while it maintains design integrity.
The next challenge is joining the motifs into one unified fabric. Motifs can be
completed and sewed together, usually with a whipstitch (Figure 1). This method
works best when the motif has straight sides that can be easily aligned; the typical
granny square is an example. When a motif has lacy edges, it is more easily crocheted
together by working the first motif in its entirety, and then joining motifs as you work.
You can also join elements by crocheting them together with a chain that alternately
slip stitches to adjacent motifs at regular intervals, thereby creating a lacy effect that
becomes part of the design (Figure 2).
Figure 1 Figure 2
sourceEXCERPT
Find more
great information
in Hip to Crochet
published
by Interweave
(2004)
Kaleidoscope Scarf presented by crochetme! 14Four Corners Headband
design by MK Carroll
Originally published in Knitscene, Winter 2007 / Spring 2008
Each motif takes an average of ten to fifteen minutes to crochet, and with some quick
finishing, you could have one of these to match every outfit.
Finished Size: 16" long and 21⁄2" wide, not including ties.
Yarn: Morehouse Merino Undyed 2-ply Sportweight
(100% wool; 220 yd [201 m]/57 g; ): White: 1 skein will make
2 wrap headbands. Headband shown was dyed after chrocheting.
See Knitscene, Winter 2007 / Spring 2008 for article on dyeing
with food coloring.
Hook: Size E/4 (3.5 mm) crochet hook.
Notions: Yarn needle.
Gauge: Square Motifs = 21⁄4" × 21⁄4"; triangular motifs = 21⁄2"
each side.
Skill Level: Easy.
Notes:
Each headband is made up of 5 square motifs and 2 triangular
motifs.
Square Motifs (make 5)
Ch 3, join with sl st to form ring.
Rnd 1: Ch 2, 12 dc into ring, sl st to top of turning ch.
Rnd 2: Ch 2, 2 dc in each st around, sl st in top of turning ch—24
dc.
Rnd 3: Ch 2, *(2 dc, tr, 2 dc) all in next st, dc in each of next 5 sts;
rep from * 3 times, sl st in top of turning ch—36 dc plus 4 ch-2
corner spaces. Fasten off.
Joe Hancock
Triangular Motifs (make 2)
Ch 3, join with sl st to form ring.
Rnd 1: Ch 2, 12 dc into ring, sl st in top of turning ch.
How to Crochet Granny Squares with CrochetMe: 8 Free Granny Crochet Patterns
©2010 Interweave Press, LLC | Not to be reprinted | All rights reserved | www.crochetme.comHow to Crochet Granny Squares with CrochetMe: 8 Free Granny Crochet Patterns
Rnd 2: Ch 2, 2 dc in each st around, sl st in top of turning
ch—24 sts.
Rnd 3: Ch 2, *(2 dc, tr, 2 dc) all in next st, dc in each of next 7 sts;
rep from * 2 times, sl st in top of turning ch—33 dc plus 3 ch-2
corner spaces. Fasten off.
Finishing
Seam one triangle motif, 4 square motifs and 1 triangle motif
tog, either by sewing, slip stitching, or single crocheting. When
seaming tog the last square and triangle, at the end of the seam
turn the work and sc along the edge of the joined motifs. Cont
down to the point of a triangle. To make tie: Sl st into st at point
of triangle, then ch 50. Skip first ch st and sl st in rem ch, then sl
st into the st at the point of the triangle again. Cont to sc along
the edge of the joined motifs to the point of the second triangle
and make a second tie. Sc to beg of sc edge and fasten off. Weave
in all ends.
MK CARROLL continues to design answers to the question
"but what can you knit/crochet in Hawaii?" You can find her
online at www.mkcarroll.com.
RISK-FREE
TRIAL OFFER
P IECEW ORK I S A UNIQUE MAGAZINE FOR THOSE
WHO LOVE ALL FORMS OF NEEDLEWORK.
Every issue will bring you well-researched stories, beautiful projects to
make, and a historical perspective you won’t find anywhere else!
“I have been a subscriber since the very first issue of PIECEWORK.
Thank you for the best needlework publication ever.”
-Patricia Anker, Glenwood IL
Take advantage of this risk free offer and send for your first issue today!
interweave.com/go/pwkd
Four Corners Headband presented by crochetme! 16Bangle Bracelet
design by Marilyn Murphy
Originally published on Knitting Daily.com, Fall 2006
Crocheted accessories are everywhere right now. The inspiration for this
bracelet came from my love for bangle bracelets and the ability to size it simply by increasing or
decreasing motifs. Plus it was fast and portable to work on while I was traveling.
Finished Size: 9" wrist circumference. Size is adjustable by
adding or subtracting motifs.
Yarn: Aunt Lydia’s Classic Crochet Thread, Size 10 (100%
mercerized cotton; 320 yd [350 m]; ): #421 goldenrod (A), #492
burgundy (B), #131 fudge brown (C), 1 ball each. Yarn distributed
by Coats & Clark.
Hook: Size 6 (1.75 mm) steel hook. Adjust hook size if necessary
to obtain correct gauge.
Notions: Small yarn needle; spray starch.
Gauge: One square = 1½".
Skill Level: Easy.
Stitch Guide
Square motif: With A, ch 5; join with sl st to form ring.
Rnd 1: Ch 3 (counts as dc), 2 dc in ring, [ch 2, 3 dc in ring] 3 times,
end ch 2, join with sl st to top of beg ch-3.
Fasten off.
Rnd 2: Join B in any ch-2 sp, ch 3 (counts as dc), (2 dc, ch 2, 3 dc)
in same sp (first corner made), *ch 1, (3 dc, ch 2, 3 dc) in next ch-2
sp (corner made); rep from * 2 times, end ch 1, join with a sl st to
top of beg ch-3.
Fasten off.
Rnd 3: Join C in any ch-2 sp, ch 3 (counts as dc), (2 dc, ch 2, 3 dc) in
same sp (first corner made), ch 1, 3 dc in next ch-1 sp, ch 1, *(3 dc, ch
2, 3 dc, ch 1) in next ch-2 sp (corner made), (3 dc, ch 1) in next ch-1
sp; rep from * 2 times, ending with sl st in top of beg ch-3.
Fasten off.
How to Crochet Granny Squares with CrochetMe: 8 Free Granny Crochet Patterns
©2010 Interweave Press, LLC | Not to be reprinted | All rights reserved | www.crochetme.comHow to Crochet Granny Squares with CrochetMe: 8 Free Granny Crochet Patterns
Bracelet square with the first square to create a circle. Border: With C,
Measure the circumference of your wrist and add 1" to determine work 1 rnd sc in each dc and ch-sp around one edge of bracelet.
the number of squares to make. The bracelet should be able to slide Fasten off. Rep border around other edge. Fasten off.
over your hand and fit comfortably on your wrist. Bracelet shown
is made of six squares. Each square is 1½" wide, so determine Finishing
the number of squares needed to match your measurement. Join With yarn threaded on a tapestry needle, weave in loose ends.
squares: Take 2 squares and with WS facing, hold them tog, Stiffen bracelet using a spray starch.
one on top of the other. With C, sc through both thicknesses in
each dc and ch-sp. Fasten off. Take next square and rep the same MARILYN MURPHY is Consulting Executive Editor of
joining process until all squares are joined. Connect the final Interweave Crochet.
presents...
Learn to master crochet motifs with this video workshop featuring Kristin Omdahl.
Invite Kristin into your home with over an hour of one-on-one crochet
Omdahl walks you through the wide variety of crochet motifs, their
various methods of construction, how to join motifs, how to add col-
orwork to your motif designs, and even how to use these motifs
as edgings. With Omdahl’s help, you’ll begin designing crochet
motifs with ease.
Each lesson is explained with step-by-step instructions,
and Omdahl offers her tips and secrets for:
a how to crochet round, medallion, square, and hexagon-shaped motifs
a how to read crochet charts and their symbols
a how to work crochet motifs in the round
a how to expand motifs as design elements
a and more.
If you want to increase your crochet expertise and begin designing with motifs,
Innovative Crochet: Motifs with Kristin Omdahl is the DVD for you. You’ll be so
inspired by Omdahl’s many examples of garments that utilize the different shapes
of motifs, you’ll be designing your own crochet motif designs in no time.
Running time: 64:00 minutes
$19.95
Bangle Bracelet presented by crochetme! 18Beaux Jestes Socks
design by Tracy St. John
Originally published in Interweave Crochet, Fall 2008
These cozy socks bring to mind afghans from eras passed, comforting and nostalgic.
Choose one cuff option for both socks or make one of each for a playful pair. Both options use
the same instructions for the foot portion, which is easily tailored to fit the length of your foot.
Finished Size: Women’s shoe size 6–8. Adjust length for larger
or smaller size.
Yarn: Brown Sheep Wildfoote Luxury Sock Yarn (75% washable
wool, 25% nylon; 215 yd [197 m]/13⁄4 oz [50 g]; ): #SY27 pine
tree (MC), #SY45 goldenrod, #SY41 dark carmel, #SY12 bark
cloth, #SY28 blue flannel, 1 skein each.
Hook: Size C/2 (2.5 mm). Adjust hook size if necessary to obtain
correct gauge.
Notions: Removable markers (m); yarn needle.
Gauge: 26 sts and 20 rows = 4" in hdc.
Skill Level: Intermediate.
Notes:
Begin with one of two cuff options (granny square or ripple), then
cont with the same sock patt.
Stitch Guide
Picot: Ch 3, sl st in 3rd ch from hook.
Hdc2tog: [Yo, insert hook in next st, yo and pull up lp] 2 times (5
lps on hook), yo and draw though all lps on hook.
Pamela Bethel
Granny Square Cuff
Granny Square Motif (make 12, using all 5 colors in a random
manner, 2 colors per square). With color of choice, ch 5, sl st
in first ch to form ring.
How to Crochet Granny Squares with CrochetMe: 8 Free Granny Crochet Patterns
©2010 Interweave Press, LLC | Not to be reprinted | All rights reserved | www.crochetme.comHow to Crochet Granny Squares with CrochetMe: 8 Free Granny Crochet Patterns
Rnd 1: Ch 3 (counts as dc here from * until 8 sts rem, 3 dc
and throughout), 2 dc in ring, in next st, dc in next 5 sts, sk
[ch 2, 3 dc in ring] 3 times, ch next st, dc in last st changing
2, sl st in 3rd ch of beg ch-3 to to new color, turn.
join. Fasten off. Rep Row 2 until cuff measures
Rnd 2: Join new color in any 3". Note: A row of sc may be
ch-2 sp, ch 3, [2 dc, ch 2, 3 dc] substituted for a row of dc as
in same ch-2 sp as join, *ch 1, desired. For sc row, work ch-1
[3 dc, ch 2, 3 dc] in next ch-2 rather than ch-3 for tch. Next
sp; rep from * 2 more times, row: Ch 4 (counts as tr), dc in
ch 1, sl st in 3rd ch of beg ch-3 next 3 sts, hdc in next 2 sts, sc
to join. in next st, *sl st in next st, sc
Fasten off, leaving long tail in next st, hdc in next 2 sts, dc
for sewing. Sew squares into in next 3 sts, tr in next 2 sts,
2 strips of 6 squares each, dc in next 3 sts, hdc in next
then sew strips tog along their 2 sts, sc in next st; rep from *
length. Sew short edges tog to 3 more times ending last rep
form cuff. Mark this seam as with dc in next 3 sts, tr in last
center back of cuff. st. Fasten off.
Top cuff edging: Determine which side of cuff is RS (whichever side appeals
Rnd 1: With RS facing, join color of choice anywhere along visually). Place RS tog and sew short ends of cuff tog. It will
either edge of cuff (this is now the top of cuff), ch 1, sc back look best if using ends from color changes to match colors
lp only (blo) in each dc and ch-sp around, sl st with new color while seaming. Mark seam as center back of cuff.
in beg sc to join (fasten off old color), do not turn. Top cuff edging:
Rnd 2: Ch 1, sc blo around, inc or dec as necessary to end up Rnd 1: With RS facing, join color of choice anywhere along
with 64 sc total, sl st in beg sc to join, changing colors as in foundation edge of cuff, ch 1, working in bottom ridge lp of
rnd 1, do not turn. foundation ch, sc in each ch, sl st in beg sc to join, changing
Rnd 3: Ch 1, *sc blo in next 4 sts, picot (see Stitch Guide); rep to new color, do not turn.
from * around, sl st in beg sc to join. Fasten off. Rnd 2: Ch 1, sc back lp only (blo) in each sc around, inc or
Bottom cuff edging: dec as necessary to end up with 64 sts total, sl st in beg sc to
Rnd 1: With RS facing, join color of choice anywhere along join, changing to new color, do not turn.
bottom edge of cuff, ch 1, sc blo in each dc and ch-sp around, Rnd 3: Ch 1, *sc blo in next 4 sts, picot (see Stitch Guide); rep
sl st with new color in beg sc to join (fasten off old color), do from * around, sl st in beg sc to join. Fasten off.
not turn. Bottom cuff edging:
Rnd 2: Ch 1, sc blo around, inc or dec as necessary to end Rnd 1: With RS facing, join color of choice anywhere along
up with 60 sc total, sl st in beg sc to join. Fasten off. Skip straight edge of cuff, ch 1, sc blo around, sl st in beg sc to
to Foot. join, changing to new color, do not turn.
Rnd 2: Ch 1, sc blo around, inc or dec as necessary to end up
with 60 sc total, sl st in beg sc to join. Fasten off.
Ripple-Stitch Cuff
With color of choice, loosely ch 61.
Row 1: Working through both lps of each ch, sc in 2nd ch Foot
from hook and in next 5 ch, *3 sc in next ch, sc in next 6 ch, Heel flap:
sk 2 ch, sc in next 6 ch; rep from * until 7 ch rem, 3 sc in Row 1: With RS facing, join color of choice at bottom
next ch, sc in each ch to end, changing to new color in last st edge of cuff 15 sts to right of center back, ch 1 (does not
(fasten off old color), turn. count as st), sc blo in next 30 sts, turn leaving rem sts
Row 2: Ch 3 (counts as dc), sk first 2 sts, dc in next 5 sts, *3 unworked—30 sc.
dc in next st, dc in next 6 sts, sk 2 sts, dc in next 6 sts; rep Rows 2-15: Ch 1 (does not count as st), sc across, turn.
Beaux Jestes Socks presented by crochetme! 20How to Crochet Granny Squares with CrochetMe: 8 Free Granny Crochet Patterns
Turn heel: than desired sock length.
Row 1: (WS) Ch 1 (does not Change to desired color for
count as st), sc in next 15 sc, toe when working sl st of final
sc2tog (see Glossary), sc in rnd, fasten off MC.
next sc, turn leaving rem sts Toe shaping:
unworked. Rnd 1: Ch 1, *sc to 2 sts before
Row 2: Ch 1 (counts as sc marked st, sc2tog, remove m,
here and for remainder of heel sc2tog over marked st and
turning), sk first sc, sc in next 2 next st, replace m in dec st;
sc, sc2tog, sc in next sc, turn. rep from * 1 time, sc to end,
Row 3: Ch 1, sk first sc, sc in sl st in beg sc to join, turn—2
next 3 sc, sc2tog (working first sts dec’d.
st of dec in ch from last row Rnd 2: Ch 1, sc around, sl st
and 2nd st in next available st in beg sc to join, turn.
from Row 15 of heel flap), sc in Rep Rnds 1–2 six times. Rep
next sc, turn. Rnd 1 four times—12 sc rem.
Row 4: Ch 1, sk first sc, sc in Fasten off, leaving a long tail
next 4 sc, sc2tog as in Row 3, to sew opening shut. Beg at
sc in next sc, turn. one m and working toward
Rep Row 4, adding 1 more st before dec in every row, until other m, with yarn needle sew opening shut, making sure
all sts from Row 15 of heel flap have been worked. Next row: to properly align the seam with the toes.
Ch 1, sc across Rem 16 sc. Fasten off.
Instep and gusset shaping:
With RS facing, join MC in 9th st of last row of turned heel
Finishing
(center of heel), ch 1 (does not count as st), sc in next 8 sc, Weave in loose ends. Block lightly according to yarn-label
work 15 sc evenly spaced along side edge of heel flap. instructions.
Rnd 1: Sc in same instep st as last st of first row of heel flap, place
marker (pm), sc blo in next 30 instep sts, sc in same instep st as Tracy St. John spends most of her time crocheting and
first st of first row of heel flap, pm, work 15 sc evenly spaced trying to convince her son that her light-up crochet hook is not
along 2nd side edge of heel flap, sc in rem 8 sc of back of heel, sl a lightsaber.
st in beg sc to join, turn. Note: There should now be 23 sc from
center-back heel to (but not including) the first marked st, 30
instep sts to (but not including) the 2nd marked st, and 23 sts to
the center-back heel. Center-back heel is now beg of rnd.
Rnd 2: Ch 1 (does not count as st for remainder of patt), *hdc
to 2 sts before marked st, hdc2tog (see Stitch Guide), remove
m, hdc in marked st, replace m, hdc2tog; rep from * 1 time,
hdc to end, sl st in beg hdc to join, turn.
Rnd 3: Rep Rnd 2.
Rnd 4: Ch 1, hdc to 2 sts before marked st, hdc2tog, remove
m, hdc in marked st, replace m, hdc in each st to next marked
st, remove m, hdc in marked st, replace m, hdc2tog, hdc to
end, sl st in beg hdc to join, turn.
Rep Rnd 4 six times. You should now have 15 sts from center-
back heel to (and including) first marked st, 27 sts to (and
including) next marked st, and 14 sts to center-back heel—56
sts. Next rnd: Ch 1, hdc around, sl st in beg hdc to join, turn.
Be sure to cont marking the 2 side sts throughout. Rep last rnd
until foot measures 61⁄2" from last row of heel flap or 2" shorter
Beaux Jestes Socks presented by crochetme! 21Gladiolus Vest
design by Robyn Chachula
Originally published in Interweave Crochet, Summer 2008
Inspired by the shape of a gladiolus flower, designer Robyn Chachula mimicked
the sharp points at the tips of the petals on the square motifs composing this vest. Each point is
joined to the next to create a geometric fabric with subtle texture and flattering drape. Short tabs
are used in the stylish buckle closure.
Finished Size: 34 (37, 421⁄2, 461⁄4)" bust circumference.
Garment shown measures 34"; 0–1" of ease is suggested.
Yarn: South West Trading Company Vickie Howell
Collection Love (70% bamboo, 30% silk; 98.5 yd [90 m]/13⁄4
oz [50 g]; ): Jack and Sally, 9 (10, 11, 12) skeins.
Hook: Sizes H/8 (5 mm) or I/9 (5.5 mm) (see Notes). Adjust
hook size if necessary to obtain correct gauge.
Notions: Yarn needle; stitch marker (m); rust-proof pins;
spray bottle; one 2 × 23⁄4" buckle.
Gauge: Width diagonally across granny square using
smaller hook = 41⁄4"; width diagonally across granny square
using larger hook = 45⁄8".
Skill Level: Intermediate
Notes:
The vest is constructed by joining granny squares tog as you
go. Use smaller hook for sizes 34 (421⁄2)" or larger hook for
sizes 37 (461⁄4)". Do not weave in ends of the granny squares
along neck and shoulder seams.
Beg with full granny squares, join according to motif-joining
diagram for your size on page 25. Cont joining three-quarter,
half, and quarter squares as indicated on diagram. Front and
back shoulders are joined at the end.
Pamela Bethel
Stitch Guide
Picot: Ch 3, sl st in first ch.
How to Crochet Granny Squares with CrochetMe: 8 Free Granny Crochet Patterns
©2010 Interweave Press, LLC | Not to be reprinted | All rights reserved | www.crochetme.comHow to Crochet Granny Squares with CrochetMe: 8 Free Granny Crochet Patterns
Granny Squares Three-Quarter Granny Square (join 6)
Ch 5, sl st in first ch to form ring.
Note: Work one full granny square, then join subsequent Row 1: (RS) Ch 6 (counts as dtr, ch 1), in ring work: 2 dc, ch
squares as you crochet foll assembly chart on page 25; read 1, *2 dc, ch 3, 2 dc, ch 1; rep from * once more, (2 dc, ch 1,
through patt before starting. dtr), turn—12 dc, 2 dtr.
Row 2: Ch 3 (counts as dc), 3 dc in next ch-1 sp, (sc, ch 3,
Full Granny Square (join 46 [46, 71, 71]) sc) in next ch-1 sp, *7 dc in next ch-3 sp, (sc, ch 3, sc) in next
Ch 5, sl st in first ch to form ring. ch-1 sp; rep from * once more, 4 dc in tch-sp, turn—22 dc.
Rnd 1: (RS) Ch 3 (counts as dc here and throughout), in Row 3-A: Ch 7 (counts as tr, ch 3), sl st in 3rd ch from hook,
ring work: dc, ch 3, 2 dc, ch 1, *2 dc, ch 3, 2 dc, ch 1; rep dc in first 2 dc, picot, dc in next 2 dc, (sc, picot, sc) in next
from * 2 more times, sl st in top of beg ch-3 to join, do not ch-3 sp, *dc in next 2 dc, picot, dc in next dc, (dc, picot, dc) in
turn—16 dc. next dc, dc in next dc, picot, dc in next 2 dc, (sc, picot, sc) in
Rnd 2: Sl st in next dc, sl st in next ch-3 sp, ch 3, 6 dc in same next ch-3 sp; rep from * once more, dc in next 2 dc, picot, dc
ch-3 sp, (sc, ch 3, sc) in next ch-1 sp, *7 dc in next ch-3 sp, (sc, in next dc, (dc, picot, tr) in top of tch—24 dc, 2 tr.
ch 3, sc) in next ch-1 sp; rep from * 2 times, sl st in top of beg Row 3-B: Work as for Rnd 3-B of full Granny Square.
ch to join, do not turn—28 dc. Fasten off and weave in loose ends.
Rnd 3-A (first square only): Ch 3, dc in next dc, picot (see
Stitch Guide), dc in next dc, (dc, picot, dc) in next dc, dc in Quarter Granny Square (join 0 [0, 2, 2])
next dc, picot, dc in next 2 dc, (sc, picot, sc) in next ch-3 sp, Ch 5, sl st in first ch to form ring.
*dc in next 2 dc, picot, dc in next dc, (dc, picot, dc) in next dc, Row 1: (RS) Ch 6 (counts as dtr, ch 1), in ring work: 2 dc, ch
dc in next dc, picot, dc in next 2 dc, (sc, picot, sc) in next ch-3 1, 2 dc, ch 1, dtr, turn—4 dc, 2 dtr.
sp; rep from * 2 times, sl st in top of beg ch to join—32 dc. Row 2: Ch 3 (counts as dc), 3 dc in next ch-1 sp, (sc, ch 3, sc)
Rnd 3-B (subsequent squares): Work as for Rnd 3-A to first in next ch-1 sp, 4 dc in ch-6 sp, turn—8 dc.
corner picot, [ch 1, sl st in corner picot of aligning square, ch 1, Row 3-A: Ch 7 (counts as tr, ch 3), sl st in 3rd ch from hook
sl st in first ch of working square] (corner picot joined), *cont (picot made), dc in first 2 dc, picot, dc in next 2 dc, (sc, picot,
in patt to next picot, join picot in same manner as corner picot; sc) in next ch-3 sp, dc in next 2 dc, picot, dc in next dc, (dc,
rep from * along edge connecting all the adjoining picots, cont picot, tr) in tch-sp—8 dc, 2 tr, 5 picots.
in Rnd 3-A to end. Row 3-B: Work as for Rnd 3-B of Full Granny Square. Fasten off.
Fasten off and weave in loose ends.
Half Granny Square (join 20 [20, 23, 23]) Seaming Shoulders
Ch 5, sl st in first ch to form ring.
Row 1: (RS) Ch 6 (counts as dtr, ch 1), in ring work: 2 dc, ch Once all squares are connected, lightly spray-block to size
1, 2 dc, ch 3, 2 dc, ch 1, 2 dc, ch 1, dtr (see Glossary), turn—8 according to schematic. Fold at underarms so that WS of
dc, 2 dtr. fronts and back are tog. Join back-shoulder granny squares to
Row 2: Ch 3 (counts as dc), 3 dc in next ch-1 sp, (sc, ch 3, sc) front-shoulder granny squares in same manner as body squares
in next ch-1 sp, 7 dc in next ch-3 sp, (sc, ch 3, sc) in next ch-1 with a sl st in each picot across. Fasten off.
sp, 4 dc in tch-sp, turn—15 dc.
Row 3-A: Ch 7 (counts as tr, ch 3), sl st in 3rd ch from hook, dc
in first 2 dc, picot, dc in next 2 dc, (sc, picot, sc) in next ch-3 Armhole Edging
sp, dc in next 2 dc, picot, dc in next dc, (dc, picot, dc) in next With RS facing and same size hook used for body, join yarn
dc, dc in next dc, picot, dc in next 2 dc, (sc, picot, sc) in next with sl st at center-bottom of underarm.
ch-3 sp, dc in next 2 dc, picot, dc in next dc, (dc, picot, tr) in Rnd 1: Ch 1, 9 sc along edge of each three-quarter granny
top of ch-3—16 dc, 2 tr. square placing marker (pm) in center st of each granny square
Row 3-B: Work as for Rnd 3-B of Full Granny Square. edge, 20 sc along edge of each half granny square, sl st in first
Fasten off and weave in loose ends. sc to join, turn—76 (76, 96, 96) sc.
Gladiolus Vest presented by crochetme! 23How to Crochet Granny Squares with CrochetMe: 8 Free Granny Crochet Patterns
Rnd 2: Ch 1, sc to first m, sc in marked sc, move m up, sk 2 marked sc, sc in each sc to next m, sk marked sc, sc in each sc,
sc, sc to next m, sc in marked sc, move m up, sk 2 sc, sc to 2 sc in each ch-3 sp to end, turn—256 (256, 334, 334) sc.
end, sl st in first sc to join, turn—72 (72, 92, 92) sc. Rnds 3–5: Ch 1, [sc to m, sk marked sc] 2 times, sc to end,
Rnd 3: Rep Rnd 2—68 (68, 88, 88) sc. Fasten off. turn—250 (250, 328, 328) sc. Fasten off.
Bottom Edging Closures
With RS facing and same size hook used for body, join yarn
With RS facing and same size hook used for body, join yarn
with sl st to center-front edge 8" up from left-front bottom
with sl st at left-front lower corner.
corner.
Row 1: Ch 1, 9 sc along edge of each quarter granny square,
Row 1: Ch 1, sc in next 5 sc, turn—5 sc.
20 sc along edge of each half granny square, turn—140 (140,
Row 2: Ch 1, sc across, turn.
178, 178) sc.
Rep Row 2 until strap measures 31⁄2".
Rows 2–5: Ch 1, sc in each sc across, turn. Fasten off.
Fasten off. Edging:
Rnd 1: With RS facing, join yarn with sl st in front panel at
corner of strap, sc evenly across length of strap, 3 sc in corner,
Neck Edging turn work 90 degrees, sc evenly across width of strap, 3 sc in
With RS facing and same size hook used for body, join yarn corner, turn work 90 degrees, sc evenly across length of strap,
with sl st at right-front lower corner. sl st in front panel at corner of strap.
Rnd 1: Ch 1, 4 sc along side of bottom edging, 9 sc along edge Fasten off. Rep for opposite side, joining yarn to WS, 8"
of each quarter granny square and 20 sc along edge of each up from right-front bottom corner. Weave in all loose ends.
half granny square; at full granny square, sc in corner picot, Weave straps through buckle to finish. Instead of buckle, use
[ch 3, sc in next picot] 4 times, cont to back neck, 9 sc along a shawl pin to close front panels at waist (optional).
edge of each three-quarter granny square placing m in center
of each edge, cont as est to bottom edge, 4 sc along side of Robyn Chachula is the author of Blueprint Crochet
bottom edging, turn—234 (234, 312, 312) sc, 8 ch-3 sps. (Interweave, 2008) and Baby Blueprint Crochet (Interweave,
Rnd 2: Ch 1, sc in each sc, 3 sc in each ch-3 sp to m, sk 2010).
Quarter Granny Square Half Granny Square Three-Quarter Granny Square Full Granny Square
3 3
3
2
1 1 1
2
2 1 3
2
chain (ch) sc3tog
slip stitch (sl st)
dc-cl Edging
single crochet (sc)
half double crochet (hdc)
Joining
dc5tog Granny Squares
3
double crochet (dc)
foundation 2
1
double crochet
treble crochet (tr)
double treble (dtr)
Gladiolus Vest presented by crochetme! 24How to Crochet Granny Squares with CrochetMe: 8 Free Granny Crochet Patterns
granny square half granny square three-quarter granny square quarter granny square
42½ (46¼)" Body Layout 4¼,(4�⁄�)"
11 (12) cm 4¼, (4�⁄�)"
17, (18½)" 11 (12) cm
43 (47) cm
2�⁄�, (2�⁄��)"
5 (6.5) cm
21.5 (23.5) cm
8½, (9¼)"
37.75 (41) cm
14�⁄�, (16�⁄��)"
Front Back Front
38¼, (41�⁄�)"
97 (106) cm
34 (37)" Body Layout
2�⁄�, (2�⁄��)"
12¾, (13�⁄�)" 4¼, (4�⁄�)" 5 (6.5) cm
32 (35.5) cm 11 (12) cm 2�⁄�, (2�⁄��)"
5 (6.5) cm
16.5 (18) cm
6�⁄�, (6��⁄��)"
37.75 (41) cm
14�⁄�, (16�⁄��)"
Front Back Front
29¾, (32�⁄�)"
75.5 (82.5) cm
Gladiolus Vest presented by crochetme! 25How to Crochet Granny Squares with CrochetMe: 8 Free Granny Crochet Patterns
Glossary
Chain (ch)
Abbreviations Make a slipknot on hook, *yarn over and
beg begin(s); beginning draw through loop of slipknot; repeat from
bet between * drawing yarn through last loop formed.
blo back loop only
CC contrasting color
ch(s) chain Slip Stitch (sl st)
cm centimeter(s)
cont continue(s); continuing *Insert hook in stitch, yarn over and
dc double crochet draw loop through stitch and loop on
dec(s)(’d) decrease(s); decreasing; decreased hook; repeat from *.
est established
fdc foundation double crochet
flo front loop only Single Crochet (sc)
foll follows; following *Insert hook in stitch, yarn over and pull up loop (Figure 1),
fsc foundation single crochet
yarn over and draw through both loops on hook (Figure 2)
g gram(s)
hdc half double crochet repeat from *.
inc(s)(’d) increase(s); increasing; increased
k knit
lp(s) loop(s)
MC main color
m marker Figure 1 Figure 2
mm millimeter(s)
patt(s) pattern(s)
pm place marker
p purl
Single Crochet Two Together (sc2tog)
rem remain(s); remaining Insert hook in next stitch, yarn over, pull up loop (2 loops
rep repeat; repeating on hook, Figure 1), insert hook in next stitch, yarn over, pull
rev sc reverse single crochet up loop (3 loops on hook), yarn over and draw through all 3
rnd(s) round(s) loops on hook (Figure 2)—1 stitch decreased (Figure 3).
RS right side
sc single crochet
sk skip
sl slip
sl st slip(ped) stitch
sp(s) space(es)
st(s) stitch(es) Figure 1 Figure 2 Figure 3
tch turning chain
tog together
tr treble crochet Half Double Crochet (hdc)
WS wrong side
yd yard *Yarn over, insert hook in stitch, yarn over and pull up loop
yo yarn over hook (3 loops on hook), yarn over (Figure 1) and draw through all
* repeat starting point loops on hook (Figure 2); repeat from *.
* * repeat all instructions between asterisks
( ) alternate measurements and/or instructions
[ ] work bracketed instructions a specified number of
times
Figure 1 Figure 2
Glossary presented by crochetme! 26How to Crochet Granny Squares with CrochetMe: 8 Free Granny Crochet Patterns
Glossary
Double Crochet (dc) Double Crochet Three Together (dc3tog)
*Yarn over, insert hook in stitch, yarn over and pull up loop [Yarn over, insert hook in next stitch, yarn over and pull up
(3 loops on hook; Figure 1), yarn over and draw through loop, yarn over, draw through 2 loops] 3 times (4 loops on
2 loops (Figure 2), yarn over and draw through remaining 2 hook), yarn over, draw through all loops on hook—2 stitches
loops (Figure 3); repeat from *. decreased.
Reverse Single Crochet (rev sc)
Figure 1 Figure 2
Working from left to right, insert crochet hook into an edge
stitch and pull up a loop, yarn over and draw this loop through
the first one to join. *Insert hook into next stitch to right (Figure
1), pull up a loop, yarn over (Figure 2), and draw through both
Figure 3 loops on hook (Figure 3). Repeat from *.
Treble Crochet (tr)
*Yarn over 2 times, insert hook in stitch, yarn over and pull up Figure 3
Figure 1 Figure 2
loop (4 loops on hook; Figure 1), yarn over and draw through
2 loops (Figure 2), yarn over and draw through 2 loops, yarn
over and draw through remaining 2 loops (Figure 3); repeat
from *.
Whipstitch
With right side of work facing and
working one stitch in from the edge,
Figure 1 Figure 2 bring threaded needle out from back to
front along edge of knitted piece.
Figure 3
Whipstitch Seams
Place pieces with right sides together. Hold
Double Treble Crochet (dtr) pieces with the 2 edges facing you.
Step 1: Secure seaming yarn on wrong side of
Yarn over three times and insert hook in 6th
one piece. Pass needle through pieces from
chain from hook. Draw a loop through chain—
back to front at start of seam. This creates a
5 loops on hook; [yarn over and draw through
Illustrations by Gayle Ford
small stitch to begin seam.
2 loops] 4 times.
Step 2: A little farther left, pass needle through
pieces, again from back to front, wrapping
seam edge.
Double Crochet Two Together (dc2tog) Repeat Step 2 to complete seam. Secure end
of seaming yarn.
[Yarn over, insert hook in next stitch, yarn over and pull up
loop, yarn over, draw through 2 loops] 2 times, yarn over,
draw through all loops on hook—1 stitch decreased.
Glossary presented by crochetme! 27You can also read