INSTALLATION GUIDE - Audacity Flooring
←
→
Page content transcription
If your browser does not render page correctly, please read the page content below
INSTALLATION GUIDE

I.       Before You Start / Preparations

Please read all the instructions before you begin the installation. Improper
installation will void warranty.
 Important notice

 All wood based products, even those specifically designed to have increased
 resistance to moisture, are hydroscopic (they will react to the moisture in the
 environment) and as a result will expand or contract accordingly. All sources of
 under floor moisture must be rectified prior to the installation of the floor. Any
 construction dampness must be completely dry. Although this product has been
 designed with bathroom installation in mind it is not waterproof and excessive
 wetting is to be avoided and water spillages dried immediately. It is important that
 you check each plank for any manufacturing defects. Any faults must be reported
 back to the store of purchase for an immediate refund or replacement prior to the
 flooring being installed.

     •   Calculate the room surface prior to installation and plan an extra 10% of
         flooring for waste.
     •   Keep the boards in room temperature for at least 48 hours in unopened
         package before you start the installation. The room temperature must be
         between 65-90°F / 18-32°C and the relative humidity should be maintained
         between 30-65% before, during and after the installation.
     •   Inspect your subfloor before you begin. It must be clean, dry (max. 2.5%
         moisture content - CM method) and level to 5mm (3/16") within a 10 feet / 3-
         meters span.
     •   If this flooring is intended to be installed over an existing wooden floor, it is
         recommended to repair any loose boards or squeaks before you begin
         installation.
     •   With a floating floor, you must always ensure you leave a ½” / 10mm gap
         between walls and fixtures such as pipes and pillars, stairs, etc.
         Tip: When installing around pipes, drill the holes ¾” / 20mm larger than the
         diameter of the pipes.
     •   A vapor barrier to be installed over concrete substrates. In the case
         installation is done over a wood substrate on or below-grade a vapor barrier
         must be installed if there is not a vapor barrier existing in a well-ventilated
         crawl space. A minimum 6 mil / 0.15mm plastic poly sheeting should be used
         as a moisture barrier. Note: Audacity flooring comes with a factory pre-

                                                                                         1
                              www.audacityflooring.com
attached pad to the back of planks, so no additional underlayment is
required.
• Decide the installation direction. It is recommended to install the length
direction of the planks parallel to the main light direction.
• Measure the area to be installed: The board width of the last row shall not be
less than 2” / 50mm. If so, adjust the width of the first row to be installed.
When measuring, take the free gap requirement of about ½” / 10mm of the
floor perimeter into account. In narrow hallways, install the floor parallel to
the lengthways.
• Inspect your laminate flooring. No claims on surface defects will be accepted
after installation.
• Due to the speed of sudden temperature changes, which has the potential to
negatively affect laminate flooring construction, it is not recommended to
install over any electrical radiant heating system. Installation over electrical
radiant heating systems will not be covered by the manufacturer’s warranty.
Below instructions are for radiant heating systems using water.
Ensure the radiant heat surface temperature never exceeds 81°F / 27°C.
Before installing over newly constructed radiant heat systems, operate the
system at maximum capacity to force any residual moisture from the
cementitious topping of the radiant heat system. The maximum moisture
content of the screed is 1.5% (CM method). Shut down the floor heating at
least 48 hours prior to installation. Make sure that the temperature in the
room is at least 60 °F / 15°C during installation. It is recommended that the
radiant heat be applied in a gradual manner after installing the laminate floor.
Refer to the radiant heat system’s manufacturer recommendations for
additional guidance.
Tools and Supplies Required
● Spacers ● Saw ● Adhesive Tape ● 6mil / 0.15mm (or thicker) polyurethane vapor
barrier for crawl space and concrete floor installations ● Rubber Mallet ● Ruler ●
Pencil ● Tape Measure ● Utility Knife ● Constructions Adhesive
2
www.audacityflooring.comFor Bathroom, Laundry Room or Commercial Installations
It is important to seal any cut planks to ensure superior and warranted
performance. When a flooring plank is cut to fit (either end cuts or side cuts), a
sealant is always required around the perimeter of the installation.
• Once the flooring installation is completed, a general Silicone based
sealant should be applied around the perimeter (in the expansion space at
walls). This should also include any other areas such as islands, doorways,
columns, etc. where the laminate flooring planks have been cut to fit.
• Branded and generic Silicone tubes are available and any local home
center or hardware location.
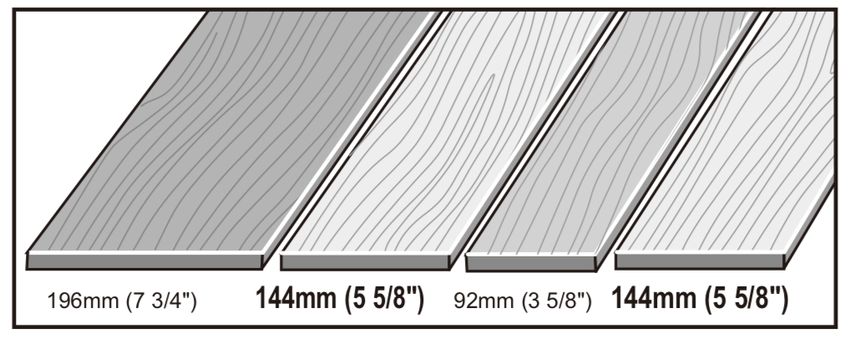
ATTENTION:
For mixed width products only.
Use a 144mm wide plank (5 5/8”) every other row.
$
NOTE: A 144mm (5 5/8") wide plank MUST be used in every other row. This
sequence must be followed throughout the entire installation.
II. Installation
1. If you are installing over a concrete subfloor, a 6-mil / 0.15mm poly (plastic
sheeting) is to be installed under the flooring.
2. Begin laying in the left-hand corner. Place the floorboard ½” / 10mm from
the left wall. Use spacers between the wall and the floorboard.
Second plank, first row: Drop the plank and gently press down the end with a
rubber mallet so it firmly locks into the previous plank until both are at the
same height. Make sure both planks are perfectly aligned.
NOTE: If you notice both planks aren’t at the same height or are not well
locked together, please follow the disassembling instructions at the bottom
of the page, disassemble and check if any debris stuck inside the lock is
obstructing.
3
www.audacityflooring.com3. At the end of the first row, leave an expansion gap of ½” / 10mm to the wall
and measure the length of the last plank to fit.
4. If cutting with a jig saw, the laminate surface should be turned down. If
cutting with a hand saw, the laminate surface should be face up.
5. Start the second row with the leftover cut part of the last plank of the
previous row. This small plank should measure at least 12” / 30cm.
Otherwise, use another plank that should be cut in two. At any case, the
short sides cut are distant from at least 30cm (12").
6. Click the long side of the plank into the previous row and place it tight to the
short end of the previous plank. Drop the plank and gently tap down the end
with a rubber mallet so it firmly locks into the previous plank until both are at
the same height. Make sure both planks are perfectly aligned and locked into
the previous row leaving no gap (refer to "Helpful Hint" at the bottom of the
page). NOTE: If you notice both planks aren’t at the same height or are not
well locked together, please follow the disassembling instructions at the
bottom of the page, disassemble and check if any debris stuck inside the lock
is obstructing.
7. After 2-3 rows. Adjust the distance to the front wall by leaving an expansion
gap of ½” / 10mm. Always ensure that the end joints are staggered at least
30cm (12"), both when in the same row as when from one row to the next
one.
8. To lay the last row: Position a loose board exactly on top of the last row laid.
Place another board on top, with the tongue side touching the wall. Draw a
line along the edge of this boards, to mark the first board. Cut along the
edge of this board to mark the first board. Cut along this line to obtain of the
required width. Insert this cut board against the wall. The last row should be
at least 2”/50mm wide. The spacers can then be removed.
9. Holes for pipes: Measure the diameter of the pipe and drill a hole that is 7/8”
/ 20mm larger. Saw off a piece as shown in the figure and lay the board in
place on the floor. Then lay the sawed-off piece in place.
10. Door molding and skirting: Lay a board (with the decorative side down) next
to the door molding and as shown in the figure. Then slide the floorboard
under molding.
III. Maintenance
• Clean the floor regularly with a vacuum cleaner or dry mop.
• If necessary, the floor may be cleaned with a wet mop and a laminate
cleaner. Avoid using too much water.
• The use of residential steam mops on this product is allowed. Use at
lowest power with a suitable soft pad, and do not hold a steam mop
on one spot for an extended period of time. Refer to the steam mop's
4
www.audacityflooring.commanufacturer instructions for proper usage.
• To protect the floor from sand we recommend you use the doormats
at entries (but do not use mats with a rubber backing).
IV. Disassembling
Separate the whole row by lifting it up delicately at an angle. To separate the
planks, leave them flat on the ground and slide them apart.
5
www.audacityflooring.comYou can also read