REVIT BASIC INTRODUCTION BArch 2019/ 2020 - Written by NADEEM HANNA
←
→
Page content transcription
If your browser does not render page correctly, please read the page content below
REVIT BASIC
INTRODUCTION BArch
        2019/ 2020

           Written by
       NADEEM HANNA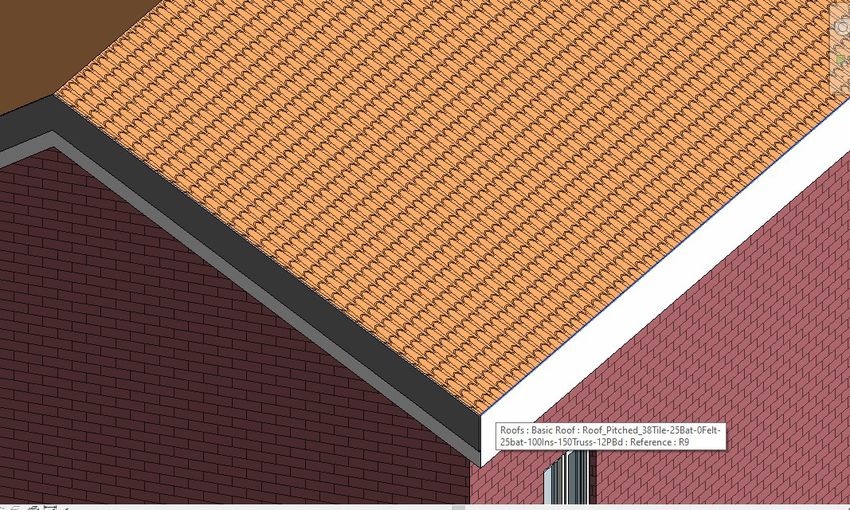
2
                                                          Some Key commands within the revit UI, make yourself familiar with these as you are working through the
                                                                                                               document, they are essential to working with revit.

User Interface

             3D View                  Thin Lines

                       Properties                                                                              Project Browser

                                                       Middle Mouse button Pan

                                                                          Middle Mouse button + Control to Orbit

                       Detail Level       Isolate
                                                Hide

                          Display Style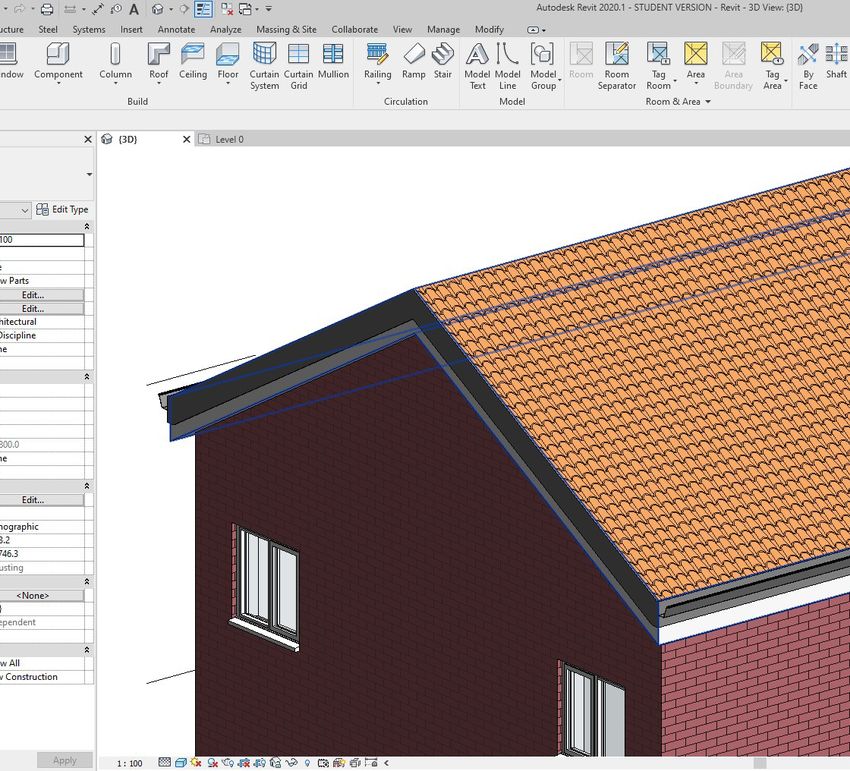
3
                                                                                  The modify tools are used to edit any of the components that have been drawn within Revit. Get familiar with
                                                                                                 them. To see how each of them work hover of them and a video should play explaining them.

User Interface                                                                                                                   The controls on the bottom left affect the visibility within revit.

                                                                               The visabiliy graphics window controls how you see things within revit. Play around it understand how to turn on
                                                                                                                                         and off elements and change there visible properties

         Align Tool, Move   Offset Tool                Temp style override
         objects together
                                Mirror Tools   Split        Measure, 2D Only
                                                                                                                       View Style      Shadows                Hide/ Isolate

                                                                                                                               Sunpaths              Tep Hide/
               Move Tool       Rotate Trim      Pin/ Lock             Draw Tools                                Detail Level                         Isolate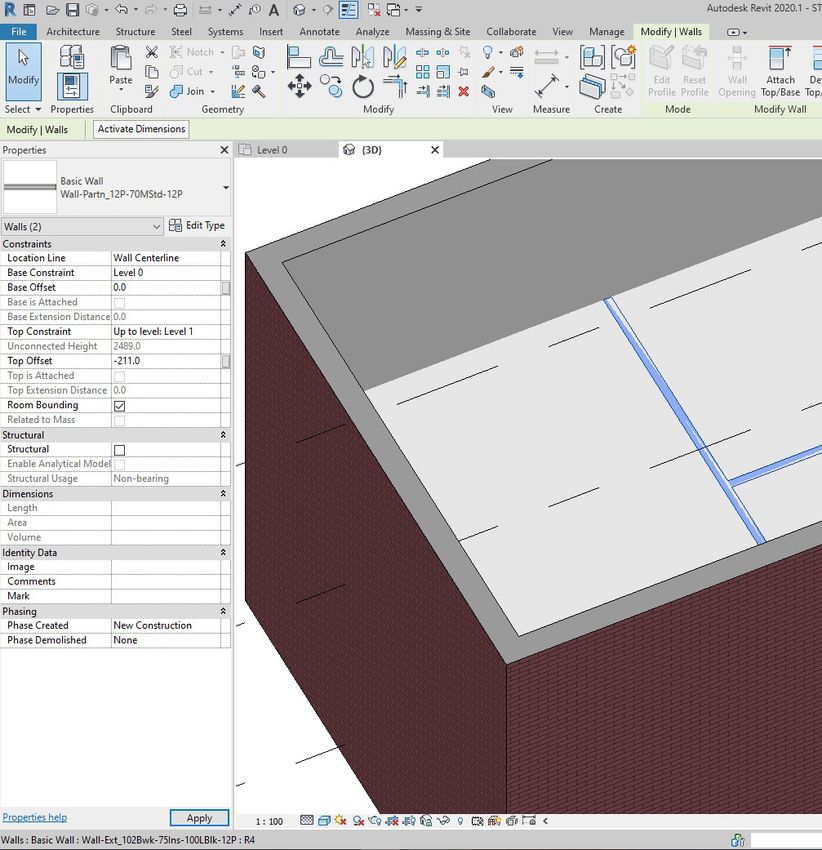
4
                                          Revit cant be installed on MAC OS

                                                  Revit Cant be down-saved
Keyboard Short-cuts and Key facts   Always download the latest Revit Version
5
           Once you open revit you should select new file. Once you have done this from the drop down select the
                                       template you wish to use. Typicality Architectural Template, and press go

Template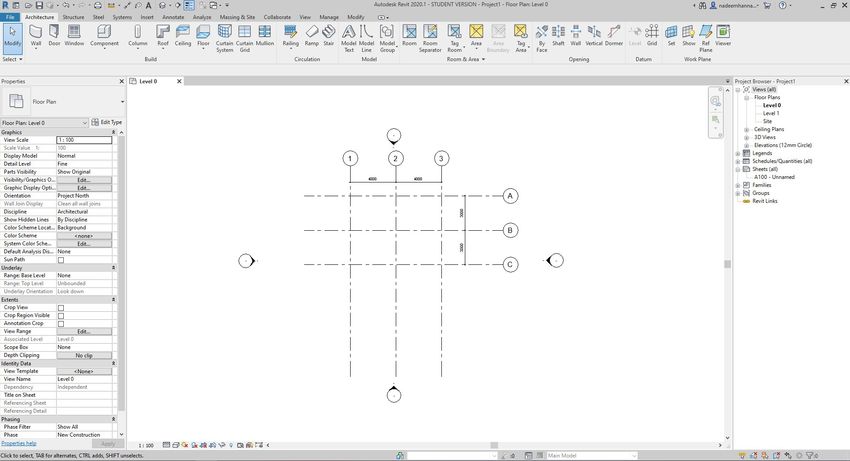
6
              Firstly we need to create a grid for any project we do. In the architecture tab press the button Grid

Create Grid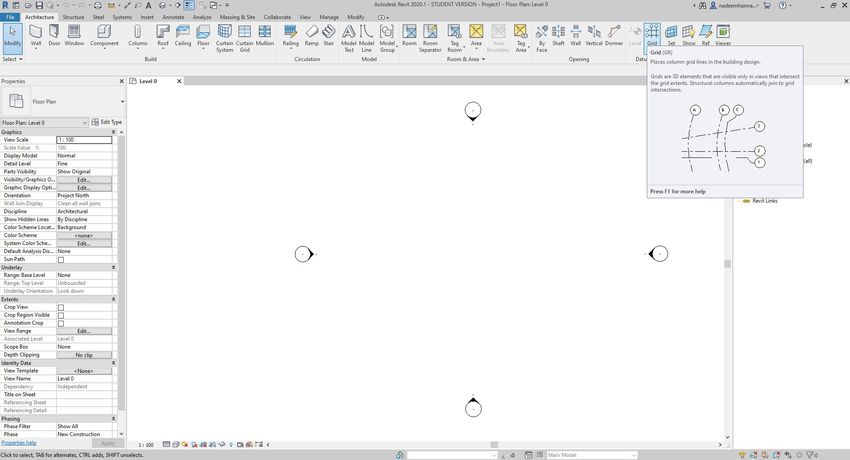
7
                               Make sure you are on the draw line command and click on the screen and drag up to draw your first grid line

Drawing a 3x3 4000x3000 Grid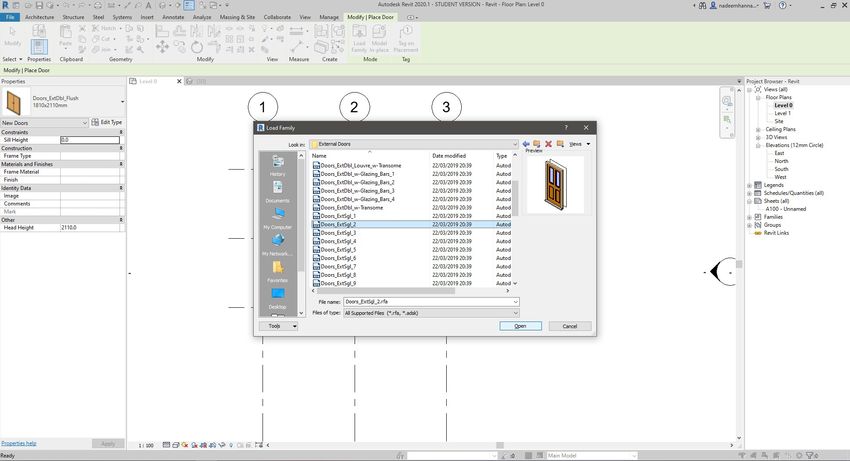
8
                               Within the draw commands select the offset line tool, this tool will draw an identical line (our case grid line) a set
                                                                                                              distance away form a selected line.

Drawing a 3x3 4000x3000 Grid                                                                     Type the offset Value of 4000 into the offset box.

                                  Click on the line you wish to offset. Make sure the light blue dashed line is at the location where you want the
                                                                         new line. This is an indicator for where the new line is going to be drawn.

                                                                                                                        Draw the Three Grid Lines.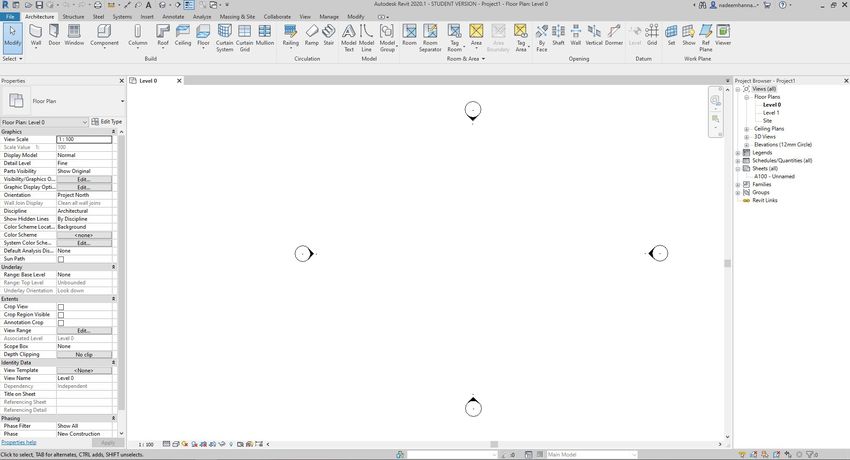
9
                               Repeat the same task again however this time draw your first grid line horizontal. Within the offset value for this
                                                                                                                  horizontal type 3000 instead.

Drawing a 3x3 4000x3000 Grid   It is normal practise for one axis of the grid line to have numbers and the other letters. To change the horizontal
                                to letters once you have drawn your first grid line double click on the number and type A. This will tell Revit you
                                                                                                  wish to use letters and it will do the rest for you.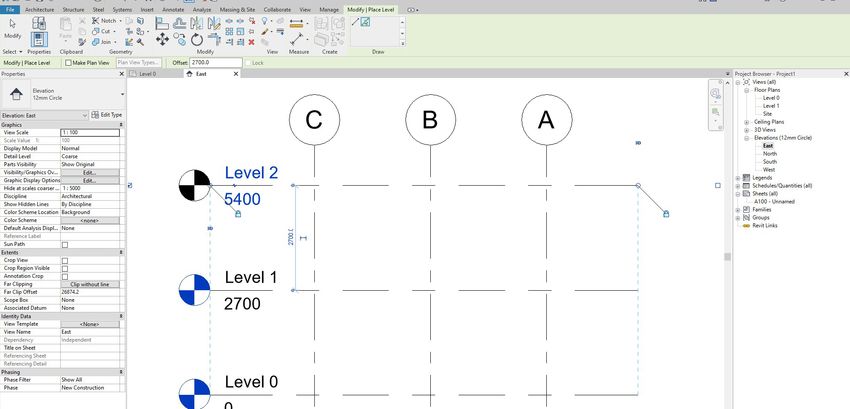
10
                                To draw Level lines you need to be in elevation view. For this within your project browser click on the elevation
                                                                                          drop down and press any election, it does not matter.

Draw Level Lines 2700 Spacing        Once you are in elevation mode, one level would have been drawn already at 4000. To change this to the
                                                                                dimension we want, double click on the 4000 and type 2700.
11
Similar to how we drew the grid, go into the architecture tab and press level.
Once you have done this press the pick line tool and in the offset box type 2700.
Draw Level Lines When drawing new levels Revit will also make new floor plan within your project browser for that level. Howev-
er you may not want that to happen. As our case we wish to draw a level to attach a roof to it however we dont
want a floor plan for the roof. In this case unchecked the make plan view box. (Levels with no Plan are Black)
Similar to the grid lines click on level one to draw the level 2 grid line above.
Use the Circles to the right to make the level lines longer .12
Go back into the floor plan and click wall from the architecture tab.
You can select the wall type from the properties (left)
Draw Wall Draw the wall around the grid, take note of the constraints set onto the wall at the top ribbon. Test these
constraint options to develop an understanding of how they are used.13
To Edit a wall press edit type within the properties browser.
BEFORE MAKING ANY CHANGES TO THE WALL YOU NEED TO DUPLICATE IT, FAILING TO DO THIS CAN
Edit Wall AFFECT EVERY WALL ASSIGNED TO THAT WALL TYPE.
To change wall build up press Edit within the structure tab, the edit assembly window should appear.
Within this window you can change the wall build up, materials/ textures , and for advanced revit users the order
and positions two walls connect at.14
To draw floors press floor within the architecture tab.
You can begin drawing the shape of the floor using the draw commands. You should notice a new command,
Floors pick wall. When drawing floors you have the ability to pick walls you wish the floor to join onto.
The properties and constraints of the floor can be changed in the same manner as we did the wall.
When done press the green tick.
Repeat step on level 1, changing the floor type within in properties drop down.15
In the same way as we drew the external walls we can draw the internal walls.
Remember when selecting the wall type to select one of the partition walls.
Internal walls To avoid the internal wall from appearing on the upper floor select the affected walls and set the top offset to
negative the thickness of the floor.16
Adding doors and windows can be done by pressing the door or window tab in the architecture tool bar.
Revit has a range of doors and windows in its library, to load these press the load family icon and locate the fam-
Doors and Windows ily you want from the pop-up browser window.
Press open when ready.17
Doors and windows are hosted on walls so to place them you need to click in the location you want the door or
window
Editing doors and windows To flip the orientation of doors and windows use the double arrow associated to that family. Alternatively use the
space bar.
To edit the size of windows and doors press edit type and change the size parameters. This is where you can
also change material,
REMEMBER TO ALWAYS DUPLICATE THE FAMILY FIRST!18
To filter the selection to all window highlight all the workspace and press filter, checking only windows.
With all windows selected click the copy icon, don’t press ctrl +C. Within the drop down menu of the paste
Copy Up all windows function click aligned to selected levels, and select the levels you want the windows to be on.
The windows will be copied up to the upper levels. This technique can be used for any families.19
To draw stairs click the stairs tab within the architecture bar. Stairs are complex so looking them up would be
beneficial. There are two types of stairs, stairs by sketch and standard stairs. Standard stairs are parametric and
understand the quantity of stars needed to reach the next level.
Stairs Around a Corner To place stairs around a corner you need to ensure the location line is set to the side you place first half of the
stair.
Once placed switch the location line to the right and draw the other half of the stair.
The bottom of the stair drawing area lets you know the number of stairs needed and the amount left.20
When drawing stairs it will pass through the upper floor. To solve this issue we need to draw a shaft which will
cut through the upper floor.
Stair Shafts and Railings Shaft can be found in the architecture tab.
When clicking shaft you get the draw commands, so with the view on level 0 draw around the staircase and
press the green tick.
The size of the shaft can be adjusted within the 3D view, using the handles.
Railings onto the exposed sides can be added through the railings node. Use the draw command to draw the
path of the railing constraining it to the 1st floor.21
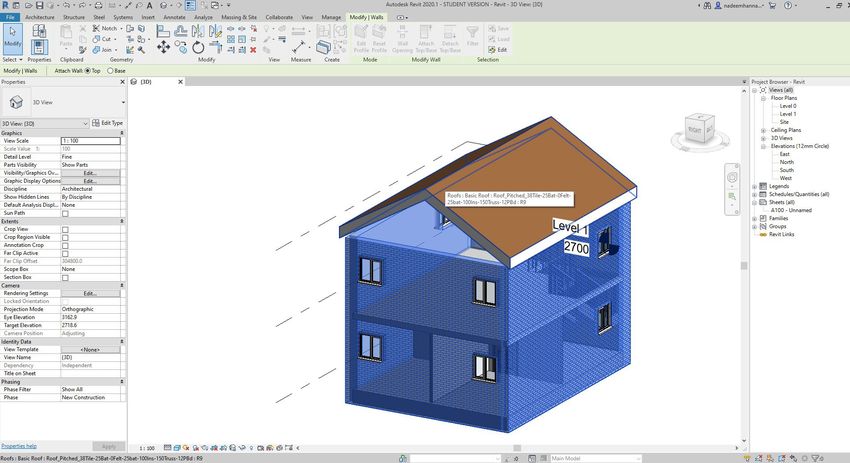
Roof can be found within the architecture tab. Click of roof by foot print, and click level 2. These are methods of
drawing roofs experiment with them.
Draw Roof Using the draw commands draw around the walls, with a 150mm offset to create an overhang.
The triangles signal there is a pitch on that side of the roof. To change the angle click on the line, it will default to
30degree. To remove the pitch highlight the lines you do not wish to pitch and click defines slopes.22
Once the roof is drawn the walls will not be attached to it.
To attach the roof click on the four exterior walls and press the attach top/ base command.
Attach Wall to Base23
Fascias and gutters can be found at the end of the roof commands.
They are profiles which can be drawn on the edges of roofs.
Fascia and Gutter24
To add furniture click on the component tab in architecture
Load the furniture family you wish in the same way as we did before and place the item in the room.
Adding and Constraining Furniture Using the dimension tool add a dimension tool add a dim from grid A - Bed Centre - Grid C and click the eq. That
will move the bed to the half way point.
Using the align tool found within the modify tab click the rear of the bed then the inner face of the wall, then the
pad lock. This will lock the face of the bed to the wall.
The bed is now constrained so when the wall or grid lines move so will the bed.25
Drawing a section click on the section button at the top
Draw the section line where you want the section to be.
Section using the blue handles you are able to change the bounds of the section.
once you have drawn the section the section tab will appear the project browser with the section.26 Further Reading Essential Revit UI https://www.youtube.com/watch?v=gLixZ2Whtc4 Revit Camera https://www.youtube.com/watch?v=Vk3leJFfHiI Perspective Section https://www.youtube.com/watch?v=oroaf17p-AI Section Box https://www.youtube.com/watch?v=ngg0OV0kk1k Visibility Graphics and overrides https://www.youtube.com/watch?v=fuxZ7bB20dI View templates https://www.youtube.com/watch?v=fv7BeriyC94 Site topography https://www.youtube.com/watch?v=cCSzZeDACco&t=694s Curtain Walls https://www.youtube.com/watch?v=jmbgGrH116I Columns and foundation https://www.youtube.com/watch?v=T3d7VGxW_bY Detailing https://www.youtube.com/watch?v=BjlmCFbmaCs CAD import https://www.youtube.com/watch?v=5YDbi1Zn2RE Basic Schedules https://www.youtube.com/watch?v=0TtPXg3ttUo Rooms https://www.youtube.com/watch?v=3aqNgtwT3hA Basic Parametric family https://www.youtube.com/watch?v=QunwyWN145E Family Basics https://www.youtube.com/watch?v=yH3Q_dqgvkQ sketchup to revit https://www.youtube.com/watch?v=4VFK-KEOMZc Rendering Options https://www.youtube.com/watch?v=Wpztrf2Cu9w Intermediate Design Options https://www.youtube.com/watch?v=Ru2oz0IKRGg Green building studio https://www.youtube.com/watch?v=jU0SBdqKj_A Insight https://www.youtube.com/watch?v=8ZrU-_Cp3WI Stairs by Sketch https://www.youtube.com/watch?v=PL-al4wjhUQ Hosted Families https://www.youtube.com/watch?v=6H77PNZmYHI Advanced Adaptive Components https://www.youtube.com/watch?v=_ADPVGzj6y4 Conceptual Mass https://www.youtube.com/watch?v=89qMh1fOgKA Dynamo intro (visual programming) https://www.youtube.com/watch?v=vsNEwe2B_Rs File sharing central models https://www.youtube.com/watch?v=Qf5RJRReQ8s
You can also read