Installation Guide for a participant's ECP/EDX-endpoint in Statnett's network
←
→
Page content transcription
If your browser does not render page correctly, please read the page content below
Statnett konfidensiell informasjon / Confidential information

            Installation Guide for a participant's ECP/EDX-
            endpoint in Statnett's network

            Version: 2.10

            Date: 22.04.2021

                                                                1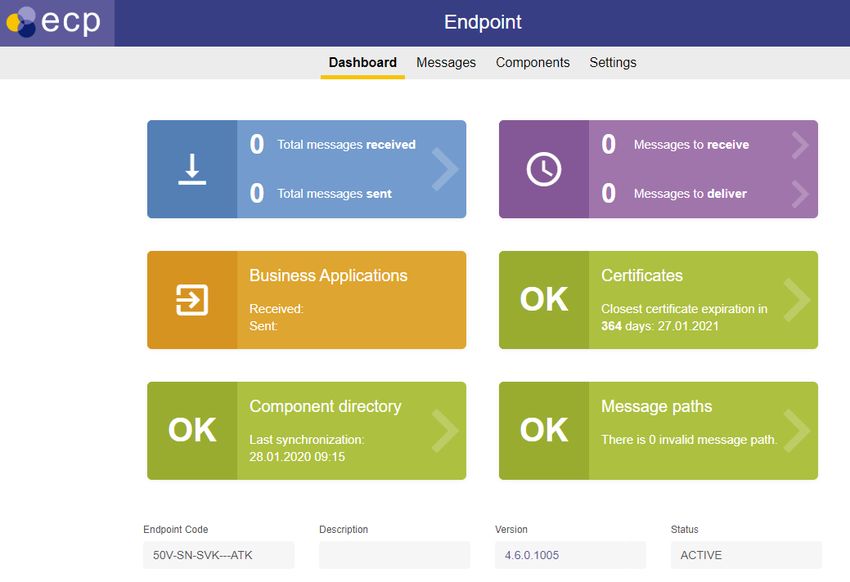
Statnett konfidensiell informasjon / Confidential information

            1 DOCUMENT HISTORY                                              3

            2 TERMINOLOGY                                                   5

            3 THE BIG PICTURE                                               6

            4 CONSIDERATIONS TO MAKE                                        7

            5 CONTRACT SIGNING, REQUIREMENTS, PREREQUISITES AND FIREWALL    8

            6 DO THIS FIRST                                                10

            7 INSTALLATION OF ECP-ENDPOINT ON WINDOWS                      11

            8 INSTALLATION OF EDX-TOOLBOX ON WINDOWS                       20

            9 INSTALLATION OF ECP/EDX ON LINUX (RED HAT 7 OR CENTOS 7)     29

            10 APPENDIX                                                    30

                                                                            2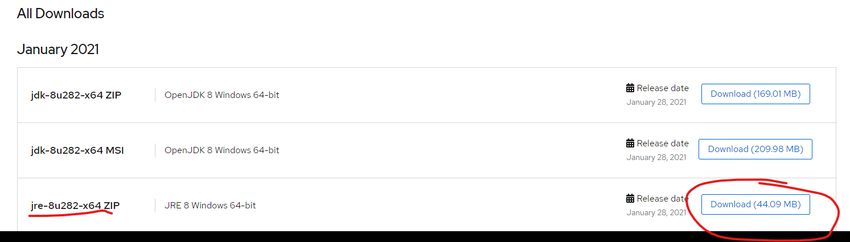
Statnett konfidensiell informasjon / Confidential information

            1 Document History

             Version Date                 Changes
             1.00    20/11-2018              - A complete rewrite of an older version (up-to-date with ECP-
                                                endpoint 4.2.0 and EDX-toolbox 1.3.1)
             1.02        22/11-2018          - Improved description of service properties on ECP configuration
                                                (chapter 7.2.1)
                                             - Improved description of service properties on EDX configuration
                                                (chapter 8.2.1)
                                             - Added a chapter on how to switch network or to install in other
                                                TSO's network (chapter Feil! Fant ikke referansekilden.)
                                             - Many small fixes to wordings, spelling, etc.
             1.03        23/11-2018          - Firewall chapter (5.5) includes actual hostnames of Statnett's CD
                                                and Broker
             1.04        23/11-2018          - Corrected wrong client name in firewall chapter (5.5)
             1.05        23/11-2018          - Added troubleshooting of non-responding port 8080 on ECP-
                                                endpoint and how to change that particular port.
             1.06        23/11-2018          - Added chapters about monitoring (10.3) and administration
                                                (10.4)
                                             - Added contact email policy in chapter 7.5.1
                                             - Added standalone server recommendation in chapter 5.4
             1.07        26/11-2018          - Clarified how to read edx.yml configuration in chapter 8.2.3
             1.08        26/11-2018          - Updated chapter explanation about Message Path in chapter 7.6
                                             - Updated comment on internalBroker.URL in chapter 8.2.2
             1.09        27/11-2018          - Miniscule word changes
                                             - Terminology long explanation references in bold
                                             - Updated chapter 5 with software requirement, moved hardware
                                                requirement from chapter 4 to 5.
                                             - Updated section about hardware requirements with ENTSOE's
                                                recommendations and adjusted Statnett's recommendations.
                                             - Added chapter 5.2 about contract signing
             1.10        28/11-2018          - Improved chapter 8.4 with verification tests
                                             - Changed what to send to Statnett in chapter 5.1
                                             - Moved configuration of edx.yml from appendix to chapter 8.5
             1.11        30/11-2018          - Minor changes to make it harder to misunderstand
                                             - Improved chapter 10.3.2 about monitoring .
             1.12        10/12-2018          - Added chapter 10.5 about how to upgrade EDX/ECP
             1.13        12/12-2018          - Added a screenshot to chapter 10.5
                                             - Added troubleshooting-chapter 0 for EDX
             1.14        12/12-2018          - Added user/pass for Hawtio-login (chapter 10.3)
                                             - Added two tips on how to edit the edx.yml
             1.15        07/02-2019          - Tiny changes in reading instructions
                                             - Added reference to more in-depth documentation of the edx.yml
                                                in chapter 8.5
             1.16        15/03-2019          - Added an important notice about the crypto.policy in chapter
                                                Feil! Fant ikke referansekilden.
                                             - Switch order of the URL/CD-code for readability
             1.17        22/03-2019          - Rearranging some content into chapter 6 and updated info about
                                                Java
                                             - Some minor changes to the text

                                                                                                                   3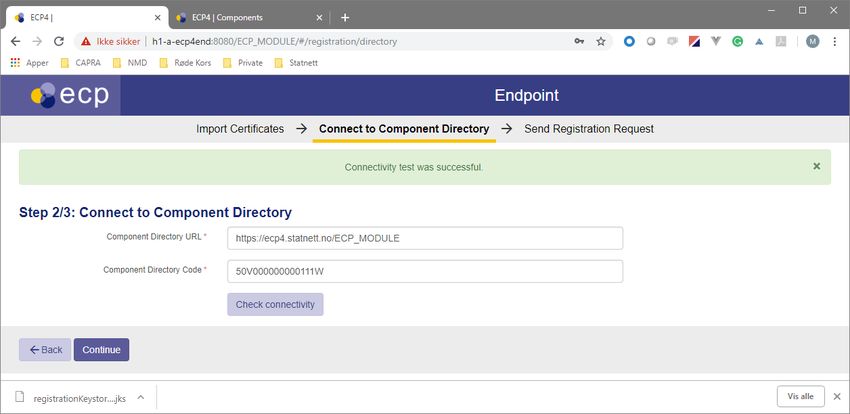
Statnett konfidensiell informasjon / Confidential information

                                              -    Aligned with the new Update Guide (v1.0)
             1.18        15/04-2019           -    Improved settings for connectivity-check (10.3.2.2)
                                              -    Fixed a wrong description on implication of CD being offline
                                                   (10.4)
             1.19        25/04-2019           -    Tiny change in the example of edx.yml configuration
             1.20        29/05-2019           -    Small improvement i chapter 7.6 regarding which broker to
                                                   choose
             2.00        11/02-2020           -    MAJOR CHANGE: INSTALLATION of ECP v4.6 AND EDX v1.7.
                                              -    New and simplified agreement to be signed to participate in the
                                                   network (chapter
                                              -    Higher HDD-requirement for EDX (chapter 5.4)
                                              -    Updated links and description about JRE update (chapter 6.2)
                                              -    Updated documentation about configuration (chapter 7.2)
                                              -    Updated some text and screenshots in registration (chapter 7.5)
                                              -    Added section about automatic renewal (chapter 7.7)
                                              -    Updated documentation about configuration (chapter 8.2)
                                              -    Major update of edx.yml-configuration (chapter 8.5)
             2.01        23/04-2020           -    Changed an error for spring-profile in EDX-configuration part
             2.02        26/05-2020           -    Small change in explanation of edx.yml to point out which
                                                   ServiceCatalogue codes to use for test and production
             2.03        27/05-2020           -    Installation procedure of JRE has been improved
             2.04        28/05-2020           -    Small, but importat fix in edx.properties configuration ('ecp-
                                                   nonha' changed to 'edx-nonha')
                                              -    Added a warning about to have only one yml-file in EDX-config
                                                   directory
             2.05        09/06-2020           -    Adjustments to the JRE-installation (chapter 6.2)
                                              -    Warning about Windows 2019 installation – it has never been
                                                   supported! (chapter 5.3)
             2.06        08/09-2020           -    Improved the automatic monitoring sub (chapter 10.3.2)
             2.07        25/09-2020           -    Improved more of the appendix-part (chapter 10)
             2.08        01/10-2020           -    Improved section about monitoring (chapter 10.3.2)
             2.09        16/04-2021           -    Important changes in ecp.properties for a stable process
                                                   (chapter 7.2.2)
                                              -    Added a reference to a new document for high performance/
                                                   high uptime endpoint (chapter 10.6)
             2.10        22/04-2021           -    Small change in the doc about JRE-version

                                                                                                                     4
Statnett konfidensiell informasjon / Confidential information
2 Terminology
Read later - this is a reference for acronyms/names used in this installation guide. Defined words are
in bold font.
Short Expanded Long
AMQP Advanced Message Queuing A protocol/standard developed in 2014 by OASIS for reliable
Protocol (persisted) message communication.
BA Business Application A "normal" application outside ECP, communicating through
ECP with other BAs. The BA must connect with an EDX-
toolbox to send/receive messages from the network.
Broker Central Broker The central broker in an ECP-network is directly reachable for
all ECP-endpoints and all messages in the network are sent to
and retrieved from this broker. It supports AMQP(S). In
addition to the central broker, each ECP-endpoint and EDX-
toolbox also have an "internal broker" (same type of broker)
for message handling.
CD Component Directory An ECP-component/server, maintaining information about all
ECP-endpoints, Broker and SC. This is like the phone book of
an ECP-network.
EIC-code Energy Identification Codes These codes are provided by Statnett and identifies your
particular endpoint (shared by ECP-endpoint and EDX-
toolbox) and is stored in the CD.
ECP Energy Communication A platform developed for ENTSO-E, by Unicorn, according to
Platform MADES 1.1/2.x specification – intended to provide secure and
reliable messaging between the actors (TSOs and others) in
the energy sector. The platform consists of EDX-toolbox, ECP-
endpoints, Broker, Component Directory (CD) and Service
Catalogue (SC).
ECP-endpoint ECP-endpoint A specific component/server in the ECP-network, responsible
for sending/receiving messages to/from the central Broker.
EDX-toolbox EDX-toolbox A "front" to the ECP-endpoint, logically a part of the same
endpoint. EDX offers a richer set of interfaces for a BA to
connect to. EDX has a Service concept which allows for more
advanced routing of messages and addressing of endpoints.
Endpoint Endpoint An endpoint is the "logical endpoint" – a combination of both
the ECP-endpoint and the EDX-toolbox.
ENTSO-E European Network of TSOs An organization of TSOs
eRoom eRoom Statnett's filesharing solution, all necessary documents for ECP
are found there.
HA High Availability A term used for a database-setup, with multiple databases in a
cluster. This is not part of the regular setup of ECP-endpoints,
but it is possible to use MySQL or MSSQL for such a setup.
Hawtio Hawtio A monitoring software – access it on ECP-endpoint and EDX-
toolbox on /hawtio on whichever port your webserver is
running. You can browse you internal broker queues (see
Broker).
MADES Market Data Exchange Standard A specification developed by ENTSO-E describing a
communication system between actors in the energy sector.
SC Service Catalogue An ECP-component/server which keeps information about
which endpoints consume/provides certain services. Without
registration here, an EDX-toolbox cannot access services.
TSO Transmission System Operator Responsible for the distribution of energy (electricity or
natural gas), in an area/country.
5Statnett konfidensiell informasjon / Confidential information
3 The big picture
The goal of ECP is to provide secure and reliable messaging between participants in the energy
sector, from one Business Applications (BA) to another. The big picture is shown below:
The drawing aims at answering the following questions you may have:
• What components exists in the ECP and which must a particpant in the network install?
• Which ports must be opened in which direction and in which firwall?
• What is the general purpose of the various components in ECP?
• How does the messages flow in the system and how is the logical flow?
Even though a picture says more than a thousand words, a little explanation might still be in order:
• You must install ECP- and EDX-server, possibly in the same OS.
• During the installation phase you will need to connect (and be approved by Statnett) in the
Component Directory.
• After the approval, you may send messages from one ECP-endpoint to another.
• By adding the EDX "on top", you will gain the service-concept which among many thing will
allow you to address a service provider without knowing a specific address (example of
destination: "SERVICE-FASIT").
• You can therefore test ECP-to-ECP traffic (using the ECP-Dashboard) before you test EDX-to-
EDX traffic (using the EDX-Dashboard)
• EDX-traffic will not work unless the Service Catalogue is updated by Statnett with
information about your endpoint and which services you will consume.
• When EDX-to-EDX traffic works you may test BA-to-BA traffic.
6Statnett konfidensiell informasjon / Confidential information
4 Considerations to make
The considerations often concern an "endpoint". This is a "logical endpoint", which is ECP-endpoint
and EDX-toolbox combined.
4.1 Test environment is recommended
Statnett recommends setting up a test-endpoint which will be connected to Statnetts test-network.
NB! It is not possible to connect from test to production (or vice versa) in the ECP-networks set up by
Statnett. Unless you are confident on going straight into production, you should install a test-
endpoint.
4.2 Number of endpoints
Statnett recommends as few endpoints as possible. We expect no performance issues. However, you
may install as many endpoints as you think you need to, for example out of legal or management
reasons.
4.3 Failover (and uptime)
All components may fail, but how to deal with it? Let's explore some options:
4.3.1 Business acknowledgement (needs no action ECP servers)
First, we expect BAs to send and process "business acknowledgement" if necessary. Consider a
scenario where BA-1 sends bid offer to BA-2. Then BA-2 responds with a "business
acknowledgement" to let BA-1 know it has received the bid. Now BA-1 knows that its bid has been
accepted and processed by BA-2 and can act accordingly. Failover-setups in the network cannot
replace such a procedure, because it can never cover "end-to-end".
4.3.2 Failover server on standby (a modest investment to get decent uptime)
Statnett recommend a failover server on standby. Make sure to make a copy of the whole database
of the master server after the master has completed registry (see chapter 7.5). This makes it possible
for the failover server to startup without going through the registration process. Then make sure,
with automatic or manual procedure, that only one the servers are running at a time. If both are
running at the same time, whichever of them are first to grab messages from the central broker, will
take them.
4.3.3 High Availability (a big investment to get premium uptime)
The Advanced Documentation (https://eroom.statnett.no/eRoom/IKT/ECP/0_eaf4) covers the
possibility of a setup of HA. Statnett does not employ HA on every component in its network.
7Statnett konfidensiell informasjon / Confidential information
5 Contract Signing, Requirements, Prerequisites and Firewall
5.1 Prerequisites
• You must have access to eRoom (https://eroom.statnett.no/eRoom/IKT/ECP) – you should
find all relevant documentation under the folder of "Installation of ECP/EDX endpoint". If you
do not have access, contact ecp@statnett.no.
• Retrieve ECP installation files from eRoom (Installasjon->Gjeldende versjon)
• For each ECP-endpoint/EDX-toolbox you install you must contact ecp@statnett.no with this
information:
o Company name
o Which network you want to connect to (test or production)
o Which services are you going to use1
• In return you'll get information you need later on:
o Registration keystore (jks-file)
o EIC/ECP/V-code (a 16-char string)
5.2 Contract Signing
To participate into the ECP-network of Statnett, one must sign an agreement (available on the
eRoom location mentioned above). The agreement is clarification your responsibilities for using the
network without any license fees. Further documentation on how to sign and return the agreement
is found in the eRoom.
5.3 Software requirements
• OS must be Windows Server 2012R2 or 2016, Linux Red Hat 7 or CentOS 7. Windows Server
2019 is not supported, although not impossible to get working2 – but expect the unexpected.
• We recommend to run EDX/ECP on a standalone3 server to avoid port-conflicts.
5.4 Hardware requirements for an endpoint
Statnett has run this software for some time and makes some recommendations expecting a peak at
a few hundred messages per hour. The official recommendation from ENTSOE has much higher
numbers based on a peak at a few thousands of messages pr hour. ENTSOE's recommendation is
presented in parenthesis. The recommendation format is separate numbers for ECP and EDX
separated by a plus-sign.
• CPU: 1C-2GHz + 1C-2GHz (4C-2GHz + 2C-2GHz)
• RAM: 4GB4 + 4GB5 (8GB + 4GB)
• Disk: 206 GB + 100 GB (40 GB + 100 GB)
1
Available services in production are "FASIT" and "MMS", while in test there are more options
2
One issue might be that the port 8005 is taken by Windows. Change that port to "-1" the ECP's server.xml.
Another caveat has been that the service-properties (see chapter 7.2.1 and 8.2.1) misses data on the
Logging/Startup/Shutdown-tabs. You may copy data from an existing installation. Other strange things has also
been reported, but the reports are generally not consistent throughout the 2019-installations.
3
An OS dedicated to run ECP-endpoint and EDX-toolbox and no other servers/processes. It doesn't matter if it's
a virtual or physical server.
4
Default setup for Java memory requirement in ECP is 4GB, but one can most likely run with 2GB.
5
Default setup for Java memory requirement in EDX is 1GB, but 2GB is preferable.
6
Calculations indicate that 10 GB is plenty for 1M messages pr 14 days (default behavior is to delete message
logs older than 14 days). Then you have 10GB for other stuff. This is assuming you don't do archiving of
message contents.
8Statnett konfidensiell informasjon / Confidential information
Even more important than a specific setup is the ability to upgrade the hardware on a short notice.
Statnett does not assume any responsibility should these recommendations be inadequate, one must
be able to adapt to the load.
5.5 Firewall configuration
Look at "the big picture" (chapter 2) to identify which ports you need to open. The arrow on the
traffic denotes from where the traffic is initiated. The table below summarizes the information:
Client Server Port Protocol Doing what?
Operator EDX-toolbox 8080 or 9090 HTTP Monitoring/Dashboard
BA EDX-toolbox 8080 or 9090 HTTP Message transport
BA EDX-toolbox 5672 or 6672 AMQP Message transport
EDX- ECP-endpoint 5672 AMQP Message transport
toolbox
Operator ECP-endpoint 8080 HTTP Monitoring/Dashboard
ECP- CD (prod): ecp4prod.statnett.no 443 HTTPS Synch of ECP-network
endpoint CD (test): ecp4.statnett.no information
ECP- Broker (prod): ecp4prod.statnett.no 5671 AMQPS Message transport
endpoint Broker (test): ecp4.statnett.no
The options you have on the port on EDX-toolbox depends on whether or not you install the EDX on
the same OS as ECP-endpoint. If you want to setup an HA-database (external database) you must
open the ports to that particular database (supported databases are MySQL and MSSQL).
9Statnett konfidensiell informasjon / Confidential information
6 Do this first
The application may be installed in either command line or GUI mode. Both modes are described in
this chapter. The overall idea with this procedure is to stop the services, backup all necessary data,
uninstall and install, then restore data and start the services.
Stop both ECP-endpoint and EDX-toolbox by following the stop procedure in the next chapter.
6.1 Variables used in the guide
Several variables are used throughout this installation guide using the format.
These variables are used only within this guide and are not to be confused with variables of your OS.
Name Description
Location of the JRE 8 used by the application
Path pointing to the target installation directory
Version name
Path to the ECP-endpoint installation package, typically ecp-endpoint-.jar
Path to the EDX-toolbox installation package, typically edx-toolbox-.jar
6.2 JRE installation
You need Java Runtime Environment (JRE) 8. Check that you have the correct version by typing "java
–version" in a console the output should indicate version "1.8.0_xxx". You must upgrade to latest
version, as of April 2021, update 282. The link below offers JDK (with MSI), but it's the JRE (currently
no MSI available) you should download:
https://developers.redhat.com/products/openjdk/download
Unzip the package you've downloaded and place it in your filesystem and update the PATH and
JRE_HOME environment variable. Example of commands that can do this:
>set PATH= C:\Program Files\Java\jre1.8.0_282\bin;%PATH%
>set JRE_HOME=C:\Program Files\Java\jre1.8.0_282
In a new cmd-console, test that "java -version" returns the correct version.
10Statnett konfidensiell informasjon / Confidential information
7 Installation of ECP-endpoint on Windows
The application may be installed in either command line or GUI mode. Both modes are described in
this chapter.
7.1 ECP-endpoint Installation
To run installation in console only (not capable of GUI), skip to step 2 and add "-console" in step 4.
Step Comment Action/Command
1 If Java was registered to execute jar Double-click the file (you must be
files, an installer window should administrator)
open and you can skip to step 5. If
an installer does not start follow
steps 2 – 4.
2 Open command line with Start > type “cmd” > right click > run as
administrator rights administrator
3 Change directory to location of ecp- Example: cd c:\ecp-installer
endpoint.jar
4 Run the ecp-endpoint.jar file. If you java -jar
want to run in console only, run the java -jar -console
second command and follow the
installation wizard (approx. like step
5). You may get warnings about
missing language resource; ignore
them.
5 ECP-endpoint installer window • Select
should open. Warning: The GUI • Next
installer doesn't notify if unlimited • ECP-endpoint should be installed as a
strength JCE is not installed. Windows service
• Next > Next
• If desired, an automatic installation script
can be generated. It can be used in the
future to install the application using the
same options.
• Done
7.2 ECP-endpoint configuration
7.2.1 Specify service properties
When ECP-endpoint is registered as a Windows service, it is possible to change its system properties
using the Tomcat application for management of Windows services (the method shown is
cumbersome but apparently robust):
➢ cd \tomcat\bin
➢ tomcat9w.exe //ES//ecp-endpoint (see footnote for syntax explanation 7)
7
https://tomcat.apache.org/tomcat-7.0-doc/windows-service-howto.html
11Statnett konfidensiell informasjon / Confidential information
When the property dialogue opens, change tab to Java. Consider changing the following settings:
• Make sure "Use default" is on/true – important if you upgraded Java/JRE and for future
upgrades
• 2048 MB is more than enough memory, even lower settings should be fine in most cases
7.2.2 Configuration of ecp.properties
NB! Only the application and the root-administatrator should have read-access to this file. The same
goes for write-access.
Property Description
ecp.endpoint.amqpApiEnabled = true You MUST ADD these four properties,
ecp.endpoint.sendHandler[0].beanName=amqpApiSendHandler otherwise messages cannot be sent from ECP
ecp.endpoint.sendHandler[0].typeName=*
to EDX.
ecp.networks = DefaultNetwork
Recommended: With the recommended setting you require
spring.profiles.active= ecp-nonha authenticated access to dashboard and
webservices. The username/passwords are
Alternative I: explained in the next chapter. Requirement
spring.profiles.active=ecp-nonha,disable-ws-auth for WS authentication is explained in chapter
Alternative II: 5.1 in ECP Administration Guide which you
spring.profiles.active=ecp-nonha,disable-user-auth
can find in eroom under "Advanced
Alternative III:
Documentation":
spring.profiles.active=ecp-nonha,disable-user-auth,disable-
ws-auth https://eroom.statnett.no/eRoom/IKT/ECP/0
_eaf4
The alternative settings can be used if you
want to run with less security.
ecp.directory.client.synchronization.messagePathSynchronizat Add it if not present or modify if necessary.
ionInterval = 0 * * * * * These settings determine how often8 various
ecp.directory.client.synchronization.directorySynchronizatio
operations are performed in the system.
nInterval=0 * * * * *
ecp.directory.client.statistics.directorySynchronizationInte With these settings, everything will be
rval=0 * * * * * synchronized with component directory
every minute.
internalBroker.host=127.0.0.1 This assumes you install EDX on the same
host. Otherwise use 0.0.0.0
ecp.db.compressionJobEnabled=false Compression is not working in v4.7.2 and
ecp.db.compressionInterval=0 10 12 * * * MUST be disabled. In later versions it will be
fixed, but then it should not be run at
midnight (which is default) – but at another
time.
7.2.3 Configuration of ecp-users.properties
To enable authentication, check the spring.profiles.active -parameter in the ecp.properties
configuration above.
NB! Only the application and the root-administatrator should have read-access to this file. The same
goes for write-access. The file defines the user, role and passwords. Here is a simple example of the
two types of users available:
8
https://crontab.guru/
12Statnett konfidensiell informasjon / Confidential information
ecp.endpoint.users[0].login=admin
ecp.endpoint.users[0].password=supersecret
ecp.endpoint.users[0].role=admin
ecp.endpoint.users[1].login=user
ecp.endpoint.users[1].password=secret
ecp.endpoint.users[1].role=user
To add more users, simply add new lines and increase the index.
7.3 Starting and stopping ECP-endpoint
7.3.1 GUI
➢ Start >services.msc
➢ Find service with name like " ecp-endpoint " and description "ECP-endpoint"
➢ Start/stop service by buttons on the top left
7.3.2 Command Line
Start/stop application using the command "SC start/stop ecp-endpoint"
7.4 Installation verification
The application should be installed in the folder. This installation folder should contain
configuration files, Tomcat folder, and uninstaller. After the application is successfully started, it
creates additional folders for data and log files. Default names and locations of these folders are
\data and \logs.
Check the status of the service, if installed: >SC query ecp-endpoint or in the Windows Services tool
Check the application log files for more information about its status. The default location is
\logs.
7.5 ECP-endpoint Registration
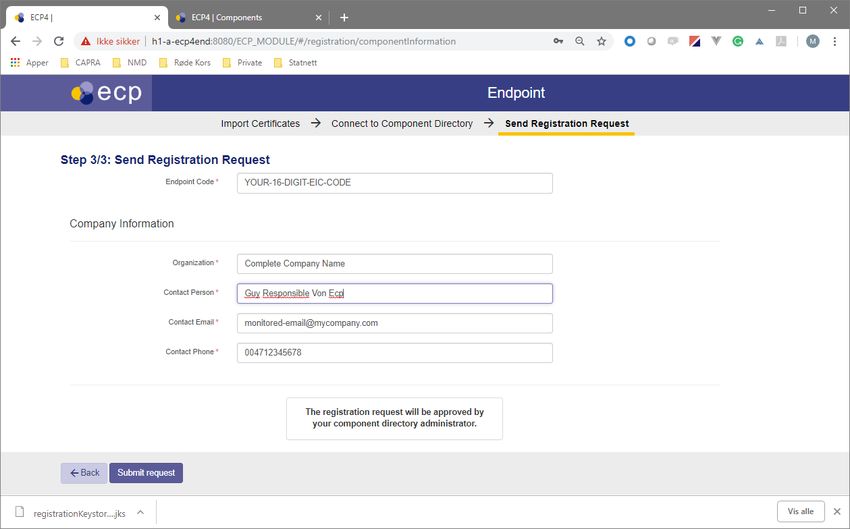
Screenshots from the registration process is show on next page.
7.5.1 Registration process
• NB! Please read all the points below before going through the registration – to avoid
rejection of the request!
• In a web browser, open: http://:8080/ECP_MODULE 9, examples:
o http://localhost:8080/ECP_MODULE
o http://127.0.0.1:8080/ECP_MODULE
• Insert the registration key store provided by your component directory administrator (see
5.1) and wait for the file to upload. Password is "password". Click “Continue” to proceed to
the next step
• Enter the appropriate URL and Code (see below), then click on the "check connectivity", then
"Continue".
o Test
9
If no response, see troubleshooting on 7.9.1. If presented with a login-screen, try admin/password and if that
doesn't work check the contents of ecp-users.properties to find the admin-password.
13Statnett konfidensiell informasjon / Confidential information
▪ URL: https://ecp4.statnett.no/ECP_MODULE
▪ Code: 50V000000000111W
o Production
▪ URL: https://ecp4prod.statnett.no/ECP_MODULE
▪ Code: 50V000000000118I
• Fill in your component code (EIC-code, see 5.1)
• For contact email in production, use a monitored10 email address. Statnett will not approve
if personal email-address, because Statnett will use this email-address to send information
about upgrades and issues. In the test-network, personal email address is allowed.
• Phone number is not as important, it's a secondary option if email contact fails.
10
Monitored means that some organization will be responsible for process the email at least daily.
14Statnett konfidensiell informasjon / Confidential information
At this point, you must wait until the component directory administrator approves your
registration request. You must send an email to ecp@statnett.no to notify of the approval request
(no automatic notification is built into ECP). There is a dashboard where you can monitor whether
your endpoint has been approved or not – the "Component Directory" and "Certificates" tile should
be green. The dashboard will look like this after a couple of minutes:
15Statnett konfidensiell informasjon / Confidential information
Once the request is approved your ECP-endpoint automatically becomes operational. It is now
possible to send messages to other ECP-nodes in the network. However, you will not receive
messages until you do the next step!
7.6 Message Path
You must define a Message Path to tell how message are supposed to be routed to your endpoint. If
you forget this step you will not receive any messages and you will not see any error messages or
alerts!
• Open a web browser and navigate to the URL of your ECP-endpoint (e.g. http://:8080/ECP_MODULE), then choose menu "Settings"
• Choose button "+ New Path"
• Set Message Type to "*", Path to "Indirect". In the drop-down, choose the broker which
starts with 50V (Statnett-broker).
• Press "Save" – approximately 60 seconds later this configuration should be known to
everyone in the ECP-network.
7.7 Make sure ECP is set to Automatic Renewal!
Default, ECP is not set to Automatic Renewal. So please, please, remember to set it. You do that in
the Web Interface, on the Settings page:
16Statnett konfidensiell informasjon / Confidential information
7.8 Verify the installation
➢ Open a web browser and navigate to the URL of your endpoint (e.g. http://:8080/ECP_MODULE).
➢ Check that the box indicating synchronization is green
➢ Make a "New Message" and send to a Statnett-endpoint. You can find which endpoint
belong to which organization on the Components-page. The MESSAGE TYPE should be set to
"TEST" and the file you send should be a small text file. Press the Send-button, wait a few
seconds and then refresh the page. If the message (check Outbox) get the status "Received"
the test is successful. See screenshots below:
17Statnett konfidensiell informasjon / Confidential information
7.9 Troubleshooting
7.9.1 ECP-Endpoint does not respond on port 8080
• One possible reason is that you have other processes listening on the same port. Check
logs/catalina.out – it should log "BindException: Address already in use". To find which
process this is, run (in console as admin) "netstat -a -n -p". You can then identify the PID of
the process listening on port 8080 and find that process in Task Manager. If you want to, you
can change the 8080 port in tomcat\conf\server.xml and restart the service.
7.9.2 Message status "Failed"
• Something is wrong with the configuration?
7.9.3 Message status "Accepted"
• Possibly, your firewall does not allow outgoing traffic to the Central Broker (see "Big Picture"
in chapter 3)
18Statnett konfidensiell informasjon / Confidential information
7.9.4 Component Directory is not synchronized
• You're not approved yet – wait a little or remind the administrator of the ECP-network
• Your firewall does not allow outgoing traffic to the CD (see "Big Picture" in chapter 3)
7.9.5 You're able to send, but do not receive any messages
• Your Message Path is not defined in "Settings" (see chapter 7.6)
19Statnett konfidensiell informasjon / Confidential information
8 Installation of EDX-toolbox on Windows
8.1 EDX-toolbox Installation
Step Comment Action/Command
1 If Java was registered to execute jar Double-click the file
files, an installer window should
open and you can skip to step 5. If
an installer does not start follow
steps 2 – 4.
2 Open command line with Start > type “cmd” > right click > run as
administrator rights administrator
3 Change directory to location of ecp- Example: cd c:\edx-installer
endpoint.jar
4 Run the ecp-endpoint.jar file. If you java -jar
want to run in console only, run the java -jar -console
second command and follow the
installation wizard (approx. like step
5).
5 EDX-toolbox installer window • Select target installation path
should open • Next
• Choose whether the EDX-toolbox should be
installed as a Windows service
• Next > Next
• If desired, an automatic installation script
can be generated. It can be used in the
future to install the application using the
same options.
• Done
8.2 EDX-toolbox Configuration
Before starting EDX-toolbox, the application must be configured. The application configured with
service properties (8.2.1) and three configuration files (next chapters). The table shows where to find
the configuration files and the overall content of them.
Config file Description
\edx.properties This is the main EDX configuration file with all the properties such as
database connection, paths to filesystem, etc.
\edx.yml> In this file it is possible to configure integration channels and EDX features
like validations, routing, external processing, etc.
\edx-users.properties An optional configuration for User/pass for logins to EDX Web and WS
8.2.1 Specify service properties
When EDX-toolbox is registered as a Windows service, it is possible to change its system properties
using the Tomcat application for management of Windows services:
➢ cd \tomcat\bin
➢ tomcat9w.exe //ES//edx-toolbox (see footnote for syntax explanation 11
)
11
https://tomcat.apache.org/tomcat-7.0-doc/windows-service-howto.html
20Statnett konfidensiell informasjon / Confidential information
When the property dialogue opens, change tab to Java. Consider changing the following settings:
• Tick off "Use default" checkbox – important if you ever upgrade JRE on your system
• Although 1024 MB memory is probably ok, consider increasing it to 2048 MB if you have the
capacity for it.
• If EDX runs in same OS as ECP, you need to change ports to avoid conflict. Here's a suggestion
of port to set in Java Options:
-Dedx.toolbox.tomcat.port.shutdown=9005
-Dedx.toolbox.tomcat.port.http=9090
-Dedx.toolbox.tomcat.port.ajp=9009
-Dedx.toolbox.tomcat.port.ajp.redirect=9443
-Dedx.toolbox.tomcat.port.http.redirect=9443
-Dcom.sun.management.jmxremote.port=2099
-Dcom.sun.management.jmxremote.rmi.port=2098
Example of properties dialogue – not all Java Options are shown
8.2.2 Configuration of edx.properties
The edx.properties configuration file comes with many configuration parameters (all of them are
described briefly in the edx.properties file and also in Appendix A. Most of the configuration
21Statnett konfidensiell informasjon / Confidential information
parameters use default values, but the following parameters must be configured for each
installation:
Parameter Description
edx.toolbox.code ECP-endpoint code assigned to this Toolbox. This is
the same EIC-code you received in chapter 5.1 and
which you specified in the last step of chapter
7.5.1.
edx.serviceCatalogue.code In the test-network: 50V000000000113S
In the prod-network: 50V000000000120V
ecpBroker.amqp.port Port number of your ECP AMQP Broker, most likely
5672 (see Big Picture in chapter 3)
ecpBroker.amqp.host 127.0.0.1 if you install EDX in same OS as ECP.
Otherwise, the IP/hostname of you ECP-endpoint.
internalBroker.amqp.port 6672 is recommended if you install EDX in the
same OS as ECP. Otherwise you may keep default
setting 5672. This is the port your BAs will connect
(if they choose to use AMQP).
internalBroker.amqp.host 0.0.0.0 – to indicate it accepts requests from
anyone. 127.0.0.1 is the default configuration,
which means that your BA must be running in the
same OS (not recommended).
multipart.maxFileSize=50MB If you have multipart.maxFileSize defined, remove
it and replace with the two properties below.
spring.http.multipart.max-file-size=50MB
spring.http.multipart.max-request-size=50MB
Recommended: spring.profiles.active= edx-nonha With the recommended setting you require
authenticated access to dashboard and
Alternative I: spring.profiles.active=edx-nonha,disable-ws-auth webservices. The username/passwords are
Alternative II: spring.profiles.active=edx-nonha,disable-user-auth explained in the chapter 8.2.4. Requirement for
Alternative III: spring.profiles.active=edx-nonha,disable-user- WS authentication is explained in chapter 4.4 in
auth,disable-ws-auth EDX Administration Guide which you can find in
eroom under "Advanced Documentation":
https://eroom.statnett.no/eRoom/IKT/ECP/0_eaf4
The alternative settings can be used if you want to
run with less security.
8.2.3 Configuration of edx.yml
The configuration in the edx.yml deals with the various interfaces available to access EDX from the
BA. Default settings (allow Web Service interface) is ok to begin with. You can use the default edx.yml
configuration, move on to next chapter, and later change the edx.yml to suit your needs. The
configuration is explained in chapter 8.5. NB! Make sure to have only one yml-file in the config-
directory – since EDX will read all yml-files.
8.2.4 Configuration of edx-users.properties
To enable authentication, check the spring.profiles.active-parameter in the edx.properties
configuration above.
NB! Only the application and the root-administatrator should have read-access to this file. The same
goes for write-access. The file defines the user, role and passwords. Here is a simple example of the
two types of users available:
edx.toolbox.users[0].login=admin
edx.toolbox.users[0].password=supersecret
edx.toolbox.users[0].role=serviceManager
22Statnett konfidensiell informasjon / Confidential information
edx.toolbox.users[1].login=user
edx.toolbox.users[1].password=secret
edx.toolbox.users[1].role=user
To add more users, simply add new lines and increase the index.
8.3 Starting and stopping EDX-toolbox
8.3.1 GUI
➢ Start >services.msc
➢ Find service with name like "edx-toolbox"
➢ Start/stop service by buttons on the top left
8.3.2 Command Line
Start/stop application using "SC start/stop edx-toolbox"
8.4 Installation verification
The application should be installed in the folder. This installation folder should contain
configuration files, tomcat folder and uninstaller. After the application is successfully started, it
creates additional folders for data and log files. Default names and locations of these folders are
\data and \tomcat\logs. You could browse through edx-toolbox.log to
see if any ERROR-entries occur – there should be none. One of the other logs will tell you if there is a
port conflict (if so go back to chapter 8.2.1). The status of the service, if installed, can be checked
either via command line: "SC query edx-toolbox" or in the Windows Services tool.
8.4.1 Send test messages
➢ Open a web browser and navigate to the URL of your endpoint (e.g. http://:9090/ - if you specified 9090 as your port). You should see this, except you won't have
any messages in the list:
➢ Make a "New Message" and send to a Statnett SF-endpoint. You can find which endpoint
belong to which organization on the Components-page in the ECP-server. The MESSAGE TYPE
should be set to "TEST" and the file you send should be a small text file. Press the Send-
button, wait a few seconds and then refresh the page. If the message get the status
"Received" the test is successful. See screenshot below:
23Statnett konfidensiell informasjon / Confidential information
➢ The previous test was to send a message from one EDX to another, without specifying which
service to use. Now, we want to test that your EDX has been added to the correct services.
To test it, make a new message and set Receiver to SERVICE- (example:
SERVICE-FASIT or SERVICE-MMS). The rest of the message is the same as in the previous test.
This message will now be routed to the application providing this service. Since this message
actually will be consumed by a proper BA, it's content should be just a simple text file (or
even better – a real payload/message which is possible to process for the BA). If this test
fails, it might be that your endpoint is still not added to the service by Statnett. Please
contact ecp@statnett.no to investigate further.
8.5 Configuring the edx.yml file
NB! Make sure to have only one yml-file in the config-directory – since EDX will read all yml-files.
This is an example of a relatively complete edx.yml, carefully crafted to show a number of features. It
should hopefully provide enough examples to help you configure your own edx.yml. The file will be
explained in detail below. Make sure not to introduce any tabs in this file, only spaces are allowed.
Also, be very careful about the number of spaces used for indentation – otherwise it will not be
parsed correctly. If you accidently miss a comma, EDX might not warn you about it. Some line breaks
are introduced in the example below for readability of very long lines; remove them! Make sure to
read the edx.log and catalina.log carefully after startup of EDX, it should show if the file was parsed
as expected.
integrationChannels:
amqpEndpoints:
- {direction: in, code: amqp-ba1-outbox, queueName: ba1.outbox, redeliveryAttempts: 1, replyQueueName: ba1.reply}
- {direction: out, code: amqp-ba1-inbox, queueName: ba1.inbox, redeliveryAttempts: 1}
fssfEndpoints:
- {direction: in, code: fssf-ba2-outbox, directory: /ba2/outbox, redeliveryAttempts: 1, replyDirectory: /ba2/reply}
- {direction: out, code: fssf-ba2-inbox, directory: /ba2/inbox, redeliveryAttempts: 1}
- {direction: out, code: edx-errors, directory: /edx-errors, redeliveryAttempts: 1}
ftpEndpoints:
- {direction: in, code: sftp-ba3-outbox, directory: ba3/outbox, redeliveryAttempts: 1, replyDirectory: ba3/reply, protocol: sftp, hostname: sftp.host.org,
port: 22, username: user, password: pass, connectionParams: {stepwise: true, separator: UNIX, knownHostsFile: /home/edx-toolbox/.ssh/known_hosts }}
- {direction: out, code: sftp-ba3-inbox, directory: ba3/inbox, redeliveryAttempts: 1, tempPrefix: ../tmp/, protocol: sftp, hostname: sftp.host.org,
port: 22, username: user, password: pass, connectionParams: {stepwise: true, separator: UNIX, knownHostsFile: /home/edx-toolbox/.ssh/known_hosts }}
kafkaEndpoints:
- {direction: out, code: kafka-publish, topicName: publish, redeliveryAttempts: 1, connectionURI: "k1.host.org:9092,k2.host.org:9092",
partitionKeyMadesHeaders: [businessType, sender], options: "compressionCodec=gzip&maxRequestSize=30000000"}
components:
validations: []
transformations: []
externalProcessing: []
routing:
routes:
- {code: R-amqp-ba1, service: {serviceCode: FASIT, domainCode: DEFAULT_DOMAIN, serviceCatalogueCode: 50V000000000113S }, start: toolbox-gateway,
end: amqp-ba1-inbox, fail: edx-errors, steps: [] }
- {code: R-fssf-ba2, service: {serviceCode: MMS , domainCode: DEFAULT_DOMAIN, serviceCatalogueCode: 50V000000000113S }, start: toolbox-gateway,
24Statnett konfidensiell informasjon / Confidential information
end: fssf-ba2-inbox, fail: edx-errors, steps: [] }
- {code: R-ba1-ba2, service: {serviceCode: MNA , domainCode: DEFAULT_DOMAIN, serviceCatalogueCode: 45V000000000059N }, start: toolbox-gateway,
end: [amqp-ba1-inbox, fssf-ba2-inbox], fail: [amqp-ba1-fail,fssf-ba2-fail], steps: [] }
- {code: R-sftp-ba3, messageType: EXT-EI-MAGASINDATA start: toolbox-gateway,
end: sftp-ba3-inbox, fail: edx-errors, steps: [] }
- {code: R-kafka-ba4, service: {serviceCode: NUCS , domainCode: DEFAULT_DOMAIN, serviceCatalogueCode: 50V000000000113S }, start: toolbox-gateway,
end: kafka-publish, fail: edx-errors, steps: [] }
sendProcessDefaultRoute: {start: "*", end: toolbox-gateway, fail: ecp-endpoint, steps: [] }
receiveProcessDefaultRoute: {start: toolbox-gateway, end: ecp-endpoint, fail: edx-errors, steps: [] }
There are three sections in this file: integrationChannels, components and routing:
8.5.1 Components
We are not interested in components – this section has no configuration, [ ] simply means an empty
array. The lack of interest in components configuration is deliberate: We don’t want to introduce
validations and transformations in the EDX, even though it works quite nice. The point is that from
the moment EDX takes on the responsibility of validating and transforming the messages, it becomes
more than a simple messenger – it becomes part of the business logic and fault handling. It is a
Statnett recommendation to deliver the message unaltered from one BA to another. This will ensure
less trouble in the transport-layer and more flexibility for the BA. The cost is that each Business
Application must handle validation/transformation for themselves.
8.5.2 IntegrationChannels
IntegrationChannels define a set of "endpoints" which specifies where BA and EDX can place or pick
up a message. These "endpoints" are not the same kind explained in chapter 2, so please do not
confuse them. There are five types of endpoints:
• AMQP (Advanced Message Queue Protocol)
• FSSF (File System Shared Folders)
• FTP (File Transfer Protocol)
• Kafka (Statnett use this for internal publish/subscribe)
• WS (Web Service) – the default endpoint, not specifically configured
Each endpoint type is placed in its own section. The endpoint must specify a direction and a code.
The direction can be
• "in": Location where BA place a message and EDX picks it up and delivers it to the receiver
• "out": Location where EDX place a message coming from a sender and BA then picks it up
The code must be a unique identifier of this endpoint. The codes in "out"-endpoints will be used in
routes, because routes define where to place messages when they're received from the network
(other endpoints).
Further important notes:
• You may create as many endpoints as you wish
• If you don't want any endpoints, simply type "[]" after the colon. (ex: sftpEndpoints: [])
• We're using the naming convention inbox/outbox as seen from the BA's point of view, which
may cause some confusion with the direction (seen from EDX' point of view)
• Default redelivery-attempts is 10 in EDX, but we override this in our example to 1. The
reason is that redelivery seldom solves any issue, it just creates a lot of "noise" in the logs.
• You should specify one in-endpoint for each BA. The reason is that you will have access to a
reply-endpoint for each BA. The BA should/could monitor the reply-endpoint to receive
messages with information about the transmission of your original message. It can tell you if
the message has safely arrived to the receiver's EDX. It can also tell you if you've used a non-
existent EDX address (receiverCode). However, the only way to know if the receiving BA has
25Statnett konfidensiell informasjon / Confidential information
picked up the message from the receiving EDX is to listen for a regular message from the
other BA with "business acknowledgement" (see chapter 4.3.1).
• When EDX receives a message from the network, it may fail to deliver it to the correct out-
endpoint. The reason could be that you have specified validation or that the message is to
big (can happen with Kafka) or something else. In those cases, the failed message will be
placed on a shared folder defined at the very last line in the config: fail: edx-errors (which in
turn points to the fssfEndpoint with code "edx-errors"). It will fall to the manager of the EDX
to resolve such issues.
8.5.2.1 AMQP-endpoint
The configuration suggested in the example shows 2 queues for a BA named "ba1". One queue is for
messages from ba1 to other recipients (ba1.outbox) with the corresponding reply-queue (ba1.reply)
mentioned above. Another for messages to ba1 from other BAs in the network (ba1.inbox).
Queues are automatically created by EDX.
8.5.2.2 FSSF-endpoint
The configuration suggested in the example show 2 folders for a BA named "ba2", following the same
pattern as for AMQP. A reply folder is also specified in the same manner as for AMQP.
You must create this folder yourself and assign read/write/execute-privileges to EDX-Toolbox process
for these folders.
8.5.2.3 FTP-endpoint
The configuration suggested in the example shows the same setup as for AMQP and FSSF, now for BA
"ba3". What happens here is that EDX has an FTP/SFTP-client which connects to an FTP/SFTP-server.
The connectionParams are optional, but useful. The parameters sent directly the underlying apache-
component and are documented here:
https://camel.apache.org/components/latest/file-component.html
https://camel.apache.org/components/latest/ftp-component.html
By setting the tempPrefix-attribute to "../tmp" you ensure that the file is not moved into the correct
folder until it's completely written. The "../tmp"-folder must created (as ba3/tmp) and given proper
privileges.
8.5.2.4 Kafka-endpoint
For Kafka we've only specified and out-endpoint, because we think that's the mostly likely use case:
That you like to use Kafka to publish messages internal to your organization. The EDX can probably
also pick messages from a Kafka-topic and send it into the network, but this has not been tested by
Statnett.
Again, as for the FTP-endpoints, there are optional attributes which can be specified. These
attributes are specified here:
https://camel.apache.org/components/latest/kafka-component.html
Statnett recommends "compressionCodec" and "maxRequestSize", because Kafka is usually not
suited for big messages (greater than 1MB?). However, with compression, many text-messages can
be compressed up till 90%. Specify the maxRequestSize so that all messages are attempted to be sent
to Kafka and not rejected before EDX has tried to compress it.
26Statnett konfidensiell informasjon / Confidential information
8.5.3 Routes
The routes listed in the example show how each BA listens to a particular type of message,
determined by the filter (service or messagetype) and the end-attribute specification.
• Ba1 listens to messages with EDX-service code = FASIT
• Ba2 listens to messages with EDX-service code = MMS
• Ba1 and Ba2 listens to messages with EDX-service code = MNA. MNA is provided by another
EDX ServiceCatalogue than for FASIT, MMS and NUCS.
• The ServiceCatalogue code provided in the example is for the test environment. For the
production environment you should use SC code found in chapter 8.2.2.
• Ba3 listens to messages with MessageType = EXT-EI-MAGASINDATA
• Ba4 listens to messages with EDX-service code = NUCS
A few notes about this:
• We advise you to keep the routing as simple as possible.
• We advise you to avoid using MessageType in the routing. This is because the MessageType
is specified by the BA and it's better for the routing to be independent of changes in the BA.
• EDX-Service is used here as something like a "system-to-system" channel. This is defined
solely within EDX and makes it well suited to perform routing (the BA may change, but the
routing stays the same).
• You may have multiple filters, both Service, MessageType and even Sender. EDX will use the
routing rule which matches the message and is most specific. Statnett advise against such
rules, it will be hard to maintain.
At the end of the routing section you'll find the two default send/receive-routes. If the routes above
do not match anything, the message will go to the default endpoint, which is a WS-endpoint. The
WS-endpoint does not have the ability to retrieve messages based on Service, only based on
MessageType. Therefore, we advise against using it, since it will be more problematic if two BAs will
use WS-endpoint; they would have to retrieve based on MessageType.
8.6 Troubleshooting
8.6.1 You have not received Service Catalogue (AKA network configuration)
Check settings on your EDX Dashboard. You should see that the network configuration has been
updated at some point. If not, you cannot send/receive messages from EDX. The reason may be
because you cannot receive files – see chapter 7.9.5. Another reason may be that Statnett has not
updated the Service Catalogue with your endpoint (this is a manual process in Statnett). Please notify
Statnett at ecp@statnett.no if you suspect this to be the case.
8.6.2 You cannot send/receive on a particular service
If you can send messages unrelated to a specific service (ex-address: the endpoint-code for Service
Catalogue in chapter 8.2.2), but cannot send to the service you're supposed to be a part of (ex-
address: SERVICE-FASIT), then the error may be that the Service Catalogue has not been updated
properly (this is a manual process in Statnett). Please notify Statnett at ecp@statnett.no if you
suspect this to be the case. Also, please check the Services->Consumed menu on the EDX Dashboard:
A list of services should appear to show which services your endpoint may "consume".
27Statnett konfidensiell informasjon / Confidential information
28Statnett konfidensiell informasjon / Confidential information
9 Installation of ECP/EDX on Linux (Red Hat 7 or CentOs 7)
The installation is not covered here, but a few tips are in order.
• The installation is made for the Red Hat 7 and CentOS 7 distribution. RPM-packages available
on the eRoom (see chapter 5.1)
• Chapters 7.5 through 7.9 are the same for any OS
• The configuration of property files (7.2.2, 8.2.2, 8.2.3) are the same for any OS
• You can browse "Advanced Documentation" on the eRoom
(https://eroom.statnett.no/eRoom/IKT/ECP/0_eaf4) to find installation guides which cover
Linux installation.
• Contact ecp@statnett.no if you have more questions. If many requires Linux installation, we
can expand this installation guide.
29Statnett konfidensiell informasjon / Confidential information
10 Appendix
10.1 Uninstallation of ECP-endpoint
Stop the application and execute the following command:
➢ java -jar \Uninstaller\uninstaller.jar –c
Uninstaller will remove all application components and deregister the service if present.
10.2 Changing network or re-register
If you want to change network or simply re-register, you can go to the Settings-page of the ECP and
find the Re-register button. This will work for ECP v4.7+. For earlier version you'll have to delete the
db-folder of ECP and restart. In both cases you will enter the registration dialog and must perform
the steps below from chapter 7.5 and onwards.
For EDX the only change will be to change settings in edx.properties (see chapter 8.2.2)
10.3 Monitoring EDX-toolbox and ECP-endpoint
10.3.1 Manual monitoring with Hawtio
In edx.properties and ecp.properties specify the following property (or change the property if it
exists):
• spring.jmx.enabled=true
You may use Hawtio to monitor queues – it can be very useful. To install it, download Hawtio from
here
https://repo1.maven.org/maven2/io/hawt/hawtio-web/1.5.11/hawtio-web-1.5.11.war
and copy it in the webapps-folder of the ECP/EDX-application with the filename hawtio.war. It
should auto-deploy and you can access it on the following URL (admin/password):
• http://:8080/hawtio/
• http://:9090/hawtio/
You can, among other things, browse queues and see if messages are picked up, and even purge
queues if something is stuck.
10.3.2 Automatic monitoring
10.3.2.1 CD monitoring
Monitor the URL below to check if your ECP-endpoint is synchronized with Component Directory
(CD). Take a look at the Big Picture to familiarize yourself with what this means.
GET http://::8080/ECP_MODULE/settings/connectivity/
is found in chapter 7.5.1. If the CD is unavailable it your endpoint will not receive
information about changes in the network and your ECP-endpoint will no longer be able to renew the
certificates. A long downtime must therefore be investigated, but probably not before 24h has
passed.
10.3.2.2 Message monitoring
What you'll do is to ask you own endpoint to send a "test-message" to a Statnett-endpoint. This is
because you in all likelihood will communicate with Statnett on a Statnett-controlled network, but
connectivity to other endpoints might also be necessary or useful to monitor. The ECP-codes used for
30Statnett konfidensiell informasjon / Confidential information
Statnett is 50V000000000115O or 50V-SN-DK----ATT for Test-environment, and 50V000000000188Y
or 50V000000000121T for Production-environment.
The simplest approach is to run an HTTP-request like this:
PUT http://:/ECP_MODULE/settings/connectivityCheck
Set HTTP header for "Content-Type" to "application/json"
Set HTTP body to {"receiver":"","messageType":"TEST"}
The more advanced approach is when your endpoint require login: Then you need a token from login
to perform the connectivity-check. We've made a python-script which may be useful, using port 8443
in this example. Some long lines are wrapped (shown with 2 space indentation):
import requests
import json
import time
import urllib3
urllib3.disable_warnings(urllib3.exceptions.InsecureRequestWarning)
# Define some necessary variables
host = 'your-own-ecp-endpoint-host'
endpoint_code_to_check = '50V000000000121T'
username = 'admin'
password = 'password'
session = requests.Session();
# Specify a URL which will force a login – to retrieve the token
response = session.get('https://%s:8443/ECP_MODULE/statistics' % host, auth=(username, password),
verify=False).content
token = (session.cookies.get_dict())
xxtoken = token['XSRF-TOKEN']
headers = {'X-XSRF-TOKEN': xxtoken, 'Content-Type': 'application/json;charset=UTF-8'}
response_conncheck = session.put('https://%s:8443/ECP_MODULE/settings/connectivityCheck' % host,
verify=False, data='{"receiver":"%s","messageType":"TEST"}' % endpoint_code_to_check,
headers=headers).text
response_status_json = json.loads(response_conncheck)
The response JSON can be parsed and dumped to file like this:
status_check = response_status_json['status']
output_json = {}
statustime = time.strftime("%Y-%m-%d %H:%M:%S")
timestamp = int(time.time())
output_json['statustime'] = statustime
output_json['timestamp'] = timestamp
output_json['connectivity_check_status'] = status_check
output_json['hostname'] = '%s' % host
output_json['endpoint_code_checked'] = '%s' % endpoint_code_to_check
print json.dumps(output_json)
And it will print something like this to your output_json file:
{"timestamp": 1599561602, "statustime": "2020-09-08 12:40:02", "connectivity_check_status": "OK",
"hostname": "your-own-ecp-endpoint-host", "endpoint_code_checked": "50V000000000121T"}
31You can also read