Installation, Tuning, and Maintenance for Ski-doo XP Summit (2008-2010)
←
→
Page content transcription
If your browser does not render page correctly, please read the page content below

Installation, Tuning, and Maintenance
                        for Ski-doo XP Summit (2008-2010)

Thank you for purchasing your new EZRyde suspension. This guide is intended to assist with the installation,
provide tuning tips, and highlight maintenance items.

Please note that GLSV assumes no responsibility for damage that may occur during installation.
Snowmobiling presents inherent dangers. GLSV assumes no responsibility for damage, injuries, or causalities
that result from the use of this product. By installing the product the purchaser agrees to release GLSV from
any and all liabilities. GLSV will provide a full refund if purchaser does not agree to the above terms.

                                                                                                                1
INSTALLATION
The installation of your new suspension is relatively easy. However, it is assumed that you have
a general knowledge of snowmobile repair and suspensions. Please seek assistance from a
qualified OEM or aftermarket dealer if you have any concern of reservation about the
installation.

Pictures in this guide should correspond to your make or model. If they do not match, please
contact EZRyde for the correct installation manual.

Step1: Remove OEM Suspension

a.   Raise the rear end of the snowmobile using a sturdy stand.
b.   Loosen rear axle bolts. This will require removal of a plastic center wheel cover.
c.   Loosen tension adjuster bolt jam nut (if present) located on the outboard aft end of each aluminum skid rail.
d.   Loosen tension adjuster bolts. Back out the adjuster bolts to an extreme while allowing the bolts to remain in
     the adjuster block.
e.   In many cases the track will sag once the tensioners are loose. However, one can tap the rear wheel axle
     assembly forward to ensure the track tension is fully removed.
f.   Remove the rear ride spring preload. Generally, it is easier to unwind the long end of the spring. This may
     require the removal of a pin, bolt, or other hardware. OEM special tools are available for performing this task.
     It is common that OEM tools will be used to remove preload from the short end of the spring. Caution, the
     spring will unwind when removed from the slide block. This can pinch a hand or finger. Proceed with
     caution.
g.   Remove rear arm mounting bolts.
h.   Remove front arm suspension mounting bolts. This may require a wrench to hold a backing nut on the inside
     of the tunnel. Caution, the entire suspension can fall to the ground. In some cases, one may have to work
     the suspension out to free it from the tunnel.
i.   Removal of the stock suspension from the track is sometime difficult. It is helpful to get assistance from
     another person. The suspension is generally removed by pushing it forward into the tunnel while pulling the
     rear portion out of the track to one side of the sled. This may require lifting the rear end of the snowmobile.
     It could be helpful to collapse the rear arm. This will require a strap to hold it down after it is compressed.

                                                                                                                        2
Step 2: Drill New EZRyde mounting holes

        a. Pull the track forward under the snowmobile belly pan or raise the sled such that the inside of the tunnel is
           accessible.
        b. Install the supplied mounting template on the inside of the tunnel using the holes marked with “stock
           mounting holes”.

Mounting Template Installed in "stock" holes                                                                               3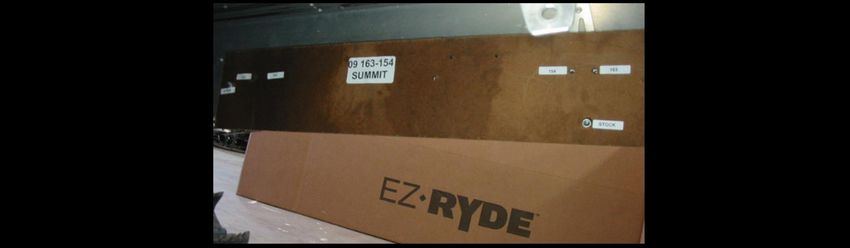
c. The mounting template will have three holes that are used to mount the compression adjust reservoir.
              These holes should be drilled on the right side of the snowmobile. Caution, position of the reservoir is
              essential to ensure that the line will not fail prematurely.

                    Template holes for the compression adjust reservoir.

            d. Use a 3/8” transfer punch to transfer the hole’s center to the inside of the tunnel. Caution; insure that both
               sides of the tunnel are marked prior to drilling any holes (use only holes marked for your track length).

Transferring template holes to the inside of the tunnel.

                                                                                                                                4
e.   Remove the mounting template, install it on the other side, and transfer punch “new” hole centers.
f.   Remove mounting template and set aside. Check the location of the front and rear hole center marks. This
     can be done using a ruler and square. Check side to side for consistency of the front and rear marks by
     measuring from “common” shock holes, rivets, or surfaces.
g.   Drill hole centers with a center drill or small drill bit. Be careful to ensure that the hole center does not
     “walk” from the marked location.

                                 Drilling holes for 3/8” mounting bolts for EZRyde skid.

h. Drill out holes with a 3/8” drill bit. Remove one of the 3/8” mounting bolts from you EZRyde skid and check to
   see if it fits through the hole without requiring threading. Enlarge hole slightly if necessary.
i. For an XP, mounting plates will need to be added to your tunnel. The rivet holes can be drilled using holes in
   the bracket. Rivet in place.

                                                                                                                     5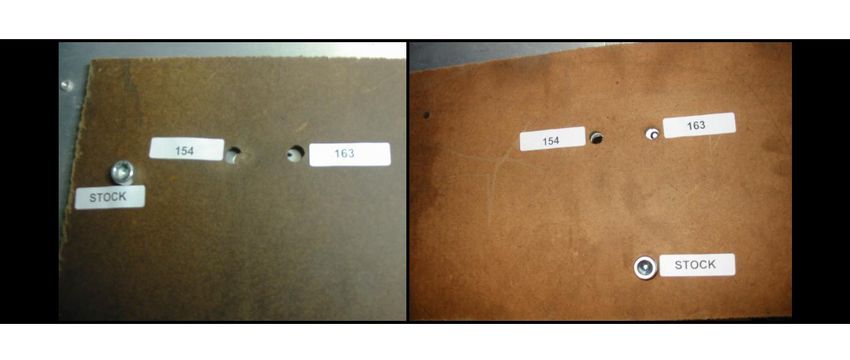
Outside brackets riveted in place.

  Rear mount inside tunnel.

                                     6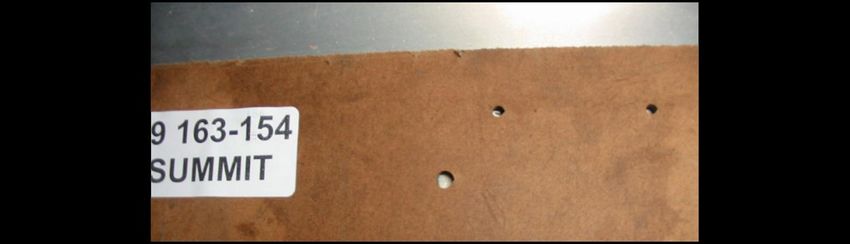
Step 3: Installing your EZRyde Suspension

             a. Place EZRyde suspension into the track. Push front end forward into open track and swing aft end into
                position.
             b. Raise front of suspension and bolt using supplied fasteners (loosely installed when package). Note: Use blue
                Loctite thread locker
             c. Bolt rear cross-shaft assembly and reservoir (just left hanging) into sled using supplied fasteners (loosely
                installed when packages). Note: Use blue Loctite thread locker. Be careful that the reservoir doesn’t get
                stuck in the arm.

Installing EZRyde Suspension.

                                                                                                                               7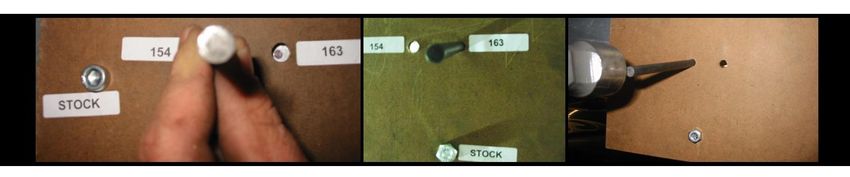
d. Mount reservoir using the supplied fasteners into drilled holes. Line up the CD adjust screw with the hole in
    the side of the tunnel.

                                 Rear reservoir hole.

e. The left figure below shows an incorrect CD reservoir line routing. The routing can be adjusted by slightly
   loosening the jam nut on the reservoir fitting and rotating the line so that it will not contact the track. Note:
   Only loosen the jam nut a slight amount, any more and the shock will loose the nitrogen charge. The right
   figure shows the correct line routing.

          Incorrect reservoir line routing.                       Correct reservoir line routing.

 f. Place a block or bucket under the rear axle and have someone help you collapse the suspension while
    watching the reservoir line. Adjust the line as necessary.
                                                                                                                       8
Step 5: Installing EZRyde Shock Covers

Shock covers are essential. The purpose of the covers is to keep snow and ice out of the spring. Snow and ice
“packing” will occur if covers are not used or are heavily damaged. Damage to your suspension and shocks
may result if “packing” occurs. Regularly inspect your shock covers and replace if necessary.

a. Install front and rear covers. Insure that covers are installed so that the Velcro is edge to edge and not
   exposed. See the below figure.

                                    Installed Velcro cover without exposure.

b. The front cover does not have Velcro on the bottom end. This allows snow to cool the shock. Do not replace
   with a full cover or your front shock will overheat and damage will occur.

Step 6: Lubrication

a. There are two different lubrication points on the EZRyde suspension which must be greased before
   operation. There is a grease fitting located on the upper end of the swing arm and one on the lower end.
   These are the only two places that need grease and should be greased every 500 miles.

                                                                                                                9
ADJUSTMENT/TUNING
Track Tension

1. Support the rear of the snowmobile with a track stand or equivalent sturdy stand.
2. Hook a spring scale around a track clip at mid-span: then pull the track down with a force of 20 lbs. Measure
   the distance between the bottom of the Hyfax and the track clip. This distance should be between ¾” and
   1”.
Note: if the track is new, it will stretch slightly and take a set within the first 300-500 miles of operation.
3. If the measurement is specified, loosen the jam nuts on the adjusting bolts and make sure the rear axle is
   loose.
4. If the measurement is more that specified, tighten the adjust bolts. If the measurement is less than
   specified, loosen the adjusting bolts.
5. After correct track tension is obtained, check the track alignment.

Track Alignment

1. Support the rear of the snowmobile with a track stand or equivalent sturdy stand.
2. Start the engine and accelerate slightly. Use only enough throttle to rotate the track several revolutions.
   Shut the engine off.
 Note: Allow the track to come to a complete stop. Do not apply the brake because it could produce
inaccurate alignment conditions.
3. When the track stops rotating, check the relationship of the rear idler wheels and the inner track drive lugs.
   If the distance from the idler wheels and the inner track drive lugs is the same on both sides, no adjustment
   is necessary. In not, continue to step 4
4. On the side of the track which has the inner drive lugs closer to the rear idler wheel, loosen the adjusting
   bolt jam nut: then rotate the adjusting bolt clockwise 1 turn
5. Continue to check the track alignment and make the necessary adjustments until proper alignment is
   obtained.
6. After proper track alignment is obtained, lock the adjusting bolt jam nut.
7. Tighten the rear axle. Make sure to use blue Loctite.
Note: Field test the track under actual conditions and, after the field test, recheck track alignment and track
tension; adjust as necessary.
                                                                                                                    10
Suspension Adjustment
Many riders do not spend time tuning there suspensions. In fact, many sleds are set by the dealer and left alone
for the lifetime of the vehicle. This is in part due to the complexity of a standard skids. It is also because the
standard suspension can be difficult to work on. Your EZ Ryde suspension is completely different. In fact, you can
remove either the front of rear shocks without removing the suspension. In addition, you can also remove the
springs without removing the shock. Simply remove the spring preload, disconnect the shock end attached to
the swing arm, remove the spring, and reinstall. You can do this with a standard 9/16” wrench and a 5/16” allen
wrench.
EZ Ryde encourages you to “play” with your suspension. You have purchased a custom premium product and
have the ability to customize your ride. We encourage you to experiment and welcome any questions or
inquiries. Remember, the more you ride and experiment the more refined your suspension will become. Your
new suspension has the following adjustment mechanisms
1. Front suspension mounting holes
2. Front spring preload
3. Rear Spring preload
4. Rear shock damping (compression only)
5. Rear spring crossover
The new suspension comes standard with a 160 lb/in spring on the front shock and a variable rate spring on the
rear shock. The rear spring rate begins a 130 Lbs/in and reaches 185 Lbs/in.
Softer or stiffer front springs are available at www.ezryde.com. The rear spring set can configured in the
following ways.
1. Change tender spring
2. Change main spring
3. Change crossover point
Both tender and main springs will affect the initial and final rates. However, each will affect the cross over point
differently. The cross over point is simply the point of total travel where the tender spring is no longer active (it is
shorted out). The crossover point is also adjustable by adding or subtracting washers to/from the spacer located
between the tender and main springs. Adding washer will increase the cross over and subtracting them will
decrease the cross over point. Please note that small changes can make a significant effect.
11Please visit www.ezryde.com for a complete listing of tables that show rates and cross over points for various
combinations. Remember, the longer the crossover point the longer the soft rate will occur. It is also important
to note that preload will effect the cross over will be reduced will added preload.
Spring preload is generally used to compensate for rider weight. However, as discussed above it will also affect
the cross over point of your rear spring combination. If your desired preload exceeds 1.75” you should purchase
a new set of springs. Please contact EZ Ryde and we will work with you to get a set of springs that match your
style or weight. It is noted, that in general more and less spring preload will give you an overall stiffer and softer
ride respectively.
If you have the following problems try these suggestions. Please try one change at a time. Determine the effect
of each prior to reaching your final settings which may be a combination of several changes.
1. Your suspension bottoms in the rollers.
a. Add preload to your rear spring
b. Reduce your cross over point by removing a washer from the rear cross over.
c. Increase the rate of your tender spring by replacing it.
d. Increase the damping on your rear reservoir (limit changes to 2 click at one time)
2. Your suspension is rough in the “washboard” bumps
a. Remove preload from your front spring
b. Decrease the rate of your front spring
c. Reduce the damping setting on your rear reservoir
d. Reduce the rate of your rear tender spring. Try not to change your rear preload.
3. Your suspension is bottoming hard.
a. Stop and check your shock covers. Packing of snow in your spring/shock will cause abrupt
bottom. In addition, this will cause damage to your suspension. There are tell-tale signs of this
and it will not be cover by warrantee. Remove snow/ice and replace the cover immediately. It
is recommended that you carry spare cover or a means to repair them.
b. Increase the preload on your rear spring set.
c. Increase the rate of you main rear spring.
d. Increase the damping setting on you rear reservoir.
e. Decrease the rear cross over point.
124. Your suspension will not lift the skis high enough or steering pressure is high.
a. Move your front suspension swing arm to the lower hole.
b. Drill additional holes if necessary. Be extremely careful to make sure each side is moved an
equivalent distance and that the hole are still in the steel mount bracket.
5. Your sled lifts the skis to high or it pushes in the corners.
a. Move your front suspension swing arm to the upper mount hole.
b. Drill additional holes if necessary. Be extremely careful to make sure each side is moved an
equivalent distance and that the holes are still in the steel mount bracket.
6. Your suspension is generally “abrupt”.
a. Reduce the damping setting on your rear reservoir.
b. Reduce the preload on your front spring.
c. Reduce the preload on your rear spring set.
d. Increase your rear crossover point by adding a washer to your crossover spacer located
between the rear tender and main springs.
e. Stop and check your shock covers. Packing of snow in your spring/shock can cause abrupt
feeling. In addition, this will cause damage to your suspension. There are tell-tale signs of this
and it will not be cover by warrantee. Remove snow/ice and replace the cover immediately. It
is recommended that you carry spare cover or a means to repair them.
7. Your suspension is generally soft.
a. Increase the preload on the rear spring set.
b. Increase the preload of the front spring. This may cause abruptness in the ‘washboard” bumps
if you go to far.
c. Decrease the crossover point of you rear spring set by adding a washer to the spacer between
the rear tender and main springs.
d. Increase the rate of your rear main spring.
e. Increase the rate of your rear tender spring
f. Increase the rate of you front spring
Front mount holes are used to adjust weight transfer or ski lift. You should start with the suspension installed in
the middle hole. To increase and decrease ski lift you should lower and raise the mount position respectively.
The adjustment screw for your reservoir should be accessible via a small hole in the tunnel on the right side of
the sled (if installed as recommended). Soften the reservoir by turning the adjustment screw counter-clockwise.
Clockwise turns will increase the damping of the rear shock.
13You can also read