Installation tutorial - Cartridge applicator with flexible attachment
←
→
Page content transcription
If your browser does not render page correctly, please read the page content below
Installation tutorial

  Cartridge applicator       Show product

  with flexible attachment

  article number: 120620

Seite 1 von 6
Installation tutorial:
                 Preparation:

                 The substrate must be free from grease, tar, oil and loose
                 particles.
                 Suitable substrates are: concrete, brick, mortar, plaster
                 and all other mineral construction materials, as well as
                 ceramics, PVC, polyethylene and polypropylene.
                 Clean the inside of the duct using a suitable brush to
                 remove dust, sand, and any loose particles.

                 Prior to application, FLEX 2000 is warmed to approx. 35 -
                 40 °C by placing in hot water to ensure optimum
                 consistency and workability

Seite 2 von 6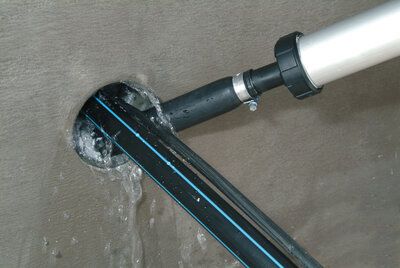
Installation:
Before applying FLEX 2000, a securing block of a two-
component PUR foam is applied in the duct at a depth of
approx. 15 cm.
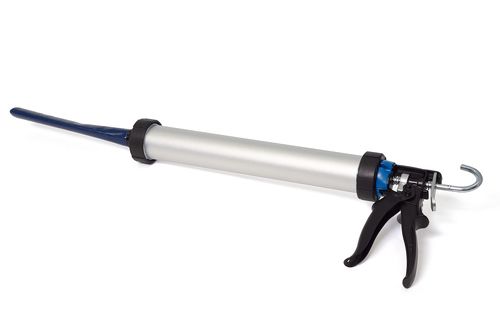
The FLEX 2000 cartridge is then inserted into the cartridge
applicator and FLEX 2000 paste injected into the annular
gap of the two-component securing block, starting at the
back and working towards the front.The layer must be at
least 12 cm thick.
After sealing cable ducts, jiggle the cables slightly and fill
any cavities with FLEX 2000.
Always ensure that the cable is free of tension and strain
after sealing.The sealing compound is then pressed in
firmly and smoothed with a metal filler knife leaving a
depression approx. 1 cm deep, which is sealed with fast-
curing cement to additionally secure the mouth of the
duct.
To feed through a new cable, the mortar cap is removed
and the cable is pushed through the sealing compound.
The duct is then re-sealed using FLEX 2000.
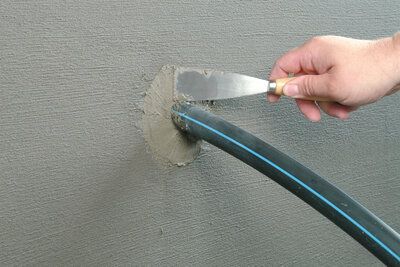
Inflowing water
Insert the flexible nozzle into the duct and seal it with
FLEX 2000 starting from the securing block.
Seite 3 von 6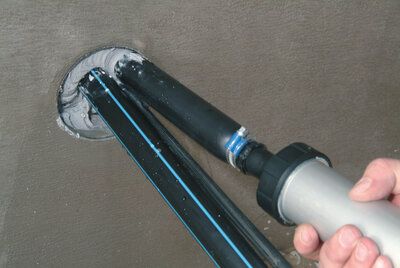
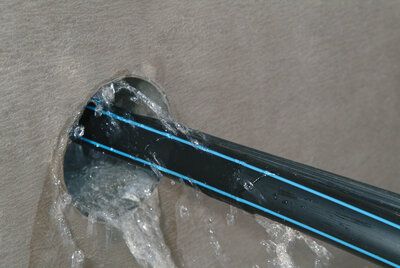
Fill the duct slowly spirally from the center outwards with
                FLEX 2000.

                Fill the duct completely with FLEX 2000.

                Smooth down the FLEX 2000 sealing compound with a
                spatula, set back approx. 1 cm.

                Close the duct with fast-curing cement and smooth it
                flush with the surface.

Seite 4 von 6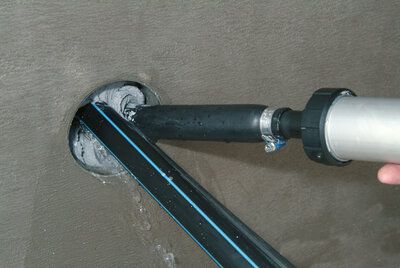
Accessories
       Flexible nozzle
       ...

Seite 5 von 6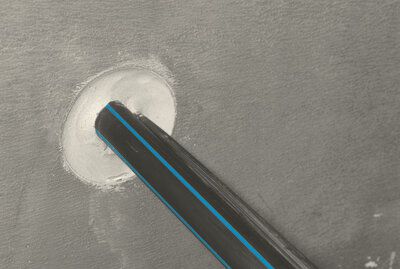
Basis

 All dimensions and information in this data sheet reflect the results of the laboratory tests
 that have been carried out. Deviations from the values determined by us under laboratory
 conditions are possible due to environmental and operating conditions beyond our control.
 The data in this data sheet only applies for the product delivered by us. The product data
 corresponds only to the specifications in Germany. Possible country-specific deviations are
 not taken into account here.

 Indication of law

 The technical information reflects our current knowledge of Cartridge applicator . It is
 intended only as information for users. As we do not know the envisaged applications and
 processing conditions, it is the responsibility of the user to carefully check that the product is
 suitable for the intended purposes. Due to the different components at the installation site
 and the working conditions in place there, MASTERTEC cannot provide any guarantee
 whatsoever for the result of the work. Claims arising from any legal relationship can only be
 recognised in the event of wilful intent or gross negligence, irrespective of the statements
 made here or advice provided verbally. In this case the user must prove that he has provided
 MASTERTEC in writing with all the information required to correctly assess the installation
 situation in good time. Subject to necessary product specifications or further developments.
 By providing this information MASTERTEC does not intend to infringe third-party rights. The
 latest data sheet in each case applies. Our corresponding terms and conditions of sale and
 delivery apply.

 The previous data sheets are no longer valid

 Printdate 31.12.2020

Seite 6 von 6

You can also read