INSTRUCTION MANUAL FOOD DEHYDRATOR - MFD-6060
←
→
Page content transcription
If your browser does not render page correctly, please read the page content below

INSTRUCTION MANUAL

               FOOD DEHYDRATOR
                        MFD-6060

PLEASE READ THIS INSTRUCTION CAREFULLY BEFORE USING THE PRODUCT

                              -1-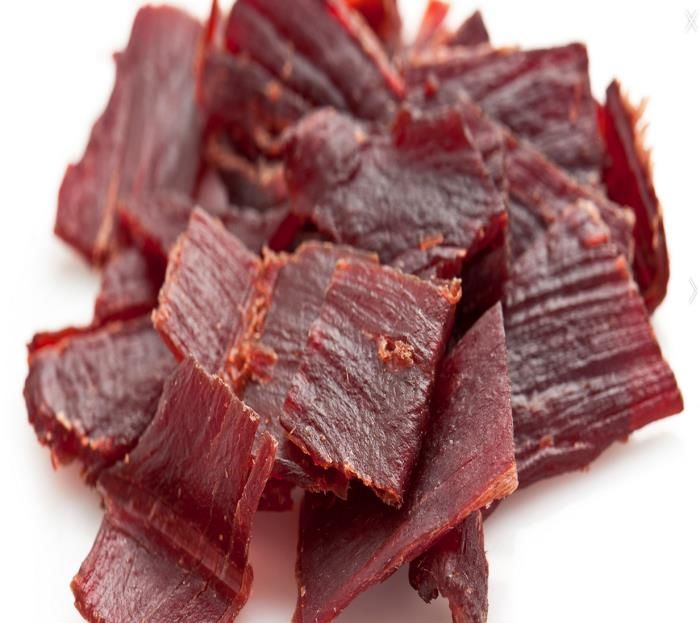
Technical specification
Normal Voltage:        120V, 60Hz
Normal Power:          600W
Thermostat:           95°F-167°F

Mesh Tray:
Use for smaller items such as herbs and berries; and sticky items such as banana & tomatoes.
Non-stick sheet (Fruit Roll Tray)
Makes delicious fruit rolls naturally. When not using as Fruit Roll Tray, store at the bottom of the unit as a
crumb tray.

                                                       -2-
Getting started
Remove all the packaging materials from the product.
Place the packing inside the box and either store or dispose of responsibly

Safety Instruction
The following basic precautions should always be adhered to when using the electrical appliance.
PLEASE READ THIS INSTRUCTION CAREFULLY BEFORE USE AND RETAIN FOR FUTURE
REFERENCE

1. This appliance can be used by children aged from 8 years and above and persons with reduced ph
    ysical, sensory or mental capabilities or lack of experience and knowledge if they have been given s
    upervision or instruction concerning use of the appliance in a safe way and understand the hazards
    involved. Children shall not play with the appliance. Cleaning and user maintenance shall not be m
    ade by children unless they are older than 8 and supervised.
    Keep the appliance and its cord out of reach of children less than 8 years.
2. This appliance is intended to be used in household and similar applications such as:
    - staff kitchen areas in shops, offices and other working environments;
    - farm houses;
    - by clients in hotels, motels and other residential type environments;
    - bed and breakfast type environments.
3. This food dehydrator is designed for DOMESTIC USE ONLY and is not suitable for commercial use.
    Do not use it for outdoors.
4. When using the food dehydrator ensures that it is on a flat, level and sturdy surface, ensure no risk
    that it may fall .Also that it can take the weight of the unit during use.
5. Failure to follow all the instructions listed may result in electric shock, fire or serious personal
    injury .The warnings, cautions and instructions discussed in this instruction manual cannot cover all
    possible conditions and situations that may occur while the product in use
6. Do not leave the food dehydrator unattended during use.
7. Always keep the food dehydrator out of children as they are unable to recognize the hazards
    associated with incorrect handling of electrical appliances.
8. This appliance is not intended for use by persons (including children) with reduced physical, sensory
    or mental capabilities, or lack of experience and knowledge. Unless they have been given
    supervision or instruction concerning use of the appliances by a person responsible for their safety.
9. Before plugging the food dehydrator into the mains electrical supply, check that the voltage and
    power supply comply with the specifications on the food dehydrator’s rating label.
10. Make sure that the food dehydrator is switched off and remove the plug from the mains electrical
    supply when it is not in use; before it is cleaned and whilst it is being repaired.
11. Ensure that the food dehydrator and power cord is not hung over sharp edges and keep away from
    hot objects and open flames; otherwise the plastic will melt and cause a fire.
12. Under no circumstances should the food dehydrator or plug be immersed in water or any other
    liquid .Do not use the appliance with wet hands.
13. Check the food dehydrator and power cord regularly for damage.
14. Do not use the food dehydrator should there be damage to the plug or cord, following a malfunction,

                                                  -3-
or after it has been dropped or damaged in any way.
15. If the supply cord is damaged, it must be replaced by the manufacturer, its service agent or similarl
y qualified persons in order to avoid a hazard.
16. Repairs to the food dehydrator should only be performed by a qualified electrician .Improper repairs
may place the user at risk.
17. None of the product’s parts are dishwasher safe, unless explicitly specified otherwise.
18. Always turn the power off at the power outlet before you insert or remove a plug. Remove by
grasping the plug; do not pull on the cord.
19. Do not use your appliance with an extension cord unless this cord has been checked and tested by a
qualified technician or service person.
20. Never use an unauthorized attachment.
21. Avoid contact with moving parts. Keep hands, hair, clothing, spatulas and other utensils away during
operation to reduce the risk of injury to persons and/or damage to the machine.
22. Please don’t turn the draught of engine towards others or tinder.
23. Please don’t keep it beside anything heating. Please keep the plug away from pressing; otherwise it
will cause a fire or electric shock.
24. If you pass this appliance on to a third party, these operating instructions must also be handed over.
Caution:
To reduce the risk of electric shock, do not immerse or expose the product, flexible
cord or plug to rain, moisture or any liquid.
Do not use the product near baths, basins or other vessels containing water or other
liquids, or when standing in or on damp or wet surfaces. Don’t keep the device in the
watery environment;
Keep the device away the place of high temperature, ray and wetly.
Don’t operate the device with wet hands.
Please turn off the power supply in the watery environment.
In the event where the appliance is dropped into the water, turn off the power at the
power outlet and remove the plug immediately. DO NOT REACH INTO THE WATER
TO RETRIEVE IT.
It is important to note that the appliance will have to be inspected by a qualified
technician before using it again.
ATTENTION! Do not run the appliance for more than 24hours in one single use. After 24 hours.
Unplug and let it cool down for at least 2 hours before operating again.
Do not operate near gas spray cans.
Incorrect operation and improper handling can lead to malfunction of the appliance and injuries to
the user.
The power cord can not be squeezed by something heavy or sharp, otherwise it will cause a fire or
electric shock.
The temperature of accessible surface may be HIGH when the appliance is operating.
-4-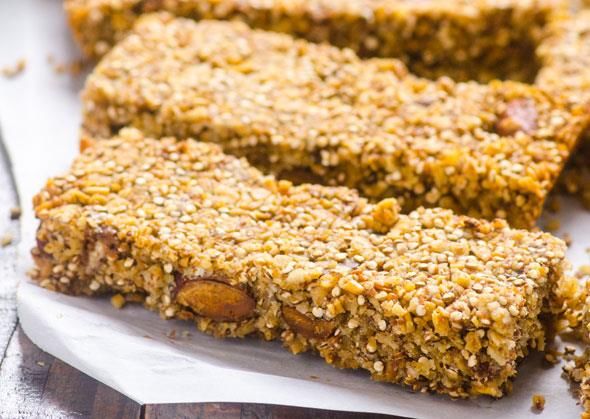
Feature of Dehydrator
This unit features an automatic fan, which circulates warm air producing a nice evenly dried device!
Dried foods are a great treat to snack on because they hold almost all of their nutritional value and flavor.
· Perfect way to preserve fruit, snacks, vegetables, bread, flowers and more.
· With ten stainless steel tray, each tray can’t over 0.6kgs food
· If you want to dry thicker food, you can take out one tray to make the height higher between two trays.
· Put the Non-stick sheet on bottom can collect the residue during dry food
· From the transparent window, you can see the food situation during drying.

Before Use:
Cleaning:
Before using the first time, wipe all parts of the appliance. Clean the 6 trays, and mesh, on-stick sheet
with a lightly moistened cloth.
Use detergent as needed. Don't put the main engine into water or other liquids!

After cleaning the unit must be run in for 30 minutes without placing any food for drying during this period.
Any smoke or smells produced during this procedure are normal. Please ensure sufficient
ventilation. After the running in period, rinse the racks in water and dry all parts. This act is only
necessary for the first time.

Unplug the dehydrator from the power supply and let it cool down before cleaning. Use a soft brush to
remove food sticking. Dry all parts before storing the dehydrator.
Do not clean the appliance with aggressive chemicals or abrasives in order not to damage the surface.

Assembling the appliance:
Make sure that the dehydrator sits steadily on a solid level surface. Stock the drying trays and connect
the plug with a wall socket. The dehydrator is now ready for use.

Usage Method

1. Put the clean food in the trays – Do not overload the trays and never overlap the food. Close the
   damper door.
2. Plug dehydrator into wall outlet, the screen and button light up and there is a beep sound at the
   beginning when it starts up. And the ON/OFF” light up, the screen shows “---“.
3. Press the “ON/OFF” button, The LED screen will show default time setting “10:00” and temp setting

                                                    -5-
“158℉”. Motor and fan start first, then heating element start working 5 seconds later. Set time begins
    to count down, the signal “:” on LED screen flashes.
4. Press the “TEMP/TIME” button and LED screen shows the time value. According to actual needs,
    press “+" or "-" button to change the drying time between "0:30” and “24:00". Press "+" or "-" button
    once, the time increment or decrement is 30 minute/press. If press "+" or "-" button for long time,
    then it automatically increases or decreases. After finish setting the drying time, system
    automatically gets into operating mode in current time setup.
5. Press the “TEMP/TIME” button and LED screen shows the temp value. According to actual needs,
    press "+" or "-" button to change the drying temp between "95℉” and “167℉". Press "+" or "-" button
    once, the temp increment or decrement is 9℉/press. If press "+" or "-" button for long time, then it
    automatically increases or decreases. After finish setting the drying temp system automatically
    confirms to work in current temp setup. LED screen operating in time mode.
    Note: Set low temperature for thin/small pieces of food or for a small load of food. Set high
    temperature for drying thick/big pieces of food and large loads. The thermostat can also be used to
    decrease the temperature as the food is near the end of its drying cycle making it easier to control
    the final moisture level in the food.
6. During drying process, you can change or check the drying time. Press the “TEMP/TIME” button first,
    then press the "+" or "-" button. Press “TEMP/TIME” button, you can check the setting time.
7. During drying process, press the “ON/OFF” button, all functions will be paused after 10 seconds.
    Screen no display..
8. In standby mode, you can press the “ON/OFF” button directly to get into default mode ( TIME : 10
    hours TEMP: 158℉). You also can change the drying time and temp if needed.
9. When the set time counts down to "0:00”, the heating element stops working first. The fan will
    continue running for 10 seconds and the buzzer rings 20 times "beep" sound (1 time/second).
10. Unplug the unit from the power point.

Hints:
·This dehydrator includes 10 trays and an overheat protection. The host contains heating elements,
motor, fan and thermostat.
·The air vents on the tray allow air to be circulated.
·Using a controlled heat temperature, Air from the back flow into each tray drying moisture..
·Depending on the moisture in the food itself and the humidity in the air, drying operation time can
change. Use the dryer in a dust free, well ventilated, warm and dry room. Well air ventilation is also
important.

· Fruit and vegetables dried in your food dehydrator will be different in appearance from those
sold in health food stores and supermarkets. This is due to your food dehydrator uses no
preservatives, no artificial coloring and only natural additives.

·Records of humidity, weight of produce before and after drying times, will be helpful to improving your
drying techniques for the future.

                                                  -6-
DEHYDRATOR
  COOKBOOK

     -7-
DRYING TIPS:
Drying time for pre-treatment fruit will vary according to the following
factors:
1) thickness of pieces or slices
2) number of trays with food being dried
3) volume of food being dried
4) moisture or humidity in your environment
5) your preferences of drying for each type of dried food
It is recommended to:
Check your food every hour.
Rotate and/or re-stack your trays if you notice uneven drying.
Label food with contents dried, date and weight before drying. It
will also be helpful to note the drying time for future reference.
Pretreated food will give the best effect in drying.
Correct food storage after drying also will help to keep food in
good quality and save the nutrients.
-8-
Temperature Settings             Uses
 95°F                            Herbs, Flowers, Dough
 104°F                           Yogurt
 113°F                           Soft Vegetables
 122°F                           Hard Vegetables
 131°F                           Citrus Peel
 140°F                           Fruit
 149°F                           Fish
 158-167°F                       Meat Jerky, Fruit Rolls

                                                                               Time,
                                                                   Dryness
              Name                      Preparation                            hours
                                                                     test
                                                                              (approx.)
                        Peel, core and cut slices or rings

  Apples                                                           Pliable      5-6

                        Cut in halves or in slices, remove pit

 Apricots                                                          Pliable     12-38

                        Peel and cut into 3-4mm slices

 Bananas                                                            Crisp       8-38

                        Pitting is optional, or pit when 50% dry

 Cherries                                                          Leathery     8-34

                        Chop or leave whole
Cranberries                                                        Pliable      6-26

                        Pit and slice

Red Dates                                                          Leathery     6-26

                        Slice

   Figs                                                            Leathery     6-26

                                        -9-
Leave whole

  Grapes                                                     Pliable     8-38

               Cut in half, dry with skin side down. Pit
Nectarines     when 50% dry                                  Pliable     8-26

               Peel in long strips
Orange rind                                                  Brittle     8-16

               Pit when 50% dry. Halve or quarter
 Peaches       with cut side up                              Pliable     10-34

               Peel and slice

   Pears                                                     Pliable     8-30

               Cut into 3/8 inch slices, other berries
Strawberries   whole                                       No moisture   8-26

               Cut into 1/3-inch strips. Boil about 10
               minutes
Artichokes                                                   Brittle     6-14

               Cut into 1-inch pieces
Asparagus                                                    Brittle     6-14

               Cut and steam blanch until translucent
   Beans                                                     Brittle     8-26

               Blanch, cool, remove tops and roots,
               slice
   Beets                                                     Brittle     8-26

                             -10-
Cut sprouts from stalk Cut in half
Brussels length-wise
Crispy 8-30
sprouts
Trim and cut. Steam tender, about 3-5
Broccoli min. Brittle 6-20
Trim and cut into 1/8-inchs trips. Cut
Cabbage core into 1/4-inch strips. Leathery 6-14
Steam until tender. Shred or cut into
Carrots slices Leathery 6-12
Steams blanch until tender. Trim and
Cauliflower cut. Leathery 6-16
Cut stalks into 1/4-inch slices
Celery Brittle 6-14
Chop
Chives Brittle 6-10
Pare and cut into 1/2-inch slices
Cucumber Leathery 6-18
Trim and slice 1/4-inch to 1/2-inch thick
Eggplant/
Brittle 6-18
Squash
Remove skin from clove and slice
Garlic
Brittle 6-16
Dry whole
Hot peppers
Leathery 8-14
-11-Slice, chop, or dry whole
Mushrooms Leathery 6-14
Slice thinly or chop
Onions Brittle 8-14
Blanch for 3-5 min.
Peas Brittle 8-14
Cut into 1/4-inch strips or rings.
Peppers Remove seeds. Brittle 4-14
Slice, dice or cut. Steam blanch 8-10
Potatoes min. Brittle 6-8
Remove outer skin and cut into
Rhubarb 1/8-inch lengths No moisture 8-38
Steam blanch until wilted
Spinach Brittle 6-16
Remove skin. Cut in halves or slices.
Tomatoes Leathery 8-24
Slice into 1/4-inch pieces
Zucchini Brittle 6-18
Remove skin, slice 3/8" thick,Space
Mangos out on dehydrator tray Leathery 6-16
Note: Time and methods of fruit pre-treatment, shown in the table above should be used as a guide only.
Customer preferences of vegetables drying might not be the same as shown in the table above.
-12-Yogurt:
You may choose to make flavored yogurt and add sugar,
honey, flavorings ,fruit, or other ingredients to taste just
prior to eating .
Yogurt flavored with preserved fruit
Ingredients:
1/2 cup chopped preserved fruit
5 tablespoons of the syrup in which the fruit was preserved
5 tablespoons of unflavored yogurt or 1 tablespoon of culture
1 quart of milk
Glass jar with screw-top
Heat the milk until it boils ( 176℉),for 1 to 2 minutes and starts to climb the side of the Saucepan.
Remove the saucepan from heat and allow the milk to cool to lukewarm (104℉).
To accelerate the cooling down, place the saucepan in cold water. Beat together the culture and milk
until smooth .
Add the syrup while beating.
Stir in the chopped fruit.
Transfer mixture into glass jars, and close with screw-top.
Remove some trays from dehydrator and place jars inside.
Dehydrate for 8 to 12 hours.
Do not stir or check yogurt during this time.
Once dehydrating is done, place in fridge. Yogurt will thicken as it cools.
Tip: The dehydrate time depend on the size of the jar and the type of yoghurt you used
as the starter. The larger the container the longer the fermentation time. If the yoghurt isn’t quite set,
place back in the Dehydrator for another hour. Repeat until the yoghurt is set. Remember that the
yoghurt will firm up more once it’s refrigerated.
• TIP: If you like thicker yoghurt place the fermented yoghurt in muslin. Hang and allow the excess liquid
to drip out. Leave for an hour and what remains inside the muslin is thick Greek yoghurt.
• TIP: Because homemade yoghurt doesn’t have any preservatives or stabilizer, the
yoghurt will separate when stored in the refrigerator. Give it a quick stir and it will
be thick and creamy again.
• TIP: If your finished yoghurt is too thin and sour tasting you have left it in the Dehydrator for too long.
-13-Fruit leather:
Strawberry Fruit Rolls
You can substitute the strawberries for blackberries,
blueberries or raspberries.
1 teaspoon vanilla extract
500g fresh strawberries, hulled, halved
300g apple puree
1. Set Dehydrator to 158°F.
2. Place all the ingredients in the jug of a blender or
bowl of a food processor. Process until smooth.
3. Spoon puree evenly onto greased fruit roll
up tray.
4. Place in Dehydrator. Leave for 6-9 hours or until
pliable. Roll up each fruit piece to form a log.
Mango Fruit Rolls
800g sliced mango in natural juice, drained
1. Set Dehydrator to 158°F.
2. Place mango in the jug of a blender or bowl of a food processor. Process until smooth.
3. Spoon puree evenly onto greased fruit roll up tray.
4. Place in Dehydrator. Leave for 6-8 hours or until pliable. Roll up each fruit piece to form a log.
Fruit rolls make delicious snacks ready to have on
hand. Here are some hints to ensure perfect fruit rolls:
TIP
• Fresh or canned fruit can be used to make fruit rolls, simply substitute weight for
weight. However, do not combine a mixture of canned and fresh fruit in the same roll
up. If using fresh fruit, make sure it is of good quality without soft or discoloured patches.
• If using fresh fruit, you will need to peel and cook it first so that it can be pureed in a blender for the
preparation required to make rolls.
• The prepared fruit must be evenly spread over the fruit roll trays to ensure even drying times.
• The fruit should be spread to an even thickness of about 5mm. The fruit, once pureed, needs to be a
spoonable consistency. If the mixture is too runny the end result will be affected.
• If mixture is too runny, you can add pureed apple or pear to the mixture to make up
the desired consistency.
• Make sure the fruit rolls are dried continuously at the recommended temperature and time.
• Once dried, the fruit rolls should be pliable and without any soft or sticky patches on top or underneath.
• Remove fruit rolls from trays when still warm and roll up to form logs.
• Wrap in non-stick baking paper and store in an airtight container in a cool, dark place for up to 1 week.
Do not store in the fridge as the fruit rolls need to be stored in a moisture-free area to maintain a pliable,
chewy texture.
• Suitable fruits for rolls include: Apple, apricot, berries, cherries, mango, peaches, pears, and plums.
-14-Jerky:
Beef jerky
Makes: 250g
Preparation: 10 mins (+ 12 hours marinading time)
Drying: 5 hrs
500g beef fillet or sirloin, excess fat trimmed
½ cup soy sauce
½ cup Worcestershire sauce
1 teaspoon salt
1. Place beef in a shallow glass dish. Pour over combined sauces and salt. Cover
with plastic wrap and place in the fridge, turning occasionally, for 12 hours to
marinade. Drain. Discard marinade.
2. Use a large sharp knife to cut beef fillet across the grain into 5mm-thick slices.
Arrange beef on drying racks. Dry on 158°F for 5 hours, rotating racks halfway through
drying process, for 5 hours.
Fish Jerky
2 cups water
2 cups brown sugar
1 cup salt
¼ cup soy sauce
4 fillets firm white fish or salmon, skin removed
2 teaspoons paprika, optional
1. Combine water, sugar, salt and soy sauce in a saucepan over medium heat. Stir until
all sugar has dissolved. Set aside until room temperature.
2. Cut fish into 2cm thick strips. Place in cooled marinade. Cover and refrigerate overnight or for at least
6 hours.
3. Set Dehydrator to 149°F.
4. Drain salmon. Lay salmon across the Dehydrator shelves in a single layer.
5. Place in Dehydrator. Leave for 8 hours. Store in airtight container in refrigerator
for up to 1 week.
TIP: Remember if you are using salmon or any other high fat fish, the shelf life will be
significantly reduced.
TIP
• Choose lean meat without much marbling (fat distributed throughout meat).
IMPORTANT: Meat must be of the highest quality and marinated on day of purchase.
• Marinate the meat in its whole form and slice after marinating. The marinade needs to be salty (see
Beef jerky recipe) as this helps draw moisture from the meat reducing the water content and making the
meat safe to consume.
-15-• Store the marinated meat in the fridge for up to 12 hours. Drain well.
• The meat needs to be sliced thinly and each slice needs to be of equal thickness, preferably 5mm. You
can achieve this with a deli-style meat slicer.
• Sometimes partially freezing the meat first, and then slicing it makes slicing easier.
Then thaw meat before arranging on trays to dry.
• Always slice the meat across the grain. Meat sliced with the grain falls apart and can have a chewy
texture.
• Dehydrated meat needs to be stored in an airtight container in the fridge for up to
3-4 weeks. If wanting to store for a longer period, label, date and freeze for up to 3 months. Thaw in
fridge overnight.
• Once the drying time is complete, cool beef to room temperature and pat surface
dry with a paper towel to remove any excess surface moisture and ensure
keeping times are safe.
IMPORTANT: Meat must be stored in the fridge or freezer only. Storing meat at room
temperature could promote the growth of bacteria if not dried thoroughly.
Cheesy Kale Chips
The ingredients may not look cheesy but
the flavor comes from the yeast and miso paste.
2 bunches kale, washed, roughly torn
1 cup nutritional yeast
1 cup white miso paste
2 tablespoons extra virgin olive oil
1 teaspoon sea salt
2 cloves garlic, crushed
1. Set Dehydrator to 122°F.
2. Combine yeast, miso, oil, salt and garlic. Stir to form a paste.
3. Rub kale leaves with miso mixture. Place on Dehydrator shelves.
4. Place in Dehydrator. Leave for 12-13 hours or until crispy. The length of time will
depend on the thickness of the kale leaves.
Store in an airtight container for up to one week.
-16-Cheesy Bread
1 cup warm water
2 tablespoons sugar
1 tablespoon yeast
4½ cups flour
¹⁄ ³ cup olive oil
1 tablespoon dried oregano
2 teaspoons salt Filling:500g bacon, cooked
2 cups grated mozzarella cheese
1 cup grated cheddar cheese
1. Set Dehydrator to 95°F. Line a Dehydrator shelf with baking paper.
2. In a jug combine water, yeast and sugar. Place jug in Dehydrator for 10 minutes. The yeast should be
bubbly.
3. Place flour, olive oil, oregano and salt on a work surface. Form into a mound and make a well in the
center.
4. Add the liquid ingredients and slowly bring the flour into the center to form a dough. Knead for about 5
minutes or until the dough is elastic and smooth.
5. Lightly grease a large bowl with oil. Place dough in the bowl and place in Dehydrator. Leave for 1 hour
or until doubled in size.
6. Remove from the bowl and knead quickly for 1 minute.
7. Roll dough out into a large rectangle. Cover the dough with bacon and cheese. Roll up, using the
widest side, into a cylinder. Bring the two ends of the dough together to form a circle. Pinch dough
together to seal.
8. Place on a lined Dehydrator shelf. Place in Dehydrator. Leave for 30 minutes. At this
point preheat oven to 392°F..
9. Remove dough from Dehydrator and place on metal baking tray. Bake for 20 minutes
or until golden and cheese is bubbling.
-17-Nutty Quinoa Granola
2 cups quinoa, soaked for 2 hours
1 cup pecans, soaked for 2 hours
½ cup pumpkin seeds, soaked for 2 hours
½ cup sunflower seeds, soaked for 2 hours
¹⁄ ³ cup maple syrup
2 teaspoons ground cinnamon
1 teaspoon ground mixed spice
1 teaspoon vanilla extract
1 teaspoon sea salt
2 tablespoons coconut oil
6 medjool dates, stones removed, roughly chopped
1. Set Dehydrator to 149°F.. Line non-stick sheet on tray .
2. Drain quinoa, pecans, pumpkin and sunflower seeds.
3. In a large bowl combine all ingredients. Make sure all ingredients are coated in oil and syrup.
4. Spread evenly over 2 Dehydrator shelves.
5. Place in Dehydrator. Leave for 24 hours or until crunchy. Place in airtight container.
Apricot Coconut Cookies
2 cups dried dates, stones removed
1 cup almond butter
1 cup dried apricots
1 cup shredded coconut
½ teaspoon salt
1. Set Dehydrator to 158°F..
2. Place all ingredients in the bowl of a food processor. Pulse until a chunky paste has formed.
3. Form mixture into 1 tablespoon sized balls. Place on Dehydrator shelves. Press down to flatten.
4. Place in Dehydrator. Leave for 7-8 hours or until firm. Store in an airtight container for up to one week.
-18-STORAGE
Store food only after they have cooled down.
Food can be kept longer if stored in a cool, dry and dark place.
Remove all the air you possibly can from the storage container and close tightly.
Optimal storage temperature is 59°F or lower.
Never store food directly in a metal container.
Avoid containers that “breathe” or have a weak seal.
Check the contents of your dried food for moisture during the weeks following
dehydration. If there is moisture inside, you should dehydrate the contents for a longer
time to avoid spoiling.
For best quality, dried fruit, vegetables, herbs, nuts, bread should not be kept for more
than 1 year, if kept in the refrigerator or freezer.
Dried meats, poultry and fish should be stored for no more than 3 months if kept in the
refrigerator, or 1 year if kept in the freezer.
Maintenance/Cleaning Method
After using, unplug the dehydrator from the power supply and let it cool down before
cleaning.
Use a soft brush to remove food sticking on the trays.
Dry all parts with a dry cloth before storing the dehydrator.
Clean the surface of body with damp cloth.
Use paper towels to remove any excess marinade.
Do not clean the appliance with aggressive chemicals or abrasives in order not to damage
the surface.
Protect the appliance from dust and dirt when not using it for a prolonged
length of time (wrap it in a plastic bag). Store it in a dry place
SAVE THIS INSTRUCTION!
-19-2 Alpine ct. Chestnut Ridge NY 10977
201.785.8840 | contact@magicmillusa.com
-20-You can also read