JAGUAR LAND ROVER ROAD STANDARDS 23/03/2021 - GEFCO
←
→
Page content transcription
If your browser does not render page correctly, please read the page content below
JAGUAR LAND ROVER ROAD STANDARDS 23/03/2021

CONTEXT
▪ Gefco has been awarded to transport JLR vehicles between Zeebrugge (C.RO) and Safenwil (Switzerland) from
  03/05/2021

▪ Performance Requirement: 99.5% of units will remain undamaged in relation to all units transported

▪ JLR claim handler is Sevatas. For each carrier found liable for damage on vehicle will be charged an additional
  £35 per claim to cover claim handling admin costs and includes advanced validation from Sevatas.

▪ In order to validate that JLR specificities have been taken into account, we ask you to send us the certificate
  confirming that the JLR operational requirements described in the following presentation and in the appendices have
  been taken into account and distributed/applied.

2     23/03/2021   JLR STANDARDS
LOADING STANDARDS
BEFORE LOADING
▪ Please ensure that all information about items below (described in appendixes for each model) are understood by all
  drivers
    ▪ DRIVER CONTROLS – STARTING THE VEHICLE
    ▪ DRIVER CONTROLS – DRIVE SELECTOR [AUTOMATIC]
    ▪ DRIVER CONTROLS –LOADING CONFIGURATION
    ▪ DRIVER CONTROLS – ELECTRONIC PARKING BRAKE [EPB]

▪ Engine must be warmed up prior to loading. A minimum of 1 minute running of engine before loading

▪ Loading must be at crawl speed to prevent suspension bounce and grounding out of under body areas and
  components.

▪ Land Rover products must be loaded in low range and hill descent as appropriate to the model.

▪ Once vehicle is parked onto transporter disengage the low range gear (if model applicable).

▪ Towing eyes (if fitted to vehicle) must not be removed

4     23/03/2021   JLR STANDARDS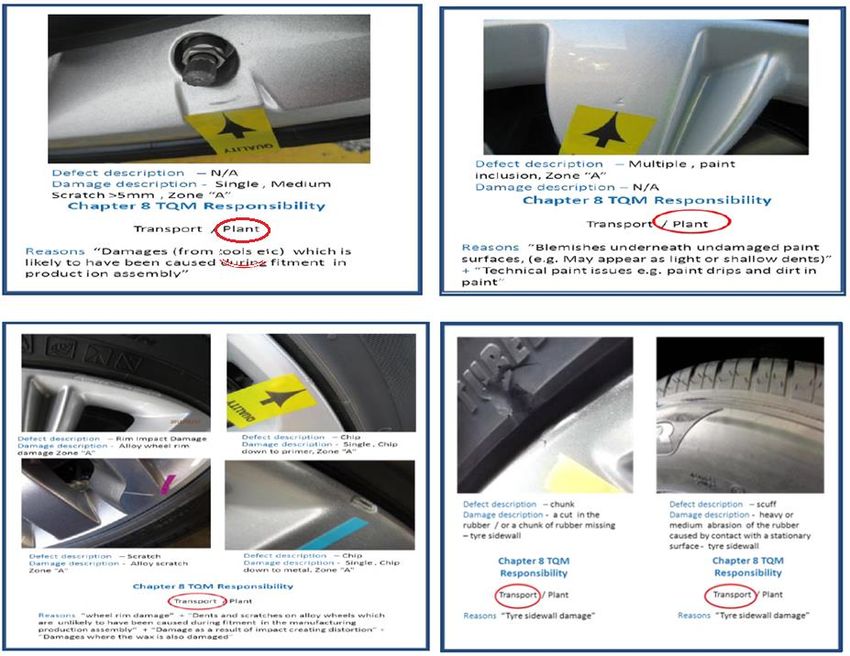
LOAD CONFIGURATION

                                                                                                                                                  Ramps should be set at
                                                                                                                                                  minimum angles to avoid
                                                                                                                                                underbody/bumper grounding
                                                                                                                                                  8 degree recommended

•       Infill deck plates should be put in position if required in support of requirement in addition to specific vehicle model handling guide loading schematics where
        applicable
•       Products should not be carried at angles exceeding 15 degrees nose up or down once loaded on to the transporter.
•       Schematics shown below are from closest contact point > e.g. Towing eye.
            •    Towing eyes if fitted on the vehicle should not be removed.
•        Wheel chocks, lashings or clamping belts should be removed from the transporter deck prior to loading/unloading.
•        If vehicle has a screw in type towing eye fitted they should not be taken out during transporter operations
•        Load planning should ensure that towing eyes are considered these can protrude up to circa 40-90mm from bumper overall length dependent on model.

    5        23/03/2021      JLR STANDARDS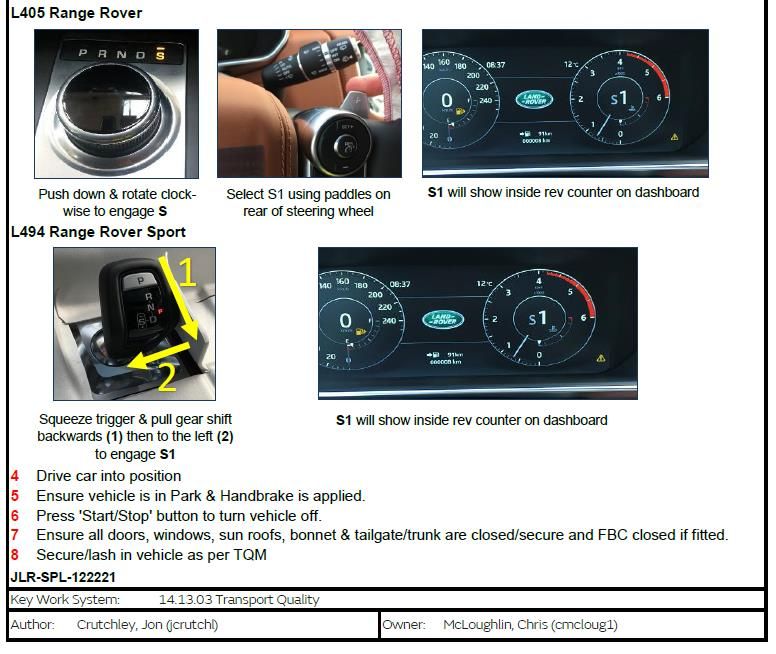
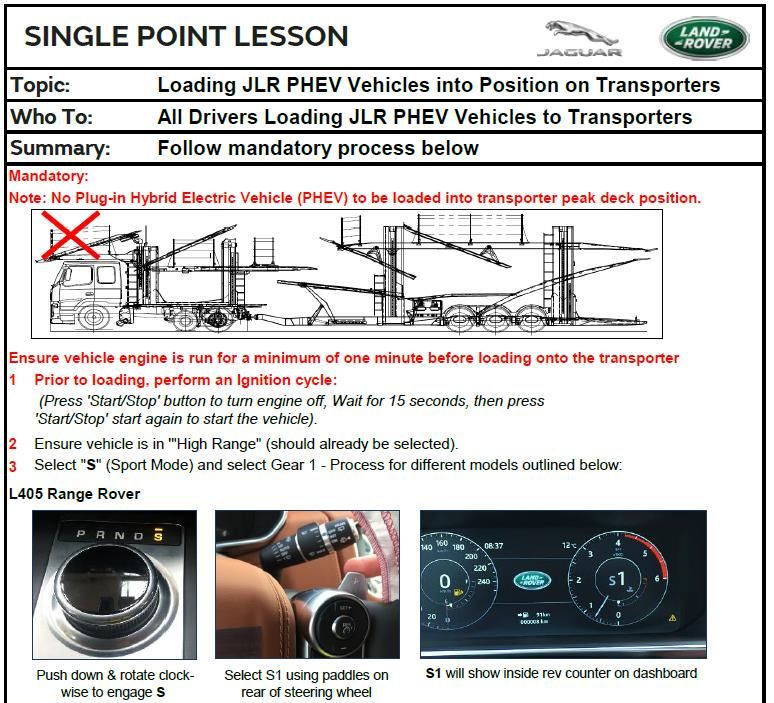
EXCEPTIONS FOR PHEV VEHICLES

6   23/03/2021   JLR STANDARDS

LASHING

•       Minimum requirement of two wheels to be chocked per vehicle loaded on the transporter
•       Number of chocks required for each wheel = x 2 (NB: Integral chocks are on some transporters)
•       Due to the weight of JLR vehicles four lashings/fixings per vehicle is recommended.
•       x 1 Lashing for each wheel

    7      23/03/2021   JLR STANDARDS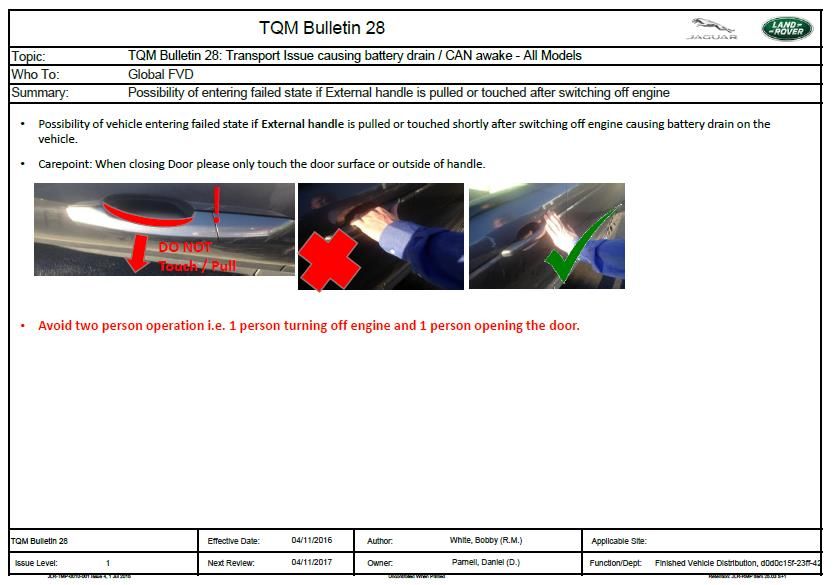
HANDOVER PROCESS
VEHICLE INSPECTION PROCESS RULES
▪   This is a one person process
▪   Maximum five minute total evaluation
▪   Vehicle to be clean and dry (where possible - may not be clean during transportation)
▪   All vehicle inspections to be undertaken in a manner that minimises contact with the vehicle (Touch to confirm issue if required)

▪   All metal items such as watches, rings, belt buckles etc. to be removed or appropriately covered
▪   View each panel separately
▪   View each panel from 1 Metre (arms-length – wherever possible) with validation (validation – not detection) of concerns allowed at no
    closer 50cm eye height (generally from standing position – bending allowed to view bottom half of panels, spoilers etc.)
▪   View each panel straight on and from 30/45 degree angle (This can be done at the four corners of the vehicle -“gun-sighting”- viewing
    along the length of vehicle allowed) paying particular attention to panel edges
▪   View each panel in the best available light with good illumination to roof and sides of the vehicle (a minimum of 1000 lux, day light
    tubes recommended, the use of sodium lighting is not permitted) Use of handheld inspection lamps is allowed. (Not Sodium lamps)

9      23/03/2021    JLR STANDARDS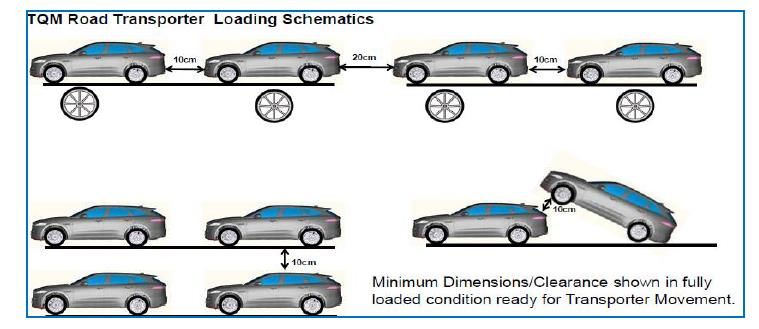
EXTERIOR : VEHICLE INSPECTION PROCESS RULES
▪   Approach the vehicle from the front, start inspection on the bonnet (hood) outer and continue around the vehicle in an anti -clockwise direction as prescribed

    below after VIN (Vehicle Identification number) check (Item 1).     1 Ensure Windscreen Vin Plate matches the Windscreen shipping label
                                                                        2 Inspect Bonnet/Hood outer panel
                                                                        3 Inspect Front Bumper/Grille (A mirror can be used to inspect the lower bumper/gravel guard)
                                                                        4 Inspect Front Bumper for Lashing Eye and foam protection behind Lashing eye (Where applicable)
                                                                        5 Inspect LH (Left hand) A Post
                                                                        6 Inspect LH Wing / Side Vent / Wheel Arch / Claddings
                                                                        7 Inspect LHF (Left hand front) Wheel
                                                                        8 Inspect LHF Outer Door Panel / Claddings
                                                                        9 Inspect LH Mirror Housing
                                                                        10 Inspect LHF Inner Door Panel (If LH Drive Vehicle)
                                                                                                                                                            X
                                                                        11 Inspect LHF Door Aperture and Inner Sill (If LH Drive Vehicle)
                                                                        12 Inspect Drivers, Cockpit for any obvious visible damage (If LH Drive Vehicle)
                                                                        13 Inspect LH Outer Sill                                                          Do not
                                                                        14 Inspect LHR Outer Door Panel/Claddings
                                                                        15 Inspect LHR Quarter Panel / Body Side Panel / Wheel Arch
                                                                                                                                                          open
                                                                        16 Inspect LHR Wheel
                                                                        17 Inspect Boot Lid / Upper Lower Tailgate Outer Panel / Claddings/Spoilers (as applicable)
                                                                        18 Inspect Rear Bumper
                                                                        19 Inspect Roof / Roof Spoiler
                                                                         (Use of a Handheld inspection Mirror or step is permitted/ Standing on any part of vehicle to inspect
                                                                        roof is not permitted)
                                                                        20 Inspect RHR Quarter Panel / Body Side Panel / Wheel Arch
                                                                        21 Inspect RHR Wheel
                                                                        22 Inspect RHR Outer Door Panel / Claddings
                                                                        23 Inspect RH Outer Sill
                                                                        24 Inspect RHF Outer Door Panel / Claddings
                                                                        25 Inspect RH Mirror Housing

     10      23/03/2021       JLR STANDARDS
INTERIOR : VEHICLE INSPECTION PROCESS RULES 26 Inspect RHF Inner Door Panel (If RH Drive Vehicle) 27 Inspect RHF Door Aperture & Sill (If RH Drive Vehicle) 28 Inspect Drivers, Cockpit for any obvious visible damage (If RH Drive Vehicle) 29 Inspect RH Wing / Side Vent / Wheel arch / Claddings 30 Inspect RHF Wheel 31 Inspect RH ‘A’ Post 32 Inspect for location of x 2 Key / Fobs (Must be stored as per TQM requirements – (generically Driver’s door pocket – ) 33 Confirm relevant vehicle protection is in place (all vehicle protections are described later in the presentation) 11 23/03/2021 JLR STANDARDS
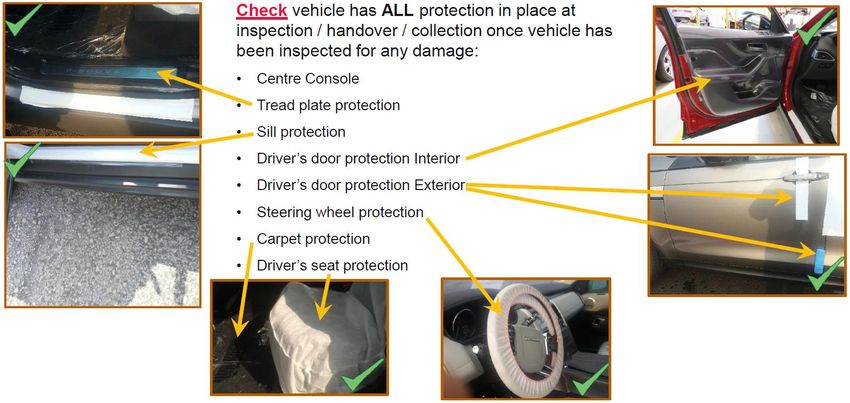
PROTECTIONS

12   23/03/2021   JLR STANDARDS
PROTECTIONS

13   23/03/2021   JLR STANDARDS
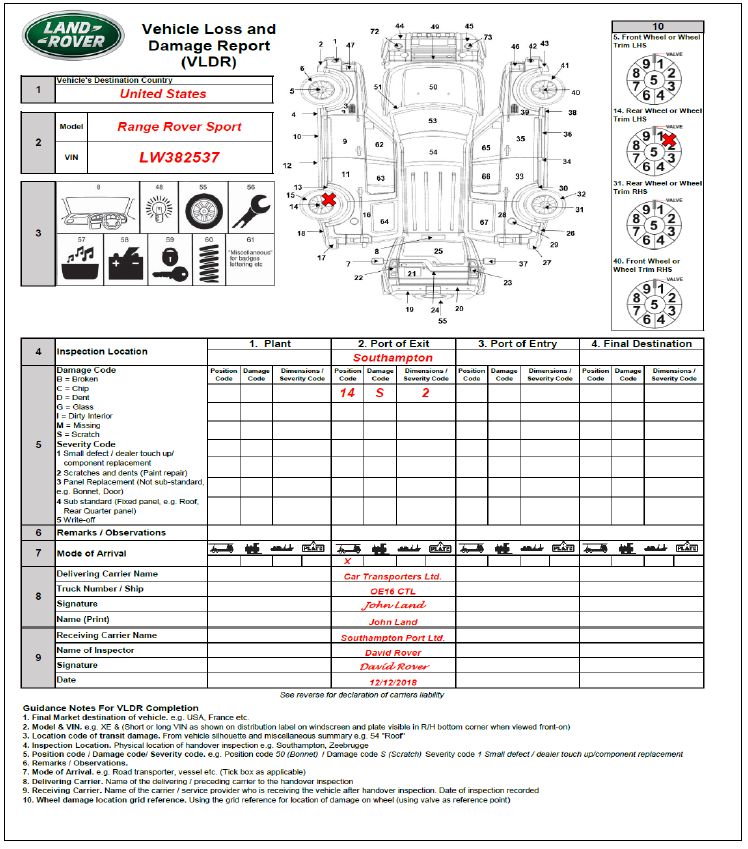
VLDR EXAMPLE
Mark an X to show position/location of damage on the vehicle (numerical digit code) VLDR
vehicle silhouette or ancillary matrix

1. Vehicle Destination (Final Market Destination)
2. Model (Type) & VIN (Vehicle Identification Number)
3. Miscellaneous (Add x on as applicable to position code if not found on silhouette e.g... Key
Fob loss/issues)
4. Inspection Location (Eg. Solihull Plant, Southampton, Zeebrugge, Compound X etc.…)
5. Damage Code and Severity
6. Remarks & Observations
7. Mode of Transport
8. Delivery Transport S/P (Service Provider)/Carrier/contractor/name & signature if available
(Section 8 on VLDR)
9. Receiving Transport S/P (Service Provider)/Carrier/contractor/name & signature if available
(Section 9 on VLDR)
10. Wheel Damage location and grid reference (12 o’clock is the wheel valve reference point)

If no VLDR is provided on loading/unloading compound, it is important that the
damages are at least noted on the CMR in box 18 with the necessary signatures.

    14       23/03/2021        JLR STANDARDS
VLDR EXAMPLE
Damage Codes (VLDR section 5)
B – Broken: EG. Impact causing fracture of component.
C – Chip:
• Splitting off in paintwork is caused through mechanical forces or pressure and are of differing depths, sizes, found commonly
on doors, boot/bonnet lids and sill/rocker surfaces.
• Can be caused during panel fit in assembly.
• Stone-chips are point form damages in the paintwork, sometimes through to the bare metal as the consequence of a stone
impact, further damages can occur in glass, plastic and chromium plated parts.
D- Dent:
• Dents are impressions /indentations or warping in the outer surface of metal or plastic parts into the parts interior OR Inner
surface of metal or plastic parts into the parts exterior.
G – Glass:
• Impact damages post ABS only to be classed as transit damage. This is clearly identified by cobweb effect to glass
fragments.
• Stress fractures and linear fractures emanating from the stress point on the edge of seal to metal point inwards across the
glass usually indicative of factory damage.
• Exterior Scratches that are visible/obvious
• Glass damage which cannot be categorised as either impact related or a stress fracture must be recorded for further
investigation by the FVD/manufacturing plant
I – Interior: Dirty interior, driver's zone usually is classed as transit concern. Other zones have restricted entry for transport due
to transit mode lockdown on all doors (Except Drivers) and would be classed as manufacturing indicative.
M – Missing: Item not in vehicle following check of vehicles. Limited to main cabin items or known fitments. EG: Interior drivers
mirror/key fobs
S – Scratch: Linear formed mechanical damages of the paintwork surface of differing depths.
F - Ferrous Oxide Contamination: Shifting/flying rust is a corrosion caused by the diffusing of iron or steel particles in the paint
surface which circulate in the atmosphere dirt and mud ingress from transport and/or Manufacturing or Distribution storage areas.
15 23/03/2021 JLR STANDARDSVLDR EXAMPLE Severity Codes: (VLDR section 5) 1. Small scratch/ dealer touch up/component replacement – EG. non critical-repair on delivery 2. Scratches and dents - Panel paint-repair intervention required before final delivery 3. Panel replacements not sub-standard EG. Bonnet/Hood or door (Bolt on) 4. Sub-standard – (Fixed/Panel, e.g. Roof or Rear Quarter Panel) 5. Write off. 16 23/03/2021 JLR STANDARDS
TYPICAL TRANSPORT DAMAGES

        Damages underneath torn/damaged protection
        covers/foils /if protection is damaged not missing
        ▪ Damage as a result of impact creating distortion
        ▪ Lost/missing key Fobs post ABS (Accepted by Sales at
          the manufacturing handover point)
        ▪ Broken windscreens/glass with evidence of impact
          damage

17   23/03/2021   JLR STANDARDS
NOT TYPICAL TRANSPORT DAMAGES
Damage in body gaps (In areas not accessible in transit)
▪ Blemishes on metal or plastic surfaces which are protruding away from the vehicle (Eg..outward
dent)
▪ Areas on the surface or vehicle that is difficult to access during the transport process
▪ Damages underneath undamaged protection covers/foils not visible at handover.
▪ High frequency, repetitive damages in the same zone with similar appearance which have been
acknowledged by JLR as a manufacturing / product issue
▪ Blemishes underneath undamaged paint surfaces, (e.g. May appear as light or shallow dents)
where the panel condition is recognized by manufacturing
▪ Damages (from tools etc.) that can occur during product assembly
▪ Stress fractures and linear fractures emanating from the stress point on the edge of seal to
metal point inwards across the glass.
▪ Dents and scratches around the lug nut/valve area of the alloy wheel which can be caused
during fitment
▪ Acidic contamination
▪ Painted body in-white condition. (Paint or lacquer overspray)
▪ Paint mismatch
▪ Technical paint issues e.g. paint drips and dirt in paint
▪ Loose items in sealed areas are excluded from Transit claims unless there is evidence of seal
damage / tampering.
18 23/03/2021 JLR STANDARDSTYPICAL TRANSIT OR PLANT (FACTORY) WHEEL DAMAGE PHOTO PLANT DAMAGE TRANSIT DAMAGE 19 23/03/2021 JLR STANDARDS
PVR (PROBLEM VEHICLE REQUEST) PROCESS
▪ This process should be used and followed if a vehicle cannot
  be transported normally due to a technical incident, vehicle
  non-starter (after jump starting has been attempted) or tyre
  replacement.

                               In case of any issue, ask to C.RO
                               people to fill in the PVR template.

   20    23/03/2021   JLR STANDARDS
TRANSPORT QUALITY MANUAL BULLETINS
EVOQUE CONVERTIBLE
21 23/03/2021 JLR STANDARDSTRANSPORT QUALITY MANUAL BULLETINS
Transport Issue causing battery drain / CAN awake - All Models
22 23/03/2021 JLR STANDARDSTRANSPORT QUALITY MANUAL BULLETINS
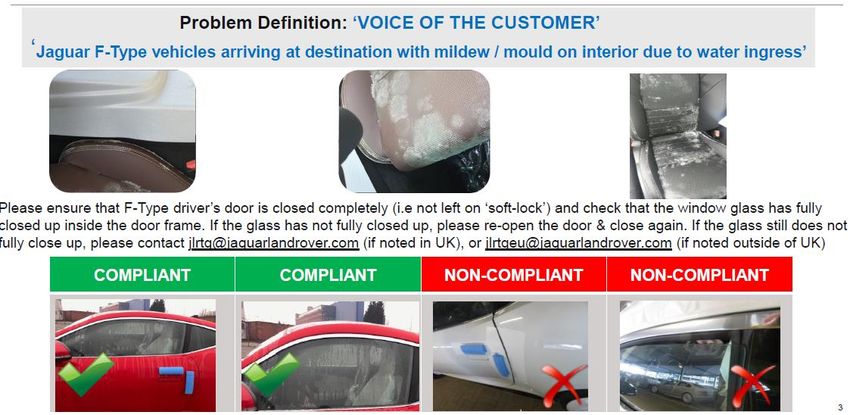
Carepoint Closure of Jaguar F-Type Doors & Windows
23 23/03/2021 JLR STANDARDSYou can also read