Get to Know Premiere Elements 2020 - What's what and what it does - Muvipix.com
←
→
Page content transcription
If your browser does not render page correctly, please read the page content below
The Muvipix.com Guide to Adobe Premiere Elements 2020

                                    Get to Know the Premiere Elements Workspaces
                                                           Basic Video Editing Moves
                                               What’s New in Premiere Elements 2020?

Chapter 1

Get to Know Premiere Elements 2020
What’s what and what it does

The interface for Premiere Elements
has been designed by Adobe to be as
simple and intuitive as possible. It is also
remarkably customizable, with a wealth of
powerful tools in obvious and, once in a
while, not so obvious places.

                                                                                    1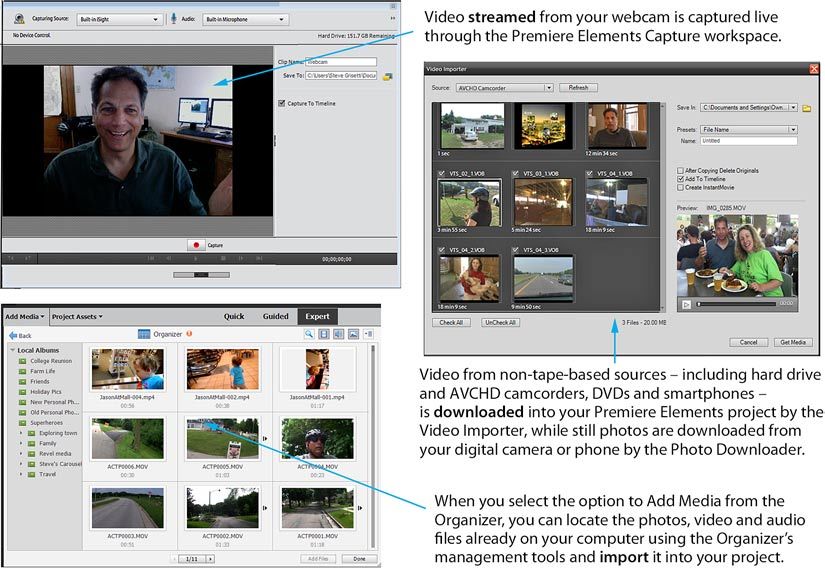
CHAPTER 1 The Premiere Elements Interface
Get to Know Premiere Elements 2020
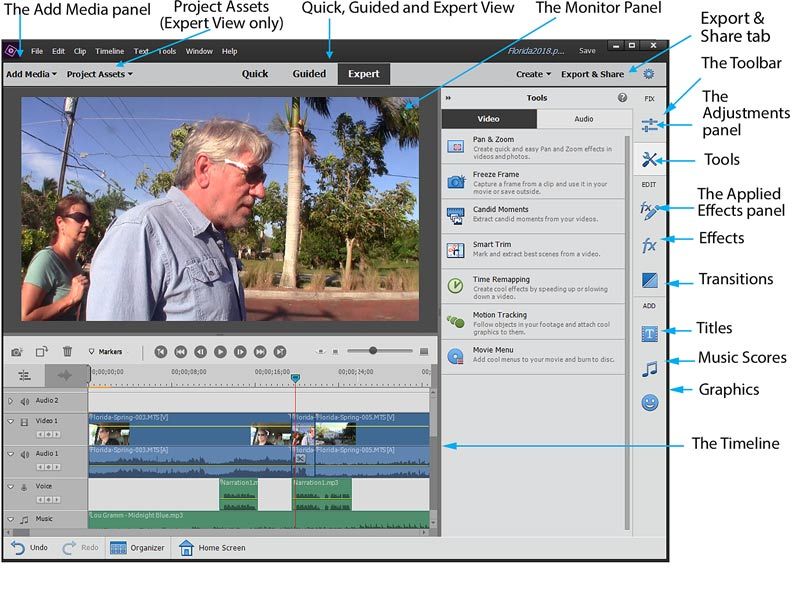
The Monitor panel
The Monitor is the panel on which you’ll preview your movie as you
work. It usually rests in the top center of the interface – though it can
change position to accommodate the Adjustments and Applied Effects
Panels, pop-ups and the Toolbar panels when necessary.
The Premiere Elements interface has been designed with efficiency and
readability in mind.
The Timeline
The interface is bright and clean with big, easy-to-�nd buttons and text
Both Quick View and Expert View (discussed on the following page)
throughout.
share a similar workspace for assembling your video: the Timeline.
Its tools are tucked out of the way – but easily retrievable with just a click
Your timeline is really where the bits and pieces become a movie.
or two.
Many of the tools are hidden away in pop-up panels that snap open with
just a click on a tab or button.
The bulk of the tools can be accessed through buttons on the Toolbar,
which runs along the right side of the Premiere Elements interface.
When it comes to the actual editing, the program offers two separate
(though connected) workspaces – Quick View and Expert View –
workspaces that allow you to go as deeply into the process as you’d like.
(More on them on page 4.)
Additionally, the program includes a Guided Edits library, available in
both Quick and Expert View. Guided Edits take you step-by-step through
a number of key editing tasks. It’s like having your own personal teacher
built right into the program! (For more information on Guided Edits, see
Chapter 3.)
2 3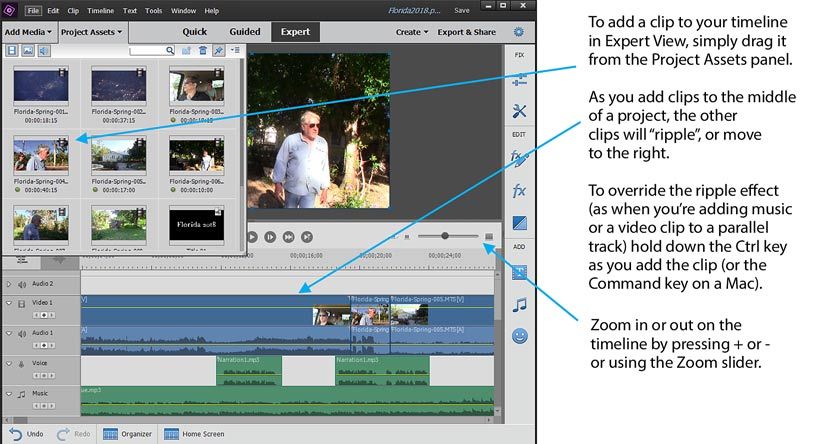
CHAPTER 1                                                                                                                                           Customizing the Premiere Elements Interface
                                                                                                                                                                  Get to Know Premiere Elements 2020

                                                                                                   Customize your workspace
                                                                                                   The sizes and arrangements of the various panels in the interface are
                                                                                                   easily customizable. Panels can be resized by dragging on the seams
                                                                                                   between them.

                                                                                                   Feel free to experiment and resize the panels by dragging on the
                                                                                                   borders between them.

                                                                                                   Many of the pop-up panels also allow you to stretch them longer so
                                                                                                   that you can see more of the assets, effects, templates, etc., at once.

                                                                                                   And, if you ever �nd the program misbehaving or if you just feel like you’ve
                                                                                                   lost control of your workspace, you can easily get back to the default look
                                                                                                   by simply going to the Window drop-down menu and selecting Restore
                                                                                                   Workspace.

                                                                                                   Minimum screen resolution
                                                                                                   Because of the size of the panels and the number of tools that Adobe �ts
                                                                                                   into some rather tight spaces, we recommend that this program not be
                                                                                                   used on a computer with a monitor with less than 1280x1024 resolution.

    Quick View and Expert View                                                                     There’s simply no room for it all to �t otherwise! And, on a smaller screen,
                                                                                                   you’ll spend a lot of time scrolling and resizing panels, trying to get to all
    Premiere Elements offers you two different workspaces in which to edit your video project:
                                                                                                   the tools.
    Quick View and Expert View.

    Quick View displays your clips as thumbnails with the duration of each clip indicated
    numerically. Your clips can be easily gathered, arranged and re-arranged.
                                                                                                       What’s a CTI?
    In Expert View, each clip’s duration is indicated by its length on the timeline. Expert View
    functions much more like a professional video editor.

     Quick View                                     Expert View
      Media clips are added directly to the          Media clips are gathered into the Project
      timeline from your computer, camcorder         Assets panel before they are added to your
      or recording device.                           timeline.

      The timeline consists of two tracks: Video     The timeline can include up to 99 video and
      and Music.                                     99 audio tracks.

      Titles added in Quick View are linked to       Multiple tracks of video can be combined
      video clips and cannot extend over more        to add titles and create effects, including       Adobe vocabulary alert! That thin, vertical, red line that moves along the Timeline as
      than one clip.                                 Videomerge, Chroma Key and Picture-in-            you play your video? It’s called a CTI, which stands for “Current Time Indicator.”
                                                     Picture.                                          That’s Adobe’s official name for it, anyway. And we’ll use that term often throughout
                                                                                                       this book.
      Overall audio levels can be raised or          Audio levels can be controlled at speci�c
      lowered for your video’s audio and your        points using keyframes created right on the       But it’s also more commonly referred to as the playhead. Because that’s what it’s
      movie’s music track.                           timeline.                                         called in virtually every other video editing program.

      A limited number of effects and titles are     A complete set of effects is available.
      readily available in Quick View.
4                                                                                                                                                                                                 5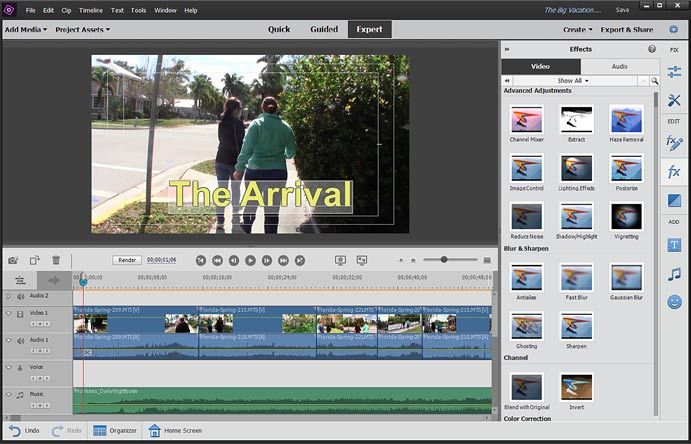
CHAPTER 1                                                                                                                                                     Basic Video Editing Moves
                                                                                                                                                    Get to Know Premiere Elements 2020

        Basic editing moves
        No matter what you plan to do with your video and no matter how creatively you plan
        to do it, the video editing process itself will still �t the same basic structure.

        Here’s a brief walkthrough of the steps you’ll take for creating any video project in
        Premiere Elements.

        1        Gather your media
                 The assets, or media, you gather to create your movie can come from a variety
                 of sources. It can be video, audio, music, photos or graphics. If you are working
                 in Quick View, any media you gather will go directly to your timeline. If you are
                 working in Expert View, it will go into your Project Assets panel.

                 To import your media into your project, click on the Add Media tab on the
                 upper left of the interface.

                 There are basically three ways to get your media into your project, all accessed
                 by one of the six buttons on the Add Media panel (illustrated below). We show
                 you how and when to use each in Chapter 5, Add Media to Your Project.

                  • Download your video from a hard drive camcorder, �ash based
                    camcorder or other video recording device.
                    Video clips from hard drive and �ash drive recording devices, including
                    high-de�nition AVCHD and Go Pro camcorders as well as smart phones,
                    are downloaded into your Premiere Elements project when you select the           • Stream or capture your video into your project.
                    Videos from Cameras & Devices option. Media can also be downloaded
                                                                                                      If you’ve got a Webcam or other WDM (Windows Device Model)
                    from other sources, including DVDs, using the DVD Camera or Computer
                                                                                                      video or audio device attached to your computer, you can use
                    Drive option. Photos can be added from cameras and other devices by
                                                                                                      Premiere Elements to capture the live video directly into your
                    selecting the Photos from Cameras or Devices option.
                                                                                                      Premiere Elements video project.
                                                                                                      Premiere Elements 2020 does not include tools for capturing
                                                                                                      tape-based video, including video from HDV and miniDV
                                                                                                      camcorders. However, video from digital tape camcorders can
                                                                                                      be captured as Premiere Elements-compatible video data using
                                                                                                      various third-party software and then importing it into to your
                                                                                                      Premiere Elements project. We show you how to capture this type
                                                                                                      of video in our Premiere Elements Appendix, on page 275.

                                                                                                     • Browse to gather and import media �les that are located on
                                                                                                       your computer’s hard drive(s).
                                                                                                      When you click the PC Files and Folders button under Add
                                                                                                      Media, Windows Explorer or the Mac OSX Finder will open,
                                                                                                      allowing you to import video, stills, graphics or music �les
                                                                                                      already on your computer’s hard drive. The Elements Organizer
                                                                                                      is a companion �le management program that can be used to
                                                                                                      manage and search media �les on your computer. (We explore
                                                                                                      the Organizer in detail in Section IV of this book.)

6                                                                                                                                                                                    7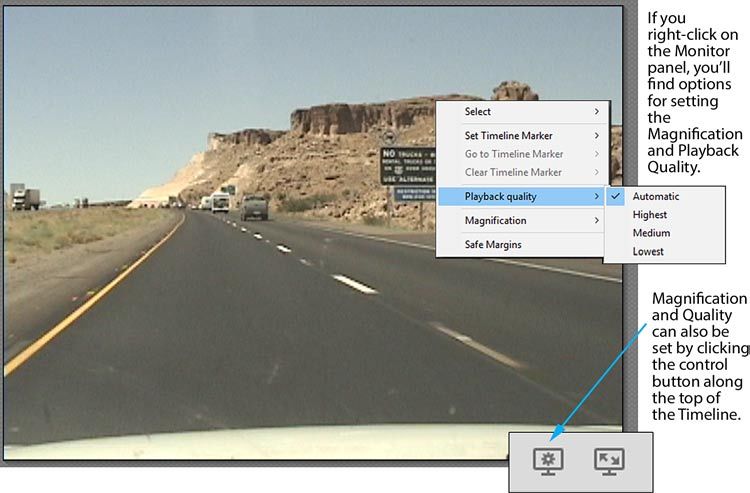
CHAPTER 1                                                                                                                                                        Basic Video Editing Moves
                                                                                                                                                    Get to Know Premiere Elements 2020

                                                                                                   We discuss how to assemble your movie in both Quick View
                                                                                                   and Expert View in Chapter 2 and Chapter 7 respectively.

            2   Assemble the clips on your timeline
                Once you’ve imported your media clips into a project, you can
                                                                                                   We also show you how to use multi-track editing in order to
                                                                                                   create a variety of effects and take advantage of several key
                                                                                                   storytelling techniques.
                begin the process of assembling your movie. If you are working
                                                                                                   We’ll also show you how to use both automatic and manual
                in Quick View, any media you add to your project will be loaded
                                                                                                   tools to work with your audio clips.
                directly to your timeline. If you are working in Expert View, the clips
                will be added to your Project Assets panel. Editing this video is as
                simple as dragging these clips from this panel to your timeline.

                Once you add your �les to your timeline, you’ll have a number of
                                                                                          3      Add and adjust effects
                                                                                                Premiere Elements comes loaded with dozens of video and
                options:                                                                        audio effects as well as hundreds of preset effects for working
                                                                                                magic on your movie.
                • Trim your clips. Trimming means removing footage from
                  either the beginning or the end of a clip. To trim a clip, click to           Adding an effect in Premiere Elements is very easy, as we show
                  select the clip on your timeline and then drag in from either its             you in Chapter 13, Add Video and Audio Effects.
                  beginning or end, as in the illustration on the following page.
                                                                                          1   As illustrated on the next page, click the Effects button on the
                • Split your clips. Splitting means slicing through your clips                Toolbar along the right side of the program.
                  so that you can remove footage from the middle or delete a
                  sliced-off segment completely. To split a clip, position the CTI            This will open the Effects panel.
                  (playhead) over your clip at the point at which you’d like the          2   Locate an effect.
                  slice to occur and then click on the scissors icon on CTI.
                                                                                              Go to any category of video or audio effects by clicking the title bar
                • Place your clip on an upper video or audio track. An important              (The bar along the top of the panel) and selecting from the list that
                  feature of editing in Expert View is the ability to place your              appears.
                  video or audio on tracks other than Video 1 and Audio 1.
                                                                                              You can also quickly locate any effect by clicking the Quick Search
                  The use of multiple tracks of video is, in fact, key to the creation        magnifying glass button at the top right of the panel and typing in
                  of many of the more advanced video effects, including Chroma                the effect’s name.
                  Key and Videomerge.

8                                                                                                                                                                                       9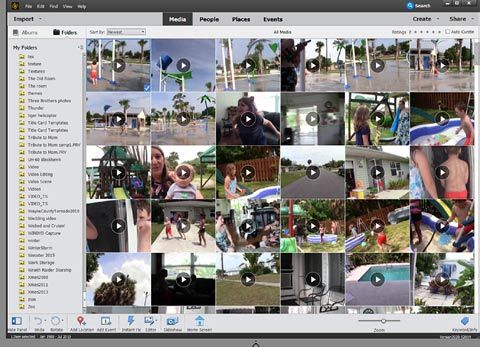
CHAPTER 1                                                                                                      Basic Video Editing Moves
                                                                                                    Get to Know Premiere Elements 2020

         We’ll discuss Effects in
         detail in Chapter 13.

     3   Apply the effect.
         To apply an effect, drag it
         from the Effects panel onto
         a clip on your timeline.

     4   Adjust the effect’s settings.
         Once you’ve applied your
         effect, you may or may not
         see an immediate change in
         your video clip. To intensify
         or �ne tune your effect,
         ensure the clip is selected
         on your timeline, then open
         the Applied Effects panel
         by clicking its button on the
         Toolbar.

         The Applied Effects
         panel is a tremendously

                                         4
         powerful workspace. Not
         only can you use it to
                                                Add and adjust transitions
         change the settings for               Transitions are the effects or animations that take your movie from
         individual effects but also           one clip to another. Some are gentle and nearly invisible – others
         as the main workspace                 are showy and draw attention to themselves. Most transitions are
         for creating and adjusting            added to your timeline and adjusted similarly to effects:
         keyframes, Premiere
         Elements’ tool for creating     1   Click on the Transitions button on the Toolbar.
         animations, motion paths            The Transitions panel will open.
         and effects that change
         over the course of the clip’s   2   Locate a transition.
         playback.
                                             Select any category of video or audio effects by clicking the title bar
         On the Applied Effects              (The bar along the top of the panel) and selecting from the pop-up
         panel, locate your effect’s         list that appears.
         listing, then click on it to        You can also quickly locate any effect by clicking the Quick Search
         open the effect’s settings.         magnifying glass button at the top right of the panel and typing in
                                             the transition’s name.
         In Chapter 14, we’ll show
         you how to customize and        3   Apply the transition.
         �ne tune your effects in the
         Applied Effects panel.              Apply a transition by dragging it from the Transitions panel onto the
                                             intersection of two clips on your timeline.
         Then, in Chapter 15,
         we’ll show you how to           4   Customize your transition.
         use keyframes to animate            Nearly all transitions include a number of properties that can be
         effects and motion paths.           customized, depending on the nature of the transition.

10                                                                                                                                    11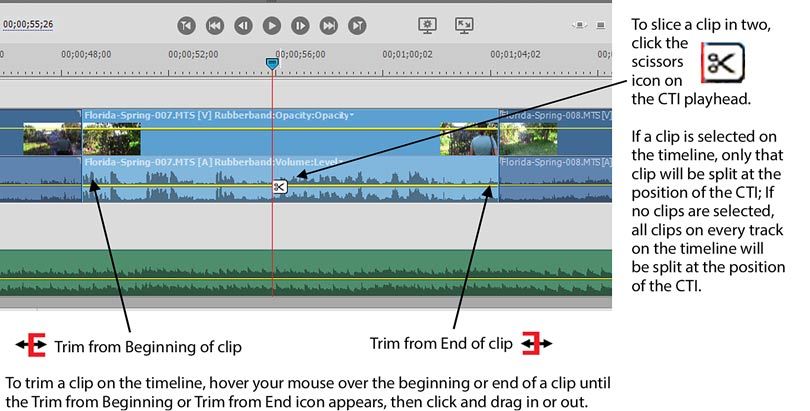
CHAPTER 1                                                                                                                                                        Basic Video Editing Moves
                                                                                                                                                       Get to Know Premiere Elements 2020

                Virtually all transitions include options for designating where the
                transition centers, the duration of the transition and for optionally
                setting the transition to reverse its movement (i.e., wiping from
                right to left rather than left to right).

                We’ll show you just about everything there is to know about adding          2   Add the title to your timeline.
                and customizing transitions – including why they sometimes seem                 Drag the title from the Titles & Templates panel to your timeline.
                to behave in very strange ways – in Chapter 11. And, as a bonus,                The Title Adjustments workspace will automatically open.
                we’ll even show you how to use the Gradient Wipe, a tool for
                creating your own custom transition effects!                                3   Customize your title’s text.
                                                                                                Type your custom text over the placeholder text.

            5      Add titles
                  Titles are text, and sometimes graphics, placed over your clips to
                                                                                                With your text block selected, you can customize the text’s
                                                                                                attributes – including the font, size, style and alignment. You can
                  provide additional visual information for your video story. Once              also apply a style to your selected text by clicking on one of the Text
                  you’ve selected a title template, you’ll create and customize your            Styles listed on the panel.
                  titles in Premiere Elements’ Title Adjustments workspace.
                                                                                            4   Customize your title’s look and animation.
                  To add a title or text to your movie:                                         The Title Adjustments workspace has tools for customizing the look
                                                                                                and style of your text, adding and placing graphics and adding very
            1   Click the Titles & Text button on the Toolbar.
                                                                                                cool text animations. You can also create rolling and crawling titles.
                The Titles & Text panel will open.
                                                                                                When you want to return to the regular editing workspace, click on
                As with Effects and Transitions, the panel has several categories               the timeline.
                of title templates. Among these are text-only stationary titles, titles
                with graphics and rolling and animated titles                             We’ll show you pretty much everything you could want to know about
                                                                                          using Premiere Elements’ tools for creating and customizing your titles and
                In addition to standard title templates, the library includes             text in Chapter 12.
                a collection of Motion Titles – animated titles with several
                customizable elements.

12                                                                                                                                                                                      13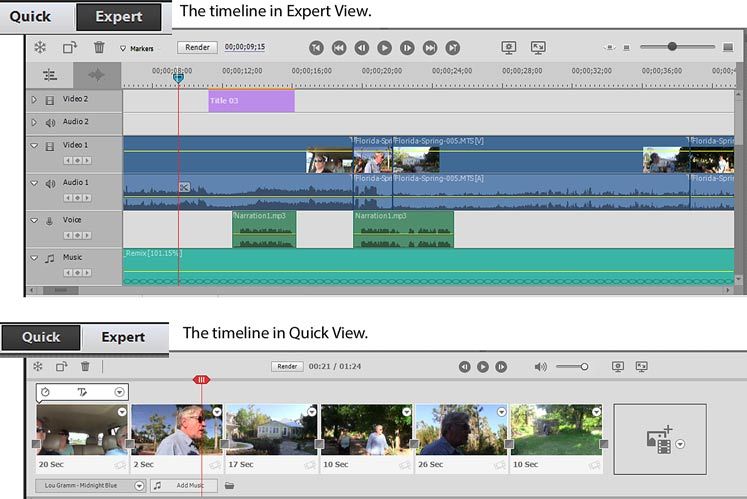
CHAPTER 1                                                                                                                                               What’s New in Premiere Elements 2020?
                                                                                                                                                                Get to Know Premiere Elements 2020

            6        Export & Share your movie
                     When you’re happy with the movie you’ve created, you’ll �nd a number
                                                                                                  What’s new in Premiere Elements 2020?
                                                                                                  In version 2020, Adobe has made an even greater effort to provide you
                     of options for publishing and sharing it, as we discuss in Chapter 21.       access to helps and tutorials for creating video projects and effects.
                     We’ll show you how to output your movie to:
                                                                                                  Guided Edits
                      •   Devices. The program will save your �nished project as an AVI �le,
                          MPEG, QuickTime (MOV) �le, AVCHD video, Windows Media (WMV)             Three new Guided Edits have been added in
                          �le or an audio �le on your computer’s hard drive. Once the output is   version 2020, bringing the total number of step-by-
                          complete, you can then use these �les any number of ways, including     step helps built into the program to 23.
                          posting them online or using them as segments in a larger video         New in Premiere Elements 2020 are Guided Edits
                          project.                                                                for �lling out video frames when you’re using
                      •   Disc. Built into Premiere Elements are tools for creating menus and     video or photos that are taller than they are wide,
                          scene markers so you can produce great-looking DVDs.                    for creating a time lapse effect from a sequence of
                      •   Online. The program comes complete with tools for loading your          photos and for replacing the sky in the photo with
                          �nished video to a social media site like YouTube or Vimeo.             an animated sky.

                      •   Audio or Image. Premiere Elements also includes tools for               We discuss the entire library of Guided Edits in Chapter 3.
                          outputting an audio �le or a still photo from your movie.
                                                                                                  Improved Elements Hub
            And that’s basically it!                                                              The Elements Hub – the Welcome Screen that
            You gather your assets, assemble them on your timeline, add effects, transitions      greets you when you launch Premiere Elements or
            and titles – then you share your masterpiece with the world.                          Photoshop Elements – now offers an even wider
                                                                                                  variety of suggestions for creating projects from
            But between these simple steps are the countless variations that can elevate your     your media.
            movie project from the realm of a basic structure to something truly amazing!
                                                                                                  New to the Hub are suggestions for Auto Creations
            And that, of course, is what this book is all about.                                  using the color pop, blur, painterly and pattern
                                                                                                  brush effects.

14                                                                                                                                                                                             15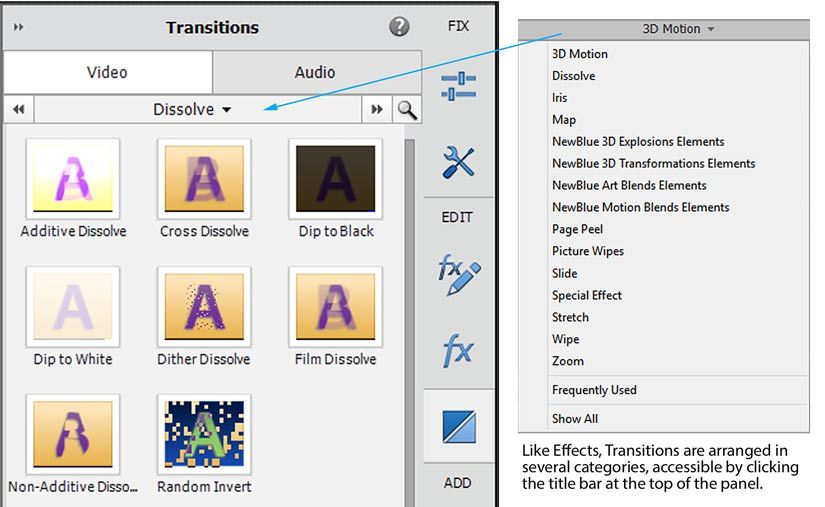
CHAPTER 1

     HEVC H.265 support
     Premiere Elements 2020 now offers support for H.265 HEVC video (a format used by many
     phones) in both the Windows and Mac versions of the program.

     Organizer enhancements
     Finally Adobe continues to
     improve performance in the
     Organizer – the media �le
     management tool bundled free
     with Premiere Elements and
     Photoshop Elements.

     In addition to automatically
     generating Smart Tags for your
     videos as well as your photos, the
     Organizer also interfaces with the
     Elements Hub panel, suggesting
     projects based on your media
     including those using the
     programs’ color pop, blur effect,
     painterly effect and pattern brush tools.

     We discuss the Organizer and its many �le management and project features in detail in
     Chapters 17, 18 and 19 of this book.

       The Muvipix.com Guide to Photoshop Elements 2020
       Adobe had designed Premiere Elements and Photoshop Elements to work together (with
       the Elements Organizer serving as bridge between them).

       If you want to know how to use all of the tools in the
       latest version of Photoshop Elements – as well as how
       to make Photoshop Elements and Premiere Elements
       work together, check out our Muvipix.com Guide to Adobe
       Photoshop Elements 2020.

       You’ll learn:

       • How to correct color, erase blemishes and enhance your
         digital photos to make your good pictures look great!
       • How to prepare photos, graphics and slideshows for use
         in Premiere Elements and other video editing programs.
       • How to edit – and even create your own – custom DVD
         menu templates for Premiere Elements.

       The book is available through Amazon.com.

       For more information as well as tutorials and feature notes, see Muvipix.com/pe2020.php

16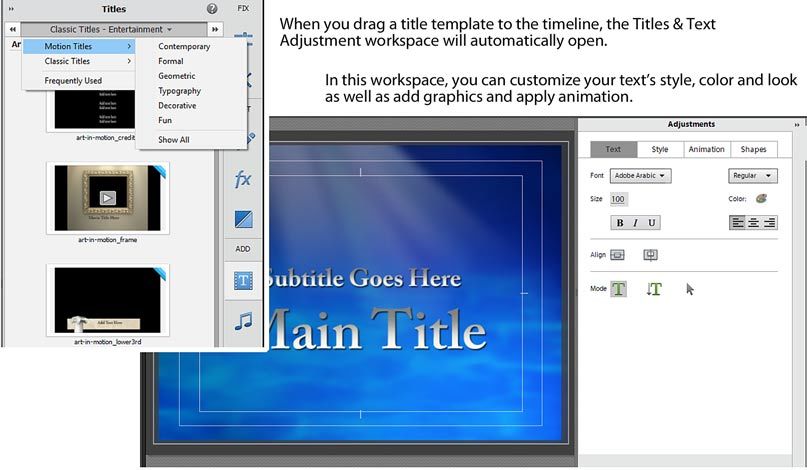
You can also read