Lesson Plan for Squishy Circuits - Written by Perry Roth-Johnson & Chris Nguyen Introduction/Background Info
←
→
Page content transcription
If your browser does not render page correctly, please read the page content below
Lesson Plan for Squishy Circuits
Written by Perry Roth-Johnson & Chris Nguyen
Introduction/Background Info
Electrical circuits are the foundation of our modern, technology-driven lives. Everything from simple
light bulbs to complex devices like the iPhone depend on electrical circuits in order to function. The
basic structure of each of these devices is the same: there is a power source, which is connected to
some wires, which are connected to a device that uses the power to do something useful (like lighting
up a room, or displaying a Facebook message from your friend).
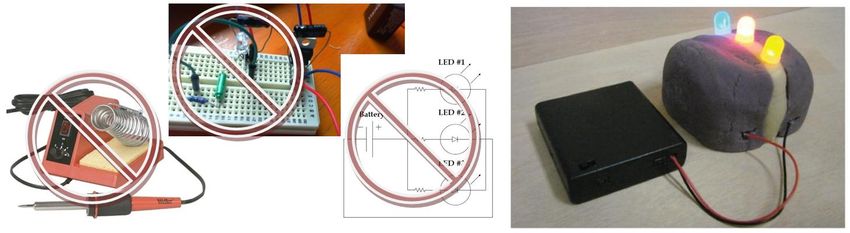
Figure 1. Electrical circuits are used in a wide variety of applications, from a simple light bulb (top left) to
complex printed circuit boards (top right, bottom left) for computers and smartphones (bottom right).
The main point of this lesson is that you don’t need to be an electrical engineer to get some hands-on
experience with circuits. You don’t need to use a soldering iron or a prototyping board or circuit
diagrams in order to start learning about electricity. In fact, all you need is some playdough to start
building your own circuits. This non-traditional circuit technology is a fun way to introduce kids to circuit
design with a toy that is familiar, safe, and easy to manipulate.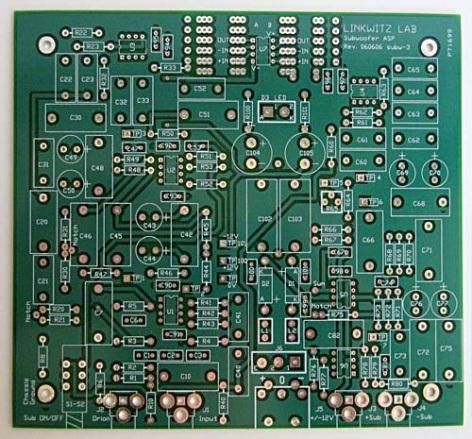
Squishy Circuits (2 of 4)

 Figure 2. Would you rather teach a kid about circuits with soldering irons, prototype boards, and circuit diagrams ... or would
                                           you rather teach them with playdough?!

This lesson plan includes recipes for two kinds of playdough: conductive dough and insulating dough.
These two kinds of playdough can be used together to introduce kids to the fundamental concepts that
make electrical circuits work.

A conductor allows electricity to easily flow through it. The conductive dough contains salt, which helps
electricity flow through the dough because the salt (sodium chloride, or NaCl) dissociates into sodium
(Na+) and chlorine (Cl-) ions. An insulator does not let electricity flow through it easily. Because of this,
they act as a wall to electricity and the electricity must go around them. If a path around the insulator is
not available, the circuit cannot be completed. The insulating dough recipe does not use salt, so no ions
are available to allow electricity to flow. (The insulating dough also uses distilled water that contains
little or no ions, whereas the conductive dough uses tap water that usually contains some ions.)

All materials have a property called resistance, which is related to how easily it allows electricity to flow
through it. We say that insulators have a high resistance, while conductors have a low resistance.
Thought of another way, insulators act as “walls” that block electricity from flowing; conductors act as
“roads” that allow electricity to easily travel along them.

In order to build a circuit, we must provide a continuous path for electricity to flow from a power source
(for example, a battery), through a conductor, into a device that uses the power (for example, a light
bulb), and back through another conductor to the power source. This is called a closed circuit. If this
continuous path is broken anywhere, electricity will not flow and the light bulb will not work. This is
called an open circuit. If the conductors in a closed circuit are touched together, it forms a new type of
undesirable circuit called a short circuit. Electricity will still flow through the circuit, but the light bulb
will not work. This is because the light bulb has a higher resistance than the conductors, and the
electricity is “lazy” – it would rather travel through the conductors when they are touching than exert
extra effort to travel through the light bulb.

There are two types of closed circuits: series and parallel circuits. Series circuits only provide one path
for electricity to flow. Parallel circuits provide multiple paths for electricity to flow.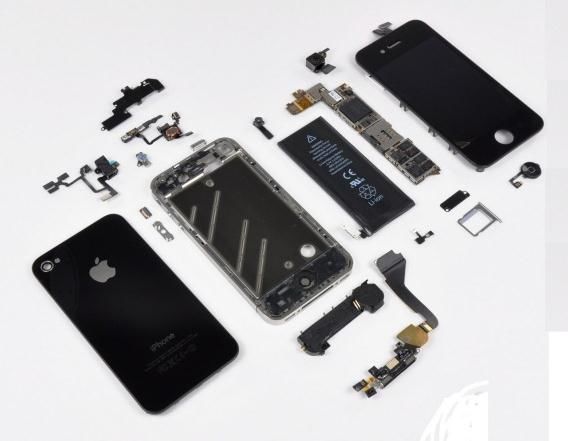
Squishy Circuits (3 of 4)
Student Objectives
After completing this lesson, students should understand the following concepts:
Conductors vs. insulators; resistance
Open circuits vs. closed circuits; short circuits
Series circuits vs. parallel circuits
Overview of Lesson Process
Survey students’ prior knowledge (5-10 min). Introduce concepts of conductors, insulators and
resistance. Demonstrate open, closed, and short circuits. Also demonstrate series and parallel
circuits. Finally, briefly discuss safety when experimenting with electrical circuits!
Activity (30 min). For the first ten minutes, students should use the attached worksheet to build
their own simple circuits to understand the concepts just introduced. For the last twenty
minutes, students can design and build their own circuits to further explore these concepts.
Wrap-up discussion (5-10 min). Which circuits worked and which didn’t work? Discuss why the
ingredients in each dough affects how easily electricity can flow through each of them. Show
images of disassembled electronic devices, like laptops, iPods, iPhones, etc .
Materials
Item Price Retailer
Flour $2.99 Ralphs
Salt $2.83 Ralphs
Cream of tartar $4.99 Ralphs
Vegetable oil $3.99 Ralphs
Food coloring $6.75 Ralphs
Sugar $3.49 Ralphs
Distilled water $1.34 Ralphs
Granulated (powdered) alum $2.49 Ralphs
9V battery (4-pack) $9.89 Radio Shack
Heavy-duty 9V snap connectors (5-pack) $2.69 Radio Shack, Catalog #: 270-324
10 mm LED assortment $20 Evil Mad Science, http://evilmadscience.com/productsmenu/partsmenu/368
Total $61.45
Conductive dough recipe [http://youtu.be/cpUFL5LZpv4] Insulating dough recipe [http://youtu.be/Wz8rGNt-iEQ]
1 cup (tap) water 1 1/2 cup flour
1 1/2 cups flour 1/2 cup sugar
1/4 cup salt 3 Tbsp. vegetable oil
3 Tbsp. cream of tartar 1/2 cup deionized (or distilled) water
1 Tbsp. vegetable oil 1 tsp. granulated alum (optional)
food coloring (optional)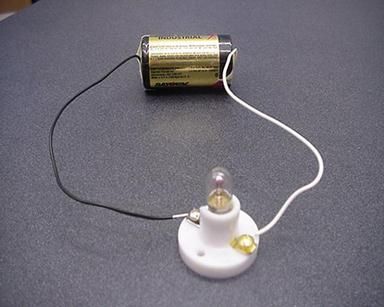
Squishy Circuits (4 of 4)
Procedures
Mentors must prepare batches of conductive and insulating dough ahead of time. Each recipe above
makes enough dough for 2 groups of 4-5 students.
Phase 1 (10 min): Students use the attached worksheet to build simple circuits to understand
fundamental concepts of circuits.
Phase 2 (20 min): Students design and build their own circuits. For example, they can build circuit
sculptures. First, have the students sketch their designs on paper. Then, they can build and test their
designs.
Wrap up discussion
Discuss which types of circuits worked and which didn’t.
What is the difference between a series and parallel circuit?
Why does one dough conduct electricity and the other doesn’t?
Tips, tricks, and safety
Don’t connect the 9V battery directly to the LED, it may burn the LED out.
Try not to mash the two types of dough into each other. This makes it difficult to separate them for future classes.
The LED only works in one direction. This is called polarity. Notice how one “leg” of the LED is slightly longer than the
other one. The longer leg should always be attached to the positive (red) wire from the battery.
Sometimes, thin strands of insulating dough will still conduct some electricity, and the LED will become dimly lit. If
this happens, use it as an opportunity to discuss resistance!
Don’t cross the wires on the battery connectors – this will short out the battery! It may heat up and explode.
Warn students to always be careful when experimenting with electricity. High voltages and high currents can be
deadly. For example, they should never stick wires or other objects into wall sockets. It’s best to always do these
activities with adult supervision.
Resources
1. http://courseweb.stthomas.edu/apthomas/SquishyCircuits/index.htm
2. http://www.ted.com/talks/annmarie_thomas_squishy_circuits.html
3. http://courseweb.stthomas.edu/apthomas/SquishyCircuits/PDFs/Squishy%20Circuits%20Classroom%20Guide.pdf
4. http://www.toysaretools.com/2011/12/electrify-your-childs-learning-through.html
5. http://www.wellersolderingiron.co.uk/images/2.jpg
6. http://lochieferrier.files.wordpress.com/2011/10/2011-10-11-11-47-21-422.jpg
7. http://bidboomerang.com/wp-content/uploads/2011/10/light-bulb-battery-circuit.jpg
8. http://www.blogonono.net/wp-content/uploads/2011/08/Printed-Circuit-Board.jpg
9. http://4.bp.blogspot.com/-a5CFl3hL_TA/TsIiL7FTcII/AAAAAAAAAVg/hTYTV7oNU0A/s1600/disassemble-iPhone-4s.jpeg
10. http://www.onlytechnews.com/wp-content/uploads/2011/12/iphone-4s.jpg
Squishy Circuits Worksheet
(adapted from Squishy Circuits Classroom Guide, http://courseweb.stthomas.edu/apthomas/SquishyCircuits/PDFs/Squishy%20Circuits%20Classroom%20Guide.pdf)
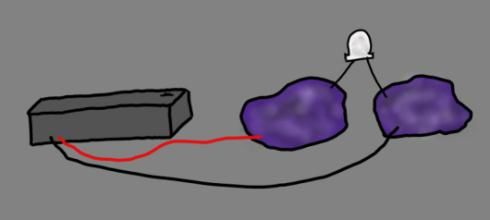
1a. Begin with two lumps of the conductive dough. Plug one wire from the battery pack into each piece
and bridge the gap with a LED.
Does the LED light up? (circle one): YES NO
1b. Take the LED out and flip it around so that each “leg” is in the opposite piece of conductive dough.
Does the LED light up? (circle one): YES NO
The LED only works in one direction. The longer terminal should be attached to the positive (red) wire
from the battery pack. This is called a closed circuit.
2. Next, pull one of the LED legs out of the dough.
Does the LED light up? (circle one): YES NO
In the last step, the LED went out because we broke the loop of electricity – this is called an open circuit.
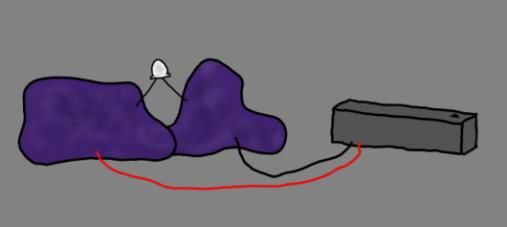
3. Put the LED leg back in, so your LED is on. Now, push the two pieces of conductive dough together.
Does the LED light up? (circle one): YES NO
In the last step, the LED went out – this is called a short circuit.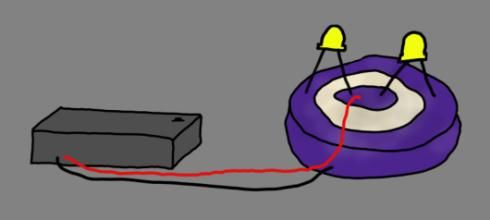
4. Separate the two pieces. The LED should once again light up, because the electricity must go through
the LED to complete the circuit. Now, create a “sandwich” with the insulating dough between two pieces
of conducting dough.

                          Does the LED light up? (circle one):           YES     NO
   The insulating dough does not let electricity flow through it easily. It acts like a “wall” to electricity.
  Therefore, the electricity has to go around the insulating dough, and through the LED which lights up!
         There is one continuous path for the electricity to flow through – this is a series circuit.

5. Now, we can create Squishy Circuits that do not have to be separated, like “sushi circuits!”

           There are multiple paths for the electricity to flow through – this is a parallel circuit.

6. Now, you can design your own circuit! Draw your design here:

Now, try to build and test your design with the materials provided!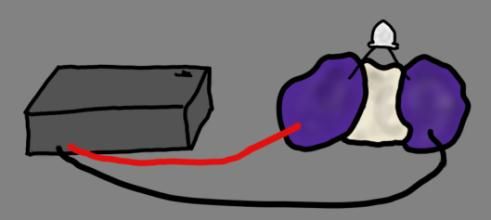
You can also read