Lifetime Fitness Study Guide - Yoga and Pilates
←
→
Page content transcription
If your browser does not render page correctly, please read the page content below
Lifetime Fitness Study Guide
                                           Yoga and Pilates
History of Yoga
Evidence has been found that Yoga dates back to 4000 BC There are carvings depicting Yoga postures in caves in what
is now Afghanistan. The language of Yoga is Sanskrit. The postures or asanas have Sanskrit names that have been
translated into English. The history of Yoga goes through different stages from the Vedas, to Pre-Classical Yoga,
Classical Yoga, Post-Classical Yoga, on to Yoga practice in recent decades. These are still in practice today all around
the world.

Modern Yoga arrived in the United States in the late 1,800’s.Yoga gained popularity in the 1960’s and has been
growing strong since. Today Yoga can be practiced traditionally and in a health club atmosphere. It is up to the individual
in how he or she wants to practice Yoga.

The Yoga we practice is Hatha. There are four different types of Hatha Yoga: Ashtanga (Power), Bikram (Hot), Iyengar
(Props), and Kudalini (Fast). The purpose of Hatha Yoga is to connect the mind and body, to balance the spinal column.
The spine is looked at as the staff of life. A healthy spinal column should keep the rest of the body functioning well.
Everything stems from the spinal cord. Its health is crucial. When practicing Yoga consider these things: Show up,
mentally and physically, and be open to the outcome. Respect yourself and those around you during Yoga practice.

Yoga Vocabulary
Asana - exercise posture or pose                 Namaste - the spirit in me salutes and respects the spirit in you.
Pranayama - breath control                       Savasana - Relaxation
HA - sun, solar, heat                            THA - moon, lunar, cool
Ashtanga - power Yoga                            Bikram - hot Yoga
Kundalini - fast Yoga                            Iyengar - Yoga with props

Exercises and Poses
Warm-up - Warm-up hips, spine, neck and shoulders, Sun Salutation 6 to 12 times through
Power Poses - Chair, Warrior sequence, Plank, Flying Cobra, Side Plank, etc.
Balancing Poses - Tree, Dancer, Shooting, Star, Leg Extension, Crane, etc.
Floor Poses - Down Dog, Cobra, Up Dog, Bird, Bow, Boat, Fish, Runner’s Stretch, Child’s, Rabbit, etc.
Lying Poses - Leg Extension, Spinal Twist, Dead Bug, Starfish, Right side and Relaxation.

History of Pilates
Pilates was created in the early 1900’s by Joseph Pilates (1880 - 1967). Pilates combines the Eastern philosophies of
exercise with Western methods of exercise. It is the “Art of Contrology.” Concentration and focus on the muscles being
exercised is crucial for effectiveness.

Pilates works the “Powerhouse” which consists of the stomach, hips, lower back and gluteus muscles. There are three
important steps in Pilates: 1. Tuck your chin. 2. Scoop your belly. 3. Breath The breath is an inhalation through the nose
and a force exhalation while contracting the abdominal muscles. The goal in Pilates is to lengthen and
strengthen the muscles. There are different types of Pilates. We practice mat or floor Pilates.

Pilates Exercises
The Hundred                      The Roll-Up             Single Leg Circles                Rolling Like A Ball
Single Leg Stretch               Double Leg Stretch      Spine Stretch Forward             Single Straight Leg
Double Straight Leg              The Saw                 The Roll-Over                     Swimming
Single Leg Kicks                 Side Kicks              Teaser                            The Seal

                                                             1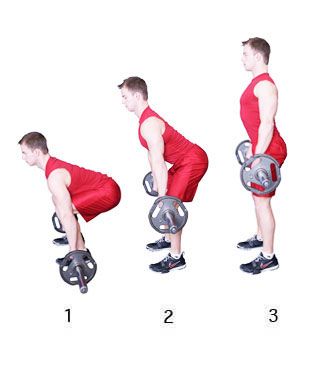
Practicing Yoga and Pilates on Your Own
Some things to consider: What do you want to practice? Yoga, Pilates or both? If it is Yoga, what type? Do you want a
health club or a specialized studio? What can you afford? How much time do you have to commit? Do you want to
practice with friends or family members? What are you looking for in an instructor? What are your short term and long
term goals? Some ideas of places to practice can be found in the phonebook, online, and asking around. Many places
will allow you one trial session. Make sure you ask many questions and read the entire contract before signing. Make
certain you know what you are getting yourself into.

What if you don’t have the money or time to commit to a club or studio? Practice at home. You have been given the tools
to practice Yoga and Pilates on your own. You can also purchase videos and books, check them out at the library, or find
them on TV. Ultimately, the decision is yours. If Yoga and/or Pilates makes you feel good, please, continue to practice.
The benefits of practice far out way the costs of not participating in physical activity.

Safety
The rule of thumb in Yoga and Pilates is, “If it hurts, don’t do it.” Hurt is defined as something not feeling right and being
painful. Hurt is not the feeling of lactic acid building up in the muscles. It is important to know the difference. There are
modifications for every pose in Yoga and exercise in Pilates.

Yoga-
Push yourself to your limit. Every day comes with a different limit. Go with what you are feeling that day. Continuously
breath and focus. Movements are slow and fluid, no bouncing or jerking of poses. Enjoy the pose and release tension.

Pilates - Mat work
Concentrate, use forced exhalation, and stay within the frame of the body. The lower back should stay glued to the floor
on all abdominal floor exercises and keep the belly button to the spine. In any rolling exercise, keep the chin tucked and
the spine rounded. With any injuries, pregnancy, or surgeries a doctor should be consulted before Yoga
and/or Pilates practice.

Stress relief and Meditation
A majority of students initially decide to take Yoga and Pilates in order to help themselves handle stress. We’ve
heard so much about stress in the last decade. What is stress? Stress is the way one reacts to a situation or the
environment. This is why different people react to stressful situations differently. Yoga and Pilates practice give us
the tools to use the positive qualities of stress for dynamic change. Yoga meditation, or Posture Position, with the
correct Pranayama (breath) controls the air, heart rate, and calms the mind. Practicing meditation at once a day
–when you are feeling stress - will help you to regain your focus and alleviate the side effects of stress (sweaty palms,
increased heart rate, racing mind, etc.). Meditation is a great way to end your day, to quiet your mind before you go to
sleep.

                                  “What lies behind us and what lies before us are tiny
                                      matters compared to what lies within us.”

                                                  ~Ralph Waldo Emerson

                                                               2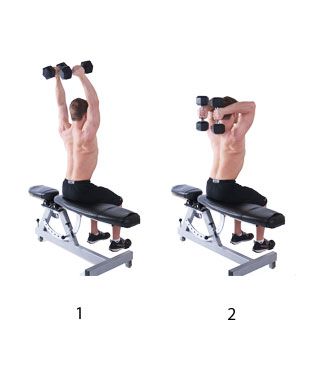
Basic Yoga Poses

Downward Facing Dog     Mountain Pose       Warrior I

     Warrior II              Boat Pose    Side Plank Pose

     Bow Pose                Cobra Pose         Tree Pose
                                3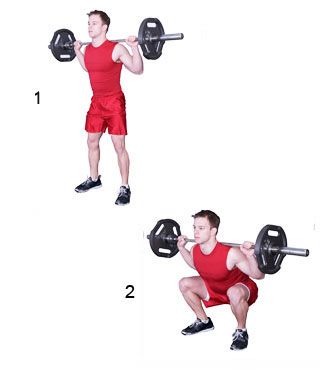
Basic Pilates Exercises
Ball Roll

            1. While balancing your body on the buttocks, pull in your feet as close as you can and clutch
            each ankle using your hands. Place your head between your knees as shown.

            2. Inhale and then roll backward while keeping your body shape the same. Roll until you are
            essentially on the back of your shoulder blades.

            3. Exhale and roll back to the starting position.

Teaser
             1. Lay on your back, draw your arms overhead, by your ears. Extend both legs up to a 45
             degree angle, keeping them long and straight, but not locked. Make sure to not arch your back
             by keeping it on the mat at all times.

             2. Raise your arms, head, and shoulders in sequence, curling the body up off the mat,
             gradually. Your arms should be roughly parallel to your legs.

             3. Reach your fingers toward your toes. Avoid tensing your thigh muscles

             as you curl upward. Return to rest position and repeat for another 6-10 times.

Roll Up
              1. Laying flat on the mat, extend your arms upward above your ears. Press your legs tightly
              together and bring your chin toward your chest.

              2. Inhale, as your peel your back gradually off of the mat while aiming your arms toward
              your feet.

              3. Exhale, and slowly do the reverse motion as you return your back flat onto the mat.
              Repeat for another 5-10 times.

                                                4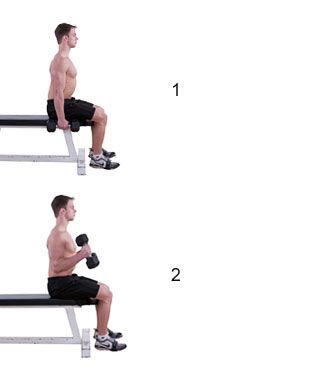
Double Leg Stretch
                         1. Lay on your back, and bring both knees toward your chest. Slowly lift your head and
                         shoulders, inhale, and extend your arms and legs in opposite directions but keep them
                         parallel to the floor.

                         2. Stretch your arms and legs by extending them upward so that they are 45 degrees to the
                         floor.

                         3. Exhale while sweeping your arms around. Brings your knees toward your chest once
                         more, and repeat 10-15 times.

The Hundred
                         1. While lying flat on your back, slide your shoulders down and backward, essentially
                         lengthening the back of the neck. Use your abdominal force to raise your head and
                         shoulders slightly, as illustrated.

                         2. Extend your arms as far as they go, past your hips at least, while straightening both legs
                         vertically as shown.

                         3. Lower the legs to a 45 degree angle, and tighten the muscles of the buttocks. Bring your
                         extending arms up and down; essentially pumping them while they remain fully extended.
                         Pump your arms roughly a 100 times, hence the name, while keeping your legs in that
                         position.

                         4. Finish by lowering your head and drawing your knees toward your chest.

Spine Stretch
1. Sit up tall on your sit bones. Your legs are extended about shoulder width apart, and your feet are
flexed. Reach the top of your head to the sky but let your shoulders stay relaxed. Inhale and extend
                    your arms out in front of you, shoulder height.
                    A modification here would be to place the fingertips on the floor in front of you between
                    your legs.

                   2. Exhale as you lengthen your spine to curve forward. You are going for a deep C-
                   Curve. Allow a deep release in the hips as you keep your shoulders down and reach
                   your fingers toward your toes.

                    3. Inhale and reach a little further as you enjoy the fullness of your stretch.

                   4. Exhale and initiate your return by using the lower abdominals to bring the pelvis
              upright. Roll up through the spine to sitting.

                                                          5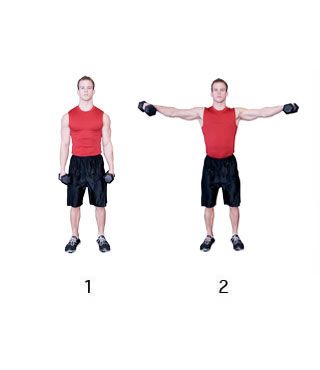
Fitness

Components of Fitness
Five components of fitness are required for a well-rounded, healthy body:

1. Cardiovascular Endurance – the ability of the heart, blood vessels, and lungs to supply oxygen and necessary
   fuel to the muscles during exercise.
2. Muscular Strength - the ability of the muscles to exert a maximal force.
3. Muscular Endurance - the ability to use the muscles for a long period of time without getting tired.
4. Flexibility - the ability to move a joint through the full range of motion.
5. Body Composition - the amount of body weight that is fat compared to muscles, bones and other body tissues.

Working on these five components will improve the fitness levels of every aspect of the body.

Taking your Pulse
    •   You can locate you pulse in your wrist or your neck. It is often times easier to locate the arteries in your neck
        because they are larger than the ones in your wrist. The arteries in your neck are called Carotid arteries, and can
        be found on either side of your neck.
    •   When taking your pulse use your index and middle finger. DO not use your thumb.
    •   When counting your pulse you should count heartbeats for 6 seconds and then multiply by ten. This will give you
        an estimated heart rate for one full minute.

Principles of a warm-up and cool down
1. A warm-up prepares the muscles and cardiovascular system to work harder.
2. A warm up prepares the muscles and cardiovascular system to work harder.
3. Muscles perform more efficiently when they are properly warmed up, which is why light cardiovascular activity
performed prior to stretching is recommended.
4. A cool slow down brings the heart rate back down to a normal pace.
5. Both a proper warm up and cool down can prevent injury and reduce muscle soreness.

The F.I.T.T. Principle
The F.I.T.T. principle can be used when designing a workout program.

Frequency - the number of times per week that you do an exercise program. (Measured in days)
Intensity - how hard you perform your exercise routine. (Level of difficulty)
Time - the duration of a single exercise routine. (Measured in minutes or hours)
Type - the kind of exercise you perform. (Ex. Weight Training, Swimming, Running.)

FITT Principle can be determined by your overall fitness goals. You must look at your short term and long term goals.
Your FITT Principle should be specific to your goals. To increase your level of fitness you must increase at least one of
the F.I.T.T. principles every 2nd week of your program. Otherwise, your body will adjust to your exercise program and no
significant improvement will take place.

Aerobic vs. Anaerobic Activities
Aerobic - means “with oxygen”. During these types of activities a steady supply of oxygen is available, allowing a person
to sustain an activity for a prolonged period of time. Ex: Jogging, or speed walking.

Anaerobic - means “without oxygen”. These are activities that use short bursts of energy, which use up oxygen fast and
cannot be sustained for a long period of time. Ex: Sprinting a 100 meter dash.
                                                            6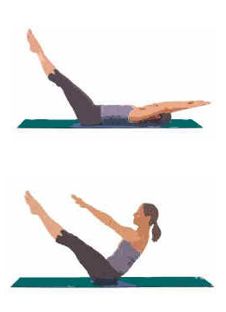
Controlling Your Weight
The key to weight control is keeping energy intake (food) and energy output (physical activity) in balance. When you
consume only as many calories as your body needs, your weight will usually remain constant. If you take in more calories
than your body needs, you will put on excess fat. If you expend more energy than you take in you will burn excess fat.

Exercise plays an important role in weight control by increasing energy output, calling on stored calories for extra fuel.
Recent studies show that not only does exercise increase metabolism during a workout, but it causes your metabolism to
stay increased for a period of time after exercising, allowing you to burn more calories.

How much exercise is needed to make a difference in your weight depends on the amount and type of activity, and on
how much you eat. Aerobic exercise burns body fat. A medium-sized adult would have to walk more than 30 miles to burn
up 3,500 calories, the equivalent of one pound of fat. Although that may seem like a lot, you don’t have to walk the 30
miles all at once. Walking a mile a day for 30 days will achieve the same result, providing you don’t increase your food
intake to negate the effects of walking.

If you consume 100 calories a day more than your body needs, you will gain approximately 10 pounds in a year. You
could take that weight off, or keep it off, by doing 30 minutes of moderate exercise daily. The combination of exercise and
diet offers the most flexible and effective approach to weight control.

Since muscle tissue weighs more than fat tissue, and exercise develops muscle to a certain degree, your bathroom scale
won’t necessarily tell you whether or not you are “fat.” Well-muscled individuals, with relatively little body fat, invariably are
“overweight” according to standard weight charts. If you are doing a regular program of strength training, your muscles will
increase in weight, and possibly your overall weight will increase. Body composition is a better indicator of your condition
than body weight.

Resistance Bands
Resistance band exercises are widely used by a variety of health and fitness practitioners – both for general strength and
conditioning and rehabilitation or injury prevention.

Resistance band exercises are ideal for home exercise programs and can easily be incorporated into a circuit training
format helping to condition cardiovascular system as well as strengthening specific muscle groups. Because resistance
tubing is so compact and lightweight, it can be used while away from home.

Resistance tubing is extremely adaptable and a large number of resistance band exercises can be developed with very
little additional equipment. Smaller muscle groups that are hard to train with more traditional free weight exercises can be
targeted with resistance tubing. This makes it particularly appealing to athletic conditioning.

Sports-specific conditioning involves training movements rather than individual muscle groups. The versatility of
resistance band exercises allows the athlete to mirror very closely the movement patterns in their sport with varying
degrees of resistance. Perhaps even more important is the role they can play in injury prevention and rehabilitation …

When it comes to strength training, most of us stick to the usual free weights and machines or, if we're feeling frisky, we
may venture over to the cable or free motion machines at the gym. What you don't see a lot of is work with resistance
bands or tubing.

We're often confused about what resistance bands do and how to use them, but they're a great way to workout while you
travel or add variety to your usual routine.

                                                                7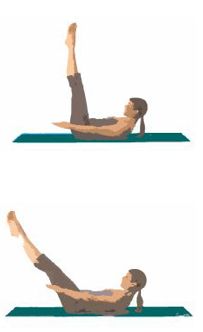
Basic Resistance Band Exercises

Overhead Press
Place band under ball or stand on band holding
handles in both hands. Begin with arms bent in
'goal post', wrists straight and abs in. Contract the
shoulders to straighten arms up and lower back
down.

Bicep Curls
Stand on the band and hold handles with palms
facing out. Keeping abs in and knees slightly bent,
bend arms and bring palms toward shoulders in a
bicep curl. Position feet wider for more tension.
Return to start and repeat.

Squats
Stand on the band with feet shoulder-width apart,
keeping tension on the band by holding a half-
bicep curl. Lower into a squat, keeping knees
behind toes, and pulling on the band to add
tension. Return to start and repeat.

Lunges
Stand with right leg forward, left leg back and band
positioned under right leg. Keeping tension on the
band by bending elbows, lower into a lunge until
both knees are at 90 degrees, front knee behind
the toe. Return to start and repeat.

                                     Stability or Exercise Ball
One of the most versatile pieces of equipment used today by conditioning professionals is the Stability Ball (i.e. "Swiss
balls”, "Exercise Balls", “Fitness balls”, "Physio Balls”, "Balance Balls", etc.). The Stability Ball has had long-standing
success in the world of clinical rehabilitation. However, due to their effectiveness in developing balance and core
strength, athletic trainers, coaches, personal trainers and physical education teachers have begun to integrate them into
their programs. Now they are the new craze in the world of athletic and functional conditioning. The history of the
Stability Ball originates back to the early 1960s. It was made by an Italian toy maker, Aquilino Cosani, and sold primarily
in Europe as the Gymnastik. In 1981 Cosani started a new company, Gymnic. These two companies are still in Italy and
are the major suppliers of SBs throughout the world.

                                                             8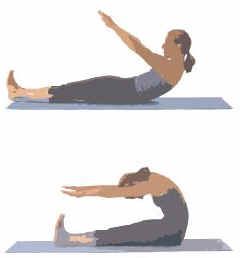
Basic Stability Ball Exercises
Wall Squats
  1. Begin by placing your stability ball against a wall, and, while standing upright, lean against the ball with your back.
      Your feet should be slightly out in front of you and approximately shoulder width apart.
  2. Using a controlled motion, lower yourself until the tops of your thighs are parallel to the floor.
  3. Slowly return to the standing upright position by pressing your feet into the floor and pushing your body back to
      upright.

Back Extensions
  1. Begin by kneeling on the floor in front of stability ball and lie face down so that the ball is at your upper abdominal
      region. Your head should be facing the floor.
  2. Cross your hands over your chest, and raise your torso approximately six inches.
  3. Hold for a count, then slowly and under control, lower your torso to the starting position.

Push Ups with Hands on Floor
  1. Start by positioning yourself in the standard push-up position, with your hands slightly wider than shoulder width.
      Place your feet on top of your exercise ball.
  2. Slowly lower yourself to the ground until your chest nearly contacts the floor.
  3. Perform a push-up by pressing yourself from the floor back to the starting position.

Oblique                                          Crunches
  1. Begin by kneeling down on one knee beside the exercise ball with the knee that is on the floor next to the fitness
      ball.
  2. Carefully lie sideways over the stability ball. You bottom arm (arm closest to the ball) should be bent with your hand
      behind your head and your top arm (arm farthest from the ball) can either be in the same position (hand behind
      head) or lying on your side. Having your top hand behind your head makes the exercise more difficult.
  3. Slowly raise you body upward by lifting your shoulder, pushing your hips into the ball and pulling with your obliques,
      making sure not to twist your body.
  4. Squeeze your obliques for a count and then slowly lower yourself back to the starting position.
                                                              9
Stationary Lunges
1. Start with a large stability ball behind you. Carefully place a leg on the ball. Your shin should be in contact with the
top of the ball. Place your front leg as far out in front of you back leg as you can while maintaining your balance
and comfort. Your front foot should be planted firmly on the floor.
2. To perform this stability ball exercise, lower yourself by slowly bending your front leg until the top of your leg is
parallel to the floor. Be sure to keep your back leg firmly on top of the stability ball throughout the movement.
3. Finish the repetition by returning to the starting position.
4. Repeat the movement, performing the required number of reps. Repeat with the opposite leg on the ball.
Crunch
1. Start by sitting on the exercise ball as if you were sitting on a chair. Slowly lean back and walk your feet forward
until the ball is positioned on your lower back region and you are looking toward the ceiling. The top your legs
should be parallel to the floor.
2. Cross your hands on your chest and keep your head in a neutral position looking forward (toward the ceiling). You
chin should not touch your chest at any point during this exercise.
3. Raise your torso by contracting your abdominals to perform the crunch.
4. Hold for a count, squeeze your abdominals, and return to starting position.
“Physical fitness is not only one of the most important keys to a healthy body, it is the basis of
dynamic and creative intellectual activity”
~John F. Kennedy
10Walking for Fitness
What are the top 10 reasons to walk?
1. Walking prevents type 2 diabetes. The Diabetes Prevention Program showed that walking 150 minutes per
week and losing just 7% of your body weight (12-15 pounds) can reduce your risk of diabetes by 58%.
2. Walking strengthens your heart if you're male. In one study, mortality rates among retired men who walked
less than one mile per day were nearly twice that among those who walked more than two miles per day.
3. Walking strengthens your heart if you're female. Women in the Nurse's Health Study (72,488 female
nurses) who walked three hours or more per week reduced their risk of a heart attack or other coronary event by
35% compared with women who did not walk.
4. Walking is good for your brain. In a study on walking and cognitive function, researchers found that women
who walked the equivalent of an easy pace at least 1.5 hours per week had significantly better cognitive function
and less cognitive decline than women who walked less than 40 minutes per week. Think about that!
5. Walking is good for your bones. Research shows that postmenopausal women who walk approximately one
mile each day have higher whole-body bone density than women who walk shorter distances, and walking is also
effective in slowing the rate of bone loss from the legs.
6. Walking helps alleviate symptoms of depression. Walking for 30 minutes, three to five times per week for
12 weeks reduced symptoms of depression as measured with a standard depression questionnaire by 47%.
7. Walking reduces the risk of breast and colon cancer. Women who performed the equivalent of one hour
and 15 minutes to two and a half hours per week of brisk walking had an 18% decreased risk of breast cancer
compared with inactive women. Many studies have shown that exercise can prevent colon cancer, and even if an
individual person develops colon cancer, the benefits of exercise appear to continue both by increasing quality of
life and reducing mortality.
8. Walking improves fitness. Walking just three times a week for 30 minutes can significantly increase cardio-
respiratory fitness.
9. Walking in short bouts improves fitness, too! A study of sedentary women showed that short bouts of brisk
walking (three 10-minute walks per day) resulted in similar improvements in fitness and were at least as effective
in decreasing body fatness as long bouts (one 30-minute walk per day).
10. Walking improves physical function. Research shows that walking improves fitness and physical function
and prevents physical disability in older persons.
Should I walk or run?
The benefits of running vs. walking
I'm frequently asked if walking is as good as jogging. It is for both health and fitness. Many of the studies on exercise and
chronic disease prevention use walking as the measurement. The risk of injury is low for walking, most everyone can do it,
it burns calories, and it makes you fit and healthy. Jogging yields the same benefits as walking, but there is more impact
on your knees, hips, and other joints.
Walking for weight loss
Walking, like any other aerobic activity, burns calories and will contribute to weight loss. Of course, to lose weight, you
must burn more calories than you consume no matter how much you exercise, so make sure to reduce your calories if
you want to lose weight, even if you're walking a lot.
Exercise is much more important for maintaining weight than it is for losing it. In fact, scientists believe it's the single best
predictor of maintaining weight. Research over the past two decades clearly shows that individuals who exercise after
weight loss are far more likely to maintain their weight than individuals who don't exercise.
As for walking specifically to control weight, walking is the most popular activity among participants in the National Weight
Control Registry. The NWCR is a longitudinal study of more than 5,000 men and women who, in order to participate in the
registry, must successfully maintain a 30-pound weight loss for a minimum of one year. The current average weight loss
11among the 5,000 participants is 60 pounds and the group has maintained that loss for roughly five years. It's tough to
argue with success!
Conclusion
It's as simple as walking out the door. And you'll be in good company. Walking is the most popular physical activity among
adults in the United States. It doesn't take all that much time (you can incorporate it into your life), you've been doing it
your entire life, you can do it just about anywhere, there are plenty of health and fitness benefits, and you'll feel good once
you get going.
Calories burned in one hour at different body weights
Calories burned per hour at different body weights
Walking 110 lbs. 125 lbs. 150 lbs. 175 lbs. 200 lbs.
Strolling less than 2 mph, level 100 114 136 159 182
Moderate pace about 3 mph 175 199 239 278 318
Brisk pace about 3.5 mph 200 227 273 318 364
Very brisk pace about 4.5 mph 225 256 307 358 409
Moderate pace about 3 mph, uphill 300 341 409 477 545
“Of all exercises, walking is the best.”
~Thomas Jefferson
12Weight Training
Weight Training Facts
1. Weight training increases your metabolism, which will help burn body fat throughout the day.
2. Using a full range of motion while performing a lift will help to maintain your flexibility by lengthening the muscles.
3. A regular weight training program will improve muscular strength.
4. Females will not gain as much muscle mass as males while weight training because of the different levels of
testosterone in their bodies. However, because female’s posses a smaller amount of testosterone in their bodies
they are able to build some muscle and become strong and toned.
5. It is important to remember to breathe while executing a lift. You should exhale when exerting the most force.
6. Good posture and a slight bend in your joints should be maintained to reduce injury.
Weight Training Terminology
Body Composition - the ratio of fat to lean body tissue including bone, muscle, water and connective tissue. Body
composition is usually expressed in a percentage. Females have a naturally higher percentage than males.
Cardiovascular Endurance - the ability of the circulatory system and respiratory system to supply oxygen to muscles
during sustained periods of physical exercise.
Flexibility - joints move through a full range of motion and muscles are elastic or stretchy. Good flexibility will reduce your
risk of acute injury in the present, and chronic injury on the future.
Maximum Heart Rate- (MHR) - The fastest your heart rate can beat without putting it in danger. Maximum Heart rate is
calculated by 220 and subtracting your age. During healthy exercise your heart should beat between 60-85% of that
number.
Muscular strength - the amount of force that a muscle can exert.
Muscular Endurance - the ability of a muscle to sustain many repetitions.
Muscular strength - the amount of force that a muscle can exert.
Muscular Endurance - the ability of a muscle to sustain many repetitions.
Recovery Heart Rate- (RHR) - Your pulse rate taken 5 minutes after you have finished exercising. The faster your heart
rate recovers, indicates better cardiovascular fitness.
Repetition - the number of times that a lift is executed in one set.
Resting Heart Rate- (RHR) - how fast your pulse is at rest. It indicates how hard your circulatory and respiratory systems
have to work to complete normal body functions. A regular exercise program over a period of time can lower your resting
heart rate. Your resting heart rate should be taken just after awakening in the morning, before getting out of bed.
Set - a group of repetitions that may be repeated after a short rest.
Target Heart Rate-(THR) - The range in which you want your pulse to stay while exercising, in order to increase your
cardiovascular endurance level. Working outside the zone will NOT increase your fitness levels.
Working Heart Rate- (WHR) - how fast your heart rate beats during exercise or physical activity.
13Basic Weight Training Exercises
Dumbbell Lateral Raise
STEP 1. Stand with your feet a shoulder-width apart, keeping your back straight and arms
slightly in front of your torso. With your elbows slightly bent, take a dumbbell in each hand.
STEP 2. Raise the dumbbells out and up to the level of your shoulders. Keep your palms
facing the ground.
STEP 3. Keeping your elbows bent, lower slowly back to the start position and repeat for the
desired number of reps.
Hammer Curl
STEP 1. Site on the edge of the workout bench and hold a pair of dumbbells using a neutral
grip (as shown on the diagram) and let them just hang at arm's length.
STEP 2. Without changing your wrist positioning, slowly curl the weights up toward your
shoulders. Remember to keep your upper arms tucked against your sides as you go through
the motion.
Seated Triceps Extension
STEP 1. Sit on a bench, and grab a pair of dumbbells. Hold them so that they are at arm's
length above your head with palms facing inward together.
STEP 2. Keep your upper arms stable as you lower the dumbbells behind your head until
your forearms are just past parallel to the floor.
STEP 3. Pause, then straighten your arms to return the dumbbells to starting position.
Back Squat
STEP 1. Stand with your feet hip-distance apart and with them facing forward and rest the
bar on the back of your shoulders just above your shoulder blades. Pull your abdominal
muscles in before starting the movement, but not so tightly that your breathing patterns are
affected.
STEP 2. Inhale slowly and start the movement at your hips by pushing them out behind you
in a sitting motion. Then allow your knees to bend, making sure that they do not travel
forward over your toes.
STEP 3. Travel down until your knees are flexed at 90 degrees at a comfortable point, exhale
slowly and push your body weight up through your heels to straighten your legs.
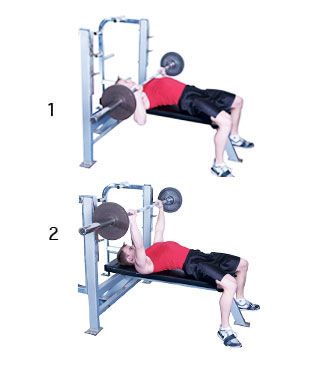
14Bench Press
STEP 1. Lie on your back with your feet supported either by a raised platform or the floor.
Make sure that you do not over-extend your lower back and keep your buttocks in contract
with the bench. Take an overhand grip on the bar, slightly wider than a shoulder-width apart.
Inhale and push the bar off the rack (if there is one) then move it lower down to the midline of
your chest.
STEP 2. Try to keep the bar, your wrists, elbows, and your shoulders working on the same
line of axis - straight up and down.
STEP 3. Hold for a second then push the bar back up, making sure that you shoulders do not
hunch forward away from the bench and that it is your triceps muscles and chest that are
pushing.
STEP 4. Keep your upper body in contract with the bench as much as possible and keep
youyour breathing rhythmical - exhale when you push the bar back up.
Dead Lift
STEP 1. Stand with your feet hip-distance apart and bend down in sitting motion until your
thighs are parallel to the floor. Keep your back straight and make sure that your spine is as
close to the neutral position as possible. Take an overhand grip on the bar with your hands
slightly wider than a shoulder-width apart.
STEP 2. Exhale, draw your abdominal muscles in, and lift the bar by pushing up through your
legs.
STEP 3. As the bar reaches your knees during the lift phase, push your hips forward to raise
your torso so that you are standing tall with your arms by your sides and the bar resting on
your thighs.
STEP 4. Hold the position for two seconds, inhale and return the weight to the floor.
“We are what we repeatedly do. Excellence, then, is not an act, but a habit.”
Aristotle
15You can also read