LORA REMOTE POWER SWITCH DEVICE FOR REMOTELY CONTROLLING INDUSTRIAL AND HOME APPLIANCES QUICK INSTALLATION GUIDE - IOT-SHOPS
←
→
Page content transcription
If your browser does not render page correctly, please read the page content below
LoRa® Remote Power Switch

Device for remotely controlling
industrial and home appliances

   Quick Installation Guide

                                         Author                  Ivo van Ling
                             Hardware Release                 1.2 (Early Bird)
                    Quick Install Guide Version   QIG_LoRa_RPSW_v1.00.docx
                                           Date                    7-07-2019
                        Covering Product code                    RE.11.LRSI
1 Table of Contents
2      REVISION HISTORY .................................................................................... 2
3      INTRODUCTION .......................................................................................... 3
    3.1        CHECK YOUR PACKAGE CONTENTS ..................................................................... 3
4      CONNECTING THE LORA RPSW TO A LORAWAN NETWORK ......................... 4
    4.1    USB INTERFACE .......................................................................................... 4
    4.2    CONFIGURATOR TOOL.................................................................................... 4
    4.3    COMMAND LINE INTERFACE (CLI) ..................................................................... 5
      4.3.1    Logging in over CLI............................................................................ 5
      4.3.2    Getting help on CLI commands ........................................................... 5
5      CONFIGURING THE LORA REMOTE POWER SWITCH.................................... 6
    5.1        RELAY TOGGLE VIA LORAWAN......................................................................... 6
    5.2        RELAY STATE MESSAGES VIA LORAWAN ............................................................. 6
6      TROUBLESHOOTING.................................................................................... 7
    6.1        EXAMPLE OF A SUCCESSFUL OTAA JOIN REQUEST .................................................. 7
    6.2        CHECKING HOW MANY GATEWAYS RECEIVED THE RPSW MESSAGES .............................. 8
    6.3        RESET TO FACTORY DEFAULTS .......................................................................... 9
7      RPSW FIRMWARE UPGRADE ....................................................................... 9

Disclaimer
The specifications and information regarding the products in this manual are subject to change
without notice. All statements, information, and recommendations in this manual are believed to be
accurate but are presented without warranty of any kind, express or implied. Users must take full
responsibility for their application of any products.

Notwithstanding any other warranty herein, all document files and software are provided “as is” with
all faults. RFI Engineering B.V. disclaims all warranties, expressed or implied, including, without
limitation, those of merchantability, fitness for a particular purpose and noninfringement or arising
from a course of dealing, usage, or trade practice.

In no event shall RFI Engineering B.V. or its suppliers be liable for any indirect, special,
consequential, or incidental damages, including, without limitation, lost profits or loss or damage to
data arising out of the use or inability to use this manual, even if RFI Engineering B.V. or its suppliers
have been advised of the possibility of such damages.

The information contained in this document is subject to change. This document contains proprietary information, which is protected by copyright
laws. All rights are reserved. No part of this document may be photocopied, reproduced or translated to another language or program language
without prior written consent of RFI Engineering B.V.
                                                                                                  QIG_LoRa_RPSW_v1.00.docx Page: 1(9)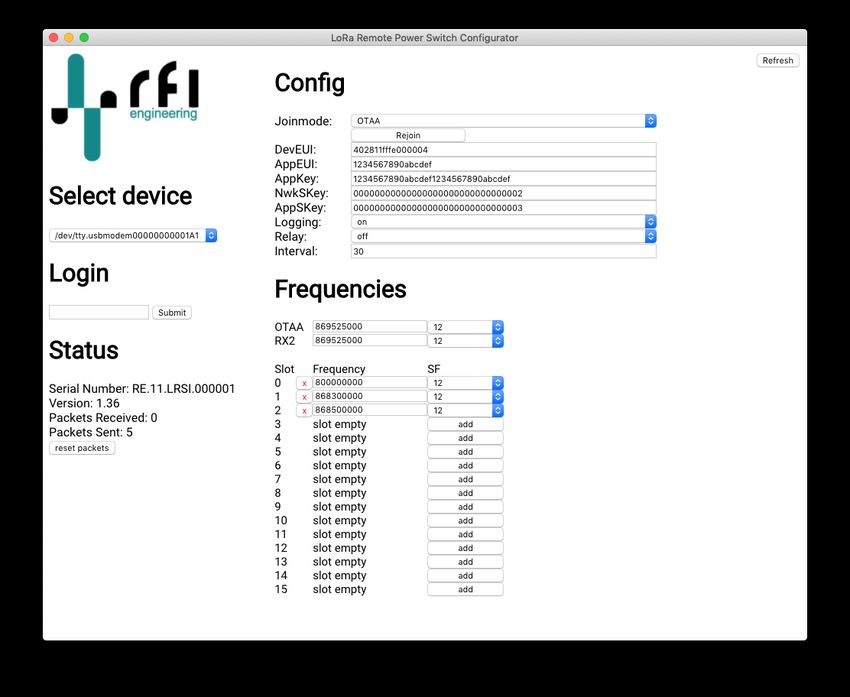
2 Revision History

 Revision        Reason                                                                                  Author          Date
 1.0             First version for RPSW software release 1.37,                                           IvL             12 May 2019
                 configurator release 1.01 and hardware release 1.2
                 (Early Bird)

The information contained in this document is subject to change. This document contains proprietary information, which is protected by copyright
laws. All rights are reserved. No part of this document may be photocopied, reproduced or translated to another language or program language
without prior written consent of RFI Engineering B.V.
                                                                                                  QIG_LoRa_RPSW_v1.00.docx Page: 2(9)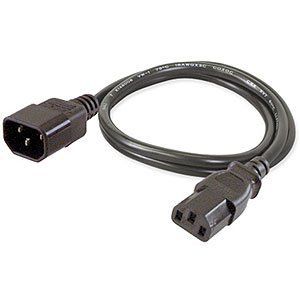
3 Introduction
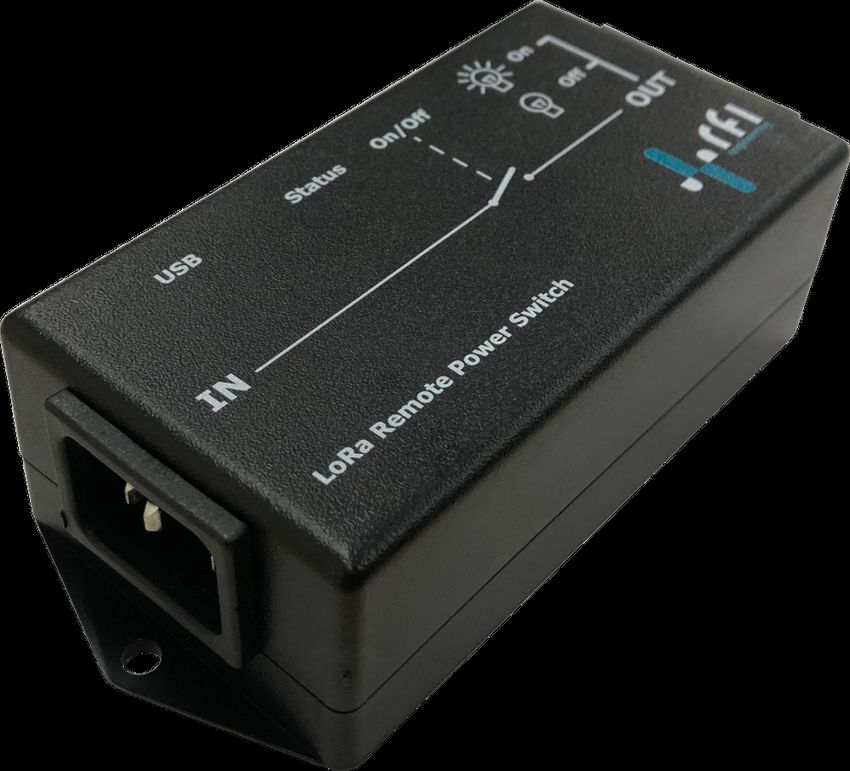
The LoRa® Remote Power Switch (RE.11.LRSI) is a device for remotely controlling industrial and
home appliances. The unit features one IEC-C14 input connector, and one IEC-C13 output
connector so that it easily fits into any environment.
Applications include the remote control of heating in vacation homes, lighting, engine pre-heaters,
aviation engine heaters, irrigation systems, water well pumps, pumping stations, cabin heaters,
resetting remote servers, enabling and disabling security systems, access control of gates and
garage doors. Communication to the RE.11.LRSI is done using the integrated LoRaWAN
transceiver. All you need to do connect the RE.11.LRSI to a private or public LoRaWAN network.
Connect your appliance to the power outlet and you have your appliance under control.
This document provides information on the following topics:
• LoRa Remote Power Switch configuration using the Configurator.
• LoRa Remote Power Switch configuration using the Command Line Interface (CLI).
• Troubleshooting.
• Firmware update.
3.1 Check Your Package Contents
These are the items included with your LoRa® Remote Power Switch purchase:
Power Cord with C13 – C14
Power Switch with embedded connectors
868MHz LoRa antenna
The information contained in this document is subject to change. This document contains proprietary information, which is protected by copyright
laws. All rights are reserved. No part of this document may be photocopied, reproduced or translated to another language or program language
without prior written consent of RFI Engineering B.V.
QIG_LoRa_RPSW_v1.00.docx Page: 3(9)4 Connecting the LoRa RPSW to a LoRaWAN network
Before the LoRa Remote Power Switch can communicate with a LoRaWAN network you will need to
register your device with its Device EUI. Although the RPSW comes with a Device EUI pre-
provisioned, it can be altered by the user. Dependent on the network you are connecting to, you
might have to alter the Device EUI.
4.1 USB Interface
Configuration of the RPSW is done using the USB interface. The micro-USB connector on the RPSW
acts as a virtual serial port when connected to a laptop or PC. RFI Engineering provides a
Configurator Tool for both Windows as well as MAC OS to configure the device. The latest
version of this Configuration Tool can be downloaded from www.rfi-engineering.com. Navigate to
the LORA REMOTE POWER SWITCH product page to find the download links.
If you don’t want to use the configuration tool, you can also use a terminal emulator (for example
putty on Windows) to configure the RPSW using simple command line interface (CLI) commands.
4.2 Configurator Tool
Using the Configurator Tool, it is possible to alter the Device EUI, Application EUI and Application
Key.
For the Configurator Tool to connect to your RPSW it needs to be connected to the correct serial
port and you will have to fill in the password in the Login box. The default password is: rfi123.
The information contained in this document is subject to change. This document contains proprietary information, which is protected by copyright
laws. All rights are reserved. No part of this document may be photocopied, reproduced or translated to another language or program language
without prior written consent of RFI Engineering B.V.
QIG_LoRa_RPSW_v1.00.docx Page: 4(9)4.3 Command Line Interface (CLI)
The RPSW supports a Command Line Interface (CLI) to configure the unit. In principle this is the
same interface over which the Configurator Tool operates. The Configurator Tool issues the same
CLI commands as you would type in manually on this interface.
However, the CLI can also be used to troubleshoot the RPSW. This troubleshooting function is
currently not supported by the Configurator Tool but might be useful for the initial setup of the
RPSW. One example is the logging function, which will show you what packets the RPSW is
sending and receiving.
CLI commands are entered on a single line and can have multiple options. Pressing [ENTER] will
execute the command.
4.3.1 Logging in over CLI
When connected to the serial interface on the RPSW pressing [ENTER] a couple of times gives you
a login prompt. For example:
Password: Permission denied, please try again.
Password: Permission denied, please try again.
Password: Permission denied, please try again.
Password:
Enter your password, followed by [ENTER] to log in. The default password is; rfi123
Password: rfi123Logged in
CMD >
Once logged in you should see the command prompt: CMD >
4.3.2 Getting help on CLI commands
The CLI has a help function that is accessed using ? or help. For example:
CMD > help
*** RFI Engineering B.V. LoRa Remote Power Switch ***
Version 1.36 (Early Bird), Compiled [Jun 15 2019 13:56:45]
The LoRa parameters of the RPSW
get lora
set mode /
set DevEUI , where value is 16 hex characters
set AppEUI , where value is 16 hex characters
set AppKey , where value is 32 hex characters
set NwkSKey , where value is 32 hex characters
set AppSKey , where value is 32 hex characters
set DevAddr , where value is 8 hex characters
The frequency parameters of the RPSW
get freq
set freq
where is 0..15
is frequency in Hz
is spreading factor 7..12
set freq
set OTAAfreq [SF], where frequency is in Hz and SF is spreading factor
7..12
set RX2freq [SF], where frequency is in Hz and SF is spreading factor
7..12
The advanced parameters of the RPSw
[DISABLED] set ADR / [DISABLED]
set interval , where seconds can be 30 - 3600
The information contained in this document is subject to change. This document contains proprietary information, which is protected by copyright
laws. All rights are reserved. No part of this document may be photocopied, reproduced or translated to another language or program language
without prior written consent of RFI Engineering B.V.
QIG_LoRa_RPSW_v1.00.docx Page: 5(9)set logging /
set relay /
set password , password can be 3 to 30 characters
reset counters, to reset the LoRa packet up and down counters
reset factory, to reset the unit to factory defaults and then reboot
reboot
exit, to log out
OK
CMD >
5 Configuring the LoRa Remote Power Switch
The LoRa RPSW connects to a local LoRaWAN network using either Over The Air Activation (OTAA)
or Authorization by Personalization (ABP). In order to connect to a LoRaWAN network using OTAA
the LoRa RPSW needs to be provisioned with:
• A configurable DevEUI - a 16 digit code uniquely identifying the LoRa RPSW (printed on
the label)
• A configurable AppEUI - a 16 digit code uniquely identifying the website that data will be
sent to
• A configurable AppKey - a 32 digit code that authenticates the LoRa RPSW to the website
and network server
After the above keys have been configured, the LoRa RPSW will attempt to join local LoRa
networks by transmitting OTAA join requests. Any network that hears the join requests and has
knowledge of the LoRa RPSW's DevEUI, AppEUI and AppKey, will allow the LoRa RPSW to join the
network and transmit data.
Once joined, LoRa RPSW repeats the OTAA process once every 30000 (30k) upload messages by
default. This re-negotiates encryption keys for enhanced security, and ensures continued operation
in the event of a network losing the keys (for instance, if the device is mistakenly deleted). In this
default setting this means that the RPSW re-negotiates the LoRa keys every 11 days.
5.1 Relay Toggle via LoRaWAN
You can toggle the relay to the off or on position by sending 00 or 01 as payload in the LoRa
message. Sending 00 turns the relay off. Sending 01 turns the relay on.
5.2 Relay State Messages via LoRaWAN
The RPSW sends the relay state every 30 seconds over the LoRaWAn interface. The interval is
controlled by the ‘interval’ setting in the RPSW, the default setting is 30 seconds.
The RPSW reports the state of the relays as follows:
00 indicates relay off,
01 indicates relay on.
The interval between sending the state messages can be set between 30 seconds and 3600
seconds (1 hour). Use the command set interval , where seconds can be 30 – 3600
to set the interval. For example:
CMD > set interval 60
Setting interval to 60 seconds
OK
The information contained in this document is subject to change. This document contains proprietary information, which is protected by copyright
laws. All rights are reserved. No part of this document may be photocopied, reproduced or translated to another language or program language
without prior written consent of RFI Engineering B.V.
QIG_LoRa_RPSW_v1.00.docx Page: 6(9)6 Troubleshooting
The RPSW contains a logging function that shows exactly what the RPSW is doing. This function
can be accessed on the CLI. In order to switch the logging function on you issue the following
command: set logging on [ENTER]
For example:
CMD > set logging on
Setting LoRaWAN package logging on
OK
From then on, the RPSW provides logging information on the CLI interface. The setting is
preserved through reboots and power cycles. So, in order to stop the logging function, you will
have to give the command: set logging off [ENTER]
For example:
CMD > set logging off
Setting LoRaWAN package logging off
OK
6.1 Example of a successful OTAA JOIN request
When the RPSW is switched on and configured for the first time it starts sending out OTAA Join
requests. When no valid OTAA Join reply is received, the RPSW issues a new OTAA Join request
every 30 seconds until a valid reply is received.
The following log shows a successful OTAA Join Request:
CMD > Sending OTAA JOIN on channel: [0] frequency: [868100000 Hz] SF: [12]
'-> DevAddr: [051F1DFF] pktUp: [8] RawMsg:
[00050000fdff112840050000fdff112840b16949c75722]
Waiting for OTAA JOIN Accept on frequency: [869525000 Hz] SF: [12]
Waiting for OTAA JOIN Accept on frequency: [868100000 Hz] SF: [12]
Waiting for OTAA JOIN Accept on frequency: [869525000 Hz] SF: [12]
|-> DevAddr: [051F1DFF] pktDown: [0] RawMsg:
[20e193fc3de977ed66dbe48c2cb074bf5f130102ba17b44a26e6b2f3df61cf1e8d]
|-> SNR: [12] Packet RSSI: [-77] RSSI: [-120]
Received an OTAA JOIN Accept
|-> DevAddr: [051F1DFF]
|-> NwkSKey: [24C3FF16159EEE909B8584A80E00123C]
|-> AppSKey: [BAAC56E1BACE062B0A9D137D11771375]
|-> RX2 SF : [SF7]
'-> RXdelay: [5 seconds]
You can check if the RPSW attached to the network OK by giving the get lora command.
CMD > get lora
Serial number : [RE.11.LRSI.000005]
LoRaWAN settings
LoRaWAN join mode: [OTAA]
DevEUI is set to : [402811FFFD000005]
AppEUI is set to : [402811FFFD000005]
AppKey is set to : [b1a449831cc7b24e63c5f935a363bbad]
NwkSKey is set to: [24C3FF16159EEE909B8584A80E00123C]
AppSKey is set to: [BAAC56E1BACE062B0A9D137D11771375]
DevAddr is set to: [051F1DFF]
Joined OTAA : [000002] World: Actility
Last msg rcvd by : [1] gateway with [25dB] margin
RPSW state
LoRa logging is : [on]
Relay state is : [off]
The information contained in this document is subject to change. This document contains proprietary information, which is protected by copyright
laws. All rights are reserved. No part of this document may be photocopied, reproduced or translated to another language or program language
without prior written consent of RFI Engineering B.V.
QIG_LoRa_RPSW_v1.00.docx Page: 7(9)Relay interval : [30 seconds]
Packets Sent : [6]
Packets Received : [0]
In the example you can see that the RPSW connected to a network from Actility [000002] and is
received by 1 gateway with 25dB margin.
6.2 Checking how many gateways received the RPSW messages
The RPSW periodically checks if it is being received by the network server. It does this by sending
a LinkCheckReq MAC command together with a Relay state message.
When a LinkCheckReq is received by the network server via one or multiple gateways, it responds
with a LinkCheckAns command. In the reply, the network server indicates the demodulation
margin in dB and the number of gateways that successfully received the last LinkCheckReq
command.
The first LinkCheckReq is sent immediately following a successful OTAA Join.
For example:
CMD > Sending OTAA JOIN on channel: [1] frequency: [868300000 Hz] SF: [12]
'-> DevAddr: [00000000] pktUp: [0] RawMsg:
[00e34900f07ed5b370000000faff1428404a03d2d0a808]
Waiting for OTAA JOIN Accept on frequency: [869525000 Hz] SF: [12]
Waiting for OTAA JOIN Accept on frequency: [868300000 Hz] SF: [12]
|-> DevAddr: [00000000] pktDown: [0] RawMsg:
[20f8a0d1e373c5d41de628244f85dd18b7390c87b8794e9ca9b70770791f7c4848]
|-> SNR: [12] Packet RSSI: [-74] RSSI: [-119]
Received an OTAA JOIN Accept
|-> DevAddr: [48E06EC8]
|-> NwkSKey: [144F682B1D16713A385563A2A07D4C31]
|-> AppSKey: [9AE2F081587A49DE0C3124EDAA5E58EA]
|-> RX2 SF : [SF12]
'-> RXdelay: [0 seconds]
Sending Relay state message on channel: [0] frequency: [868100000 Hz] SF: [12]
'-> DevAddr: [48E06EC8] pktUp: [0] RawMsg: [40c86ee0482100000201ce9039e974]
Listening for reply to our Relay state message on frequency: [869525000 Hz] SF: [12]
Listening for reply to our Relay state message on frequency: [868100000 Hz] SF: [12]
|-> DevAddr: [48E06EC8] pktDown: [0] RawMsg: [a0c86ee048040000060207026b5e8d85]
|-> SNR: [-5] Packet RSSI: [-121] RSSI: [-120]
|-> Received MAC command [DevStatusReq]
|-> Received MAC command [LinkCheckAns]
Listening for reply to our Relay state message on frequency: [869525000 Hz] SF: [12]
You can force the RPSW to send a LinkCheckReq message by giving the following command:
linkcheck. The LinkCheckReq command is sent together with the next relay state message to the
network server.
For example:
CMD > linkcheck
Scheduling a [LinkCheckReq] MAC message to network server
OK
CMD >
Sending Relay state message on channel: [2] frequency: [868500000 Hz] SF: [12]
'-> DevAddr: [48E06EC8] pktUp: [10] RawMsg: [40c86ee048210a000201877df6482e]
Listening for reply to our Relay state message on frequency: [869525000 Hz] SF: [12]
Listening for reply to our Relay state message on frequency: [868500000 Hz] SF: [12]
|-> DevAddr: [48E06EC8] pktDown: [2] RawMsg: [60c86ee048030300020102a3c6d8cf]
|-> SNR: [-6] Packet RSSI: [-122] RSSI: [-118]
|-> Received MAC command [LinkCheckAns]
Listening for reply to our Relay state message on frequency: [869525000 Hz] SF: [12]
The information contained in this document is subject to change. This document contains proprietary information, which is protected by copyright
laws. All rights are reserved. No part of this document may be photocopied, reproduced or translated to another language or program language
without prior written consent of RFI Engineering B.V.
QIG_LoRa_RPSW_v1.00.docx Page: 8(9)The last received LinkCheckAns is decoded and stored in the RPSW. It can be seen when typing
the command: get lora. The status information is displayed in the line: Last msg rcvd by : [2]
gateways with [1dB] margin
For example:
CMD > get lora
Serial number : [RE.11.LRSI.000005]
LoRaWAN settings
LoRaWAN join mode: [OTAA]
DevEUI is set to : [402814FFFA000000]
AppEUI is set to : [70B3D57EF00049E3]
AppKey is set to : [14ED42F530B4B3252C6E553199867FE1]
NwkSKey is set to: [144F682B1D16713A385563A2A07D4C31]
AppSKey is set to: [9AE2F081587A49DE0C3124EDAA5E58EA]
DevAddr is set to: [48E06EC8]
Joined OTAA : [000024] World: Gimasi
Last msg rcvd by : [2] gateways with [1dB] margin
RPSW state
LoRa logging is : [on]
Relay state is : [off]
Relay interval : [30 seconds]
Packets Sent : [18]
Packets Received : [3]
6.3 Reset to factory defaults
You can reset the RPSW to factory default settings by giving the command: reset factory. This
command resets all keys and counters to zero. It also resets the devEUI to the factory default
setting, i.e. the value it is indicated on the bottom of the unit. The DevEUI for LoRa devices from
RFI Engineering all start with 402814, the Organizationally Unique Identifier (OUI) of the
company.
7 RPSW firmware upgrade
The firmware of the RPSW can be updated using the USB port. You have to put the unit in Device
Firmware Upgrade (DFU) mode in order to flash the device with new firmware.
To put the RPSW in DFU mode disconnect the Press button for DFU mode
unit from the mains power. Insert a small pin
(for example a paper clip or similar) in the hole
at the bottom of the unit to press the button.
While keeping the button depressed power the
unit on. You can then release the button. No
LEDs on the side of the unit are lit, and the unit
is now in DFU mode.
Using DFU utils (available for Windows, MAC
OS and Linux) you can flash new firmware into
the unit. New firmware releases can be found
on www.rfi-engineering.com.
The information contained in this document is subject to change. This document contains proprietary information, which is protected by copyright
laws. All rights are reserved. No part of this document may be photocopied, reproduced or translated to another language or program language
without prior written consent of RFI Engineering B.V.
QIG_LoRa_RPSW_v1.00.docx Page: 9(9)You can also read