Milk Carton Bird House What you need
←
→
Page content transcription
If your browser does not render page correctly, please read the page content below
Crafts and Projects Using Recycled Materials
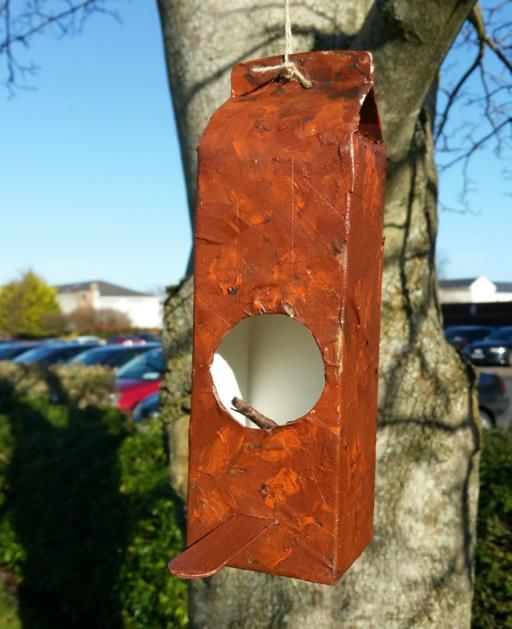
Milk Carton Bird House
What you need:
• Milk carton
• Stapler and staples
• Masking tape
• A soft cloth, rag or chamois
• Brown paint (acrylic is best) watered down
• Scissors or a knife (and adult assistance)
• Twine
What to do:
1. Clean and dry the milk carton thoroughly. Staple the top of the carton shut.
2. Tear off small pieces of masking tape and cover the entire carton with the pieces of tape.
3. Using a soft cloth, rub brown paint all over the tape-covered carton. This will give the
carton a rough, bark-like finish.
4. Cut a hole (WITH ADULT ASSISTANCE) about 4” above the bottom of the carton. The
hole should be approximately 1” to 1 ½” in diameter. This hole is for the birds to get in and
out of the house.
5. Poke a few drainage holes in the bottom of the carton and two ventilation holes in the top
of the carton.
6. Poke a hole through the top of the feeder, string a piece of twine through the hole and
hang your feeder on a tree.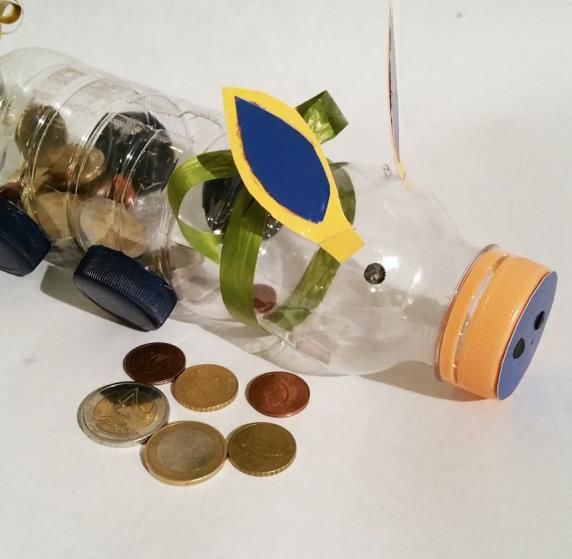
Crafts and Projects Using Recycled Materials

                                  Suncatcher Craft
                                      What do you do with unwanted CDs that clutter up your
                                      room? You can turn them into a fun recycling project
                                      that will add sparkle to your home.

                                         What you need:
                                       • Junk CDs
                                       • Craft glue
                                       • Things that sparkle or are colorful (rhinestones,
                                         beads, glitter, sequins, etc.)
                                       • Monofilament fishing line
                                       • Scissors
                                       • Newspaper

   What to do:
1. Before getting to work, cover your work surface with newspaper.

2. Plastic is not the easiest surface when it comes to gluing things down. Test the glue on
   one CD by gluing a rhinestone or one of the larger, heavier decorations in place. If this
   glue works, call in the young artist! If not, try a different glue.

3. Give your child a CD and then let her get creative with the decorations. She can create a
   sparkly design, styling her suncatcher with flowers, suns, or faces. Or she can create a
   more abstract pattern. Let the glue dry.

4. When the glue has dried, pick up the suncatcher. Be ready to catch anything that was not
   glued down well. Re-glue anything that is not secure. Again, let the glue dry.

5. Turn the disk over and decorate the second side. Again, let the glue dry and then test the
   suncatcher to see if everything is secure.

6. Cut a two-foot length of monofilament and tie it through the disk. Now find a place where
   people will be able to admire the suncatcher. Only hang the suncatchers outside if you
   have used a glue that is not water-soluble.
Crafts and Projects Using Recycled Materials

                            Milk Bottle Bird Feeders
                                           What you need:
                                       •   An empty 2 Litre milk container
                                       •   Twine
                                       •   Chopstick
                                       •   Scissors
                                       •   Box cutter (optional)
                                       •   Birdseed
                                       •   Markers or paint (optional)

   What to do:
1. Rinse and dry your milk container thoroughly.

2. On one non-handle side of the container, use your marker to draw openings where the
   birds can access the bird seed. Also mark where you want to insert the chopstick, which
   will act as a perch for your feathered friends.

3. Use scissors to cut out the door and hole for the perch; you can use a box cutter to score
   the center of your cut-outs as needed to make it easier to cut into the plastic. Insert
   chopstick into perch holes.

4. Remove lid of the container and tie twine, strong string, or thin wire around the base of the
   neck just under the cap’s threading and tie; replace cap.

5. Decorate with markers or paint, if desired.

6. Fill with bird seed, hang from a tree branch or from a hook on the eave of your roof and
   watch birds coming to feed.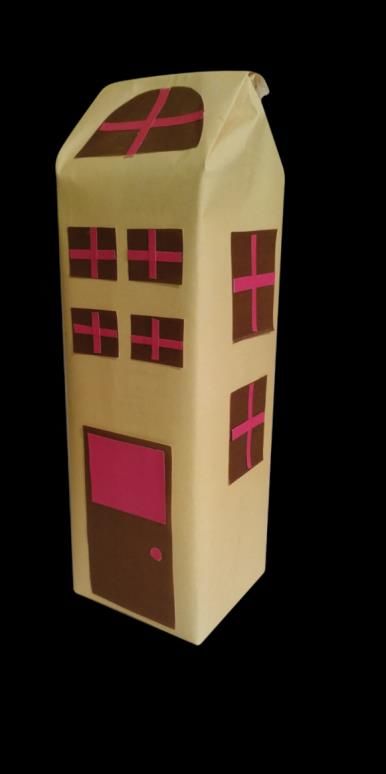
Crafts and Projects Using Recycled Materials

                     Recycled Sports Drink Piggy Bank
                                                What you need:
                                           • Sports drink bottle, cleaned and dried
                                           • Construction paper scraps
                                           • Curling ribbon
                                           • 4 water bottle or soda bottle caps, cleaned and
                                             dried
                                           • Scissors – Glue - Hole punch

   What to do:
1. Set your sports drink bottle on its side and cut an opening in the center of the “back”
   where your money will go. Cut two slits to insert ears as well, closer to the bottle cap. Set
   the bottle aside.

2. Using construction paper, cut out two leaf shapes with a tab at the bottom to create your
   piggy’s ears. Cut two smaller leaf shapes as the inner part of the ears. Glue together.

3. Using your bottle cap as a template, trace and cut a circle shape from your paper scraps
   and glue to the top of the cap.

4. Using your hole punch, punch out four small circles from your construction paper. Glue
   two to the bottle cap to create nostrils. Glue the other two to the bottle for eyes.

5. Insert the ears into the ear slots.

6. Curl a small length of ribbon and glue to the bottom of your bottle to form a tail.

7. Adhere bottle caps to the bottom of the ‘piggy’ to form ‘feet’. Allow to dry and start filling
   with coins!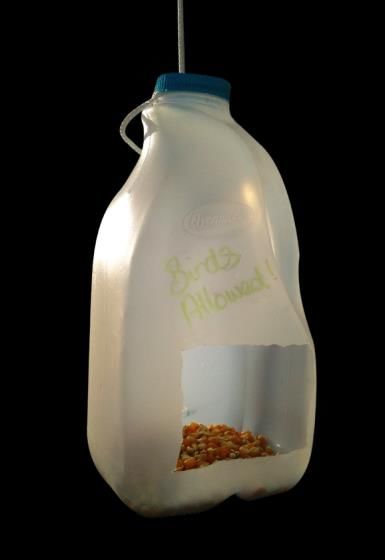
Crafts and Projects Using Recycled Materials

                                Milk Carton Houses
                                                What you need:
                                           •   Milk, juice, or cream cartons (different sizes)
                                           •   White acrylic paint, gesso, or white latex house
                                               paint
                                           •   Pencils
                                           •   Paintbrushes
                                           •   Tempera or acrylic paint
                                           •   Optional: construction paper, scissors, and
                                               glue
                                           •   Containers for water
                                           •   A covered work area

   What to do:
1. Cover the cartons with white acrylic, gesso, or latex house paint. Let dry. (Optional: wrap
   the milk carton with paper -- like a present).

2. Paint the carton (using tempera paint) to look like a house. (Optional: Glue construction
   paper windows, doors, etc. onto the carton).

3. Draw windows, doors etc. onto the carton.

4. Add construction paper embellishments.

5. Make several houses and you have a village.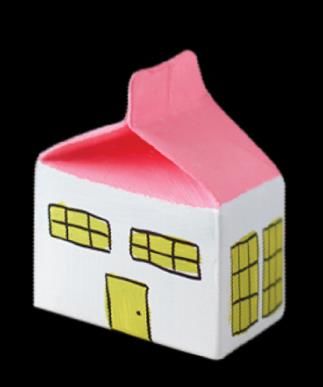
You can also read