MINI Quick Start Guide - photosentinel.com/support
←
→
Page content transcription
If your browser does not render page correctly, please read the page content below
MINI
   Quick Start Guide

Ver. 6.3               photosentinel.com/support
CONTACT
                                                 INDEX     Support + Contact

    CONTACT US
    If you run into issues not covered or resolved by this quick start
    guide, additional information can be found on our website, or by
    contacting our international support team:

                  Web:    photosentinel.com/support

                 Email:   support@photosentinel.com

    INDEX
    Setup Tips                                                 3
    Quick Start Guide                                          4-5
    Network Setup                                              6-7
    Network Troubleshooting                                    8

2
SETUP TIPS
CREATE AN INSTALLATION
Before setting up your hardware, you will need to create
an installation by following the steps outlined at
photosentinel.com/kb/create-installation.
The installation will allow you to select a Cloud Services plan,
configure your system and view your photos on an online
gallery.
Note: Once the installation has been created, monthly service fees
will apply. We recommend setting up your installation close to the
date of installing on-site.
TEST BEFORE INSTALLING
The controller integrates with a cellular network to transfer
photos and data. You may need to manually configure the
equipment to work with your local network. To save time,
money and stress at the installation site, we recommend
you set up and test the system before you travel to install it.
SYSTEM ALERTS
System Alerts and Notifications let you know if your system
is behaving unexpectedly or has a critical issue. Alerts are
enabled by default, and you will receive Notifications at the
email address and/or mobile number listed in your User Details.
To learn how to change Alerts and Notification preferences, or
to understand more about the Alerts System, head to
photosentinel.com/kb/alerts-system.
3QUICK START
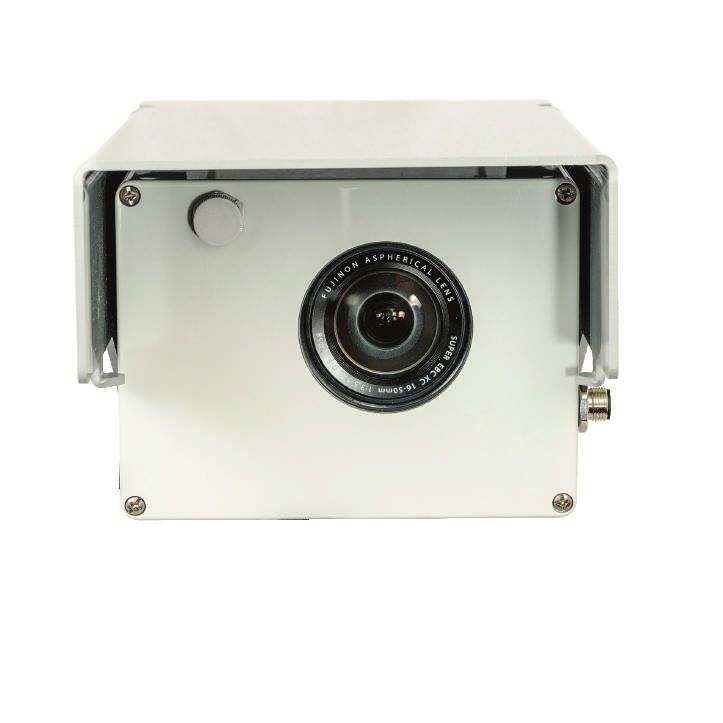
QUICK START FOR THE MINI
1 Log into the photoSentinel a. Log in to setup.photosentinel.com.au with 1a
Control Hub and configure your your username and password.
photoSentinel for testing. b. If you have not yet created an installation,
follow the instructions on page 3.
c. Select your installation from the dropdown
2 Insert your SIM card and check menu, then navigate to the Config page.
that the microSD card is already d. For testing, set both the photo frequency and
installed in the controller. upload/connection frequency to ten minutes.
3 Switch the photoSentinel a. Check the camera’s on-board time and date 4a
controller ON. settings are correct.
b. Adjust any other settings you wish to. The
Fujifilm X-A3 comes set up for long term
4 Switch the controller into Camera time-lapse shooting, but you may have some
Bypass mode, switch on the settings you wish to change.
Fujifilm X-A3 and set up the c. Frame your photo.
camera. Switch the camera off d. Take a photo and view it in playback to make
again at completion of setup. sure the camera is saving to the micro SD
card in the controller.
5 Switch the photoSentinel
e. Switch the Fujifilm X-A3 off. It should remain
off for normal photoSentinel operation.
controller to Normal mode. The
system will power on the camera
and take a photo, and upload it The photoSentinel controller will attempt to 5a
connect to the cellular network for the first time
over the cellular network.
using a series of pre-programmed APNs. If it
Allow 5-10 mins for upload. finds a working APN, it will connect and upload
(See LED guide over page.) a photo.
If, after trying all the pre-programmed APNs,
the system still does not connect, you will need
6 View the photo on the web to manually program in your network’s APN.
gallery to ensure it has uploaded. For how to set your APN, see pages 6-8.
7 Repeat steps 4-6 until you’re a. Go to setup.photosentinel.com.au 6a
happy with the photo that is b. On the Galleries page, click on your
uploading. photoSentinel unit to go to the photo gallery.
4QUICK START
8 Place the provided silica gel
sachet into the photoSentinel
Mini housing.
Double check the window is clean.
9 Check that the photoSentinel is in
Normal mode and is switched on.
10 Replace the camera unit back
into the housing and tighten the
a. Go to setup.photosentinel.com.au 11
four screws. a
b. Select your photoSentinel from the
dropdown menu, then navigate to the Config
page.
11 In Control Hub adjust the photo
The most common regime is to set the
interval and connection settings
photo interval and upload/connection
to the desired ongoing regime for settings to the same frequency to ensure
your project. consistent syncing of operations.
Setup Complete
SHOOTING WITH THE MINI
To perform a one time auto-focus on the camera, point it at the
subject and push the Fn button next to the trigger button. This
will auto-focus the camera once, and then leave the camera in
manual focus.
To operate in photoSentinel NORMAL mode, the camera power
switch on the Fujifilm X-A3 must remain OFF.
To change camera settings in CAMERA TEST mode, turn the
Fujifilm X-A3 camera power switch to ON, adjust camera
settings, and then switch the camera back off.
5APN SETUP
SET THE CELLULAR NETWORK APN
The Access Point Name (APN) allows a SIM card to connect to
the internet. To find your APN, either do an online search (your
SIM card provider + APN) or call your network provider’s help
desk. As one provider can have multiple APNs, make sure you
get the APN for your particular network plan. If it’s unclear which
APN is for your service, you may have to try multiple APNs to
find the right one.
There are two ways to set the APN.
SMS the APN to photoSentinel Export the APN via Control
Hub and microSD card
1 Make sure the photoSentinel is
OFF and insert the SIM card. Insert the micro SD card into your 1
computer (using microSD-to-SD, or
microSD-to-USB converter).
2 Using your phone, send an SMS to
the photoSentinel SIM card with
the following format: Log into setup.photosentinel.com.au, 2
select your unit from the dropdown and
APN=your.APN (where your.APN is then navigate to the Config page.
replaced by the relevant APN).
Scroll down to Advanced Settings and 3
enter the relevant APN.
3 Turn the photoSentinel ON and
check the LED indicator light
sequence for successful Click on Export Settings to File at the 4
bottom of the page.
connection (see opposite).
Save the downloaded file (default.xml) to 5
the root directory of the microSD card.
Ensure the photoSentinel is OFF and 6
insert the microSD card.
Switch the photoSentinel ON (Normal 7
mode) and it will install the new APN.
Check the LED light sequence for
successful connection (see opposite).
6APN SETUP
LED INDICATOR LIGHT SEQUENCE
1 Insert the SIM card and turn on the photoSentinel.
2 LED alternating cyan/green - System start up.
3 LED solid yellow - A photo will be triggered.
4 LED solid blue - Trying to connect to the internet.
5 LED flashing green 1 second - Trying to determine APN.
Successful Connection Unsuccesful Connection
6a LED flashing blue 1 second - LED flashing green 0.2 seconds - 6b
APN identified and the Cannot determine the APN;
photoSentinel has connected to requires manual configuration.
the internet.
LED solid red - 7b
7a LED flashing blue 0.2 seconds - Failed to connect to the internet
The photo is being uploaded to or failed to complete file upload.
the photoSentinel server. The photoSentinel will sleep for
two minutes and then try again.
8a LED solid green -
The photo has been successfully If left on, the photoSentinel will 8b
uploaded. After two minutes the repeat this process indefinitely
photoSentinel will go to sleep until until it recieves the APN
the next scheduled activity. information, so turn it off until
the APN can be configured.
If the LED indicates successful If the LED indicates an
connection, log into unsuccessful connection, try
setup.photosentinel.com.au another APN or check the
and check that the photo has guide on the next page for
been uploaded. other initial SIM card issues.
7APN ISSUES
COMMON CONNECTION SETUP ISSUES
Below are troubleshooting tips for common issues that may
occur when trying to connect your photoSentinel to the cellular
network for the first time.
Cause Description Solution
SIM card has a Some SIM cards have a PIN lock You can remove a PIN by
PIN lock which needs to be disabled for inserting the SIM card into a
the photoSentinel to use the mobile phone and disabling the
SIM card. PIN in your settings, or ask to
have it removed at purchase.
SIM card hasn’t Some SIM cards require Contact your network provider
been activated activation before they can be to activate the SIM card.
used.
Cellular network photoSentinel uses the common Check that your network is
is not WCDMA cellular technology WCDMA (aka WCDMA. If not, you’ll need to
UMTS/HSDPA). Some providers change your network to one
use a different, incompatible that is WCDMA.
cellular technology.
Provider needs The network provider may have Ask your provider to remove the
IMEI number locked the SIM card to a certain IMEI lock on the SIM card. If
device and it needs to be they need the IMEI number of
unlocked. your photoSentinel unit, you
can find it on your unit’s Status
page in Control Hub.
SIM card is Some network providers lock Contact your network provider to
device-locked their SIM cards to particular get the SIM card unlocked.
devices.
SIM card Very occasionally, an APN will Find out the username and
requires require a username and password, and contact
username password, particularly if the SIM photoSentinel headquarters to
and password card is on a corporate plan. arrange for these to be added to
your photoSentinel.
8You can also read