Modern WordPress development tools - Ella Hyvärinen - Theseus
←
→
Page content transcription
If your browser does not render page correctly, please read the page content below
Ella Hyvärinen

Modern WordPress development tools

Metropolia University of Applied Sciences
Bachelor of Engineering
Information and Communication Technology
Thesis
31 March 2018
Abstract

Author                     Ella Hyvärinen
Title                      Modern WordPress development tools

Number of Pages            41 pages + 4 appendices
Date                       31 March 2018

Degree                     Bachelor of Engineering

Degree Programme           Information and Communication Technology

Professional Major         Media Technology

Instructor                 Ilkka Kylmäniemi, Lecturer

This thesis focuses on the research of modern web development with WordPress content
management system (CMS). The thesis suggests an alternative approach to WordPress
theme development and aims at perfecting it with the latest technologies. The objective of
this thesis is to indicate that usage of the modern web development tools is beneficial for
the developer in order to obtain an efficient development process and error-free production.
Furthermore, the objective of this thesis was set because an equivalent documentation ex-
ists.

This qualitative study is researched with the help of Roots, which is an open-source tool
stack for modern WordPress development. Utilization of each tool, Trellis, Bedrock and
Sage, in WordPress development perform in a different area with individual purposes and
methods. The purpose of this study is to explore development by using the basics of Sage
starter theme and demonstrate an advanced workflow of WordPress theme development
with Sage. The demonstration is created with experimental setup in a local development
environment while the proposed workflow is simulated as a website.

As a result of this thesis, a documentation of an advanced development workflow with Sage
was developed. The documentation recommends extending and customizing the theme es-
pecially by adding ACF plugin (Advanced Custom Fields). By extending the theme more
diverse and controlled behaviour of the theme and website can be attained. In addition, using
ACF helps developers to build their own content builder for a theme.

In the documentation, the suitability of Sage to WordPress theme from the developer and
end user point of view are evaluated. This study indicates that dividing theme development
process into iterations according to the agile software principles is beneficial for achieving
the best end result for the both parties. Furthermore, the study concluded that continuous
adaptive improving of the workflow is essential, and Sage is applicable for changes due to
its flexibility. Therefore, based on this study the utilization of modern WordPress develop-
ment tools, especially Sage, is recommended in WordPress development process to obtain
an advanced workflow from development stage to production.

Keywords                      modern web development, WordPress, theme development
Tiivistelmä

Tekijä                     Ella Hyvärinen
Otsikko                    Modernit WordPress-kehitystyökalut

Sivumäärä                  41 sivua + 4 liitettä
Aika                       31.3.2018

Tutkinto                   Insinööri (AMK)

Tutkinto-ohjelma           Tieto- ja viestintätekniikka

Pääaine                    Mediatekniikka

Ohjaaja                    Lehtori Ilkka Kylmäniemi

Insinöörityön tarkoituksena oli tutkia moderneja web-kehityksen työkaluja ja sitä, kuinka niitä
voidaan hyödyntää WordPress-sovellusalustalla. Insinöörityössä kehitettiin vaihtoehtoinen
menetelmä WordPress-teeman kehittämiselle modernista lähtökohdasta uutta teknologiaa
hyödyntäen. Lisäksi työssä tutkittiin ketterien menetelmien mukauttamista web-teknologioi-
den kehitykseen. Tavoitteena oli osoittaa, että modernit web-kehityksen työkalut ovat hyö-
dyllisiä kehittäjille tehokkaan tuotantovaiheen ja virheettömän lopputuloksen takaamiseksi.
Tutkimusongelman tavoitteenasettelu pohjautui tilanteeseen, jossa vastaavaa dokumentaa-
tiota valittujen työmenetelmien soveltamisessa tavoitteen saavuttamiseksi ei ollut saatavilla.

Insinöörityössä opiskeltiin Roots-nimisen avoimen lähdekoodin työkalujen osa-alueita
WordPress-kehityksessä. Näihin työkaluihin kuuluvat Trellis, Bedrock ja Sage. Työssä kes-
kityttiin erityisesti WordPress-teeman työnkulun kehitykseen kokeellisen esimerkin avulla.
Tuotetun työnkulun ohjeistus muodostettiin luomalla kokeellinen esimerkkiverkkosivusto
paikallisessa työympäristössä.

Insinöörityön lopputuloksena valmistui yksinkertainen työnkulun dokumentaatio WordPress-
teeman kehityksen vaiheista Roots-työkalupakkiin kuuluvan Sage-aloitusteeman avulla.
Teeman kehityksen dokumentaatiossa käydään Sage-teeman perusteet läpi. Lisäksi doku-
mentaatiossa ehdotetaan teeman räätälöintiä ja laajentamista, erityisesti ACF-lisäosan (Ad-
vanced Custom Fields) yhdistäminen teemaan on suositeltavaa monipuolisemman ja kont-
rolloidumman lopputuloksen saavuttamiseksi. ACF:n käyttö Sagen kanssa mahdollistaa ke-
hittäjille suunnatun edistyksellisen työnkulun yksilöllisen teeman luomiseksi.

Dokumentoinnissa arvioidaan Sage-teeman soveltuvuutta WordPress-teemaksi kehittäjän
näkökulmasta unohtamatta loppukäyttäjän tarpeita. Insinöörityössä tehty tutkimus osoittaa,
että huolellinen suunnittelu ja testaus on tärkeää toteutusvaiheen kannalta ja että teeman
kehitysvaiheet tulisi jakaa ketterien kehitysmenetelmien mukaisiin iteraatioihin parhaan lop-
putuloksen saavuttamiseksi molemmille osapuolille. Huomioitavaksi asiaksi nousi myös
Sage-teeman joustavuus jatkuvan työnkulun ja metodien kehittämisen tärkeyden kannalta.
Tutkimuksen perusteella voidaan suositella modernien WordPress-kehityksen työkalujen,
etenkin Sage-aloitusteeman, hyödyntämistä WordPress-kehitysprosessin aikana edistyk-
sellisen työnkulun saavuttamiseksi kehityksen ja tuotantovaiheen välillä.

Avainsanat                    moderni web-kehitys, WordPress, teeman kehitys
Contents

List of Abbreviations

1   Introduction                                                          1

2   Web Development with WordPress                                        2

    2.1   Problems and possibilities with WordPress                       3
    2.2   The future of WordPress                                         8

3   Modern development tools                                              10

    3.1   Roots                                                           11
    3.2   Dependency management tools                                     17

4   Advanced theme development workflow                                   21

    4.1   Extending and customizing Sage                                  23

5   Results                                                               33

    5.1   Evaluation of the benefits of using Sage in theme development   34
    5.2   Considerations                                                  39

6   Conclusion                                                            41

References                                                                42

Appendices
Appendix 1. Sage theme installation setup
Appendix 2. The user view of creating content to ACF fields
Appendix 3. hero-page.blade.php file
Appendix 4. The browser view of the example webpage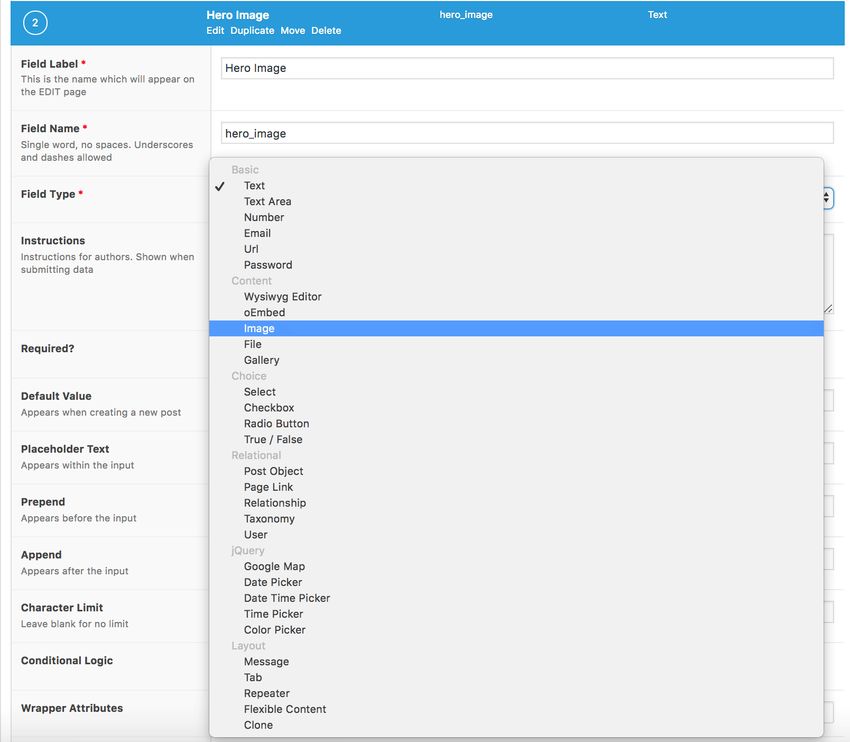
List of Abbreviations

CMS        Content management system. Software application for creation and modi-
           fication online content.

HTML       Hypertext Markup Language. Markup language for creating online content.

CSS        Cascading style sheets. Stylesheet language for visual presentation of
           online content.

Sass       Syntactically awesome style sheets. Scripting language compiled into
           CSS. Includes features such as variables, nesting, mixins and inheritance
           that do not exist in CSS.

PHP        PHP: Hypertext Preprocessor. Server-side scripting language for pro-
           cessing data. PHP can be embedded into HTML.

JS         JavaScript. Interpreted programming language for creating dynamic online
           content.

SQL        Structured Query Language. Language designed for managing data in a
           relational database management system.

UI         User interface. Graphical interaction between human and product, system
           or machine.

UX         User experience. Received experience when interacting with product, sys-
           tem or machine.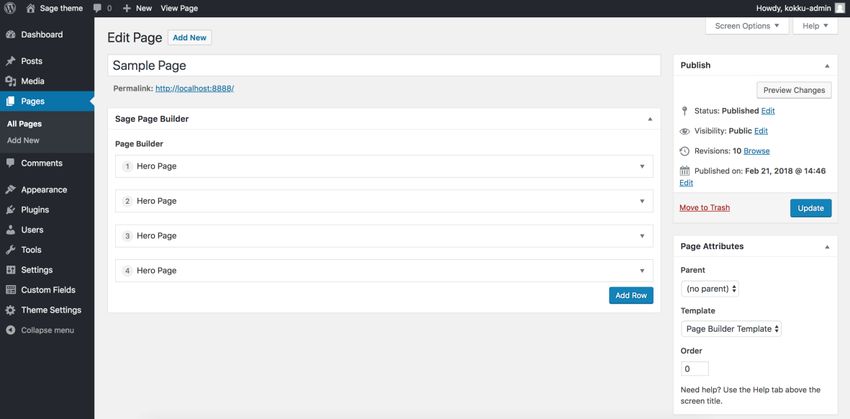
1

1   Introduction

Modern web development methods with WordPress ensure an efficient way to create
single or multifunctional websites and services. Modern WordPress development tools
ensure a proper package managing, automating the workflow process as well debugging
errors from development to production stage. The usage of the modern development
tools provides a solid and efficient workflow at the development stage and smooth tran-
sition to production stage.

Management of the website is generally responsibility of the user. Responsibility of the
developer in turn is to ensure that users can create and modify the content of website
without problems or interruption. Therefore, user generated and managed content has
to take into consideration as early stage as at the planning and development process of
the website. The challenge for developers is to resolve how to improve technical and
creative processes at the development stage in order to produce custom made and func-
tional product without forgetting to provide unique and easily maintained management
system for the user.

The purpose of this thesis is to study and demonstrate the advanced workflow in the
WordPress theme development process. The second chapter merges detailed research
and theoretical background of WordPress with analysis of the present state of modern
web development. The third chapter presents Roots, the modern development tool stack
for WordPress and provides background information of dependency management tools.
The chapter four focuses on the advanced workflow and implementation of the tools to
the theme development. Finally, the chapter five summarizes the conclusion and pre-
sents benefits of the usage of modern development tools with WordPress.
2

2   Web Development with WordPress

Web development is generally associated with developing websites for hosting on the
internet. In fact, web development ranges from plain websites to complex web-based
applications. The web development process involves web design and development, cli-
ent-side and server-side scripting, database configuration on top of other tasks. [1]

The web development hierarchy can be divided into three areas at high level that include
client-side scripting, server-side scripting and database technology. The role of modern
web development is to optimize all these three areas that the key factors - speed, security
and performance - will improve [1]. The key factors are main indicators for the success
of web product.

Web development is in continuous transformation and it is developing rapidly. The used
technologies and best practises are improving and changing all the time. Modern web
development uses the latest technologies, and the fundamental concept is that always
using the latest versions of the software improves speed, security and performance of
the overall application. [2]

WordPress is in turn a free and open-source CMS (Content Management System) soft-
ware that is based on PHP support and MySQL database. In order to function WordPress
application software needs to be installed on a web server. Installation, maintaining and
upgrading the application is very simple. Setting up WordPress is convenient with a well-
known five-minute installation, so anyone can build a basic website and start creating
content immediately [2].

WordPress is suitable for building simple or complex websites, web-based applications
among other web services. Flexibility of the CMS expands it to be suitable for developers
as well as non-technical users. Approximately 30% of the internet uses WordPress as a
website platform amongst professionals, businesses and bloggers, which makes Word-
Press the most popular CMS platform. [3]

Despite the popularity of CMS, it has significant problems when it comes to relevant
elements of the modern web development. However, multiple solutions with web devel-
opment tools are broadly provided to correct the issues.
3

2.1   Problems and possibilities with WordPress

WordPress was released in 2003, but its roots and development started already in 2001.
Originally WordPress was developed for a blog publishing platform, but it has evolved to
be used as a full CMS. At the moment, the latest stable release of WordPress is version
4.9.4. [4]

The server needs to fill a few requirements in order to run WordPress. WordPress rec-
ommends that the host server is compatible with PHP version 7.2, MySQL version 5.6
or MariaDB version 10.0. The host server should also have HTTPS support. HTTPS
(HTTP Secure) is an adaptation of the HTTP (Hypertext Transfer Protocol) and it stands
for a secure communication over a network. In HTTPS, the communication protocol is
encrypted by TLS (Transport Layer Security) or SSL (Secure Sockets Layer). TLS and
SSL are standard security technologies for establishing an encrypted link between a web
server and a browser. Basically, the host server can be any server that supports PHP,
MySQL and HTTPS. [5]

The problem with performing the key factors of web development is that WordPress
works in a legacy environment with older PHP and MySQL versions. At the moment a
minimum requirement for PHP is version 5.2.4 and MySQL version 5.0. However, Word-
Press strongly recommends using the latest versions of PHP and MySQL, which are
usually faster, more secure and stable [2].

WordPress backwards compatibility

WordPress strives to and prides on with its backward compatibility. Compatibility for the
majority is one of the most important philosophies behind the WordPress project also
known as Design for the Majority. The majority of WordPress users are non-technically
minded and they are the users WordPress is designed for. Obviously, when taking into
account the majority it happens over minority. So, from the developer’s point of view,
backward compatibility is not a good idea, because it is not serving modern technical
requirements and needs even if it is part of WordPress philosophy. [6]
4

WordPress has chosen backward compatibility over technological progress in the past
years. This decision has made the application codebase complex, outdated and with
technical debt. Over the years the codebase has become more complicated to improve,
because the previous versions have to take into consideration as well. The main goal
with backward compatibility is that the product can be used by many users even if they
are not using the latest components the product may require.

In the reality, backward compatibility means that WordPress can still function even if the
PHP version of the server is not updated to the latest version. In the same way as plugins
work with WordPress even if the WordPress version is not the latest and the other way
around. Commitment to backwards compatibility and fast release cycles of WordPress
enables very easy updating of the application and its components without problems for
users and developers. At the same time, every new release of WordPress means more
work into the codebase. [7]

As mentioned earlier, WordPress allows the software to be performed on a PHP version
5.2.4. PHP version 5.2.4 was released in 2007, which means that the version is over 10
years old [8]. Moreover, the PHP team has stopped supporting the PHP version 5.2.4 in
2011, so it has been unsupported ever since [9].

Each PHP release branch has supported versions. Active support period lasts two years
from the initial stable release of the version, and that period covers new releases of fixed
bugs and security issues that have been reported.

After the active support period, the release is supported for an additional year for critical
security fixes only. When the supported years are finally completed, the branch reaches
its end of life and becomes unsupported. Users of the unsupported versions are strongly
advised to upgrade PHP branch to a current release. Unsupported versions may be ex-
posed to security vulnerabilities and bugs, which creates major security issues, for in-
stance, to the WordPress services. [10]

Instead of focusing only on backward compatibility, forward compatibility should be taken
into account. The goal with forward compatibility is to focus on the forward thinking about
the future code and avoid the unnecessary backward compatibility. The best practise to
keep WordPress installation more secure, is to keep WordPress application up to date
[2].
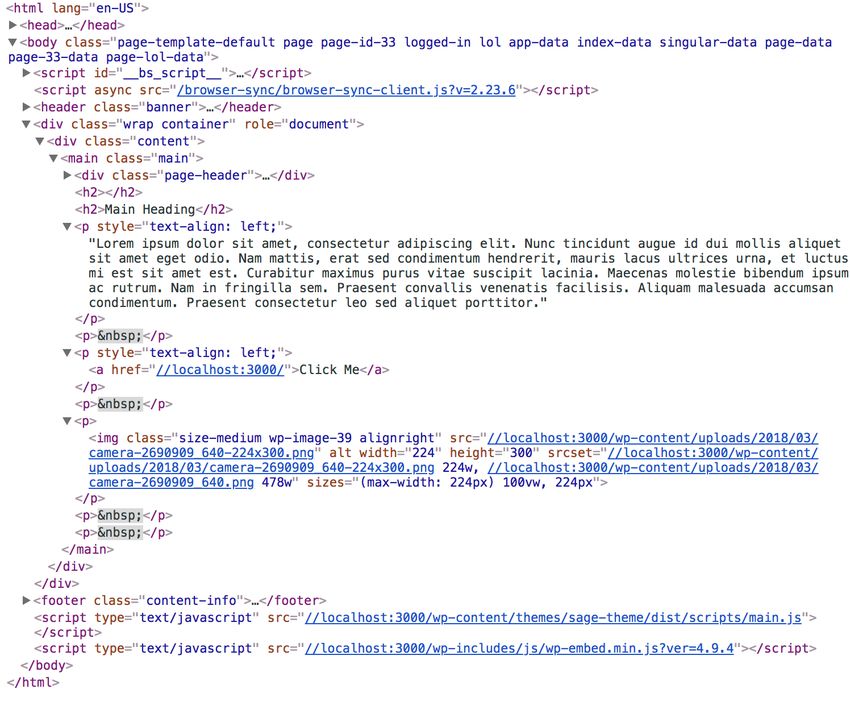
5

WordPress optimization

Optimizing WordPress is essential for improving the speed and performance. Hosting
setup and WordPress configuration are the main sections to be optimized [11]. In the
WordPress configuration optimizable components include the application software,
server load and the size of used graphics. Unused themes and plugins should be deac-
tivated and deleted. In addition, code of the used plugins and theme should be optimized.

Optimizing code is important, because the code executes faster and the website con-
sumes less memory after optimization. As a result, the website will load faster, so the
performance will be better for end users as well as for developers. [12]

Other benefits of code optimization are cleaner codebase, so the code maintenance is
easier and readability is better. Also, refactoring and debugging the codebase will be-
come more efficient and straightforward.

While handling the optimization issues of WordPress, bloated code generated by the
content editor becomes a concern. Content editor, also named as WYSIWYG editor
(What You See Is What You Get), is the basic tool for editing the page and post content
in WordPress administration panel. The elements are rendered on the front-end client
view as defined in the content editor and styled according to the theme stylesheets. The
end result is usually similar that can be expected from the content editor view. However,
the rendered code on the webpage can be bloated as can be seen in figure 1 below.
6

Figure 1.   Example of the HTML created by content editor in WordPress. Reprinted from the
            local development environment view.

As an obvious example of the problems that WordPress includes, the bloated code gen-
erated by the content editor is one of the major issues. The rendered code is actually a
bad HTML, including unnecessary and empty elements on top of wrapping other ele-
ments inside paragraph elements (figure 1). Even if bloated code does not always have
a direct difference nor impact on the visual front-end result, it is not following the best
practices of HTML.
7
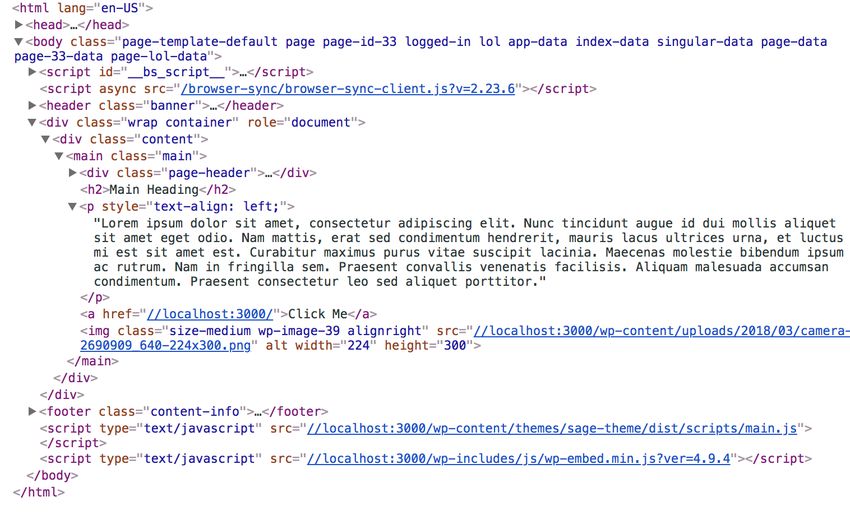
Figure 2. Example of the optimal HTML code with the same content as in the figure 1. Reprinted
from the local development environment view.
The optimal result without unnecessary HTML elements and attributes would be similar
as illustrated in figure 2. In principle, the HTML code in figure 1 is valid, but it is not
optimal. Bloated code generated by WYSIWYG editor can be optimized and controlled
by multiple ways. One way is to avoid using WYSIWYG editor by replacing it with other
custom content field options introduced in chapter four. While the WYSIWYG editor might
be the only possibility in some cases, avoiding to using it as much as possible is the best
solution for preventing the bloated code issue.
WordPress and code optimization are workflow optimization, because the workflow gets
optimized and improved at the same time as well. Overall, smaller technical debt is
adapted to the application when everything is optimized as well as possible.
Theme development
Theme development with WordPress have a few options - installing a theme, creating a
child theme, using a starter theme or creating an own theme. Creating a theme from
scratch or using a starter theme to meet certain needs, conditions and design is usually8 what developers have in mind when starting to develop a website [13]. Overall, theme development can provide an entirely customized end result for the website. Since there are no issues with backwards compatibility and code optimization, the theme develop- ment has many possibilities. WordPress has minimum requirements for the theme development. The theme files can include only index.php and style.css files. In reality, themes tend to require more files in most cases. Theme development should always follow WordPress instructions accord- ing to which theme files have to consist of semantic HTML, valid CSS and reliable Ja- vaScript. Semantic elements mean that elements have a meaning, like headings are marked-up according to their hierarchy. Validated HTML and CSS helps in solving cross- browser rendering issues in turn. The principle called DRY (Don’t Repeat Yourself) means that the code in theme tem- plates should be modified to reusable parts. Reusable parts may include content blocks or even functions. Templates should be restructured into reusable components so there is no need to repeat same code blocks in the different templates. Besides, using custom made PHP functions and WordPress built-in functions have conducive impact to staying DRY. [13] All previously mentioned quality factors are effortlessly controllable with modern front- end development tools within theme development. The idea behind usage of the modern front-end development tools in theme development is to provide efficient, automated and more error-free workflow. Overall, correctly structured code is easily maintainable and quickly modifiable [13]. 2.2 The future of WordPress The fundamental matter with WordPress is that it needs to evolve and grow. The change of needs of users and developers takes place faster than WordPress changes. Word- Press is no longer used for the most part as a blog publishing platform but as a full website or service. Today’s need is to create content blocks and views instead of only posts and pages to the website. Blocks and views can be any consistent, reusable and wrapper HTML elements, such as articles, sections or divs, for instance.
9

At the moment, WordPress core does not have the feature in edit screen to have full
control of how the content is viewed on the website when using a browser. However,
developers need to control how the content is displayed on the website. Currently, the
only possibility is to use plugins and front-end programming to organize, control and style
the code, so the end result will be well-structured and reliable code.

WordPress has many years of technical depth development due to backwards compati-
bility. In the future some major core changes need to be made to keep up with modern
demands that developers and users have. Efficient websites which do not compromise
with WordPress limitations and requirements must be developed. Also, developers want
to manage the websites by creating ways for users to administer them. Users want to be
able to easily modify and create new content on the website.

Agile software development

Agile software development pursues adaptive planning, iterative development style and
continuous improvement among other deliverables. Agile practices encourage to rapid
and flexible response to a change which is possible, because the issues are identified at
the early stage of process. Agile software development is the target that WordPress is
aiming for, but it is unreachable due to fundamental issue of backward compatibility with
WordPress.

Iterative and incremental development were invented by making mistakes. Iterative re-
fers to staging the strategy of reworking the project in iterations whereas incremental
refers to staging the strategy of developing pieces of the project and integrating as soon
as they are developed. Iterative development lets the developer learn about the require-
ments and design of the system. Incremental development in turn lets the developer
learn more about own development process as well as design of the system at the same
time.

The reason for using incremental and iterative strategies is to allow failing and discover-
ing mistakes as early stage as possible, in order that they can be repaired easily. Over-
coming failure is essential for development process. While making mistakes and learning
of them, the system evolves and developers learn about the process. When the stage of
10

process fails is the moment when lessons are learned and consequently the developers
evolve. Usually the failure or not-functioning situation is the first push when process
starts to develop into better and sometimes more modern direction. [14]

Lean practices can be easily implemented to the web development with WordPress. Web
development iterations contain design, development and testing at the high level. Plan-
ning carefully what to do before starting the development is time-saving and convenient,
because identifying the challenges and possible problems at the beginning can save the
developer from encountering those issues later at the development or production stage.
During designing phase developers focus on how to obtain things identified during the
planning phase. This means designing development tools in a practical way. Implemen-
tation stage includes the actual performance of the tool. At the end of each iteration,
results should be evaluated and reviewed carefully.

Modern developments tools support agile software development, because all the stages
are planned, executed, tested and evaluated in iterative or incremental iterations. Usually
the iteration stages are automated with the modern development tools.

3   Modern development tools

This chapter will introduce Roots which is combination of modern WordPress develop-
ment tools and dependency management tools which are the used methods and mate-
rials to support the development workflow. Also, this chapter will investigate the benefits
of using modern WordPress development tools to achieve common objectives of the
modern web development. The presented tools will provide solutions for identified prob-
lems of WordPress in the previous chapter.

The role of the modern WordPress development tool stack is to optimize the three hier-
archy areas of the web development, so the whole application stack will perform faster
(figure 3). The client-side includes the request-response cycle between the browser and
WordPress application. Server-side means WordPress application and the scripts that
the PHP runtime executes. Database technology in turn encapsulates the query-result
cycle between WordPress and the database. [15]
11

Figure 3.   WordPress stack. Reprinted from smashingmagazine.com [15].

The research approach follows action research using a modern web development model
as a method for a common data (figure 3). Choosing the right tools for the project is an
important part of the designing and planning the workflow.

3.1   Roots

Roots is a stack of modern open-source WordPress development tools that cover a full
WordPress application for the advanced development and deployment. Roots is de-
signed and created to improve the development workflow by using tools named Trellis,
Bedrock and Sage. The development process can be done by using the Roots tools
together or separately. Each tool has a different placement in the stack. Trellis covers
the server, Bedrock includes the application and Sage focuses on the theme. Conse-
quently, depending on the choice of used Roots tool, the process can be focused on the
theme, application, server or the whole service. [16]

Trellis

Trellis is a modern WordPress LEMP stack. LEMP is a variation of the more well-known
LAMP stack [17]. LAMP is an archetypical model of web service stacks comprising of the
combination of components for deploying and developing the web services. LAMP in-
cludes Linux as an operating system, Apache as a web HTTP server application, MySQL
as a RDBMS (Relational Database Management System) and PHP as a programming
language. The difference between LAMP and LEMP is that Apache is replaced by nginx
in the LEMP stack [18]. Nginx is a HTTP proxy server application, which is faster, more
lightweight and scalable yet powerful compared to its predecessor Apache.
12

The minimum installation requirements as a software tools for a development server are
VirtualBox and Vagrant. Vagrant is a tool for building and managing virtual machine en-
vironments and VirtualBox in turn is a free and open-source cross-platform virtualization
application. VirtualBox supports the creation and management of virtual machines run-
ning environments like Vagrant. [19]

Figure 4.   The recommended directory structure of a Trellis project. Reprinted from roots.io/trellis
            [19].

In development, Trellis automatically creates virtual machine to simulate a server, provi-
sions it and installs WordPress for a hosting a WordPress site. The recommended project
directory structure is illustrated in figure 4.

Trellis uses Vagrant virtual machine environment for development and any Ubuntu
server of Linux distributions in production. Basically, Trellis provides a complete Word-
Press server running with all the software needed and configured according to the best
modern practices. With Trellis, the WordPress development and production servers are
developed and deployed by a proper way.

In addition, Trellis provides a remote server and deploys it with a single command. De-
velopment and production parity is an important part of the ideology of Trellis, which
means keeping development, staging, and production as similar as possible. Generally,
there are major gaps between development and production, for instance, time, personnel
and tools gaps. All of the gaps may have substantial impact to the project workflow, but
from the modern development tools point of view the major issue is the gap influencing
between tools. For example, the development environment may use a LEMP stack, while
production deploy uses a LAMP stack. The advantage of development and production
parity approach with Trellis, is that development project can be deployed to production
without issues, because both of the environments remain similar. [20]
13 Bedrock Bedrock is a WordPress project boilerplate with improved folder structure and modern development tools. Bedrock organizes the WordPress project better, improves security and configuration files in addition to proper dependency management. In other words, Bedrock is a self-contained WordPress project that installs WordPress and required plugins with automation. The installation requirements for Bedrock are PHP version 5.6 or later and Composer as a dependency manager for PHP. [21] Figure 5. Folder structure of a Bedrock application. Reprinted from roots.io/bedrock [22]. The improved folder structure organization of Bedrock application places WordPress to its own subdirectory (figure 5). Bedrock separates web, configuration and dependency files into different folder directory destinations named web/ and config/ and vendor/ ac- cording to their purposes. The web/ directory includes WordPress application. Word- Press core is located under wp/ subdirectory and WordPress content under app/ subdi- rectory. Moreover, previously named wp-content subdirectory is renamed to app for con- sistency and better reflection to its content. [22] All the actual configuration files are separated under to the config/ directory. The reason why wp-config.php configuration file still remains under the web/ directory is that
14

WordPress requires it. Composer managed dependencies are installed to the vendor/
directory except WordPress plugins and themes which are installed under web/app/.

The main configuration file is application.php located under the config/ directory that con-
tains information what wp-config.php usually would. For environment specific configura-
tion, Bedrock uses the files under config/environments subdirectory. WordPress config-
uration operates on environment specific configuration files and environment variables
specified in ENV file. Using environment variables is an efficient way to separate config-
uration code from the application code, because variables are available in the application
with built-in methods. [23]

Required environment variables are:

       •      DB_USER
       •      DB_NAME
       •      DB_PASSWORD
       •      WP_HOME
       •      WP_SITEURL

The installation process of Bedrock resembles a lot of classic WordPress installation
workflow. First steps are to download Bedrock and install Composer. The second step
is to edit ENV files to match necessary environment variables, such as database creden-
tials, home and site URL information and alternative authentication keys. The final step
is to install WordPress.

Sage

Sage is a WordPress starter theme with a minimal HTML5 templates and template in-
heritance with a theme wrapper templating system [24]. A custom theme development
with Sage follows a modern front-end development workflow. Main features of Sage in-
clude Sass (Syntactically awesome style sheets) as a style sheet scripting language,
modern JavaScript as an interpreted programming language and Blade as a template
engine provided by Laravel [25].
15 Other features are Webpack, Browsersync and Controller for Sage. Dependency man- agement tools for the theme development are introduced later in this chapter. Optional features include CSS frameworks, such as, Bootstrap 4, Bulma, Tachyons and Foundation. Also, Fontawesome can be included, which is a wide icon set and toolkit. WordPress version 4.7 or later, PHP version 7.0 or later, Composer, Node.js and Yarn need to be installed as dependencies before installing Sage. The latest version of Sage is 9.0.0 and its release was in February 2018. The latest release contains major changes with development toolkit and features compared to previous releases. In previous ver- sions of the Sage theme build tools were Grunt or Gulp and front-end package manager was Bower. Laravel’s Blade template engine replaced completely the previous theme wrapper system. Also, the theme file structure was reorganized, so theme template files are no longer placed in the theme root (figure 6). [26]
16

Figure 6.   Sage theme files structure. Reprinted from github.com/roots/sage [27].

The app/ directory contains all of the theme functionality whereas all the theme template
files and assets are placed into resources/ directory (figure 6). Since Sage is a starter
theme, it is acceptable, even recommended and necessary to modify most of the theme
files to satisfy the needs of the website.

For theme setup the file setup.php in app/ directory need to be edited. Functions regard-
ing to enabling or disabling theme features, navigation menus settings, defining post
thumbnail sizes, and displaying sidebars availability are all placed in setup.php file. [27]
17

The resources/views/ directory contains files that can be extended according to the
WordPress template hierarchy. The files in resources/views include template files from
the resources/views/partials/ directory.

The theme templates are minimal HTML5 templates provided by Laravel’s Blade tem-
plate engine. Blade templates can be easily modified to specific developing purposes
and site needs. In addition, new Blade templates can be added if needed. The advantage
of using the template engine is to avoid repeating the same code in the different tem-
plates. So, modifying and creating new templates should follow the DRY principle of de-
velopment strategy.

Passing data to Blade templates functions via controller or namespace functions. Con-
troller for Sage is basically a WordPress package to enable a controller when using Blade
with Sage [28]. The PHP code in Sage is namespaced, which means that every function
is prefixed with a unique name. So, effective way to manage reusable components, that
are used through the website, is to create a controller for them or add the component
function into namespace for passing the data to the blade template.

3.2   Dependency management tools

Dependency management tools, sometimes also called task running tools, allow error
free and faster development by automating the process. Each tool has its own purpose
and advantage for the development process. Dependency management tools optimize
the overall workflow by keeping dependencies organized and updated all the time. The
installation process of dependency management software to part of the system varies
by the operating system, but the usage of tools in command line is similar with every
system. The most important tools in developing with Sage for dependency management
are introduced in this subchapter.
18

Composer

Composer is a dependency manager for PHP. Composer declares the packages that the
application depends on and it will manage them by installing and updating into vendor/
directory inside the application. [29]

Theme installation process happens via single Composer command following with con-
trolled theme setup installation in command line. The overall installation steps are illus-
trated in the appendix 1.

# @ app/themes/ or wp-content/themes/
$ composer create-project roots/sage theme-name

The command above installs Sage by placing it into a new theme project folder in Word-
Press themes directory [27]. During theme installation process is possible to update
theme headers for the style.css file, configure the development URL for Browsersync,
select a desired CSS framework and include Fontawesome. The steps dealt with theme
installation process are optional, so those can be completed at the theme setup stage or
anytime later if necessary. Defining the local development URL and used CSS frame-
work is very easy, convenient and time-saving to do at theme setup stage even though
those can be defined later as well. (Appendix 1)

Installation of dependencies for the project with Composer can be executed with the
command below.

$ composer install

The command above installs the defined dependencies for the project according to com-
poser.json and composer.lock files (figure 6). The composer.json file lists all the used
dependencies for the project whereas the composer.lock files incudes the exact infor-
mation of dependencies versions. The composer.lock file secures that the project uses
the specific versions of defined dependencies. Updating the dependencies with Com-
poser can be done with the command below.

$ composer update
19

The command above installs the latest versions of dependencies according to com-
poser.json file and updates composer.lock file to match the new versions of dependen-
cies.

Yarn

Yarn is a package and dependency manager for the application code [30]. Yarn replaces
npm as a package manager in the theme development process with Sage. Benefits of
the use of Yarn include that the node_modules/ directory is smaller and Node depend-
encies installation process is faster.

For enabling the build process with Yarn in theme, the command below need to be exe-
cuted in the theme directory.

# @ themes/your-theme-name/
$ yarn

The command above installs necessary dependencies to run the build process [27].

# @ themes/your-theme-name/
$ yarn run build
$ yarn run build:production

The first command above is used at development stage to run the build process, whereas
the second command above is used to run the build process for deployment. Both build
processes compile and optimize the files in the assets directory, but the build process
for production compile assets without source maps. However, the most used command
with Yarn in the theme development workflow is the command below. [27]

# @ themes/your-theme-name/
$ yarn run start

The command starts Browsersync session and compile assets whenever file changes
are made to the theme files [27].
20

Webpack

Webpack is a module bundler made for modern JavaScript applications which means a
build system toolkit for automating and improving development workflow. In Sage theme
development process Webpack is used for compiling assets, optimizing images, check-
ing JavaScript errors and concatenating together with minifying files. In the build process
Webpack generates one or multiple bundles of static assets from the modules with de-
pendencies of the application. [31]

Browsersync

Browsersync is a module for synchronized browser testing while developing [32]. If
Browsersync is wanted to be enabled during the yarn run start command, the develop-
ment URL need to configured according to local development hostname. For example,
if the local development host uses port number 8888, the development URL should re-
flect localhost:8888. The new Browsersync session opens the connection according to
proxy URL, which default is localhost:3000. The development URL and proxy URL can
be defined at the theme installation process or updated to resources/assets/config.json
file [27].

NPM

Node Package Manager (npm) is a package manager for JavaScript modules and the
largest software registry. Npm downloads and installs repositories into local development
environment, so those can be compiled into project by new ways. In Sage theme devel-
opment npm is used as a front-end package manager. For example, the chosen CSS
framework for the theme development is pulled via npm as a dependency. [33]
21

Git

Version control is essential for every development project. Git is a version control system
that controls the different versions of the project and at the same time creates back-ups.
Accurate version control is particularly important in distributed developing process be-
tween multiple developers, but it is necessary for single developer projects as well. [34]

Ignoring files with GITIGNORE file is a good way to not include, for instance, dependency
packages to the Git repository. Sage theme ignores by default dist/, node_modules/ and
vendor/ directories among other files. So, when pulling the theme project to development
with Git, Composer packages need to be installed for the project again as instructed
earlier.

4     Advanced theme development workflow

This chapter describes the setup and implementation needed for building Sage theme
for WordPress site. The aim of the experimental setup is to test and evaluate the meth-
ods used to achieve the object. Focus is on the gathering observations of the corner-
stones of the workflow and analysing results of the used methods in Sage theme devel-
opment. The goal is to propose solution for extending and customizing Sage theme.

Before starting the advanced theme development process with Sage a few steps have
to be taken care of. First step is to have an active local development environment with
up-to-date WordPress installation. Second step is to make sure that Composer, Node.js
and Yarn are installed, so those software can function as a part of the operating system.
Third step is to install Sage with Composer in WordPress themes directory with the com-
mand below.

$ composer create-project roots/sage theme-name

The command above runs the controlled theme installation process as illustrated in Ap-
pendix 1. After the theme installation is complete the next step is to run command below
in the theme directory as advised in Appendix 1.
22

$ yarn && yarn build

The command above installs necessary dependencies to run the build process with Yarn,
so the advanced theme development workflow will be enabled for the project. The final
step is to activate the created theme in WordPress administration panel in the section
where themes are managed. After all the steps are completed, the theme development
workflow can proceed. The command below should be used while developing the theme
to attain the advanced development workflow advantages.

$ yarn run start

The indicated command above compiles theme assets every time when file changes are
made and also starts Browsersync session in the browser. In addition, is important to run
the build process with Yarn and commit changes with Git often enough while developing
the theme.

The theme development stages include design, implementation and testing. In this con-
text, design does not mean the looks of the website but the design of the web page
structure, functionality and workflow. At the design stage is determined of what kind of
blocks the web page is structured, what are the required functions and how they are
implemented. The implementation stage is about combining the development tools and
design decisions into a smooth theme development workflow. The final stage of theme
development is testing the performance and usability.

Workflow of the theme development with modern technologies and methods combines
usage of the front-end development tools with the actual theme. However, advanced
theme development with Sage needs extending and customizing the theme. Sage is just
a starter theme for developing WordPress theme. For a better theme development and
content editor control of WordPress is essential to use a plugin for building a pages and
views. This thesis introduces ACF (Advanced Custom Fields), because it is recom-
mended plugin by Roots to implement in Sage theme.
23

4.1   Extending and customizing Sage

ACF is a plugin for WordPress developers to get full control to WordPress content fields
and the field data [35]. Custom fields are a native part of WordPress and they can appear
on pages, posts or custom post types depending on the WordPress application settings.
However, the native custom field interface is complicated and not very user friendly to
use. The look of custom fields can be tailored and the usage of data can be controlled
with ACF plugin. ACF enables easy and controlled content editing and it can be easily
integrated to Sage theme.

ACF plugin can be downloaded and activated in WordPress administration panel in the
section where the plugins are managed. Secondary option is to download ACF from its
website and manually place it to WordPress application plugins/ directory or install it in
the WordPress administration panel.

Creating a field group

Field groups are used to attach fields to post and page edit screens. Each field group
contains a title, fields, location rules and settings options. Figure 7 illustrates the creation
of a new field group.

Figure 7.   Creation of a new field group. Reprinted from the ACF administration panel view in
            WordPress.

The title of the field group is Sage Page Builder and it contains a field named Page
builder. In the location part is defined when and where the created fields are added on
24
the edit screen. For example, different field groups are created for different purposes, so
header, footer, posts and pages most likely have own field groups displayed on their edit
screens. As demonstrated in figure 7, the field group is displayed if the page template
equals to Page Builder template.
Field group settings are below the location rules. In the settings can be defined how the
ACF field group is displayed on the edit screen and also the visibility of the native Word-
Press custom fields can be modified. Overall view of the ACF field group settings can be
found in figure 8.
Figure 8. Overview of the field group settings. Reprinted from the ACF administration panel view
in WordPress.
The figure 8 demonstrates that the content editor is hided from the screen, so ACF
groups are the only way for the end user to create a content.
Field settings
Field settings contain a few required values, which are field label, name and type. The
field label is the name what is displayed in the end user view. The field name in turn is25
the value queried in the template. The field type options are illustrated in the figure X.
The example field group contains one field which type is flexible content, as can be found
in figure 7.
The flexible content field is essentially a wrapping system for an unlimited number of sub
fields, called layouts. In addition, each layout can contain endless amount of sub field
groups, so with flexible layout can be created very plain or complex layouts.
Figure 9. Overview of the ACF field type options. Reprinted from the ACF administration panel
view in WordPress.
Figure 9 illustrates how the field type of a sub field called Hero Image is an image. The
field type should be selected according to its purpose. For instance, image for images,
URL for external links and page link for internal links. WYSIWYG editor is right choice
for the content like WordPress shortcodes and complex piece of text with links.26
Figure 10. Overview of the example Hero Page layout. Reprinted from the ACF administration
panel view in WordPress.
Figure 10 shows an overall view of the layout called Hero Page, which is a sub field of
Page Builder. Hero Page contains multiple sub fields and each of them has a different
purpose in the layout.
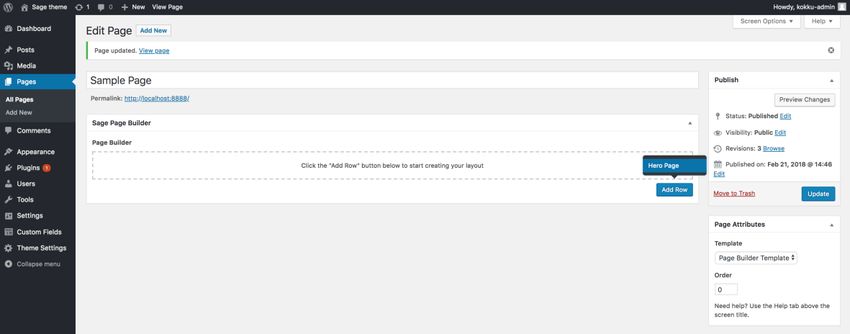
Once ACF field group is created it can be implemented anywhere on the website. Figure
11 illustrates the end user view of implementing the created layout named Hero Page to
the webpage named Sample Page.27
Figure 11. Demonstration of adding a new ACF layout to the webpage. Reprinted from the Word-
Press administration panel view.
As can be noticed in figure 11, the page template must be equal to Page Builder Tem-
plate, otherwise ACF field group will not show in the edit screen. The end user view of
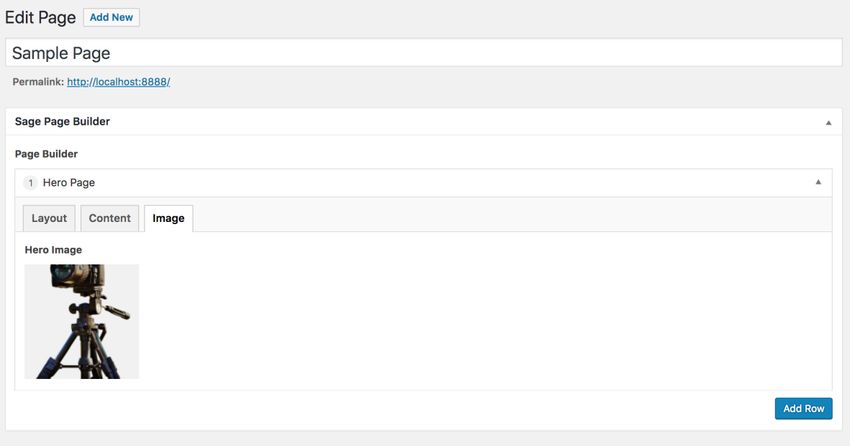
creating and modifying content to Hero Page layout in Sample page can be found in
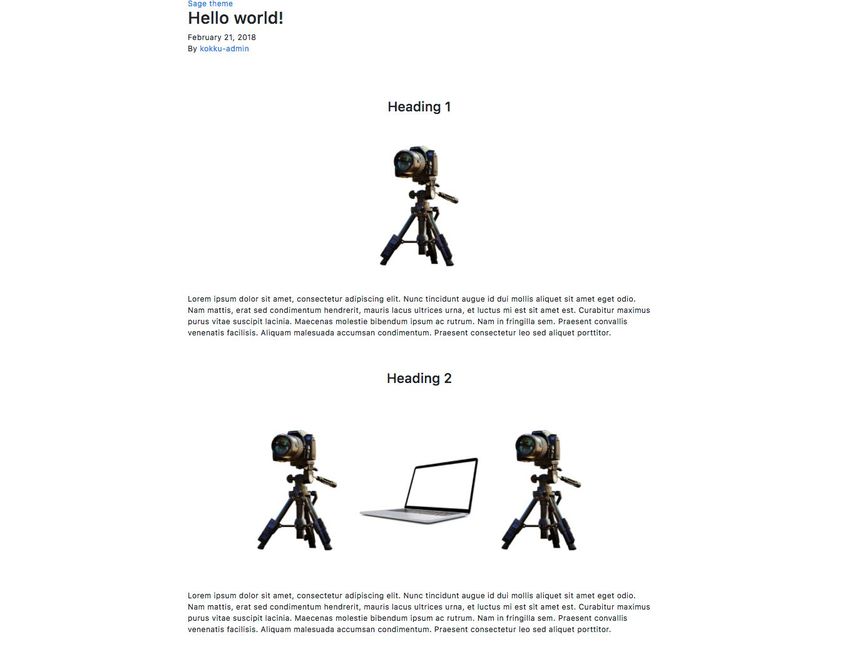
Appendix 2. Appendix 2 demonstrates the end result view for Hero Page layout and its
sub fields. Sub fields are divided into different tabs according to their purpose and for
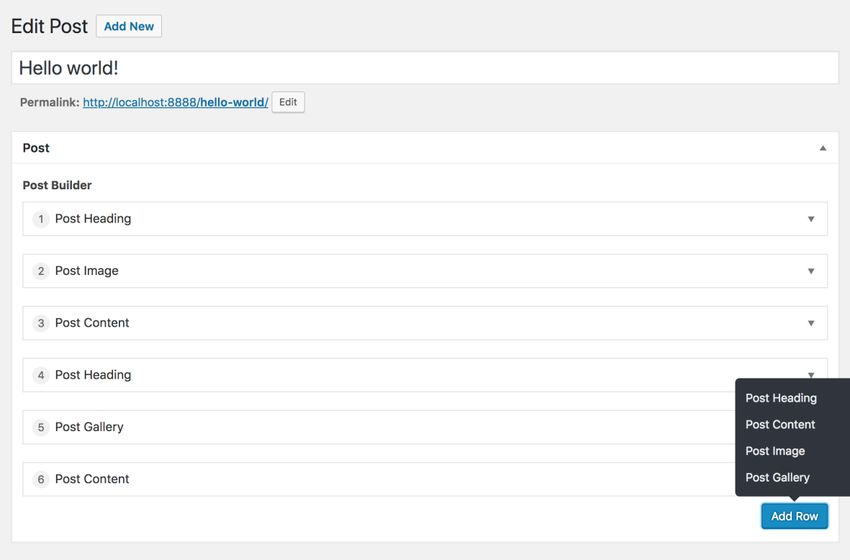
consistency reasons. The user can easily add multiple Hero Page layouts into same
webpage (figure 12).
Figure 12. Demonstration of adding multiple ACF layouts to the webpage. Reprinted from the
WordPress administration panel view.28
The layouts can be reordered, deleted or duplicated as preferred. Sample Page contains
four Hero Page layouts (figure 12).
At this point of the theme development workflow, nothing of the content created is dis-
played on the actual Sample Page webpage in the browser, because no functionality for
displaying values in the theme templates exists.
Displaying ACF values
ACF is made especially for developers, so using ACF combines knowledge of program-
ming, ACF and WordPress functions. However, displaying the field values in templates
is easy. Any field value can be returned as a PHP variable via get_field() function or as
a HTML via the_field() function. Displaying field values happens in the theme templates
with ACF API functions.
First step for displaying values is to create a new ACF field group with fields in WordPress
administration panel at ACF plugin control system as illustrated in figures 7, 8 and 10.
Second step is to implement the layout to the webpage and insert content to it at Word-
Press administration panel page editing view. The third step is to create needed tem-
plates to the theme and create queries for the ACF values into created templates.
Firstly, a new page template need to be created into theme views/ directory. To maintain
the consistency in the naming system the page template is named template-page-
builder.blade.php. The page template for Sage Page Builder field group is shown below.
template-page-builder.blade.php
{{--
Template Name: Page Builder Template
--}}
@extends('layouts.app')
@section('content')
@while(have_posts()) @php(the_post())
@include('partials.page-header')
@include('partials.content-page-builder')
@endwhile
@endsection29
Secondly, a new theme template for Page Builder field need to be created, which content
is demonstrated in the code example below. The new theme content template is named
to content-page-builder.blade.php and it is placed into views/partials/ directory in this
example. Page template file, such as the code example above, includes content template
file, such as the code example below, to template engine.
content-page-builder.blade.php
@php(the_content())
@if( have_rows('page_builder') )
@while( have_rows('page_builder') ) @php( the_row() )
@if( get_row_layout() == 'hero_page' )
@include('partials.page-builder.hero-page')
@elseif( get_row_layout() == 'hero_images' )
@include('partials.page-builder.hero-images')
@endif
@endwhile
@endif
The file, content-page-builder.blade.php code example above, involves the basic logic
for looping through the Page Builder flexible content fields. Basically, the loop checks if
Page Builder field has specific layouts. If the statement is true, then it will include a theme
template according to the layout.
For each layout in Page Builder field will be created a new template file, so layout named
Hero Page has a template file named hero-page.blade.php (Appendix 3). In this research
example, all the Page Builder templates for layouts are located in views/partials/page-
builder/ folder named after the ACF layout for keeping the theme directory organized and
the naming system coherent. The final step for displaying the ACF values is to add nec-
essary ACF queries to the layout template file in order to view the webpage result in the
browser. Content of the hero-page.blade.php file demonstrates the combination of ACF
functionality in actual theme template file (Appendix 3).
As mentioned before about the problem with the content editor screen, ACF provides full
control to the content created in the WordPress. The queried ACF result is HTML or PHP
object, that can be displayed and stylized exactly how it is defined in the theme template.
Each layout template is completely customizable for the layout needs and targets by
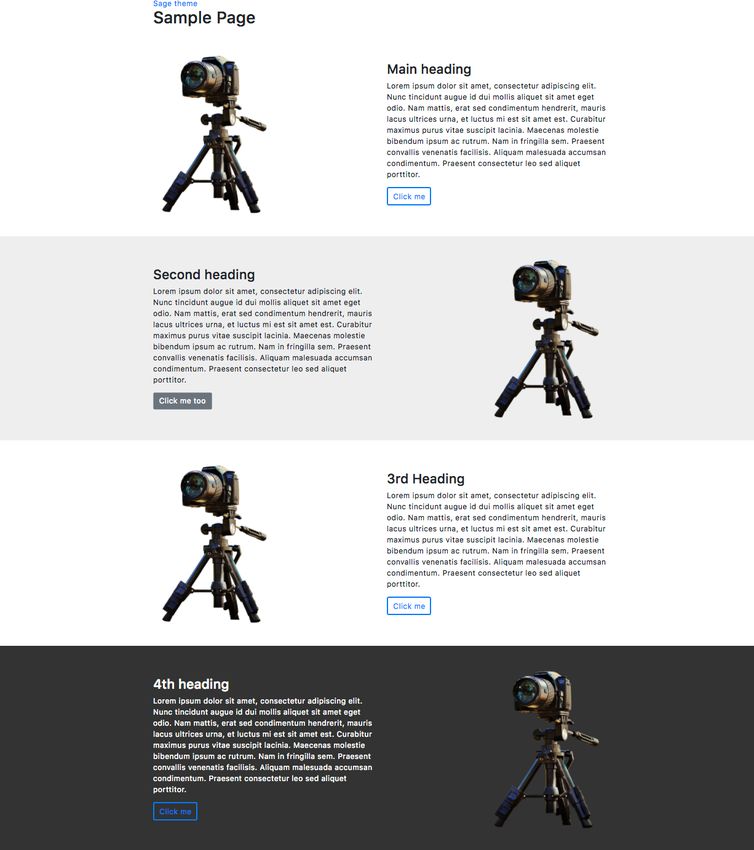
stylizing with Sass. Optimal idea would be creating a new style file for every layout, so
the codebase will stay organized. In this example layout style files of Page Builder field30 are placed into a new /page-builder folder in resources/assets/styles directory. Each lay- out style file is named after the layout name, so style file for Hero Page layout is named _hero-page.scss. Page Builder layout files are imported to main.scss file as shown be- low. @import “page-builder/hero-page”; Finally, after passing all the steps as designed and preferred, the layout view should be visible in the webpage. The final output view on the browser of the research example Hero Page layout can be found in Appendix 4. The workflow for creating new layouts to Page Builder field starts from ACF settings with creating a new layout. After the layout sub fields and options are set, a new template file and style file for the layout need to be created. Also, content-page-builder.blade.php and main.scss need to be modified as demonstrated in the earlier steps. The options page The options page feature in ACF provides a function to add new administration pages with subpages for editing ACF fields. The options page feature is particularly good for header and footer elements, because the saved data is global which means it can be displayed anywhere on the website. [36] Before creating new administration pages with the options page feature a few steps have to be completed. For enabling options page feature in WordPress administration panel, a code snippet need to be added, for example into setup.php file in app/ directory. The code example below demonstrates how to create a new options page with subpage.
31

if( function_exists('acf_add_options_page') ) {

    acf_add_options_page(array(
      'page_title' => 'Theme General Settings',
      'menu_title' => 'Theme Settings',
      'menu_slug'   => 'theme-general-settings',
      'capability' => 'edit_posts',
      'redirect'    => false
    ));

    acf_add_options_sub_page(array(
      'page_title' => 'Theme Footer Settings',
      'menu_title' => 'Footer',
      'parent_slug' => 'theme-general-settings',
    ));
}

In the code snippet above is created a new options page named Footer, and it will be
used for managing ACF fields in the footer element in this example. The next step is to
create a new field group for the Footer options page. The example field group is named
also Footer. The important part in creating the field group for options page is to update
location rules according to intended options page (figure 13).

Figure 13. Footer field group for the options page feature. Reprinted form ACF administration
           panel view in WordPress.

Figure 13 illustrates a new field group named Footer with one field for the Footer options
page. The next steps are to create content to ACF fields in Footer administration options
page and modify the Blade template for footer element.
32
The example below demonstrates how to query a value from an options page in the
footer template. Querying the values differs from the standard get_field() API function,
because a second parameter is required to target the options page.
footer.blade.php
@if( have_rows('footer_block', 'option') )
@while( have_rows('footer_block', 'option') ) @php( the_row() )
@php(the_sub_field('heading'))
@php(the_sub_field('textarea'))
@endwhile
@endif
The example footer has one repeater field named Footer Block and the repeater has sub
fields for heading and text area. The code example loops through sub fields of Footer
Block field.
The same workflow can be implemented to creating an options page for header element.
The advantage of saving the menu into ACF options page is that the version control
covers menu options as well other ACF options of the website.
Local ACF JSON files
Local JSON feature in ACF saves field group and field settings as JSON files within the
theme directory. Enabling the local JSON feature requires only creating a new folder
named acf-json in the theme directory root which is resources/ directory. If the folder
exists, each time when a field group is saved a JSON file will be created or updated with
the data of field group and field settings. [37]
The main functionality with local JSON is the capacity to synchronize changes between
database and saved data in ACF JSON files. Synchronization will be available if theYou can also read