National Dental Epidemiology Programme - Oral health survey of children in year 6 2022 to 2023: guidance for handling data Published September ...
←
→
Page content transcription
If your browser does not render page correctly, please read the page content below
National Dental Epidemiology
Programme

Oral health survey of children in year 6 2022 to 2023:
guidance for handling data

Published September 2022
Contents
Introduction .......................................................................................................................... 3

Stage 1: collect information.................................................................................................. 4

Stage 2: enter data into the data collection tool ................................................................... 5
   2.1 copy the format file ..................................................................................................... 5
   2.2 start a new survey or open an existing survey ............................................................ 5
   2.3 input survey data ........................................................................................................ 6
   2.4 create a new record or save a record ......................................................................... 8
   2.5 navigate the records ................................................................................................... 9
   2.6 find a record................................................................................................................ 9
   2.7 delete a record............................................................................................................ 9
   2.8 save the file onto a disk or memory stick to be used as a back-up ............................. 9
   2.9 close the form ........................................................................................................... 10

Stage 3: check data for errors............................................................................................ 11
   3.1 create a duplicate file................................................................................................ 11
   3.2 check the data for errors ........................................................................................... 11
   3.3 errors explained ........................................................................................................ 11

Stage 4: amend incorrect records ...................................................................................... 14
   4.1 find a record using record number ............................................................................ 14
   4.2 find a record using Child ID Number......................................................................... 14
   4.3 delete a record (leave deletions until the end) .......................................................... 14
   4.4 close the form ........................................................................................................... 15

Stage 5: send files to dental epidemiology coordinators (DECs) ....................................... 16
   5.1 export data to Excel .................................................................................................. 16
   5.2 complete Appendix N summary file .......................................................................... 16
   5.3 complete Appendix O data linkage file ..................................................................... 18
   5.4 email files to DECs ................................................................................................... 19
   5.5 upload files to Microsoft Teams ................................................................................ 19

References ........................................................................................................................ 22

                                                                   2
Introduction
This document provides guidance on data handling for the National Dental Epidemiology
Programme 2022 to 2023 oral health survey of children in year 6. It should be read in
conjunction with the national protocol (reference 1) and the administrators' guide for the
survey (reference 2).
All appendices referred to in the document are part of the national protocol and can be
downloaded from the oral health survey toolkit page (reference 3).
3Stage 1: collect information
Children’s details, agreement to participate and examination status should be entered
electronically into Appendix K: examination day sheet year 6, 2022 to 2023. This is
password protected. Please contact your local dental epidemiology coordinator (DEC) for
the password.
Once the survey is complete, if Appendix K has been completed electronically it can be
used to collate information into the Appendix O: data linkage year 6, 2022 to 2023 file in
stage 5. Appendix K can also be used to sum the totals required to complete the Appendix
N: data summary year 6, 2022 to 2023 file in stage 5.
The clinical and non-clinical data will be recorded onto data collection sheets. These will
then be entered into the data collection tool using Microsoft Access.
4Stage 2: enter data into the data
collection tool
Enter data into the Microsoft Access programme using the format provided – make sure it
is the version called Data collection year 6, 2022 to 2023.accdb
The databases are password protected, please contact your local dental epidemiology
coordinator for the password.
2.1 copy the format file
Double click to open the zip file and then save the Access data collection file into the
required directory of your computer or network.
Please do not alter the national format fields as this causes great difficulties when trying to
collate the data.
If you wish to add other variables, there is one ‘spare’ text variable at the end of the format
which can be used to suit most local needs. If you need more variables please contact the
national dental epidemiology team dentalphintelligence@dhsc.gov.uk
2.2 start a new survey or open an existing survey
1. Open Microsoft ACCESS.
2. From the menu bar select 'File', 'Open'.
3. Locate and select the Access format file you saved from stage 1.
4. Click 'Open'.
5. Input the password – obtainable from your local dental epidemiology coordinator.
6. If a warning is displayed when you first open the file click 'OK', click 'Stop all macros',
click 'Enable content'.
7. The menu will be displayed.
8. Click 'Open Data Input Form'.
9. The form will be displayed.
5If the caries chart does not fit on the whole screen, change your screen resolution to small
– Click 'Start', 'Control Panel', 'Display', select 'smaller-100% (default)', click 'Apply'.
2.3 input survey data
Before you start to enter data, please make sure the caps lock is on (Please note: This will
then eliminate the error of lowercase codes or postcodes).
Only input data for children who have parental agreement.
Examination and site details
1. Click in the first field and input the 'Lower tier LA name' of the site (see protocol
Appendix H), then either using the 'TAB' key, 'RETURN' key or the mouse move to the
next field.
2. Input the 'Examiner' name.
3. Input the 'School name'.
4. The 'Type of school' is multiple choice, using either the mouse or cursor keys select
the required option (0 – Mainstream or 1 – Special support).
5. Input the 'School postcode' in upper case, split into Inward and Outward code. (Take
care that you don’t confuse the letter ‘O’ with the number ‘0’, or the letter ‘I’ with the
number ‘1’).
6. The 'Examination date' should be entered as a date, for example 26/11/2022, 26-11-
22.
The above site details can be copied forward to the next record by clicking 'Duplicate
School Details' (this includes the lower tier LA code entered as part of the child id number
in the next step).
Child’s details
7. The 'Child Identity Number' is a unique identifier to the child and is alpha/numerical. It
should be entered as the 'Lower tier LA code', see protocol Appendix H, for example
E07000127, followed by a 4-digit unique 'Number of sampled child' for example 0014,
this then automatically joins together to create the 'Child Identity Number' and is
displayed, for example E070001270014.
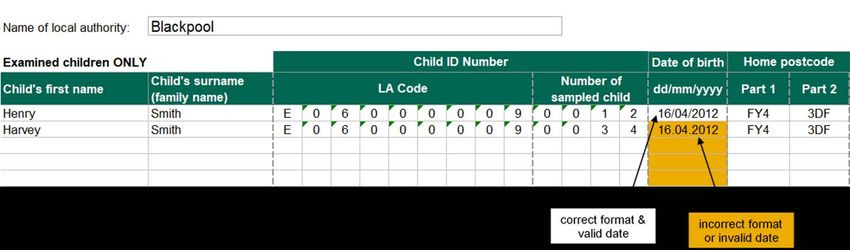
68. The 'Date of birth' should be entered as a date, for example 17/05/2012, 17-05-12.
The 'Age' is automatically calculated (using date of examination) and is displayed.
9. Input the child’s 'Home postcode' in upper case, split into Inward and Outward code.
(Take care that you don’t confuse the letter ‘O’ with the number ‘0’, or the letter ‘I’ with
the number ‘1’).
10. The 'Sex' is multiple choice, using either the mouse or cursor keys select the required
option.
11. The 'Multiple birth' is multiple choice, using either the mouse or cursor keys select the
required option. This is to record whether a child is a twin, triplet and so on.
12. The 'Higher ethnicity' and 'Lower ethnicity' fields are compulsory fields and are multiple
choice, using either the mouse or cursor keys select the required options. The codes
are in section 8.1.12 of the protocol. You may have used local codes, but these should
be matched up so that the codes provided in the format can be used. The lower
ethnicity selection should relate to the higher ethnicity selection options, for example if
'A – white' has been selected then the lower ethnicity can only be code A1 – A5 or 'X –
ethnic group not provided'; you cannot select an option from another lower ethnicity
box unless you are using locally agreed codes 'F - specific other', 'G - specific other' or
'H - specific other', for example 'A - white', 'F - Eastern European'. The locally defined
group codes and descriptions used must be sent to the DEC when the data is
submitted.
Examination
13. The 'Sample group code' is multiple choice, using either the mouse or cursor keys
select the required option.
14. The 'Examination status' is multiple choice, using either the mouse or cursor keys
select the required option.
For children with parental agreement but who were absent on the day of examination, or
who refused to be examined themselves, the 'Plaque', 'pufa/PUFA' and 'Symmetrical
diffuse white patches' and 4 'Questions' fields will be automatically set to 'A – child absent'
or 'R – child refused' so just go on to the next child record.
Oral cleanliness
15. The 'Plaque' assessment field is multiple choice, using either the mouse or cursor keys
select the required option. If the child was examined but there is no plaque data
recorded on the collection sheet use code X – not recorded.
7Caries chart
16. To move around the dental chart use the cursor keys. When a code is entered it
overwrites the ‘-’ value.
17. If code 6,7,8 or C has been entered in surface ‘D’, then surface data for all that tooth
will be automatically completed.
Other details
18. The number of 'pufa/PUFA' conditions field is multiple choice, using either the mouse
or cursor keys select the required option. If the child was examined but there is no
pufa/PUFA data recorded on the collection sheet use code X – not recorded.
19. The 'Symmetrical diffuse white patches' field is multiple choice, using either the mouse
or cursor keys select the required option. If the child was examined but there is no
symmetrical diffuse white patches data recorded on the collection sheet use code X –
not recorded.
Questionnaire
20. The 4 'Questionnaire' fields are multiple choice, using either the mouse or cursor keys
select the required option. If the child was examined but there is no questionnaire data
recorded on the collection sheet use code X – not recorded.
Optional details
21. There is one 'Spare' field in this section which can be used for extra data to be
recorded.
2.4 create a new record or save a record
To create a new record for the same school, click 'Duplicate school details'.
To create a new record for a different school, click 'Add new blank record' or click the
button at the bottom of the screen. This automatically saves the record that you have just
input.
To save a record click 'Save record'.
82.5 navigate the records
To move forward a record, click the button at the bottom of the screen.
To move back a record, click the button at the bottom of the screen.
To move to the first record, click the button at the bottom of the screen.
To move to the last record, click the button at the bottom of the screen.
2.6 find a record
1. Click 'Find record'.
2. In ‘Find what’ enter the value of what you are looking for, for example: a specific child’s
identity number or a specific school name.
3. Make sure ‘Look in’ is 'Current document'.
4. Click 'Find next'.
2.7 delete a record
Got to the record you wish to delete. Click 'Delete current record' and click 'Yes' to confirm.
2.8 save the file onto a disk or memory stick to be used as a
back-up
This stage should be undertaken if data entry is not completed on a network drive that is
backed up every night by your IT department.
1. From the menu bar, click 'File', 'Save database as'.
2. Select the relevant drive (usually as follows) and folder location.
• c: Hard disk.
• e: Encrypted Memory stick.
3. Click 'Save'.
9The file that you are now viewing is the file saved to the backup device. Before continuing
either repeat stage 2.8 and save to hard disk C: (or when using a desktop pc the relevant
network drive), or close the file down and re-open from the hard disk drive (or network
drive).
2.9 close the form
Click 'Close form'. This then returns you to the main menu.
10Stage 3: check data for errors
3.1 create a duplicate file
Before starting to clean the data, create a duplicate file to ensure you still have an original
file in case the file becomes corrupt in any way.
1. From the menu bar, click 'File', 'Save database as'.
2. Choose a different filename for example 'Year 6 2023 Data clean.accdb'
3. Click 'Save'.
3.2 check the data for errors
From the main menu click 'Check data for errors'.
A series of queries will run and if any errors are found details will be displayed. If some
columns are too narrow put the cursor at the very top of the column and drag the right side
line to the right to widen the column and the figures should be revealed.
You can print out any errors that are found or note them down in a separate table. To
close a query and view the next one, click the small grey cross in the top right of the query
box.
Figure 1: screenshot from data collection tool
3.3 errors explained
Check 1 Missing child details
This check is to see if any records have missing details for the children. Any blanks or ‘Not
provided’ should be double checked with the paperwork to see if it was accidentally
missed or obtained at a later date.
Check 2 Year 6
To check for children out of year group (child should be born between 1 September 2011
and 31 August 2012).
11Check 3 LA Name Group Exam
To check for incorrect input of LA Name, sample subgroup or examination status and to
provide a count of each. The counts can be used to check all relevant data has been
entered and data input tallies with the paperwork appendices.
Check 4 Add subgroup
To check if any additional subgroup data has been input correctly for sites.
Check 5 School type and subgroup
To check if school type and subgroup input match correctly for sites.
Check 6 Child duplicates
To check if there are any duplicate records input. Note if there are siblings that attend the
same site they should have been entered as 'Multiple births' and then they will not show as
duplicates.
Check 7 Repeat Training
To check if there are any repeat and/or training examinations that need deleting before
submitting or if they should have been entered as a different examination status.
Check 8 Child PCode
To check for any I or Os input instead of 1 or 0.
Check 9 Child PCode All
These are not necessarily errors this is a list grouped by all child postcodes. Scroll down
through the list manually looking for any anomalies in the data input as your local
knowledge is used for this check. For example, a Child postcode1 input as PU4 would
stand out as should be PR4.
Check 10 School PCode
To check for any I or Os input instead of 1 or 0.
Check 11 School name postcode
These are not necessarily errors, this is a grouped list to check for any mismatch of site
names (various permutations of spellings and punctuation), postcode anomalies or
incorrect date of examinations input.
12Check 12 Ethnicity
To check for miscoding, refer to protocol 8.1.12. Lower ethnicity groupings must be
selected from the relevant section relating to the higher ethnicity: 'A – white' (lower A1-A5
or X), 'B - mixed' (lower B1 to B4 or X), 'C - Asian' (lower C1 to C5 or X), 'D - black' (lower
D1-D3 or X), 'E - other' (lower E1-E2 or X), 'X - ethnic group not provided' (lower X).
If using local lower ethnicity codes 'F - specific other', 'G - specific other', 'H - specific other'
then the relevant higher ethnic group must also be used, for example 'A - white', 'F -
Eastern European'.
Check 13 Examined incorrect plaque pufa/PUFA white patches
To check for examined children with blank, absent or refused plaque and/or pufa/PUFA
and/or symmetrical diffuse white patches information input.
Check 13a Examined incorrect questionnaire
To check for examined children with blank, absent or refused questionnaire information
input.
Check 14 Absents refused plaque pufa/PUFA white patches
To check for absent or refused children with information input for plaque and/or pufa/PUFA
and/or symmetrical diffuse white patches other than the relevant absent or refused option.
Check 14a Absents refused questionnaire
To check for absent or refused children with information input for the 4 questionnaire
questions other than the relevant absent or refused option.
You should now have a list of ID numbers or record numbers that need to be investigated
because of errors, unless all data was inputted 100% perfectly. Some records will need
checking and correcting, others may need deleting if the child was truly the wrong year
group, and not just appearing to be so because of a recording error. Recording onto paper
charts can help with the process needed to clarify errors.
13Stage 4: amend incorrect records
Click 'Open data input form'.
4.1 find a record using record number
1. At the bottom of the screen where it says 'Record 1 of '
2. Input the record number to amend, press 'Return'.
3. The record to amend will be displayed, check it is the correct one.
4. Amend the errors.
5. Click 'Save record'.
4.2 find a record using Child ID Number
1. Click 'Find record'.
2. In ‘Find what’ enter the 'Child id number'.
3. Make sure ‘Look in’ is 'Current document'.
4. Click 'Find next'.
5. The record to amend will be displayed, check it is the correct one.
6. Amend the errors.
7. Click 'Save record'.
4.3 delete a record (leave deletions until the end)
To be used to remove genuinely out of year group children or duplicate records.
1. Find the record you wish to delete, double check it is the correct one.
2. Click 'Delete current record', click 'Yes' to confirm.
144.4 close the form
1. Click 'Close form'.
2. The menu is then displayed.
When you have checked and cleaned the data file you are ready to export the data.
15Stage 5: send files to dental epidemiology
coordinators (DECs)
5.1 export data to Excel
1. Make sure you are in the correct ‘cleaned’ Access data collection file.
2. From the main menu click 'Export data to Excel file'.
3. Locate the folder where you wish to save the file.
4. In ‘File name’ change ‘Data.xlsx’ to 'E********_year_6_2023.xlsx' (where asterisk is the
LA code, refer to protocol appendix G).
5. Make sure there is a tick in the 'Autostart' box
6. Click 'OK' and the data should open up within Excel.
7. From the menu bar at the top click 'File' and then click 'Info'.
8. Click 'Protect workbook' and then click 'Encrypt with password'.
9. Within the 'Password:' box type the same password you used to enter the data into the
Access data collection tool (beginning with N), make sure the CAPS lock is on.
10. Click 'OK'.
11. Within the 'Re-enter password:' box re-type the same password and then click 'OK'.
12. Click 'Save'.
13. Click the cross in the top right corner of the spreadsheet to close and exit Excel.
14. Click 'Exit' on the main menu of the data collection tool to quit Access.
5.2 complete Appendix N summary file
Open the Excel Appendix N Data summary file (Figures 2 and 3). If possible, use your
completed Appendix Ks as guidance to sum the totals, use 1 line for each lower tier local
authority (LA) and enter the information required for each.
16Figure 2: example of appendix N
• Upper tier LA Code - Refer to protocol Appendix G
• Upper tier LA Name
• Lower tier LA Code - Refer to protocol Appendix G
• Lower tier LA Name
• Name(s) of examiner(s) - If there is more than one examiner for the survey enter all
the names in the same cell so there is only 1 row for each lower tier LA
• Start date of examination - The first day children were examined
• End date of examination - The last day children were examined
State mainstream schools (with year 6 children) listed by Number of children WITH parental
Number of children with :
local authority agreement to participate :
Number of
Total number children for
Total Number of Agreement to
of year 6 whom agreement Form not Child Child
number of schools participate Examined
children to participate was returned absent refused
schools visited provided
attending sought
(sample size)
54 2784 20 354 287 67 267 16 4
18 1500 18 308 260 48 240 17 3
25 2023 22 327 300 27 264 36 0
40 2542 21 350 285 65 258 23 4
Figure 3: example of appendix N
• Total number of schools - The total number of mainstream schools providing education
to children in year 6
• Total number of year 6 children attending - The total number of children in year 6
attending listed schools
17• Number of schools visited - The total number of schools that were actually visited
• Number of children for whom agreement to participate was sought (sample size) - The
total number of children in year 6 for whom agreement to participate was initially
sought (number of forms sent out)
• Agreement to participate provided - The total number of children in year 6 with
agreement to participate forms signed and returned
• Form not returned - The total number of children in year 6 for whom agreement to
participate was sought but either did not return a signed form or for whom a negative
response was received
• Examined - The total number of children in year 6 with agreement to participate who
were examined
• Child absent - The total number of children in year 6 with agreement to participate who
were absent on the day of the survey
• Child refused - The total number of children in year 6 with agreement to participate
who refused to be examined on the day of the survey
The appendix N information must be accurate to enable the calculation of participation
rates for the survey at both national and local levels.
This file should be saved as 'AppN_E********_year_6_2023.xlsx' where '********' is the
relevant local authority code, refer to protocol Appendix G List of LA codes and names.
5.3 complete Appendix O data linkage file
The information in this file will be used to attempt to link the children in year 6 survey data
to the national height and weight data. For all examined children only, the information in
the separate Appendix Ks must be collated together into 1 final protocol Appendix O data
linkage file (Figure 4). This file is password protected, please contact your local dental
epidemiology coordinator (DEC) for the password. If Appendix K has been completed
electronically then the relevant data can be copied and pasted into Appendix O.
18Figure 4: example of appendix O
This file should be saved as 'AppO_E********_year_6_2023.xlsx' where '********' is the
relevant local authority code, refer to protocol Appendix G List of LA codes and names.
5.4 email files to DECs
Files must be emailed from an nhs.net email address to your local DEC's nhs.net email
address or uploaded to a Microsoft Teams site set up by your local DEC (stage 5.5).
Files to be emailed or uploaded to the DEC:
• the Excel exported cleaned password protected data file created in stage 5.1, labelled
'E********_year_6_2023.xlsx'
• the Excel completed summary sheet Appendix N, labelled
'AppN_E********_year_6_2023.xlsx'
• the Excel completed data linkage sheet Appendix O with details for examined children
only. This should be password protected and labelled 'AppO_E********_ year_6_2023.xlsx'
Where '********' is the corresponding LA code, refer to protocol Appendix G.
5.5 upload files to Microsoft Teams
If requested to do so by your local DEC rather than email:
191. Within Microsoft Teams, in the top right of the screen, click on your current team
organisation and in the drop down menu click on 'Department of Health and Social
Care', this will then display any GOV-OHID teams that you are a guest of.
Figure 5: screenshot of Microsoft Teams
2. Select the relevant team required to upload survey files to.
3. Select the relevant channel for your local authority.
Figure 6: screenshot of Microsoft Teams
4. From the menu at the top click 'Files', 'Upload' and 'Files'.
Figure 7: screenshot of Microsoft Teams
5. Within the browser window locate and select the file to upload.
6. Click 'Open'
207. The file should then be displayed within the channel.
8. Repeat steps 4 to 7 to upload all required files listed in stage 5.4.
DECs can follow stage 5.5 to upload LA survey files to the relevant LA folder within their
'DEC data upload' channel within the national team site.
21References
1. Office for Health Improvement and Disparities (2022): National Dental Epidemiology
Programme. Oral health survey of children in year 6, 2022 to 2023: national protocol.
Available from: www.gov.uk/government/publications/oral-health-survey-of-children-in-
year-6-2022-to-2023-survey-toolkit
2. Office for Health Improvement and Disparities (2022): National Dental Epidemiology
Programme. Administrators' guide to child cohort surveys. Available from:
https://www.gov.uk/government/publications/oral-health-survey-guidance
3. Office for Health Improvement and Disparities (2022): National Dental Epidemiology
Programme. Oral health survey of children in year 6 2023: survey toolkit:
www.gov.uk/government/publications/oral-health-survey-of-children-in-year-6-2022-to-
2023-survey-toolkit
22© Crown copyright 2022
Office for Health Improvement and Disparities
This publication is licensed under the terms of the Open Government Licence v3.0 except
where otherwise stated. To view this licence, visit nationalarchives.gov.uk/doc/open-
government-licence/version/3
Where we have identified any third party copyright information you will need to obtain
permission from the copyright holders concerned.
23You can also read