Penn State Sentinel Bee Nest Study 2019 Instructions for Participants - Beescape
←
→
Page content transcription
If your browser does not render page correctly, please read the page content below

Penn State Sentinel Bee Nest Study 2019
                          Instructions for Participants
                                  Doug Sponsler, 2/25/2019

Introduction
Thank you for your participation in the 2019 Penn State Sentinel Bee Nest Study! Our study has
two objectives. First, we aim to document patterns of wild bee diversity across Pennsylvania,
with special emphasis on the comparison of different landscape types, such as cities, farmlands,
and forests. Second, and no less important, we want people to discover the wild bees of their
neighborhoods, to learn their names, know their habits, and become invested in their
conservation. Thanks for partnering with us!

Building your nest

                                                                                              1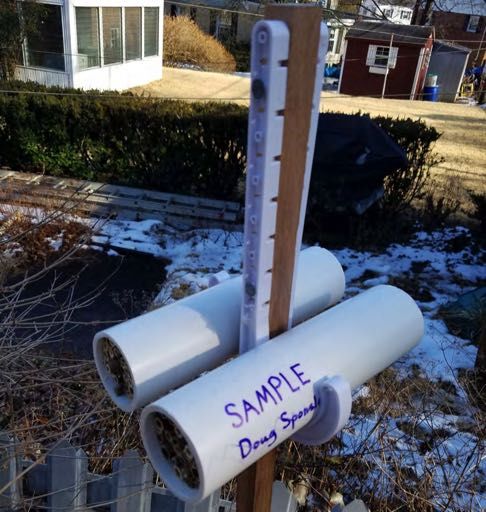
Your first task as a participant in this study is to build a nest. At Penn State, we have designed
an extremely low-cost wild bee nest that uses a combination of hardware store materials and
natural Phragmites reeds, following the well-validated methods of Staab et al. (Staab et al.
2018). It can be built for well under $10, and once you get the hang of it, you may want to build
more -- go for it!

Materials
   1. Phragmites reeds (enough to pack two PCV pipes)
   2. 2” diameter x 9” length PVC pipe (x2)
   3. 2” pipe hangers (x2)
   4. 1” roofing nails (x4)
   5. 60” garden (x1)

Construction

    1. Harvest Phragmites1. Using a sharp knife of sickle, cut Phragmites reeds off at the
       base, as close as possible to the soil surface. Then, cut off top extremity of the reed that
       includes the flowering “tassel”; this will reduce the risk of transporting seeds. (Figures 1-
       2)

Figure 1. A stand of Phragmites in south Philadelphia. Note the conspicuous “tassels” at the apex of
each reed. These, combined with the 10-14’ height of the reeds, make Phragmites easy to identify.

1
  Phragmites australis is an extremely common plant that exists in both native and highly invasive
subspecies. Look for it along roadside ditches and wetlands. Be sure to get permission to harvest from
the land owner, and use caution if collecting along roadsides.

                                                                                                         2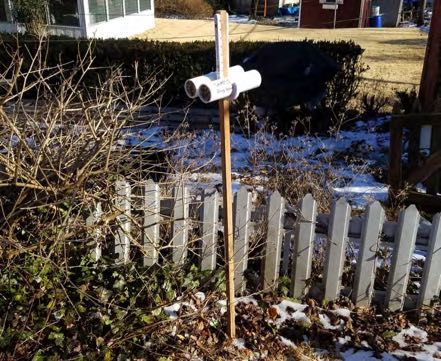
Figure 2. Harvested Phragmites loaded into the ultimate research vehicle -- the versatile minivan.

    2. Cut reeds into ~8” sections2 so that each one contains a node somewhere toward the
       middle. To find nodes, rub off the flaky sheathing of the reed and look for narrow bands
       that occur at regular intervals; these nodes form septa that divide the interior of the reed.
       By including a node in the middle of each section, you give bees a back wall to their
       house, and you enable two different nests to be made in the same reed section (one in
       each open end).

    3. Sort reeds by internal diameter into small (3-4 mm), medium (5-6 mm), and large
       (7-8 mm). This can be done roughly--no need to measure every reed once you get a feel
       for what the sizes look like. (Figure 3)

2
  One of the best tools for this is a band saw with a fine-toothed blade. If you do not have one of these
available, use another tool that can make clean cuts through brittle material, such as a rotary cut-off
wheel (e.g. Dremel tool) or a detail handsaw (e.g. veneer saw, fret saw). The key is making clean cuts so
that you don’t end up with splinters occluding the end of the reed.

                                                                                                        3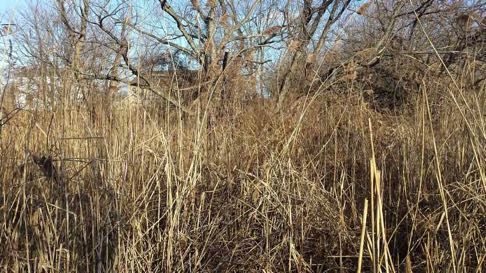
Figure 3: Reed sections sorted by internal diameter: small (left), medium (center), large (right).

    4. Cut PVC pipe into 9” sections. This can be done easily with either a hand saw or
       power saw. The pipe is cut slightly longer than the reed sections so that there is some
       overhang to protect the nest from rain.

    5. Pack PVC sections with reed sections3. For each PVC pipe, use 4 small reeds, 4
       large reeds, and enough medium reeds to achieve a snug fit so that nothing falls out
       when you shake it. After packing, use a pair of tweezers to remove any splinters or
       debris that may be blocking the openings of the tubes4 (Figure 4)

3
  Phragmites reeds are fairly strong end-to-end, but fairly brittle when compressed laterally. Try not to
break the stems while packing; if you do, replace the broken ones.
4
  Note that you will also see a filmy pith inside the reeds; this does not need to be removed.

                                                                                                            4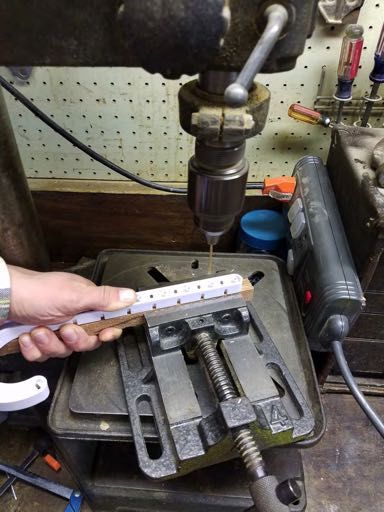
Figure 4: PVC tube packed snugly with reed sections.

   6. Pre-drill holes in your garden stake. Use your pipe hanger as a guide for where the
      holes should go. Use a drill bit that is slightly smaller than the diameter of the nails you
      are using so as to achieve a secure attachment. Pre-drilling is necessary to prevent the
      stake from splitting when the nails are driven. (Figure 5)

                                                                                                     5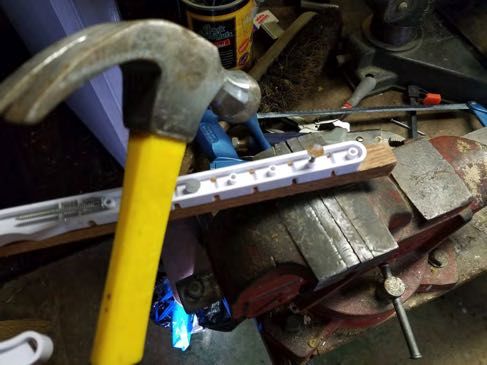
Figure 5: Pre-drilling garden stakes using pipe hanger as a guide for where holes should go.

                                                                                               6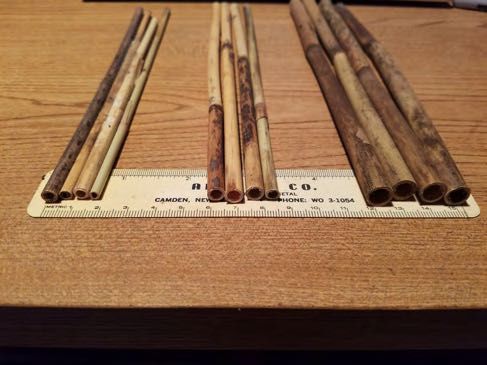
7. Attached pipe hangers to opposite sides of the stake so that 2 PVC tubes can be
      mounted side-by-side. (Figure 6-7)

Figure 6: Attaching pipe hangers to stake.

                                                                                        7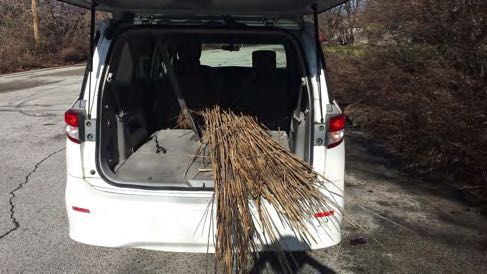
Figure 7: Side-by-side arrangement of PVC pipes using two oppositely mounted pipe hangers.

                                                                                             8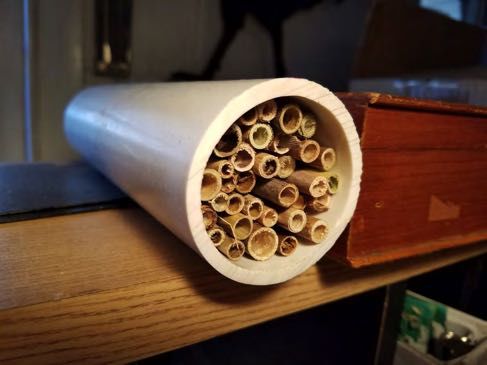
Installing your nest
   1. Find a spot on your land where your nest can be unobscured by tall vegetation.

   2. Before mounting your PVC tubes on the pipe hangers, drive your stake securely into the
      ground so that one of the two open sides of your nest faces southeast (to get morning
      sun).

   3. Mount your PVC tubes, and you have a finished sentinel nest! (Figure 8)

Figure 8: Finished sentinel nest.

Monitoring your nest

                                                                                           9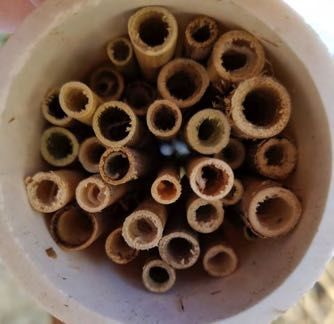
As close as possible to the 1st of every month, please do the following:

   1. Take a crisp closeup of the open ends of each of your PVC tubes (i.e. 4 pictures per
      nest unit) and email these photos to dbs31@psu.edu. This will enable us to keep track of
      which reeds are “capped”, meaning that a female bee has completed a nest in it. Be
      sure to get the rim of the tube in the picture so that we can use it as a reference to
      measure the size of each reed. (Figure 9)

       Name your photos yourname_nest#_photo#_ddMonthYYYY. For example, the photos of
       my nest #1 that I will take on March 1 will be named:

       sponsler1_A_01March2019.jpg
       sponsler1_B_01March2019.jpg
       sponsler1_C_01March2019.jpg
       sponsler1_D_01March2019.jpg

Figure 9. Photo showing stem ends, including PVC rim as a reference for measuring stem
diameter.

   2. Take a zoomed out photo standing at your nest and facing north, south, east, and
      west (4 photos) and email these photos to dbs31@psu.edu. These will help document

                                                                                           10
the microhabitat of your nest. Be sure to aim the camera low enough to capture low-
growing plants close to the nest.
Name your photos yourname_nest#_direction_ddMonthYYYY. For example, the photos
from nest #1 that I will take on March 1 will be named:
sponsler1_N_01March2019.jpg
sponsler1_S_01March2019.jpg
sponsler1_E_01March2019.jpg
sponsler1_W_01March2019.jpg
3. OPTIONAL -- take photos of any insects (you’ll probably see more than just bees)
that show up at your nest and post them to iNaturalist. iNaturalist is a crowd-
sourced natural history program where you can share observations with other users and
help each other identify specimens. Visit their website for more information:
https://www.inaturalist.org/
Finally, don’t be discouraged if you go a long time without seeing anything at
your nest. It’s very hard to predict how many bees will show up in a given place, and it
is typical in studies of this kind to have a lot of empty nests. But even an empty nest can
tell us something, and we are all learning together.
Have fun!
Doug Sponsler
Postdoctoral Fellow, Penn State University
Research Associate, Academy of Natural Sciences of Drexel University
dbs31@psu.edu
267-225-2917
11You can also read