Playpen Barrier - IMPORTANT! READ AND FOLLOW THESE INSTRUCTIONS CAREFULLY AND KEEP FOR FUTURE REFERENCE - Perma Child Safety
←
→
Page content transcription
If your browser does not render page correctly, please read the page content below
INSTALLATION VIDEO

  Playpen
  Barrier

                                                             29.5”
                                                             (75cm)
                                                             Tall

                  Fits Openings 28.8” to 144.6”
                         (73cm - 370cm)

IMPORTANT! READ AND
FOLLOW THESE INSTRUCTIONS
CAREFULLY AND KEEP FOR
FUTURE                 REFERENCE.
This product complies with safety standard ASTM F1004-19.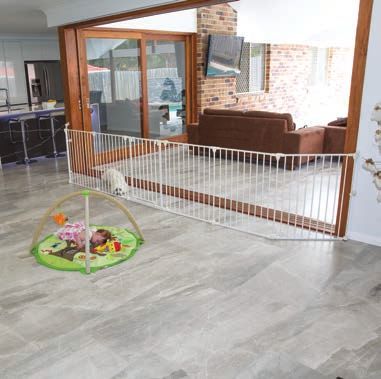
TABLE OF
    CONTENTS

       SAFETY INFORMATION
       General                           03
       Maintenance                       03
       Warnings                          04
       Mountings                         06

       WHAT’S IN THE BOX
       Parts                             08

       INSTALLATION
       Gate Placement                    10
       Underside Bracket Wall Assembly   11
       Topside Bracket Wall Assembly     15
       Room Divider or Safety Barrier    18
       To Add Extra Panels               20
       To Remove Unwanted Panels         21
       Playpen Assembly                  22

       OPERATION
       How to Open                       23
       Safety Play Mat                   24
       Cleaning Instructions             25

       SUPPORT
       Warranty Certificate              26
       Warranty Card                     27
       After Sales Support               27

2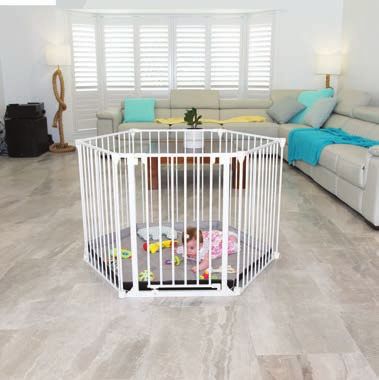
SAFETY
                                     INFORMATION

GENERAL
Read this instruction manual carefully and keep it in a safe place for
future reference. The correct use and maintenance of this product is
essential.

MAINTENANCE
Regularly check that the gate is functioning correctly, lubricate
hinges and moving components with a suitable spray lubricant.
Tighten and adjust mounts to ensure secure smooth operation.
Inspect all components regularly and stop using if any component is
damaged or missing.

                                                                         3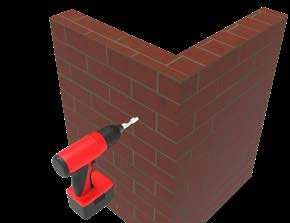
WARNINGS

     WHEN USED AS A SAFETY BARRIER
    WARNING Incorrect fitting or positioning of this safety barrier
            can be dangerous.

    WARNING Do not use the safety barrier if any components
            are damaged, missing or disassembled.

    WARNING Never install this product on glass doors or
            windows.

    WARNING Stop using the product if the child is able to climb,
            dislodge or open barrier unassisted.

    WARNING A maximum of 9 panels can be used when used
            as a barrier/room divider.

    WARNING Danger to older children if climbing over the barrier.

    WARNING Regularly check that the barrier is properly fixed
            and secure.

    WARNING Any additional or replacement parts should only be
            obtained from after sales support.

    WARNING This safety gate is suitable for openings from 73cm
            (28.8”) to 370cm (145.6”).

    WARNING Before using this product, carefully inspect for any
            loose parts and whether any parts need to be
            tightened.

    WARNING Children have died or been seriously injured when
            [gates/enclosures] are not securely installed.

    WARNING ALWAYS install and use [gates/enclosures] as
            directed using all required parts.
4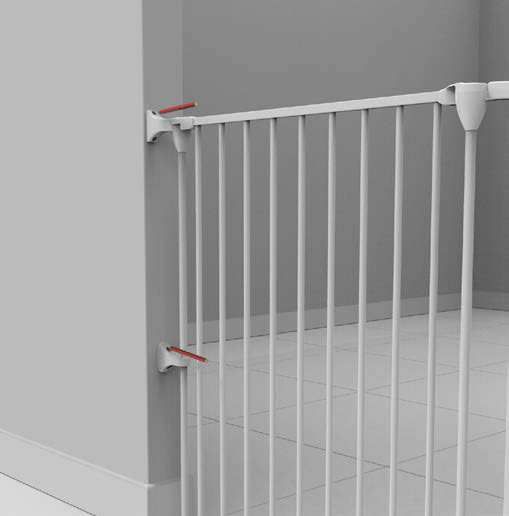
WARNINGS

        WHEN USED AS A PLAYPEN
WARNING This product is intended for use with children
        from 6 to 24 months or small to medium pets
        from 4.5kg (10 lbs) up to 18kg (40 lbs).

WARNING Do not use the playpen without the PERMA
        Products play mat base.

WARNING Do not place the playpen close to an open fire or
        other heat source.

WARNING Do not leave anything in the playpen which
        may provide a foothold or create a danger of
        suffocation or strangulation.

WARNING This safety barrier is for domestic use only.

WARNING This safety barrier has a manual closing system.

WARNING Ensure that the playpen is fully erected and all the
        locking mechanisms engaged before placing your
        child in this playpen.

WARNING Do not use the playpen if any part is broken, torn
        or missing and use only spare parts approved
        by manufacturer, accessories which are not
        approved by manufacturer shall not be used.

WARNING Check regularly that all assembly fittings are
        tightened properly.

WARNING Use only with the locking/latching mechanism
        securely engaged.

WARNING NEVER use to keep child away from pool.

                                                               5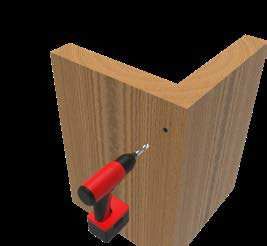
SAFETY INFORMATION

    MOUNTINGS
    Gate must be installed in a structurally sound opening.
    Ensure mounting surface (wall, door frame, stair posts, etc.) is
    strong, rigid and has an even surface.

    Note: If using gate on stairs, it must be placed either on the top
    step or on the lowest step at the bottom.

    Select the appropriate fixing method from the following list.

                                         WOOD MOUNTING
                                         Drill 2mm (5/64’’) pilot holes
                                         and use the wood screws pro-
                                         vided screwing directly into the
                                         wood.

                                                    FOR INSTALLATION
                                                    Wood Screws

                                         DRY WALL MOUNTING
                                         Locate the wood stud and
                                         follow the wood mounting
                                         instructions. Do not mount
                                         into dry wall without
                                         additional support.
6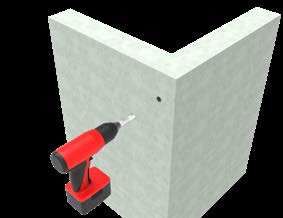
HARD WALL MOUNTING
BRICK
Drill 5mm (3/16’’) pilot holes,
insert anchor and secure with
screws.
FOR
INSTALLATION
Wood Screws
Anchor
HARD WALL MOUNTING
CONCRETE
Drill 5mm (3/16’’) pilot holes,
insert anchor and secure
with screws.
TOOLS REQUIRED
PHILLIPS HEAD
PENCIL SCREW DRIVER DRILL
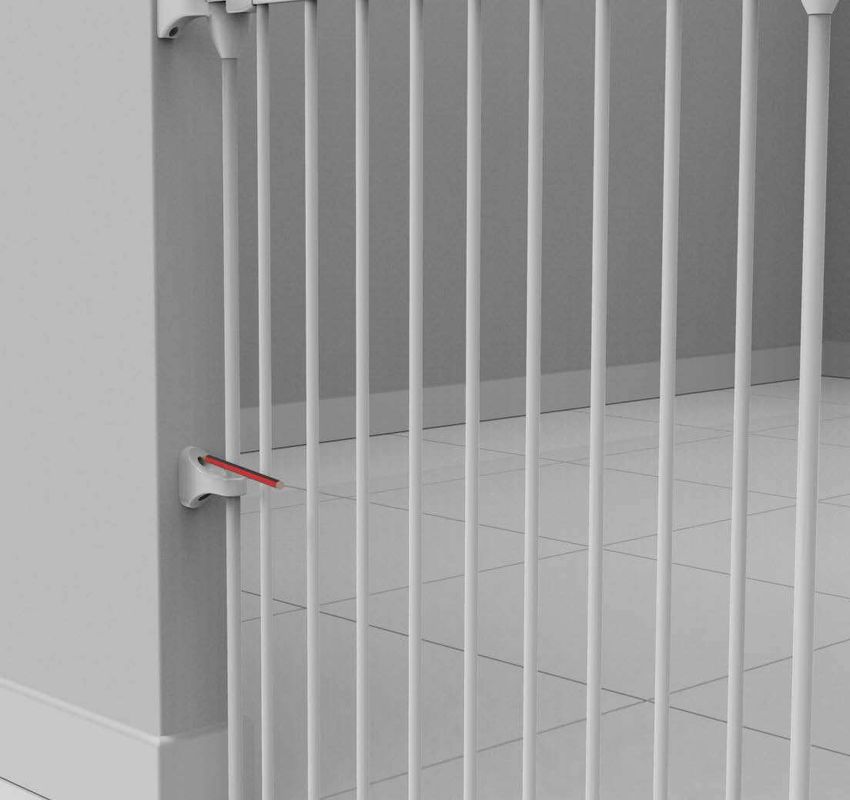
This gate must only be fixed to a solid and secure surface. If unsure,
check with a qualified builder or trades person that the installation
you intend is suitable and safe within the chosen location.
7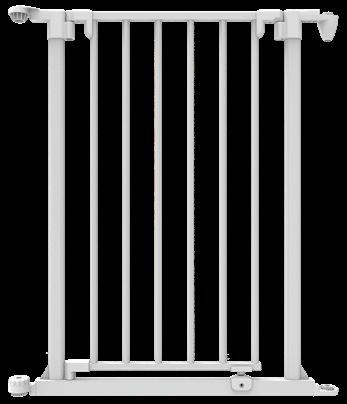
WHAT’S IN THE BOX

    PARTS

       UNDERSIDE                          TOPSIDE

                               5x
                         Barrier Panels

                             1x
                          Gate Panel

8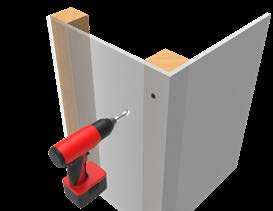
1x                              1x
           Top Underside                    Top Topside
            Wall Bracket                    Wall Bracket

                2x                              1x
         Lower Wall Bracket                   Top Cap

                1x                              8x
            Bottom Cap                        Screws

                               7x
                           Corner Tubes

If any parts are missing do not attempt to use your Playpen Barrier.
Please contact us at www.permachildsafety.com/contact to obtain
replacements. Only use parts supplied by the manufacturer with
your Playpen Barrier.
                                                                       9
INSTALLATION

 STEP 1:
 GATE PLACEMENT
 SUITABLE PLACEMENT OF GATE AND CATCH MOUNT

                                As a Barrier;
                                Across the room

                                As a Playpen;
                                In an open space

10
INSTALLATION
STEP 2: UNDERSIDE
BRACKET WALL ASSEMBLY
1. Place the Lower Wall Bracket over Corner Tube, and then put
the Corner Tube into the Top Underside Wall Bracket.
2. Put the Top Underside Wall Bracket into the top of the Barrier
Panel, and the bottom into the bottom of the Barrier Panel, and
then into the Bottom Cap.
113. Mark screw hole positions with a pencil for the Top Underside
Wall Bracket and the Lower Wall Bracket.
4. Disassemble and screw in Top Underside Wall Bracket and
Lower Wall Bracket.
125. Reassemble gate panel by connecting the top of the Barrier
Panel to the Top Underside Wall Bracket.
136. Place the Corner Tube through the Lower Wall Bracket.
7. Then place the Corner Tube into the Top Underside Wall
Bracket. Pull the Corner Tube up so you can position the
bottom of the Corner Tube into the bottom hole, and then into
the Bottom Cap.
14INSTALLATION
STEP 3: TOPSIDE BRACKET
WALL ASSEMBLY
1. Place the Lower Wall Bracket over Corner Tube, and put the
Top Cap on the bottom of the Barrier Panel.
2. Place the Corner Tube into the Barrier Panel and then into the
Top Topside Wall Bracket. Pull the Corner Tube up, while lifting
the bottom into its position.
153. Mark screw hole positions with a pencil for the Top Topside
Wall Bracket and the Lower Wall Bracket.
4. Disassemble and screw in Top Topside Wall Bracket and then
screw in the Lower Wall Bracket.
165. Place the Corner Tube through the Lower Wall Bracket and
then push the Corner Tube through the top hole.
6. Put the Top Cap on the bottom of the Barrier Panel, and then
position the Corner Tube in place.
17INSTALLATION STEP 4: ROOM DIVIDER OR SAFETY BARRIER Up to 9 panels including the gate may be used in open configurations providing the 2 end panels are securely fixed to a wall with the fixings provided. 18
19
INSTALLATION

 STEP 5:
 TO ADD EXTRA PANELS
 1. Align opposite ends of panels, place the Corner Tube into the
    top hole first, then pull the Corner Tube up so you can position
      the bottom of the Corner Tube into the bottom hole.

                                      UNLOCKED

                                                       LOCKED

20
INSTALLATION
STEP 6:
REMOVE UNWANTED PANELS
1. Turn base knob to the unlocked position, pull up on the Corner
Tube and slide the bottom of the Corner Tube out from the
base. With the Corner Tube removed you can lift and remove
the unwanted panel.
LOCKED
UNLOCKED
21INSTALLATION
STEP 7: PLAYPEN ASSEMBLY
1. Align the Gate Panel and one of the other panels together.
Place the Corner Tube into the top hole first, pull the Corner
Tube up so you can position the bottom of the Corner Tube
into the bottom hole. Align arrow with hexagon icon.
2. Repeat step 1 and 2 for all sides and corners.
3. Turn base knob and align lock icon with dot on panel to lock
and unlock panels.
LOCKED UNLOCKED
22OPERATION
HOW TO OPEN
1. Using one hand place thumb on the button and grip gate with
fingers. Slide button and lift gate, then open gate in either
direction, when released gate will swing closed automatically.
Always check gate is properly closed.
2. To90°enable
angle.
stay open feature, completely open gate to a
90°
23OPERATION
SAFETY PLAY MAT
(SOLD SEPARATELY)
1. Note: A safety play mat is required if playpen is used
with children.
Your child’s play mat can now be placed into the playpen and
secured to the bottom bars of each panel with the ties.
The play mat is available separately, contact after sales support
for details.
24OPERATION
CLEANING INSTRUCTIONS
Simply use a soft damp cloth to wipe bed rail, dry after cleaning.
Do not use chemical or abrasive cleaners.
25SUPPORT
WARRANTY CERTIFICATE
Congratulations! You have made an excellent choice of this quality product. Our commitment to
quality also includes our service. Should you, contrary to expectations, experience defects due
to manufacturing faults, we will provide you with a warranty against defects as follows:
Warranty
The product is guaranteed to be free from defects in workmanship and parts for a period of 12
months from the date of purchase. Defects that occur within this warranty period, under normal
use and care, will be repaired, replaced or refunded at our discretion. You are entitled to a re-
placement or refund for a major failure and for compensation for any other reasonably foresee-
able loss or damage. You are also entitled to have the goods repaired or replaced if the goods
fail to be of acceptable quality and the failure does not amount to a major failure.
Proof of Purchase
This warranty is valid for the original purchase and is not transferable. Please keep your
purchase docket, tax invoice or receipt as the best proof of purchase, and as proof of date on
which the purchase was made.
Extent of Warranty
This warranty is limited to defects in workmanship or parts. All defective products or parts will be
repaired or replaced. This warranty does not cover consumable items.
Normal Wear and Tear
This warranty does not cover normal wear and tear to the products or parts.
Exclusions
This warranty does not cover:
• Any defects caused by an accident, misuse, abuse, improper installation or operation,
lack of reasonable care, unauthorised modification, loss of parts, tampering or attempted
repair by a person not authorised by the distributor.
• Any product that has not been installed, operated or maintained in accordance with the
manufacturer’s operating instructions provided with the product.
• Any product that has been used for purposes other than domestic use.
To Make a Claim
If a defect in the goods appears within 12 months, you are entitled to claim a warranty. Please
contact after sales support via the link below:
www.permachildsafety.com/contact-us
Please ensure that you have a copy of proof of purchase so that we are able to respond as
quickly and efficiently as possible.
26WARRANTY CARD
Details:
Product Name: 3 in 1 Playpen Barrier
Product Number: White 2747 | Warm Black 2752
Your Name:
Address:
Phone:
Email:
Date of Purchase:
Location of Purchase:
We recommend that you keep a copy of your receipt, showing the date of
purchase, with this warranty certificate and keep for your reference. In the
event of a product fault, please contact after sales support. Ensure that
you include the product details (as shown on this card) so that we are able
to respond as quickly and efficiently as possible.
AFTER SALES SUPPORT
Product Code: White 2747 | Warm Black 2752
For questions, concerns and to view our latest products visit:
www.permachildsafety.com/contact-us
27©2020 Permastik Pty Ltd. All Rights Reserved. Distributed by Perma Products USA® www.permaproducts.com Tel: 239 494 5481 Made in China to Perma quality standards
You can also read