2 BUTTON GSM INTERCOM WITH KEYPAD (3G) - Control your gate with your mobile phone - GSM Activate
←
→
Page content transcription
If your browser does not render page correctly, please read the page content below
2 BUTTON GSM INTERCOM
    WITH KEYPAD (3G)
  Control your gate with your mobile phone
       www.gsm-activate.co.uk

         MODEL NUMBER 3GINT1

                  Page 1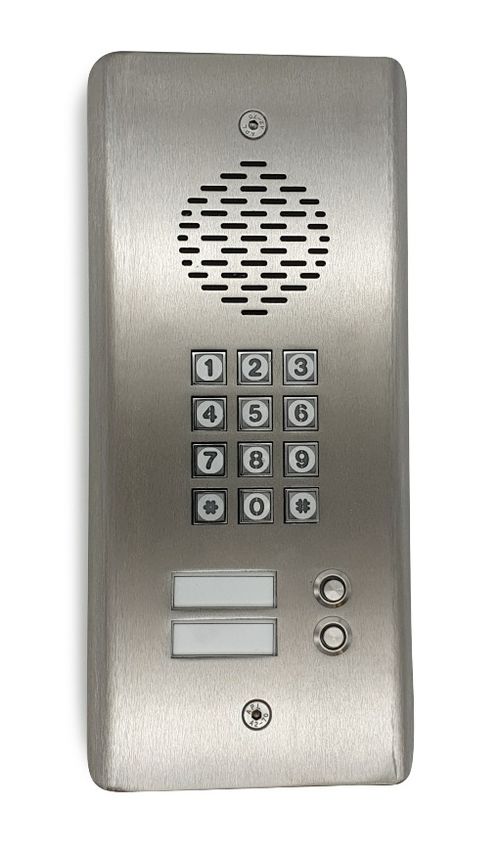
Product Information

The GSM 3G Gate Intercom incorporates a professional industrial grade GSM engine that
receives calls at its SIM number, as any ordinary GSM phone. The system operates in the
GSM module Quad-band 850/900/1800/1900/2100Mhz and incoporates 3G capabilities.This
Intercom works with both 2G and 3G Simcards.

When a visitor arrives at your property they will press the call button on the intercom which
will then connect to a phone number (up to 2 numbers can be added which will be rung in
sequence) of your choosing. Once you answer the phone and speak to them you can then
open the gate from your phone and let them in remotely from wherever you are in the world.

You can also open the gates by dialling the simcard number held within the unit and also
by pressing a combination of your choice on the keypad.

The advantages of this over other systems are that you do not have to leave the car to open
your gates, avoiding weather or safety issues, you don't need to carry around a separate
remote device or indeed replace it if it were to get lost!

No phone line is required as the unit will use the mobile phone network to place the calls.

                                        Specification

 ●   GSM Frequency: Quad band freq 850/900/1800/1900/2100 MHz
 ●   Power Supply Voltage: 12 DC
 ●   Current used in standby mode: 70 Milliamps.
 ●   Max current: up to 2 amps.
 ●   Stainless steel vandal proof Enclosure.
 ●   Backlit keypad.
 ●   Standard 2G or 3G simcard.
 ●   No Landline Required.
 ●   Dimensions - L260 x W120 x H45mm
 ●   Brushed stainless steel is 2mm thick.
 ●   Operating temperature: -10...+40°C
 ●   Signal strength function.
 ●   Stay Active simcard Function.
 ●   2 Call points (activated in sequence) per button.
 ●   Digit keypad code access (50 separate 4 digit access codes)
 ●   Phone list for dial to open access (30 users)
 ●   Hold gate open feature.
 ●   Pedestrian relay or door lock.
 ●   Easy programming via SMS message (keypad programmed via keypad)
 ●   Adjustable Relay Time.

                                            Page 2
Instructions
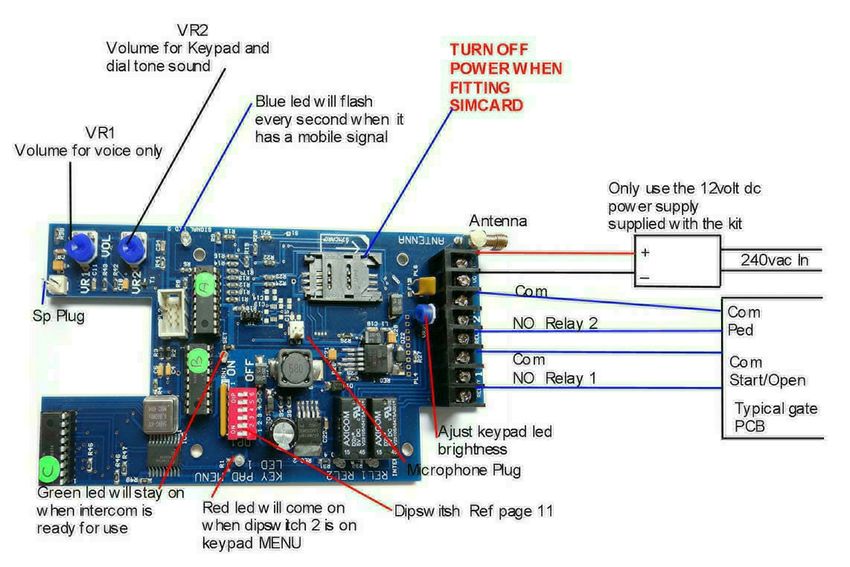
IMPORTANT - PLEASE READ
Please ensure that you disconnect the power when you fit the simcard and that you place the
simcard with the clipped corner facing outwards. As shown in the picture above.
VR1 - Volume (Voice) Adjusts the voice level on the intercom.
VR2 - Volume (Keypad) Adjusts the level of sound for keypad and Dial tone.
Signal LED (blue) The blue LED flashes once per second to indicate when a
signal has been found.
Ready LED (green) The green LED will come on when the unit is ready for
operation.
Keypad LED (red) When the red light is on it indicates you are in keypad mode for
programming the keypad. (Dipswitch 2 on)
Dipswitch To adjust dipswitch settings refer to Page 11
Page 3Installing your simcard
New SIM cards will need registering before they can be used. Full details of how this is done can
normally be found in the SIM card pack. It will normally require that the SIM card is inserted into
a mobile phone, a number dialled and instructions followed. While the SIM is in the mobile phone
it would be a good time to disable call diverts, ring back and disable features such as voicemail
and text alerts. Please be advised that if the intercom will be used on a regular basis, we would
recommend a contract based sim card as pay as you go call charges can be as high as 25p per
call.
The GSM Gate Intercom has a built in “sim active function” which keeps track of the units activity.
If there has been no usage for 6 weeks it will send out a text message to a preset recorded
number to keep the simcard alive. This then eliminates the problems of sim’s being shut down if
they are unused for 3 months.
Please activate and put credit on your simcard then disable the voicemail using the following
codes
Vodaphone: call 1210 Tesco call 2915
T-Mobile: call 222 O2 call 1760
Orange: call 4502 Giff Gaff call 1626
EE - send the text message command VM OFF to 150
Ensure the unit is powered down before inserting the simcard
1: Slide back the sim door and lift it up.
2: Slide the simcard in to the door making sure that the clipped corner of the simcard
lines up with the clipped corner of the sim holder.
3: Close the SIM door.
4: Slide the SIM door to lock the simcard in place.
5: Connect 12 volts DC to the input connector as per figure 1.
*Important DC Only - Please use the power supply supplied with the unit
Once power has been applied (referring to figure 1) the blue network LED light will flash once
every second. Once a signal has been found the green LED will come on and stay on.
To check the strength being received please send the text message
#SS
The unit will reply back with a score from 1 - 30. The unit must have a score of at least 10.
2G OR 3G
The intercom can work on both 2G and 3G networks, you can choose which network the unit
will use via Dipswitch setting 1.
Dipswitch OFF -The unit will search for a 2G Network signal.
Dipswitch ON -The unit will search for a 3G Network signal.
We strongly recommend checking the signal strength on both 2G and 3G and using which has the
highest signal strength score. The signal strength should be at least a score of 10 for reliability.
FOR USE WITH MOBILE NETWORK “THREE” YOU CAN ONLY USE 3G SETTING.
Page 4Programming Intercom Call Button Entry.
On the front panel there is 1 intercom call button. Pressing the relative call button will dial
the primary and divert number relating to the button number. To programme these numbers
you will need to send a text message code which will store the number you want to use in
either the primary or divert position for each call button.
Example -
#PRI=1#07713099514# This stores the mobile phone number as primary number for
call button.
#DIV=1#07713099514# This stores the mobile phone number as divert number for call
button.
To delete a stored number use location followed by star (see table below)
#PRI=1* or #DIV=1*
Note - there is a maximum of 15 digits per phone number stored
If the code is accepted the unit will reply “PRI number stored” or “DIV number stored”
The Intercom can be reset by texting
#RESET
This will delete all primary and divert numbers plus your dial to open (whl) numbers.
NOTE - It will not affect keypad codes.
Page 5Using Intercom Call Button Entry
Once the numbers have been programmed for each button, the call buttons are ready to be
used. Visitors will press a call button on the intercom. This will then call the stored primary
phone number. If the call is not answered it will then try the divert number.
When you answer the call you can talk to the visitor at your gate. When you are happy to let
them in you can press the following keys on your phone keypad for different actions.
# (hash) Key Activates relay 1 to open the pedestrian or door lock
* (star) Key Activates relay 2 to open the gate.
Number 3 Locks on relay 1 to hold the gate open.
Number 0 Increases call time by one minute.
To release the gate from hold state, dial the simcard number or enter your 4 digit code on your
intercom keypad. This will close the gate.
NOTE - You only have 60 seconds to talk to your visitor before the intercom automatically
hangs up the call. To increase the time by a further minute please press the 0 button
on your phone keypad.
Primary & Divert Numbers/Using Voicemail.
The intercom will call the primary number for 30 seconds. If it is not answered it will divert to
the divert number and again ring for 30 seconds. If you are a voicemail user, the voicemail will
answer the call in approximately 15 seconds stopping the call going to the divert number.There
are 2 solutions for this scenario.
Extend the time voicemail will answer to above 30 seconds therefore allowing it to divert
before voicemail answers by using the network specific codes below -
EE - **61*07953222222**XX#
O2 - **61*901*11*XX#
T-Mobile - **61yourownmobilenumberwithnospaces**XX#
Tesco - **61*905*11*XX#
Orange - **61*07953100123**X
Giff Gaff - **61*443*10XX#
Option 1
In all our examples, the Xxs stand for the number of seconds you’d like the phone to ring for
before voicemail kicks in. So replace the Xxs with 30 to enable your phone to ring for half a
minute before the call diverts. Most providers allow you to increase the time in 5 second
intervals. There are limits as to how long you can make the ring last for. Most providers set a
cap at 40 seconds.
Option 2
By turning dipswitch 5 to on, the intercom will switch the call to the divert number after
approx 14 seconds. This will be before voicemail answers.
Page 6Programming Dial to Open Gate Entry (WHL List) (Caller ID)
You can open the gate direct from a mobile phone or landline by calling the simcard number.
Once you call the number the GSM Intercom will reject the call and take the command to
open the gate.
We have a caller ID function controlled by dipswitch 6. If this is set to ON only the numbers
stored in the intercom will be accepted to open the gate. If set to OFF there is NO caller ID
security and any caller can open the gate.
To program a number to the caller ID (whl) list you will need to send a text message code:
#WHL#NUMBER#
To delete the number send a text message code:
#WHL*NUMBER#
Please note the only difference is the star not hash after WHL.
Example #WHL#07713099514# to store you mobile number.
Example #WHL*07713099514# to delete mobile number.
If the code is accepted the unit will reply “WHL number stored”
If the code is accepted the unit will reply “WHL number deleted”
To reset all numbers you can text the code
#RESET
This will delete all primary and divert numbers plus your dial to open (whl) numbers.
NOTE - It will not affect keypad codes.
To open the gate permanently from your phone you can send a text
#OPEN - this will hold relay 1 on.
To close the gate just ring the simcard number this will reset relay 1 and the gate will close.
Relay Pulse Time
The default pulse time for each relay is 2 seconds. You can increase this to 10 seconds for
each relay using dipswitches 3 and 4 - please see dipswitch settings on Page 11
Page 7Program Keypad Entry
You can open the gate via the keypad with a 4 digit keypad access code. (Up to 50 codes
can be stored). The keypad is independent from the rest of the intercom. It does NOT need a
signal or even a simcard to work.
To add your keypad numbers, simply enter keypad admin mode. This is done by switching
dipswitch 2 to on - the red LED will come on to indicate you are in keypad admin mode.
You can now enter a 4 digit code and assign the code to either relay 1 or relay 2. This is done
by either the # or * key after entering the 4 digit code.
Example you type - 1234# To assign relay one (could be full access to property)
5412* To assign relay two (could be pedestrian access to property)
If the code is accepted you will hear 4 beeps. If you make an incorrect entry you will hear a
singular long beep and you will need to start again.
To delete a stored 4 digit code enter the 4 digits followed by the zero key to confirm. If the
code is deleted successfully you will hear 6 beeps. If you make an incorrect entry you will
hear a singular long beep and you will need to try again.
Example you type - 5412 and then 0 to delete the code 5412
NOTE - To delete all keypad codes type 0000 followed by the zero key (0) to confirm.
Once your numbers are stored you will need to turn dipswitch 2 back to the OFF position.
Failing to do this will will mean the keypad is unusable as it will still be in admin mode.
How to operate keypad
Type in the 4 digit code. It will operate the relay you have programmed as above.
Relay Pulse Time
The default pulse time for each relay is 2 seconds. You can increase this to 10 seconds for
each relay via dipswitches 3 and 4. Please see dipswitch settings on Page 11.
Page 8Quick Programming
Intercom entry numbers (call button)
To add Primary #PRI=1#07713099514#
To delete Primary #PRI=1**
To add Divert #DIV=1#07713099514#
To delete Divert #DIV=1**
Full instructions are on page 6
Call ID (Dial to Open) (whl list)
To store white list number #WHL#07713099514#
To delete white list number #WHL*07713099514# Max 30 Numbers.
To hold relay 1 on send a text message command
#OPEN
Reset when finished by dialling the simcard number.
Full instructions are on page 7
Keypad Entry (dipswitch 2 on position)
To ADD a code press your 4 digit code followed by # for relay one or * for relay two.
To delete a stored code press your 4 digit code followed by zero (0) key.
Example - 1234# assigns 1234 to relay 1
Example - 1234* assigns 1234 to relay 2
Example - 1234 then 0 deletes stored 1234 code.
Factory Reset & Signal Strength Check
#RESET - Delete all intercom button numbers and (WHL) white list numbers.
#SS - Signal strength test and text you the score.
Page 9Important Installer Notes
● When installing the aerial antenna cable please ensure that the cable leaves the back box
by the shortest route possible and is not coiled up left inside the intercom.
● Do not stick the aerial to any metal surface. This will degrade the signal strength received.
● Only use 12volts DC power supply that is supplied in the kit.
● Please remove voicemail function from the simcard before installing into the intercom.
Major UK network voicemail removal codes are shown on page 4.
● Prior to commissioning, please ensure tha signal strengh is sufficient by sending the text
#SS. We recommend you need a score of at least 10. Please try both 2G and 3G via
dipswitch 1.
● If you do not receive a good signal strength, please reposition the aerial antenna to
improve the signal strength or alternatively change the network provider as the signal
strength can vary between suppliers.
● There are two volume adjustment controls
VR1 - controls voice
VR2 - controls the dial tone and key tone (please see page 2).
● We do not recommend using three network simcards as the only work on 3G only. This
means sometimes they struggle for a consistent signal as they can not fall back onto 2G
like other networks.
Page 10Dipswitch Settings
1 ON 2G/3G The intercom will search for a 3G signal at
start up.
1 OFF 2G/3G The intercom will search for a 2G signal at
start up.
2 ON KEYPAD ADMIN When switched ON you can store or delete
keypad access numbers. - IF ON RED LED
WILL COME ON.
2 OFF KEYPAD ADMIN When switched OFF the intercom will act as
normal.
3 OFF Relay 1 Time Setting Relay 1 will stay ON for 2 seconds.
3 ON Relay 1 Time Setting Relay 1 will stay on for 10 seconds.
4 OFF Relay 2 Time Setting Relay 2 will stay on for 2 seconds.
4 ON Relay 2 Time Setting Relay 2 will stay on for 10 seconds.
5 ON ANSWER PHONE The intercom will switch to divert after 15
seconds.
5 OFF ANSWER PHONE The intercom will switch to divert after 30
seconds.
6 ON CALLER ID ONLY pre-programmed numbers can ‘dial to
open’.
6 OFF CALLER ID ANY numbers can ‘dial to open’.
For more technical support please browse the FAQ’s on our website
www.gsm-activate.co.uk
Alternatively email our Technical Support team at technical@gsm-activate.co.uk and we will
reply or call you back within 24 hours Monday - Friday.
03/04/19 - GD Page 11Quick Commands Send Text Operation Acknowledgmemt #SS Gives a Signal Strenth Test Score of 1-30 #PRI=1#07713099514# Stores mobile number as primary no PRI number stored #DIV=1#07713099514# Stores mobile number as divert no Number Stored #PRI=1** Deletes primary number PRI number deleted #DIV=1** Deletes divert number DIV number deleted #RESET Deletes all stored numbers #WHL#NUMBER# Adds number to caller ID list WHL number stored #WHL*NUMBER# Deletes number on caller ID list WHL number deleted #OPEN Holds relay 1 ON 1234# Assigns code to relay 1 Hear 4 beeps 4567* Assigns code to relay 2 Hear 4 beeps 12340 Deletes stored code 1234 Hear 6 beeps
You can also read