POWERPOINT PRESENTATION: PHOTOGRAPHY 101 - PREVENTIONWEB
←
→
Page content transcription
If your browser does not render page correctly, please read the page content below

SESSION 2 | ACTIVITY D

PowerPoint Presentation: Photography 101
Introduce Photography 101 presentation to group
members. Discuss expectations:

 HH Let the participants know that there will be a
    short presentation on photography.
 HH The facilitators’ job is to teach some important
    photography concepts.
 HH The group members’ job is to listen carefully,
    participate in group discussion, and ask any
    questions that they may have.

Explain the purpose of Photography 101 for
Picturing Resilience participants:

 HH Learn basic photography skills.
 HH Review the different parts of the camera and
    their functions.
 HH Discuss helpful tips on how to hold a camera and
    take good photos.
 HH Learn skills to help group members communicate
    their thoughts and feelings through photography.

Define Photography:

 HH The art or practice of taking and
    processing photographs.
 HH Uses light to capture an image.
 HH Can be used to capture a moment, tell a story, or
    express a feeling.
 HH Photography has been around for almost 200
    years.

PICTURING RESILIENCE INTERVENTION (PRI) | DCC.MISSOURI.EDU   AP P E NDI X XVI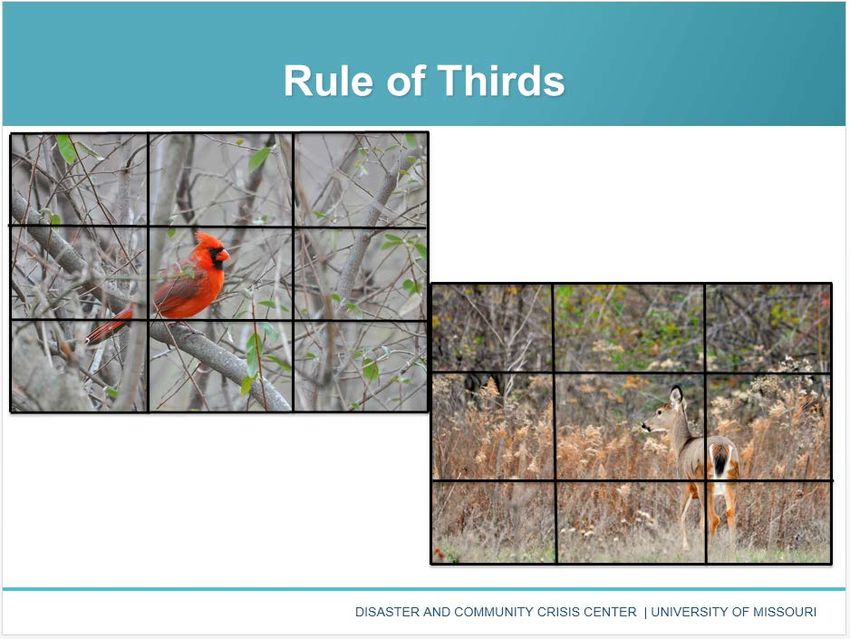
PowerPoint Presentation: Photography 101 (continued)
** This slide features digital cameras; the next slide is for disposable
cameras. Please refer to the slide(s) most appropriate for your group. **

Explain all of the different parts of a digital
camera and their functions.

Include the following:

   HH   Screen (viewfinder)
   HH   Battery and charger
   HH   Memory card
   HH   Flash
   HH   Lens and shutter
In addition, make sure group members know
how to:

   HH   Turn camera on and off
   HH   Charge the battery and check battery life
   HH   Use the flash
   HH   Preview photographs taken (playback button)
   HH   Zoom in and out
   HH   Use special settings such as special lighting, timer or rule of thirds option

Explain all of the different parts of the
disposable camera and their functions.

Include the following:

   HH   Flash
   HH   Lens and Shutter
   HH   Viewfinder
   HH   Power switch
In addition, make sure group members know how
to complete the following basic functions:

   HH Turn camera on and off
   HH Use flash
   HH Know how many pictures are left on the camera

PICTURING RESILIENCE INTERVENTION (PRI) | DCC.MISSOURI.EDU                              AP P ENDI X XVII
PowerPoint Presentation: Photography 101 (continued)
Discuss the proper physical stance for taking
good photographs and keeping your camera safe.
HH Both hands on camera
HH Camera strap around wrist
HH Legs shoulder-width apart
HH Elbows close to your side
HH Look through viewfinder to make sure your subject
is visible and the camera isn’t “leaning” to either
side (see the “not so good” stance here to the left)
HH Make sure nothing (like your finger or the camera
cord) is blocking the view-finder!
Give group members time to look at the two
pictures on the slide and discuss what the photographer is doing right and wrong in each picture.
Once group members understand the basics about
their equipment and how to hold their camera,
they are ready to:
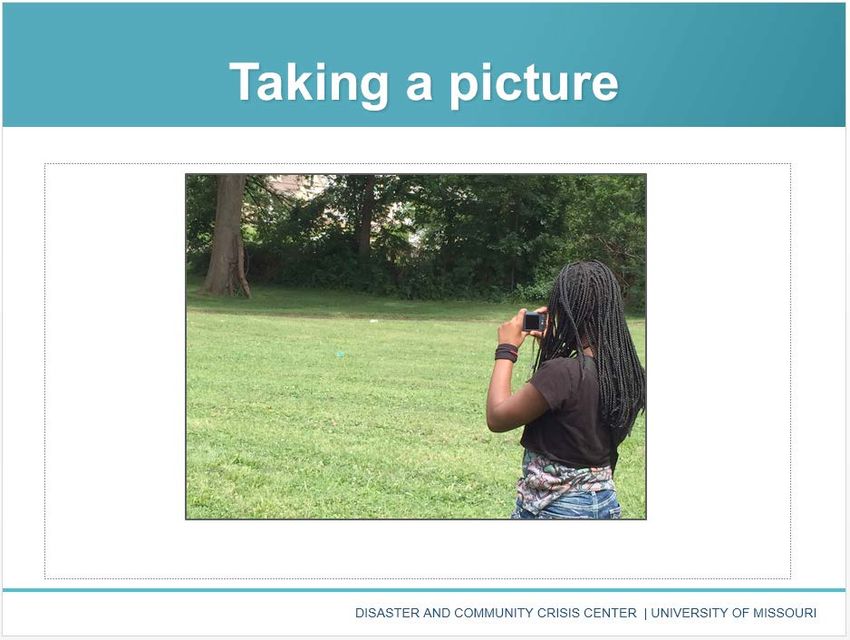
Review the basic steps of taking a photograph:
1. Select a subject (focal point) for photograph.
2. If necessary, ask permission to take photograph.
3. Quickly scan surroundings and make sure you’re in
a safe place to take pictures (i.e. avoid traffic, etc.)
4. Determine if flash is needed.
5. Hold camera steady.
6. Look through viewfinder and line up subject.
Depending
on your camera, consider features like zoom and focus.
7. Press shutter release to take photograph.
8. Consider taking more than one photo of your chosen subject (perhaps from multiple angles) so you’ll have
several options for the exhibit.
PICTURING RESILIENCE INTERVENTION (PRI) | DCC.MISSOURI.EDU AP P E NDI X XVIII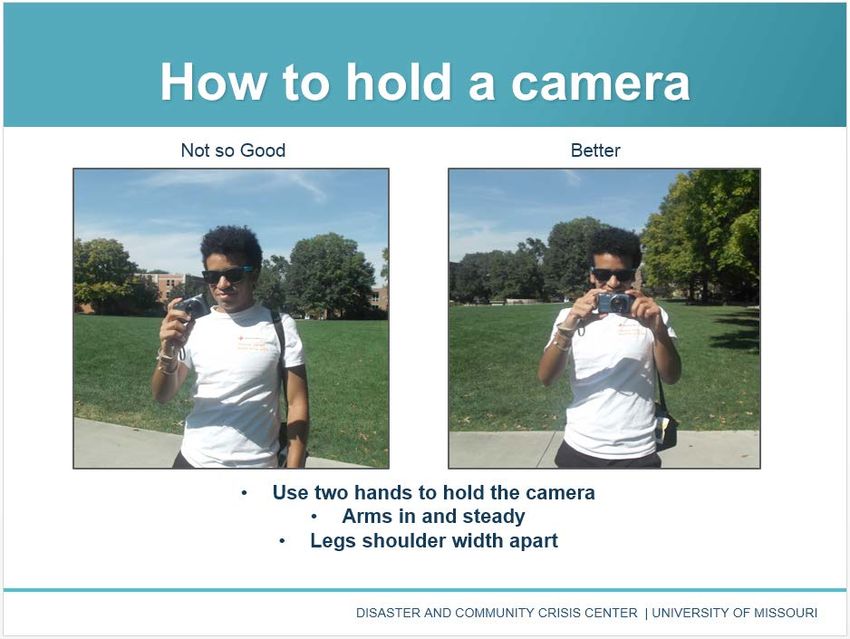
PowerPoint Presentation: Photography 101 (continued)
Discuss the following lighting concepts:
  HH Lighting is one of the most important things to
     consider when taking a picture.
  HH Without proper lighting, pictures will come out
     underexposed (looking too dark or “gloomy”) or
     overexposed (“washed out” or too bright).
  HH If the camera doesn’t have an automatic flash, the
     photographer must determine if flash is needed.
  HH Try to take pictures with the sun (or any other
     bright light) behind you. If a bright light is
     shining behind your subject, your subject may
     appear too dark.
  HH Lighting can also be an important feature in
     setting the mood for your photos.

Introduce framing concepts to group participants:
  HH Framing is a special technique that uses objects
     in the environment to bring attention to your
     subject, as shown in these examples.
  HH Framing is not necessary- but can be a fun way to
     add visual interest to photographs.
  HH Use caution- if there is too much framing or if it is
     not centered correctly, it can be distracting to your
     viewers as they may notice the frame more than
     your subject.
Ask group members if they can point to some
naturally occurring frames within the room.

Explain the concept of the Rule of Thirds to
group members.
  HH Think of a photo as divided by a grid of two
     horizontal and two vertical lines, as shown in the
     pictures here. You’ll see that each picture can be
     divided into “thirds,” both vertically (top, middle
     and bottom) and horizontally (left, middle, and
     right). Rather than lining up your subject in the
     middle “thirds” of the frame, try to place your
     subject along one or more of these grid-lines.
  HH This changes the way the subject is viewed and
     where attention is focused.
  HH The rule of thirds is optional, but it can add some
     variation and visual interest in your photography.

PICTURING RESILIENCE INTERVENTION (PRI) | DCC.MISSOURI.EDU   AP P ENDI X XIX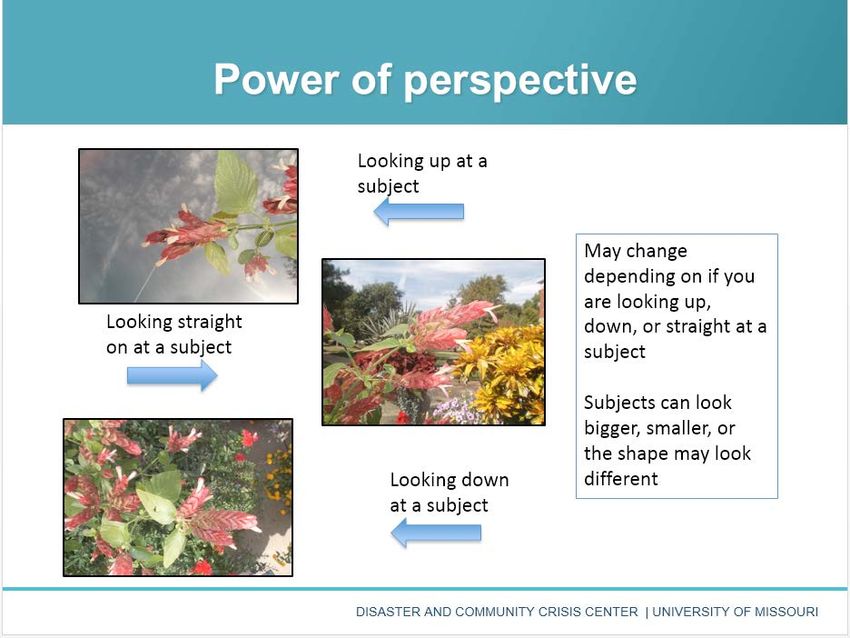
PowerPoint Presentation: Photography 101 (continued)
Ask group members to think about the power
of perspective. How can the content, mood,
and message change when a photo is taken from
different angles?

Discuss the following:

  HH Perspective refers to how the camera is being
     pointed at the subject.
  HH Taking a photograph from different angles,
     distances, or directions with your camera can
     change the photograph completely, by altering
     the subject’s apparent size, shape, or lighting,
     or changing what you want to highlight about
     the subject.
  HH You can experiment with taking photographs from different perspectives until you find a picture that you are
     happy with.

Introduce the concept of naturally occurring
lines in photography and how these can be used to
enhance the visual interest of a photograph.

  HH Ask group members to name some naturally
     occurring lines. Some examples could include:
     UU the horizon
     UU mountains
     UU telephone poles
     UU fences
     UU street lines
  HH Lines, if used appropriately, can help to lead the
     eye of the viewer to the subject of your picture or
     help frame your subject.
  HH Use caution: if there are too many lines, they can be distracting and lead the viewer’s attention away from
     your subject.

PICTURING RESILIENCE INTERVENTION (PRI) | DCC.MISSOURI.EDU                                          AP P E NDI X XX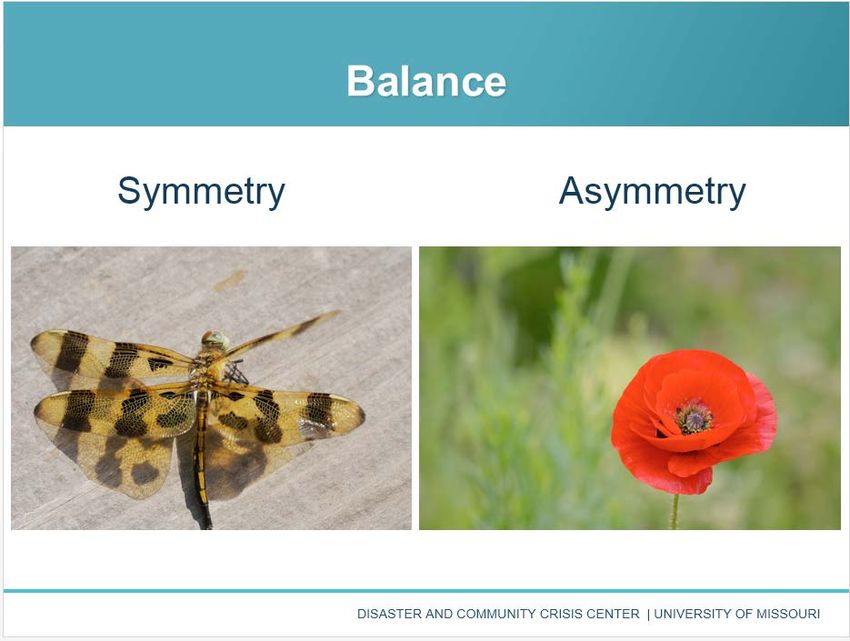
PowerPoint Presentation: Photography 101 (continued)
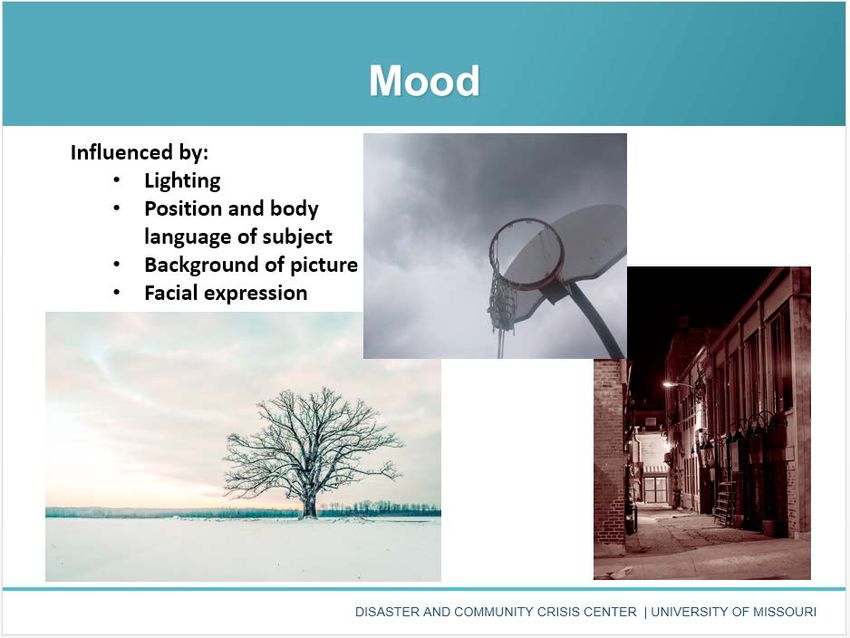
Define mood as it relates to photography.
HH The mood of the picture is the emotion or feeling the
picture portrays.
HH The mood of the picture can be:
UU happy
UU sad
UU lonely
UU fearful
UU excited
HH Mood can be influenced by a number of different
factors including:
UU lighting
UU position of subject
UU weather
UU background
UU facial expressions of a subject
Consider the following questions for discussion points:
HH What are the moods or emotions that are displayed in these pictures?
HH What is happening in these pictures to create a specific mood?
HH What are some ways you can portray different moods in your photography?
Explain the concept of balance to group members.
HH Symmetry and asymmetry are important concepts
that relate to balance in photograph.
HH Symmetry occurs when you can cut the picture
in half and both sides would be the same (the
dragonfly in the picture is symmetrical)
HH Asymmetry occurs when this is not true and often
both sides of the cut would be very different.
HH In the picture of the red flower, the subject is
asymmetrically aligned. The balance in the picture
is created by the negative space to the left of
the flower.
PICTURING RESILIENCE INTERVENTION (PRI) | DCC.MISSOURI.EDU AP P ENDI X XXI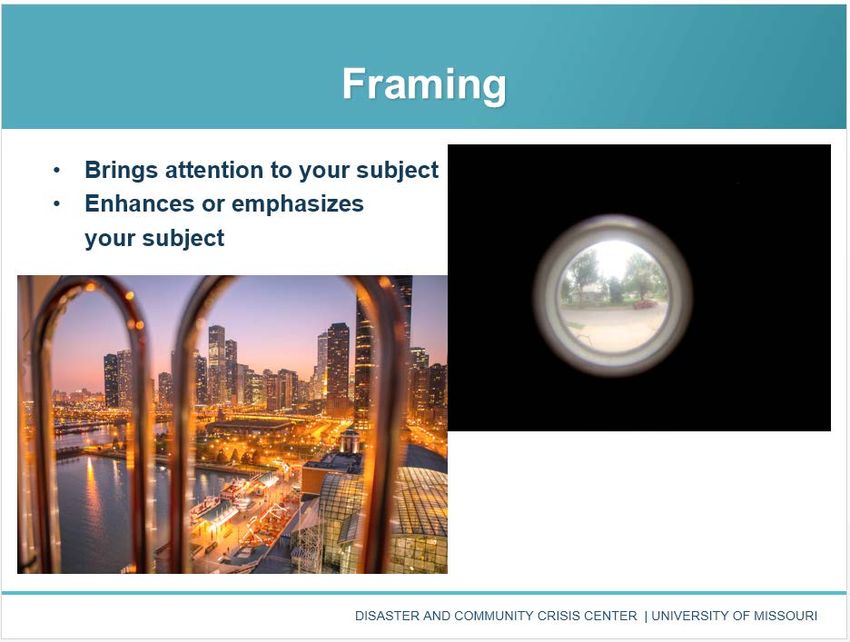
PowerPoint Presentation: Photography 101 (continued)
Review the basic photography concepts.

Ask group members the following:

  HH   How is the lighting?
  HH   Is there framing?
  HH   What is the subject?
  HH   Does this photograph use the rule of thirds?
  HH   What perspective is used?
  HH   Are there any lines?
  HH   What is the mood?
  HH   Is it symmetrical or asymmetrical?”
  HH   How else could you take the photo?

Remind group members about important topic
of safety, ethics and consent discussed during
Session 1.

Address the following with group members:

  HH The more thoughtful you are before taking a
     picture, the happier you’ll be with the photo and
     the message or story it tells. Take your time, and
     think it through!
  HH Don’t be afraid to try different things with your
     camera. Be creative!
  HH No picture is worth getting hurt or making others
     upset, so remember SAFETY, ETHICS, and
     CONSENT for every photo you take.
*All Photography 101 photos provided courtesy of Creative Commons and licensed under CC BY 2.0. See Photo Attributions (p. LIII)
for individual author and source attributions.

PICTURING RESILIENCE INTERVENTION (PRI) | DCC.MISSOURI.EDU                                                              AP P ENDI X XXII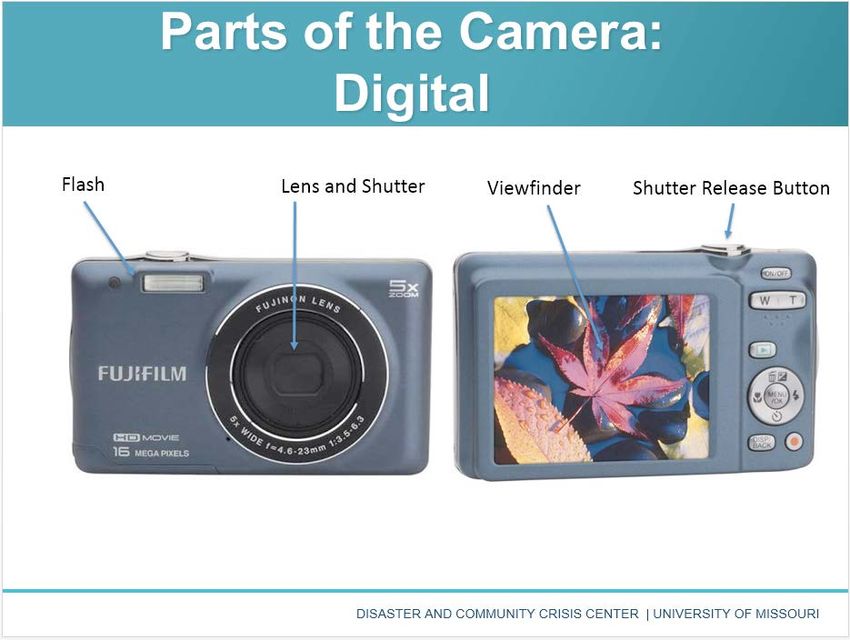

You can also read