PS236 Getac Camera Operation Guide
←
→
Page content transcription
If your browser does not render page correctly, please read the page content below
Operation Guide
              PS236 Getac Camera

                                                      PS236
                                                   Getac Camera
                                                          Operation Guide

                                   Copyright and Copies. The Software (including any copy thereof) is owned by Getac
                                   or its suppliers and is protected by copyright and patent laws. The Software copy is
                                   licensed to you the client, not sold to you, and you (the client) are not an owner of
                                   any copy thereof.   You may make one copy of the software for backup or archival
                                   purposes.   You may not otherwise copy the software, except as authorized by
                                   applicable law, nor the written materials accompanying the Software. Getac hereby
                                   reserves all rights not explicitly granted in this license agreement.

                                   Copyright © 2010 Getac Technology Corporation and/or any of its affiliates.
                                   All Rights Reserved.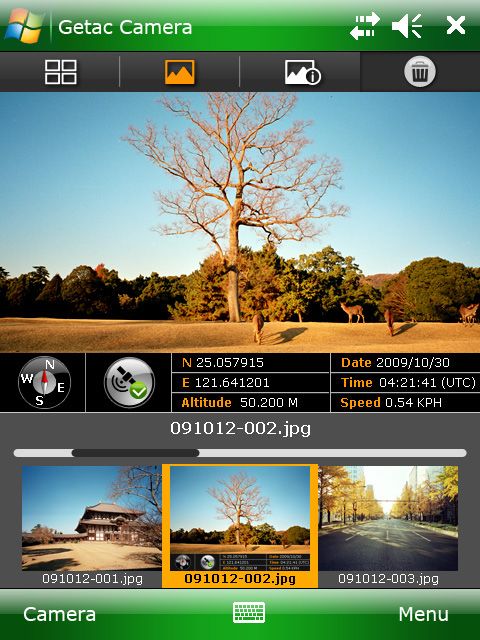
Table of Contents
Operation Guide
              PS236 Getac Camera

                                   Chapter 1   Introduction ..........................................   01

                                   Chapter 2   Installing Getac Camera ..........................        01

                                   Chapter 3   Starting Getac Camera ...........................         02

                                   Chapter 4   Taking Pictures ......................................    04

                                   Chapter 5   Viewing Pictures ....................................     06

                                   Chapter 6   Managing Images ..................................        09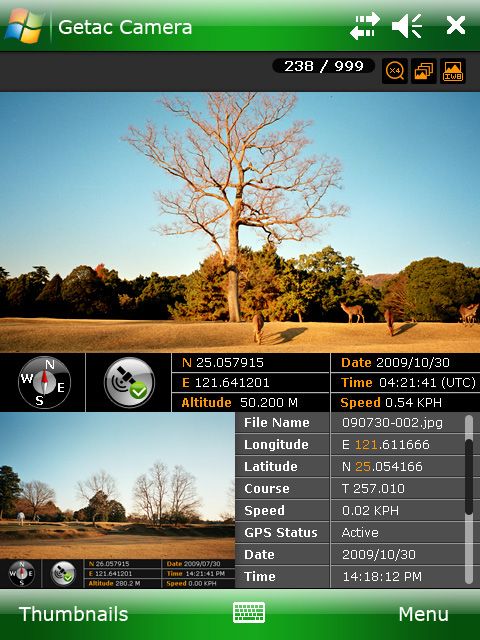
01                Introduction
                                   Getac Camera is a geo-tagging camera program, which allows you to stamp geographical
Operation Guide
              PS236 Getac Camera

                                   information on photos as watermarks and embed such information into JPEG files as EXIF
                                   2.2 metadata.

                                   02                Installing Getac Camera
                                   NOTE:
                                   ● For   Getac   Camera     to   run,   the   firmware   version   of   your   PS236    must    be
                                     G1.50.027.WWE/G1.51.027.WWE or later. You can ask your sales representative for
                                     firmware updates. (To know the firmware version, tap                  Settings         System
                                           System Information         Software Version          ROM Image Version or see the
                                     version number shown during the startup period.)

                                   ● If you have problems starting the program, contact your sales representative for program
                                     activation.

                                   The installation source file is available to you either by downloading or through a storage media.
                                   To install Getac Camera to your PS236:

                                   1. Decompress the installation source file. You will get two files for two different
                                     installation methods.

                                   2. Use one of the methods to install the program.
                                     Method 1: Connect your PS236 to your computer. Make sure that ActiveSync or
                                     Mobile Device Center is working on your computer. Then, execute the file
                                     PS236_Camera_1.0.X.X.exe (where X is a number). Your PS236 will respond and ask
                                     for your action. Follow the onscreen instructions to complete the installation.

                                     Method 2: Copy the file PS236_Camera_1.0.X.X.cab (where X is a number) to your
                                     PS236. On your PS236, browse to the file and double tap it. Follow the onscreen
                                     instructions to complete the installation.

                                   3. After the installation, you will see the Getac Camera in the programs list.

                                                                                                                                        - 01 -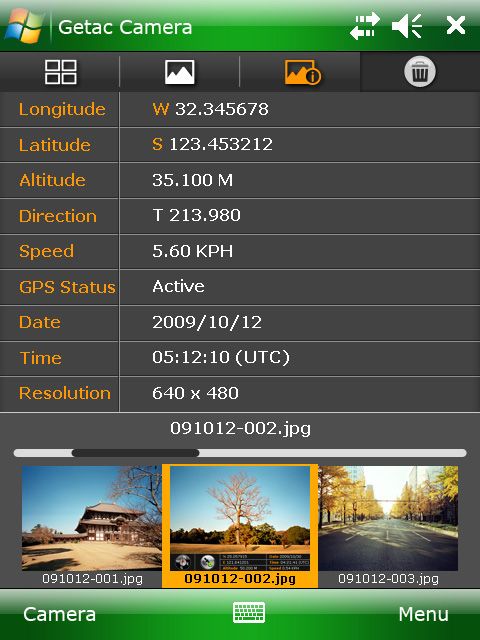
03               Starting Getac Camera
                                   To start the program, press the Camera key            on your PS236 or tap          Getac
Operation Guide
              PS236 Getac Camera

                                   Camera.

                                   The GPS positioning will be automatically activated. When the GPS positioning is completed,
                                   you will see the geographical information in the watermark area on the screen.

                                                                                    Status Bar

                                                                                    Live Image

                                                                                    Watermark

                                                                                    Instant View

                                       Screen                                       Descriptions
                                      Elements

                                     Status Bar      Displays the current status.

                                                                      Number of pictures already taken / Total number of
                                                                      pictures allowed.
                                                                      (Maximum number shown is 999 even if the storage
                                                                      capacity allows for more.)

                                                                      Current zooming level.

                                                                      Current shooting mode: Normal/Burst/Timer

                                                                      Current white balance: Automatic/Sunshine/Cloudy/
                                                                      Fluorescence/Incandescence

                                     Live Image      Displays the live image.

                                                                                                                                 - 02 -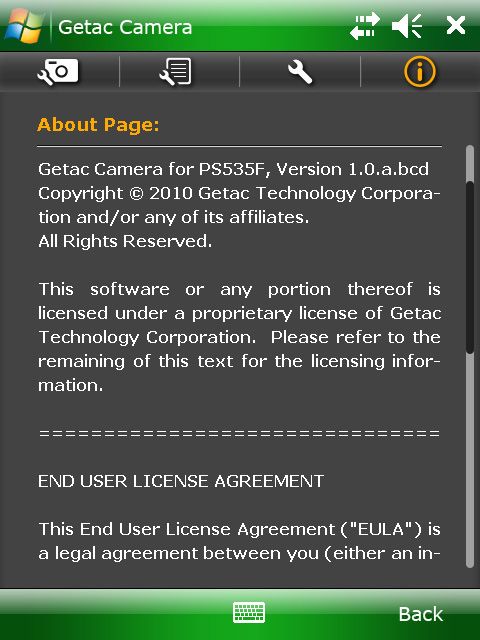
Screen                                     Descriptions
                                      Elements

                                     Watermark       Displays the GPS information such as direction, GPS status, longitude,
                                                     latitude, altitude, date, time, and speed.
Operation Guide
              PS236 Getac Camera

                                                     GPS Signals             No or poor GPS signals.

                                                                             GPS positioning completed.

                                                     Compass                 Letters in red: GPS information not available or
                                                                             compass not calibrated.

                                                                             Letters in white: GPS or compass information
                                                                             available.

                                     Live Image      Displays the picture you have just taken or selected. The left part
                                                     contains the preview image and the right part contains the properties of
                                                     the image.

                                   To exit the program, tap        at any time.

                                   NOTE:
                                   ● When Getac Camera is installed, the Camera key           on your PS236 starts the Getac
                                     Camera program instead of the original Camera program.

                                   ● The scroll bar on any Getac Camera screen is an indicator only; it is not intended for
                                     tapping and dragging operations.

                                   ● The instructions and screens in this document are based on Windows Mobile 6.1.

                                   ● If the message “Not enough memory available for attempted operation. Please check
                                     system memory.” appears, try one of the below to free the memory of your device.
                                     - Stop programs you are not currently using.
                                     - Set the resolution of the images to a lower one.

                                                                                                                                - 03 -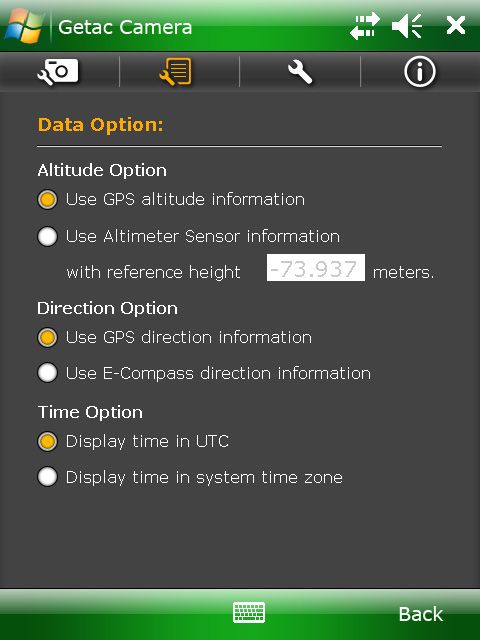
04               Taking Pictures
                                   1. Start the Getac Camera program. You will be in Camera Mode.
Operation Guide
              PS236 Getac Camera

                                   2. For camera controls such as shooting mode and zooming, tap Menu. (See “Camera Mode
                                     Settings” later for detailed information.)

                                     You can also directly zoom in or out by pressing     or     (with Fn lock on) key on your
                                     PS236 keypad. (Zooming is possible only if the resolution setting is 640x480.)

                                   3. Aim the camera lens at the subject. Press the            key halfway down for automatic
                                     focusing. A white frame appears. Wait until the color of the frame turns green indicating
                                     the subject is in focus.

                                   4. Press the      key fully or tap and hold the Live Image area to take the picture.

                                   5. The message Saving... appears on the screen for a few seconds, meaning the picture is
                                     saved to the predefined storage location.
                                   NOTE: Always wait for the saving procedure to complete before giving the next command.
                                   An untimely command can be lost, especially in Burst mode.

                                   6. The result shows in the Instant Image area below. You can tap the area twice to switch to
                                     Brower Mode for the full view. (See “Browser Mode” later for more information.)

                                                                                                                                  - 04 -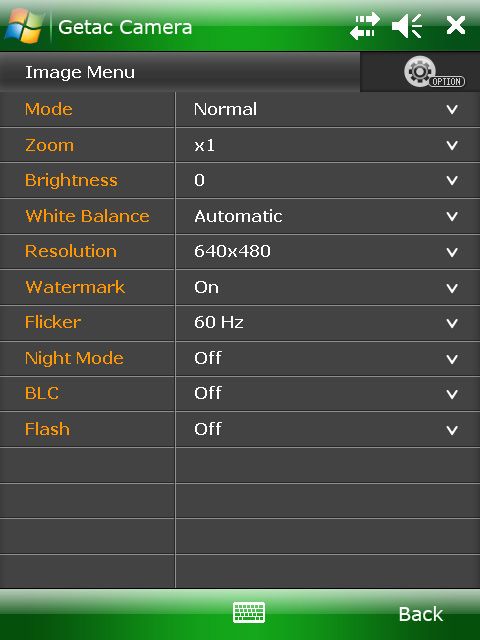
Camera Mode Settings
                                   To change camera settings, tap Menu while in
                                   Camera Mode.
Operation Guide
              PS236 Getac Camera

                                   Tap the down arrow of the item you want to
                                   adjust. In the pull-down menu, tap your choice.
                                   When finished, tap Back and then Yes.

                                   All changes (except for Mode) remain effective
                                   until you change them again.

                                                                     The screen shows
                                                                   the default settings.

                                    Menu Items                                      Descriptions

                                        Mode        Three choices for the shooting mode:
                                                    Normal       This is the default setting whenever the program is started.
                                                    Burst        Continuous shooting of 3 pictures.
                                                    Timer        5 second countdown before shooting.
                                       Zoom         Available choices depend on the current resolution setting.
                                                    x1      Available for all.
                                                    x2      Available under 640x480 resolution setting.

                                     Brightness     Seven brightness levels.
                                   White Balance    This Five choices (Automatic, Sunshine, Cloudy, Fluorescence, and
                                                    Incandescence) from which you can select one that matches the current
                                                    light source.the default setting whenever the program is started.

                                     Resolution     Four choices (640x480, 1280x960, 1600x1200, and 2048x1536).
                                                    If the current zoom level is not valid for the resolution you have changed
                                                    to, the zoom level will be automatically adjusted. (See the descriptions of
                                                    the Zoom item for the relationship between resolutions and zoom levels.)

                                     Watermark      On or Off.
                                                    Set to Off if you do not want the watermark to show in the picture. (This
                                                    does not affect the embedded EXIF 2.2 metadata.)

                                       Flicker      Set to the frequency of the local electrical system (60Hz or 50Hz) for
                                                    flicker free shooting under electric light.

                                     Night Mode     On or Off.
                                                    Set to On for shooting in low light situations.
                                        BLC         On or Off.
                                                    Set to On for the “backlight compensation” feature. This corrects the
                                                    exposure of subjects that are in front of a bright light source, therefore
                                                    resulting in clearer images.
                                        Flash       On or Off.
                                                    Set to On to use the LED flashlight when taking pictures.
                                                                                                                                  - 05 -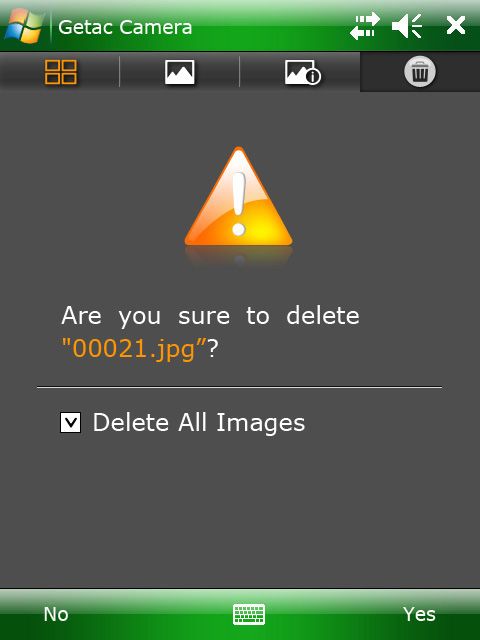
05                  Viewing Pictures
                                   There are different ways to view pictures and data. On some occasions, you can drag
Operation Guide
              PS236 Getac Camera

                                   up/down or left/right on the screen to access the pictures and data more easily.

                                   Instant View
                                   While in Camera Mode, the picture taken is immediately shown in the Instant View area with
                                   properties information.

                                   In this view, you can:
                                   ● Tap the image twice to switch to Standard View.
                                   ● Tap the properties list twice to switch to Properties View.
                                   ● Go to the previous or next picture by any of the three methods:
                                     — Drag across the image: from left to right for the previous picture and vice versa.
                                     — Press the       or    key on your PS236 keypad (with Fn lock on) for the previous or
                                       next picture.
                                     — Tap the image and, when          and      icons appear on both sides, tap the left or
                                       right arrow to go to the previous or next picture.

                                   ● View all properties of the current picture by drag down or up in the properties list on
                                     the screen.

                                   Browser Mode
                                   While in Camera Mode, tapping Thumbnail brings you to Browser Mode. To switch back to
                                   Camera Mode, tap Camera.

                                   Browser Mode has three views (Thumbnail, Standard, and Properties) as described below.

                                                                                                                                - 06 -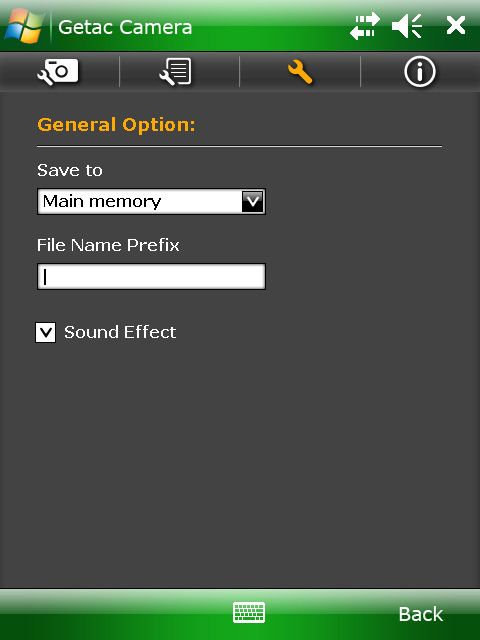
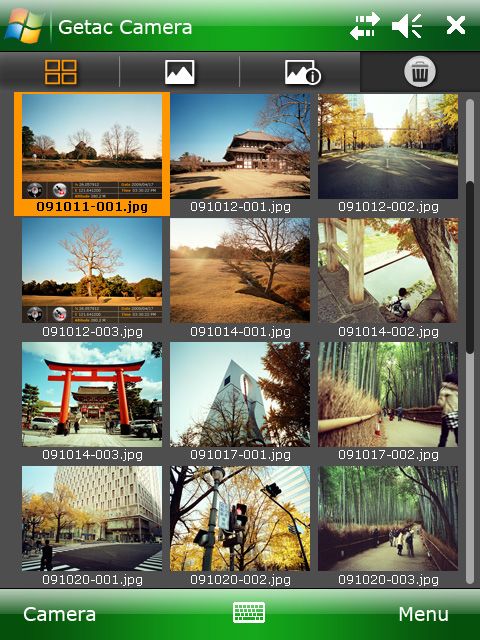
Thumbnail View
                                   Thumbnail is the default view of Brower Mode, showing 12 preview images at one time.
Operation Guide
              PS236 Getac Camera

                                   In this view, you can:
                                   ● Scroll down or up by dragging down or up
                                     on the screen.
                                   ● Go     up/down/left/right             one   picture   by
                                     pressing          /        /          /     key on your
                                     PS236 keypad (with Fn lock on).
                                   ● Switch to Standard View of the selected
                                     picture by any of the two methods:
                                     — Tap the picture twice.
                                     — Tap         .
                                   ● Switch to Properties View of the selected
                                     picture by tapping                .
                                   ● Delete the selected picture by tapping
                                     and then Yes.

                                   Standard View
                                   In Camera Mode, tapping the image twice in the Instant View area brings you to Standard
                                   View. If you are currently in Thumbnail or Properties View, tap     to switch to this view.
                                   The selected picture is shown in the upper part of the screen. The lower part of the screen
                                   contains the strip of pictures; three small pictures (previous, current, and next) are shown
                                   at a time.
                                   In this view, you can:
                                   ● Go to the previous or next picture by any of the
                                     three methods:
                                     — Tap the left or right picture in the Strip area.
                                     — Press the           or       key on your PS236 keypad
                                       (with Fn lock on) for the previous or next picture.
                                     — Tap the left or right edge of the image and,
                                          when    and           icons appear on both sides,
                                          tap the left or right arrow to scroll to the
                                          previous or next picture.
                                   ● Switch to Thumbnail View by tapping                    .
                                   ● Switch to Properties View of the selected
                                     picture by tapping               .
                                   ● Delete the current picture by tapping
                                     and then Yes.
                                                                                                                                  - 07 -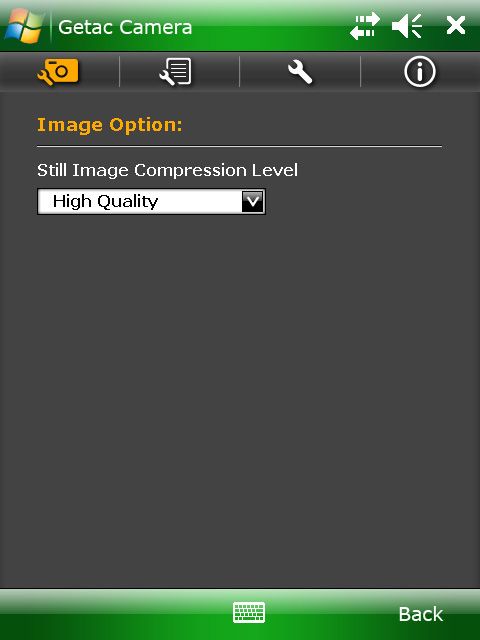
Properties View
                                   In Camera Mode, tapping the properties list twice in the Instant View area brings you to
                                   Properties View. If you are currently in Thumbnail or Standard View, tap          to switch to
Operation Guide
              PS236 Getac Camera

                                   this view.
                                   The information of the selected picture is shown in the upper part of the screen. The lower
                                   part of the screen contains the strip of pictures; three small pictures (previous, current, and
                                   next) are shown at a time.
                                   In this view, you can:
                                   ● View all properties of the current picture by
                                     drag down or up within the properties list
                                     on the screen.
                                   ● Go to the properties of the previous or next
                                     picture by any of the three methods:
                                     — Tap the left or right picture in the Strip area.
                                     — Press the       or     key on your PS236
                                        keypad (with Fn lock on) for the previous
                                       or next picture.
                                     — Tap the left or right edge of the properties
                                        list, and, when       and      icons appear
                                        on both sides, tap the left or right arrow
                                        to scroll to the previous or next picture.
                                   ● Switch to Thumbnail View by tapping              .
                                   ● Switch to Standard View of the selected
                                     picture by tapping         .
                                   ● Delete the current picture by tapping                and then Yes.

                                   Sorting Order
                                   By default, the pictures are sorted by name in
                                   Browser Mode. You can change the sorting
                                   order to size or date.

                                   To change the sorting order, tap Menu while
                                   in any of the three views. Tap the down arrow
                                   and, in the pull-down menu, tap your choice.
                                   Tap Back and then Yes when finished.

                                                                                                                                     - 08 -
06 Managing Images
Deleting All Images
Operation Guide
PS236 Getac Camera
If you want, you can delete all images by tapping
in any of the three views, check the “Delete
All Images” item, and tap Yes.
CAUTION: Deleted images cannot be restored.
Options
To select options for
the camera, tap Menu
and then tap .
There are four pages
as described below.
The screen shows
the default settings.
- 09 -Page Setting Items Descriptions
Still Image Three choices: High Quality, Normal Quality, and Low
Compression Quality. A higher setting means a larger file size.
Image Option Level
Operation Guide
PS236 Getac Camera
Altitude Option Displays altitude according to one of the two choices:
GPS The altitude is based on GPS altitude
Data Option
information.
Altimeter The altitude is based on the altimeter
Sensor sensor built into your device. You can
use the value calculated by your device
or manually input a value (between
-4000 and 4000).
Direction Option Displays direction according to one of the two choices:
GPS The direction is based on GPS direction
information.
E-Compass The direction is based on the electronic
compass built into your device.
NOTE: Make sure to calibrate the
compass for accurate information.
(Refer to the documentation of the
E-Compass software to know how to
calibrate.)
Time Option Displays the time throughout the program according
to one of the two choices:
UTC The time is based on Coordinated
Universal Time.
System time The time zone setting of the device is
zone taken into consideration. If the current
location is in daylight saving time, the
time will be adjusted accordingly.
Save to Sets the storage location of the pictures to one of the
two choices:
General Option
Main The picture will be saved to the device’s
Memory My Documents / My Pictures folder.
Storage Card This choice appears only when a storage
card is inserted.
File Name By default, the filename is xxxxx (where xxxxx is a
Prefix sequential number).
You can add a prefix to the filenames (default is no
prefix). Type the characters in the entry field.
Maximum number of characters allowed is 3.
Sound Effect Sets if the program will play sounds for screen tapping
and photo shooting. (This setting is independent of the
“Sound and Notifications” settings of Windows Mobile.)
- 10 -Page Setting Items Descriptions
Provides copyright and licensing information of the
program.
About
Operation Guide
PS236 Getac Camera
Tap Back and then Yes when finished. The changes remain effective until you change them again.
- 11 -You can also read