SWAROVSKI OPTIK EL RANGE - TRAINING
←
→
Page content transcription
If your browser does not render page correctly, please read the page content below
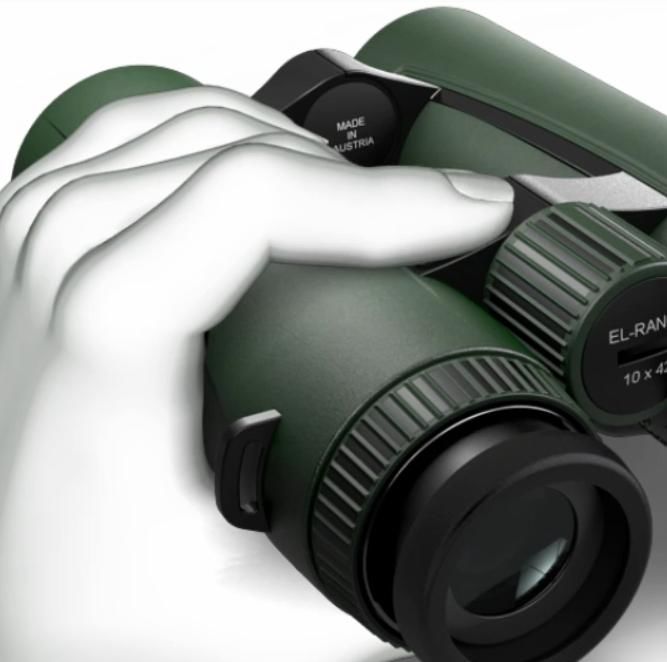
SWAROVSKI OPTIK EL RANGE
TRAINING

Models: 8x42 and 10x42
Range: 30 meters to 1375 meters / 33 yards to 1500 yards
Weight: 8x42 – 32.1 oz; 10x42 – 31.6 oz

Based on the EL (non-SWAROVISION) platform with improved optical properties over the previous EL
models. Therefore, the EL Range does not have HD objective lenses, nor does it have Field Flattener
Lens Technology found in EL SWAROVISION series.

Two Key Sales Features - Light Transmission and SWARO-AIM technology

Light Transmission:
91% in each barrel! This is a considerable improvement over the competition and a major selling
feature! It was a great challenge and tremendous achievement for SWAROVSKI OPTIK engineers to be
able to obtain 91% light transmission with the aiming dot and distance readings in the optical system.

Continuous development and adjustment of SWARODUR, SWAROTOP, and SWAROBRIGHT coatings
to specific glass qualities have contributed to this unprecedented brightness level in a rangefinding
binocular.

To reduce glare in “low sun on horizon”, Dawn-Dusk conditions, strategically placed ribbing/grooves along
with special interior housing finishes were utilized.

By comparison:
A Zeiss Victory RF (8/10x45) yields light transmissions of 85% on the left barrel and 74% on the right
barrel.
A Leica Geovid (8/10x42) yields light transmissions of 77% on the left barrel and 79% on the right barrel.

SWARO-AIM
The EL Range features an Inclinometer. The SWARO-AIM inclinometer determines the angle to a
target and will give a compensated (shorter) ballistic trajectory compensated distance. Example: the
actual distance to a target could be 405 yards at a 30° angle, up or down. If the angle to the target was at
this relatively steep 30° angle, up or down, at 405 yards, the “ballistic trajectory compensated” distance
would be about 350 yards. This means that because the 405 yard shot is at “30°”, the shooter should use
this 350 yard compensated distance (for his BT, BRH, etc.) because the effect of gravity on the bullet is
really over the shorter 350 yard distance. The EL Range can determine this trajectory compensated
distance by simply pushing the measuring button.

Simple to use:
To range any game animal or object, push the measuring button so that the aiming dot will appear in the
right barrel. Place the aiming dot on the game/object you wish to range and simply release the button for
the distance in yards/meters that will appear in the left barrel. The measuring button is located in on the
ocular end bridge on the left side. You will normally be using your left index finger on this button.

Displays:
The aiming dot (mark) is located in the Right Barrel. #1
The distance display(s) are located in the Left Barrel. #2-#6

    1.   Aiming Mark
    2.   Display of the measured range in yards or meters (4 digit)
    3.   Measured angle in degrees or corrected shooting distance
    4.   Angle symbol
    5.   Display in yards (y) or meters (m)
    6.   Degree symbol (º)

In order to see both Aiming Dot and Distance Readings together, it is important that you set your
eyecup height and interpupillary distance first. As you are doing this, hit the measurement button
to make sure you can see the Aiming Dot and Distance readings simultaneously.

The (small diameter) aiming dot and digital readouts are in a RED color LCD Display and are easily
visible under all light conditions.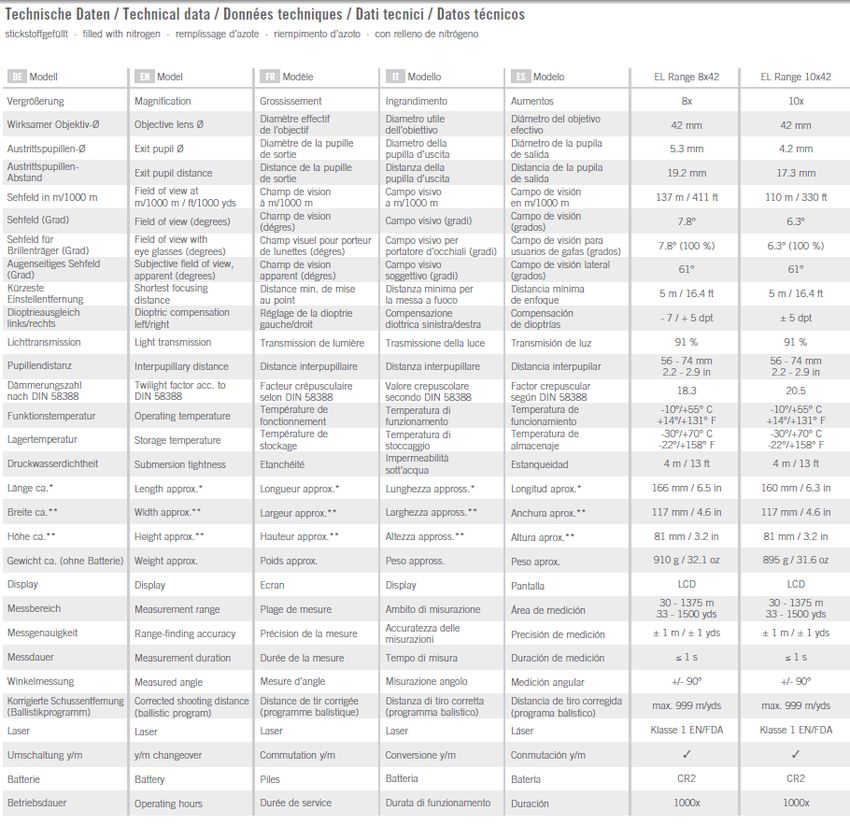
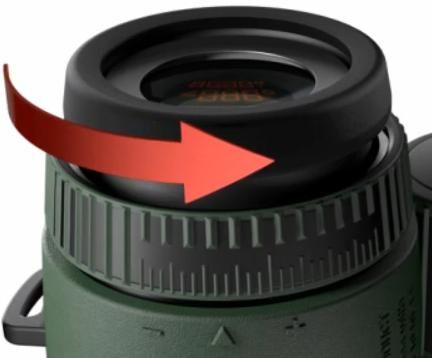
Field of View:
Wide Field of Views were difficult to obtain for a RF binocular:

EL Range 8x42 – 411 ft @ 1000 yds
EL Range 10x42 – 330 ft @ 1000 yds
Eye Cups can be set in 4 positions. Offers full FOV for eyeglass wearers.

Leica Geovid 8x42 FOV – 368 ft @ 1000 yds
Leica Geovid 10x42 FOV – 331 ft @ 1000 yds

Zeiss Victory RF 8x45 FOV – 375 ft @ 1000 yds
Zeiss Victory RF 10x45 FOV – 330 ft @ 1000 yds

Eye Relief:
The eye relief on the new EL Range is greater than on the previous EL’s
EL Range 8x42 – 19.2 mm (old EL 8.5x42 was 18 mm)
EL Range 10x42 – 17.3 mm (old EL 10x42 was 15 mm)

Leica Geovid 10x42 – 15.6 mm
Leica Geovid 8x42 – 18 mm
Zeiss Victory RF 10x45 – 15.5 mm
Zeiss Victory RF 8x45 – 16 mm

Focusing:
Because of the design of the EL Range, individual eye
focusing is different than other SWAROVSKI OPTIK
binocular designs.

The EL Range has a central focus wheel, as well as 2
separate dioptric adjustment rings around the ocular end of
each barrel.

To make Dioptric Focusing adjustments you must first pull
up on the diopter “ring”, towards the eyecup, to release it
from its locked position. After the correct focus is made,
you must push the “ring” back down to lock your focus into
place.

Focusing with the Diopters
To obtain the best focus, first place the objective covers on the binoculars, or simply place the binoculars
on a table to get a dark background. Make sure that you have the eyecups set where you like them
and the correct interpupillary distance is set for your eyes so that you can see both targeting dot
in the right barrel and the display in the left barrel are visible at the same time.

Pull up on both diopter rings to unlock them. Push the measurement button to bring up the aiming circle in
the right barrel. Turn right diopter ring until the aiming dot is clear. Now hit the measurement button twice
to bring up a display in the left barrel. Turn the left diopter ring until the display becomes clear.

Once the readouts on both sides are focused, push the diopter rings back down to lock them in place.
You can now return to the central focus wheel for normal distance focusing. (From this point, slight
adjustment of the diopters may be necessary to get a perfect focus of distant objects while keeping the
aiming dot and distance readouts in focus).
From a sales perspective, because of the slightly more complicated nature of focusing the EL
Range, it may be best to simply leave the Diopter Adjustment Rings at their 0 or neutral position
for initial demonstration purposes.

Electronics:
The electronics of the EL range are housed in the bottom of the binocular and are called “Fins”. One of
the better ways to get maximum stability of the EL Range in your hands is to position the fins in the
palm/ball of your hands.

The laser is sent out in very rapid, invisible pulses via a “Single Channel Technology”. This technology is
designed to yield very accurate measurements.

This same technology renders some complications with very short range measurements.              Thus the
minimum range for using the EL range will be 33 yds / 30 m.

There is a scan mode for moving game that can be utilized by pressing and holding the measuring button.
The maximum distance in scan mode is 999 m / yds.

Laser Distance Capability
SWAROVSKI OPTIK EL Range 8/10x42: 33 yds – 1500 yds / 30 m – 1375 m
For comparison purposes:
Leica Geovid HD 8/10x42: 11 yds – 1420 yds / 10 m – 1300 m
Zeiss Victory RF 8/10x45: 10 yds – 1300 yds / 10 m – 1200 m

For demonstration/sales purposes, please note, the laser of the EL Range can not go through
windows. The laser will simply be deflected back. (Many of you may have gotten used to the fact
that the LG 8x30’s laser can be used through windows). If your dealer has a small store, it would
be best to demonstrate the EL Range outside, or through an open window or door. Please make
your dealers/consumers aware of this fact.
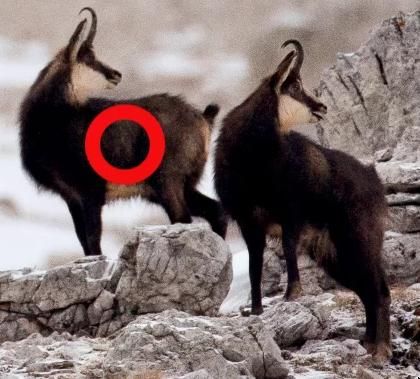
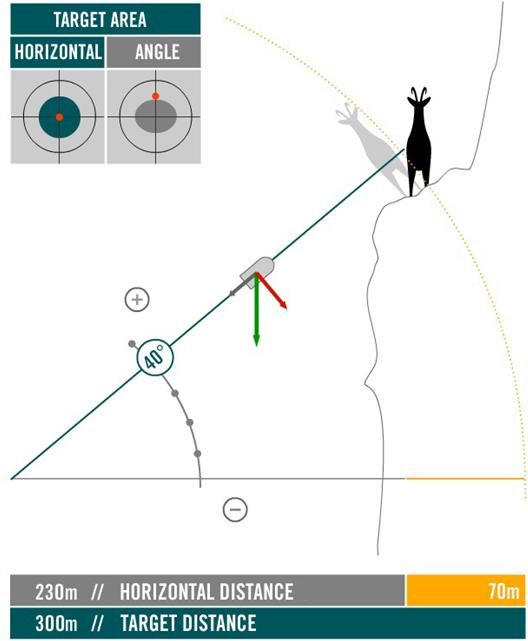
Beam Divergence:
The beam divergence (or beam size/width) of the EL Range is a roughly rectangular shaped beam that
gets increasingly larger, in a linear manner, the further away the beam gets. The size of the beam is 1.5
mrad high X 0.5 mrad wide. A MRAD is usually described as 1 yard @ 1000 yards. In simpler terms - 54
inches x 18 inches @ 1000 yards; or @ 500 yards – 27 in. x 9 in.; or @ 100 yards – 5.4 in. x 3.6 in.

Essentially, what is inside the aiming circle is what distance the laser will measure.

By comparison:
EL Range – 1.5 mrad x 0.5 mrad
The Leica Geovid’s beam divergence is 2.5 mrad x 0.5 mrad
The Zeiss Victory RF’s beam divergence is 1.6 mrad x 0.5 mrad

SWARO-AIM Angle Measurement / Corrects for “trajectory” distance to target due to angled shot:
The EL Range is equipped with the SWAROAIM inclinometer system.

An inclinometer measures an uphill, or downhill angle to an object. This is an important measuring feature
that can often mean the difference between a hit or miss, at a steep angled, long range shot.

Ballistic trajectories are normally determined over a horizontal plane. Trajectory solutions with a long
range reticle or by using elevation click adjustments are also traditionally determined over a horizontal
plane. When an angled shot presents itself at “X” distance, the trajectory curve has to be recalculated for
the gravitational forces on the bullet over the shorter angled distance.
With the EL range SWARO-AIM system, there are 3 ways you can set the display. For areas where you
know where there is a good chance you could be taking a fairly steep angled shot, you can use the Mode
button to set the range display in the left barrel to look like this:

In this display mode, the actual distance to the target is 298 yards, but at this particular angle, the
corrected ballistic trajectory distance is 250 yards. In this case you would set your BT for a 250 yard
shot or use the appropriate Bar/Dot of your BRH/BRX reticle for a 250 yard shot.

If you know you will be in relatively flat terrain, you will have the ability to turn off the system so that the
yardage readout will appear as a single reading:

Or if you want to know the actual angle to the target, the EL Range will provide that also. (The angle will
appear between the angle and degree symbols in actual use)

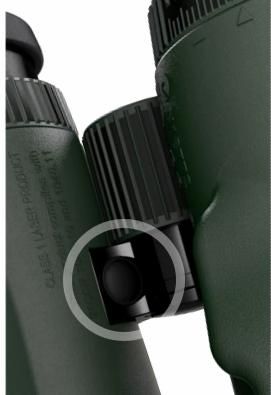
The Mode Button:

There is a Mode Button on the EL Range, on the bottom of the left (ocular side) bridge, directly opposite
the Measurement Button on top of the bridge.

The Mode Button allows you to change various characteristics of the EL Range. There are 4 sections.
Every time you wish to change a mode, you must press and hold the mode button for 2 seconds.
              st
    1. The 1 mode is for manually setting the brightness of the display. You are able to choose
       between 5 different brightness levels here. This is what you will see if the brightness level is set to
       brightness level 4:

        To manually change to one of the other brightness levels from here you will hit the measurement
        button on top.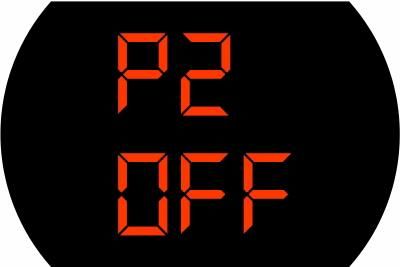
nd
2. The 2 Mode is to change settings in the SWARO-AIM angled shot program. When you hit the
                                      nd
   mode button while in Mode 1, this 2 display will appear like this:

   The “CAL” here stands for Calibrate (NOT caliber). If the mode is left here it will always give you 2
   yardage readings; the actual distance (the top readout), as well as angle compensated distance
   to the target (the bottom readout), like this:

   Note: While using the EL Range with both distance displays (as shown above), at relatively
   shallow angles (10° or less), it will be common to see readouts something like “400/393”. This 7
   yard distance will have virtually no effect on trajectory. The steeper or more severe the angle, and
   long distances will dictate the necessity of using the lower compensated trajectory distance.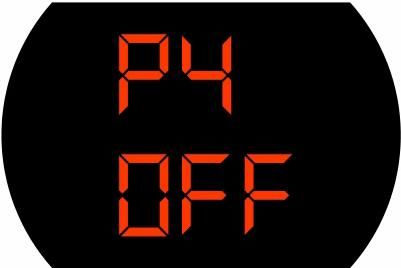
nd
In this 2 mode you also have the option of setting the display to see only the angle in degrees to
a target. To get to this display from the calibration display, simply hit the measurement button.
The actual degree will appear between the angle and degree symbols when in use:

                   nd
While still in this 2 Mode, you can turn the angle shot system off, so that you will get the
conventional reading of a single distance measurement readout if desired, again by simply
pressing the measurement button:

This is an example of a single distance reading in the OFF position in Mode 2.
rd
3. By pressing the mode button again to get into the 3 mode, the user will be able to change the
distance readout to English Yards or Metric meters. Simply press the measurement button to
change:
th th
4. Pressing the Mode button again will put you into the 4 and last Mode. This 4 mode controls the
“Automatic Brightness Level Adjustment”. It simply turns it on or off.
When the Automatic Brightness Level Adjustment is “On”, it will automatically brighten and dim
the displays, according to one of the 5 Brightness levels that were chosen in Mode 1.
Brightness Levels:
When the Automatic Brightness Level is on, the brightness levels of the Display, will increase or decrease
depending on surrounding ambient light. Brightness will also be heavily affected by the proportion of
infrared light, meaning the automatic brightness levels will work better where there is more infrared light.
Sales Tip:
Since there is much more infrared light outdoors than inside a building or closed room, the Automatic
Brightness Control Feature will not work as well inside. Another reason to keep in mind, where at all
possible, demonstrate the EL Range outside. Again remember that the minimum distance for the laser to
work is 33 yards. The EL will close focus down to approximately 16 feet, but the laser needs a minimum
of 33 yards to work.Technical Data
You can also read