Samples-Plus-Synthesis Hybrid Synthesizer - netdna-ssl.com
←
→
Page content transcription
If your browser does not render page correctly, please read the page content below
Samples-Plus-Synthesis Hybrid Synthesizer

User’s Guide
         Version 1.2
         April 2019

       Sequential LLC
1527 Stockton Street, 3rd Floor
  San Francisco, CA 94133
            USA

    ©2019 Sequential LLC
     www.sequential.com
Table of Contents
A Few Words of Thanks . . . . . . . . . . . . . . . . . . . . . . . . . . . . . . . . xi
Chapter 1: Getting Started . . . . . . . . . . . . . . . . . . . . . . . . . . . . . . 1
Tested to Comply
First Things First . . . . . . . . . . . . . . . . . . . . . . . . . . . . . . . . . . . . . . . 2
With FCC Standards Using the Main Display. . . . . . . . . . . . . . . . . . . . . . . . . . . . . . . . . . 3
Sound Banks. . . . . . . . . . . . . . . . . . . . . . . . . . . . . . . . . . . . . . . . . . 4
FOR HOME OR OFFICE USE Selecting Programs. . . . . . . . . . . . . . . . . . . . . . . . . . . . . . . . . . . . . 4
Editing Programs. . . . . . . . . . . . . . . . . . . . . . . . . . . . . . . . . . . . . . . 5
Comparing an Edited Program to its Original State. . . . . . . . . . . . . 5
Creating a Program from Scratch. . . . . . . . . . . . . . . . . . . . . . . . . . 7
Saving a Program. . . . . . . . . . . . . . . . . . . . . . . . . . . . . . . . . . . . . . 7
Canceling Save. . . . . . . . . . . . . . . . . . . . . . . . . . . . . . . . . . . . . . . . 8
Working with Stacked or Split Programs. . . . . . . . . . . . . . . . . . . . . 9
This device complies with Part 15 of the FCC Rules. Operation is subject to Exploring the Prophet X. . . . . . . . . . . . . . . . . . . . . . . . . . . . . . . . . 13
the following two conditions: (1) This device may not cause harmful inter-
ference and (2) this device must accept any interference received, including Chapter 2: Prophet X Controls. . . . . . . . . . . . . . . . . . . . . . . . . . 14
interference that may cause undesired operation. Sample Playback . . . . . . . . . . . . . . . . . . . . . . . . . . . . . . . . . . . . . . . 15
Sample Playback Parameters (Front Panel). . . . . . . . . . . . . . . . . 16
Additional Sample Playback Parameters (Display Menus). . . . . . 18
TAB 1 - Inst Tune. . . . . . . . . . . . . . . . . . . . . . . . . . . . . . . . . . . . . . 18
TAB 2 - Inst Misc. . . . . . . . . . . . . . . . . . . . . . . . . . . . . . . . . . . . . . 19
TAB 3 - Inst Loop. . . . . . . . . . . . . . . . . . . . . . . . . . . . . . . . . . . . . . 20
This Class B digital apparatus meets all requirements of the Canadian TAB 4 - Inst Edit. . . . . . . . . . . . . . . . . . . . . . . . . . . . . . . . . . . . . . . 21
Interference-Causing Equipment Regulations. Oscillators. . . . . . . . . . . . . . . . . . . . . . . . . . . . . . . . . . . . . . . . . . . . . 22
Oscillator Parameters (Front Panel) . . . . . . . . . . . . . . . . . . . . . . . 24
Additional Oscillator Parameters (Display Menu) . . . . . . . . . . . . . 25
TAB 1 - Osc Tune . . . . . . . . . . . . . . . . . . . . . . . . . . . . . . . . . . . . . 25
TAB 2 Osc Shape . . . . . . . . . . . . . . . . . . . . . . . . . . . . . . . . . . . . . 26
Cet appareil numerique de la classe B respecte toutes les exigences du TAB 3 - Osc Misc. . . . . . . . . . . . . . . . . . . . . . . . . . . . . . . . . . . . . . 27
Reglement sur le materiel brouilleur du Canada. TAB 4 - Osc Select . . . . . . . . . . . . . . . . . . . . . . . . . . . . . . . . . . . . 27
For Technical Support, email: support@sequential.comMixer . . . . . . . . . . . . . . . . . . . . . . . . . . . . . . . . . . . . . . . . . . . . . . . . . 28 Modulation. . . . . . . . . . . . . . . . . . . . . . . . . . . . . . . . . . . . . . . . . . . . . 55
Mixer Parameters (Front Panel) . . . . . . . . . . . . . . . . . . . . . . . . . . 28 Modulation Parameters (Front Panel). . . . . . . . . . . . . . . . . . . . . . 56
Additional Mixer Parameters (Display Menu) . . . . . . . . . . . . . . . . 29 Modulation Examples . . . . . . . . . . . . . . . . . . . . . . . . . . . . . . . . . . 56
TAB 1 - Mixer. . . . . . . . . . . . . . . . . . . . . . . . . . . . . . . . . . . . . . . . . 29 Effects. . . . . . . . . . . . . . . . . . . . . . . . . . . . . . . . . . . . . . . . . . . . . . . . 58
TAB 2 - Panning. . . . . . . . . . . . . . . . . . . . . . . . . . . . . . . . . . . . . . . 29 Effects Parameters (Front Panel) . . . . . . . . . . . . . . . . . . . . . . . . . 60
TAB 3 - Hack/Deci. . . . . . . . . . . . . . . . . . . . . . . . . . . . . . . . . . . . . 30 Arpeggiator. . . . . . . . . . . . . . . . . . . . . . . . . . . . . . . . . . . . . . . . . . . . 62
Filter. . . . . . . . . . . . . . . . . . . . . . . . . . . . . . . . . . . . . . . . . . . . . . . . . . 31 Arpgeggiator Parameters (Front Panel) . . . . . . . . . . . . . . . . . . . . 63
Filter Parameters (Front Panel) . . . . . . . . . . . . . . . . . . . . . . . . . . 32 Additional Arpeggiator Parameters (Display Menus). . . . . . . . . . . 64
Additional Filter Parameters (Display Menus). . . . . . . . . . . . . . . . 33 Clock Parameters . . . . . . . . . . . . . . . . . . . . . . . . . . . . . . . . . . . . 65
TAB 1 - VCF ADSR. . . . . . . . . . . . . . . . . . . . . . . . . . . . . . . . . . . . 33 Sequencer. . . . . . . . . . . . . . . . . . . . . . . . . . . . . . . . . . . . . . . . . . . . . 66
TAB 2 - VCF Envelope Amount . . . . . . . . . . . . . . . . . . . . . . . . . . 34 Editing a Sequence. . . . . . . . . . . . . . . . . . . . . . . . . . . . . . . . . . . . 68
TAB 3 - LP Filter . . . . . . . . . . . . . . . . . . . . . . . . . . . . . . . . . . . . . . 35 Sequencer Parameters (Front Panel). . . . . . . . . . . . . . . . . . . . . . 69
TAB 4 - LPF Misc. . . . . . . . . . . . . . . . . . . . . . . . . . . . . . . . . . . . . . 36 Additional Sequencer Parameters (Display Menus). . . . . . . . . . . 69
Filter Envelope . . . . . . . . . . . . . . . . . . . . . . . . . . . . . . . . . . . . . . . . . 37 Clock . . . . . . . . . . . . . . . . . . . . . . . . . . . . . . . . . . . . . . . . . . . . . . . . . 70
Envelope Parameters (Front Panel) . . . . . . . . . . . . . . . . . . . . . . . 39 Clock Parameters (Front Panel) . . . . . . . . . . . . . . . . . . . . . . . . . . 70
Additional Filter Envelope Parameters (Display Menus). . . . . . . . 40 Unison. . . . . . . . . . . . . . . . . . . . . . . . . . . . . . . . . . . . . . . . . . . . . . . . 71
TAB 1 - VCF ADSR. . . . . . . . . . . . . . . . . . . . . . . . . . . . . . . . . . . . 40 Unison Parameters (Display Menus). . . . . . . . . . . . . . . . . . . . . . . 72
TAB 2 - VCF Env Amount . . . . . . . . . . . . . . . . . . . . . . . . . . . . . . . 41 Using Chord Memory. . . . . . . . . . . . . . . . . . . . . . . . . . . . . . . . . . . 73
Amplifier Envelope. . . . . . . . . . . . . . . . . . . . . . . . . . . . . . . . . . . . . . 42 Master Volume/Program Volume. . . . . . . . . . . . . . . . . . . . . . . . . . . 75
Amplifier Envelope Parameters (Front Panel) . . . . . . . . . . . . . . . 43 Transpose. . . . . . . . . . . . . . . . . . . . . . . . . . . . . . . . . . . . . . . . . . . . . 76
Additional Amplifier Parameters (Display Menus). . . . . . . . . . . . . 44 Hold. . . . . . . . . . . . . . . . . . . . . . . . . . . . . . . . . . . . . . . . . . . . . . . . . . 76
TAB 1 - VCA ADSR. . . . . . . . . . . . . . . . . . . . . . . . . . . . . . . . . . . . 44 Glide. . . . . . . . . . . . . . . . . . . . . . . . . . . . . . . . . . . . . . . . . . . . . . . . . . 77
TAB 2 - VCA Env Amount . . . . . . . . . . . . . . . . . . . . . . . . . . . . . . . 45 Glide Modes . . . . . . . . . . . . . . . . . . . . . . . . . . . . . . . . . . . . . . . . . . . 78
TAB 3 - Vol/Pan. . . . . . . . . . . . . . . . . . . . . . . . . . . . . . . . . . . . . . . 46 16-Voice Mode. . . . . . . . . . . . . . . . . . . . . . . . . . . . . . . . . . . . . . . . . . 79
Auxiliary Envelopes. . . . . . . . . . . . . . . . . . . . . . . . . . . . . . . . . . . . . 47 Pitch and Mod Wheels. . . . . . . . . . . . . . . . . . . . . . . . . . . . . . . . . . . 80
Auxiliary Envelope Parameters (Front Panel) . . . . . . . . . . . . . . . 47 Pitch Wheel. . . . . . . . . . . . . . . . . . . . . . . . . . . . . . . . . . . . . . . . . . 80
Additional Auxiliary Envelope Parameters (Display Menus). . . . . 48 Modulation Wheel. . . . . . . . . . . . . . . . . . . . . . . . . . . . . . . . . . . . . 81
TAB 1 - Env ADSR. . . . . . . . . . . . . . . . . . . . . . . . . . . . . . . . . . . . . 48 Touch Sliders . . . . . . . . . . . . . . . . . . . . . . . . . . . . . . . . . . . . . . . . . . 82
TAB 2 - Env Amount . . . . . . . . . . . . . . . . . . . . . . . . . . . . . . . . . . . 49 Play List. . . . . . . . . . . . . . . . . . . . . . . . . . . . . . . . . . . . . . . . . . . . . . . 83
TAB 3 - Env Dest. . . . . . . . . . . . . . . . . . . . . . . . . . . . . . . . . . . . . . 49
Low Frequency Oscillators . . . . . . . . . . . . . . . . . . . . . . . . . . . . . . . 50 Chapter 3: Programming the Prophet X . . . . . . . . . . . . . . . . . . 86
LFO Parameters (Front Panel) . . . . . . . . . . . . . . . . . . . . . . . . . . . 51 Synthesis 101: Synth Bass . . . . . . . . . . . . . . . . . . . . . . . . . . . . . . . 86
Additional LFO Parameters (Display Menus) . . . . . . . . . . . . . . . . 52 Creating Stereo Synth Brass. . . . . . . . . . . . . . . . . . . . . . . . . . . . . . 90
TAB 1 - LFO Shape. . . . . . . . . . . . . . . . . . . . . . . . . . . . . . . . . . . . 52 Turning the Synth Brass Sound into a String Pad. . . . . . . . . . . . . 91
TAB 2 - LFO Control . . . . . . . . . . . . . . . . . . . . . . . . . . . . . . . . . . . 53 Creating a Hard-Sync Lead. . . . . . . . . . . . . . . . . . . . . . . . . . . . . . . 92
TAB 3 - LFO Dest . . . . . . . . . . . . . . . . . . . . . . . . . . . . . . . . . . . . . 54 Modulation Techniques. . . . . . . . . . . . . . . . . . . . . . . . . . . . . . . . . . 94
Creating a Stereo Tremolo Effect with an LFO . . . . . . . . . . . . . . . 94
Creating Movement with Pulse-Width Modulation. . . . . . . . . . . . . 95
Modulating the Stereo Filters Independently. . . . . . . . . . . . . . . . . 96
Creating Sounds Using FM (Frequency Modulation) . . . . . . . . . . 97Using Sampled Instruments . . . . . . . . . . . . . . . . . . . . . . . . . . . . . . 99 Appendix A:
Selecting and Modifying a Sampled Instrument . . . . . . . . . . . . . . 99 Modulation Sources . . . . . . . . . . . . . . . . . . . . . . . . . . . . . . . . . 130
Layering Two Different Sampled Instruments. . . . . . . . . . . . . . . 100
Bypassing the Low-pass Filter on Sampled Instruments. . . . . . . 101 Appendix B:
Using Sample Stretch. . . . . . . . . . . . . . . . . . . . . . . . . . . . . . . . . 101 Modulation Destinations. . . . . . . . . . . . . . . . . . . . . . . . . . . . . . 131
Using the Prophet VS Waves . . . . . . . . . . . . . . . . . . . . . . . . . . . 103
Manipulating Samples and Loops. . . . . . . . . . . . . . . . . . . . . . . . 105 Appendix C:
Reversing a sample. . . . . . . . . . . . . . . . . . . . . . . . . . . . . . . . . . . 105 Alternative Tunings. . . . . . . . . . . . . . . . . . . . . . . . . . . . . . . . . . 132
Changing Sample Start and End Points and Adding a Loop. . . . 106
Creating ”Granular-Style” Loops . . . . . . . . . . . . . . . . . . . . . . . . . 108 Appendix D:
Creating Longer Loops . . . . . . . . . . . . . . . . . . . . . . . . . . . . . . . . 109
Troubleshooting and Support . . . . . . . . . . . . . . . . . . . . . . . . . 136
Combining Samples and Synthesis . . . . . . . . . . . . . . . . . . . . . . . 110
Blending Real and Synthesized Strings . . . . . . . . . . . . . . . . . . . 110 Troubleshooting. . . . . . . . . . . . . . . . . . . . . . . . . . . . . . . . . . . . . . 136
Blending Contrasting Sounds . . . . . . . . . . . . . . . . . . . . . . . . . . . 111 Contacting Technical Support . . . . . . . . . . . . . . . . . . . . . . . . . . . 138
Using 16-Voice Mode . . . . . . . . . . . . . . . . . . . . . . . . . . . . . . . . . . . 112 Warranty Repair. . . . . . . . . . . . . . . . . . . . . . . . . . . . . . . . . . . . . . 138
A Final Word. . . . . . . . . . . . . . . . . . . . . . . . . . . . . . . . . . . . . . . . . . 113
Appendix E:
Chapter 4: Connections/Setups. . . . . . . . . . . . . . . . . . . . . . . . 114 MIDI Implementation. . . . . . . . . . . . . . . . . . . . . . . . . . . . . . . . . 140
Rear Panel Connections . . . . . . . . . . . . . . . . . . . . . . . . . . . . . . . . 114 MIDI Messages. . . . . . . . . . . . . . . . . . . . . . . . . . . . . . . . . . . . . . 141
Using USB. . . . . . . . . . . . . . . . . . . . . . . . . . . . . . . . . . . . . . . . . . . . 116 NRPN Messages. . . . . . . . . . . . . . . . . . . . . . . . . . . . . . . . . . . . . 145
Calibrating the Prophet X. . . . . . . . . . . . . . . . . . . . . . . . . . . . . . . . 117 Control NRPN Data. . . . . . . . . . . . . . . . . . . . . . . . . . . . . . . . . . . 152
Calibrating the Filters. . . . . . . . . . . . . . . . . . . . . . . . . . . . . . . . . . 117 SysEx Messages. . . . . . . . . . . . . . . . . . . . . . . . . . . . . . . . . . . . . 152
Calibrating the Pitch and Mod Wheels . . . . . . . . . . . . . . . . . . . . . . 117 Packed Data Format . . . . . . . . . . . . . . . . . . . . . . . . . . . . . . . . . . 156
Calibrating the Touch Sliders . . . . . . . . . . . . . . . . . . . . . . . . . . . . . . 117
Resetting the Global Parameters. . . . . . . . . . . . . . . . . . . . . . . . 118
Importing Programs and Banks . . . . . . . . . . . . . . . . . . . . . . . . . . 120
Formatting a USB Flash Drive. . . . . . . . . . . . . . . . . . . . . . . . . . . . 121
Importing Add-On Samples/Instruments . . . . . . . . . . . . . . . . . . . 121
Updating the Prophet X OS. . . . . . . . . . . . . . . . . . . . . . . . . . . . . . 122
Global Settings. . . . . . . . . . . . . . . . . . . . . . . . . . . . . . . . . . . . . . . . 123
viii Sequential Prophet X User’s Guide ixLICENSE AGREEMENT
By purchasing Sequential Prophet X, you accept the following product license agreement with
A Few Words of Thanks
respect to the “Samples by 8Dio” sample elements thereof and/or incorporated therein (“Samples”): Thank you for purchasing the Prophet X. The Prophet X is a powerful evolution of
1. License Grant: the Prophet series. We’ve added a new sound engine with sample playback, which
The Samples in Sequential Prophet X are licensed, but not sold, to you by 8Dio, Inc. for commer- gives you all of the synthesis capabilities and great sound you’d expect from a
cial and non-commercial use in music, sound-effect, audio/video post-production, performance,
broadcast or similar finished content-creation and production use. 8Dio allows you to use any of the
Prophet, but now with the infinite possibilities of samples. What’s more, the new
Samples for commercial recordings without paying any additional license fees or providing source analog filter design in the Prophet X is not only fantastic for synth sounds, but
attribution to 8Dio, Inc. does something special for the sampled instruments as well.
This license expressly forbids any inclusion of the Samples into any other hardware device or in any
virtual instrument or library of any kind, without our express written consent. This license forbids As a whole, the Prophet X covers more musical ground than any Prophet we’ve
any re-distribution method of any of the Samples by means of re-sampling, mixing, processing, ever created. Composers will love it for soundtracks, synth geeks will love it for
isolating, or embedding into software or hardware of any kind, for the purpose of re-recording or
reproduction as part of any free or commercial library of musical and/or sound effect samples and/or sound mangling, live players will love it for its versatility, and we love it because
articulations, or any form of musical sample or sound effect sample playback system or device or on its just an awesome synth.
a stand-alone basis.
2. Rights/Watermarking Policy: Make some great sounds with it!
The Samples, including accompanying documentation, are protected by copyright laws and inter-
national copyright treaties, as well as other intellectual property laws and treaties. 8Dio retains full Cheers,
copyright privileges and complete ownership of all recorded sounds, instrument programming, docu-
mentation and musical performances included in Sequential Prophet X. Any rights not specifically
granted herein are reserved by 8Dio.
Any unauthorized use, distribution or reproduction of the Samples shall not be permitted, shall con-
stitute a violation of law, and shall entitle 8Dio to, in addition to any other remedy at law or equity,
injunctive relief. It is unlawful to deliberately circumvent, alter or delete technological measures of
protection and information provided by 8Dio which identifies the products, its owner and the terms
and conditions for its use. Please note that the Samples may be imbedded with a digital watermark.
If the product ends up in other people’s music, you will be held legally responsible, so we ask you
to not to violate the terms of this license agreement. You further agree to take all reasonable steps to
protect this product from unauthorized copying or use.
THE SEQUENTIAL CREW
Art Arellano, Fabien Cesari, Bob Coover, Carson Day, Chris Hector, Tony Karavidas, Mark Kono,
Justin Labrecque, Andy Lambert, Michelle Marshall, Andrew McGowan, Joanne McGowan,
Julio Ortiz, Campbell Smith, Tracy Wadley, and Mark Wilcox.
THE 8DIO CREW
Troels Folmann, Cam Goold, Alejandro Cabrera, Colin Fisher, and Tawnia Knox.
THE SOUND DESIGN TEAM
Richard Devine, Rory Dow, Peter Dyer, Mike Hiegemann, Tim Koon, Kurt Kurasaki, Kevin Lamb,
Drew Neumann, Bob Oxley, Francis Preve, Robert Rich, Lorenz Rhode, Matia Simovich,
Huston Singletary, James Terris, Mitch Thomas, and Taiho Yamada.
Special thanks to Robert Rich for the alternative tunings content.
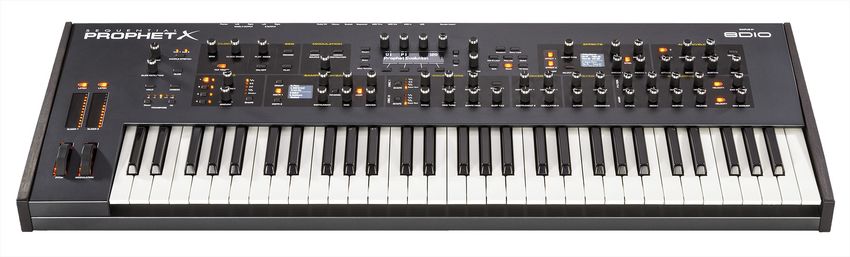
x SequentialChapter 1: Getting Started
The Prophet X is an 8-voice stereo/16-voice mono, bi-timbral, hybrid
digital/analog synthesizer that combines synthesis and sample playback.
It has oscillators, filters, envelopes, LFOs, and other classic synthesizer
components in addition to a 150 GB library of sampled instruments on its
internal SSD drive.
The SSD drive also provides 50 gigabytes of internal storage for importing
additional samples from sample library developers. Support for user-created
sample content will be added in a future software release. By combining
synthesis and sample playback, you can create an almost infinite variety of
unique sounds.
We’ve designed the Prophet X to be as easy to use as possible, with its
essential sound-shaping controls within easy reach on its front panel.
Additional functionality resides in its three displays.
This chapter of your user’s guide provides a brief overview of such
essential tasks as how to choose, edit, and save sounds. Later chapters
explain each of the parameters on the Prophet X, how to program sounds,
how to make connections, and how to use the Globals menu to set up and
manage your synth’s overall behavior.
Pedal/CV
Instr 1 Instr 2 Revert
U1 P1 120
BASIC PROGRAM A EFFECT 1
EFFECT 2
SELECT 1 / 2
Fact/1 Ambience
Chord Cluster
Fact/5 Cinematic
Ensemble Synth LOOP
Prophet X front panel
Prophet X User’s Guide Chapter 1: Getting Started 1First Things First Using the Main Display
You’re probably eager to power up your Prophet X and take a tour through The most frequently used controls on the Prophet X are on its front
its sounds. Here’s how to get up and running: panel. But there are many additional controls (as well as numeric display
of values) visible in its main display.
Getting Started:
For example, adjusting a knob or switch in the Mixer section reveals
1. Plug the power cable into the AC power connector on the back panel of
the instrument level and oscillator level parameters in the display. The
the Prophet X.
display also reveals additional parameters not found on the front panel
2. If you have a sustain pedal, connect it to the sustain jack on the back of such as panning. You can select and edit these additional parameters
the Prophet X. If you have an expression pedal, connect it to the pedal/ using the four Soft Knobs and Soft Keys located above and below the
cv jack. display.
3. Turn on the Prophet X. It takes few moments for the sound library to
load. The Soft Knobs are detented encoders that are useful for dialing in values
with precision. The Soft Keys select between various menu tabs.
4. Connect the main/a output on the back of the Prophet X to your amp/
mixer/powered speakers using unbalanced, ¼ inch audio cables. (These
are the main stereo outputs for the synth. They carry Layer A and also soft knob 1
parameter 1
soft knob 2
parameter 2
soft knob 3
parameter 3
soft knob 4
parameter 4
Layer B if no cables are connected to the b output jacks.)
5. Turn up the volume on your amp/mixer/powered speakers.
6. Turn up the volume on the Prophet X.
Revert Inst 1 Level Inst 2 Level Osc 1 Level Osc 2 Level
7. Use the bank and program knobs to scroll through the factory sounds.
You can also use Soft Knob 1 and Soft Knob 2 as well as inc and dec 60
INST 1 LEVEL
60
INST 2 LEVEL
20
OSC1 LEVEL
20
OSC2 LEVEL
buttons to scroll through the sounds in the currently selected bank. Mixer Panning Hack/Deci
Env Amt LPF Misc
Turn to scroll through
User and Factory banks soft key 1 soft key 2 soft key 3 soft key 4
U1 P1 120 menu tab 1 menu tab 2 menu tab 3 menu tab 4
Prophet Evolution
The Main Display
Turn to scroll through
programs 1-128 in each bank
Bank and Program controls
Each of the factory presets has interesting and useful modulation functions
programmed into Slider 1 and 2 and the Mod wheel. While you’re trying out the factory
sounds, play with these performance controls and listen how the sound changes.
Each preset also has a pre-programmed sequence. To hear it, press the play button in
the seq section.
2 Chapter 1: Getting Started Sequential Prophet X User’s Guide Chapter 1: Getting Started 3Sound Banks Editing Programs
The Prophet X contains a total of 1024 programs. Banks U1-U4 are user Because the majority of the sound-shaping controls of the Prophet X appear
banks that can be overwritten. Banks F1-F4 are factory banks that are on its front panel, editing an existing program is simple: turn a knob and
permanent. As shipped, user banks U1-U4 are identical to permanent listen to its effect. Keep turning knobs and pressing buttons. If you like what
factory banks F1-F4. Each bank has 128 programs (x 4 banks = 512 you’ve created, save the program. (See “Saving a Program” on page 7.)
programs each). You can edit the programs of either bank, but you can
only save them to user banks U1-U4. Any edits you make are made to Layer A. You can also edit Layer B if you
want.
We include banks of non-rewritable permanent sounds so that they are
always available, to be used as is, or as templates for new sounds of your To hear and edit Layer B:
own. It’s easy to design a new sound by tweaking an existing one.
1. Press the edit b layer button.
Banks A1-A4 are “add-on” banks. Programs included with sample expansion
libraries from sound developers will load here. If you purchase expansion libraries Press to edit
then edit any of the programs in banks A1-A4, you must save them to user banks Layer B
U1-U4, as you would with any user-created sounds.
Turn to scroll through
User and Factory banks
Bank and Program controls
U1 P1 120
Prophet Evolution
Turn to scroll through
programs 1-128 in each bank The rotary controls on the front panel are a mixture of “endless” rotary encod-
ers (which have no position indicator) and potentiometers or “pots,” which have a
position indicator and a finite travel range from left to right. You can choose between
three different modes that determine how the synth reacts when you edit its param-
eters with a pot. For details, see “Pot Mode” on page 124.
Bank and Program controls
Comparing an Edited Program to its Original State
Selecting Programs When editing a program, it’s often useful to compare its edited state to
Use the bank and program knobs to select and recall programs. its original state to evaluate your edits.
To choose a program: To compare an edited program to a saved version:
1. Turn the bank knob to select the bank you want. 1. Edit a program, then press the compare button.
2. Turn the program knob to select a program within that bank. 2. Play the keyboard to hear the saved version of the sound.
3. To disable the compare function and return to the edited sound, press
the compare button again to turn it off. Programs can’t be written while
in compare mode.
4 Chapter 1: Getting Started Sequential Prophet X User’s Guide Chapter 1: Getting Started 5When editing a program, press to hear Creating a Program from Scratch
saved version for comparison
An existing program can be very useful as a jumping off point for new
sounds. But it’s also useful (and educational) to create a new sound from
scratch. The Prophet X makes this easy by providing a “basic preset”
that you can quickly recall at any time. This preset is very simple, with a
single oscillator as its basis.
To recall the basic program:
1. Press the global button.
2. Use Soft Knob 1 to select basic program in the display menu.
Compare button
3. Press soft button 1 (write now). The current sound settings are reset to
It’s also useful to be able to check the value of a parameter for reference. the basic program.
Normally, to make a parameter value appear in the display, you have to
4. Press the global button again to return to normal operation. From here
turn the parameter’s knob — which will change the parameter value. But
you can begin creating your own sound using the basic program as a
there is a way to do this without changing the value: starting point.
To check the value of a parameter without changing it:
1. Press the show button. You can also recall the Basic Program by simultaneously pressing the trans-
pose downand hold buttons.
2. Turn any parameter knob. The value appears in the display.
3. To return to normal operation, press the show button again to disable it. Chapter 4 provides several sound design tutorials. It is designed to give you
a basic working knowledge of how to use the Prophet X to make your own
sounds. See “Chapter 3: Programming the Prophet X” on page 86.
Press Show
and turn any knob
Revert
U1 P1 120 Saving a Program
to see its current setting
without changing it Prophet Evolution If you’ve created a sound that you like, you’ll probably want to save it.
Saving a program overwrites a previously saved program. Sound design-
ers often save many incremental versions of a program as they continue
to refine it. These intermediate versions often make good jumping off
points for new sounds.
Using the Show button to display a parameter value To save a program to the same preset location:
1. Press the save/load button. Its LED begins blinking.
2. Enter a name for the program using the appropriate Soft Knobs and
Soft Keys. (See the illustration that follows for their functions.)
3. Press the save/Load button again. Its LED stops blinking and the
program is saved.
6 Chapter 1: Getting Started Sequential Prophet X User’s Guide Chapter 1: Getting Started 7To save a program to a different location: Comparing Before You Save
1. Press the save/load button. Its LED begins blinking. Before saving a program to a new location, it’s a good idea to listen to the
program in the target location to make sure you really want to overwrite it.
2. Turn the bank or program knobs (or Soft Knob 1 and Soft Knob 2) to
select a new location. You can only save to banks U1-U4.
To evaluate a program before you overwrite it:
3. Enter a name for the program using the appropriate Soft Knobs and
1. Get ready to save by pressing the save/load button. It starts flashing.
Soft Keys. (See the illustration that follows for their functions.)
2. Press the compare button. Its LED lights up.
4. Press the save/load button again. Its LED stops blinking and the
program is saved. 3. Use the bank and program knobs to navigate to the sound you want to
compare and play the keyboard to hear the sound.
4. To disable the compare function and go back to the edited sound, press
Saving a program saves any edits to programs on both Layer A and Layer B.
the compare button again to turn it off. (Programs can’t be written
while in compare mode.)
select bank select program select character edit character
5. If you want to save the edited sound, the save/load button is still
flashing and ready to save, so navigate to a location with the bank and
program knobs and press save/load. The sound is saved.
6. Alternatively, if you want to cancel saving and continue editing, press
Revert Write Bank Write Prog Select Char Edit Char the global button. Saving is canceled.
Writing to Bank:1 Program:1 A: S uper Strings
Hit ‘Write’ to Save Prog
Hit ‘Global’ to Exit B: Basic Program
Copy Name A>B Insert Char Delete Char KeySelect
AssignB Working with Stacked or Split Programs
The Prophet X is bi-timbral, meaning that it can produce two different
sounds/programs at the same time, either by stacking them, or by
copy name insert character delete character toggle to “B”
allowing you to split the keyboard and assign one sound to the upper
from layer A/B to edit the name
of Layer B
section of the keyboard and a different sound to the lower section of the
keyboard.
Saving a Program
The two layers are referred to as Layer A and Layer B. By default, Layer
A is always active when you recall a program. If either the split button
Canceling Save or the stack button is lit, then Layer B is also active. Each Layer can
Sometimes you may want to cancel saving a program before you have different Effects, Unison, Arpeggiator, and Sequencer settings. This
commit. allows for some very interesting combinations of sounds.
To cancel the save process before you commit:
As you scroll through various factory programs, you can tell which are
stacked and which are split. On stacked sounds, the stack button is lit.
• If the save/load button LED is flashing, press the global button. The On split sounds, the split button is lit.
save/load LED stops flashing and saving is canceled. You can return to
editing if you want.
8 Chapter 1: Getting Started Sequential Prophet X User’s Guide Chapter 1: Getting Started 9To turn on Stack mode:
All factory programs have a “B” layer, even if that layer isn’t currently enabled. • If it’s not currently lit, press the stack button. The button becomes
To hear Layer B in isolation, press the edit layer b button and disable stack or split (if lit. The program on Layer B is stacked with the program on Layer A.
active) by turning off the stack button or split button. Pressing edit layer b a second
time enables Layer A again.
Polyphony is halved since two voices are used per note.
To turn off Stack mode:
• If it’s currently lit, press the stack button. The button becomes unlit.
Only the program on Layer A is heard.
Press to enable
Layer B editing
To edit Layer B:
1. Press the edit layer b button. Layer B editing is enabled.
2. Change any parameters to change the sound of Layer B.
Button is lit when
split is active Button is lit when 3. Press the edit layer b button again to turn off Layer B editing.
stack is active
To edit Layer A and B simultaneously:
Split and Stack buttons
1. With Stack mode on (stack button is lit) press and hold the edit layer
b button until it begins flashing, indicating that you are in “Link” mode.
Stacked Programs Release the button. (It should still be flashing.)
Stacking two programs allows you to create extra complex sounds, since
2. Change any parameters. The parameters are changed on both Layer A
you can have two completely different programs layered on top of each
and Layer B.
other.
3. To turn off Link mode, press the edit layer b button again. It stops
Polyphony is halved in Stack mode, so your 8-voice Prophet X, func- flashing.
tions as a 4-voice because it uses two voices for each key played. If you
want to increase polyphony, press the 16-voice button. This switches
the Prophet X into 16-voice mono mode. Polyphony is doubled, but the Saving a program saves any edits to programs on both Layer A and Layer B.
stereo filter signal path is converted to mono. Digital effects remain in
stereo, however. To copy Layer A to Layer B:
1. Press the edit b layer button.
2. Press Soft Key 1 (copy a > b).
3. Press Soft Key 1 again to confirm. Layer A is copied to Layer B.
To copy Layer B to Layer A:
Press to enable
16-voice 1. Press the edit b layer button.
mono mode
2. Press Soft Key 2 (copy b > a).
Enabling 16-voice mono mode
3. Press Soft Key 1 to confirm. Layer B is copied to Layer A.
10 Chapter 1: Getting Started Sequential Prophet X User’s Guide Chapter 1: Getting Started 11To swap Layer A and Layer B: To create exactly the kind of split you want, sometimes you may need to
1. Press the edit b layer button. swap the sounds on Layer A and B.
2. Press Soft Key 3 (swap a > b). To swap Layer A and Layer B sounds:
3. Press Soft Key 1 to confirm. Layers A and B are swapped. 1. Press the edit b layer button.
2. Press Soft Button 3 (swap A< >B). The layers are now swapped.
Split Programs
In split mode, playing a key on the left side of the keyboard will play the
Layer A sound and playing a key on the right side will play the Layer B Exploring the Prophet X
sound. Polyphony is allocated equally between the two sounds, with half Before you explore the sound creation possibilities of the Prophet X,
of the available voices on Layer A and half on Layer B. we’d like to point you toward a few things that will help you tailor it to
your needs. The better you know it, the more you’ll get out of it.
The specific key that starts the Layer B sound is called the split point,
and is saved with the program. First, read about “Global Settings” “Global Settings” on page 122.
There are many useful settings and functions found in the Global menu
that will affect the overall behavior of your Prophet X, including tuning,
All factory programs have a “B” layer, even if that layer isn’t currently enabled.
MIDI connections, calibration, and more. In particular, read about Pot
Modes and determine which works best for you when you’re editing
sounds.
To turn Split on:
• If it’s not currently lit, press the split button. The button becomes lit. Also, starting on page 114, read about the various connectors on the
The left side of the keyboard plays the Layer A sound and the right side back of your Prophet X and how you can use its various pedal, audio,
of the keyboard plays the Layer B sound. MIDI, and USB inputs and outputs.
To turn Split off:
Finally, be on the lookout for tips and notes scattered throughout this
• If it’s currently lit, press the split button. The button becomes unlit. manual to gain a better working knowledge of the Prophet X. We wish
Only the program on Layer A is heard across the full range of the you many hours of musical exploration!
keyboard.
To set the split point:
1. Press and hold down a key on the keyboard.
2. Press the split button. This sets the start point for Layer B.
3. Play a few notes to confirm that the split is where you want it.
4. If you want to re-set the split to a different note, disable split by press-
ing the split button again, then repeat steps 1 and 2.
You can also press the edit b layer button and set the split point with Soft Knob 4.
12 Chapter 1: Getting Started Sequential Prophet X User’s Guide Chapter 1: Getting Started 13Chapter 2: Prophet X Controls Sample Playback
This chapter explains all of the controls on the Prophet X, section by The Sample Playback portion of the Prophet X provides 150 GB of
section. factory-installed 16-bit, 48 kHz multi-sampled instruments. You can
scroll through the instruments using the type and instrument knobs next
As explained in Chapter 1, the most frequently used controls on the to the display in the sample playback section.
Prophet X are located on its front panel, with many additional controls
(as well as numeric display of values) visible in its main display. You can add an additional 50 GB of samples by purchasing sample
libraries or importing your own. (User-created samples will be supported
For example, adjusting a knob or switch in the Mixer section reveals the in a future software release.) You’ll need to download and copy them to
instrument level and oscillator level parameters in the display. The a USB flash drive (USB stick). You can then load the samples into the
display also reveals additional parameters not found on the front panel Prophet X by connecting the USB stick to the sample import port on the
such as panning. You can select and edit these additional parameters back panel of the synth. See “Formatting a USB Flash Drive” on page
using the four Soft Knobs and Soft Keys located above and below the 120 for instructions on how to do this.
display.
The Soft Knobs are detented encoders that are useful for dialing in
values with precision. The soft keys select between various menu tabs.
F/4 Choir
02. Children
Vowel Long Ah
soft knob 1 soft knob 2 soft knob 3 soft knob 4 F/9 Choir
parameter 1 parameter 2 parameter 3 parameter 4 03. Acoustic LOOP
Strum
The Sample Playback section
Revert Inst 1 Level Inst 2 Level Osc 1 Level Osc 2 Level
60 60 20 20
INST 1 LEVEL INST 2 LEVEL OSC1 LEVEL OSC2 LEVEL To audition any of the sampled instruments:
Mixer Panning Hack/Deci
Env Amt LPF Misc
1. Press the global button, use Soft Knob 1 to navigate to the basic
program command, then press Soft Key 1 (write now).
2. In the mixer section, turn up Instrument 1 and turn down all other
soft key 1
menu tab 1
soft key 2
menu tab 2
soft key 3
menu tab 3
soft key 4
menu tab 4
sources (Instrument 2, Oscillator 1, Oscillator 2).
3. In the sample playback section, press the instr 1 button.
The Main Display
4. With the type knob, scroll through the various sound categories.
5. With the instrument knob, scroll through the various instruments while
you play the keyboard. Larger instruments may take a moment to
completely load into memory.
6. To hear the instruments without low-pass filtering by the synthesizer, press
Soft Key 2 (inst1misc) then use Soft Knob 4 to enable lpf bypass.
14 Chapter 2: Prophet X Controls Sequential Prophet X User’s Guide Sample Playback 15Sample Playback Parameters (Front Panel) Size: Adjusts the size of the looped portion of the instrument sample by
Group: Factory, User, Add-on—Hold down this button and turn the type moving both its loop start and loop end points.
knob to select between the permanent library of internal factory samples
Center: Adjusts the location of the loop within the sample. The size of
and sample libraries you have loaded in addition to the factory set — either
user samples or samples purchased from sound developers. the loop stays the same, but its location within the sample (as defined by
its center point) is moved when you adjust this control.
Instr 1: Pressing this button selects sampled instrument 1 for editing.
Sample Stretch: On, Off—Striking and holding down a key and press-
Instr 2: Pressing this button selects sampled instrument 2 for editing. ing this button stretches the sample that is mapped to that key across
the entire keyboard for the currently selected instrument. In this mode,
Type: Selects the overall instrument type. Instruments are organized into normal sample switching will not occur when you play up and down the
categories by type (piano, strings, etc.) or general sound characteristics keyboard. The same sample will simply be pitch-shifted.
(ambience, sound effects, etc.).
Use this to create the classic sampler “chipmunk voice” and other pitch
Instrument: Selects a specific instrument from within the selected shift effects. You can set Sample Stretch individually for Instrument 1
category (Type). and Instrument 2 by selecting the desired instrument (using the instr 1 or
instr 2 button) then enabling sample stretch. The LEDs indicate whether
Reverse: Pressing this button reverses the playback direction of a or not Sample Stretch is on for either instrument.
sampled instrument. For example, when reversed, a piano (which has an
immediate attack and a slow decay) would have a slow attack, and an
abrupt end.
Because the instruments are multi-sampled at different velocities for greater
realism, striking a key at different velocities will play different samples. Samples
Start: Adjusts the sample start point. This changes the sound of the recorded/played at higher velocities are generally louder and brighter. When you strike
sample since moving the sample start point later will omit some of its a key and press the sample stretch button, the sample that is stretched is the sample
that matches the velocity at which you struck the key. In other words, the sample that
initial audio content. In most acoustic instruments the beginning of a you hear when you strike the key is the one that gets stretched.
sound is louder and contains more harmonics, so moving the sample start
later would omit the brightest, loudest part of the instrument sample.
Instr 1 Instr 2
Hold down a key
End: Adjusts the sample end point. This will also change the sound of and press this button
to stretch the sample
the sample, since you will omit some of the audio that occurs at its end. on that key across
the entire keyboard
Loop: Toggles a sustain loop in the sample on and off. With Loop on,
the sample will repeat the looped portion for as long as you hold down a
key and after you release the key until the amp envelope finishes. Not all
instruments have a pre-defined loop. Toggling Loop on in an instrument
without a pre-defined loop creates a loop that stretches from the instru-
ment’s start to its end (i.e. the entire length of the sample). Sample Stretch
The Prophet X recognizes sustain loops only. Release loops are not supported.
16 Sample Playback Sequential Prophet X User’s Guide Sample Playback 17Additional Sample Playback Parameters (Display Menus) TAB 2 - Inst Misc
Additional Sample Playback parameters appear in the menus in the main Stretch Key Boost Glide Rate LPF Bypass
display. To see these, press the instr 1 or instr 2 button in the Sample Play-
back section of the front panel. D3
STRETCH KEY
0dB
BOOST
0
GLIDE RATE LPF BYPASS
Inst1 Tune Inst1 Misc Inst1 Loop Inst1 Edit
TAB 1 - Inst Tune
Frequency Fine Tune Inst1 Pan Sample Vel Stretch Key: C-2...G8—When Sample Stretch is on, this indicates which
key/note (and its associated sample) is stretched. Changing the stretch
C2
FREQUENCY
0
FINE TUNE
0
Tone KEY FOLLOW
key note value will change which sample is stretched (since each key
typically has a different sample mapped to it).
Inst1 Tune Inst1 Misc Inst1 Loop Inst1 Edit
Boost: 0...+9dB—Boosts the gain of the selected instrument up to 9dB
Frequency: C0...C10—Sets the base frequency of the instrument in in 3dB increments.
semitones. When Sample Stretch is off, changing the parameter value
here shifts the sample set relative to that value. When Sample Stretch is Glide Rate: 0...127—When the sample stretch and glide buttons are
on, changing the parameter value here will tune the pitch of the stretched both on, this control sets how quickly the pitch of one note glides up or
sample by the designated value. down from the pitch of the previously played note. On sampled instru-
ments, glide only works when Sample Stretch is enabled. For more
Fine Tune: -50...+50—Sets the base frequency of the instrument in cents. information about Glide, see page 77.
You can “tune” an instrument or sample with this control.
LPF Bypass: On/Off—Enables the selected instrument to be unaffected
Tone: -64...+63—The Tone control is a high-pass/low-pass filter. Use it by the synthesizer’s low-pass filter or the filter envelope. This is useful
to remove unwanted high or low frequencies in the selected instrument if you want a sampled instrument to remain sonically separate from the
so that it blends better with the other components in a sound (such as a sound of the oscillators, which always pass through the filters.
second sampled instrument or the oscillators). Turn the knob clockwise to cut
low frequencies. Turn the knob counter-clockwise to cut high frequencies.
Key Follow: On, Off—Turns pitch tracking on and off for an instrument.
When off, playing higher or lower notes on the keyboard will not change
the pitch of an instrument. This is useful for sound effects and percus-
sion, where you may not want pitch shifting to occur.
18 Sample Playback Sequential Prophet X User’s Guide Sample Playback 19TAB 3 - Inst Loop TAB 4 - Inst Edit
XFade Rate Loop Mode Edit Sample Sample Vel Sample Start Loop Size Loop Center Sample End
20
X FADE RATE
Regular
LOOP MODE EDIT SAMPLE SAMPLE VEL Start: 0 Center: 1000 Size: 499 End: 999
Inst1 Tune Inst1 Misc Inst1 Loop Inst1 Edit Inst1 Tune Inst1 Misc Inst1 Loop Inst1 Edit
XFade Rate: 0...255—If loop is on for a sampled instrument, this Sample Start: Sets the point within instrument samples that sample
controls the length of the crossfade between the loop start and loop end. playback begins.
Some sounds benefit from longer loops in order to smooth the transition
between these points. Loop Size: Adjusts the size of the looped portion of the instrument
sample by moving both its loop start and loop end points.
Loop Mode: Regular, Pitched, Sync—Sets how the sustain loop behaves
in an instrument or sample (if a loop exists in the sample). In regular Loop Center: Adjusts the location of the loop within the sample. The
mode, the loop plays continuously while a key is held. In pitched mode, size of the loop stays the same, but its location within the sample (as
the loop becomes a pitch period calculated based on the assigned note of defined by its center point) is moved when you adjust this control.
the sample. You can change the size of this pitch period by pressing Soft
Key 4 (Inst1 Edit) and changing the loop size setting. A loop size setting Sample End: Sets the point within instrument samples that sample play-
of of 1 indicates a single pitch period. In sync mode, the loop plays back back ends.
in sync with the master clock BPM. This is useful for loops that consist
of rhythmic material that you wish to synchronize to the sequencer and
arpeggiator.
Edit Sample: On, Off—If you have edited a sample’s start, end, or loop
size or center, turning off edit sample will temporarily ignore the edits
and play the sample in its original, unmodified state.
Sample Vel: On, Off—Toggles velocity sensitivity and velocity-based
multi-sample switching on or off for the selected instrument. Turning
sample velocity off will cause the Prophet X to always play the sample
normally designated to have the greatest velocity. It will not switch
samples based on how hard you play, as it usually would.
20 Sample Playback Sequential Prophet X User’s Guide Sample Playback 21Oscillators To audition the oscillators:
1. Press the global button.
Oscillators provide the raw building blocks of the Prophet X’s sound
(along with the sampled instruments) by producing waveforms, each 2. Use Soft Knob 1 to navigate to the basic program command, then press
of which has its own inherent sound character based on its harmonic Soft Key 1 (write now).
content. The Prophet X has two digital oscillators per voice. 3. In the basic program, only Oscillator 1 is audible. (The level of Oscil-
lator 2 is set to zero and Instruments 1 and 2 do not have an instrument
Oscillators 1 and 2 are capable of generating sine, sawtooth, pulse, and selected.)
super sawtooth waves. You can vary the “pulse width” of these wave-
4. In the oscillators section, press the shape button to step through the
shapes using the shape mod parameter. This allows for a great variety of
various waveshapes. Sawtooth is selected by default. Notice that it is
different waveshapes and timbres. The shape mod parameter controls the
possible to select no waveshape.
thickness/detuning of the super sawtooth wave.
5. As you toggle through the waveforms, turn the shape mod knob and
listen to how the timbre of the waveform changes. When super saw is
selected as the waveshape, this knob controls the thickness (detuning)
The digital oscillators on the Prophet X are extremely stable. To emulate the of the Super Saw wave.
random pitch drift and oscillator instability of vintage instruments, use the slop 1 & 2
parameter to dial in as little or as much drift as you like. 6. Turn up the level of Oscillator 2 in the Mixer and experiment with
setting each oscillator to a different waveshape. Experiment with the
fine tune knob on the oscillators and notice how slightly detuning the
sine
sawtooth oscillators in relation to each other creates movement and thickness in
pulse/square their combined sound.
7. Try rotating the filter’s cutoff and resonance knobs to see how they
affect the sound of the oscillators.
8. Use the pitch knob to change the pitch (in semitones) of the oscillators.
Try tuning one oscillator to a interval such as a third, a fifth, or a sixth.
9. With both oscillators on, press the sync 2 > 1 button, then rotate the
pitch knob on Oscillator 1 while you hold a note. This is the classic
hard sync sound. You can route an envelope to Oscillator 1 pitch using
The Oscillators section
the modulation matrix to create this effect each time you play a note.
You’ll learn more about the mod matrix in “Modulation” on page 55.
Oscillator 1 can be hard-synced to Oscillator 2 using the sync 2>1 button
for harmonically-complex sounds when modulated. Both oscillators
feature a fine tune knob for detuning and thickening sounds.
You can force either or both of the oscillators to start its wave cycle from its
beginning (its zero crossing) each time you press a note on the keyboard by setting
wave reset to on in the osc shape tab. This is useful for creating sounds that have a
very consistent sound each time you trigger them.
22 Oscillators Sequential Prophet X User’s Guide Oscillators 23Oscillator Parameters (Front Panel)
Shape: Sine, Sawtooth, Pulse, Super Saw —This button selects the Try using the auxiliary envelope to sweep the pitch of Oscillator 1 when it is
waveshape generated by the oscillator. You can also turn the oscillator off synced to generate the classic, hard-edged sync sound.
by selecting no waveshape.
Slop 1&2: 0…127 – Adds randomized detuning to the oscillators to
Pitch: Sets the base frequency of Oscillator 1 or 2 over a 9-octave range emulate the tuning instability of vintage analog oscillators. This tuning
from 16 Hz to 8 KHz (when used with the Transpose buttons). Adjustment instability is a big part of what made vintage instruments sound charac-
is in semitones. The global master coarse and master fine settings affect teristically warm and fat. The oscillators in the Prophet X are very stable,
the pitch of the oscillators. See “Global Settings” on page 119 for more and will not drift unless configured to do so. Use slop 1&2 parameter to
information. dial in as little or as much drift as you like.
Fine Tune: -50...+50 – Fine tune control with a range of a quarter tone up
or down. The 12 o’clock position is centered. Steps are in cents (50 cents = Additional Oscillator Parameters (Display Menu)
1/2 semitone).
Additional oscillator parameters are accessible through the menus in the
Shape Mod: -64…+63 – Changes the “pulse” width of the selected
main display. To see these menus, adjust any control in oscillators section
waveform, which modifies its harmonic content and timbre. To generate of the front panel.
a square wave when pulse is selected as the waveform, set this parameter
to 0. When super saw is selected as the waveshape, shape mod controls
TAB 1 - Osc Tune
the thickness (detuning) of the Super Saw.
Frequency Fine Tune Osc Slop Key Follow
C2 0 0
Applying waveshape modulation using a low frequency oscillator or other FREQUENCY FINE TUNE OSC SLOP KEY FOLLOW
modulation source in the mod matrix is a great way to add movement and thickness to Osc1 Tune Osc1 Shape Osc1 Misc Osc1 Select
a sound.
Sync 2>1: Off, On—Turns Oscillator 1 hard sync on. Sync forces Oscillator Frequency: Sets the base frequency of Oscillator 1 or 2 over a 9-octave
1 (the slave) to restart its cycle every time Oscillator 2 (the master) starts range from 16 Hz to 8KHz (when used with the Transpose buttons). Adjust-
a cycle. This provides a way to create more complex, harmonically rich ment is in semitones.
shapes from simple waveforms—especially when the frequency of Oscil-
lator 1 is set to a different interval than Oscillator 2. Fine Tune: -50...+50—Fine tune control with a range of a quartertone up
or down. The 12 o’clock position is centered. Steps are in cents (50 cents =
1/2 semitone).
Oscillator 1
Osc Slop: 0…127 – Adds randomized detuning to the oscillators to
emulate the tuning instability of vintage analog oscillators. This tuning
Oscillator 2
instability is a big part of what made vintage instruments sound charac-
Oscillator 1 teristically warm and fat. The oscillators in the Prophet X are very stable,
synced to and will not drift. Use osc slop parameter to dial in as little or as much
Oscillator 2
drift as you like.
Oscillator hard sync
24 Oscillators Sequential Prophet X User’s Guide Oscillators 25Key Follow: Off, On—When Key Follow is on, the oscillator tracks the Wave Reset: Off, On—(In the osc1 shape tab in the display) When
keyboard or note data received via MIDI. When off, the oscillator plays Wave Reset is off, the Prophet X oscillators are free running. That is, the
at its base frequency setting, though the pitch may be affected by modu- oscillators are running whether a note is being gated on or not. When
lation from other sources. the amplifier envelope is set for a fast attack, this can cause a soft, but
detectable, pop or click at the beginning of a note because the note might
be gated on at a point in the wave’s cycle other than a zero crossing. The
TAB 2 Osc Shape first cycle to play might be truncated. For some sounds, like monophonic
Shape Shape Mod Sync Wave Reset
basses, this may actually be desirable. It adds a bit of randomness to the
attack that can make it sound more organic. When wave reset is on, the
Pulse
SHAPE
0
SHAPE MOD SYNC WAVE RESET
wave is always reset to zero—the start of its cycle—when a note is triggered.
Osc1 Tune Osc1 Shape Osc1 Misc Osc Select
TAB 3 - Osc Misc
Shape: Sine, Sawtooth, Pulse, Super Saw —This selects the waveshape Glide Rate
generated by the oscillator. You can also turn the sound of the oscillator
off by selecting no waveshape. 17
GLIDE RATE
Shape Mod: -64…+63 – Changes the “pulse” width of the selected Osc1 Tune Osc1 Shape Osc1 Misc Osc Select
waveform, which modifies its harmonic content and timbre. To generate a
square wave when pulse is selected as the waveform, set this parameter to 0.
Glide Rate: 0...127—Sets the oscillator glide (portamento) amount.
Glide can be set independently for each oscillator. Low values are
shorter/faster. The glide switch must be on to hear the effect of glide
rate. For a detailed explanation, see “Glide” on page 77.
-64 0 63
Oscillator pulse width (square wave) TAB 4 - Osc Select
Soft Key 4 toggles between Osc 1 and Osc 2 so that you can edit their
Sync: Off, On—Turns Oscillator 1 hard sync on. Sync forces Oscillator 1 parameters from the display.
(the slave) to restart its cycle every time Oscillator 2 (the master) starts
a cycle. This provides a way to create more complex, harmonically rich
shapes from simple waveforms—especially when the frequency of Oscil-
lator 1 is set to a different interval than Oscillator 2.
26 Oscillators Sequential Prophet X User’s Guide Oscillators 27Mixer Additional Mixer Parameters (Display Menu)
Additional Mixer parameters are accessible through the menus in the
The Mixer section is where you set the levels of the various sound
main display. To see these menus, adjust any control in mixer section of
generators on the Prophet X. These include Instruments 1 and 2, which
the front panel.
are sampled, and Oscillators 1 and 2, which are digital oscillators. You
must turn up at least one of these sources in order to make sound with
the Prophet X. (Alternatively, you can use the filter to generate its own TAB 1 - Mixer
sine wave by turning up resonance all the way so that it self-oscillates.)
Inst 1 Level Inst 2 Level Osc 1 Level Osc 2 Level
60 60 20 20
Rather than limit the outputs of the Prophet X to keep the instrument from INST 1 LEVEL INST 2 LEVEL OSC1 LEVEL OSC2 LEVEL
clipping, we allow you to adjust levels at various points in its signal path. This gives Mixer Panning Hack/Deci
Env Amt LPF Misc
you the option to “overload” things in interesting ways, if you wish to do so. If not,
try reducing the levels of the instruments and oscillators in the mixer section, the env
amount parameter in the Amplifier Envelope, or the resonance parameter in the filter.
Instrument 1 Level: 0...127—Sets the output level of Instrument 1.
Instrument 2 Level: 0...127—Sets the output level of Instrument 2.
Osc 1 Level: 0...127—Sets the output level of Oscillator 1.
Osc 2 Level: 0...127—Sets the output level of Oscillator 2.
TAB 2 - Panning
Inst 1 Pan Inst 2 Pan Osc 1 Pan Osc 2 Pant
The Prophet X Mixer
0
INST 1 PAN
0
INST 2 PAN
-10L
OSC1 PAN
10R
OSC2 PAN
Mixer Panning Hack/Deci LPF Misc
Mixer Parameters (Front Panel)
Instrument 1: 0...127—Sets the output level of Instrument 1. Inst 1 Pan: -64L...63R—Sets the panning location of the instrument
within the stereo field. Instrument panning is disabled in 16-voice mode.
Instrument 2: 0...127—Sets the output level of Instrument 2.
Inst 2 Pan: -64L...63R—Sets the panning location of the instrument
Osc 1: 0...127—Sets the output level of Oscillator 1. within the stereo field. Instrument panning is disabled in 16-voice mode.
Osc 2: 0...127—Sets the output level of Oscillator 2. Osc 1 Pan: -64L...63R—Sets the panning location of oscillator 1 within
the stereo field. Oscillator panning is disabled in 16-voice mode.
Osc 2 Pan: -64L...63R—Sets the panning location of oscillator 2 within
the stereo field. Oscillator panning is disabled in 16-voice mode.
28 Mixer Sequential Prophet X User’s Guide Mixer 29Filter
To create super-wide stereo synth sounds, pan oscillator 1 hard left (-64L) and
oscillator 2 hard right (63R). The Filter takes the basic, raw sound of the samples and digital oscil-
lators and subtracts frequencies, changing their harmonic content and
the character of their sound. This change can be varied over time using
TAB 3 - Hack/Deci the Filter Envelope to produce more dynamic, animated timbres. The
Prophet X’s filter is a classic, 4-pole, resonant low-pass filter that can self-
Bit Hack Decimate oscillate (generate a sine wave) when resonance is set to its maximum.
0
BIT HACK
0
DECIMATE
In addition, when used in 8-voice mode, the Prophet X filter has a stereo
signal path. This results in a noticeable increase in richness and depth.
Mixer Panning Hack/Deci LPF Misc
This also gives you the ability to pan instruments 1 and 2 and/or oscil-
lators 1 and 2 to different positions in the stereo field. (See “TAB 2 -
Bit Hack: 0...15—Reduces the bit depth of the original 16-bit samples Panning” on page 29.)
by a selectable number of bits, so that a value of 15 results in extremely
coarse 1-bit fidelity. This has the effect of reducing fidelity and increas-
ing “noisiness.” The more harmonics there are in a sound, the more effect
In addition to the low-pass filter, there is a resonant high-pass filter available
bit hack has. Higher settings can sound quite nasty. Bit hack occurs in the effects section. If you want to sweep this filter using an envelope as you would
pre-filter and pre-effects, so you can filter the bit-hacked sound and add typically do on the low-pass filter, use the Modulation Matrix to route the Filter Enve-
digital effects such as reverb and delay. lope or one of the Auxiliary Envelopes to it. Each sample instrument also has its own
Tone control which provides low-pass and high-pass filtering (without resonance).
Decimate: 0...127—Reduces the sample rate of the samples and the
digital oscillators. This has the effect of reducing fidelity and adding
digital artifacts. Higher settings can sound very harsh. Decimation, like
Bit Hack, occurs pre-filter and pre-effects, so you can filter the decimated
sound and add digital effects.
The Prophet X Filter
To hear the effect of the filter:
1. Press the global button and use Soft Knob 1 to navigate to the basic
program command, then press Soft Key 1 (write now).
2. Hold down a note and rotate the filter’s cutoff knob. Notice how it cuts
the high frequencies as you rotate counter-clockwise, making the sound
of the oscillator less bright. If you turn the cutoff knob fully counter-
clockwise you’ll filter out all frequencies and hear nothing.
30 Mixer Sequential Prophet X User’s Guide Filter 313. Return the cutoff knob to its halfway position, hold down a note again Additional Filter Parameters (Display Menus)
then turn the resonance knob about halfway up. Notice how the sound
changes as a band of frequencies near the cutoff is amplified. Additional Filter parameters are accessible through the menus in the
main display. To see these menus, adjust any of controls in filter section
4. Rotate the filter’s cutoff knob again and listen to a classic resonant of the front panel.
filter sweep.
In the previous example, you controlled the filter cutoff by hand. In most
cases, you will use the Filter Envelope to do this. To learn more about the TAB 1 - VCF ADSR
Filter Envelope see page 37. Attack Decay Sustain Release
Filter Parameters (Front Panel) A:25 D:36 S:52 R:44
VCF ADSR VCF Env Amt LP Filter LPF Misc
Drive: 0...127—Increases signal input to the filter, boosting volume and
adding harmonic saturation and warmth.
Attack: 0...127—Sets the attack time of the envelope. The higher the
setting, the slower the attack time and the longer it takes for a sound to
Sampled instruments have a Boost parameter (in the inst misc tab) that is useful
reach its full volume. Pads typically have softer (longer) attacks. Percus-
for increasing signal level to the filter if necessary. This can enhance filter Drive. sive sounds have sharper (shorter) attacks.
Decay: 0...127—Sets the decay time of the envelope. After a sound
Cutoff: 0...164—Sets the filter’s cutoff frequency. Frequencies are
reaches its full volume at its attack stage, decay controls how quickly the
reduced from the top down, cutting the high frequencies and passing the
sound transitions to the level set with the sustain control. The higher the
low frequencies, hence the name “low-pass.”
setting, the longer the decay. Percussive sounds, such as synth bass, typi-
cally have shorter decays.
Resonance: 0...255—Emphasizes a narrow band of frequencies around
the cutoff frequency. High levels of resonance can cause the filter to self- Sustain: 0...127—Sets the sustain level of the envelope. The higher the
oscillate and generate its own pitch. setting, the louder the sustained portion of the sound will be. The sound
will stay at this level for as long as a note is held on the keyboard.
Release: 0...127—Sets the release time of the envelope. This controls
High levels of resonance can sometimes cause the Prophet X outputs to clip.
Monitor your outputs carefully to ensure optimal, clean signal levels. how quickly a sound dies out after a note is released.
Key Track: 0...127—Sets the amount of modulation from the keyboard
to the filter’s cutoff frequency. Any setting above zero means that the
higher the note played on the keyboard, the more the filter opens. This
is useful for adding brightness to a sound as higher notes are played, which
is typically how acoustic instruments behave. When set to zero, keyboard
filter tracking is off, meaning that filter frequency is unaffected by playing
higher or lower notes on the keyboard. When set to 127, the filter will track
in half-step increments, which can be useful if you are using the filter to
generate a pitch through self-oscillation.
32 Filter Sequential Prophet X User’s Guide Filter 33You can also read