2GB MP3 Player USER GUIDE - DO NOT FORMAT UNIT under FAT.
←
→
Page content transcription
If your browser does not render page correctly, please read the page content below
DO NOT
                            FORMAT
                             UNIT
                           under FAT.

2GB MP3 Player
 USER GUIDE
   © Jazwares, Inc. 2010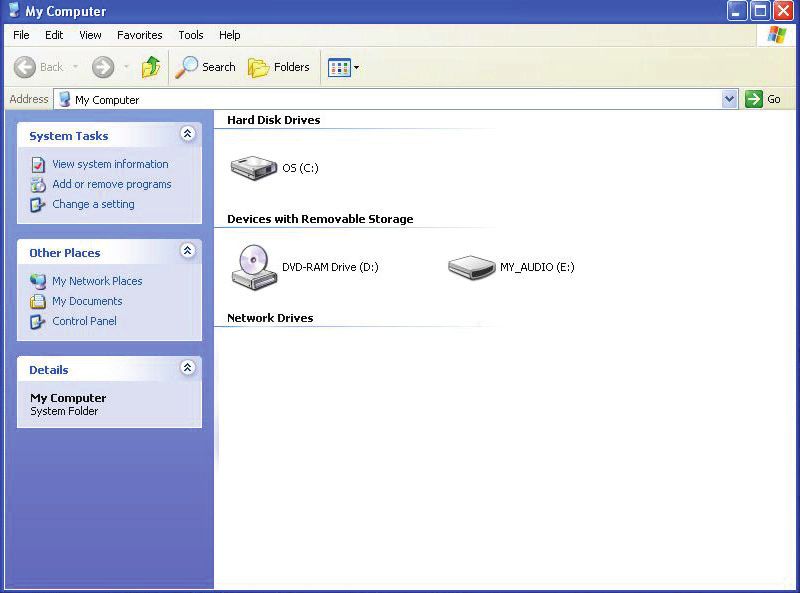
CONTENTS
Please read the instructions along with the MP3 Player carefully
before you use it, so that you can operate it conveniently.

WELCOME & Safety Tips                                                  3

Knowing You MP3 Player                                                 4-5

Start Using Your MP3 Player                                            6

MP3 Player Modes                                                       6-12
        Music Mode                                                     7-8
        Record Mode                                                    9
        Voice Mode                                                     9-10
        System Mode                                                    11

Troubleshooting                                                        12

Notes                                                                  13

Warranty                                                               14-15

Features & Specifications                                              16

Frequently asked questions                                             17

     Included in box:
     • MP3 Player
     • Earphones
     • USB Cable - Specifically to download pictures to the computer
     • User Guide and Warranty

                                         -2-
Congratulations on your purchase of the MP3 Player!
We hope you enjoy all the great features. To get the most out
of your MP3 Player please read this manual as it provides tips
and information about its various features.

SAFETY TIPS:
• Use this only as intended.
• To prevent fire or shock hazard, do not expose this unit
   to rain or moisture.
• Do not submerge the unit in any liquid.
• Do not place near fire.
• Do not disassemble.
• Do not touch the USB connection port of the player while during formatting,
  downloading or uploading process. Unexpected disconnection may cause data
  loss or damage to the player.
• Avoid using headphones/earphones at high volume. Hearing experts advise
  against continuous loud and extended music play. Keep the volume at a
  moderate level. The quieter the sound, the longer you can listen to it safely.

     NOTE : For Home and Personal Use
     This product is intended to be used for recording and playback for your home    e
     & enjoyment. Copying & commercial use of copyrighted material without
     permission of the copyright owner may be prohibited by law. Use of your media
     player, in compliance with all copyright and applicable intellectual property laws,
     remains the responsibility of the user of the product.

                                            -3-
Knowing Your MP3 Player:
PREVIOUS / NEXT /
REWIND FAST FORWARD
MENU DISPLAY
L
VO
ON/OFF VOLUME
PLAY/PAUSE
-4-Knowing Your MP3 Player:
USB PORT / EARBUDS JACK
RESET
RESET
MIC
MICROPHONE
LO
V
SPEAKER
-5-Start Using Your MP3 Player:
CHARGING THE UNIT
Use the USB cable to conect the unit to the computer.
We recommend to allow the unit to fully discharge before charging it for the first time.
This will help condition the battery for optimal performance.
LOADING FILES
Use USB cable to connect to computer.
After connected correctly, the screen will display connecting icon.
At this time, you can download or upload data files and music from the computer.
Don’t take off the USB cable when your player is connected to the computer and
transmitting data.
IMPORTANT: When removing the player from the computer, first close all the
windows that belong to your player. Click the icon on the bottom right corner
of the windows desktop & safely detach your player from USB cable.
TURNING THE UNIT ON
1. Press the ON/OFF button. The welcome screen will display.
2. Use the buttons to scroll trough the MP3 Player modes.
3. Press M to enter the desired mode.
To turn your MP3 Player off, press and hold the ON/OFF button.
MP3 Player Modes:
MUSIC MODE VOICE MODE
Allows you to play the songs Allows you to play back the
Music stored on your MP3 Player. Voice voice notes recorded on the unit.
RECORD MODE
Allows you to record voice SYSTEM MODE
notes and save them on your Allows you to adjust the
Record MP3 Player. System settings of the unit.
Press and hold the M button to return to the main menu from any mode.
-6-Music Mode:
1. Scroll to music and press M to enter into the music mode.
2. Press button to start playing music.
3. Press and hold button to fast forward a song. Press button to rewind.
4. Press the buttons to go to the next or previous song.
MAIN MUSIC MODE SCREEN
Current song playing
Equalizer Mode
Playing Mode
Music Format Time Played
128 032 NOR 02:32 Battery
MP3 A 236 06:36
Total songs stored Song length
SONG NAME
Playing Mode 20
Volume state
ADJUSTING THE VOLUME
1. Press the VOLUME button. The volume bar will appear on the display.
2. Use the buttons to adjust volume.
To switch to speaker press and hold the VOLUME button.
CHANGING EQUALIZER MODE
1. Press M while playing music. Equalizer folder will appear.
2. Press M again to enter into the folder.
3. Use the buttons to scroll trough the equalizer options.
4. Press M to select.
-7-CHANGING REPEAT MODE
1. Press M while playing music.
2. Press button to scroll to Repeat.
3. Press M to enter Repeat mode.
4. Use the buttons to scroll trough the repeat options.
5. Press M to select.
USING REPLAY MODE
1. Press M while playing music.
2. Press button to scroll to Replay.
3. Press M to select replay. Screen will return to the main interface of music mode.
4. Press button to select starting period of replay. Screen will show “A-”.
5. Press button to select end point B of replay. Screen will show “A-B”.
Player will start continuously playing the fraction of song selected.
6. Press button to exit replay mode. Player will go back to normal playing mode.
BROWSING FOR MUSIC
1. Press M while music is on pause. Local folder will appear.
2. Press M again to enter into the folder.
3. Use the buttons to scroll trough the songs.
4. Press M to select a song.
DELETING A FILE
1. Press M while music is on pause.
2. Press button to scroll to Delete file.
3. Press M to enter Delete file.
4. Use the buttons to select YES or NO.
5. Press M to accept.
DELETING ALL FILES
1. Press M while music is on pause.
2. Press button to scroll to Delete all.
3. Press M to enter Delete all.
4. Use the buttons to select YES or NO.
5. Press M to accept.
-8-Record Mode:
1. While on main menu, scroll to Record and press M to enter into the
Recording mode.
2. Press button to start recording.
3. Talk to the microphone located on the back of the unit. See page 5.
4. Press button to stop recording.
5. Press and hold M to save recording.
Voice Mode:
1. While on main menu, scroll to Voice and press M to enter into the voice mode.
2. Press button to start playing a voice or to pause it.
3. Press and hold button to fast forward a voice. Press button to rewind.
4. Press the buttons to go to the next or previous voice.
ADJUSTING THE VOLUME
1. Press the VOLUME button. The volume bar will appear on the display.
2. Use the buttons to adjust volume.
To switch to speaker press and hold the VOLUME button.
CHANGING EQUALIZER MODE
1. Press M while playing a voice. Equalizer folder will appear.
2. Press M again to enter into the folder.
3. Use the buttons to scroll trough the equalizer options.
4. Press M to select.
CHANGING REPEAT MODE
1. Press M while playing a voice.
2. Press button to scroll to Repeat.
3. Press M to enter Repeat mode.
4. Use the buttons to scroll trough the repeat options.
5. Press M to select.
-9-USING REPLAY MODE
1. Press M while playing a voice.
2. Press button to scroll to Replay.
3. Press M to select replay. Screen will return to the main interface of voice mode.
4. Press button to select starting period of replay. Screen will show “A-”.
5. Press button to select end point B of replay. Screen will show “A-B”.
Player will start continuously playing the fraction of voice selected.
6. Press button to exit replay mode. Player will go back to normal voice
playback mode.
BROWSING FOR VOICE NOTES
1. Press M while voice play back is on pause. Local folder will appear.
2. Press M again to enter into the folder.
3. Use the buttons to scroll trough the songs.
4. Press M to select a song.
DELETING A FILE
1. Press M while voice play back is on pause.
2. Press button to scroll to Delete file.
3. Press M to enter Delete file.
4. Use the buttons to select YES or NO.
5. Press M to accept.
DELETING ALL FILES
1. Press M while voice play back is on pause.
2. Press button to scroll to Delete all.
3. Press M to enter Delete all.
4. Use the buttons to select YES or NO.
5. Press M to accept.
-10-System Mode:
While on main menu, scroll to System and press M to enter into the
system settings.
LCD SETTINGS - Backlight and contrast options
To adjust Backlight:
1. Press M to select LCD set.
2. Press M to adjust backlight. Use buttons to desired number.
4. Press M to accept.
To adjust Contrast:
1. Press M to select LCD set.
2. Press button to scroll to contrast.
3. Press M to adjust contrast. Use buttons to desired number.
4. Press M to accept.
LANGUAGE SETTINGS
1. Use button to scroll to language while on system mod e.
2. Press M to enter the language menu.
3. Use the buttons to scroll trough the different languages.
4. Press M to select desired language.
AUTOMATIC POWER OFF SETTING
To adjust the time of automatic power off:
1. Use button to scroll to power off while on system mode.
2. Press M to enter to select.
3. Use the buttons to adjust the seconds.
4. Press M to accept.
MEMORY INFORMATION
To check memory status
1. Use button to scroll to memory info while on system mode.
2. Press M to see memory status. It will show the capacity left on your player.
3. Press M to return to system mode menu.
-11-Troubleshooting:
NO POWER Please make sure your player is charged.
NO SOUND IN Check earphone connection.
Please make sure earphone is clean.
EARPHONE Make sure your MP3 file is not damaged.
STRANGE CODE IN Please make sure you have selected the proper language.
DISPLAY
Check USB cable connection.
CAN’T DOWNLOAD Check whether USB cable is damaged.
MUSIC PROPERLY Check installation of drive program.
Check whether there is free memory space.
Need More Help?
Do Not Return Item to Store.
Call 1-800-370-1827 and speak to a customer service representative.
-12-Frequently asked questions:
LOADING MUSIC FILES TO YOUR MP3 PLAYER
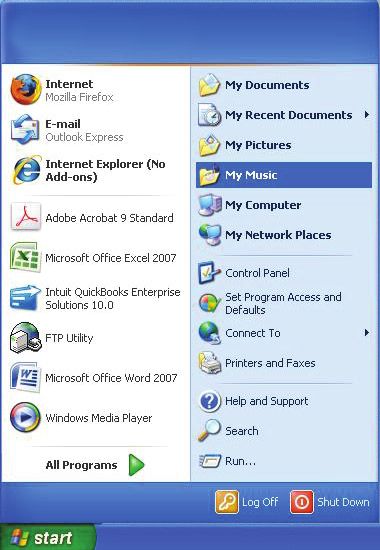
1. With the unit connected to the computer, click on MY MUSIC
under the START menu to look for the music files on your computer.
Leave the window with the music open.
2. Then click on MY COMPUTER under
the START menu to look for your MP3 Player.
It is named “MY_AUDIO”. Click to open.
3. With the two windows open (The window that contains the music files on your
computer and the window of your MP3 Player drive) click the song you want to
upload and drag it to your MP3 Player. It will start copying the music file.
You can upload several songs at the same time by selecting the files while holding
CTRL and then dragging them onto your MP3 Player.
IMPORTANT: Only drag music files to your MP3 Player. Do not drag the entire folder
or the MP3 Player would not be able to read the music.
-13-NOTES:
This equipment has been tested and found to comply with the limits for
a Class B digital device, pursuant to Part 15 of the FCC rules.
These limits are designed to provide reasonable protection against
harmful interference in a residential installation. This equipment generates,
uses and can radiate radio frequency energy and, if not installed and used
in accordance with the instructions, may cause harmful interference to
radio communications.
However, there is no guarantee that interference will not occur in a
particular installation. If this equipment does cause harmful interference
to radio or television reception, which can be determined by switching the
equipment off and on, the user is encouraged to try to correct the
interference by one or more of the following measures:
Reorient or relocate the receiving antenna.
• Increase the separation between the equipment and receiver.
• Connect the equipment into an outlet on a circuit different from
that to which the receiver is connected.
• Consult the dealer or an experience radio/TV technician for help.
Complies to Canadian ICES-003
-14-Limited Ninety (90) Day Warranty:
WARRANTY COVERAGE
Jazwares, Inc.’s warranty obligation is limited to the terms set forth below.
WHO IS COVERED
Jazwares, Inc. warrants the product to the original purchaser or the person receiving
the product as a gift against defects in material & workmanship as based on the date
of the original purchase from an authorized dealer or retailer. The original sales receipt
showing the product name & the purchase date from an authorized retailer is considered
such proof.
WHO IS COVERED
Jazwares, Inc. warranty covers new products if a mechanical defect arises & a
valid claim is received within the Ninety (90) Day Warranty Period. At its option,
Jazwares, Inc. will either (1) repair the product at no charge,using new or refurbished
replacement parts, or (2) exchange the product with a product that is new or which has
been manufactured from new, or serviceable used parts & is at least functionally
equivalent or most comparable to the original product in Jazwares, Inc.’s inventory,
or (3) refund the original purchase price of the product.
Jazwares, Inc. warrants replacement products or parts provided under this warranty
against defects in materials & workmanship from the date of the replacement or repair
for ninety (90) days or for the remaining portion of the original product’s warranty,
whichever provides longer coverage for you. When a product or part is exchanged,
any replacement item becomes your property and the replaced item becomes
Jazwares, Inc. property. If a refund is granted, your product becomes
Jazwares, Inc. property.
Replacement product can only be sent if all warranty requirements are met.
Failure to follow all requirements can result in delay.
WHAT IS NOT COVERED - EXCLUSIONS & LIMITATIONS
The limited warranty applies only to the products manufactured by or for Jazwares, Inc.
that can be identified by the trademark, trade name, or logo affixed to it. This limited
warranty does not apply to any non Jazwares, Inc. hardware product or any software,
even if packaged or sold with the product. Non Jazwares, Inc. manufacturers, suppliers,
or publishers may provide a separate warranty for their own products packaged with the
bundled product. Jazwares, Inc. is not liable for any damage to or loss of any programs,
data or other information stored on any media contained within the product, or any
non - Jazwares, Inc. product or part not covered by this warranty.
© Jazwares, Inc.
-15-Limited Ninety (90) Day Warranty:
WHAT IS NOT COVERED - EXCLUSIONS & LIMITATIONS
This warranty does not apply
(a) to damage caused by accident, abuse, misuse,
misapplication, or non - Jazwares, Inc. product,
(b) to damage caused by service performed by anyone other than Jazwares, Inc.
(c) to a product or a part that has been modified without the written permission
of Jazwares, Inc.
LIMITED WARRANTY DOES NOT COVER
• Shipping charges to return defective product to Jazwares, Inc.
• Product repair and/or part replacement because of improper installation, connections
to improper voltage supply, abuse, neglect, accident, unauthorized repair or other
cause not within the control of Jazwares, Inc.
• Damage or claims for products not being available for use, or for lost data or
lost software.
• Damage occurring to product during shipping.
• A product that requires modification or adaptation to enable it to operate in any country
other then the country for which it was designed, manufactured approved and/or
authorized, or repair of products damaged by these modifications.
• Product lost in shipment and no signature verification receipt can be provided.
• Failure to operate per Owner’s Manual.
RMA REQUIREMENT
If Jazwares, Inc.’s Customer Service verifies that the product is defective,
the Return Authorization Department will issue an RMA number to be placed on
the outer package of the product. Jazwares, Inc. can not accept any product that
does not include an RMA number on the package.
BEFORE RETURNING ANY PRODUCT, CONTACT JAZWARES, INC. CUSTOMER SERVICE.
Customer service is available 9-6 EST at 1-800-370-1877.
REPAIR OR REPLACEMENT AS PROVIDED UNDER THIS WARRANTY IS THE EXCLUSIVE
REMEDY FOR THE CONSUMER. JAZWARES, INC. SHALL NOT BE LIABLE FOR ANY INCIDENTAL
OR CONSEQUENTIAL DAMAGES FOR BREACH OF ANY EXPRESS OR IMPLIED WARRANTY
ON THIS PRODUCT. EXCEPT TO THE EXTENT PROHIBITED BY APPLICABLE LAW, ANY IMPLIED
WARRANTY OF MERCHANTABILITY OR FITNESS FOR A PARTICULAR PURPOSE ON THIS
PRODUCT IS LIMITED IN DURATION TO THE DURATION OF THIS WARRANTY.
Some states do not allow exclusions or limitation of incidental or consequential damages, or allow
limitations on how long an implied warranty lasts, so the above limitations or exclusions may not
apply to you
This warranty gives you specific legal rights. You may have other rights which vary from state to state.
This warranty is only valid in the United States of America.
© Jazwares, Inc.
-16-Features & Specifications:
FEATURES:
Backlit LCD Display
Built - In Speaker
Plays Music
Plays up to 500 Songs*
ID3 Support : Title, Lyrics & Play
USB 2.0 For File Transfers
SPECIFICATIONS:
Memory : 2 GB Flash
Music Format: MP3, WMA, WAV
Recording Format: WAV
Preset Equalizer Modes : Rock, Pop, Classic and More!
Voice Record Function
Multi-languages
Plug & Play : Windows / Windows Media®
Internal Rechargeable Battery
*Song capacity is dependent upon the
size of each song file. 500 songs is
based upon the assumption that each
song file will be 3.8 Mega Bytes
Other brand names mentioned herein are
for identification purposes only and may be
trademarks of their respective holder(s).
2GB MP3 Player
USER GUIDE
Jazwares Inc.
1067 Shotgun Road
Sunrise, Fl. 33326
ENV6
© Jazwares, Inc. 2010You can also read