Operation Manual for Android Operating System
←
→
Page content transcription
If your browser does not render page correctly, please read the page content below
Operation Manual for Android
         Operating System

The operation manual is for reference only. Detailed images and functiQns
please comply with the actual objects. They are subject to change without
prior notice.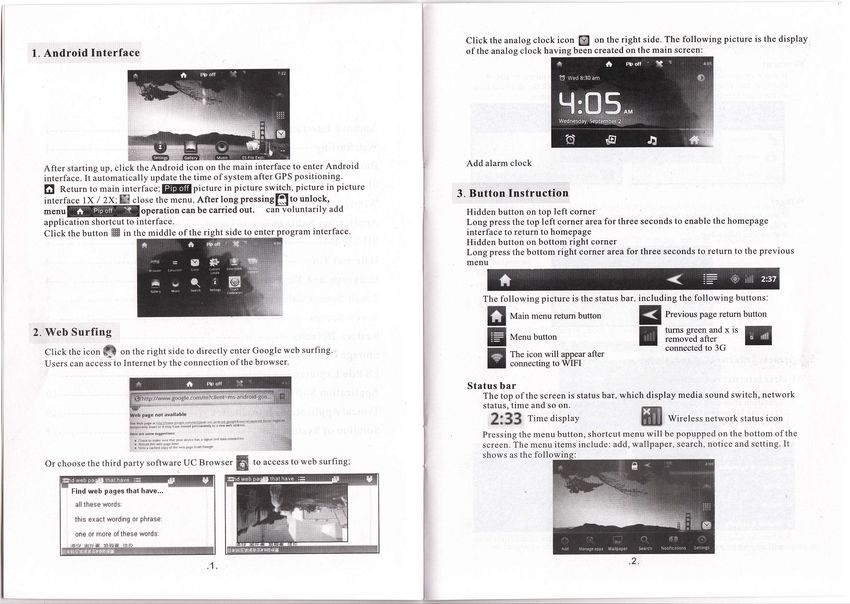
--.--2
Shortcut with Small Tool ---                                                  -J

Wireless Internst Connection --------------.--l::,'l----::--.-.-'-'---t3
Application    Settings                   -----:---'".--------'------'- --"--"4
SD Card--------------..:--.:---:'-:.--i;-.1:11-:;r11':--:,-   "-'-----"--'-'---4
                                           :

                                                                  --------------4
Touch Screen Calibratiol         -."i'-;;--i;;-;'                       --------5
Click the analog clock icon @ on the right side. The following picture is the display
l. Android Interface                                                                           of the analog clock having been created on the main screen:

                                                                                               Add alarm clock
  After starting up, click the Android icon on the main interface to enter Android
  interface. It automatically update the time ofsystem after GPS positioning.
  I   Retuin to main interface;          @@   picture in picture switch, picture in picture
                                                                                              3. Button   Instruction
  ilierface lX / 2x;K close tt ,""ru, After long pressingl!!           to unlock,
                                         "
  *.ooE@operationcanbecarriedout.can-voluntarilyadd                                            Hidden button on top left corner
  application shortcut to interface.                                                           Long press the top left corner area for three seconds to enable the homepage
  Click the button & in the middle of the right side to enter                m interface.      interface to return to homepage
                                                                                               Hidden button on bottom right corner
                                                                                               Long press the bottom right corner area for three seconds to return to the previous
                                                                                               menu

                                                                                                   The following picture is the status bar, including the following buttons:

                                                                                                    6     Main menu retum button                  Previous page retum button

  Web Surfing
  Click the icon @ on the right side to directly enter Google web surfing.
                                                                                                    ts    Menu button
                                                                                                                                           !      ffiir"TjhHf*@
  Users can access to Internet by the connection ofthe browser.                                     K     The icon will appear after
                                                                                                          connecting to WIFI

                                                                                                Status bar
                                                                                                   The top of the screen is status bar, which display media sound switch, network
                                                                                                   status, time and so on.
                                                                                                    3:33,      rime display                XK.      wl."t"r, network status icon
                                                                                                   Pressing the menu button, shortcut menu will be popupped on the bottom ofthe
                                                                                                   screen. The menu items include: add, wallpaper, search, notice and setting. It
                                                                                                   shows as the followin
  Or choose the third party software UC Browser                 to access to web surfing;
                                                          ffi
         Find web pages that haw...
          all   ihese words:

         this exect wording or phrase:

          one or more ofthese words:

                                                 .1   .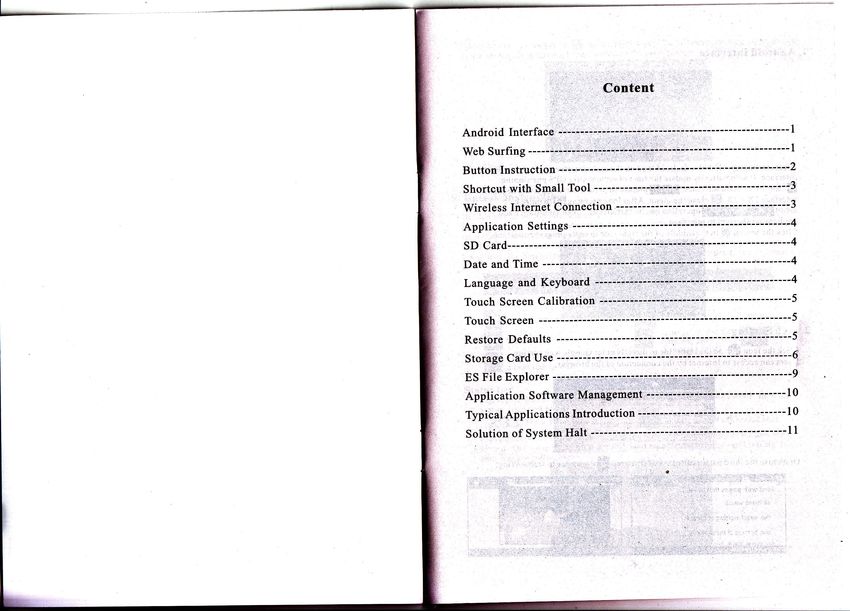
4. Shortcut     with Small Tool                                                               6.   Application Settings
 Shortcut
     Ifyou want to add a shortcut to the main screen, please press menu .. add *
     shortcut, and choose shortcut to add to the main screen. Click the shortcut icon
     on the main screen to carry out corresponding shortcut operation.

       p    shon.utt
                                                      fi   anptiotions

       df   wiagets                                   p    Bool-art

       g      Folders                                                                              Unknown source
                                                                                                   Allow installation ofapplications from non-electronic markets after selected.
                                                                                                   Manage applications
 Widget                                                                                            To manage and remove installed applications, press the menu button   - setting       *
     If you want to add a widget to the main screen, please press menu          *   add   -        applications - manage applications.
     widget, and choose   a   widget to add to the main screen. The widget can be added            Running services
     is shown as   following:                                                                      To view and control the services currently running, press the menu button -*
                                                                                                   setting * applications * running services.
                                                                                                   [evelopment
                                                                                                   To set development options ofapplications, press the menu button   -   setting   -
                                   An6to6ue   ctock                                                applications    *   development.
                              I                                .:'.'.1:.'..*l

                              -E   Calenddr
                                                                                              7. SD card
                              +    Homesqreqtips
                                                                                                      Take out the SD card to check the available storage space.

5. Wireless    Internet Connection
 Wireless internet connection
     l.Insert the matched USB card into the USB port and do the following
        operation after confirming the light ofthe module turns to green;
     2.Press the Menu button and select "Settings" in the pop-up menu;
     3.Select "wireless & networks" in the setting menu;
     4.Select the check box behind Wi-Fi option to open Wi-Fi as shown below;

                                                                                              8. Date and Time

                                                                                                      To set date, time, time zone, signal timing and format, press the menu
                                                                                                      button   -   setting -date and time.

                                                                                              9. Language and             Keyboard
     5.After the success of the network connection, Wi-Fi wireless connection icon
       will appear in the status bar at the top ofthe desktop.                                        Set language area (language and area), text input and automatic correction options.
                                                .J.
                                                                                                                                             .4.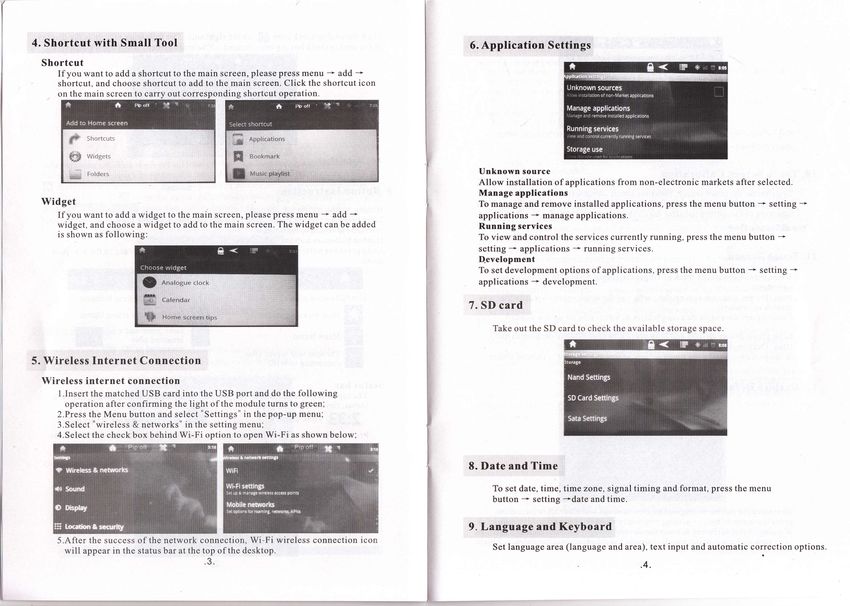
13. Storage Card Use
                                                                                            Inserta memory card:
                                                                                              Inseit the memory into card slot and use your fingers to press the card in until
                                                                                              hearing the sound of "click".
                                                                                            Go over files in the storage card:
                                                                                              Run the "ES file browser" program to go over the content in the card.
                                                                                            Remove the storage card:
                                                                                              When needing to popup the TF card, please stop the file to record in the card,
    Sogou input method, Baidu input method, Google input method and other                     and then select "setting - SD card * uninstall SD card before pulling it out.
                                                                                            Note:
    input methods can be installed.                                                             1. The card should be inserted into correct position, otherwise it will be damaged.
                                                                                                2. Storage card ofmajor brands is recommended to be used to avoid that the
                                                                                                   card is not compatible.
10. Touch Screen     Calibration                                                      x'    The hot plugging ofthe storage card
                                                                                                Please do not do the hot plugging to the card while using or going over the   files
    To calibrate the touch screen, press the touch screen calibration icon. Follow
                                                                                      l         in the storage card. Ifpulling out the storage card directly while going over or
    the prompts to do touch screen calibration. Appropriate prompt will appear for              using the files in the siorage card in the software such as My Video, My mu'sic
    returning to the setting list after the calibration is completed.                           and My Album, the card may be damaged and the device may automatically exit
 Troubleshooting                                                                                the program for self-protection. Please see "storage Card Use" for reference
                                                                                                ofthe plugging ofthe storage card.
                                                                                            Storage space
11. Touch Screen                                                                                There are two available storage spaces in the device: internal storage ofthe
                                                                                                device and the storage card. The displayed removable disk of the internal
    Touch screen senses the track of finger trajectory, so can do the following                 storage ofthe device is "ResidentFlash3" ; the displayed folder name ofthe
    operation:                                                                                  storage card is "SDMMC" . The available space in the ResidentFlash3 for the
    Note: Do not place objects on the surface ofthe touch screen because that may               user is about 1.6 GB, while the storage card depends on the specific capacily
    scratch or crush it.                                                                        and the maximum storage card the device can support is 32GB.
    Click: Select an icon to do a single click to select icon or option needed.             File copy:
                                                                                                In the file browser, the displayed folder name ofthe internal storage ofthe
    Long press: Select an icon and long press it to drag it to the desktop display.
                                                                                                device is "LocalDisk" ; the displayed folder name of the storage card is
    Drag: Drag in the desktop.to switchamong three interfaces.                                    "sdcard" . To copy flies between the internal storage of the device and the
    In the process of using the touch screen, stylus can be used to instead finger:
                                                                                                storage card, please read the following operation for reference:
                                                                                                Ifyou need to copy f,rles from the storage card to theinternal storage ofthe device:
                                                                                            l.Aciess to file browser, click the storagi card icon ffi to enter sdcard folder;
12. Restore Defaults                                                                        2. Select the SCSI folder to open it to see the files in the external removable disk;
                                                                                            3.selecting the files to copy and long press the icon, an operation list as following
                                                                                               will popup;

    To restore the device to original factory settings and clear all information,
    press the menu button * setting * privacy right - restore factory settings.             4   Click copy to copy the selected files;
    Warning: After selecting to reset the device, Google account, data and settings         5   Click the internal storage icon Q ofthe device to switch to LocalDisk;
    of systern and application and downloaded applications will be deleted. Please          6   Long press the blank area and an operation list as following will popup;
    cautiously use this function.
                                          .5.                                                                                          .6.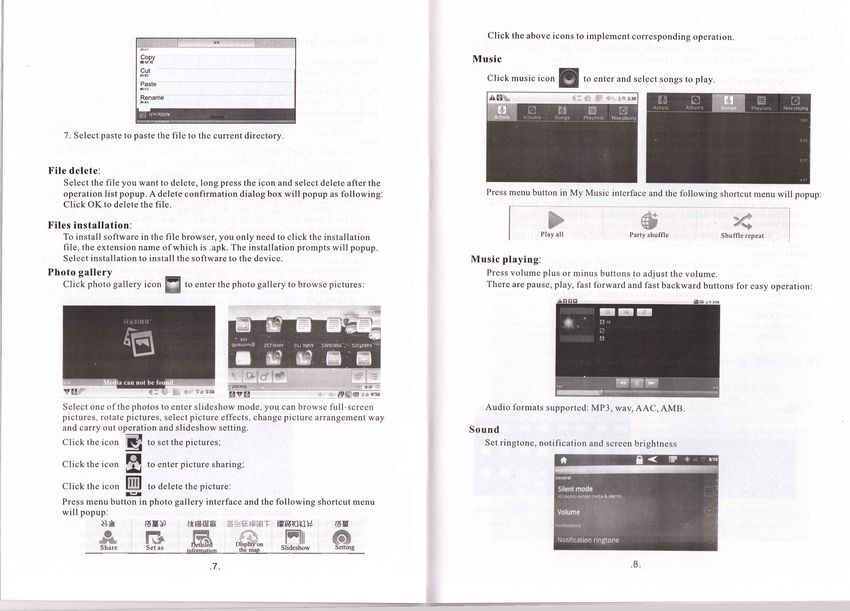
Click the above icons to implement corresponding operation

                           copv                                                             Music
                           Cut
                                                                                               Click music i"on                to enter and select songs to play.
                           Paste                                                                                       !
                           Rename

   7. Select paste to paste the file to the current directory.

File delete:
   Select the file you want to delete, long press the icon and select delete after the
   operation list popup. A delete confirmation dialog box will popup as following:             Press menu button in         My Music interface anllhe fo.-llowing shortcut menu will popup:
   Click OK to delete the file.

Files installation:
   To install software in the file browser, you only need to click the installation                            PIay   all
                                                                                                                                              $
                                                                                                                                            arty shu
                                                                                                                                                                        *
                                                                                                                                                                    Shuffle repeat
   file, the extension name of which is .apk. The installation prompts will popup.
   Select installation to install the software to the device.                               Nlusic playing:
Photo gallery                                                                                  Press volume plus or minus buttons to adjust the volume.
   Click photo gallery icon         [t     to enter the photo gallery to browse pictures:      There are pause, play, fast forward and fast backward buttons for easy operation:
                                    It

   v6ltr                                 i. 7 r+rBa 'li-vib*"1-                   rp*o,*
   Select one ofthe photos to enter slideshow mode, you can browse lull-screen                 Audio formats supported: MP3, wav, AAC, AMB
   pictures, rotate pictures, select picture effects, change picture arrangement way
                  -!;
   and carry out operation and slideshow setting.                                           Sound
   Clickthe ico.,            tosetthepictures;                                                 Set ringtone,   notification and screen brightness
                      $
   Click the   i"o,          to enter picture sharing;
                  $
   click the i"on Jiifl      to delete the picture:
                      EI
   Pregs menu button in photo gallery interface and the           following shortcut menu
   will popup:

               *
               P,fr         .l6f),         r*iEl='g A+glFET

                            IR .m. +ffi" Jn[- Q,_
                                                 .7.
                                                                  lSW{lIlH"      16r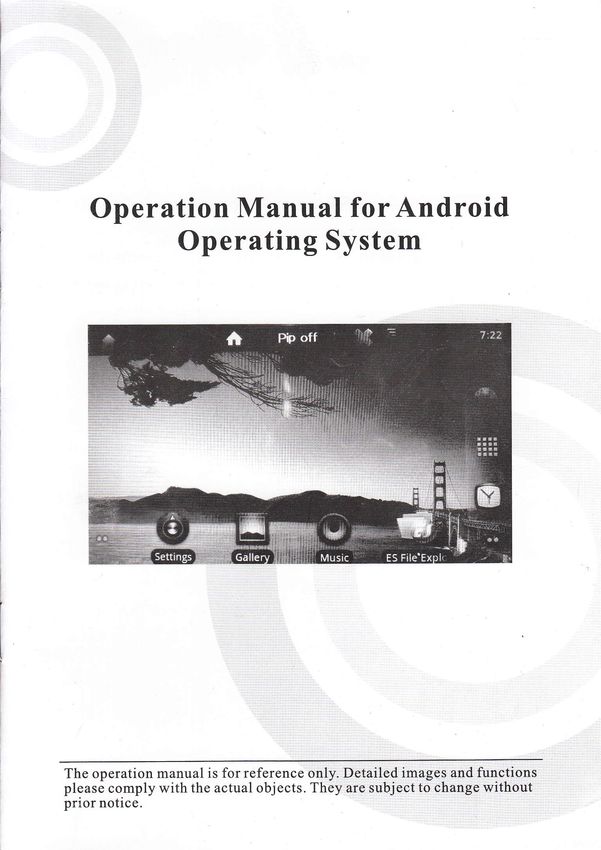
Silent mode
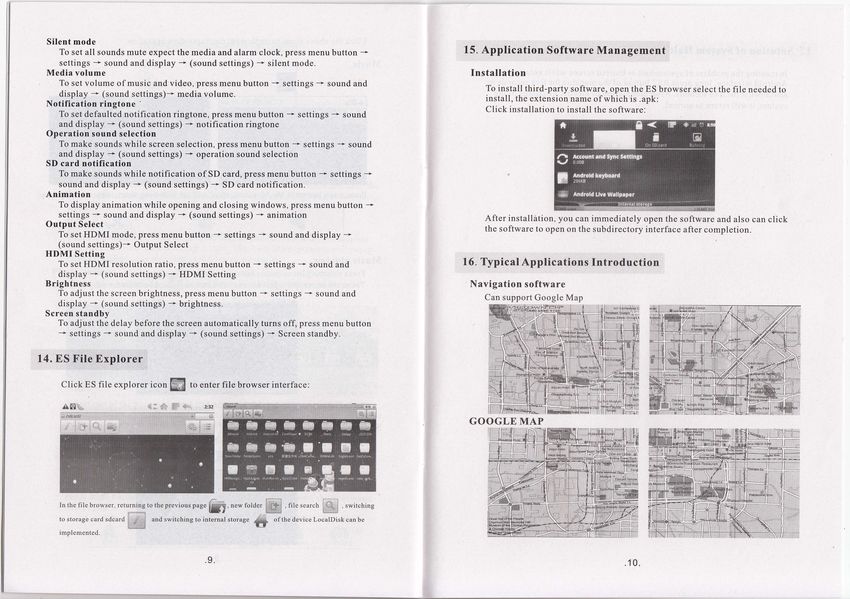
To set all sounds mute expect the media and alarm clock, press menu button - I 5. Application Software Management
settings - sound and display * (sound settings) * silent mode.
l\{edia volume Installation
To set volume ofmusic and video, press menu button - settings -* sound and
To install third-party software, open the ES browser select the file needed to
display - (sound settings)- media volume. insta1l, the extension name of which is .apk:
Notification ringtone'
* * Click installation to install the software:
To set defaulted notification ringtone, press menu button settings sound
and display - (sound settings) - notification ringtone
Operation sound selection
To make sounds while screen selection, press menu button - settings * sound
and display - (sound settings) * operation sound selection
SD card notification
To make sounds while notification ofSD card, press menu button * settings -t
sound and display * (sound settings) - SD card notification.
Animation
To display animation while opening and closing windows, press menu button -
settings * sound and display - (sound settings) * animation After installition, you can immediately open the software and also can click
Output Select the software to open on the subdirectory interface after completion.
To set HDMI mode, press menu button settings -* sound and display
- -
(sound settings)-- Output Select
HDMI Setting
To setHDMI resolution ratio, press menu button * settings * sound and 16. Typical Applications Introduction
display - (sound settings) * HDMI Setting
.
Brightness Navigation software
To adjust the screen brightness, press menu button * settings - sound and
Can support Google Map
display * (sound settings) - brightness.
Screen slandby
To adjust the delay before the screen automatically turns off, press menu button
* settings * sound and display - (sound settings) - Screen standby.
I4. ES File Explorer
Click ES file explorer icon ffi to enter file browser interface:
In the file browser, returning to the previor" pu8e ,"w folde. , file search , switchine
ffi, W $$
to storag'e card sdca.d *a .*i,cting to i.t"rrut ,1" aevice LocalDisk can be
lt** "to.u** 1$1f
implemented.
.9. .10.,,
+
fi
pyrstom, it{ill rgturn to norm$l,
ICar DVn Player
rM,t&!v} ffi u kY' ;w'xll38& pt&Yx&.
Instruction Manual
g *3 a*6x-i{X {;${ 8x3 }\&s s$ 3* si
The operation manual is for reference only. Detailed images and functions
please comply with the actual objects. They are subject to change without
prior notice.Safety Precaution
The disk entrance shall be kept clean and any dust
Welcome to purchase the Product! that is found shall be wiped off immediately; The
disk with dust shall be wiped off with clean cloth
before it is placed into the playet,otherwise, dust
Thank you for purchasir,g car multimedia player
made by us! To ensure your correct use of the brought into the player with the disk will have
impact on the transmission mechanism after a
system, please read the user's manual prior to use
long time's use, resulting in slow entry, or no
and keep it properly for your daily reference.
entry or exit of the disk.ffiffi Notes for Installation Notes for installation The player only adapts to l2Y-74Y DC power negative-pole grounding system, so confirm if your car is applicable for this kind ofnegative-pole electrical grounding system prior to installation. Prior to installation of the player, please take off the power source at negative pole (-) , and the chance to damage your machine due to short circuit can be reduced in doing so. Wires shall be connected in accordance with colors in the guide to installation, for wrong connection may cause stagnancy of the machine or damage electrical system of the car. The lead wire of a speaker (-) shall be connected to (-) its terminal, and it is prohibited being connected to chassis of the vehicle or the speakers. Do not block the ventilation hole or heat radiation plate so as to prevent from fire as a result of over heating inside the machine. After installation is completed and used for the first time (including replacing the battery of the car), press the RES key on the panel with a small tool so that the system is in the default setting state.
|}ii||il   Panel schematic diagram                                                                                        &S Panel schematic diagram

                   7 INCH WIDE SCREEN SYSTEM

                                                                                                                             IRemote control receiver                                     E Mode
                                                                                                                             Remote cotrtrol induction area.                              Press the button to switch futrctions among DVD,
                                                                                                                                                                                          radio, navigation, Bluetooth aod other functions.
       I Microphone                                          press the buttoo to etrter the GPS navigation map
       Can be used to make calls using         Bluetooth     interface; when the machine has no navigation
                                                             function. / Press the button under other functions to
                                                                                                                             ELCD
                                                                                                                             Display all kinds ofimages and click the control
       E Remote control receiver                             enter lhe main inlerface of radio. In radio in ter[ace, it      menu iD the scroen to solect control project.                E Reset button
       Remote control inductiou area.                        has band switch function.
                                                                                                                                                                                          Press the button to reset the system   ofthe machine.
       E Power button                                        EBand                                                           E Power button
       Short press this knob        to enter Meun;           Press tlie button under otherfunctions to enter the
       press and hold this button to start up or shut                                                                        Short press this knob      to enter Meun          ;
                                                             main interface ofradio. In radio intedace, it has
       down the player.
                                                                                                                             press md holdthis button to start up or shut                 lE Adoroid/Navigation/band
                                                             band switch function.
                                                                                                                             dom the player.                                               Ifthe machine is equipped with navigation function,
       E Mute / switchboard                                  E Slot-out button / decline screen
                                                                                                                                                                                          press thebutton to etrter lhe GPS travigation map
       Short press to tum off the somd     /                 Long Press the buttotr to eject the disc / make the
                                                                                                                                                                                          interface: when the machine has no navigatioo
       long press to tum offthe lighting   of                                                                                E Mute / switchboard                                         function. / Press the button utrder other functions to
       the display screen                                    soreon decline to the right plaoo, whilo short press                                                                         eoter the main itrterface ofradio. In radio interface, il
                                                             the button to make the screen decline in sections.
                                                                                                                             Short press to turtr offthe sound   /   loog press to
                                                                                                                             tum offthe lightiog ofthe display screen                     has batrd switch functiotr.
       EVolume-
       Click to decrease the volume                          E LCD
                                                             Display all kinds ofimages and click the control                E Microphone
       EVolume+                                              menu in the screen to select control project.                   Can be used to make calls using     Bluetooth                I Slot-out button /          decline screen
       Clickto increase   the   volume                                                                                                                                                    Long Pross the buttotr to eject the disc / make the
                                                             lE Reset     button                                                                                                          screen declitre to the right place, while short press the
       E Mode                                                Press the button to reset the system   ofthe machine.           EVolume-
                                                                                                                                                                                          button to make the screen decline in sections.
       Press thebuttotr to switch functions
                                                                                                                             Click to decrease the volume
       mong DVD, radio, navigation,
       Bluetooth and other functions.
                                                             lE USB     port                                                                                                              E USB port
                                                             Can b€ connected to a memory card and the card can                                                                           Cao be connected to a memory card and the card can
       E Adoroid/Navigation/band                             store music, movies or pictures for appreciation and            EVolume+                                                     store music, movies orpicturgs for appreciation and
       Ifthe machine is equipped with navigation function,   reference.                                                      Click to itrcrease the yolume                                reference.

                                                                                                                                                                                     _J
iffi&l Panel schematic diagram WW Panel schematic diagram
7 INCH WIDE SCREEN SYfiEM
tr Microphone EVoIume+ I Microphone E Adoroid/Navigation/band
Canbe usedtomake calls using Bluetooth Click to increase the volume Can be used to make calls usitrg Bluetooth Ifthe machine is equipped with navigation function,
press the buttotr to etrter the GPS navigation map
interface; when tle machitre has no navigation
E Remote control receiver E Adoroid/Navigation/band E Power button function, press ihe button to euter the radio
Remote control induction area. Ifthe machine is equipped with navigatiou functiotr, Short press this knob to enter Mem ; interface. / Press the button under other futrctiotrs to
press the button to enler the GPS navigation map eoter the main interface ofradio. In radio interface,
press and hold this button to start up or shut
interface; when the machine has no navigation it has band switch functiotr.
E Power button function, ptess the button to etrterthe radio interface. down the player.
Short press this knob to enter Meun ; / Press the button under other functions to enter the E Band
press md hold this button to start up or shut main interface ofradio. In radio interface, it has band
dom the player. E Mute / switchboard Press the button under other functions to enter the
switch function. Short press to tum offthe sound / loag press to main intelface ofradio. In radio interface, it has
tum offthe lighting ofthe display screen batrd switch function.
E Mute / switchboard
Short press to turtr offthe sound / long press to lE Slot-out button IE Mode
tum offthe lightiog ofthe display screen Lotrg Press the button to eject th€ disc / make the ELCD Press the buttoD to switch functions among DVD,
screen decline to the right place, while short press the Display all kinds ofimages and click the control radio, navigation, Bluetooth and othgr functions.
button to make the screen decline in sections. menu in the screen to select control project.
, E Mode l[ Slot-out /sliding button
Prgss thebutton to switch functions among DVD, Lotrg Pross the buttoD to eject the disc / make the
E Remote c'ontrol receiver
radio, navigation, Blu€tooth and other functions. lll Reset button Remote control ioduction area. screen decline to the dght place, while short press
Press the buttoo to reset th€ system ofthe machine. the buttoo to make the screen decline in sections.
E LCD lE Reset button
Display all kinds ofimages and click the control EVolume-
metru in the screen to select control proj€ct. IE USB port Press the button to reset the system ofthe machine.
Click to decrease the volme
Can be connected to a memory card and the card can E USB port
E Volume- store music, movies or pictures for appreciation and Can be coonected to a memory card and the card can
Click to decrease the volume reference. storg music, movies orpictures for appreciation and
E Volumea reference.
Click to increase the volume
-4- -5WW Panel schematic diagram ffi Panel schematic diagram
I Microphone E Mode f Microphone E Mode
Can be used to make calls using Bluetooth Pless the button to switch functions amotrg DVD, Can be used to make calls using Bluetooth Press the buttotrto switch functions among DVD,
radio, navigation, Bluetooth and other functions. radio, navigation, Bluetooth and other functions.
E Power button E Adoroid/Navigation/band E LCD E Adoroid/Navigation/band
Short press lhis knob to enter Meun; Ifthe macbine is equipped witb navigatioa Display all kinds ofimages and click the cotrtrol Ifthe machine is equipped with navigation
press md holdthis button to start up or shut fuction, press the button to enterthe GPS menu in the screetr to select control project. futrction, press the buttoa to enter the GPS
down the player navigation map interface; when the machine has no navigatioo map interface; fi'hen the machine has no
navigation function, press the button to enter the navigatiotr function, press the button to enter the
radio interface. / Press the buttonuilder other E Remote control receiver radio interface. / Press the buttotr under other
E LCD functions to enter the main inlerface oftadio. In Remote control induction area. functions to enter the maiD interface ofradio. Itr
Display all kinds ofimages and click the control radio interface, it has baud switch function. radio itrterface, it has band switoh functiotr.
menu in the screen to select control project. E Powerbutton
@ Band Short press this knob to enter Meun ;pressand IE Band
Press the button under other functions to enter the hold this button to start up ot shut down the Press the button undgr other functiotrs to enter the
E Mute / switchboard main itrterface ofradio. In radio iaterface, it has player. main interface ofradio. In radio interface, it has
Short press to turn offthe sound / long press to band switch function. bmd switch function.
turu offthe lighting ofthe display screen
ll Slot-out /sliding button E Slot-out /sliding button
Lotrg Press the button to eject the disc / make the E Volume- Long Press the button to eject the disc / make the
E Remote control receiver screen decline to the fight place, while shortpress Clickto decrease the volume sereen decline to the right place, while shortpress
Remote control induction area. the button to make the scrgeo decline itr sections. the buttotr to make the screetr decline iu sections.
E Reset button E Volume+ E Reset button
E Volume- Press the buttotr to reset the systom ofthe machine. Click to increase the volume Press thg button to reset the system ofthe machine.
Click lo decrease the volume
lE USB port lE USB port
Canbe connected to a memory crd and the card E Mute / switchboard Can be connectedto a memory card and the card
can store music, movies or pictures for
Short press to turn offthe sound / long press to
E Volume+ can store music, movies orpictures for
appreciation and referetrce. turo offthe lighting ofthe display screen appreciatioo and referetrce.
Click to increase the volume
-6-ffi Remote Controller Position
SD. GPS Parts on the front plate
l. Power key
2. Mode switch key
3. Pause/play key
4. Mute key
5. Waveband/pattern key
6. Menu position selection key
7. Confirm key
8. Stop/return key
9. Programmed playing/stereo/single
sound channel switch key
GPS card slot 10. Repeated playing/se1f-help memory key
1 l. Volume increase/decrease key
12. Random playing/ far and near distance
control key
I 3. PBC playing
14. Playing time display switch
15. Number key
I 6. Caption setting
SD card slot 17. Title and list setting key
@@@@ 18. Setting menu key
19. Slow playing key
@@@@ 20. Viewing angle selection key
oSD Card SlOt:A slot for inserting to takins out of the SD 21. Zoomed-in image display key
card with music , movies and photos. 22- Set audio feature
*GPS Cafd SlOt:ft the nachine is equipped with navigation 23. Radio station selection/DVD program
function , It be comes GPS Navigation map after insevtlng selection/fast forward/fast backward key
GPS card. If the machine is equipped vith Android function
, you must operate into Android system to see moyle picture 24. Sound channel switch key
or sisten to nust after inserting SD card. 25. Playing time setting keyBasic operation Basic operation
Main menu Universal Setting
@ @
oooo @oooo l. Normal setting
2. Display setting
key
key
3. Sound setting key
6. Language setting
7. Key sound setting
I l. Brake check setting
12. Steering wheel setting
8. Music navigation setting 13. Touch screen calibration
l. Bluetooth mode 9. Android mode (optional, 4. Time setting key 9. Backlight mode setting 14. Main menu key
2. USB mode Detailed description place 5. Version information key 10. Rear view setting
3. SD/MCC card mode refer to "Android Operating
4.IPOD mode (optional) System Operation l@ Normal setting
5. AUX IN mode Instruction Manual".
6. Universal setting mode Without Android function, " Click @ Normal setting key to set language, key sound, music
navigation, backlight mode, rear view, manual brake check, steering
7. DISC mode the key is for GPS function) wheel setting and touch screen calibration respectively.
8. Radio mode (optional) 10. TVmode
11. Night light mode
12. Status and time display area
q Display setting
Click @ Display setting key to set display mode, tone, brightness
13. Wallpaper switch and contrast respectively.
14. Nextpage
l5.Previous page q Sound setting
Click @ Sound setting key to set sound effect mode, equal loudness,
@ Enter various modes treble, bass and balance for four speakers in the car respectively.
* Click @ @ keys to enter their respective modes. E Time setting
Click @ Time setting key to adjust time and date respectively.
e Universal setting
Click @t KI I i"o, in any interface other that of GpS to show
g Return to main menu:
the menu of universal setting as in the following figure. Click @ f K I icon to return to main menu mode.Basic operation Basic Operation
@ No.-ul setting t! oisptay setting
1. Language setting
e Click the display mode as shom in the right
figure to choose from the following four modes:
2. Key sound setting
3. Music navigation setting I Customize -* StandaJ --) Bright --) 56fi -l
4. Backlight mode setting
rl
5. Rear view setting
6. Steering wheel setting
a Click Tone, Contrast and Bdghtness as shown in
the right figure to customize Tone, contrast and
7. Touch screen calibration brightness ofthe display screen.
8. Manual brake check setting
1 Click@ key to set menu display in Chinese or English; Click@ sound key to set key sound as Souna setting
"Enabled" or "Disabled";Click@keytosetmusicorvideoatnavigationas "Enabled" or
"Disabled" ; Click @ key to set bicklight ofthe player in the mode ol "Day" or "Night" ; Click
!
@ f"y to set rear vi; as "Enabled" or "Disabled" ; Click @ key to set brake as "Enabled" or a Click Sound effect mode key as shown in the
"Disabled" : Click the sleering wheel. For specific right figure to choose from the following five
@ key lo enter lhe nexl menu as set l-or
operation, refer to thi Pop---> Jvz-) Classicl
;)Srmdud--)
@ Steering wheel setting
Setting anduse ofsteering whccl: a Click Equal Loudness key as shown in the right
If youi car is controlled with a steering wheel, operate as per the figure to choose from "Enabled" or
following procedure: "Disabled" states for equal loudness.
1. Turn offthe power, tind the steering wheel cable (Ca0tion: some
car has three wires, and others have two) and ground wire, and 6 Click leftward or rightward direction keys for
conlect the ground wire in thc steering wheel to the ground wire Treble and Bass to customize treble and bass.
among three wires ofthe steering wheel led out from the main e Click leftward, rigbtward, upward or downward
cngin;. Ifthe steering wheel ofthe car hm three wircs, connect thc
otlier two key wires to the remaining two key wires in the steering keys ofthe car as shown in the right figure to
wheel led out from the main enginei ifthe steering wheel has two customize front, rear, left and right speakers.
wires, connect thc remaining key wire to any ofthe two key wiros
led out from the main engine;
2. Check the wiring for the steering wheel and turn on the power a11el
conlirming all wlres are connected correctly, and click setting key
$ firn" setting
on the right and upper offhe screen to enter the setting menu;
3.Click steering wheel sctting key on thc menu to pop up the steering wheel setting mcnu;-. o Click key andkeyfortime adjustmentto set
4.Alier thc stee"ring wheel seiting menu is popped up, piess test key and you can see samplingralue for A and R time and minule respectively.
disDlaved in rhe inlormarion bux, and rhis is rhe.let;ulr r elue for lhe stcering u heel sampled by lhe main cnginc: a
5.thinilrck Cancel keyunderir/ndclcarallkel. Rcmcmbertoclickthiskeyeachtimetoclearallprevious Click key for time adjustment to set display time
settinss befole chaneinr [he settln as 12H or 24H.
o learn'rocliclandrr'"fir..Cfi"f,igh"funcrionkevand PLSPRFssKEY uillbepromptedinlheinlormalion a Click key and key for date adj ustment as shown
.niii.n- nro-nri.o rhe uier ot rhr kevs on the "reering wheel required [or de[inrtton. After pressing keys on lhe
a;.;i;; ilh"al. i;I;ior rhe kcv vou'press u rll be dis-played in the information column. indicating thai the key has in the right figure to adjust year, month and day
6"* ..u'-oiia Ov rtre main ensin"el And vou can learn Ib uie lhe nert key, till all keys are learncd. ofthe date.
Z.nfiirteainine.'voushoul,lpriss Complerion" keyloLeepkeysloulearnandenablesleeringwheelfunction.llyou
dontpress'A!ply'kelifterlearning.allkeysyo-ulearnbeforewillbein\alid: e After adjustment is completed, clickApply key
8.Afteriearning,ifyoudonotwantlt,pre-ss "Cahcel" keytocancelitanddisablesteeringwheelfunction; to pop up time setting menu.
9. In the course"o? leirning, ifyour think sampling value for some keys are is too similar, and wrong.codes are easy to
wires, that is [o say, exchange the twotcy wires led out from the main engine. Ifthe
occur, exchange the tw; kei"wire,
steering wheeihas one key connect it to tire other key wire led out of the main engine and leturn to step 1 for
learning again;
I 0. There"m;y be several kels for the steering wheel, and you can learn function ofthe keys as per the function fo,r keys
on it a"iru. Do not min'd whether there a"re the keys rir lhe menu for sleering wheel or nol. for they do nol influence
! Version information
vorrr "normal use- You need iusl to learn the kevs on lhe sleerinA qheel
rr.ari"ii.lii"iri,,-t"k.r;;;,h".i;;;s*hi"i,'you.un"nr"rrhisertingmenuandclrck "Cancel" keytodisable & Click
.i""ii re h"E i, ncr ion. A frer it rs di iabled, y6ur sreeri ng wheel wi ll not work. I f you need to enable sleering wheel [Version information] key to display version information ofthe software.
lunclro-n," return to Slep I lo leirn selllngs again.
13Radio Operation Mode Radio Operation Mode
Radio mode
A RDS (optionat functions)
. (G>- O) will not work without RDS or RDS is disabled.
A. IPTYI click@ to choose your favorite types ofprograms, and it searches for
the programs you set automatically in 2 seconds.
B. [TA] Click @ RDS to search foi and play radio stations.
C. [AF] Default setting of AF function is in the state of "Enabled" . To disable or
enable it, press @ key. In case current signal is weak, the player searches for radios
automatically within 50 seconds and play radio stations with strong signal of same
type.
Volume control
" Click@[+] and @[ ] keys respectively to control increase or decrease of volume.
volume is divided into 40 grades. If volume is set above gra, DVD SD MMC USB Operation Mode ,l DVD SD MMC USB Operation Mode
@ Stop playing
DVDiSD/MMC/USB operation mode e Inthestateofplaying,click@ [ I ] keytostopplayingandclick@ [ Hl] keyto
After into the player, the player will enter DVD mode automatically.
a disk is placed play again.
In case there's a disk in the player, ciick DVD icon in the main menu to enter DVD mode
@ fug" up/down key
Click@P1 key to enter page 2, click @ key to display P2, click P2 to enter Page 3,
1. Disk entry/exit key
2. Play/pause key
click @ key to display P3, click @ key to display P3, click P3 to enter page 1
3. Stop key
4. Page up/down key @ Menu play
5. Menu play key
6. Caption key
a ClickG) [Menu]key to enter menu playing mode,IThe disk shall be VCD2.0 or
7. Sound channel key DVD supporting menu playing]
8. Zoom in/out key
9. Volume*
@ Caption key
10. Volume-
" Click @ [Caption) key to choose from various captions accompanied with DVD.
1 1. Repeat playing key
12. Fast forward key
1 3. Fast backward key @ Sound channel function operation
lb
14. Next program e Click(D ISoundchannel]keyto switch among left soundchannel, right sound
1 5. Previous program
channel, mixed sound channel, stereo and language (shall be supported by the disk)
16. Retum to main menu freely.
@-
17. Universai setting menu
18. Status and time display area Zoom in/out key
a @
€b. 19. Pattem key
20. Random key q Click @ [Zoom inlout] key to magnify screen displayed in DVD. Refer to
21. DVD setting key directions for remote controller.
22.Titlekey
23.
24.
Display key
Search key
@ Volo-. control
a Click@ [ * ] volume key to increase volume, and click @[ - ] volume key
o 25.
26.
OK key
Upward key
to decrease volume.
rg
27. Rightward key
@ Repeat playing
o 28. Leftward key
lh 29. Downward key e Click @ [Repeat] key to set repeat playing mode and the sequence for repeated
30. Mute key clicking is as follows:
sinsre prosam whore disk close
+
Remarks: The default is repeated playing of the whole disk P *p""t"-g repeating
-rePeat3l
$ nirt entry/exit key $ Fast for\trard/backward control
" ClickOI I ] keytocompletediskentryandexitoperations. * Click@[ ] I and@[ ( ] keys forfast forwardorbackwardplayingrespectively
Click@ t}key continuously to enter fast forward X2/ fastforward X4l fast
U I" the state ofplaying forward X 8/ fast forward X 20 playing]. In the state of fast forward or fast backward
state, press @ [ X ] key directly to resume to normal playing state.
" Click A I H ] key to pause playing and click it again to resume normal playing.
l6DVD SD MMC USB Operation Mode TV Operation Mode
! Program selection setting In main menu, click TV icon to enter TV mode (analog TV or digital TV are available
for selection)
" Click @ I >, I or (D I r< ] key to select next program or previous program
respectively. TV mode Analog TV
t$ Ruturn to main menu l. TV pattem setting
2. TV pattern setting
. Click @ tEl icon to return to main menu
3. Previous channel
p Universal setting
4. Next channel
5. Volume -
^ Click@ [ffi1] icon to pop up a universal setting menu. For details, see part of 6. Volume *
universal setting at page 9.
7. Universal setting menu
p Pattern key 8. Status and time display area
9. Refum to main menu
" Click@ [Pattern]key to choose from NTSC/PAL pattern/Automatic systems. 10. Automatic search
1 l. Previous channel
$ Random key
" Click@ [Random]key to play programs in DVD in
I! tt
a random manner.
pattern setting
@ nVn setting key " ClickO[TV seuing] key to select correct TV audio/video mode repeatedly.
. Click@ ClickO[TV setting] key repeatedly to select TV pattern as per the following
[setting] key to set DVD mode sequence:
r-> > > -r
t! ritte tey
|
PAL_|
,r*
PAL
M PAL
DK <
BG
sEcAM
SECAI.IL
,o .--J
" Click@ lTitle] key to display list of ritles in DVD
t! Display key ! Preset radio station
" Click @ [Display] key to display DVD playing time, programs and remaining time " Click@[automatical radio search] Button, it will automatically scan and store
radios. The maximal number of radios it can store is 99.
$ Search key
p Voto-" Control
" Click€b [Search] key to search for programs in DVD.
" Click(O[ * ] and@t - lkeytocontrolincreaseanddecreaseof volume.
Confirm key Volume is divided into 40 grades. Ifvolume is set above grade 30, turn off
$ power (orACC car key) and restart, volume of the player will be memorized in
' Click@ @ leftward, rightward, upward and downward keys to choose the the set volume position; if volume is set below grade 30, volume of the player
state you want and click @ key to confirm. will be memorized in grade 15 after restarting.
t! Speaker state display
' Click speaker t EI I as shown in @ and it witl be changed inro the state I E ] as ! Cnrrro"l selection
shown in the figure, viz. Mute, and click again to return to the state with sound. . Click@l)}r lorol tTV Operation Mode IPOD Function Mode
Digital TV
1. Menu
IPOD function mode (optional)
2. Sound channel 1. Volume *
3. Previous channel 2. Volume -
4. Next channel 3. Random key
5. Volume- 4. Close key
6. Volume+
5. Repeat key
6. Confm key -o
7. Universal setting menu
8. Status and time display area
7. Video
8. Previous video
@ o
9. Next vidco
9. Return to main menu @ -@
10. Caption
10. Next prograrr
@ -o
11. Exit key
ll.Playlpausckcy
12. Previous title
@
o
12. Search key [3. Retum to main mcnu
I 4. Universal sctting mcnu
o
I 5. Status and time display area
16. Menu key
U" Menu
Click @ [Menu] key to display digital TV menu.
@ votr-. control
. Click O t+l and@ 1 I keys respectively to control increase or decrease of volume.
U" Sound channel Volume is divided into 40 grades. Ifvolume is set above grade 30, turn offpower (orACC
Click @ [Sound channel] to control left and right sound channels of digital TV. car key) and restart, volume of the player will be memorized in the set volume position; if
volume is set below grade 30, volume ofthe player will be memorized in grade I 5 after
E Click@[
Yolume control
f @ .Ranaom
restarting.
] and (@ t - I keytocontrolincreaseanddecreaseofvolume.
Volume is divided into 40 grades. Ifvolume is set above grade 30, turn offpower Click() [Random] keytoplayaudioandvideocontents in IPODrandomly
(or ACC car key) and restart, volume of the player will be memorized in the set
volume position; if volume is set below grade 30, volume of the player will be @ ctor.
" Click @ [Closc] key to close IPOD connection state and IPOD stans charging immediately
memorized in grade l5 after restarting.
@ Repeat
Cn"rrnel selection Click@lRcpcatl keytorepeatplayingcurrcntprogramorrcpeatplayingall
! in a cycling way.
programs
Click@[ ]l ] keys to select previous or next channel
@ uenu playing
q Caption
Click@ [Caption]key to control caption of digital TV.
c Click@ [menuj key to enter menu playing mode
@ Progra* selection setting
q Close
Click@ [Close] key to exit from digital TV interface.
@ ,,
Click@ [ >l ]keyor(D I tBluetooth Operation Mode Bluetooth Operation Mode
Bluetooth mode Phone dialing Phonebook
1. Dial/receive key
l Phonebook
2.Dialed phone
2. Refuse/hang-up key
3.Received phone
3. Backspace key
4. Bluetooth/mobile phone 4.Un-received phone
receiving switch key 5.Bluetooth/mobile
5. Phone dialing
phone receiving switch
6. Phonebook 6. Page up
7. Music playing 7. Refuse/hang-up
8. Bluetooth setting 8. Dial/receive key
9. Number dialing key 9. Page down
10. Dialing display box
1 1. Retum to main menu ! Searctr of phonebook/received/dialed/un-received phones
12. Status and time display area o UploadphonenumbersinaccordancewithBluetoothprotocolsupportedbythemobilephone.
13. Universal setting
" Click(AlDialedphonelkeytosearchforlatestdialedphonenumbers,max. l0numbers.After
selectfg ihe phon" nrmb"r. press @ E 0., to dial ihe number.
o Click@ [Received phone] key to search for latest received phone numbers, max. l0 numbers.
@ ftuetooth matching and connection After Jlecting the phone numier, press @ E U., to dial the number.
a Click@ [Un received phone] key to search for latest un-received phone numbers, max. I 0 numbers.
Turn on the power ofthe player and Bluetooth function will be enabled automatically. After silecting the phone number. press@ E 0", to dial the number.
o For the first matching, search for matching Bluetooth equipment with a mobile phone
Note: Upload way ofphonebook is set in accordance with different mobile phones. Please upload to the
Select OK. Input universal code "0000" and confirm and the mobile phone will player with universaI Bluetooth in the phonebook ofthe mobile phone.
display as "Matching is successful". Select connection and confirm. Music playing Bluetooth setting
. After mobile phone has been matched and connected with the player, it will be
connected automatically for next starlup:
Remarks: Operation for different kinds ofmobile phones is different. Refer to
operation manual ofmobile phone for details.
! oiatlreceive phone
6 Press number key to display the phone number on the @ Status and time display
window. If the number is pressed by mistake, press @ [ C ] key to clear it. Clear
Otlf key again to dial the phone number and press 14 [11 kev to hane up.
^ For receiving an incoming call, as a call comes in, number of incoming call will be
@6 uonite music playing
displayed on the status display bar. Click@ t tr ] key to receive the incoming call BluetoothoftheplayersupportsA2DPstercoBluetoothmusicplayingcommunicationprotocolandsupports
and press@ [!1 k"y to refuse the call. active qontrol function. Ifthe Bluetooth connecting the player supports A2DP communication protocol, just
O I A ] key in the standby state. Thc playe r will control music playinryf thc mobilc phone. Click
clrcklrllll(eylntheslandbyslalc.lncplalcrwlllcontrolmus,cplaylnLorrncmoollcpnonc.t
c]ick
! nut,.ro to the main menu O t I j kcy in thestaleof music plSying.- If music playing is pauscd click!l I A I kev apain
-r; AUX Operation Mode iX Precautions for the use of remote controller
AUX mode Place remote control transmitter on the remote controller at the IR ofremote control
receiver on the main engine for a series ofoperations.
Replacement of battery of remote controller
1). Hold cord I in the middle and pull out the battery base.
1. Volume-
2. Volume+
3. Mute/sound
Pull it out outwards
2) Put the side ofthe battery with mark (+) upwards and place in button-type battery
W* Volume control
ClickO[+] and@l-l keys respectively to control increase or decrease of volume.
Volume is divided into 40 grades. Ifvolume is set above grade 30, turn offpower
(or ACC car key) and restart, volume of the player will be memorized in thi set
volume position; if volume is set below grade 30, volume of the player will be
memorized in grade 15 after restarting.
@ Speakerstate display
e Click speaker I fl ] as shown in@ , it will be changed inro rhe state of I S ]
shown in the figure, viz. mute and click again to return to the state with sound. 3) Insert the batter base into the remote controller till it is put in place
with a "click" sound.
Notes:
I . After it is used for a period of time, replace the lithium battery when remote
control distance is shortened or it does not work;
2.Thebattery shall be put in a place out ofreach ofchildren. In case it is
swallowed, send to the doctor immediately.
3. For installation ofthe battery, make sure the polarity ofthe battery shall be
correct. Please do not hold the battery with metal pincers, which may result
short circuit.
24 25Specification
Trouble-shooting
Conventlon
Power supply --. t4.4DC F'ault Cause and solution
Load 4 ohm
I Check ifthe fuse for power supply is
Maximum power output 60Wx4 No power supply burned and fuse with proper capacity shall
+/-8dB(Bass 00Hz,treble 0KHz) be replaced when necessary
Tone control I I
----------. Display of LCD is in
Size approx, I 92x I 78x I 00mm(LxWxH)
disorder or keys do not work f Press RESET key for one time
Installation size approx, I 69x 1 82x l06mm(LxWxH)
Radio station can not
* Check ifthe antenna is connected or is
Weight ---. approx.2.5kg connected properly. If so, conneet the
be received
antenna properly
DVD part
Disc play DyD N CD / 2,0 /I\(P3A{P4(D[TJVCD/PICTURE-CD) * Length ofantenna may not be set properly.
Check ifthe antenna sticks out completely
Image format AUTO/PALA,ITSC or ifit is broken. Ifso, stick it out or change
to +/-30 degree Radio receiving effect is poor a new antenna.
* Broadcast signal is too weak, change
. another radio station of strong signal.
.0 vp-p 75 ohm * The antenna is not grounded iroierly,
Confirm ifthe antenna is grounded properly.
* If a disk has been loaded into the player,
Image format - - 16:9 mail box and 16:9 flat scanning CD disk can not be loaded just exit it
Audio frequency pflrt * Calibrate frequency for tuning radio
Maximum output level------ --*---2 Vrms(+/-3dB) Stereo sound indicator flashes * Broadcast signal is too weak, please
Frequency response set it at MONO mode
2Oto2OK]{z
Signal to noise ratio ----*-. 85 dB Noise * CD disk is damaged or dirty. Replace
with a qualified disk
Separating degree -, 80 dB t Video cable from the player is not
No image
AM tuning part connected to TV set properlv
Frequency range ---------*-----. 522-1620Kllz(Europe/China),530-l 7 I 0KHz( America) f Color system is not set properly. Set color
Image jumps system as PAL or NTSC in accordance with
Intermediate frequency ---. -.450KH2 the condition for the TV set connected
Bluetooth function
f If Bluetooth mobile phone is matched and
connected correctly without the player
F!{,iuning,pdit does not work Match and connect again referring to
Frequency range ----------- 87.5- l08Mllz(Europe/China),87.5-l07.9MHz (America) user's manual for mobile phone
Intermediate frequency ----.l}.7MHz Echo for communication with t Volume is too large. Decrease volume
Bluetooth is too big appropriately
Practical sensitivity l5 dB
Bluetooth music from mobile f If Bluetooth mobile phone is placed far
Signal to noise ratio 60 dB from the player.
phone or sound in
Place the mobile phone within 5m from
Stereo separation 30 dB(lMHz) communication is intermittent the player
Frequency --. 30-l5MHz
* Note: If the faults are not removed with the above methods, do not dismantle the
machine for repair. Please ask for help from your local distributor.
-26-
27DVB-T module User Manual
DVB-T
 Guide
                                                                                                                   :l
    o'
   welcome to tbe wonderfur worrd| of- mobire TV usrng mobiJe TV features, you
                                                                                  cm simar coverase wirhin
the s@pe of mobile TV signals from the suppliers to provide the besr                    'oron*r.
understatrding of extemal infomation, in the prcess of moving rccess
                                                                             ielevision          i.a J-"
                                                                     to the spidt of joy               i

 a        When you wmt to use mobile TV featres, the mmual will               puide   you with useful iufomatim;

I   Pleare read caefirtly the "Guide" instructions md instructions md
                                                                              ,]
                                                                      use only the originar arcessories, cm
oot be exp(ted to avoid the dmage. If you do not fouow the conect procedure
                                                                               to use [he system or comect
rncompatuble accessories, suoh rcts would lead to
                                                   4utomtic failw wuilty, md you may, oven ondmger lhe
safety of othere. In responw, the Compmy assmes no responsibility;

               O*:rds on the dariry of television signals in the strong o weak, no pmgmTnine
,l-T ::yl
lmages or images to trmsfer to open or use an extemar mtenna. if
                                                                                                   for the fuzzy
                                                                     it still ca not receive, preare conrrt the
local TV signal provides md distributorsl

a        not to the module on the temperature is too high or too wet;

a        function due to thelinciese or chmge md improve the perfommce
                                                                       of the mmual vesion, i without
ootice;

I        the "Guide" in the   pictre forreference     purposes only,   ue subjrct;

a        I reserv€d to the "Guide', the ultir-rate power of interpjetation.

                   ',
                   tl,,
                                      I      r'             r

                                                   ',iii'
1. lntroduce
Contents This DVB-T module is l'ulty complimt with the intemational DVB standard
and thus ransmits digiral images,
sounds ud infomation guides directry to your TV through the tenestdal
broadcasti.g. Nw you Jm
I comfortably see md receive digitaliy transmitted music, news, movie and
sports tenestrial broadcasts in vour
l-l Features. -l- oflice on at your home. In the Channel Search section, both the automatic channel
sedch methoo ani the
manual seilch mode ue provided The Menu is vcry moclem and supports
2.search channel........ l- diflerent languages. All functions
2.1 countrJ seting....- -2' can be cmied out using the TSP, touch screen piulel, and some
of the functions can also be cmied out using
the front panel.. The slim module is easy to use and adaptable for future
2.2 ailomatic search advuces. please be awarc that ne;
2.3 Mmual Search....... .3- software may change the functions of the slim modulc.
2.4 Reset Delault..........
I .1 Features
2.5 Search shofrcut way
3.BNic Operation............... .''....,''....4 ) Auto/Manual seuch
4, Preferences setting ......... ! Supports multinational Language
4.1 LanguaSe setting.... -5- ) Channcl manrger
4.2 A/V Control............ 5
! Auto save channel
,1.3 Personal Style......... ) Suppots high speed mobility
5. System Settin9................. 6- ) Strong to noise/good sensitivity
-6- ! Cornpliant with full DVB-T standilds
-6- > Audio output supports StereoAudio R/L,I2S
6 Chamels List......... . -7- ! supnort. EPC,Teletcrt.Subbtjtle
6.1 edit channels.. -7 > Video output supports ITU656/601,CVBS
6.2 Fdir fa!orile Channels Li*........... -'7- > PND,PMqMP3/4,Mobite TV,Hand-held applications
-8- 2.search channel
ffiffi
9-
E. Ttouble Shooting... 10- If your slim nodule is connected to the aerial and television, you can automatically
search channels without
entering any other information. it is because no channel storage
search, you can set up semch mode and the
colrn(r).
Remark: Figule 2.1 Figure 2.1 A
a) Press the [!!E bruo, to enter the main menu interfrce, lour icons screen, that were Installation.
system' channel list and preferences, press the DDI o, IIil bu,ron,o choose the
ffiffi
icon. ro be erected
the icon was to enlarge highlighted (Figure 2.2 show). We selected to install
icon ood pr"r, th" El
button to enter the instalration menu, rhe installarion menu can be set into
the count;y and search, it
provides two method of the search: automatic and manual
channel semch channers.(Figure 2.3 show)
Figure 2.2 Au"ing EDIEI button to chmge channel and frequency. (Figure 2.6show)
c) Use the f,lU llGutton to select seilch button, press th. E buuon to seilch.
d) when completing channel search, pre* ur" El builon caa automatic to save the changes and display
program.
Figue 2.3 Figure 2.3 A
b) Press the ffi{ru*:.r)!!{'**"^l I d buuon to select next menu, press ,h"@Ibu,,on to r"ru-
the main menu, press the KI button to exit the menu itrterface.
c) Used theDil / IIII buno, to select menu items tron top to bottom. press EE button to the
"onfi*
cufent operatiotr. Figure 2.5 Irigure 2..5 A
2.1 country setting
You can set the country for Menu. Default country is Eogland.
1. Etrter to the installation menu.
2. Press the El, !!I button to drsptay the availabte Country List.
3. select your desircd country using the DD E[bu,,on, and press the Ebuno. ro confim (Figue
2.,1show) Figure 2.6 Figure 2.6 A
Remuk
* Please wait for finishing the Channel Search. If you watrt to stop the Channel Seuch, press
*re l[
burton. If the channel seuch is stopped or finished, then press the ElI b.uon, the resurt ofchannel
Seach is automatic saved and display the channels program.
* If seach operation is successfully complcted, and the channel does not exist, pr"", th" Elbotton
Figure 2.4 Figure 2.4 A on,l
try to reset the seilch operation again if necessary. when completing channel Seuch, the channels
2.2 Automatic Search automatic save to changes. you can easily set_up using simple organization
and options, md watch the
a) use the Dfilrfr[ buuon to select auromatic serch and pr"r, th. E burton, Into the automatic broadcasting after completing the set-up procedure.
search interface, Wait while the receiver seuches for the channels, this may take a few minutes.( Figure
J * Press the Ml oouon to save the previous input infbrmation aDd exit the installation wizrd
2.5sho$.) when
b) In automatic sctrch pedod, the progress inskucted that the strip will have the seuch progress indication, in
rundng the insrailatior wiza... rf you exit the instal wizard without fu[y
compreting the settins
I ptocedures' you may not watch any broadcasting normaily. In
this case, you can use tnl Instalatioi
search pedod, if will prcss ,rr" !!E key operation to pause, press DD[] Elluouon to setect save Menu to configurc your receiver as you like.
button and exit. ) 2.4 Reset Default
c) If search operation is successfully completed, ud the chmnel does not exist, press ,h" Mlbutton to
l. Enter the installarion menu
selectExit ud try to reset the seuch operation again if necesstry.
d) The auto seach will complete the program which the automatic demonstatiotr will seuch itr the left side 2. Pres DEIL E[ button to select resesr defauh. ild pr.r. ,h. Ef button to conlim
program tabulation, please choose save atrd exit menu.
3. Using the m Gigure 2.7show) fil {nigur" z.za showl 7 ffi@igure 2.7show) fl
(Figure 2.7A show)
2..1 Manual Search button to select Yes or No , md press the
.F! bo,* ,o Select yes to restore all setting to Factory
a) Press the Elbutton ,re Dlllr ll3totto.
Default. Select No ro rerun ro Sj.rem. r Figure 2.7/A show) "onfim.
ond to select Manual Search, enter manual seilch interface.
4 Reset default menu of restorc all setting to Factory Default, please trote you
to restore a time defau
b) You can use EDfu ffibutton to select channel and frequency .press the E bu,,on,o you cm data to be able to delete, for example; Channel, menu, installation md
so on.
lt all
"nter,mffi mffi
mffi
Figue 2.7 Figve2.'7 A
Figure4.l Figue4.1A
xr
t;
Figure 2.8 Figre 2.8A
4.2 A,/V Conrrol
2.5 Search shortcut way
a) Press Menu buttotr to sel@t preferences.
a) The first press search channel shortcut into the Language Interface, press Ef,llrlI[ *a l