2019-2020 Tablet Care and Usage Guide - Brighton Central ...
←
→
Page content transcription
If your browser does not render page correctly, please read the page content below

2019-2020 Tablet Care and
      Usage Guide

                            1
TABLE OF CONTENTS
BCSD TABLET USE REMINDERS                           4

DIGITAL CITIZENSHIP GUIDE                           5

RECOMMENDATIONS FOR TABLET CARE                     5

BCSD LOG-IN INFORMATION                             6

WINDOWS 10                                          7

      START MENU                                    8
      ACCESS APPS, FILES, AND SETTINGS
      SHUT DOWN, RESTART, AND PUT TO SLEEP
      TILES
      TASK BAR

      SNAP ENHANCEMENTS                            11
      SNAP WINDOWS SIDE BY SIDE

      ACTION CENTER                                13
      CONNECT TO WI-FI
      INSTALL A BLUETOOTH DEVICE OR PRINTER
      TABLET MODE

ONEDRIVE/ DOCUMENT MANAGEMENT                      15
     CREATING, FILING, AND NAMING DOCUMENTS        16
     ACCESSING AND EDITING DOCUMENTS               17
      SHARING FILES OR FOLDERS                     19

ONENOTE                                            21
      HOW TO ACCESS CLASS NOTEBOOKS                22
      THE ANATOMY OF ONENOTE                       23
      CREATING NEW SECTIONS                        24
      CREATING NEW PAGES                           25
      DRAW AND INK                                 25
      TAGS                                         26
      SEARCH                                       27
      INSERT PICTURES                              28
      INSERT SCREEN CLIPPING                       29
      RECORD AUDIO OR VIDEO                        31
      ADD FILES                                    32
      CUSTOMIZE THE RIBBON                         33
      SYNC ERRORS                                  35

                                                        2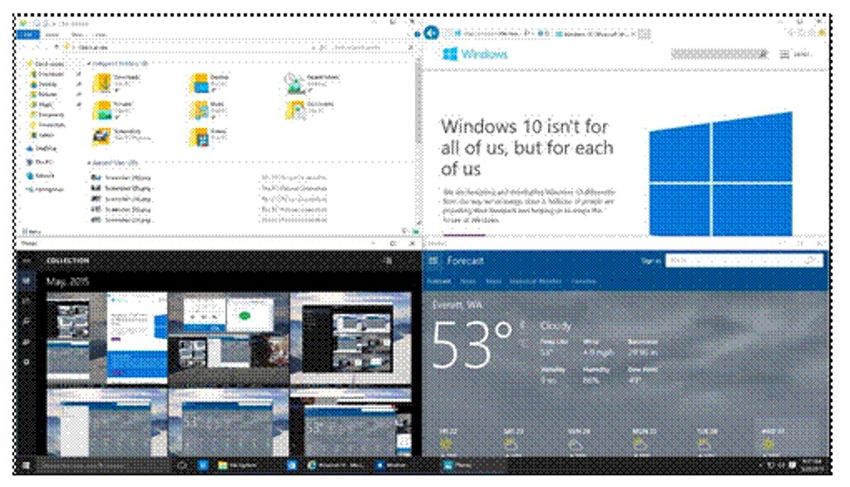
SCHOOLOGY                                  37
     SCHOOLOGY HOME PAGE                   38
     RECENT ACTIVITY
     UPCOMING
     GRADES
     CALENDAR
     MESSAGES
     COURSE UPDATES

     COURSE MATERIALS                      41
     FOLDERS
     ASSIGNMENTS TESTS/
     QUIZZES FILES/LINKS
     DISCUSSIONS
     PAGES

     NOTIFICATIONS                         43
     EMAIL
     MOBILE MESSAGES/ PUSH NOTIFICATIONS

     MOBILE APP                            44

                                                3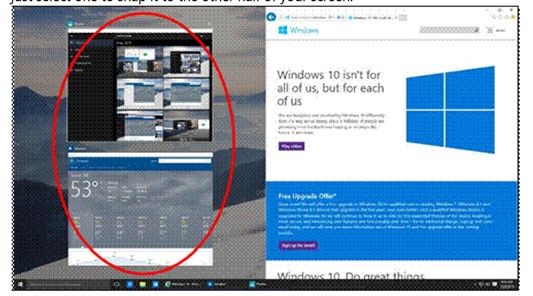
Tablet Use Reminders…

In addition to abiding by the building-specific Acceptable Use
Policy, each student is expected to…

  1.   bring his/her fully-charged device to school every day.

  2.   handle the tablet with care and respect.

  3.   follow classroom rules for the tablet set forth by the
       classroom teacher.

  4.   use the district-provided tablet for educational purposes
       only.

  5.   respect people’s intellectual property.

  6.   show respect for himself/herself and others.

  7.   report the loss of the tablet/ charging cord immediately.

  8.   be prepared to turn his/her device over for inspection at
       any time.

                                                                   4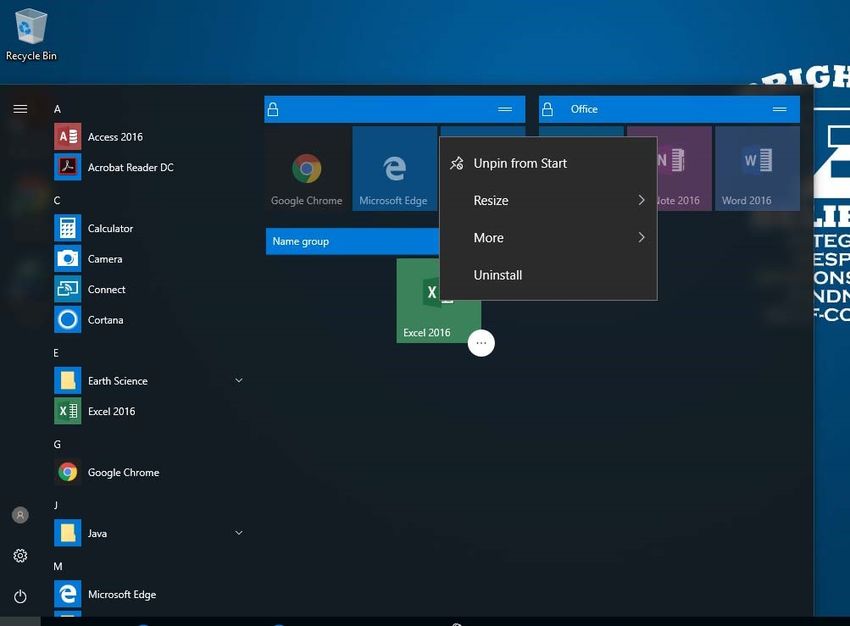
5
Recommendations for Tablet Care
To ensure your tablet will be a reliable tool to support your learning, it should be maintained and cared for
as any other tool would be. Please review the following information that will help you keep your tablet in
good condition.

Daily Practices
·   Charge your battery fully when you are at home so you are able to work for the day.
·   Bring your tablet and charging cord to class each day.
·   Close all files/ windows and restart your tablet each morning in homeroom.

Preventative Maintenance
·   Do not store in direct sunlight for long periods or where the tablet will be exposed to excessive heat.
·   Avoid direct exposure to water, sand, dust and other environmental hazards.
·   Keep the tablet away from food and beverages.
·   Keep power cables out of harm’s way when charging your tablet to avoid tripping others.

Cleaning Your Tablet
·   To clean your tablet’s display: wipe the screen surface gently using a soft cotton or microfiber cloth.
    Do not use abrasive solvents.
·   Caution: Your tablet is not waterproof. Do not pour or spray liquids directly on your tablet or wash
    your tablet with a heavily soaked cloth.
·   If you do accidentally spill liquid on the tablet, turn it off, position it so that the liquid can run out, and
    bring the computer to the library so that our tech crew can check it.

Battery Care
The battery in the tablet should last through your school day under normal use. The following hints will
help you get the most out of your battery.

· Always make sure you charge battery fully when you are at home.

· Set your screen brightness to the dimmest that you are comfortable with.

· When not using Wi-Fi, set your tablet in airplane mode to conserve power.

· Only turn on the Bluetooth antenna if you are using a Bluetooth device.

                                                                                                                  5
BCSD Log-In Information

Username: lastnamefirstinitialgraduationyear       (i.e. smithj2023 )
Password: password assigned by school or what you changed it to
                                                                         School Device

At school or at home, browse to: mail.bcsd.org
Sign-in with your school username@365.bcsd.org and password.
                                                                            Office 365
Username: username@365.bcsd.org (be sure to include the
@365.bcsd.org)
(i.e. smithj2023@365.bcsd.org)
Password: password used to sign-in to school computers

At school or at home, browse to:
https://schooltool.bcsd.org/schooltool
                                                                          Parent Portal
Username: lastnamefirstinitialgraduationyear (i.e. smithj2023)
Password: password used to sign-in to school computers

At school or at home, browse to: bcsd.schoology.com
                                                                            Schoology
Username: username@365.bcsd.org
Password: password used to sign-in to school computers

At school or at home,
                                                                        Castle Learning, Khan
browse to: https://clever.com/in/brightonschools
If prompted, choose to sign in as a student and type in our school
                                                                          Academy, Safari
name (Twelve Corners Middle School/ Brighton High School.)               Montage & More
Username: username@365.bcsd.org
 (i.e. smithj2022@365.bcsd.org)
Password: password used to sign-in to school computers

                                                                                        6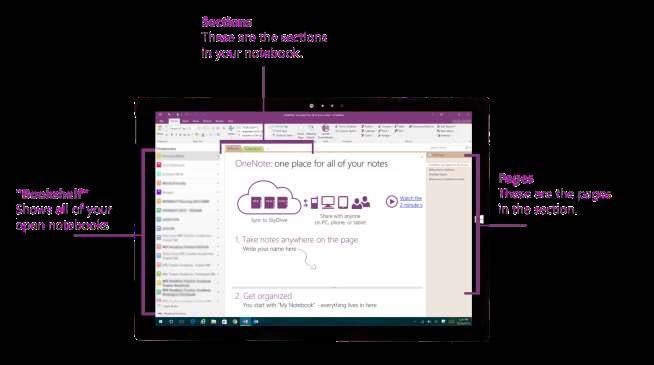
7

Start menu
    The Start menu is enhanced with resizable tiles and other new capabilities to help you be more
    productive.

    From the Start menu, you can:

•   Lock your computer, change your account settings, or sign out.

•   Quickly access your apps, documents, pictures, and settings.

•   Shut down your computer, restart it, or put it to sleep.

•   Search for apps, settings, and files, and search across the web.

    Display the Start menu
    To display the Start menu:

    ·     Select the Start

        button on the far left of the Windows Taskbar.
    – OR –

    ·      Press Windows logo key on the keyboard.

    Quickly access your apps, files, and settings

                                                                                                     8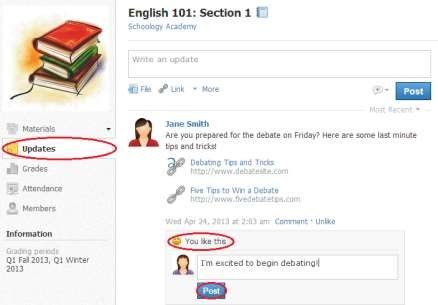
In the left pane of the Start menu, immediately below your user name, you’ll find the following:

    •   Links to your most-used and recently added apps

    •   Links to File Explorer and Settings

    •   A Power button

Select an app to launch it. Press and hold (or right-click) the app to choose from a broader range of
options, which, depending on the app, may include the following:

    •   Open

    •   Pin to Start

    •   Pin to taskbar

        Shut down your computer, restart it, or put it to sleep
    •   On the Start menu, select Power.

    •   Select the option you want: Sleep, Shut down, or Restart.

        Search for apps, settings, and files, and search across the web
        Start typing in the search box to the right of the Start button to search across the following locations:

                                  •       Apps on your PC—

                                  •       Settings
                                  •       Files—including your documents, pictures, music, and videos

   Tiles
        In the right pane of the Start menu, you’ll find tiles for some common apps.

        To move a tile, just drag it to another position.

    •   You can drag tiles to rearrange them within the right pane of the Start menu.

    •   You can also drag apps between the tile view and the app list view.

                                                                                                                9
Right-click a tile to display a menu for performing other actions with that tile. Depending on the app,
these actions may include:
• Unpin from Start Open file location
• Pin to taskbar Resize a tile
• Uninstall Turn live tile off
Tiles in the Start menu are divided by category. To rename a category divider, select it and enter the new
name for that category.
Task Bar
You can pin programs directly to your taskbar to make for quicker access to the things you constantly use.
Search for the program through the Start menu, right-click it and then select Pin to taskbar.
We suggest that you pin Chrome, Edge, Word, and OneNote to start.
10Snap enhancements
Windows 10 includes several enhancements to Snap, making it easier to manipulate the layout of open
windows on your desktop. These enhancements include:
• Consistent Snap behavior across traditional and modern apps.
• Snap Assist, which makes it easy to snap additional windows after the first one.
• Four-quadrant Snap, which enables you to fill your screen with four apps in a two-by two
configuration.
Snapping two windows side by side
To arrange two windows side by side on the screen:
• Drag the title bar of a window to the left or right side of the screen, until a half-screen outline of the
window appears.
• Release the mouse (or lift your finger) to snap the window into position.
• OR…hit the Windows Key and the Left or Right arrow
• Repeat steps 1 and 2 for the other window, using the other side of the screen.
11Snap Assist
When you snap an app to the left or right, Snap Assist displays thumbnails of your other open apps—
just select one to snap it to the other half of your screen.
Quadrant snap
To arrange four windows in a two-by-two configuration on the screen:
• Drag the title bar of the first window to the left or right side of the screen near a corner, until a
quarter-screen outline of the window appears.
• Release the mouse to snap the window into position.
• Repeat steps 1 and 2 for the other three windows, using the other corners of the screen.
12Action Center
Within the Action Center, you’ll find:
• A persistent list of notifications, so that you can view and address them at times of your choosing.
• Links for performing quick actions, such as turning Wi-Fi on or off.
Opening the action center
Notice the collapse
option.
To open the notification center, select
the notification center icon in the
notifications area at the far right of
the Windows Taskbar.
You can also swipe in from the right
of your screen to access the Action
Center.
Connect to Wi-Fi
To connect to Wi-Fi, access the Action Center and click on Network. The computer will search for local
devices. Select the one you wish to connect to, and enter the necessary password (if required). Note:
There is also a Wi-Fi shortcut on your task bar between the
volume button and the pen icon.
Install a Bluetooth Device or Printer
To install a Bluetooth device (i.e. a mouse), click on the Connect
option. If the desired device is not listed, select Find Other
Types of Devices.
13You will be directed to the Settings menu. Click on the + to add devices. Toggle between Bluetooth
and Printers on the left side of your screen.
Tablet Mode
Tablet mode makes Windows 10 more touch-friendly when using your device as a tablet. Select Action
Center on the taskbar (next to the date and time), and then select Tablet mode to turn it on or off.
Note: When in Tablet mode, you will NOT see your task bar or any files/ apps on your desktop.
1415
CREATING, FILING AND NAMING DOCUMENTS

1. OPEN AN INTERNET BROWSER (EDGE OR CHROME).

2. LOG IN TO OFFICE 365 (MAIL.BCSD.ORG).

3. GO TO ONE DRIVE/ CLICK ON CLOUD ICON.

4. IF YOU HAVEN’T ALREADY CREATED A FOLDER FOR EACH OF
   YOUR CLASSES, DO THAT NOW.

5. OPEN THE APPROPRIATE CLASS FOLDER (i.e. English, Social
   Studies, etc.).

6. CLICK THE “+ NEW” ON RIBBON ON TOP OF THE FILE LIST.

7. SELECT TYPE OF DOCUMENT YOU NEED (i.e. Word, PowerPoint,
   Excel).

                                                              16
8. RENAME THE DOCUMEN BEFORE ENTERING ANY OTHER
CONTENT BY CLICKING AND TYPING OVER THE WORD
“DOCUMENT” AT THE TOP OF THE SCREEN.
ACCESSING & EDITING DOCUMENTS
ACCESSING & EDITING DOCUMENTS
TO EDIT, FOLLOW STEPS 1-3 ABOVE, THEN:
1. FIND FILE IN FILE LIST.
2. CLICK “EDIT DOCUMENT” ON RIBBON AT THE TOP.
3. CHOOSE “EDIT IN BROWSER”.
4. PROCEED WITH EDIT.
5. REMEMBER, DOCUMENTS IN OFFICE 365 SAVE
AUTOMATICALLY!
17ACCESSING & EDITING DOCUMENTS IN THE CLIENT VERSION
***Note: Only do this if you need to access some functionality that
the online version does not offer.***
1. CLICK “EDIT IN WORD” ON RIBBON AT THE TOP.
2. EDIT THE DOCUMENT IN THE CLIENT VERSION AS NECESSARY.
3. CLICK ON THE SAVE ICON AT THE TOP LEFT AND CLOSE OUT.
Notice the double arrows on top of the disk. This signifies that clicking it
will sync the changes you made in the client version to the online version.
In other words, it will save the most recent version of the file in OneDrive
for you.
18SHARING FILES OR FOLDERS IN ONEDRIVE
1. PICK THE FILE OR FOLDER YOU WANT TO SHARE BY SELECTING
THE CIRCLE TO THE LEFT OF THE ITEM. YOU CAN ALSO PICK
MULTIPLE FILES AND SHARE THEM TOGETHER. NEXT, CLICK ON
THE “SHARE” ICON AT THE TOP OF THE PAGE.
2.IN THE SHARE BOX THAT APPEARS, DETERMINE THE PRIVILEGES
YOU WISH OTHERS TO HAVE WHEN ACCESSING THIS
DOCUMENT BY CLICKING ON THE DROPDOWN MENU.
193. CHOOSE ONE OF THE SHARING OPTIONS: COPY LINK or
OUTLOOK. (Note: Choosing one of these options, as opposed to
simply entering names, gives you much more control over who has
access to the document.)
4.WHEN YOU CLICK ON THE “OUTLOOK" OPTION, AN EMAIL DRAFT
WILL BE GENERATED WITH THE LINK TO THE FILE/ FOLDER.
1. Enter the names of people to whom you wish to give access.
2. Change the subject to something more clear.
3. Add your message above or below the generated link in the
body of the email.
4. Send the email.
20What follows is information for navigating the desktop version of OneNote. If you are using the Windows 10 App,
please access this site for tutorials: http://bit.ly/OneNote2018
21How to Access Class Notebooks
Class notebooks live in Office 365. To access:
1. Log in to Office 365.
2. Click on the OneNote App
Click on the desired notebook from the list that appears.
Your notebook will open in the Web Version of OneNote. You may work in this version, or you may prefer
to open the notebook in the desktop/ client version. To do the latter, click on the Open in OneNote
option.
22The "Anatomy" of OneNote (Online)
The "Anatomy" of OneNote (Desktop/
Client Version)
23Create a new section
You can create and organize new sections in a notebook when a section already has a lot of pages and
scrolling through them takes too long.
1. Desktop/Client Version: Right-click any existing Online Version: Click on the + Section
option.
section tab in your notebook, and click New
Section.
2. Type a meaningful description for the new section, and press Enter.
NOTES:
• You can organize a section by dragging its tab to the left or right and you can rename a section by right-clicking the section tab
and clicking Rename.
• If you accidentally create an extra new section, right-click the section tab and click Delete. Be careful though. When you delete a
notebook section all of the notes pages in that section will also be deleted.
Add a new section group (Desktop/ Client Version)
If you already have a lot of sections in your notebook, you can create a section group.
A section group lets you combine multiple sections into their own group. When you open a section
group, you’ll see only the section tabs contained in that group, which makes it easier to navigate
through section tabs in large notebooks.
Right-click any existing section tab and click New Section Group.
•
Type a meaningful description for the new section group and press Enter.
•
When you click the tab of the section group, all of the normal section tabs at the top level of your
notebook disappear to make room for the sections you’ll create or move there. To exit the section
group display and return to the top level of your sections, click the green arrow icon to the far left of
the section tabs.
24Create a new page in OneNote
In OneNote , you can add as much content to a page as you’d like—you’ll never run out of space. If
you’d like to get organized, you can create additional pages at any time.
1. Desktop/ Client Version: On the right side of the window, Online Version: Click on the + Page
over the column of page tabs, choose Add Page. option.
2. Type a page title into the heading area at the top of the page, and then press Enter.
You can organize pages by dragging their tabs up or down in the page tabs column.
: If you accidentally create a page that you don’t need, right-click its page tab and then click Delete.
Draw and annotate with ink in OneNote (Desktop/Client Version & Online)
1. On the ribbon, click the Draw tab.
2. Select the drawing tool you want to use. There’s a Pen, a Marker, and a Highlighter.
3. After you’ve chosen your preferred drawing tool, customize your drawing style by doing any of the
following:
Select a basic drawing color by clicking one of the four color dots
•
Select a custom color by clicking the arrow next to the Ink Color button and choosing the
•
exact color you want to use. After selecting a custom color, clicking the Ink Color button will
apply that color to any other ink strokes you have selected. To change your custom color
selection, click the arrow next to the button again.
4. Select the stroke thickness for your selected drawing tool by clicking one of the wavy line samples.
You can make a new selection at any time to begin drawing with a different stroke thickness.
5. To erase any parts of a drawing, click the arrow to the right of the Eraser tool, choose the eraser
size that you want, and then draw over the ink strokes that you want to erase.
6. To select any parts of a drawing, either to modify or move them, click the Lasso Select button, drag
a selection around the ink strokes you want, and then Control-click the selection for more options.
7. To stop drawing at any time, click the Text Mode button.
25Apply a tag to a note (a great way to track assignments that are
due)
Tags are a way to categorize and prioritize notes. With tags, you can quickly return to important
items, remind yourself about action items, or filter on notes you’d like to share with others. You can
tag anything from a single line of text to an entire paragraph.
1. Place the cursor at the beginning of the line of text you want to tag.
2. Click Home > Tags, and then click the icon of the tag you want to apply.
Desktop/
Client
Online
Use the arrows next to the tags list to scroll through the available tags or click the More arrow in
the lower-right corner of the scroll box to show all available tags.
You can search for tagged notes by keyword and category and see the results in an easy-to-read
summary.
TIPS: When you’re done with a tagged note, you can remove the tag so it doesn’t show up in tagged notes search results.
• To remove a single tag, right-click it, and click Remove Tag.
• To remove multiple tags, select all of the text containing the tags you want to remove, and then press CTRL+0 (ZERO).
Search for tagged notes in OneNote (Desktop/Client version only)
If you’ve previously added tags to any of your notes, you can search for the tags by using tag
keywords. The results appear in an easy-to-read summary.
Note tags need to be associated with typed or handwritten notes in order for them to appear in
your search.
3. Click Home > Find Tags.
264. In the Tags Summary task pane that opens, click any tag in the list to open the page that contains
the associated tagged note.
TIP: To narrow the search, at the bottom of the Tags Summary task pane, click the Search drop-down, select a narrower
search scope from the list, and then click Refresh Results.
If you want to view the tag search results as a notes page, click the Create Summary Page button
at the bottom of the Tags Summary task pane.
Search notes in OneNote
One of the main advantages of using OneNote instead of traditional notebooks is its ability to quickly
search through all of the information you've collected and retrieve important notes based on criteria that
you specify. Instead of having to flip and skim through paper pages, you can quickly retrieve anything
you've jotted down. OneNote also makes it easy to browse through your most recent notes and search for
spoken words in recorded audio notes.
Search for text
To search for a keyword or phrase in all of your notes, even across multiple notebooks, do the following:
In the search box to the far right edge of your section tabs, select the arrow to the right of the magnifying
glass icon, and in the list that appears, choose All notebooks.
NOTE: If you prefer using keyboard shortcuts, you can press Ctrl+E to expand your search to all notebooks.
In the search box, type a keyword or phrase.
Desktop/Client
Online (search
page or
section)
27As you type, OneNote begins returning page results that match your search word or phrase. Choose a
search result to retrieve the matching note.
When you’ve finished your search, press Esc.
NOTES:
If you want to narrow the search scope, select the arrow to the right of the magnifying glass icon, and in the list that appears choose
how to limit your search: Find on This Page, This section, This Section Group, This Notebook, All Notebooks.
To cycle through a large number of search results more easily, adjust the search scope, sort your search, you can pin the search
results pane. Simply press Alt+O.
Search for words in audio and video clips
OneNote can recognize spoken words in audio and video recordings if Audio Search is turned on. This
option is turned off by default because it slows down searching.
To turn on Audio Search:
Choose File > Options > Audio & Video.
Under Audio Search, select the Enable searching audio and video recordings for words check box and
click OK.
Insert a picture on a notes page
In Microsoft OneNote, you can insert pictures, graphics, and clipart into your notes. Pictures can add
visual flair, contain visual information that relates to your notes, or function as a decorative background
much like stationery.
Insert a picture from a file
If the picture you want to insert into your notes is located on your computer or local network, do the
following:
1. On the Insert tab, in the Images group, click Picture.
2. In the Insert Picture dialog box, navigate to the location where the image file is located, click to select
the file, and then click Insert.
When the picture appears in your notes, you can click to select it and then use the selection handles that
appear around the image to scale or resize the picture. If you want to be able to type notes over the
picture, right-click the picture and then click Select Picture as Background.
Insert a picture from the Web
If the picture you want to insert into your notes is located on the Internet, do the following:
1. On the Insert tab, in the Images group, click Picture.
2. In the Insert Picture dialog box, type or paste the full image URL (for example,
http://www.microsoft.com/picture.jpg) into the File name box, and then click Open.
28When the picture appears in your notes, you can click to select it and then use the selection handles that
appear around the image to scale or resize the picture. If you want to be able to type notes over the
picture, right-click the picture and then click Select Picture as Background.
Insert a screen clipping on a page (Desktop/ Client Version Only)
Capturing visual information on your computer screen is a great way to preserve content that may
eventually change or expire—like a breaking news story or a time-sensitive list. You can use OneNote to
take a screen clipping of any part of your computer screen and add it as a picture in your notes.
1. Bring into view the information that you want to capture (for example, a web page or another
application).
2. Switch to OneNote, and place the cursor where you want to add the screen clipping.
3. Choose Insert > Screen Clipping.
OneNote minimizes and you are returned to a dimmed version of the last thing you looked at.
4. Use your mouse or finger to select the area of the screen you want to capture.
After you make your selection, it will appear as an image in your notes. It will also be copied to the
Windows Clipboard so you can paste (Ctrl+V) the screen clipping on another page in your notebook or
into another app.
NOTE: Screen clippings are static images that represent a snapshot of information. If the source of the information is updated, the
screen clipping remains the same. There’s no link between a screen clipping and its original source. You can, however, extract words
from images in OneNote and paste them as editable text.
If you prefer using keyboard shortcuts, press Alt+N+R to start your screen clipping.
29Using the OneNote icon in the Task Bar (Desktop/Client Version Only)
If you're used to clicking the OneNote icon in the Windows system tray, you might notice that it's not
visible in Windows 10. Here's how to get it to appear.
1. In the lower-left corner of the screen, click the Windows icon, and then click Settings.
2. In the Windows Settings window, search for Select which icons appear on the taskbar.
3. Beside the Send to OneNote Tool, change the toggle to On.
After the Send to OneNote tool is in the system tray, you can begin to use it. To change what the icon
does right-click it, point to OneNote icon defaults, and choose New quick note, Open OneNote, or
Take screen clipping.
NOTE: If you click the icon, you will see the Select the OneNote Location dialog. However, the keyboard shortcut you see
(Windows+Shift+S) has been changed with the Windows 10 Creators Update. Using that shortcut, your screen clipping will go
immediately to your clipboard so you can paste it into any application, including OneNote.
30Record audio or video
(Audio Only in Online Version)
1. Click a location on the page in OneNote where you want to place the recording, and then do one of
the following:
To create an audio-only recording, click Insert > Record Audio.
•
To create a video recording with optional audio, click Insert > Record Video.
•
Recording starts as soon as OneNote adds a media icon to the page.
2. To end the recording, press Pause or Stop on the Audio & Video tab.
3. To play a recording, click the media icon on the page and then click Play.
If you take notes during the recording, they'll be linked to the audio and video created with OneNote.
This way you can search your notes and find specific parts of the audio or video recording.
NOTE: If you select the See Playback button on the Audio & Video tab, OneNote will position the cursor within any notes that
you took during the recording. For example, if you’re recording an interview and you took notes two minutes into the clip,
OneNote will jump to that exact part of your notes whenever you play back the clip and it reaches the two minute mark. This is
immensely useful for retaining context between a recorded event and any reactions, thoughts, and ideas that you had at any
particular moment during that event.
31Add files to OneNote
When you’re doing research or planning a project, you can add digital file printouts into your notes to
keep relevant information together.
Instead of actually printing the file onto paper, OneNote can send a digital image to your notebook. After
the image is on the page, you can add notes to it.
1. Click Insert > File Printout.
2. In the Choose Document to Insert dialog box, select the file that you want to insert.
OneNote will print the contents of the file to the current page in your notebook.
NOTE: If you want to insert a password-protected document, you’ll need to enter the correct password
before the document will be printed to OneNote.
Files printed into OneNote appear as pictures. You can drag a picture to another place on the page and
you can drag the file handles that appear around a picture to resize it.
Copy text from a file printout
You can extract text from a file printout and paste it in your notes. This is useful if you want to make
changes to the text or if you want to copy any part of the text into an email or other file, like a Word
document.
1. Right-click the image, and then do one of the following:
Click Copy Text from this Page of the Printout to copy text from only the currently selected image
•
(page).
Click Copy Text from All the Pages of the Printout to copy text from all the images (pages).
•
2. Click where you’d like to paste the copied text, and then press Ctrl+V.
NOTE: The effectiveness of OneNote’s text recognition depends on the quality of the source formatting in the document or file you
inserted. When pasting text that you copied from a picture or file printout, always look it over to make sure that your selection was
recognized properly.
32Customize the ribbon (Desktop/Client Version
Only)
Use customizations to personalize the ribbon the way that you want it. For example, you can create
custom tabs and custom groups to contain your frequently used commands.
IMPORTANT: Ribbon customization is specific to the Microsoft Office program you are working in at the time. Ribbon customization
does not apply across the Office programs.
You can rename and change the order of the default tabs. However, you cannot rename the default
commands, change the icons associated with these default commands, or change the order of these
commands. The default commands appear in gray text.
To add commands to a group, you must add a custom group to a default tab or to a new, custom tab. To
help you identify a custom tab or group and to distinguish from a default tab or group, the custom tabs
and groups in the Customize the Ribbon list have (Custom) after the name, but the word (Custom) does
not appear in the ribbon.
1. Default tab and group that has commands that cannot be changed
2. Custom group in a default tab that has new commands added. These new commands can be changed.
To start to customize your ribbon, see the steps below.
Access the Ribbon window
1. Click the File tab.
2. Under Help, click Options.
3. Click Customize Ribbon.
You can also get to the Customize the Ribbon window, by right-clicking any tab on the ribbon, and then
clicking Customize the Ribbon.
33Add a custom tab
When you click New Tab, you add a custom tab and custom group. You can only add commands to
custom groups.
1. In the Customize the Ribbon window under the Customize the Ribbon list, click New Tab.
To get to the Customize the Ribbon window, see the “Get to the Customize the Ribbon window” section.
To see and save your customizations, click OK.
To add commands to a custom group, see the Add commands to a custom group section.
Rename a default or custom tab
1. In the Customize the Ribbon window under the Customize the Ribbon list, click the tab that you want to
rename. To get to the Customize the Ribbon window, see the “Get to the Customize the Ribbon
window” section.
Click Rename, and then type a new name.
To see and save your customizations, click OK.
Hide a default or custom tab
You can hide both custom and default tabs, but you can only remove custom tabs.
In the Customize the Ribbon list, the custom tabs and groups have (Custom) after the name, but the
word (Custom) does not appear in the ribbon.
1. In the Customize the Ribbon window under the Customize the Ribbon list, clear the check box next to
the default tab or custom tab that you want to hide. To get to the Customize the Ribbon window, see
the “Get to the Customize the Ribbon window” section.
2. To see and save your customizations, click OK.
Change the order of default or custom tabs
1. In the Customize the Ribbon window under the Customize the Ribbon list, click the tab that you want
to move. To get to the Customize the Ribbon window, see the “Get to the Customize the Ribbon
window” section.
2. Click the Move Up or Move Down arrow until you have the order you want.
3. To see and save your customizations, click OK.
Remove a custom tab
You can hide both custom and default tabs, but you can only remove custom tabs.
In the Customize the Ribbon list, the custom tabs and groups have (Custom) after the name, but the
word (Custom) does not appear in the ribbon.
1. In the Customize the Ribbon window under the Customize the Ribbon list, click the tab that you want
to remove. To get to the Customize the Ribbon window, see the “Get to the Customize the Ribbon
window” section.
2. Click Remove.
3. To see and save your customizations, click OK.
34Sync Errors (Desktop/Client Version Only)
Try opening the notebook in OneNote Online. This can help determine if the problem is caused by
the server or by OneNote.
1. In OneNote, click File > Info.
2. Right-click the URL shown below the name of the affected notebook, and click Copy.
3. In your web browser, click inside the address box, and press Ctrl+V to paste the copied URL.
4. Press Enter to load the notebook in OneNote Online.
If you're able to successfully open the notebook in OneNote Online and the changes appear, the
problem may be caused by the desktop version of OneNote. Closing and re-opening the notebook
usually clears and successfully resets the connection.
1. In OneNote, click File > Info.
2. Next to the name of the affected notebook, click Settings, and then click Close.
3. Switch back to the notebook in OneNote Online in your browser, and then click Open in OneNote
on the ribbon.
IMPORTANT: Depending on the notebook size and type of Internet connection you're using, it may take a while
to sync all the notebook content over to the desktop version of OneNote.
If you're able to open and view the notebook in OneNote Online but can't see the changes, the
information hasn't synced back to OneNote Online. Check the sync status dialog for specific sync
errors.
1. In OneNote, click File > Info.
2. Click the View Sync Status button.
3. Check for errors in the dialog box, note the error code and message and check the list of error
codes in this article.
NOTE: You may see a Get Help button next to an error. If you do, click it as it should open a troubleshooting
article specific to the error.
35Sections won't sync
There may be times when your shared notebook is syncing normally except for one of its sections.
You can verify this by doing the following:
1. In OneNote, click File > Info > View Sync Status.
2. In the Shared Notebook Synchronization dialog box, click any notebook icon with a yellow triangle
warning over it to see the name of any section that’s causing sync problems.
3. Click the Sync Now button next to the notebook containing the section.
Individual notebook sections can occasionally stop syncing properly. If you have a single section that
isn’t syncing with the rest of an otherwise up-to-date notebook, you can try the following workaround:
4. In the same notebook, create a new section.
5. Copy (don’t move) all of the pages from the old section into the new one you just created. You can do
this by right-clicking each page and then clicking Move or Copy.
6. When all of the pages have been copied to the new section, press Shift+F9 to manually sync the
notebook. If a progress bar appears, wait for it to finish.
If following these steps successfully syncs the pages in the new section that you created, you can
safely delete the old section and then continue working in the new. After the old section is deleted,
you can rename the new section to the same name as the deleted section.
If these steps don't work, section sync errors or problems can also be caused by a corrupted section
located in the Notebook Recycle Bin. If you no longer want that section, you can delete it from the
Recycle Bin to stop the error:
In the OneNote notebook, click the History tab, and then click the Notebook Recycle Bin.
•
Right-click the section (or page) and choose Move or copy.
•
You can also Copy and Paste the pages or content in the section to another page or section.
•
Once that's done, you can delete the original section or page.
36Schoology Home Page
Your homepage is the first place you'll land every time you log in to Schoology. It briefs you on
activity in your school, courses, and groups. It also keeps you organized by showing important
upcoming events and assignments.
Recent Activity
By default, you land on the Recent Activity feed when you log in. This feed shows all comments
and updates pertaining to your courses and groups. To filter your feed to view only Updates, Polls,
or Blog posts, click the Most Recent link in the top corner, and select a filtering option.
Upcoming
The Upcoming area on the right side of your homepage displays events, assignments,
tests/quizzes, and discussions with a due date. Hovering over each item displays the course or
group associated with the item.
You may access your personal Calendar by clicking the Calendar link in the upper-right
of Upcoming. For more information about your personal calendar, review the
Calendar section below.
Grades and Attendance
Select the Grades/Attendance tab in the left menu of your homepage to see a breakdown of your
grades and attendance for each course. Click a specific course to view each graded item, your
grade, the max points, and any comments from the instructor.
You may also download a Student Report by clicking the button in the top right of the page.
Calendar
The calendar located on the left menu of your homepage is an aggregate of personal, school,
group, and course items. The calendar is a great way to keep track of your workload and stay up-to-
date with past and upcoming items.
37Create personal events
You can add personal events to your calendar from your personal calendar, located on the left column of the
homepage.
To create an event, follow these steps:
1. Select the Calendar tab in the left column of your homepage.
2. Click the date to which you'd like to add the event.
3. Fill out the Event form.
4. Choose an RSVP option (depending on the settings in place at your school, this option may not be available
to you).
Disabled—Requires no RSVP. This event will only be viewed by you.
•
Only Invitees Can RSVP—Event remains personal until you invite people you’re connected with.
•
Anyone Can RSVP—Make the event public (available to anyone).
•
Attach a File, Link, or Resource (optional).
•
Enable Comments at the bottom left (optional).
•
5. Click Create to complete.
Edit an event
To modify an existing event, follow these steps:
1. Click the event you'd like to modify.
2. Click the Edit Item button.
3. Once you've finishing editing your event, click Save Changes.
Delete an event
To delete an event, follow these steps:
1. Click the event you'd like to delete.
2. Click the View Item button.
3. Click the gear to the right of the event profile.
4. Select Delete to remove the event.
Note: If you choose to create an Event with an invitation from your homepage, you must invite everyone
manually.
Messages
Depending on the settings in place at your school, you may be able to receive messages from teachers at
your school, and send messages to teachers at your school.
Check New Messages
When you have a new message in your inbox, the Messages icon on the top menu displays an updated
number. You'll also see a number next to the Messages area on the left menu of your homepage.
1. Navigate to your Messages area by clicking on the icon on the top menu, or by clicking on the Messages
area on the left menu of your homepage.
2. Click the message you'd like to read. New messages are highlighted in blue.
3. To reply to a message, enter a comment in the Message area, and click Send.
38Check Sent Messages
1. Navigate to your Messages area by clicking on the icon on the top menu, or by clicking on the
Messages area on the left menu of your homepage.
2. Click the Sent Messages tab.
3. To read a message, click on a message you've sent in the past.
4. To send a message, click on the +New Message button.
5. Fill out the form, and click Send to complete.
Note: A recipient name will automatically populate when you enter a teacher's name into the To
field. Please wait for the auto-population. If you're not able to send a message to peers or certain
users, please talk to your teacher for further advice.
Course Updates
The Updates area of the course profile is used by instructors to create announcements and brief messages
for the course. Updates will appear in the Updates section of your course as well as on your homepage.
You and your classmates may comment on each Update. In some courses, your instructors may allow you
to post updates also.
39Course Materials
Course materials encompass from lessons and presentations, to assignments and exams. Each course may
be organized differently, so the course materials might be listed in the Materials Index, or organized into
folders. To access your course's materials, go to the Course Profile by clicking the Courses dropdown
menu at the top of the screen and selecting the course you'd like to access.
Course Folders
Folders organize course materials, and they're distinguished by the blue folder icon next to their name.
Inside of a folder, you will find an assortment of course materials:
1. Assignments
2. Tests/Quizzes
3. Files/Links
4. Discussions
5. Albums
6. Pages
Course Assignments
Assignments are graded items. Each assignment may require you to use a Submissions feature in the right
column to make a submission. Once you've made a submission, the instructor can grade the assignment,
provide feedback, and upload a file back to you.
To submit a file to an assignment, follow these steps:
1. In the Assignment Profile click on the Submit Assignment button to the right.
2. Use the Add a Comment area for questions and concerns (optional).
3. Select one of these options:
Upload—Select a file from your computer.
•
Create—Create a document on the web using the text editor.
•
Resources—Select a file from your Resources
•
4. Click the Submit button to finish.
Note: Assignments can also be given a Due Date, which will automatically display the assignment in your
personal Calendar and Upcoming area on your homepage. Assignments also might not be graded,
depending on the settings set by the instructor of the course.
Course Tests/Quizzes
The tests/quizzes material are online assessments for the course. These tests/quizzes can have an
assortment of the following question types:
True/False Matching
Multiple Choice Fill in the Blank
Ordering
Short-Answer/Essay Questions
40Tests/quizzes can remain open for a maximum of 6 hours before the session expires. Please make sure
you exit the test/quiz and resume it at a later time if the test will take longer than 6 hours to complete.
After you submit a test/quiz, your grades will appear in the Grades area. Tests/quizzes may be timed, or
may allow multiple submissions. Each test/quiz will vary depending on the instructor and the course.
How do I take the Test/Quiz?
1. Click on the name of the test/quiz.
2. Make sure you're in the Test/Quiz tab.
3. Click on the Begin Test/Quiz button.
4. Answer the questions appropriately.
5. Click on the Submit button when you are ready to submit the test/quiz to your instructor.
How do I view my past submissions?
For some tests/quizzes, your instructor may allow you to view your past submissions. If this is the case,
you will see an additional tab My Submissions when you click the test/quiz name. This tab will show you a
list of all your submissions, with links on the right to View Assessment.
Course Files/Links
Files that have been added to your course can appear inside of Folders or in the Files/Links area of the
Materials Index. Typical file types can be viewed in your browser without having to download the file.
These include:
1. Word (.doc, .docx)
2. Excel (.xls, .xlsx)
3. Powerpoint (.ppt, .ppt)
4. PDF (.pdf)
Course Discussions
Discussions are interactive conversations that allow participation between you, your classmates, and your
instructor. Each discussion has threaded commenting, allowing you to respond to any post by another
student.
For some courses, instructors may choose to moderate the discussion posts. Moderation requires a course
admin to approve each post before it is published. When this feature is turned on, your posts will not be
immediately visible to other students.
Course Pages
Pages are resources created by your instructor to supplement the course. These pages are highly versatile,
allowing for the inclusion of text, image, outside link, and video information. They may appear inside of
folders, or in the Pages area of the Materials Index.
41Notifications
Schoology sends you email notifications for Social, Academic, Group, and School activity that occurs in
your account. To access your personal account notifications, click on the down facing arrow in the upper
right corner of your Schoology page, and select the Notifications option.
Email
You can select which notifications you would like to receive from courses and groups in which you're
enrolled. To customize your notifications, follow these directions:
1. Select the arrow next to your name on the top right side of the page.
2. Click Notifications from the drop-down menu.
3. Select the button next to the notifications you want to change.
4. Choose On (receive from all sources), Off (no notifications), or Custom (pick and choose the sources).
5. Click Save Changes at the bottom.
Note: If you receive notifications for Schoology Messages you've received, you may respond to the
message directly from the notification in your email.
Mobile Message/Push Notifications
Text message or Push notifications are also available for certain actions. You can link your mobile phone
to your Schoology account by following these directions:
1. Select the arrow next to your name in the top right corner and click Notifications.
2. Select the Send Notifications to Your Phone via Text Message box to the right.
3. Enter your Cell Phone Number (your number remains hidden from other members).
4. Choose your Country.
5. Select your wireless Carrier.
6. Click Set Mobile to complete.
Note: Email and cell phone notifications differ from the Notifications Icon located on the top menu, which
provides a running list of academic actions. If you live outside of the U.S. or Canada, text message
notifications are not yet supported at this time.
42Mobile App
When you receive an assignment from a teacher in one of your classes, you can review and submit the
assignment from the Schoology app on an iPad or iPhone.
Review an Assignment
Depending on how you have set up your notifications in Schoology, when a new assignment is posted to
one of your classes you will receive updates in one or more places:
Push notification from your iPhone or iPad.
•
Email.
•
Text Message.
•
Schoology Notifications Panel.
•
The course's Upcoming feed.
•
The course Materials section.
•
To open and review the assignment, tap it from one of these locations.
Examples: View assignments from your Notifications Panel...
Or from your class's Upcoming feed.
43Submit an Assignment
After you've reviewed the assignment, the Schoology app offers several ways to create and turn it in.
To write and turn in an assignment:
1. Open the assignment and tap Submissions.
2. Tap the gear icon
in the upper-right corner and then tap:
Create Submission to write a text-only response. Tap Save Draft to save a working copy of the
•
assignment, or the check mark ✓ to turn it in.
Submit Photo/Video to add a file from your device’s camera roll.
•
Submit from Resources to add a file from your Schoology Resources folder. You can attach files you
•
created in other apps from here as well, including OneDrive.
Record Audio to record a sound file.
•
44Open In
Additionally, you can create the file in another app and submit it using the Open In function
As long as the app has Open In, you can submit directly from it to
Schoology. For example, to submit a file you created... In the Pages app:
1. Open the file in Pages that you want to submit.
2. Tap the Open In icon and then tap Open in Another App.
3. Choose the format for the file.
Note: Always choose Word, PDF, or RTF as the format.
4. Tap Choose App.
Or in OneDrive:
1. Open the file in OneDrive that you want to submit.
2. Tap the three vertical dots and then tap Open in.
After you've opened the file in a different app, you can open and submit it in Schoology:
1. Find Schoology in the Open In list.
2. Tap Schoology to leave the Pages app and open the file in the Schoology app.
3. Tap Submit to Assignment, browse to the class and assignment, and then tap Upload.
After your teacher has reviewed your submission
and commented on or graded it, you'll receive more
notifications in the same spots as when the
assignment was posted.
45You can also read