Uniware Training Document - Unicommerce Support Portal
←
→
Page content transcription
If your browser does not render page correctly, please read the page content below
Unicommerce eSolutions Pvt Ltd 2021

                  UNICOMMERCE ESOLUTIONS PVT LTD

            Uniware Training Document

For detailed document, please refer to Unicommerce
Knowledgebase Portal." to "Detailed product documentation
can be easily accessed at Support.unicommerce.com
Unicommerce eSolutions Pvt Ltd 2021

Contents
Warehouse / Facility & Billing Party ............................................................................................................. 5
   Facility: ...................................................................................................................................................... 5
   Billing Party: .............................................................................................................................................. 6
Channel / Marketplace Management ........................................................................................................... 6
   Marketplace Integration ........................................................................................................................... 6
Shipping Provider Management ................................................................................................................... 7
   Types of Shipping Providers: ..................................................................................................................... 7
   List of shipping providers with API integrations: ...................................................................................... 7
   Shipping Provider Integration: .................................................................................................................. 8
Tax Class ........................................................................................................................................................ 9
Product Category: ......................................................................................................................................... 9
Product Creation (SIMPLE & BUNDLE) .......................................................................................................... 9
   Add SIMPLE Product one at a time ........................................................................................................... 9
   Add SIMPLE Product Using Import for bulk. ........................................................................................... 10
   Add BUNDLE Product one at a time ........................................................................................................ 11
   Add BUNDLE Product Using Import for bulk........................................................................................... 11
Product Mapping: ....................................................................................................................................... 12
   Scenario 1:............................................................................................................................................... 13
   Scenario 2:............................................................................................................................................... 13
   Scenario 3:............................................................................................................................................... 13
   Scenario 4:............................................................................................................................................... 14
Inventory Adjustment: ................................................................................................................................ 15
   Inventory Management using Import ..................................................................................................... 15
   Inventory Management of a Bundle ....................................................................................................... 15
Vendor: ....................................................................................................................................................... 15
   Adding Vendor (Single) ........................................................................................................................... 16
   Adding Vendor (Bulk) .............................................................................................................................. 16
Vendor Catalog: .......................................................................................................................................... 16
   Vendor Catalog (Single)........................................................................................................................... 16
   Vendor Catalog (Bulk) ............................................................................................................................. 17
   Setting Vendor Priority: .......................................................................................................................... 17

Unicommerce eSolutions Pvt Ltd 2021
Purchase Management: .............................................................................................................................. 17
   PO Creation ............................................................................................................................................. 17
       Manual Purchase Order Creation : ..................................................................................................... 17
       PO against Backorder: ......................................................................................................................... 18
       Bulk Item adding in manual generation of PO: ................................................................................... 18
       PO against Reorder: ............................................................................................................................ 18
       PO through Purchase Cart: ................................................................................................................. 18
   Approve a Purchase Order: ..................................................................................................................... 18
GRN (Goods Received Note): ...................................................................................................................... 19
   Create a GRN (manually):........................................................................................................................ 19
   Create GRN (Bulk): .................................................................................................................................. 19
Putaway for GRN items: .............................................................................................................................. 19
Gatepass (Return to vendor): ..................................................................................................................... 20
Return to Vendor: ....................................................................................................................................... 20
Order processing ......................................................................................................................................... 21
   Different Options in ORDER’s Tab........................................................................................................... 21
       2. Unverified Order: ............................................................................................................................ 21
       3. Cancelled Order: ............................................................................................................................. 21
       4. All: ................................................................................................................................................... 21
       5. Failed Order: ................................................................................................................................... 22
   Different Options in SHIPMENT’s Tab ..................................................................................................... 22
       2. Packed: ............................................................................................................................................ 22
       3. Ready to Ship: ................................................................................................................................. 23
   Manifest Generation: .............................................................................................................................. 23
   5. Dispatched: ......................................................................................................................................... 23
   8. Customer Returns: .............................................................................................................................. 24
Picklist: ........................................................................................................................................................ 24
   Picklist Flow............................................................................................................................................. 24
Status Sync: ................................................................................................................................................. 25
   Automatic Return Sync: .......................................................................................................................... 25
   Manual Return Management ................................................................................................................. 26
   Customer Initiated Return (CIR):............................................................................................................. 27
Unicommerce eSolutions Pvt Ltd 2021
Return To Origin (RTO):........................................................................................................................... 27
Myntra Return Management: ................................................................................................................. 28
Reverse Logistics Management: ............................................................................................................. 28
Image scan based Outbound QC for Return Management: ................................................................... 29
Payment Reconciliation .............................................................................................................................. 30
Enable Reconciliation Sync: .................................................................................................................... 30
Awaiting Payment ................................................................................................................................... 30
Unreconciled: .......................................................................................................................................... 30
Disputed: ................................................................................................................................................. 31
Reconciled: .............................................................................................................................................. 31
All Transactions: ...................................................................................................................................... 31
Settlements: ............................................................................................................................................ 31
Dashboard and Reports .............................................................................................................................. 32
Dashboard: .............................................................................................................................................. 32
Overview: ............................................................................................................................................ 32
Sales: ................................................................................................................................................... 32
Fulfillment: .......................................................................................................................................... 32
Purchases (Only available in professional version): ............................................................................ 32
Returns: ............................................................................................................................................... 32
Inventory: ............................................................................................................................................ 32
Payments: ........................................................................................................................................... 32
Reports: ................................................................................................................................................... 33
Sales Order .......................................................................................................................................... 33
Returns and Cancelled Report ............................................................................................................ 33
Product Report .................................................................................................................................... 33
Inventory Reports ............................................................................................................................... 33
GST Reports......................................................................................................................................... 33
Busy Reports ....................................................................................................................................... 33
Purchase Orders .................................................................................................................................. 33
Reconciliation Tally Report ................................................................................................................. 33
Fast Moving SKU’s ............................................................................................................................... 33Unicommerce eSolutions Pvt Ltd 2021
Warehouse / Facility & Billing Party
Warehouse:
A warehouse is a building for storing goods. Warehouses are used by manufacturers, importers,
exporters, wholesalers, transport businesses, customs, etc.
Facility:
This is warehouse configuration to manage the shipping and billing of the goods being sold from the
respective warehouse.
Please click on settings ->Facilities to configure or edit the Facility in Uniware.
To configure the facility in Uniware, one must have following information handy:
• Party Name (Company name for Invoices)
• Display name (For Uniware only)
• GST Number and PAN number
• Signature Image (Mandatory)
• Company logo (Optional)
• Billing and Shipping Address (For Invoices)
After the above mentioned details in the respective fields, please click on Save Warehouse.
Now we have to update the Invoice Sequence under the Invoice Sequence Tab. Please find below the
description basis the Uniware package you are using:
• Sale Invoice prefix and Sale return Invoice prefix (For Standard and Professional version both) to
manage invoice sequence / series for a particular financial year.
• Delivery Challan (For professional version only)
• Gatepass Invoice and Gatepass Return Invoice series (For professional version only)
• Purchase Invoice and Purchase Return Invoice series (For professional version only)
This completes the Facility setup.
Uniware provides multi warehouse management depending on the package you are using. Please find
below:
Standard – You can only manage single warehouse.
Professional – You can manage up to two warehouses.
Enterprise – You can manage multiple warehouses.Unicommerce eSolutions Pvt Ltd 2021
Billing Party:
A seller can have more than one GST number within the same state and selling on same platforms (Like
Flipkart or any other marketplace) with the different company name then he can create multiple Billing
parties to manage the Billing and Shipping.
Please find below the scenarios when one should use Billing Party feature in Uniware:
• If seller is selling only on marketplaces (Like Flipkart, Amazon India etc.) then the system will
fetch the Invoice series for a particular order from the respective marketplace.
• If the seller is doing offline orders or selling on Carts (Like Shopify or Magento) and having
multiple companies registered within the same state, then he can manage different invoice
series by creating multiple Billing Parties as per his/her requirements.
• If the seller is selling On Myntra B2B then he can also manage Invoice series with the help of
either facility or a billing party.
Please click here to learn how to setup Billing Party.
Channel / Marketplace Management
Marketplace Integration
Unicommerce helps you manage all the leading marketplaces in a single unified platform. For managing
the channels in Uniware and leverage the benefits of centralized inventory management, we need to
integrate the same.
There are few channels which has some restriction of the version and traceability:
AJIO: Only works in Professional version and with Item/SKU level traceability.
Flipkart Smart: Only works in Professional with dedicated inventory model
Refer support article for some important marketplaces:
1. Amazon
2. Flipkart
3. Snapdeal
4. Limeroad
5. Myntra B2B/FBM
6. Amazon Flex
7. Myntra PPMP
8. AJIOUnicommerce eSolutions Pvt Ltd 2021
9. Flipkart Smart
10. Amazon FBA
Shipping Provider Management
Unicommerce helps you manage all the leading shipping providers for domestic and international
shipping.
For all the self ship orders, cart orders, custom channel orders, you can add the shipping provider
already added with us in to your Uniware account to ship your orders to the customers and ensure a
proper tracking of the shipments.
Use Cases for Shipping Providers in Uniware:
• To manage Self Ship Orders for Marketplaces, Carts, Custom Channel s (Offline)Orders.
• To manage Amazon FBA & Flipkart FA orders, a self ship option is enabled so that the shipments
get generated and dispatched as these channels work as Third Party Warehouse.
• For channels like Ajio as well seller has to add Shipping Provider as (Self) in the System so that
the shipments get generated.
Types of Shipping Providers:
1. Shipping Aggregators:
• Shipping aggregators are basically those logistic partners who are having inbulit API’s
with various couriers like Fedex, Delhivery, and BLueDart etc for the generation of AWB
numbers. It provides multiple options for the seller to choose the shipping provider
basis their cost, delivery time and reach of the delivery.
• Shyplite, Shiprocket, Vamaship and Ithink are the best examples of shipping aggregators
that Uniware supports.
2. Logistic couriers:
• Logistic couriers are those single entities who are responsible for the generation for
AWB Numbers.
• Some of Logistic couriers support API’s for the generation of AWB Numbers like Fedex,
Delhivery, Bluedart etc.
List of shipping providers with API integrations:
Shipping Aggregators:
➢ Shiprocket
➢ Shyplite
➢ iThink
➢ VamashipUnicommerce eSolutions Pvt Ltd 2021
➢ ShadowFax
➢ Pickrr
Logistic Couriers:
➢ Fedex
➢ Delhivery
➢ BlueDart
➢ DotZot
➢ DHL
➢ DHL Global
➢ Ecom Express
➢ Aramex
Shipping Provider Integration:
To integrate any shipping provider or logistics, you just have to search the same shipping provider with
the name.
• The steps are simple:
1. On the path Settings > Shipping Providers, click the button
2. Search the Shipping provider which you want to add.
3. Fill in the general details like its name, serviceability and shipping methods. Click here to
learn more about serviceability
4. The AWB Generation can be done in many ways –
a. If you select LIST, the system will pick the tracking number or the AWB number from
the list we feed.
b. GLOBAL LIST is the common list of AWB numbers across all facilities.
c. If you select MANUAL, then every shipment allotment to a courier will require a
manual entry of the AWB number during the shipping package addition to its
manifest.
d. If you select API, the API fetches the AWB number every time a shipment is
assigned to this courier.
5. On clicking it the system allows you to enter the list of AWB numbers.
6. Enter a comma-separated or newline-separated value in the text box.
7. Please remember that you cannot select API as a valid option for AWB number generation in
case of “SELF” or the other shipping providers those don’t provide AWB through API mode.
8. For API AWB generation, you can fill the optional value at connector which will be provided
by the respective shipping provider.
Click here to learn more about how to add shipping provider in Uniware.Unicommerce eSolutions Pvt Ltd 2021
Product Creation & Mapping
Product data working includes, Defining Tax Classes, Category creation Product Creation,
Product Mapping and Inventory Adjustment.
Tax Class
Introduction of Goods and Services Tax (GST) has replaced VAT, CST and all other indirect taxes levied on
goods and services by the Central and state governments with Uniform Tax throughout the country to
mark the evolution of a common national market.
Please click here to learn how to create tax class and learn more about Goods and Services Tax.
Product Category:
The classification of similar type of products into a class for easier application of tax slabs is known as
categorisation of products.
You can associate a product with the existing categories in the system while creating the product detail.
Please click here to learn how to create category in Uniware.
Product Creation (SIMPLE & BUNDLE)
In Uniware there are two types of products i.e. SIMPLE & BUNDLE and also there are two ways we can
create product or master SKU or Uniware SKU. Lets discuss both the methods: Link
You can add new products SKU in the Uniware by the two ways:
Add SIMPLE Product one at a time
o In Uniware, Product SKU code can be created with the length of 3 to 45 characters
o Uniware allows only four special symbols as Dash- Dot. Underscore_ and Forward Slash /.
However, “Space” is not allowed in Uniware SKU.
o The SKU code creation limit for Uniware Standard = 1 Lac and Uniware Professional = 3 Lac
which means you can only create product SKU as per mention limits.
Process Steps:
1- On the path Products > Products, click on ‘Add Product’ to add a new product definition.
2- Fill the detail for sku and press the “Save” button.
You must fill bellow fieldsUnicommerce eSolutions Pvt Ltd 2021 SKU Code – As per your choice Product SKU with Uniware SKU criteria. Product Name – Your product Name as you want to identify it in Uniware Product Category – Fill the category code as per your product category defined in Uniware GST Tax Type – Select the GST tax type as per your product defined tax class HSN Code – HSN code fined by Govt norms Rest fields you can fill as per your choice for use in system (Optional). 3- Press the “Save” button. Add SIMPLE Product Using Import for bulk. For bulk creation, you can import the products as per defined template in Add Product sheet in the system. 1- On the path Tools -> Import, Select ‘Item Master’ in the menu. 2- Find the import file template and fill the data as per you sku details. You can select ‘CREATE NEW AND UPDATE EXISTING’ in the import options, for this gives you freedom of creating a new SKU and even updating the existing product mapping in one step only. 3- Fill the SKU details in below-shown csv format. The fields with asterisk are mandatory. You must fill bellow fields SKU Code – As per your choice Product Sku with Uniware sku criteria. Product Name – Your product Name as you want to identify it in Uniware Product Category – Fill the category code as per your product category defined in Uniware GST Tax Type – Select the GST tax type as per your product defined tax class HSN Code – HSN code fined by govt norms Rest fields you can fill as per your choice for use in system (Optional). 4- Then save the sheet in default format CSV. 5- Now select the option to choose the file and uploads the sheet which was filled up as the above steps. And press the upload file button. Then upload 6- Message highlighted for upload.
Unicommerce eSolutions Pvt Ltd 2021
7- You can check the sheet uploaded result with successful upload. If there will be any issue in uploaded
data you can check the same from View import and repeat the task for SKU.

Note:

    o    SKU code if created cannot edit or delete it, you can only disable it in uniware.

    o    In Uniware, SKU code can be created with the length of 3 to 45 characters and allow only four
         special symbols as Dash- Dot. Underscore_ and Forward Slash /. However, “Space” is not
         allowed in Uniware SKU.

    o    The SKU code creation limit for Uniware Standard = 1 Lac and Uniware Professional = 3 Lac

Add BUNDLE Product one at a time

To create a Bundle in Uniware, ensure that its component products already exist within the system as
individual products.

Multiple bundles are created within Uniware, each containing a relevant product in varied quantities.
Each bundle will be uniquely defined with an SKU and zero quantity of its own. However, the inventory
quantities will be adjusted for every individual sellable item within the bundle definition.

Steps:

1. Follow the path Products > Products

2. Click Add Product

3. Define the Bundle name, its SKU, and the other parameters, just as we define a product in Uniware.

4. Select Product type = BUNDLE and check the parameters for the component product definition.

5. Select Tax Calculation Type: PRICE_OF_BUNDLE_SKU Or PRICE_OF_COMPONENT_SKU that will
decide the tax calculation based on main bundle sku or component sku.

6. Select the Component SKU & Quantity and save

Add BUNDLE Product Using Import for bulk.
When importing a bundle, the items contained should be defined clearly, it’s SKU, quantity and
individual prices.
Unicommerce eSolutions Pvt Ltd 2021
To create a new sku product as bundle use item master (ideally done at setting up of the system), select
CREATE_NEW in the Import Options.
Download the csv format and fill the data of your products sku.
Provide the given values in the import file:
Category code-Default
Product code-Bundle uniware code you want to create.
Name-The name of the bundle you want to give.
GST TAX Type-Tax code
Type-You have to mention “BUNDLE” in this column.
Component product code -You have to mention the product uniware code which you want in the
bundle.
Component quantity – Quantity of the particular product in the bundle.
Tax Calculation Type – PRICE_OF_BUNDLE_SKU Or PRICE_OF_COMPONENT_SKU that will decide the
tax calculation based on main bundle sku or component sku.
For Example: If you want a bundle code ABC of the products having code as A,B and C then you have to
create three rows in which you have to mention bundle code ABC in the product code in all three rows.
After that in component product code you have to mention A in first row, B in second row and C in third
row with their respective quantity present in bundle and the unit prices.
Please remember: We can also import a bundle and its component products at the same time as long as
we are listing these component products above the bundle definition in our import file.
Article to refer
Product Mapping:
There are different scenarios where customer might have listed his / her products on different
marketplace. We will list each scenario and how data can be prepared for the respective scenarios.
1. Same SKU Codes on all marketplaces without any Bundle / Combo products
2. Same SKU Codes on all marketplace with Bundle / Combo products
3. Same SKU Codes on all marketplace and also selling on Myntra and PayTm
4. Different SKU Codes on all marketplace for the same product
5. Same SKU Codes on all marketplace but the actual product which is live is completely differentUnicommerce eSolutions Pvt Ltd 2021
Scenario 1:
• In case there are same SKU codes on all the marketplaces but there are no bundle / combo
products
o Take export of Unlinked SKU codes and filter channel with maximum live
(Best way would be to add channel with maximum products live first)
o Pick the Seller SKU Codes to create it as Uniware SKU Code
(If present, Find Spaces or special characters except(_,-,.) and replace it with Dash (-) or
a hyphen (_))
o If seller SKU did not contain any special character or a space then make the Item master
with the Seller SKU Codes as Uniware Sku Codes with mandatory fields.
o Please click here to learn how to create products.
o After uploading Item master sheet, please check if any listing is not linked and is present
under unlinked tab.
Note: Please check the progress on import option and see the progress. In case of any error, please
check error log by downloading the sheet. Correct the errors and re-upload the sheet.
Scenario 2:
• In case of similar SKU codes all over the marketplaces but with Bundle or Combos live
o Take export of unlink SKU codes data and filter out the channel which is having
maximum products live.
o After that filter the bundles / combos are separate then copy them in another excel so
that we can go ahead with creation of single products first. Click here to learn how to
create simple products.
o Once the Single products are created then we need to create Bundle / Combo products
with the item master file using the single products as Component SKU codes and their
respective quantities. Click here to learn how to create Bundle / Combo products.
o Once Done with Bundle Creation cross check the unlink SKU codes once.
Scenario 3:
• In case of similar SKU codes all over the marketplaces but if client is dealing on Myntra or Paytm
o Please cross check whether the Seller SKU codes are parent SKU codes or not.
o If there is no parent SKU codes in that case create the products if the SKU codes are
same on all the marketplaces. Click here to learn how to create products.
o If Seller SKU codes are having parent ID’s then please download active listings report
from the channel and concatenate (Add) parent SKU codes and variants in a separate
column.
o After concatenation, use them as SKU codes in Uniware and create item master.
o In this case the auto mapping will not work since the seller SKU and Uniware SKU codes
would be different. Please follow below steps for mapping :
▪ Take the export of Unlinked tab dataUnicommerce eSolutions Pvt Ltd 2021
▪ From the concatenation sheet, pull respective seller SKU code and channel
product id against the parent SKU code which will be seller SKU code in data
export of Unlinked tab.
▪ After following the above mentioned steps, you will have Channel Name,
Channel Product Id, Seller SKU codes and Uniware SKU codes.
▪ Download Channel Item Type sheet from Tools ->Import -> Channel Item Type
▪ Fill out the first four columns (A,B,C & D) and import the sheet. Click here to
learn how to do product mapping.
Scenario 4:
• All the marketplace have different SKU codes for the same product
o Go to unlinked tab and export the data.
o Create a master SKU code (Unique SKU code) for only single / simple items by using
seller SKU code of the channel which is having maximum listings live (In case of any
special character or a space available in seller SKU code, find and replace it with “_” or “-
“). Click here to know how to upload item master.
o Now from Unlinked Data export, copy the seller SKU code and paste it by inserting a
new column right after seller SKU code column.
▪ Follow the special character / space replacement procedure like above
mentioned step with “_” or “-“ in the unlinked data tab.
▪ After following the above mentioned steps, you will have Channel Name,
Channel Product Id, Seller SKU codes and Uniware SKU codes.
▪ Download Channel Item Type sheet from Tools ->Import -> Channel Item Type
▪ Fill out the first four columns (A,B,C & D) and import the sheet. Click here to
learn how to do product mapping.
o Once the simple / single products are created and mapped, filter Combo / Bundle by
selecting channels with maximum bundle listings.
o Create the master SKU code (Unique SKU Code) (In case of any special character or a
space available in seller SKU code, find and replace it with “_” or “-“).
o Use the master SKU code for Bundle creation by assigning respective simple / single
products along with the quantities of simple / single products in the Bundle. Please click
here to learn how to create Bundle /Combo products.
o Map the bundle products by following the same step, we did for simple products. Please
click here to learn how to do product mapping.
Summary:
1. We have learned how to create Simple products in Uniware. Need to know more! Click here.
2. We have learned how to create Bundle products in Uniware. Need to know more! Click here.
3. We have learned how to map products in Uniware. Need to know more! Click here.Unicommerce eSolutions Pvt Ltd 2021
Inventory Adjustment:
Once the products are created and mapped in Uniware, we need to add the inventory / stock physically
available in the warehouse. Let’s learn how we can add the inventory in Uniware:
Inventory Management using Import
• Please take the export of products created in Uniware and remove Bundle products.
• Download inventory adjustment sheet from Tools ->Import ->Inventory Adjustment
• Fill out the SKU Code, Quantities, Shelf Code and Adjustment Type (ADD, REMOVE, TRANSFER,
and REPLACE).
• Import the sheet and inventory will be added. Please click here to know how to adjust inventory.
Inventory Management of a Bundle
A bundle is not a distinct product in itself, but only a collection or combination of other products in
varying quantities. It is just like a basket of products which can be customized. So when we sell it, we
don’t hold inventory of a bundle as a standalone item.
The items contained within a bundle can have a defined quantity. Thus, the availability of a bundle will
essentially depend on the availability of its component items.
The inventory count of the component items is auto-adjusted by Uniware as soon as a bundle is sold. No
longer will you need to go back and manually check all the bundle counts sold and manage the inventory
counts accordingly.
Vendor and Purchase Management
Vendor:
A vendor is a supplier/seller of goods and services available to the users. For our business, we might be
buying the same goods/services from multiple vendors/sellers and have to maintain a list carrying their
details.
As a part of vendor management, we take care of many aspects, including the management of
competitive prices, ensure on-time delivery and taking care of the customer service.Unicommerce eSolutions Pvt Ltd 2021
Uniware allows you to add vendors manually as well as in bulk.
Adding Vendor (Single)
• Please go to Purchase -> Vendors
• Click on ADD (top right corner)
• Fill the general details. Add the Vendor’s name, code and the website URL.
• In the Accounting Details add PAN and GSTIN number.
• Define the Vendor Contact Details and his Billing Address in the next sections.
• If you have vendor agreement, you can add the same in the last section
• Click on Save the Vendor Details.
Click here to learn how to add Vendors manually in Uniware in detail.
Adding Vendor (Bulk)
• Select Tools > Import in the menu.
• Select “Vendors” in the import type.
• Chose create a new sheet or update the existing one under import options.
• Click on Download CSV template on middle right of the screen.
• Update the values to create the list of vendors.
• Import the sheet and the list of Vendors can be easily created
Click here to learn how to add multiple vendors together.
Once the vendors are created, you can update the respective vendor’s catalog in Uniware.
Vendor Catalog:
The vendor catalog allows you to list all the products available with different vendors. It links the
Product SKU with the Vendor SKU. This mapping helps you to easily identify the items available with a
particular vendor.
Vendor Catalog (Single)
• Follow the path Purchase - > Vendor Catalog
• Click the button ‘add vendor item mapping’.
• The system prompts to enter the following information in the next form:
▪ Vendor Name
▪ Vendor SKU
▪ Unit Price
▪ Item type SKU code
On submitting the information, particular item record is inserted in the Vendor catalog.
Click here learn how to manually add / edit vendor catalog in detail.Unicommerce eSolutions Pvt Ltd 2021
Vendor Catalog (Bulk)
• Follow the path Tools > Import
• Select the “Vendor Item Master” in the Import type.
• Download the csv file from “Download CSV format”
• Fill the details in the CSV file. Below are the mandatory fields to be updated:
▪ Product Code – Uniware SKU Code
▪ Vendor Price – Vendor’s selling price of product
▪ Vendor Code – Unique code which defines the vendor
▪ Vendor SKU Code – Vendor’s SKU code of the product
• Save and import the sheet and it will create the vendor catalog in Uniware.
Click here to learn how to add / edit vendor catalog in bulk.
Setting Vendor Priority:
When you upload the Vendor Catalog in the system, it asks to define the priority. If you are buying same
products with multiple vendors then it is necessary to define the priority. Priority is basically a number
set for a vendor. Priority 1 is the highest.
Click here to learn in detail on how to set the vendor priority.
Purchase Management:
A Purchase Order (PO) is a buyer generated document specifying the number of products, their
quantities and agreed prices the seller will provide to the buyer.
Purchase Orders can be managed on a single page. From adding PO items to sending it for approval,
creating and completing its GRN, initiating and completing the Quality check of the constituent PO
items!
Uniware provides a very flexible approach of creating or punching a Purchase Order with accurate data
in the most time-efficient manner.
PO Creation
There are different ways a purchase order can be created in the uniware. Lets discuss each one in
details:
Manual Purchase Order Creation :
Each Purchase Order is created manually before sending it to the suppliers for any new order(s).
The form has been designed meticulously to let the user enter definite quantities in a speedy
manner. Please click here to learn more.Unicommerce eSolutions Pvt Ltd 2021
PO against Backorder:
To fulfill outstanding sales orders in case of just-in-time procurement, system automatically
suggests desired purchase quantities through Backorders.
Please click here to learn more.
Bulk Item adding in manual generation of PO:
The Purchase Order’s item can be added in PO by importing files from the system.
Please click here to learn more.
PO against Reorder:
The system is capable of notifying you the exhaustion of an Item SKU. When an item is about to
get out of stock, you can ‘Reorder’ it from the same system notification.
Please click here to learn more.
PO through Purchase Cart:
A Purchase Cart allows you to select the products and their respective quantities for eventually
placing a Purchase Order. The Purchase Cart can contain products from different vendors at a
time, and on a single click POs are raised for multiple vendors.
Please click here to learn more.
After creating purchase order the next step is to approve the purchase order.
Approve a Purchase Order:
Any Purchase Order which has been created needs to be approved, after checking its financial
implications. Please click here to learn how to approve a PO.
Upon approval of the PO, the Vendor against which the PO is raised receives the PO and sends
the required items back to the buyer.
Upon receiving the PO at the warehouse, the GRN needs to be created.Unicommerce eSolutions Pvt Ltd 2021
GRN (Goods Received Note):
A GRN is a record used to confirm all goods have been received and often compared to a
purchase order payment is issued.
The system will send an email to the respective vendors after GRN is complete to notify about
received goods in order to give them full visibility.
Create a GRN (manually):
• Click on the PO number under APPROVED tab, for which GRN is to be created.
• Click on “Create GRN” (+ sign available in blue color, top right corner)
• Add items for which GRN is to be created. Enter the received quantity and additional
cost (if any)
• As soon as you complete the GRN, you can do a Quality check of the received products
on the same page.
• You can reject the received item if it fails quality criteria. Also you can mention the
reason of rejection in REJECTION REASON.
• Once Quality check is done, click on “Quality Check Done”
Create GRN (Bulk):
If your purchase patterns and list of vendors are repetitive, you can create GRN in bulk using
CSV import (Go to Tools> Imports> Auto GRN items)
• Select Tools > Import (second last tab left side).
• Select “Auto GRN Items” in the import type.
• Download the template and update the values to create GRN in bulk.
• Again, as you complete the GRN, you can do a Quality check of the received products.
Click here to learn how to do GRN manually as well as in bulk.
After the quality check of all the items are accepted, then in that case, a putaway for the GRN item is
mandatory.
Putaway for GRN items:
Once the GRN and QC are complete, we add these items received from Vendors to our Warehouse. This
process is called Putaway.
• Follow the path Inbound > Putaway
• Click the button “create Putaway”Unicommerce eSolutions Pvt Ltd 2021
• Select the type of Putaway: “PUTAWAY_GRN_ITEM” and press the button CREATE
PUTAWAY.
• Scan the GRN number for which the items have been received and awaiting put away.
• Press ADD TO PUTAWAY.
• After successful addition into the Putaway, close the put away to mark it COMPLETE
(Top right corner).
If any item is failed the quality check then it has to be marked rejected during quality check and a
Gatepass has to be created.
Gatepass (Return to vendor):
A Gatepass is a simple document containing the detail of items while making any product movement
outside the warehouse.
It is defined to secure the outbound transactions and ensure a smarter way of managing and keeping a
track of the inventory for those products which were not dispatched for fulfilling an order. The scenario
may be, a product is sent out for only exhibition purpose, return it to vendor in case of QC rejection or
discarding the bad inventory etc.
Below are all the possible cases of Gatepass feature:
In the case of PO rejected items, Gatepass return to vendor has to be created.
Return to Vendor:
• Click the button Create Gatepass on the top right corner of the screen.
• Fill in the details in the next form, select the type of gate pass (Return to vendor), the purpose
(not a mandatory field), party name and the reference number (if any).
• After filling all the relevant values, Press the button Create Gatepass.
• Now enter the details of the items which are to be sent back to the vendor.Unicommerce eSolutions Pvt Ltd 2021
• Update values like inventory type, shelf code, and number of items then press “ADD TO
GATEPASS”
• Then press the close icon (Top right corner).
Please click here to learn more about Gatepass.
For Gatepass which is created as returnable or in case of stock transfer, you need to create Putaway
for gate pass item.
Please click here to learn how to do create Putaway Gatepass item.
Order processing
Unicommerce runs order sync every 30 minutes to fetch all the orders to Uniware from the respective
marketplaces. As soon as the orders are fetched in Uniware it will be visible under Orders -> Pending
orders.
Also the orders which are created manually in Uniware will be visible in pending orders tab.
Different Options in ORDER’s Tab
1. Pending Order
2. Unverified Order
3. Cancelled Order
4. All
5. Failed Order
1. Pending Order: In Pending order tabs all the orders will reflect which are processed (before
manifest) or not processed (Fresh order). Once you close the manifest, order will be removed from
pending orders.
2. Unverified Order: Few marketplaces have provided option for sellers to verify the orders before
processing so for those channels orders are reflected in Unverified Order tab. As of now we have two
marketplaces for which orders are reflected in unverified order, which are PAYTM GLOWROAD. You
need to verify the orders pending in Unverified Order tab to process the same from Uniware. In case of
PAYTM, if you don’t want to verify those orders then you can enable auto verification by following these
steps: Setting ->Channels ->Click on Paytm Channel ->Auto Verify Orders (Optional) -> Select Yes.
3. Cancelled Order: It shows all the cancelled orders in Uniware. For marketplace orders, Uniware
automatically updates the status of the order with every order sync which runs every 30 minutes. Other
orders need to be cancelled manually.
4. All: This provides list of all the orders which are newly created, processing, completed, cancelled and
pending verification.Unicommerce eSolutions Pvt Ltd 2021
5. Failed Order: This lists all the orders which are not successfully created. This is the reason the
orders in the tab are called failed orders. There are two different reason for which order might be failed:
• In Uniware if SKU is not mapped and against the same SKU the order is created either
manually or through order sync from Marketplace the order will be failed. You can
check the Dashboard for failed order notification regularly. To fix the failed order for
which SKU is not mapped, you need to map the SKU.
• The other reason is the incorrect address. In case any order which is created through
sync does not have correct address then it will be failed. Seller need to correct the
address to to fix this and then it will be available for processing.
Uniware allows you to process the orders from Fulfillment -> Shipment Tab.
Different Options in SHIPMENT’s Tab
1. New
2. Packed
3. Ready To Ship
4. Courier Return
5. Dispatched
6. Delivered
7. Putaway Pending
8. Customer Return
1.New: All fresh orders will be available in the New Tab once the inventory is allocated to the order. The
orders reflecting in New tab can only be processed further. To generate the invoice please follow below
steps:
• Select the Channel for which you have to process the orders
• Select the orders, you can select up to 100 orders.
• As soon as the orders are selected, action button will be highlighted, click on the action
and click on Add to Batch. Add to Batch provides an option to group the orders and can
be identified together by using Batch Id. Click here to learn more.
• Select all the orders again and then click on print invoice. Once the Invoice is generated,
Order moves to packed tab.
• The order status remains processing but the shipment status is Packed.
Note: AMAZON and PAYTM orders directly move to READY TO SHIP once you print the invoice.
2. Packed: Orders showing under packed means invoice has already been generated. Now follow below
steps to generate the pack slip (Label):
• Select the Channel for which you have to process the orders
• Select the orders, you can select up to 100 orders.
• As soon as the orders are selected, action button will be highlighted, click on the action
and click on print label. Once the label is generated, the order moves to Ready To Ship.
• The order status remains processing but the shipment status is Ready To Ship.Unicommerce eSolutions Pvt Ltd 2021
3. Ready to Ship: All the orders for which Invoice and Label (Pack Slip) are already generated will be
visible in Ready To Ship tab. Now the next step would be to generate manifest.
Manifest Generation:
To generate the manifest, Please follow below steps:
• Go to Fulfillment -> Manifests
• Click on Create Manifest on top right corner
• On the Pop Up window, please select Channel, Shipping Provider, Shipping Method and
click on create manifest.
• Click on three horizontal bars under shipment summary.
• Select the orders using the check box and click on Add to Manifest. On the shipment
summary, click on done after the success message.
• Close the manifest from top right corner by clicking on Vehicle option and this
completes the order processing. Now you can print the manifest from printer option.
• After the manifest close the order status is marked as complete and shipment status is
marked as dispatched.
5. Dispatched: Once you close the manifest your orders will be moved in the Dispatch tab.
4. Courier Returns: All the courier return will be visible in this tab. As of now you can get this for
Custom Channel and Carts.
6. Delivered: In this tab we show all the orders which are marked delivered on Marketplace or Seller
Panel.
7. Putaway Pending: Orders which are cancelled after invoice generation and before manifest
close will be moved to Putaway pending tab. Seller need to check this tab regularly and complete the
putaway for all the orders which were cancelled so that Inventory can be putback.Unicommerce eSolutions Pvt Ltd 2021
8. Customer Returns: All the returns which are synced from the marketplace are visible in
customer return tab. As soon as you receive the return packet, you need to go to this tab and search the
orders and complete the putaway to putback the inventory.
Picklist:
Order processing through Picklist is available in Uniware Professional and Enterprise version.
A Picklist is created to optimize the picking process by grouping items to be processed together.
It is required to help the warehouse staff to pick correct items from the correct shelves in an
efficient manner, organizing the picking instructions such that a warehouse staff doesn’t have
to go to the same shelf in identical round trips to fetch the same product.
From the functional point of view, when the Picklist is in either of the states: CREATED or
RECEIVED, they are pending Picklist, since the order items are not completely received at the
invoicing station.
Picklist Flow
Follow a few simple steps to create and receive Picklist:
1. On the path Fulfillment > Picklist, select “Create Manual” on the top-right side of the
screen.
2. Select the Orders and click on Create Picklist.
3. This creates the Picklist successfully. You can generate the Picklist or receive it at the
invoicing station. Both the actions can be done on this page.
4. Once the Picklist has been marked as received, invoices can be generated.
Please remember: For SKU level traceability (i.e., SKU Barcoding), you have to
scan the items while receiving the Picklist for conducting these actions. And it is
available only in Professional & Enterprise version only.
5. After the invoices are generated, Labels can also be generated from within the Picklist
6. Once invoices and labels are generated for all the orders, Picklist can be marked as
closed.
Please click here to learn more about how to use Picklist feature to process orders and use
cases.Unicommerce eSolutions Pvt Ltd 2021
Status Sync:
Orders synced in Uniware is processed from seller panel rather than Uniware then Uniware updates the
status of the orders as available on seller panel and mark those orders as Dispatched, Cancelled or
returned.
Please click here to learn more about status sync.
Returns Management
Unicommerce return management solutions offer a centralized panel to manage account reconciliation for
marketplaces returns and inventory against all the returns. Our return module is highly efficient to centrally
manage Customer Initiated Returns and Return To Origin effectively, ensuring smooth and quick
turnaround time.
Some of the factors contributing to the higher rate of returns for e-commerce stores are listed below:
Products not matching their online descriptions
Wrong product delivered
Damaged item(s) received
Issues with fit and/or product quality
The customer no longer wants the product
Fraudulent returns
With class leading API integrations with 40+ marketplaces and 30+ logistics partners, Uniware, in every
order status sync from channels, automatically create Customer Returns for all the market places returns
and Courier returns for all shipping provider returns.
Automatic Return Sync:
Uniware provides complete order status sync of all the orders which are synced in the system if it is
delivered or returned. The system will automatically create Reverse pickups for all the RETURNED Order
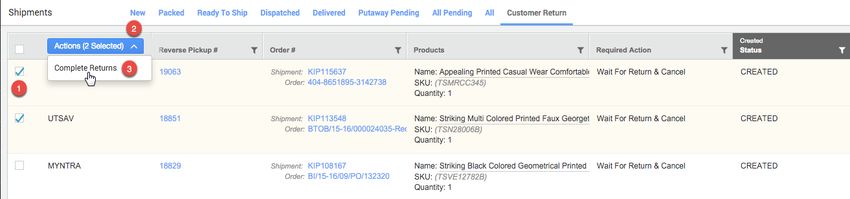
items at market places. These will be visible on the Shipments page, under the tab “Customer Returns”.
You can complete the return for multiple shipments in one go. Please follow below steps to navigate to the
customer return tab:
Uniware -> Shipments -> Customer Return
1. Select the Returned Order items for Putaway.Unicommerce eSolutions Pvt Ltd 2021
2. Click the Action button.
3. Select “Complete Returns”.
4. The window which pops up next will let you mark the inventory as Good, Bad or Return to Customer.
5. Hit “Complete” and then “Done”.
Post this; the inventory will be updated in the DEFAULT shelf. You can change the shelf code also in case
you are managing Shelf in Uniware. This feature is currently available for all channels where return status
sync functionality available.
Please click here to learn more.
Manual Return Management
For other channels and Carts, Uniware provide you option to create putaway and complete the return
process. Putaway can only be created for those shipments which have been ‘dispatched’ through uniware.
The process of putaway will adjust the inventory count for the products correctly. Refer below steps:
1. On the path Inbound >> Putaway, select the Putaway type as ‘PUTAWAY_RECEIVED_RETURNS’.
2. In the putaway created, scan the shipment.
3. Select items and add to putaway after choosing inventory type.
4. Don’t forget to Complete the putaway after the inventory is placed back on the shelves.Unicommerce eSolutions Pvt Ltd 2021
While completing the return, Uniware provide you credit note against the invoice created against the order
hereby helping in maintaining GST filing and same can be imported to tally/busy through report tab.
Please click here to learn more.
Uniware also provide feature to manage Customer Initiated Returns (CIR) and Return to Origin (RTO)
shipments in Professional version for CUSTOM channel only.
Customer Initiated Return (CIR):
In case customer initiates a return after receiving the package, a reverse pickup has to be created in the
system. The customer return is handled by marketplaces or by the vendor(s) depending upon from where it
originated. Uniware allows reverse pick up to be created only for custom channel shipments having status
“DISPATCHED”.
Steps involved in CIR are mentioned below:
1. Create reverse pickup from order detail page, select action as per customer requirement and
mentioned reason. Here, item can be replaced or same item can be sent again. New order will get
created depending on the action selected and that can be processed as normal order.
2. Once the reverse pickup is created shipment will show in the related tab under Return >> Reverse
Pickups. Now you can arrange/schedule the reverse pickup for the old order to get back from the
customer. Assign courier for return AWB no. to get back shipment to the warehouse.
3. Depending on the action chosen, if a physical return of the item is expected, then we create a
Putaway under the tab Putaway >> Create Putaway >> Putaway_Reverse_Pickup_Item.
For complete process of CIR, click here or connect with our team on live chat support.
Return To Origin (RTO):
In case a shipping package could not be delivered at your door step for a certain reason like, door found
locked or location not found etc, the item must return to the warehouse. At warehouse, the process would
involve creating a manifest for the return.
Steps involved in RTO are mentioned below:
1. We create a return manifest for the shipping package. Follow the path Returns and select
‘Create Manifest’ in the sub-menu. Select the shipping provider (that one from which the
shipment was originally sent) and add order to manifest created and close the same.You can also read