2.0 ehpocaGEO 8 On-Off 10 - 12 DC Inverter 12 DC Inverter ELEC - Innova
←
→
Page content transcription
If your browser does not render page correctly, please read the page content below
User manual   EN

ehpocaGEO
            2.0
           8 On-Off
 10 - 12 DC Inverter
12 DC Inverter ELEC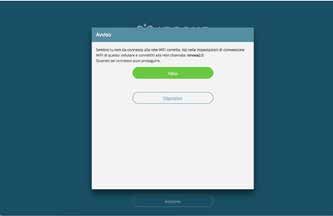
We would first of all like to thank you for having chosen one of our products.

              We are sure you will be happy with it because it represents the state of the art in the technology of
              home air conditioning.

              By following the suggestions contained in this manual, the product you have purchased will operate
              without problems, giving you optimum room temperatures with minimum energy costs.

                                                                                                      Innova S.r.l

                                                                       This booklet, code N273027D - Rev. 01 - (05/18) consists
                                                                       of 20 pages.

                 Compliance
    This unit complies with the following European Directives:         •   Waste electrical and electronic equipment 2012/19/
    •       Low voltage 2014/35/EU                                         EC (WEEE).
    •       Electro-magnetic compatibility 2014/30/EU                  •   Energy consumption indication on the labels of energy-
                                                                           related products 2010/30/EU
    •       Use restrictions of hazardous substances in electrical
            and electronic equipment 2011/65/EC (RoHS2)                •   ErP Directive 2009/125/EC and regulation 2012/20EC

                 Symbols
    The pictograms in the next chapter provide the necessary           unmistakable way.
    information for correct, safe use of the appliance in a rapid,

                   Editorial pictograms

    U       User                                                       S   Service
    -       Refers to pages containing instructions or information     -   Refers to pages containing instructions or information
            for the user.                                                  for the CUSTOMER TECHNICAL ASSISTANCE
                                                                           SERVICE installer.
        I   Installer
    -       Refers to pages containing instructions or information
            for the installer.

                   Safety pictograms
            Warning                                                        Prohibition
    -       It indicates actions that require caution and a suitable   -   Refers to prohibited actions.
            preparation.

2
U I S USER MANUAL
General table of contents
EN
1 User manual
1.1 Warnings . . . . . . . . . . . . . . . . . . . . . . . . . . . . . . . . . . . . . . . . . . . . . . . . . . . . . . . . . . . 4
1.2 Management of the appliance with the touch-screen display and remote control . . . . . . 4
1.3 Description of operations . . . . . . . . . . . . . . . . . . . . . . . . . . . . . . . . . . . . . . . . . . . . . . . 5
1.4 Setting cool only or heat only modes . . . . . . . . . . . . . . . . . . . . . . . . . . . . . . . . . . . . . . 8
1.5 Brightness regulation . . . . . . . . . . . . . . . . . . . . . . . . . . . . . . . . . . . . . . . . . . . . . . . . . . 8
1.6 Touch-screen display key lock . . . . . . . . . . . . . . . . . . . . . . . . . . . . . . . . . . . . . . . . . . . 8
1.7 Hotel function . . . . . . . . . . . . . . . . . . . . . . . . . . . . . . . . . . . . . . . . . . . . . . . . . . . . . . . 8
1.8 Heating operating (only for ELEC model) . . . . . . . . . . . . . . . . . . . . . . . . . . . . . . . . . . . . 8
1.9 Suggestions for power saving . . . . . . . . . . . . . . . . . . . . . . . . . . . . . . . . . . . . . . . . . . . 9
1.10 Diagnosis of problems . . . . . . . . . . . . . . . . . . . . . . . . . . . . . . . . . . . . . . . . . . . . . . . . . 9
1.11 Technical specifications . . . . . . . . . . . . . . . . . . . . . . . . . . . . . . . . . . . . . . . . . . . . . . . . 11
1.12 Periodic Maintenance . . . . . . . . . . . . . . . . . . . . . . . . . . . . . . . . . . . . . . . . . . . . . . . . . 12
2 INNOVA App operation
2.1 Minimum system requirements . . . . . . . . . . . . . . . . . . . . . . . . . . . . . . . . . . . . . . . . . . . 13
2.2 Installing and using the APP . . . . . . . . . . . . . . . . . . . . . . . . . . . . . . . . . . . . . . . . . . . . . 13
3USER MANUAL U I S
USER MANUAL
1.1 Warnings
Objects or structural obstacles (furniture, curtains, During heating mode, the conditioner eliminates
plants, leaves, blinds, etc.) must not obstruct the normal periodically any ice formed on the external battery. In
air flow both from the internal and from the external grids. such situation, the machine keeps on working, but it
does not dispense warm air to the room. This phase
It is strictly forbidden to place any containers on top can last from 3 up to maximum 10 minutes.
of the appliance, especially if they contain liquid. This
could trigger a short-circuit, damage the appliance and/ The appliance must not be installed in rooms where
or expose the user to the risk of electrocution. explosive gases develop or where there are humidity
and temperature conditions that exceed the maximum
Do not lean against, or worse sit on, the body of the levels reported on the installation manual.
conditioner, this would damage the appliance.
Clean the air filter regularly as described in the specific
Do not move the horizontal air outlet flap manually. Always paragraph.
use the remote control to perform such operation.
In the event of water leaks, turn off the appliance and
disconnect the electric power supply. Call the nearest
service centre.
1.2 Managing the appliance with the touch-screen display and the remote control
1 Corresponding button on remote control
2 Corresponding button on touch-screen display
BUTTON / DISPLAY:
Setpoint Heating only button (2)
Up button Nocturnal well-being button
Down button Control of air flow direction button
On/off button Fan speed control button
Well-being button Timer mode setting button (1)
(economic automatic mode)
Cooling only mode button Timer mode setting button (2)
Dehumidification only mode button Brightness sensor
Digital thermometer;
Ventilation only mode button
1÷7 red bars in winter, blue bars in summer
Heating only button (1) Not used
Normally, the display shows the operating status (see In addition, it is possible to select the various functions by
paragraph entitled Description of operations), as well as pressing the symbols.
any alarms (see paragraph entitled Display alarms).
4U I S USER MANUAL
EN
It is possible to select the various modes by pressing the - placing obstacles between the remote and the
buttons (see paragraph entitled Description of operations). appliance while using it.
The remote control provided has been designed to In addition:
be functional and hard-wearing, however, it must be - if there are other appliances using remote controls in
handled cautiously. the room (TV, radios, stereos, etc.), interferences may
occur
Avoid: - electronic or fluorescent lamps can interfere with
- leaving it exposed to rain, pouring liquids on it or communication between the remote and the appliance
dropping it into water - remove the battery if not using the remote for a long
- hitting it or dropping it on hard surfaces time.
- leaving it under the sun
Battery insertion
Only CR2012 3V dry lithium batteries must be used in the bottom part of the remote. The battery must be
(supplied). Used batteries must be handed over to inserted respecting polarity. Once the battery is inserted,
the specific collection areas as arranged by the Local close the cover.
Authorities for this type of waste.
In order to insert the batteries, open the specific cover
1.3 Description of operations
General start-up and management
In order to manage the appliance using the remote control touch-screen (for 3 seconds) or by using the remote control.
and the touch-screen, the main switch on the electrical In order to send commands to the internal unit, the top part
power supply line must be turned on (its exact position can of the remote must point towards the display of the internal
be indicated by the technician who installed the appliance) unit. The reception of the command is confirmed by a beep
or the power supply plug must be connected to the system and by the display. The maximum distance for the remote
socket. control to work is approximately 8 metres.
Once such operations have been performed, it is possible
to manage the system by holding down the symbols on the
Key/Display Operation
The keys of the remote control and of the touch screen display perform the same functions.
When the unit is turned on, the 3 digits on the display will show the set-point.
• It is possible to set the set-point between 16 and 31°C, to which temperature the unit will bring the room.
If the temperature is set too low or too high, not only it is unhealthy, but it is also an unnecessary
waste of energy.
5USER MANUAL U I S
Key/Display Operation
Switching the appliance on and off
It is possible to switch the appliance on or off (stand-by) by pressing the specific button. The control system of the
appliance is equipped with a memory, so settings will not be lost if the appliance is switched off or in the power supply
is cut. This key is used to activate or deactivate the appliance for short periods of time.
In case of long periods of inactivity, the appliance must be deactivated by disconnecting either the main switch or
the plug from the socket.
Well-being button (economic automatic mode)
By choosing this mode on the appliance, it sets the best level of comfort in the room. The conditioner selects the mode
automatically (cooling or heating) according to the temperature set and ventilation speed according to the temperature
of the room.
Cooling only mode
• In this mode, the appliance dehumidifies and cools the room.
• It is possible to set the desired temperature between 16 and 31°C and, if this temperature is lower than the room
temperature, the compressor starts up after three minutes (maximum) and the appliance starts dispensing cool
air, maintaining ventilation active even if the setpoint has been reached.
Dehumidification only mode
In this mode, the appliance dehumidifies the room. Selecting this mode is useful during mid-seasons, i.e. on days (e.g.
rainy ones) when the temperature is pleasant, but excess humidity causes discomfort. This mode ignores both room
temperature and ventilation speed settings.The latter is always set to a minimum. It is normal for the appliance to work
intermittently.
Ventilation only mode
By selecting this function, the compressor is never activated and the appliance does not affect either room temperature
or humidity. IT IS possible to choose the speed of the fan
Heating only mode
• In this mode, the appliance heats the room.
Set on heating only mode, the appliance periodically defrosts the evaporator coil, if necessary. During this phase,
the conditioner does not dispense warm air, even if its internal components are on, except for the room fan.
• It is possible to set the desired temperature between 16 and 31°C and, if such temperature is higher than the
room temperature, the compressor starts up after three minutes (maximum) and the appliance starts dispensing
warm air.
Nocturnal well-being button
While the appliance is on in the selected cooling or heating mode, it is possible to choose different functions by
pressing the button in order to maximise noise reduction, energy saving and nocturnal well-being regulation.
In this mode, ventilation is set on minimum speed.
This mode should be activated right before going to sleep.
• In cooling mode, the set temperature is increased by 1°C after one hour and by another degree after two. After
the second hour, the temperature is no longer changed and, after six hours, the appliance is put in stand-by.
• In heating mode, the set temperature is lowered by 1°C after one hour and by another degree after two. After the
second hour, the temperature is no longer changed and, after six hours, the appliance is put in stand-by.
This function is not available for dehumidification only, ventilation only and economic automatic modes and can be
excluded any time (ideally once awake) by pressing the button again.
If the Timer has also been set, the appliance will turn off at the set time.
Control of air flow direction
By pressing the specific button, it is possible to either select the continuous oscillation of the mobile air outlet flap - in
such case, the symbol on the display is lit - or to block it in any position.
IMPORTANT: The mobile flap must never be moved manually. In cooling and dehumidification modes, the position
of the flap is reset every 30 minutes to prevent dew from forming.
6U I S USER MANUAL
Key/Display Operation
Fan speed control (models 8 and 10)
By pressing this button several times, the speed will change according to the following sequence: Minimum, Medium,
Maximum and Automatic EN
The higher the speed is set, the better the appliance will perform, but it will be less quiet. By selecting Automatic mode
(shown by three speed bars moving up and down on the display), the on-board microprocessor automatically adjusts
the speed, so that it stays higher the greater the difference between the temperature detected and the temperature
set. The speed will always be automatically decreased as the room temperature approaches the set temperature.
This is not possible in humidification only or nocturnal well-being mode where the appliance can only operate at a low
speed.
Setting power for models inverter 10HP and 12HP
By pressing this key sequentially, it is possible to set the power supplied by the appliance on 5 adjustments: Minimum,
Medium, Maximum, Dual Power and Automatic.
The higher the power is set, the better the appliance will perform, but it will be less quiet.
The Dual Power function (shown by three flashing speed bars on the display and the seven red or blue bars moving
up and down of the digital thermometer), available only in heating and cooling mode, supplies a 30-minute Overboost.
Then, the controller inhibits the function and switches to automatic mode.
By selecting Automatic mode (shown by three speed bars moving up and down on the display), the on-board
microprocessor automatically adjusts the speed, so that it stays higher the greater the difference between the temperature
detected and the temperature set. This is not possible in humidification only or nocturnal well-being mode where the
appliance can only operate at a low speed.
Setting the Timer function
• The appliance allows the user to program when to turn it on and off, as required.
• While the conditioner is running, it is possible to schedule when it turns off by pressing the Timer button, followed
by the number of hours (from 1 to 24), after which the unit will be put in stand-by.
• When the air conditioning unit is off, it is possible to schedule when it turns on by pressing the Timer button,
followed by the number of hours (from 1 to 24) after which the unit will start.
• Then, press the confirm button.
Touch-screen display key lock
• The key lock is activated by keeping the Timer symbol on the touch-screen display pressed for three seconds.
The user cannot perform any actions. The stand-by symbol flashes every second.
• To deactivate the lock, keep the Timer symbol on the touch screen pressed for three seconds once again.
The lock remains active in the case of a power failure and also if the remote control is used!
7USER MANUAL U I S
1.4 Setting cool only or heat only modes
It is possible to deactivate the heating or the cooling only) mode.
modes following a simple procedure. Press the A key again to switch back to HO (heating only)
Keep the A key on the touch-screen display pressed for mode.
5 seconds until HC (heating and cooling) appears on the Wait for 3 seconds without touching anything to memorise
display. the setting and return to normal operations.
Press the A key for 1 second to switch to the CO (cooling
1.5 Brightness regulation
The display brightness sensor can be disabled (leaving the the night button ( ) for 10 seconds. "ds" (disabled) or
maximum brightness at all times) by pressing and holding "En" (enabled) will appear on the display.
1.6 Touch-screen display key lock
The key lock is activated by keeping the Timer symbol on To deactivate the lock, keep the Timer symbol on the touch
the touch-screen display pressed for three seconds. screen pressed for three seconds once again.
The user cannot perform any actions. The lock remains active also for the next operations performed
The stand-by symbol flashes every second. via remote control and in the event of a power failure.
1.7 Hotel function
ventilation, heating and cooling) and the settable set range
Press and hold the air exchange key ( ) for 10 seconds
is reduced from 22 to 28 in cooling mode and from 16 to
to enable the function ("En" displayed); the dehumidification
24 in heating mode).
and Auto functions are disabled (leaving active only
1.8 Heating operation (only for ELEC model)
The 12HP DC inverter ELEC has an additional electric If night-time operation is not selected, the element will
element which provides heat when the weather conditions switch on, together with the compressor, if:
outside are bad. The heat power of the resistor is equal • the 2.0 unit is working with the heat pump (heating
to 1,000W, so when the device software switches the mode);
2.0 unit on, it will provide the combined thermal power
• the room temperature is ≤ 24 °C;
produced by the heat pump and the thermal power of the
electric element. • the room temperature is 2°C lower than the setpoint<
If you need to operate the appliance in quiet mode, it can • the internal coil temperature is ≤ 44 °C;
be activated with “element only”, without the compressor, • the ventilation is switched on and stable;
simply by setting the night-time mode by pressing the
• there are no alarms or failures related to the ventilation,
button
room temperature probe and temperature coil.
In this case, the element comes on if:
In normal operation, with the heating switched on, the
• the 2.0 unit is working with the heat pump (heating
element will deactivate if:
mode);
• the coil temperature of the internal exchanger is ≤ 47 °C;
• the room temperature (measured by the internal probe)
is one degree less than the configured setpoint; • the room temperature is greater than the setpoint;
• the room temperature is ≤ 27 °C; • the room temperature is at 25 °C;
• there are no alarms or failures related to the ventilation, • the ventilation stops or the fan is faulty;
room temperature probe and temperature coil. • the compressor discharge temperature increases
The ventilation speed in this mode is fixed at 900 rpm. abnormally;
• the compressor operating frequency increases
abnormally;
N.B. For the ELEC versions with resistor, disconnecting
voltage from the device abruptly is prohibited in order to
prevent internal overheating! Use the CP contact that
places the device in standby and guarantees correct
post-ventilation.
Also, remember never to cover the intake grille and output
vent in any way whatsoever!
8U I S USER MANUAL
1.9 Suggestions for power saving
- Always keep the filters clean (see maintenance and - Do not block the air flow paths (input and output)
cleaning chapter). of the unit; this, as well as causing a non-optimal
- Keep the doors and windows of the rooms to be air performance of the unit, will jeopardise the correct EN
conditioned closed operation of the same and may cause irreparable
Do not let direct sunlight to enter the room (use damage to the units.
curtains or lower the blinds or close the shutters)
1.10 Diagnosis of problems
For the User it is very important to distinguish any display, it is necessary to contact Customer Service.
inconveniences or abnormal operation of the unit
compared to its normal operation. Also, the most We also remind you that any attempt to repair the unit on part
common problems can be easily solved by means of of unauthorised technicians will void the warranty immediately.
simple operations performed by the User (See paragraph:
Troubleshooting), while for some alarms signalled on the
Operating aspects that should not be interpreted as problems
- The compressor will not restart before a certain time has - During operation in heating mode, the warm air is delivered
passed (about three minutes from the previous stop). It is a few minutes after the activation of the compressor. If the
not possible to stop and restart the compressor without fan started at the same time as the compressor, in the first
waiting at least three minutes. This is provided for in the minutes of operation the air delivered would be too cold
operating logic of the unit, so as to protect the compressor (which may disturb the occupants of the room) since the
from frequent activations. unit is not yet ready.
Open CP contact
If the presence contact is not closed, the appliance will
not start and the CPalarm appears on the display.
Evacuation of condensate water in the event of an emergency
Should any anomaly occur in the condensation water service.
system, the maximum level float blocks the conditioner During heating, condensation should drain freely through
and the OF code appears on the display. the specific pipe. In the event of an alarm, check that
During cooling and dehumidification, electronics keeps the the condensation pipe is not bent or obstructed, thus
water distribution system active with the battery - together preventing the water from flowing out.
with the fan - to disperse excess water in the container.
If the problem persists, please contact the assistance
Using the unit if the remote control is not available
If the remote control has been lost, the batteries are exhausted or it
no longer works, the unit can be operated by using the keys on the
touch screen display on the machine.
9USER MANUAL U I S
Troubleshooting
In the even of a malfunction, please refer to the following table. If, please contact the authorised technical assistance.
after performing the suggested checks, the problem is not solved,
Fault Possible causes Solution
Check there is power supply (by turning a light on, for example).
Check that the thermal-magnetic circuit breaker used exclusively to protect
The appliance No power supply the appliance has not been tripped (if it has, reset it). If the problem repeats
doesn't switch immediately, please call the Service Centre and avoid trying to make the
on appliance work.
Check that the appliance can be turned on using the touch-screen display and
Remote control batteries have run out
substitute the batteries.
The temperature set is too high or too
Check and adjust the temperature, if necessary.
low.
The air filter is clogged Check the air filter and clean it if necessary
Check that there are no other obstacles
The appliance Remove anything that might block the air flow.
to the air flow both inside and outside.
does not
Try to reduce the heating and cooling load of the room following instructions
cool/heat
The heating and cooling load has below:
adequately.
increased (for example, a door or • Cover large windows exposed to sunlight with curtains or with external
a window has been left open or an maskings (blinds, porches, reflecting films, etc.);
appliance has been installed in the • The air conditioned room must remain closed for as long as possible;
room which generates a lot of heat). • Avoid turning on halogen lamps or other high energy consumption
appliances such as small ovens, steam irons, hot plates etc.).
Display alarms
An alarm code appears on the display in the event of FUNCTIONING column).
faults. Some of the functions, however, remain active (see
Alarm Cause Operation
It is still possible to activate Cooling, Dehumidification and Heating modes. It only monitors
E1 Faulty room temperature RT sensor
the antifreeze function of the internal coil.
E2 Faulty internal coil IPT sensor It is still possible to activate Cooling, Dehumidification and Heating modes.
E3 Faulty outside temperature OT sensor It is still possible to activate Cooling, Dehumidification and Heating modes.
It is still possible to activate Cooling, Dehumidification and Heating modes. Defrosting is
E4 Faulty external coil OPT sensor
performed at fixed times.
E5 Faulty internal fan motor None of the modes can be activated.
E6 Faulty external fan motor None of the modes can be activated.
Lack of communication with the
E7 None of the modes can be activated.
display *
E8 Compressor discharge probe failure None of the modes can be activated.
CP Open CP contact The appliance only works if the contact is closed. Check that the clamps are connected.
During cooling and dehumidification, electronics switches the compressor off and keeps
the water distribution system active with the battery - together with the fan - to disperse
OF Maximum level float intervention excess water. During heating, condensation should drain freely through the specific pipe.
In the event of an alarm, check that the condensation pipe is not bent or obstructed, thus
preventing the water from flowing out.
* for models 10 and 12 HP DC Inverter: lack of communication
between the main, power, driver or display boards
The only way to solve the problem is to disconnect and reconnect
the appliance. If the alarm still appears, please contact the
authorised technical assistance.
10U I S USER MANUAL
1.11 Technical specifications
Please read data plate to obtain the technical data listed
below.
EN
- Serial number to enter in the App
- Power supply voltage
- Maximum absorbed power
- Maximum absorbed current
- Amount of refrigerant gas
- Casing protection level
10 HP 12 HP 12 HP ELEC
U.M. 8 HP
DC Inverter DC Inverter DC Inverter
Technical specifications
Cooling power (1) kW 1,65 2,04 2,35 2,35
Power in max cooling mod. Dual Power kW - 2,64 3,10 3,10
Power in min cooling mod. Dual Power kW - 0,83 0,92 0,92
Heating power (2) kW 1,70 2,10 2,36 2,36
Heating power (3) kW 0,79 0,98 1,11 1,11
Additional power electrical resistance kW - - - 1,00
Power in max heating mod. Dual Power kW - 2,64 3,05 3,05
Power in min heating mod. Dual Power kW - 0,71 0,79 0,79
Power absorbed when cooling (1) W 580 630 730 730
Power absorbed when heating (2) W 545 638 720 720
Dehumidification capacity L/h 0,7 0,8 0,9 0,9
Power supply voltage V-F-Hz 230-1-50 230-1-50 230-1-50 230-1-50
EER W/W 2,84 3,24 3,22 3,22
COP W/W 3,12 3,29 3,28 3,28
Energy efficiency class when cooling A A+ A+ A+
Energy efficiency class when heating A A A A
Internal-external ventilation speed No. 3 3 3 3
Internal/external air flow at max speed m³/h 360/430 380/460 400/480 400 (8)
Internal/external air flow at medium speed m³/h 300/360 310/380 320/390 320 (8)
Internal/external air flow at min speed m³/h 240/320 260/330 270/340 270 (8)
Dimensions (WxHxD) mm 1010X549X165 1010X549X165 1010X549X165 1010X549X165
Weight including packaging kg 47,6 48,5 48,5 49,5
Sound pressure level (min-max) (4) dB(A) 38/29 39/26 41/27 41/27
Unit sound power level inside (min-max) (5) dB(A) 44/57 44/57 45/58 45/58
Wall holes diameter mm 162 162 162 162
Wall holes distance mm 293 293 293 293
Refrigerant gas R410A R410A R410A R410A
* with Dual Power function activated during heating
Reference conditions
Room T External T
(1) Cooling mode tests (EN 14511) DB 27°C - WB 19°C DB 35°C - WB 24°C
(2) Heating mode tests (EN 14511) DB 20°C - WB 15°C DB 7°C - WB 6°C
(3) Heating mode tests DB 20°C - WB 15°C DB -7°C - WB -8°C
(4) Internal side sound pressure measured in semi-anechoic chamber at a distance of 2 m.
(5) Internal side sound pressure measured in accordance with regulation EN 12012
Operating limits
Internal ambient temp. External ambient temp.
Maximum operating temperature in cooling mode DB 35°C
DB 32°C
- WB 24°C DB 43°C
DB 43°C
- WB 32°C
Minimum operating temperature in cooling mode DB 18°C DB -5°C
Maximum operating temperatures in heating mode DB 25°C
27°C DB 24°C
DB 18°C
- WB 18°C
Minimum operating temperatures in heating mode DB 5°C DB -10°C
11USER MANUAL U I S
1.12 Periodic Maintenance
The air conditioner you have bought has been designed to only include the following cleaning operations:
keep maintenance operations to a minimum, in fact, they
External cleaning
Disconnect the unit from the power supply before Do not use abrasive sponges or abrasive or corrosive
each cleaning and maintenance intervention by detergents as you might damage the painted surfaces.
setting the main power supply switch to off.
When necessary, clean the external surfaces with a soft
Wait for the components to cool down in order to damp cloth.
avoid any burns.
Cleaning the filters
The air conditioner you have bought has been designed to To extract the filters:
keep maintenance operations to a minimum, in fact, they - open the grid and remove it;
only include the following cleaning operations: - extract the filters by lifting them;
- Clean the air filter after a period of continuous use - remove the dust from the filter with a vacuum cleaner
and according to the concentration of impurities in the or by washing it in running water without using
air, or when you wish to start-up the appliance after a detergents or solvents and leave to dry;
period of inactivity. - put the filters back on top of the batteries, taking care
The filter is located in the top part of the appliance. to position them correctly;
- put the grid back.
After filter cleaning check if the panel is properly
mounted.
It is forbidden to use the device without its mesh filter.
1
3
2
12U I S USER MANUAL
FUNZIONAMENTO APP INNOVA
InnovApp DuePuntoZero
EN
1.13 Minimum system requirements
The INNOVA TwoPointZero App lets you manage the main To download and install the app, there are some operating
parameters of your air conditioner using a smartphone system version requirements for your smartphone:
and tablet or with a specific desktop version conveniently
• for Android smartphones, the minimum version
from home or when you are out. Using our app is very
is 4.1.1
simple. Just switch on the air conditioner display, set up
the connection with your smartphone and begin managing • for Apple smartphones, the operating system
the air conditioner directly from your device. must be IOS 8.0 or higher.
Follow the step by step guide all the way to the end.
1.14 Downloading and configuring the APP
1. From your smartphone, connect to the Apple Store 3. Download the app onto your smartphone, following
or Google Play. the installation wizard to install it.
2. Search for InnovApp TwoPointZero 4. Open the app
Figure 2-1 Figure 2-2 Figure 2-3
At the first launch, a pop-up appears for acceptance or Select the language and the PUSH notification
refusal of the terms and conditions of use, which can management method.
be consulted by tapping on the word “here”, therefore Tick the “PUSH notifications” preference to receive
accessing the INNOVA website. alarms connected to the air conditioner’s operation on
your smartphone even when the App is closed.
Tap “Let’s get started” to begin using InnovApp
TwoPointZero. Note: These settings can also be changed later by
selecting the “Preferences” menu item.
13USER MANUAL U I S
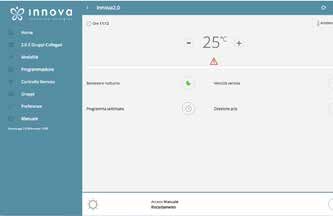
1.15 Air conditioner control via smartphone at home
After switching on the display of your air
conditioner, go to your telephone’s WiFi
settings:
ensure that you have activated WiFi
check the available WiFi connections
find the Innova 2.0 network
connect to it.
Note: with Android devices, this procedure is
automatic. With iOS devices, you must enter
the WiFi settings of your device and select the
“Innova2.0” network.
Note: If there are several air conditioners to
configure, switch on one at a time in order to
prevent errors.
The product screen appears (Figure 2-6) where
you can assign a name and indicate the unit’s
Figure 2-4 Figure 2-5 serial number, made up of 9 alphanumeric
characters on the air conditioner’s data plate
(see section 1.11 on page 11).
A password can be set for the Innova 2.0
network in order to protect against management
of your product by unauthorised users.
Note: For iOS devices, after entering the
name of the product, the WiFi network name
also changes automatically. You must therefore
go back to your telephone’s WiFi settings and
connect to the renamed network “Innova2.0”
followed by _ and the name that you have just
established, for example “Innova2.0_MyInnova
2.0”).
Note: The device name can also be changed
later by accessing the menu item “2.0 and
connected groups” and tapping on the second
icon (pencil symbol). For iOS devices, once the
name has been edited, you must return to your
Figure 2-6 Figure 2-7 telephone’s WiFi settings and connect to the
WiFi network with the new name that has just
been established.
Going back into the app, you can access the
main menu through the icon in the top left
corner.
When the “2.0 and Connected groups” item is
selected, the air conditioners on the network
are displayed and they can be edited or
scheduled as desired.
New devices can be added, searching for,
installing and configuring them tapping on the
+ symbol in the top right corner. This will open
Figure 2-8 Figure 2-9 the screen as illustrated in Figure 2-18.
14U I S USER MANUAL
EN
When one of the configured products is selected, the Note: From this moment on, your smartphone becomes
general air conditioner control screen appears, through the remote control that you use to control the air conditioner
which it can be controlled and managed. over the local network, but not over the Internet.
In order to do this, you must complete another step:
connect to your home WiFi, accessing your smartphone's
settings and then select the "Remote Control" menu item.
1.16 Management on desktop
You can also manage the air conditioner from your
computer, configuring a specific desktop version of the utente$
App.
• Access the “Software” page of the INNOVA website:
www.innovaenergie.com > documents > software
Mac
• Download the zipped folder “TwoPointZero
InnovAPP desktop version - MAC” and open it;
• double click on the file run.sh to open a command
window:
- type cd
- drag the folder “TwoPointZero InnovAPP
desktop version - MAC” into the command
Figure 2-10
window (Figure 2-10) and press Enter
- type sh run.sh and press Enter (Figure 2-11)
• The browser window will open with the first screen of utente$ cd /Users/utente/Desktop/twopointzero
utente$
the App for the desktop version. (Figure 2-12)
• You can begin with the configuration as explained in
section 2.2 for the mobile version.
•
Windows
• Download the zipped folder “TwoPointZero
InnovAPP desktop version - WINDOWS” and
open it;
• double click on the file run.bat and the browser
screen will open (Figure 2-12)
Note: As the first step of configuration, you will be asked
to verify the connection to the air conditioner WiFi network. Figure 2-11
Therefore, go into the computer WiFi settings and select
the corresponding network. If it was not already renamed
during installation on smartphone, the WiFi will be called
Innova2.0. After which, click Done.
Note: In order to make InnovApp TwoPointZero work on
your desktop, you must have Java installed on the PC.
Figure 2-12
15USER MANUAL U I S
1.17 Remote control: manage your air conditioner even away from home
Once you have selected the menu item
"Remote Control", a list of the available WiFi
connections will appear.
Note: the air conditioner can connect only with
2.4GHz networks.
Select the preferred network for Internet
access.
Then enter the WiFi network password and
confirm it.
Figure 2-13 Figure 2-14
Note: the password can contain only
alphanumeric characters from "A" to "Z" and
from "0 " to "9".
Special characters are not permitted.
The App connects the air conditioner to the
domestic network and the main screen to
manage the appliance will appear again on the
smartphone/tablet.
At this point, the smartphone/tablet is
Figure 2-15 Figure 2-16 connected to the selected network.
From this moment, your 2.0 air conditioner is
connected to a server over the Internet and
can be managed from anywhere in the world
over your telephone's WiFi or data connection.
Note: In the event that the procedure is
not successful, the smartphone/tablet will
automatically reconnect to the local network of
the 2.0.
Therefore, repeat the procedure, rechecking
the password entered and the name of the
Figure 2-17
network.
16U I S USER MANUAL
1.18 Managing the air conditioner: App features
GENERAL CONTROL SCREEN
of the air conditioner
EN
Air conditioner start-up/
Menu and air shut off
conditioner name
Current conditions (time
and temperature)
Adjustment settings
temperature
Air conditioner
operating settings
(night mode, fan speed,
scheduling, our output
direction)
Air conditioner start-up/
shut off Current state and the
(as at the top right) possibility of changing
the air conditioner
operating mode.
Figure 2-18
MENU
menu items
HOME
general control screen
(Figure 2-18)
2.0 AND CONNECTED GROUPS
list of the air conditioners and groups of air
conditioners configured in the App
MODE
list of possible air conditioner management
modes (manual, automatic, night, scheduled,...)
SCHEDULING
section dedicated to the weekly scheduling of
the air conditioner.
Note: this is possible only if remote control has
been configured.
REMOTE CONTROL
GROUPS
list of groups of several air conditioners (e.g. 1st
floor, 2nd floor,...).
PREFERENCES
language and PUSH notifications
MANUAL
link to the INNOVA website where you can find
Figure 2-19 the necessary documentation
www.innovaenergie.com/en/documents-
products-airconditioners-innova/manuals/
17USER MANUAL U I S
MODE
The air conditioner operating mode
can be changed in several ways:
clicking on the change button at the
bottom right of the air conditioner
general screen
selecting "Mode" in the general menu
clicking on the "Weekly schedule" icon
on the device's main screen.
This provides access to the screen
illustrated in Figure 2-20.
Figure 2-20
PREFERENCES
In the "Preferences" section which can be selected on the menu,
the App language and the PUSH notification settings can be
changed.
To receive notifications on the air conditioner's operation directly
on your smartphone even when you are not using the App, tick the
"PUSH Notifications" option.
MANUAL
By selecting the "Manual" menu item, you will access the INNOVA
website where you can consult the air conditioner's technical
documentation.
18U I S USER MANUAL
SCHEDULING
From the "Mode" menu item, you
can decide to start the air conditioner EN
manually or according to a schedule.
By selecting the "Scheduling" item, you
access the air conditioner calendar
scheduling feature (as illustrated in the
figures below).
By clicking "edit" on a day of the week,
you can add and define one or more
start-up and shut-down periods for the
air conditioner during that day, clicking
on the "+" symbol.
Note: Schedule several start-up/shut-
down periods with a minimum duration
of half an hour on the same day.
Figure 2-21 Figure 2-22
Figure 2-23 Figure 2-24
Figure 2-25
Once scheduling of a day has been confirmed, you will If you want to apply the same schedule that you have just
be returned to the screen with the list of the days of the confirmed for other days, simply click "copy" and select the
week. (Figure 2-26) days where you want to apply this schedule (as illustrated
in the sequence of example figures shown below).
19USER MANUAL U I S
Figure 2-26 Figure 2-27 Figure 2-28
After completing scheduling, the
operating mode screen will appear as
illustrated in Figure 2-29.
Returning to the air conditioner's main
screen (Figure 2-2830), on the lower
part, there is the time of the first air
conditioner restart should it be during
a scheduled shut-down time.
To deactivate scheduling and return to
manual mode:
- select "Mode" in the general menu
and then "Manual".
- clicking on the edit icon at the bottom
right of the air conditioner general
screen.
Figure 2-29 Figure 2-30
N.B. Note: If the settings are changed If the air conditioner is in a place that symbol on the air conditioner
on the air conditioner display, is open to the public where it cannot display for 10".
scheduling is disabled and manual be monitored, the display screen lock To go back to editing the air conditioner
mode is resumed. can be enabled in order to prevent settings from the display, press the
unauthorised people from changing timer icon again for 10".
the settings.
Simply press and hold the Timer
20U I S USER MANUAL
GROUPS
If you have several air conditioners, you
can combine them in groups to simplify EN
scheduling and management of them.
(For example, the air conditioners in a
hotel could be grouped by floor).
First of all, select "Groups" in the menu
and create a new group by clicking on
"+".
Then give the group a "Title" and save
using the icon at the top right.
The group has been created but it has
still not been associated with any air
conditioners. (This will be explained in
the next section)
Returning to the "Groups" screen, the
new group will appear and it can be
edited or deleted using the adjacent
icons. Figure 2-31 Figure 2-32
CORRELATED GROUPS
The section contains the list of all You can also associate an air
the configured air conditioners and conditioner with the group through the
groups. air conditioner itself.
Select the penultimate icon on the
To add new air conditioners, click row of the air conditioner (icon list with
the “+” button at the top right of the three rows) and click "Assign groups"
screen and choose whether you want (Figure 2-36). Assign the air conditioner
to search for air conditioners on the to one of the groups shown on the list.
network or add them manually. Figure 2-33
When, on the other hand, you click
"Sent settings", the settings of that air
conditioner are applied to the group
that will be selected.
As for the groups, once the group is
created in the "Groups" section as
explained in the previous section,
at this point, you can associate the
Figure 2-34
various air conditioners to the group.
Click on the eye beside the group
name and then on the "+" symbol and
select the air conditioners to associate.
Lastly, save using the icon at the top
right.
Figure 2-35 Figure 2-36
21USER MANUAL U I S
CONTROL WITH SEVERAL DEVICES
“Innova2.0”: ignore the warning, clicking on the “devices”
The same air conditioner can be managed with several
button right below the loading bar (Figure 2-37).
devices (smartphone/tablet/PC).
If you are connected to the WiFi network where your 2.0 is
After configuration with the first device, the machine can
also connected, the telephone automatically scans all the
be controlled with another smartphone/tablet following the
“2.0” units connected to the network (Figure 2-38).
procedure described below.
Once the device has been found, the general control
First of all, you must connect to the Wi-Fi network where
screen opens automatically, from which you can control
the 2.0 you want to control is also connected.
the air conditioner with the second telephone/tablet as
Install the “InnovApp TwoPointZero” app on the new well.
smartphone/tablet and proceed as illustrated in figures
Note: If the search does not automatically find the air
2-1, 2-2 and 2-3 on page 13.
conditioner, press “+”.
At this point, the telephone alerts that you are not
connected to the right WiFi network and to connect to the
Figure 2-37 Figure 2-38 Figure 2-39
ON, OFF and RESET OF THE WIFI NETWORK
With the “reset” function, you can resume the configuration
press the button again. The abbreviation “rSt” will
from the start in a few simple steps:
appear. Wait 10" so that the operation will complete
• Press and hold in the button on the air conditioner successfully. At this point, new WiFi configuration of
display for 10 seconds. When the word “On” appears the 2.0 is required, starting from the indications in
on the display, release the button. Figure 2-4.
• If you do not touch anything for another 10", the 2.0 • By holding the button in again, the 2.0 WiFi status
WiFi is active and remains visible and usable with the switches to “OFF” mode: the WiFi transmitter will
last configured name. therefore be off and no longer visible from smartphone/
• To reset the air conditioner and return its WiFi network tablet.
to the original configuration (named "Innova2.0"),
22U I S USER MANUAL
1.19 Troubleshooting
Effect Causa Solution EN
iOS smartphones do not automatically identify Go to the telephone's settings and select
The air conditioner cannot be configured on
the WiFi network which was renamed during the 2.0 unit's WiFi network with the name
the iOS smartphone
configuration of the App. assigned to it during configuration of the App.
Remote configuration is unsuccessful The WiFi network may be weak. Check the signal power
The WiFi transmitter may be switched off
The air conditioner's WiFi cannot be found OR the air conditioner may already be Ensure that there is power to the device
configured in "Remote control"
Configure one air conditioner at a time:
Several air conditioners in the house cannot During configuration, two or more air
therefore, switch on one at a time, keeping all
be configured conditioners are on
the others off, and start the configuration.
The version that allows control of the air
conditioner through the App is 1.0.36. Check
The air conditioner cannot be controlled The problem is connected to the version of your version by accessing the app menu:
through the App the air conditioner. one of the menu items must be "firmware:
1.0.36". In the case of a previous version,
contact INNOVA service.
Enter a new password using only the
During configuration of the remote control,
The password contains special characters permitted alphanumeric characters: from "A"
the WiFi network does not work
to "Z" and from "0 " to "9".
Ensure that you have configured remote
The air conditioner scheduling section cannot Scheduling of the 2.o is possible only after control, accessing the dedicated section
be accessed remote control has been configured. from the App menu. Otherwise, configure it
as explained on page 15.
Immediately after carrying out remote This is a synchronisation problem between
Wait a few minutes.Otherwise, shut down
configuration, the name of the air conditioner the air conditioner, the server and the
and restart the air conditioner.
is "TEMP" smartphone.
MQTT Server Problem The server is in maintenance Wait
Faults on the display:
See page 10
errors E7, E6 and other alarms
23realized with iés technology by
INNOVA s.r.l.
s.r. l .
Via
FrazI .Maggio
St rada,8 -1638089
- 38085
STORO
PIEVE
(TN)
DI BONO
- ITALY(TN) - ITALY
tel. +39.0465.670104 fax +39.0465.674965
info@innovaenergie.com
N273027D
N273027A- -Rev.
Rev.01
0You can also read