BLACK PEARL RC801 Instruction Manual - 7"HD Screen FPV Diversi ty RX
←
→
Page content transcription
If your browser does not render page correctly, please read the page content below

BLACK PEARL                                                RC801

7 ” H D            S c r e e n              F P V          D i v e r s i t y                 R X

                             Instruction Manual

Before operating the unit,please read this manual thoroughly,and retain it for future reference.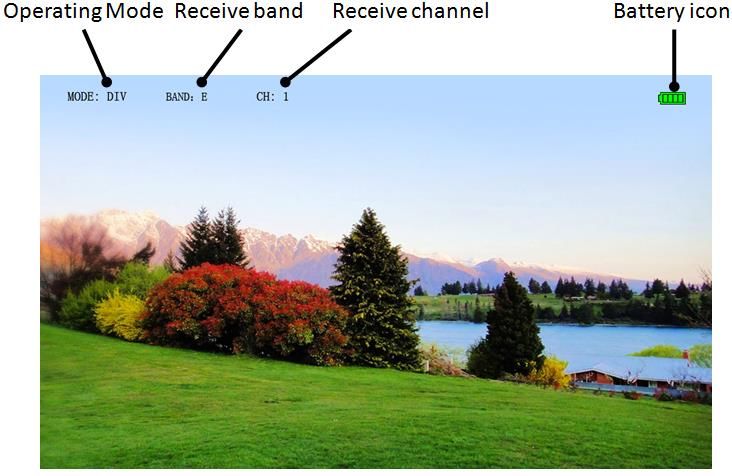
Catalogue

Safety Notice........................................................................................................................................................ 1
    Warning ......................................................................................................................................................... 1
    Battery ........................................................................................................................................................... 1
    Caution .......................................................................................................................................................... 1
Packing List ......................................................................................................................................................... 2
Battery .................................................................................................................................................................. 3
    Battery Installation ....................................................................................................................................... 3
    Recharge the Battery ................................................................................................................................... 3
Sun-shadow ......................................................................................................................................................... 3
    Install the Sun-shadow ................................................................................................................................ 3
Icons ..................................................................................................................................................................... 4
    Function Icons.............................................................................................................................................. 4
    Screen Icons ................................................................................................................................................. 4
Operation Instruction .......................................................................................................................................... 5
    Power on/off ................................................................................................................................................. 5
    Working Mode .............................................................................................................................................. 5
    Diversity Mode.............................................................................................................................................. 5
    RX1 and RX2 Mode ...................................................................................................................................... 5
    AV IN Mode ................................................................................................................................................... 5
    HDMI Mode.................................................................................................................................................... 5
Function Instruction ........................................................................................................................................... 6
    ZOOM Function ............................................................................................................................................ 6
    Display Scale ................................................................................................................................................ 6
    DNR................................................................................................................................................................ 7
    Display Direction.......................................................................................................................................... 7
Menu ..................................................................................................................................................................... 8
    Color .............................................................................................................................................................. 8
    Sound ............................................................................................................................................................ 8
    Function ........................................................................................................................................................ 8
    Wireless ........................................................................................................................................................ 8
Specification ........................................................................................................................................................ 9
Safety Notice
Warning
●   In order to reduce the damage of fire, electric shock or product hazard, do not expose the unit to
    rain or moisture.
●   Please use only the recommended accessories.
●   Do not disassemble this product,it should be repaired by the professional people.

Battery
●   DO NOT dismantle the battery.
●   DO NOT make the battery short or its terminals in touch with metal objects,there is explosion
    danger.
●   DO NOT use any damaged or leaking battery.
●   DO NOT throw the battery into fire

●   DO NOT put the battery in the place over 65℃.

●   DO NOT expose the battery to strike,fall,etc..

●   Be sure to leep the battery out of children’s reach.

●   Please replace the battery immediately if its working life becomes short significantly.
●   Replace the battery with the same one or the equivalent recommended by the manufacturer.
●   This device uses Li battery,which is recyclable resources, to deal with the waste battery, please
    send it to the resource recycling.

Caution
●   The magnetic field with certain frequency may affect the image and sound of this device.
●   DO NOT install or store this device in book cabinet,closet or other closed spaces to avoid such
    risks as electronic shock,fire and so on due to overheat.
●   DO NOT place this device near open fire.
●   This device is not dustproof,waterproof,please note when using.

                                                     1
Packing List

  ①Main Body                        ②Sun Shadow

 ③Battery          ④Antenna                       ⑤AV Cable

 ⑥DC Input Cable   ⑦DC Output Cab

                              2
Battery
Battery Installation
●   Push the battery socket with gold contacts toward the gold contacts of the battery compartment of
    the device,and press the battery down;when battery reaches the bottom of the battery
    compartment,the battery lock will fix the battery automatically.

●   If you don’t install the battery, you can use 7~28V power supply.

Recharge the Battery
●   Please use power supply with 15V/2A at least
●   Please recharge the battery fully at the first time
●   During recharging,the red indicated light is on;after recharging,the green indicated light is on.

Sun-shadow
Install the Sun-shadow
●   3 pieces of baffles make up the sun-shadow,first install 2pieces of baffles on the both sides of
    main body ,then install
●   The top baffle toward the card slot of the main body according to the icon as below,and make sure
    they are fixed well,.
●   When you disassemble the sun-shadow,please take off the top baffle,then the right and left one.

                                                   3
Icons
Function Icons

Screen Icons
●   There are different icons in different working modes.
●   When battery icons shows as            ,it means the batter need be recharged or changed.

                                                  4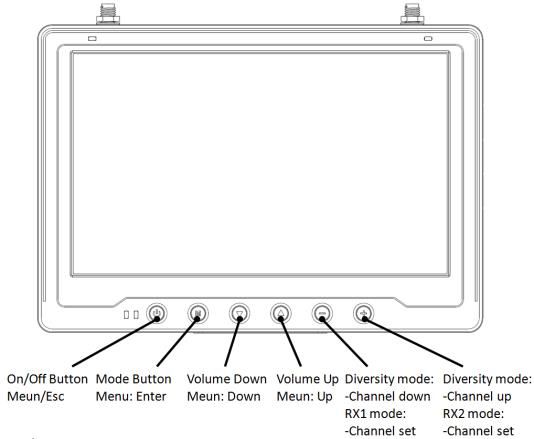
Operation Instruction
Power on/off
●   Press the power button until the device is on,the red indicated light will be on.

Working Mode
●   Press mode button can set up: DIV、RX1、RX2、AV IN、HDMI IN model.

●   Video TV system set-up(except HDMI mode): Press menu button to         enter ‘function’,then

    ‘Video sys’ to choose PAL or NTSC.

●   Under DIV、RX1、RX2 modes,you need press menu button first to enter RF to set up the frequency

    band to make sure,the device Work with the transmitter in the same band.

Diversity Mode
●   The due antenna diversity receiver is made up of ANT1、ANT2 and receiving circuit,according to

    their RSSI output,the device can keep receive the strongest signal all the time. and maximize
    image display stability.
●   Antenna LED will show the current stronger one.
●   < - > and < + > button controls the channel change.
●   DIV AV OUT outputs diversity receiving signal for video recorder and external display purposes.
DIV AV OUT ONLY works under the diversity mode.

RX1 and RX2 Mode
●   Under this mode, the channel of RX1 and RX2 can be set up separately; can set up the current
    shown video signal of RX1 or RX2 by mode button.
●   < - > button controls RX1 channel,< + > button controls RX2 channel.
●   RX1 AV OUT and RX2 AV OUT output the corresponding channel of themselves,the device can
    receiver the video signals from 2different transmitters at the same time.
If there is only one transmitter working, there is no different to use RX1 and RX2.
If there are two transmitters working,Please pay attention to adjust the bang and the
channel,let each other dose not affect the image effect.

AV IN Mode
●   For inputting external video and audio signal.
●   In AV IN mode, wireless receiving circuit automatically shut down to save battery life.

HDMI Mode
●   HDMI can input HD video to show much clearer image,and automatically adapt to the resolution
    (the maximum input 1920X1080/60Hz).
●   In HDMI mode,wireless receiving circuit automatically shut down to save battery life.
Press the mode button in the HDMI mode, may slow response, this is a normal
phenomenon, because HDMI mode requires multiple attempts to connect with an external
device, after success connecting,the device can quickly display.

                                                   5
Function Instruction
ZOOM Function
● Vertical Scaling
Use this function, can make vertical scaling, only show 16:9 moving image region of 4:3 picture on the
screen.
Support shortcut keys:Long press < >button to ZOOM IN,long press < > button to ZOOM OUT(back
to original scale)
Attention: NOT Support HDMI video vertical scaling.
For example: original scale ZOOM IN
● Horizontal Scaling
Use this function, can make horizontal scaling, change input 4:3 image into 16:9 image displayed on
the screen.
The default in 16:9 mode (ZOOM IN full screen display), to change settings, please enter the
menu->Function-> Display
Ratio to choose 4:3 or 16:9 displaying.
For example:Original scale 16:9(ZOOM IN)
Through these functions can realize image full screen easily display, in order to obtain the best display
effect,enable the above functions at the same time can also obtain the following display effect:
6DNR
When external signal is input,due to various reasons,for example: signal source is interference
transmission line caused by EMI,which may cause more image noise and more serious picture
ripples;set up DNR function can improve these phenomenas.When you set DNR to “High”,you Will
reduce the noise to the maximum extent to improve the display effect.
-When there is some serious noise interference, the DNR features may not function.
Display Direction
In the menu,Flip Horizontal、Flip Vertical can control video display direction, Flip Horizontal is for
image mirror display,Flip Vertical is for image upside down display.
-This feature helps CAMERA inverted installation,the reversed image display on the
screen; open the two functions at the same time can make sure the image displayed in
normal correct direction for ever.
-Attention: this function starts, the screen icon will also change the display direction
7Menu
(Works in black for explaining the menu function)
Press button into menu setup;these menu consists of 4 directories:Color 、Audio、Function、
Wireless;Press button to enter settings,press or button to browse options and adjust value.
Color
● Picture Mode Bright
Standard Default setup, we advise to use this setup,which applies to
most image display
Soft
User-Brightness、Contrast、Saturation、Sharpness
● Color Temp Warm
Normal
Cool
● DNR off turn off DNR
Low light noise
Mid middle noise
High strengthening noise, may reduce the quality of the image
Sound
● Sound Mode Standard
Class
Dance
Live
Pop
Rock
User-Bass、Treble
● Balance 0~20 adjust the volume balance of speakers;the default is 10,two speakers
with the same volume.
Function
● Language English、French、German、Spanish、Portuguese、Japanese、Russian、Italian
● OSD setting OSD Timeout 0~60S,can set up the menu shown time on the screen
Transparency 0~4 level,control menu into a translucent display effect
● Display Ratio 4:3
16:9
Auto default automatically that video will display full screen according to
input resolution
● Reset all specifications are back to factory settings
● Auto Power Off Off、15Mins、30 Mins、45 Mins、60 Mins
● Flip Horizontal On、Off mirror image display control
● Flip Vertical On、Off image 180 degree rotating display control
8● Icon On、5 Sec、10 Sec、15Sec、20 Sec、25 Sec、30 Sec、35 Sec、40 Sec、45 Sec、
50 Sec、55 Sec、60 Sec
set the status icon on the screen shown all the time or hidden automatically according to set time
● Video Sys PAL 、NTSC
Wireless
● -Diversity band A、B、E、F
● -RX1 band A、B、E、F
● -RX2 band A、B、E、F
Specification
Diagonal 7 inch
Display Resolution 1024X600
Screen Contrast 700:1
Luminance 300cd/㎡
ISM 5.8GHz
Band CH 1 CH2 CH3 CH4 CH5 CH6 CH7 CH8
Working frequency A 5865M 5845M 5825M 5805M 5785M 5765M 5745M 5725M
Wireless B 5733M 5752M 5771M 5790M 5809M 5828M 5847M 5866M
Receiving E 5705M 5685M 5665M 5645M 5885M 5905M 5925M 5945M
F 5740M 5760M 5780M 5800M 5820M 5840M 5860M 5880M
Sensitivity -90dBm±1dBm
Channel 32Channel ( 4 Band X 8 Channel )
Antenna Port 2 X SMA,50ohm
Diversity receiving Antenna diversity
TV System NTSC/PAL
Video output level 1.0Vp-p Typ,75ohm
Audio output level 1.0Vp-p Typ,10Kohm
RX1 AV OUT Video、Audio output
RX2 AV OUT Video、Audio output
AV Port DIV AV OUT Diversity receiving, Video、Audio output
AV IN Video、Stereo Audio input
HDMI IN(A Type) Support HDMI 1.3 Digital Input, Support HDMI Audio in
Built-in Microphone 8Ω/1W X 2
DC IN 7~28V/ 2A
DC OUT Output Voltage:DC IN or battery voltage
Power Supply Output Current:1A
Battery 11.1V/1000mAh(3 series LiPo cells)
Consumption 12V input:7.8W
Dimensions Main Body 183X126X19.5mm(not include sun shadow)
Battery 105X87.5X6.7 mm(not include prominent part)
9Weight Main body 350 g
Battery 95 g
Tripod connector General 1/4 "thread
Working Temperature -10℃~+65℃
10You can also read