Student Lesson Plan - How to Use Microsoft Movie Maker
←
→
Page content transcription
If your browser does not render page correctly, please read the page content below
Student Lesson Plan – How to Use
Microsoft Movie Maker
Goal:
To learn how to use Microsoft Movie Maker to make a video that explains how the student’s 5
integrated simple machine project works.
Objectives of Lesson:
1. Learn how to open Movie Maker
2. Learn how to import media into Movie Maker
3. Learn how to use the timeline to layout a movie
4. Add titles and credits to a movie
5. Add a sound file (voiceover) to a segment of the movie
6. Output the movie to a .avi file
Materials:
1. Computers with Microsoft Movie Maker and Paint (in accessories folder) available.
2. Video clips already available on the server
3. Microphone for making audio files
4. Interactive whiteboard for demonstrating features in front of classroom
Activities:
1. Preview Movie Maker
a. Show initial screen
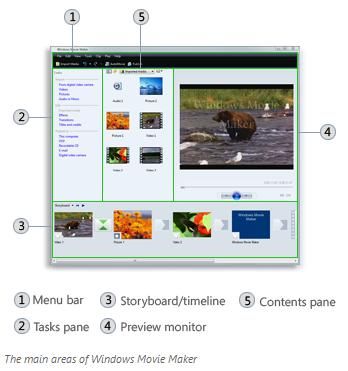
b. Show parts of the screen (display picture)
i. Menu Bar
ii. Tasks/Collections pane
iii. Storyboard/Timeline
iv. Preview Monitor
v. Contents Pane
2. Find and Open Movie Maker
a. Click Start Select Movie Maker
b. Go through Panes on program
i. Show how to switch between Tasks and Collections (ViewTasks or
Collections)
ii. Show how to switch between Storyboard and Timeline (Dropdown menu)
3. Import clips into Movie Maker
a. Select the Import Media button at the top of the page in Movie Maker
b. Locate clips on Server in the Open Folder D DeVore SMET clips
c. Click on which files you want to import (you can select multiple files)
i. Note: Movie Maker can only import .mpeg, .avi, .wmv, or .asf files
d. Then select Import on the file selection screen
i. Notice that the file has now been added to the contents screene. Select multiple clips from the Contents Pane to and place them on the
Storyboard.
f. Click on the first movie clip to highlight it and then Click the Play Button in the
Preview Pane to see how these clips play
4. Manipulating a clip on Movie Maker
a. Splitting a clip
i. Play the video. While watching the video, pick a spot where you would
like to split the video and hit the pause button in the Preview Pane.
ii. The Split Button is in the lower right hand corner of the Preview Pane.
Press this button and see what happens in your clips on the Timeline.
iii. Notice that one clip is now been made into two parts.
1. This is useful for adding title pages, pictures, and splitting clips
where you want to add narration versus using the video sound
b. Add a Title Page to a movie or in a movie
i. Select ToolsTitles and Credits
ii. Pick where you would like the Title page
iii. Enter appropriate text for the title page
iv. Notice on the timeline you can adjust the length of time of the clip
c. Adding pictures to a movie
i. Must first add pictures to your Collection
ii. Select Import Media again and this time select a picture
iii. Once this picture is in your collection you can place this picture on your
timeline. Note if you want this picture within a clip, you can split the clip
and add the picture.
1. Note: I use Microsoft Paint in the Accessory Folder to draw free
body diagrams for my movies or copy pictures made in Word or
Powerpoint into Paint to get the .jnp format needed for Movie
Maker.
d. Adding Effects to a Clip
i. Select a clip
ii. Select Clip Videos Effects to get a list of all effects possible. Types
of Effects are too numerous to list but it does include:
1. Slowing down a clip
2. Speeding up a clip
3. Flip/Rotate/Ripple/Brightness/Zoom
e. Adding Sound/Voiceover
i. Add a Audio overlay (voiceover) to a picture or movie clip
1. Using the Timeline, select the position where you want to add a
voiceover.
2. On the Timeline/Storyboard pull-down, select Narrate Timeline.
(Can also be found under Tools)
3. Set the audio level and speak into a microphone connected to the
computer to narrate the picture or clip.4. When done press Stop Narration and you can save the audio file
to your Collection
ii. What to do if you want to mute the audio on a video and replace it with a
narration
1. Select the video clip for which you want to mute the audio.
2. Select Clip AudioMute to mute the sound for the audio clip.
3. Now you can narrate the clip without the clip audio interfering
4. Note: If you only want to narrate part of a clip with the original
audio suppressed, then you must split the clip into parts where
you want to do a voiceover versus the clip where you want the
original audio.
Student – Teacher Interactions
Each student must have a computer with Movie Maker and server access. The teacher
introduces Movie Maker by using a projector to show the panes in Movie Maker and give a
general overview of the panes. Students are then to follow the guided activities above using
videos from the server. This gives the students exposure to a variety of capabilities of Movie
Maker while letting the students be creative. After the teacher introduces Movie Maker to the
group, the teacher will walk around and inspect student progress. Feedback is given on an
individual basis, but the teacher may address common problems with the group as a whole.
Student – Student Interaction
When finished with the guided activity, the students are to have a 3 minute movie to present to
the class. In this way the students can demonstrate what they learned during the activity. Other
students can then observe the movie and ask questions to the student creator about various
features used in each movie.
Student Outcome
Students will produce a 3 minute movie using Microsoft Movie Maker to demonstrate their
knowledge of Movie Maker. They will do this using video clips of their projects contained on the
server.
Local, State, and National Standards
1. National Science Teaching Standards
a. Teaching Standard A
Teachers of science plan an inquiry-based science program for their students. In
doing this, teachers
i. Develop a framework of yearlong and short-term goals for students.ii. Select science content and adapt and design curricula to meet the
interests, knowledge, understanding, abilities, and experiences of
students.
iii. Select teaching and assessment strategies that support the development
of student understanding and nurture a community of science learners.
iv. Work together as colleagues within and across disciplines and grade
levels.
Teaching Standard A is being met through section ii., iii., and iv. above. This
project takes information developed in a Technology Education class and
analyzes the information in the student’s Physics class.
b. Teaching Standard B
Teachers of science guide and facilitate learning. In doing this, teachers
i. Focus and support inquiries while interacting with students.
ii. Orchestrate discourse among students about scientific ideas.
iii. Challenge students to accept and share responsibility for their own
learning.
iv. Recognize and respond to student diversity and encourage all students to
participate fully in science learning.
v. Encourage and model the skills of scientific inquiry, as well as the
curiosity, openness to new ideas and data, and skepticism that
characterize science.
Teaching Standard B is being met through section iii. and iv.. Students are to
analyze their own projects and discuss how the machines in their video work
based on physics principles.
c. Teaching Standard C
Teachers of science engage in ongoing assessment of their teaching and of
student learning. In doing this, teachers
i. Use multiple methods and systematically gather data about student
understanding and ability. Analyze assessment data to guide teaching.
ii. Guide students in self-assessment.
iii. Use student data, observations of teaching, and interactions with
colleagues to reflect on and improve teaching practice.
iv. Use student data, observations of teaching, and interactions with
colleagues to report student achievement and opportunities to learn to
students, teachers, parents, policy makers, and the general public.
Teaching Standard C is being met through sections i. and ii.. The videos are
being used as another method for assessing student learning of topics in physics
and technology.
2. State Science Teaching Standards
a. Ohio 9-10 Science Standards
i. Explain the movement of objects by applying Newton's three laws ofmotion.
ii. Demonstrate that energy can be considered to be either kinetic (motion)
or potential (stored).
iii. Explain how energy may change form or be redistributed but the total
quantity of energy is conserved.
iv. Construct, interpret and apply physical and conceptual models that
represent or explain systems, objects, events or concepts.
v. Develop oral and written presentations using clear language, accurate
data, appropriate graphs, tables, maps and available technology.
Student Assessment
Students are to be evaluated on their video and presentation. Each video needs to contain the
following items:
1. Multiple video clips included in movie (20%)
2. At least 1 picture included in movie (10%)
3. At least 1 voiceover explaining what is happening in the movie is included (20%)
4. At least 1 Title Page is included in the movie (15%)
5. At least 1 Effect is included in the movie (15%)
6. Movie content makes sense and explains topic well (20%)
7. Adding at least 1 transition (extra credit) (5%)
Total Possible Points for Lesson: 20 pts
Technology Tools Need for Lesson
1. Computers with Movie Maker and access to school server
2. Digital video camera-students make clips for projects but the teacher must put them on
the school server
3. SD card reader – For teacher so videos can be taken from digital video camera and put
onto school server
4. Microphone – to be used for voiceovers
5. Projector connected to a computer – to project introduction screen (Note: this may be
replaced with handouts if unavailable)
NOTE: Video clips shot by students of their projects need to be copied onto the server
before this lesson takes place!Movie Maker Screen Description Source: http://windows.microsoft.com/en-US/windows-vista/Getting-started-with-Windows- Movie-Maker
You can also read