GUIDELINES FOR ORAL VIDEO PRESENTATIONS
←
→
Page content transcription
If your browser does not render page correctly, please read the page content below
GUIDELINES FOR
ORAL VIDEO PRESENTATIONS
You are required to prepare a 10-minute pre-recorded presentation of your paper. All presentation videos will
be available on the online platform starting on Monday, 14 June and will remain available online throughout
the entire conference to provide enough time for all attendees to view and enjoy the presentations at their
convenience.
Deadline for uploading your video presentation:
Tuesday, 1 June
(23:59 Honolulu, Hawaii, USA)
Uploading instructions will be sent on or before Friday, 28 May.
Your presentation file MUST follow these five (5) requirements:
- be an MP4 video file (NO other video formats - be 200 mb or LESS
are acceptable) - widescreen format
- be 10 minutes maximum - include the conference border (see below)
Font sizes on slides should be comparable to 18 points Arial (20 points Calibri) or larger for participants on
mobile devices. We recommend you use a sans-serif typeface.
A presentation video example is available on the website.
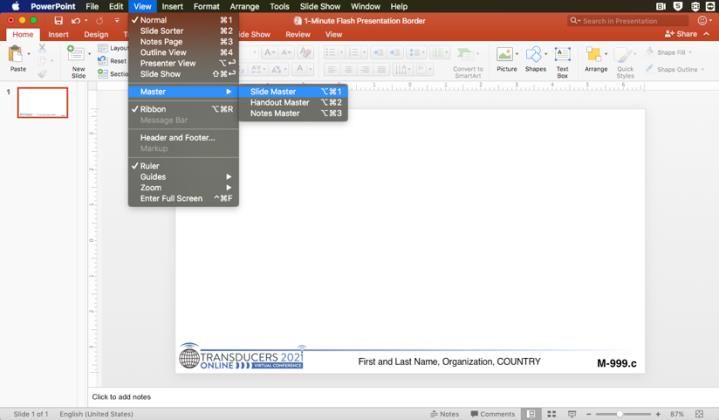
Conference Border
We suggest that you use the conference border at the bottom for the entirety of your presentation. You can
download the PowerPoint file from the conference website. To update your presenter information in the slide,
go to the slide master via the top bar in PowerPoint: view - master - slide master. Select the top image on the
left panel and then you can edit your name and oral session number. Refer to the conference program for your
assigned session paper number. (NOTE: once the program finalized, an email will be sent to all presenting
authors) Don’t forget to go back to normal view once you update your presenter information.
Questions may be sent to: authors@transducers2021.org.
GUIDELINES FOR
                                        ORAL VIDEO PRESENTATIONS
The following pieces of advice may help in preparing and recording your video.
• Ensure the area to be recorded in is well lit with no bright lights in the video frame.
• When recording your face, consider the level of your camera. Placing it at eye level is usually better than shooting
   from below.
• Make sure your entire face is visible and that you are not continuously moving your head!
• Record your video in a time or place with no background noise, and no risk of other persons or pets coming into the
   field of view of the camera!
• There are no restrictions on the media that you can use, but keep the audio and visual features on-topic. Ensure they
   support your message instead of distracting from it.
The following information is to assist in planning the content of your video.
• This link provides advice from the University of Sussex for their Three Minute Thesis competition:
    http://www.sussex.ac.uk/internal/doctoralschool/researcherdev/threeminthesis/preparing3mt

1. Write down what you want to say:
Speak and write for your audience who will not be experts in your specific area of research. To do this you should:
• Think of a way to attract the attention of your audience and get people interested in your research, avoid jargon and
    academic language.
• Imagine that you are explaining your research to a (not scientific) friend or family member.
• Do not dumb down or devalue your research, what you are doing is exciting and you should convey enthusiasm for
    your subject.

2. Have a clear outcome in mind: Know what you want your audience to take away from your presentation.

3. Tell a story, think out of the box, and be creative:
You may like to present your work like a story, with a beginning, middle and an end. It is not easy to condense your
research into 10 minutes, so you may find it easier to break your presentation down into smaller sections. Try writing an
opener to catch their attention, then highlight your different points, and finally have a summary to restate the importance
of your work.

4. What not to do:
Do not write your presentation like an academic paper. Try to use shorter words, shorter sentences and shorter
paragraphs. You can use humor, however be careful not to dumb down your presentation or say something that may not
be understood by someone from a different culture.

5. Revise:
You may like to proof your presentation by reading it aloud, firstly to yourself and then to an audience of friends/family.
This allows you to not only check your grammar and writing style, but also to receive critical feedback and test the cohesion
and clarity of your story. Do not be afraid to ask your audience if your presentation clearly highlights what your research
is about and why it is important. Practice your text, speak clearly and use variety in your voice (fast/slow, loud/soft). Do
not rush - find your rhythm. Remember to pause at key points as it gives the audience time to think about what you are
saying.
There are many ways to create and edit your video.
• PowerPoint can make a video from a presentation. Select ‘Slide Show’, ‘Record Slide Show’, then save as an MP4.
• OBS Studio which is a free and open source software for video recording and live streaming:
   https://obsproject.com/.
• Screen recording tools. This site provides examples of free tools that you can use:
   https://www.techradar.com/news/the-best-free-screen-recorder,
• Recording video of any kind and editing it using video editing tools like Adobe Premier, and Apple iMovie.
GUIDELINES FOR
                                      ORAL VIDEO PRESENTATIONS
                          PowerPoint Presentation Guidelines
1. In order to maximize the visibility of your presentation, we recommend that you use color carefully to direct
   the audience’s attention to different areas and to highlight specific points.

2. Use a simple, high color contrast design, and avoid adding unnecessary visuals. Too many images and colors
   can draw attention away from your points. Choose images that have a purposeful messages and are relevant
   to your presentation. Keep in mind that less is more.

3. Color may be used in schematics, graphs, illustrations and photographs when it adds to the clarity of the
   presentation.

4. Not all colors are equally visible. Bright red, blue, green and orange are easiest to see. Avoid yellows and
   light or pastel colors that are not easily seen on a clear background, except possibly as a local background in
   a boxed area.

5. Use extra-wide line widths for color lines.

6. Be sure to leave a 10% safety margin on all sides of your slides.

7. Placing an institutional logo in the border is acceptable, so long as it doesn’t consume valuable screen area.

8. Arial or Helvetica font is strongly preferred. These fonts have an equal line width for all parts of all characters
   and projects clearly. Furthermore, they are available on Microsoft PowerPoint. The “redeeming” feature of
   fonts like Arial, Helvetica, etc in this context is that they are sans serif fonts, which are better suited for
   presentation slides than, e.g., Times or other fonts with serifs. The recommended font sizes are:

                             - 36 point for titles         - 26 point for major bullets
                             - 30 point for sub-titles     - 24 point for indented bullets

                     We recommend that you do NOT use a font size smaller then 18 point.

9. Keep each slide simple. It is better to use a large font and two slides than to use a small font in order to
   squeeze your message into one slide!
You can also read