Product images for do-it-yourself items - Manual based on the GS1 Product Image Specification - GS1 Nederland
←
→
Page content transcription
If your browser does not render page correctly, please read the page content below

Product images for do-it-yourself items
Manual based on the GS1 Product Image Specification

Release 1.2, Ratified, 26 April 2018
Document Summary

 Document Item                                    Current Value

 Document Name                                    Product images for do-it-yourself items

 Document Date                                    26 April 2018

 Document Version                                 1.2

 Document Status                                  Ratified

 Document Description                             Manual based on the GS1 Product Image Specification

Log of Changes

 Release         Date of Change              Changed By                  Summary of Change

  0.1              14-04-2014                 Suzan Buss                  Draft version.

  0.2              10-06-2014                 Suzan Buss                  Draft version, agreed with retailers.

  0.3              1-9-2014                   Suzan Buss                  Draft version, agreed with suppliers.

                                                                          First definitive version, following agreement
  1.0              13-11-2014                 Suzan Buss
                                                                          with STC and sector.

                                                                          -   Definitions (composite photo, detail photo)
                                                                              added.
                                                                          -   Layout of exceptions and additions summary.
                                                                          -   White border specified and illustration added
                                                                              (1.2).
                                                                          -   Minor clarifications to Table 2.1.

  1.1              10-2-2015                  Suzan Buss                  -   Table 2.2 added (file naming for composite
                                                                              and detail photos).
                                                                          -   Examples added (3-5 supporting elements,
                                                                              3-6 composite photo, 3-7 detail photo).
                                                                          -   Name of clipping path ‘Pad 1’ changed to
                                                                              international name ‘Path 1’.
                                                                          -   A few textual enhancements/corrections.
                                                                          -   Glossary added.

  1.2              26-4-2018                  Suzanne Deveer              -   Added a visual to table 1.1 (filling knife)

Disclaimer
GS1, under its IP Policy, seeks to avoid uncertainty regarding intellectual property claims by requiring the participants in
the Work Group that developed this Product images for do-it-yourself items to agree to grant to GS1 members a royalty-
free license or a RAND license to Necessary Claims, as that term is defined in the GS1 IP Policy. Furthermore, attention is
drawn to the possibility that an implementation of one or more features of this Specification may be the subject of a patent
or other intellectual property right that does not involve a Necessary Claim. Any such patent or other intellectual property
right is not subject to the licensing obligations of GS1. Moreover, the agreement to grant licenses provided under the GS1
IP Policy does not include IP rights and any claims of third parties who were not participants in the Work Group.
Accordingly, GS1 recommends that any organization developing an implementation designed to be in conformance with this
Specification should determine whether there are any patents that may encompass a specific implementation that the
organization is developing in compliance with the Specification and whether a license under a patent or other intellectual
property right is needed. Such a determination of a need for licensing should be made in view of the details of the specific
system designed by the organization in consultation with their own patent counsel.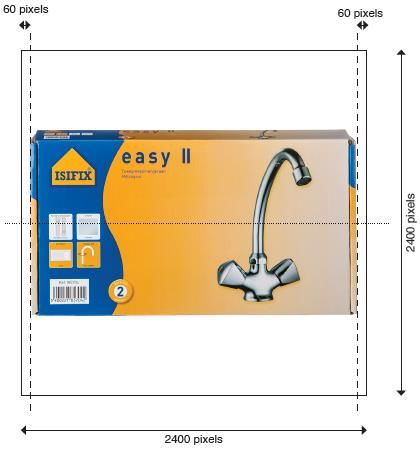
Product images for do-it-yourself items

THIS DOCUMENT IS PROVIDED “AS IS” WITH NO WARRANTIES WHATSOEVER, INCLUDING ANY WARRANTY OF
MERCHANTABILITY, NONINFRINGMENT, FITNESS FOR PARTICULAR PURPOSE, OR ANY WARRANTY OTHER WISE ARISING
OUT OF THIS SPECIFICATION. GS1 disclaims all liability for any damages arising from use or misuse of this Standard,
whether special, indirect, consequential, or compensatory damages, and including liability for infringement of any
intellectual property rights, relating to use of information in or reliance upon this document.
GS1 retains the right to make changes to this document at any time, without notice. GS1 makes no warranty for the use of
this document and assumes no responsibility for any errors which may appear in the document, nor does it make a
commitment to update the information contained herein.

Release 1.2, Ratified, 26 April 2018             © 2018 GS1 Nederland                                       Page 3 of 18
Product images for do-it-yourself items

                                             Table of contents
1     Introduction ................................................................................................. 5

2     General agreements ..................................................................................... 6
      2.1     Supplied images ............................................................................................................. 6
      2.2     Supply specifications ....................................................................................................... 6
      2.3     Colour and quality ........................................................................................................... 7
      2.4     Views ............................................................................................................................ 8
      2.5     Determining the front face ............................................................................................. 10
      2.6     Additions and exceptions................................................................................................ 11

3     File naming ................................................................................................. 12
      3.1     GTIN based file name construction .................................................................................. 12
      3.2     File construction composite and detail photos ................................................................... 14
      3.3     Examples ..................................................................................................................... 14

4     Appendix .................................................................................................... 16
      4.1     Glossary ...................................................................................................................... 16
      4.2     Future developments ..................................................................................................... 18

Release 1.2, Ratified, 26 April 2018                     © 2018 GS1 Nederland                                                       Page 4 of 18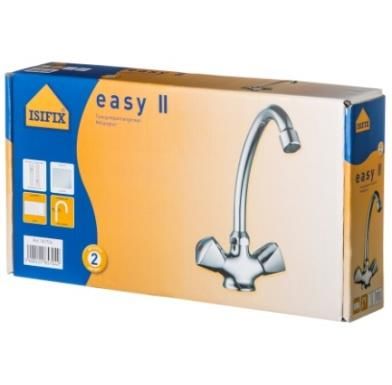
Product images for do-it-yourself items

1         Introduction
The use of images has always been important for businesses, and this has burgeoned with the growth in online
marketing and sales. As the consumer cannot pick up and touch the product, it is important to have a clear
representation of it, so as to produce more sales and fewer returns. With the advent of webshops the numbers
of product images needed has grown enormously. Nowadays product images are needed for the whole range
of products available online, not just promotional items in flyers. Organizing and exchanging images is not
always without its problems, however. Unless there is a standard format for images, exchanging them between
the various parties is a complex and inefficient process. On top of this, retailers invest large amounts of money
in taking photos of products that their suppliers have already photographed.

Aim
The aim of this document is to develop a standard method for organizations in the DIY sector. This standard
method describes how images are created, associated and exchanged with trading partners. In addition, a
unique naming convention is denoted. These standard organizational processes are needed to improve
efficiency and reduce the cost of exchanging images. Using uniform file naming for images – with a worldwide
agreed standard – makes it clear to everyone what the image (and view) is without opening the file.

Unless explicitly stated, the rules apply to both shelf management and the commercial (online/offline) exchange
of images.

This document has been designed for suppliers and retailers, but it also provides a framework for others
supplying services to them. This guide is based on the existing GS1 Product Image Specification standards.

Exchange
This manual will be followed by a survey of how product images can be exchanged in the sector, preferably via
a central database: using the standards set out in the guideline and a central database will make for an even
greater improvement in efficiency, resulting in cost benefits. Product images will only have to be supplied once
for various applications and buyers. On top of this, it will reduce the time to market for online sales, as images
for every product will be available immediately. This follow-up phase is to start in 2015.

Release 1.2, Ratified, 26 April 2018          © 2018 GS1 Nederland                                      Page 5 of 18
Product images for do-it-yourself items

2          General agreements

2.1        Supplied images
All images supplied must comply with the guidelines set out in this document, unless a particular view has no
added value for consumers. This is the case with certain product groups in the DIY sector, as there is a wide
variety of products. The side of a piece of sandpaper or a detail photo of a plug will not provide any useful
information, for instance.

It is understood that there are instances where images other than ‘product’ photos will be needed. Also,
situations may arise where product shots are needed at a size or resolution that exceeds the standards in this
guideline. In these cases, where there are exceptions to the guideline, or in case of doubt, the supplier should
consult with the retailer.

2.2        Supply specifications

Images must be supplied at the maximum resolution possible and may also be extracted at lower resolutions
(e.g. for shelf management). The images supplied must comply with the following specifications:

    -      TIFF file.
    -      LZW compressed.
    -      Adobe RGB 8 bits per channel colour mode.
    -      300 dpi.
    -      Image size: minimum 2400 x 2400 pixels, maximum 4800 x 4800. In the case of smaller products
           the image must be able to be displayed at a size at least twice the original format (at 300 dpi).
    -      Image size to be a 1:1 square aspect ratio.
    -      White border to be 60 pixels all round (see figure 1.1).
    -      Image to be free-standing.
    -      With a transparent background.
    -      With a clipping path. It is very important for the purpose of batch image repurposing that the
           clipping path be named ‘Path 1’ (N.B. initial capital and space).*
    -      Default flatness setting should be 1-device pixels.

*
  A transparent background plus a clipping path would seem to be unnecessary duplication, but we recommend doing both so as to ensure
that the background really is separate from the product area.

Release 1.2, Ratified, 26 April 2018                   © 2018 GS1 Nederland                                               Page 6 of 18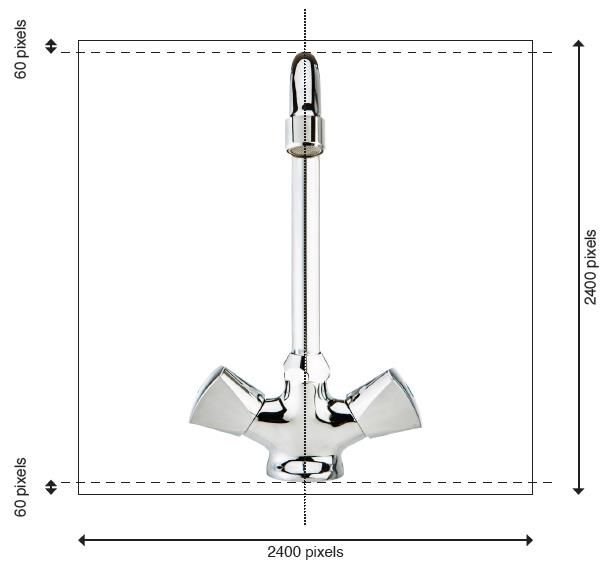
Product images for do-it-yourself items

2.3       Colour and quality
Instructions for quality image capture and processing:

   -      No colour casts.
   -      The image must be colour-accurate.
   -      Reflections must be realistic and within the product area, i.e. there must not be any reflections
          visible outside the product area.
   -      Reflections of the environment (e.g. the photographer) must not be visible, or only minimally.
   -      Shadows must be realistic and neutral and within the product area, i.e. there must not be any
          shadows visible outside the product area.
   -      Retouching must be as seamless and undetectable as possible and be convincing at a minimum of
          200% magnification (e.g. removal of expiration/best before dates).
   -      The image may be mirrored if the product is symmetrical.
   -      A rendered image (converted from 3D to 2D) is permitted.
   -      The subject should preferably be evenly lit with the light coming from the left.
   -      No alpha channels or layers, guides or rulers.
   -      No transfer functions or PostScript colour management.
   -      No signatures, ‘finger printing’ or visible watermarks.
   -      No compression artefacts.
   -      No artificial enlargement (interpolation).
   -      No scanning from printed pages.
   -      No visible dust, scratches, dents, damage or fingerprints.
   -      No manufactured shadows.
   -      Moiré patterns must be minimized.
   -      Any ‘price’ indication must be omitted. This also applies to stickers such as ‘fragile’ and ‘display
          model’.
   -      No persons or animals in the image.
   -      No props or additional products are allowed within the primary image areas unless they are needed
          for clarification.

Figure 1.1: White border 60 pixels all round

Release 1.2, Ratified, 26 April 2018           © 2018 GS1 Nederland                                      Page 7 of 18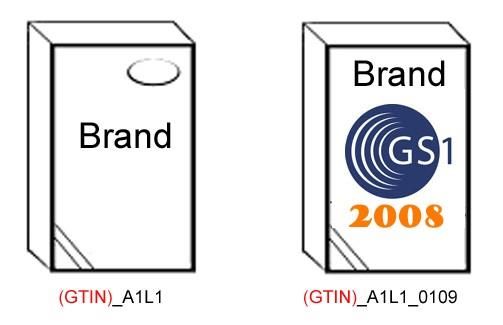
Product images for do-it-yourself items

2.4                                Views
At least the following views of products must be available:

                                    View              Product with          Product with        Product without packaging
  Application

                                                      packaging –           packaging –
                                                      contents also         contents not
                                                      photographable        photographable
                                                      without packaging     without
                                                                            packaging
                                                      Lamp, tap             Cement, sand,       Putty knife, lock
                                                                            adhesive
                                                                                                NOT REQUIRED
                Shelf management

                                   1.   In
                                        packaging,
                                        straight-on
                                        front

                                                                                                NOT REQUIRED
                                   2.   In
                                        packaging,
                                        straight-on
                                        left

                                                                                                NOT REQUIRED
                                   3.   In
                                        packaging,
                                        straight-on
                                        top

                                                      NOT REQUIRED          NOT REQUIRED
                                   4.   Out of
                                        packaging,
                                        straight-on
                                        front

                                                      NOT REQUIRED          NOT REQUIRED
                                   5.   Out of
                                        packaging,
                                        straight-on
                                        left

Release 1.2, Ratified, 26 April 2018                              © 2018 GS1 Nederland                                 Page 8 of 18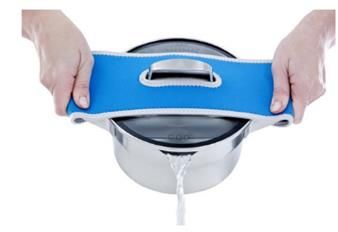
Product images for do-it-yourself items

                         View              Product with         Product with        Product without packaging
  Application

                                           packaging –          packaging –
                                           contents also        contents not
                                           photographable       photographable
                                           without packaging    without
                                                                packaging
                                           NOT REQUIRED         NOT REQUIRED
                        6.   Out of
                             packaging,
                             straight-on
                             top
                                                                NOT REQUIRED
                Sales

                        7.   Out of
                             packaging,
                             oblique
                             (plunge)
                             left

                                                                NOT REQUIRED
                        8.   Out of
                             packaging,
                             oblique
                             (plunge)
                             right

                                                                NOT REQUIRED
                        9.   Out of
                             packaging,
                             oblique
                             (plunge)
                             top

                        10. In             NOT REQUIRED                             NOT REQUIRED
                            packaging,
                            oblique
                            (plunge)
                            left

                        11. In             NOT REQUIRED                             NOT REQUIRED
                            packaging,
                            oblique
                            (plunge)
                            right

Release 1.2, Ratified, 26 April 2018                  © 2018 GS1 Nederland                                 Page 9 of 18
Product images for do-it-yourself items

                       View               Product with              Product with              Product without packaging
       Application

                                          packaging –               packaging –
                                          contents also             contents not
                                          photographable            photographable
                                          without packaging         without
                                                                    packaging
                      12. In              NOT REQUIRED                                        NOT REQUIRED
                          packaging,
                          oblique
                          (plunge)
                          top

     Table 1.1: Views of products that must be available in shelf-management and sales

     Note 1:
     In the case of some products it is also necessary to supply an image of the back or underside to enable the
     product to be recognized or to show its uniqueness. This is the case, for example, with outdoor loungers,
     switches and top-class products. In these cases the advice is to supply this view/these views as well. The same
     applies to products that need to be shown in use so as to clarify what the product does.

     Note 2:
     The ‘oblique’ angle (plunge) is 30º for side views (see figure 1.2) and 10-15º for top views (see figure 1.3). For
     side views there is a tolerance of ±10º (i.e. anything between 20º and 40º is permitted).

                                                            10° - 15°
30° (20-
40°
permitted)

     Figure 1.2: Angle of side view                                 Figure 1.3: Angle of top view

     2.5             Determining the front face
     The front facing of the products is determined by the GS1 package Measurement Rules. All other facings are
     taken in relation to the front face.

     The GS1 Package Measurement Rules state that:

            -        The default front is the side with the largest surface area that is used by the manufacturer to ‘sell’
                     the product to the consumer. In other words, the side with markings such as the product name.
            -        Some product packages have more than one possible front with the same surface area. These
                     products can be presented both vertically and horizontally on the shelves. If a product package has
                     more than one possible front, the highest side is considered to be the default front.

     Release 1.2, Ratified, 26 April 2018                © 2018 GS1 Nederland                                      Page 10 of 18
Product images for do-it-yourself items 2.6 Additions and exceptions Some products would seem to be incompatible with the above-mentioned standards, so they are listed here along with the rules agreed for them. The following rules apply to the product groups listed, unless a particular view has no added value for consumers. The omission of particular views should always be agreed with the retailer. Composite photos: In a composite photo images are placed over one another in layers to produce a complete image. Examples are a screwdriver with a close-up of the tip, or a box of nails with one or more nails out of the package in the foreground. These are compositions. Important: the resolution of the smallest image in the composition must be 300 dpi. Important: all images must have an active clipping path. It is very important for the purpose of batch image repurposing that the clipping path be named ‘Path 1’ (note the initial capital and space). Detail photo: A detail photo is a photograph, line drawing or other graphical representation of a particular product attribute. It is used to emphasize a particular detail or attribute of an item. This includes photos of a small part of a consumer unit in the case of products that are too large to be shown in their entirety (timber or plastic panels or pipes). Important: a clipping path is required. Products on a roll, such as carpet and wallpaper: These products must be partially unrolled on the ‘oblique’ photos (photographed at an angle) so that the print is visible. Products that are attached to something when in use, such as a garage door or a toilet roll holder: Should be photographed detached. Apparel: Should be photographed flat, not stuffed, straight-on front and straight-on back. Longer products: For longer products it is permitted to overshoot the image on the left. Again, the top angle must be 10-15º and the angle at which the product overshoots the image must be 30º. Measures of capacity: If a product has more than one measure of capacity (e.g. paint) a unique photo of each size should be taken. Colours: A unique photo should be taken of every colour variant of the product (e.g. paint). Promotional packaging: If a product has a promotional packaging as well the regular packaging, unique photos should be taken of both. Volume products: For volume product an Image of the standard consumer unit is needed plus one loose product. For example: tiles are always sold in sets of four, then the image should show a stack of four tiles plus a close-up of a loose tile. Light fittings: The light should be on, unless an image with the lights off provides more information. Handles (e.g. on paint can): Paint cans and other products with handles should be photographed with the handle at the backside. The handle attachments must not be cut off. Pumps/nozzles: Pumps and nozzles should be put at the left side while photographing. Release 1.2, Ratified, 26 April 2018 © 2018 GS1 Nederland Page 11 of 18
Product images for do-it-yourself items

3          File naming
The file name of the image should be based on the 14-digit GTIN of the item being photographed. The remaining
characters should indicate the various views.

3.1        GTIN based file name construction
Minimum requirements:

    Position in         Symbol          View                           Explanation
    the file
    name
    1-14                GTIN            GS1 article number

    15                  _               Underscore spacer

    16                                  Still shot of product,         Does the image show only the item, or
                                        single GTIN                    are supporting elements also visible?
                        A               Still shot, single GTIN,
                                        with supporting elements       B also applies to mood images
                        B

    17                  1               Front                          Facing indicator
                        2               Left
                        3               Top
                        7               Back
                        8               Right
                        9               Bottom
    18                  C               Centre                         Plunge: Angle reference relative to the
                        L               Left                           face being represented
                        R               Right
                        N               No Plunge
    19                  1               In packaging
                        0               Out of packaging
                        A               Case
                        B               Innerpack
                        If the 16th
                        character is
                        ‘B’, optional
                        additions:
                        G
                                        Staged
                        H
                                        Held
                        J
                                        Worn
                        K
                                        Used
                        L
                                        Family
                        M
                                        Open Case
Table 2.1: Minimum requirements file name

Release 1.2, Ratified, 26 April 2018            © 2018 GS1 Nederland                                   Page 12 of 18
Product images for do-it-yourself items
The following characters are optional additions to be used if the product being imaged requires them in the
order in which they should appear.
Position in Symbol View Explanation
the file name
20 _ Underscore spacer
21-22 aa Language Indicator (2 Example of French version:
character alpha): (GTIN)_A1L1_fr
ISO639 format - Example syntax for
populating a country variation of a
Language Code attribute: aa or
optionally aa-BB where aa = ISO 639
code list, must be lower case, where
BB = ISO 3166-1 Country Code, 2
Alpha character representation, must
be upper case (to be used only if
multiple faces of dissimilar languages
occur).
21-26 MMYY Image end date/promotional MMYY that image is valid until (i.e. if
(4 character numeric) good until 1206 (Dec 2006) then to be
removed after 1 January 2007).
21-29 sNN Sequence Number (3 Lowercase ‘s’ followed by numeric digits
character alphanumeric) for Sequence number will be added at
the end of file name with the following
format: underscore, lowercase ‘s’ and
then two mandatory numeric
characters.
Table 2.2: Optional additions file name
Release 1.2, Ratified, 26 April 2018 © 2018 GS1 Nederland Page 13 of 18Product images for do-it-yourself items
3.2 File construction composite and detail photos
File name construction for composite photos and detail photos.
Position in the Symbol View Explanation
file name
1-14 GTIN GS1 article number Use the GTIN to which the image is
linked.
15 _ Underscore spacer
16 M Composite photo See the definitions above.
F Detail photo
17 _ Underscore spacer
18 + 001 Unique sequence
number
Table 2.3: File name construction for composite and detail photos
3.3 Examples
In the examples (GTIN) represents the 14-digit product GTIN. The following examples are of products in their
packaging that cannot be photographed out of their packaging. For the other views see the respective file
naming in the table above.
Figure 2.1: Products in its packaging (not photographable out of its packaging)
Release 1.2, Ratified, 26 April 2018 © 2018 GS1 Nederland Page 14 of 18Product images for do-it-yourself items Figure 2.2: File name construction for product in its packaging (this item is not photographable out of its packaging, therefore shelf management photos also show it in its packaging) (GTIN)_A1C1 (GTIN)_A7C1 Figure 2.3: Product with more than one marketable face (the highest vertical face is shown as ‘1’) (GTIN)_A1L1_nl (GTIN)_A1L1_fr Figure 2.4: The same product in dissimilar languages Figure 2.5: End date for time-specific promotional packaging Release 1.2, Ratified, 26 April 2018 © 2018 GS1 Nederland Page 15 of 18
Product images for do-it-yourself items

(GTIN)_B1CK                                        (GTIN)_B9RK

Figure 2.6: Still shot of product with supporting elements

(GTIN)_M_002                                       (GTIN)_M_123

Figure 2.7: Composite photo

(GTIN)_F_001                                       (GTIN)_M_002

Figure 2.8: Detail photo

4         Appendix

A.1       Glossary
 Name                                                  Definition

 Adobe RGB colour space                                The colour of a pixel is defined as the sum of its blue, red
                                                       and green values. By ‘blending’ these colours virtually any
                                                       colour can be created. Standards are needed to ensure
                                                       that different devices such as your camera, computer,
                                                       monitor and printer reproduce colours the same way.
                                                       Adobe RGB is a colour space developed by Adobe Systems
                                                       Inc. which is in general use as a standard.
                                                       An alpha channel is part of an image enabling it to be
 Alpha channels                                        reproduced partially translucent. The process involved is
                                                       known as ‘alpha blending’: the image is combined with a
                                                       background so that it appears to be transparent.

Release 1.2, Ratified, 26 April 2018            © 2018 GS1 Nederland                                     Page 16 of 18
Product images for do-it-yourself items
Name Definition
Clipping path/clipping mask A clipping path or clipping mask is a selection and cut-out
of part of the original complete image. It is used e.g. to
place objects free-standing.
Compression artefacts Compression artefacts are caused by non-lossless
compression. In highly compressed JPEG photos in
particular sharp transitions become splodgy or frayed e.g.
in the case of text. The JPEG compression mechanism
often causes these artefacts to occur in 8 x 8-pixel
patterns.
LZW stands for Lempel-Ziv-Welch, the names of the three
LZW compressed creators of this data compression technology. Data
compression is the process of reducing file size by
summarizing the data. Smaller files can be downloaded
faster and require less disk space. LZW is one of the most
popular compression algorithms and is used in many
programs and image formats.
Moiré patterns Moiré is a kind of digital artefact that occurs when two
patterns intersect, forming a new pattern. As the new
pattern is always coarser than the two original ones, the
shape changes depending on the screen frequency and
angle. The finer the two original patterns the easier the
moiré is to see.
Photoshop layers Photoshop layers can be compared with sheets of
transparent paper on top of one another. The underlying
layers can be seen through the transparent parts of an
upper layer. A layer can be moved to change the position
of its content, just as a sheet of transparent paper in a
stack can be moved to a different position. The coverage
of a layer can also be changed so as to make the content
partially transparent.
PostScript colour management This converts file data to the printer’s colour space. This
option cannot be used if you want to include the image in
another document with colour management.
TIFF files Intended mainly for unedited/original files. TIFF format
does not involve any loss of quality and can be opened by
many programs. EPS files are used for vectors; JPG files
involve loss of quality.
Transfer functions Transfer functions are generally used to compensate for
the point widening or narrowing that occurs when an
image is transferred to film. Point widening is when the
ink dots comprising a printed image are larger than in the
halftone raster (e.g. as a result of spreading out on the
paper). Point narrowing is when the dots are printed
smaller. In this option the transfer functions are applied to
the file in the case of point narrowing.
Release 1.2, Ratified, 26 April 2018 © 2018 GS1 Nederland Page 17 of 18Product images for do-it-yourself items
A.2 Future developments
Heading Description 16th Status
Character
Manuals/ construction Rules for the exchange of Expected: summer 2015
drawings these documents
Effect on entire Rules on the exchange of n/a Expected: 2015/2016
document future pictorial matter, e.g.
360º images and videos
Release 1.2, Ratified, 26 April 2018 © 2018 GS1 Nederland Page 18 of 18You can also read