PSE Refrigeration Dryer (60Hz) - Parker Hannifin

Page created by Judy Reynolds
 
CONTINUE READING
PSE Refrigeration Dryer (60Hz) - Parker Hannifin
PSE
 Refrigeration Dryer (60Hz)

                           PSE 325
                           PSE 400
                           PSE 500
                           PSE 700
                           PSE 800
                          PSE 1000

EN User Manual
ES Manual de uso
FR Manuel d’utilisation
                              DATE: 06.07.2021 - Rev. 03
                                 CODE: 398H271746
PSE Refrigeration Dryer (60Hz) - Parker Hannifin
Index                                                          1 Safety                                                                      or its components.
1 Safety                                                                                                 1
                                                                                                             1.1 Importance of the manual
                                                                                                                                                                                           !   IMPORTANT: The manufacturer reserves the right to modify this
 1.1 Importance of the manual ..............................................................1                                                                                              manual at any time to provide the most comprehensive and updated
 1.2 Warning signals ..............................................................................1         • Keep it for the entire life of the machine.                                 information. The user is advised to consult the manual supplied with
 1.3 Safety instructions .........................................................................1          • Read it before any operation.                                               the unit.
 1.4 Residual risks .................................................................................1       • Parker reserves the right to make changes to this user manual. Refer-
2 Introduction                                                                                           2     ence the version that comes with the unit.                                  1.4 Residual risks
 2.1 Transportation ................................................................................2                                                                                      The installation, start up, stopping and maintenance of the machine must
 2.2 Handling .........................................................................................2     1.2 Warning signals                                                           be performed in accordance with the information and instructions given
                                                                                                                                                                                           in the supplied technical documentation and always in such a way to
 2.3 Inspection ......................................................................................2
 2.4 Storage...........................................................................................2      !        Instruction for avoiding danger to persons
                                                                                                                                                                                           avoid the creating of a hazardous situation. Some risks remain, that were
3 Installation
 3.1 Procedures .....................................................................................2
                                                                                                         2
                                                                                                              Y        Instruction for avoiding damage to the equipment.
                                                                                                                                                                                           unable to be eliminated during the design stage, which are listed below: :
                                                                                                                                                                                            Part affected      Residual           Manner of                   Precautions
 3.2 Operating space.............................................................................2
 3.3 Condenser Types ..........................................................................2
                                                                                                              Z        The presence of a skilled or authorized technician is required.                           risk             exposure

                                                                                                                                                                                           heat exchanger small cuts       contact                     avoid contact, wear pro-
 3.4 Installation Environment .................................................................2
 3.5 Electrical connection ......................................................................2            ,        There are symbols whose meaning is given in the para. 8.1           coil                                                        tective gloves

 3.6 Condensate drain connection ........................................................2                                                                                                 fan grill and fan lesions       insertion of pointed        do not poke objects of any
4 Commissioning                                                                                          2                                                                                                                 objects through the         type through the fan grill
 4.1 Preliminary checks .........................................................................2
                                                                                                             1.3 Safety instructions                                                                                       grill while the fan is in   or place any objects on

                                                                                                             !
 4.2 Starting...........................................................................................2                                                                                                                  operation                   the grill
                                                                                                                   Every unit is equipped with an electric disconnecting switch for
 4.3 Operation .......................................................................................2
                                                                                                             operating in safe conditions. Always use this device in order to eliminate    inside the unit: burns          contact                     avoid contact, wear pro-
 4.4 Stop................................................................................................3                                                                                 compressor                                                  tective gloves
                                                                                                             risks during maintenance.
5 Control (PSE325-500)                                                                                   3                                                                                 and discharge
 5.1 Control panel..................................................................................3        !    This user manual is intended to aid both the end-user and service        pipe
 5.2 Symbol ...........................................................................................3     technician. Only a trained, qualified technician should remove panels to
 5.3 Unit of measurement settings ........................................................3                                                                                                inside the unit: intoxication, defects in the insula-       adequate electrical protec-
                                                                                                             perform service.                                                              metal parts and electrical     tion of the power            tion of the power supply
 5.4 Configuration condensate drain.....................................................3
 5.5 Viewing probe values .....................................................................4             Y Do not exceed the design limits given on the data plate.                    electrical wires shock, seri- supply lines upstream
                                                                                                                                                                                                            ous burns     of the electrical panel;
                                                                                                                                                                                                                                                       line; ensure metal parts
                                                                                                                                                                                                                                                       are properly connected
 5.6 Remote ON/OFF ............................................................................4
                                                                                                             !Y It is the user’s responsibility to avoid loads different from the
                                                                                                                                                                                                                          live metal parts             to earth
 5.7 CYCLING function .........................................................................4
 5.8 Alarm management ........................................................................5              internal static pressure. The unit must be appropriately protected when-      outside the       intoxica-     fire due to short circuit   ensure conductor cross-
 5.9 Alarm history ..................................................................................5       ever risks of seismic phenomena exist.                                        unit: area sur-   tion, serious or overheating of the       sectional areas and the
                                                                                                                                                                                           rounding the      burns         supply line upstream        supply line protection sys-
 5.10 Setting clock/date. .......................................................................5
6 Control (PSE700-1000) Touch                                                                            6   !      Any safety devices for the compressed air circuit are to be provided   unit                            of the unit’s electrical
                                                                                                                                                                                                                           panel
                                                                                                                                                                                                                                                       tem conform to applicable
                                                                                                                                                                                                                                                       regulations
 6.1 Control panel “Touch” ....................................................................6             by the user and must be selected according to the specification of the
 6.2 Symbol ...........................................................................................6     system and in accordance with local legislation.
 6.3 Information menu ...........................................................................6           Only use the unit for professional work and for its intended purpose.
 6.3.1 Setting parameter menu .............................................................6                 The user is responsible for analyzing the application aspects for product
 6.3.2 Alarm menu .................................................................................8         installation, and following all the applicable industrial and safety stand-
 6.3.3 Probe menu.................................................................................9          ards and regulations contained in the product instruction manual or oth-
 6.3.4 Digital input menu .......................................................................9           er documentation supplied with the unit.
 6.3.5 Digital output menu .....................................................................9            Tampering or replacement of any parts by unauthorized personnel and/
 6.3.6 Serial number menu ..................................................................10               or improper machine use exonerate the manufacturer from all responsi-
 6.4 Rapid menu ..................................................................................10         bility and invalidate the warranty.
7 Maintenance                                                                                          11    The manufacturer declines present or future liability for damage to per-
 7.1 General instructions .....................................................................11            sons, things and the machine, due to negligence of the operators, non-
 7.2 Refrigerant. ..................................................................................11       compliance with all the instructions given in this manual, and non-appli-
 7.3 Preventive Maintenance Programme ...........................................11                          cation of current regulations regarding safety of the system.
 7.4 Dismantling ..................................................................................11        The manufacturer declines any liability for damage due to alterations
8 Troubleshooting                                                                                      12    and/or changes to the packing.
                                                                                                             It is the responsibility of the user to ensure that the specifications pro-
9 Appendix
                                                                                                             vided for the selection of the unit or components and/or options are fully
                                                                                                             comprehensive for the correct or foreseeable use of the machine itself

   English                                                                                                                     PSE 325-1000 60Hz                                                                                                                         1/12
PSE Refrigeration Dryer (60Hz) - Parker Hannifin
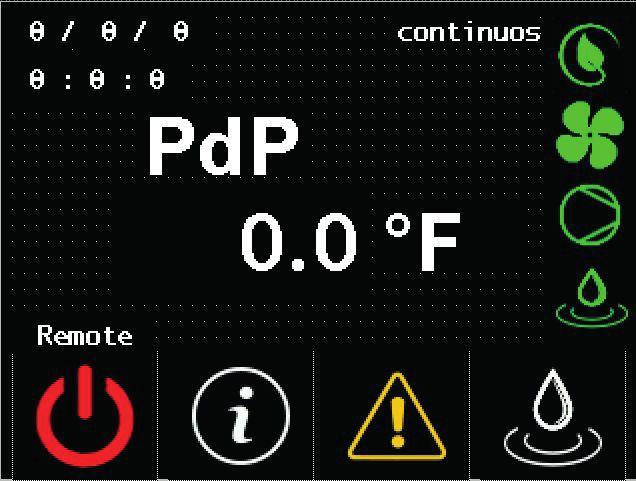
English                                                                                    PSE 325-1000 60Hz                                                                                                                   2/12
2 Introduction                                                                3.2 Operating space
                                                                              Leave a space of 5 ft (1.5 m) around the unit.                                    Select the power supply and insert a
This manual is in reference to Parker PSE325-1000 refrigeration dryers        Leave a space of 6.5ft (2 m) above dryer models with vertical condensa-           bridge as shown below:
designed to remove water vapor from compressed air.                           tion air expulsion.                                                               S7-S6 for 400/3/50
                                                                                                                                                                S8-S6 for 460/3/60
2.1 Transportation                                                            3.3 Condenser Types                                                               Inside the electrical panel there is an
The packed unit must:                                                         Air-cooled version (Ac)                                                           instruction label.
 • remain upright;                                                            Standard condenser type for all PSE models. Note: Do not duct away,
 • be protected against atmospheric agents;                                   create cooling air recirculation situations or obstruct the ventilation grills.   3.6 Condensate drain connection
 • be protected against impacts.                                              Water-cooled version (Wc)
2.2 Handling                                                                  Water-cooled version (Wc) - Optional condenser type only available on             Y    Make a connection to the draining system. Avoid connecting to a
Use a properly suited fork-lift truck for lifting. Avoid any type of impact   PSE1000 and up. Note: It is recommended that a mesh filter be installed           closed circuit shared by other pressurized discharge lines. Ensure proper
when handling the dryer.                                                      on the cooling water inlet (not included with PSE as standard).                   condensate discharge. Dispose of all the condensate in conformity with

2.3 Inspection                                                                Y, Inlet condensation water characteristics:                                      current local environmental regulations.

a) All the units are assembled, wired, charged with refrigerant and oil
  and tested under standard operating conditions in the factory;
                                                                               Temperature        ≥50°F (10°C)        CL-
PSE Refrigeration Dryer (60Hz) - Parker Hannifin
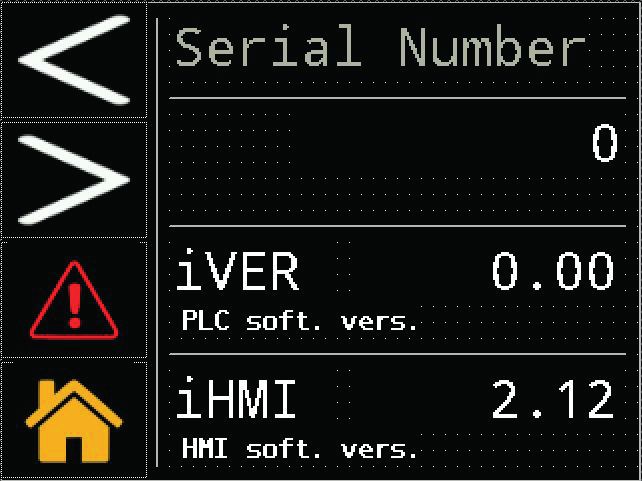
• Always leave the dryer on when the compressor is on and working.               5.2 Symbol                                                                      5.4 Configuration condensate drain
• The dryer operates automatically , therefore constant field adjustment                                                                                         There are three modes of operation:
  to settings is not required. See section 5 for navigating controls.             Symbol         Symbol status                        Function
                                                                                                                                                                  a) CAPACITIVE = Automatic drainign using a capacitive sensor;
• In the event of unforeseen excess air flows or spikes in moisture load,

                                                                                   k
                                                                                                 Lit up                               Compressor ON              b) TIMED = programmable draining times;
  by-pass the dryer to avoid overloading it.
• Avoid inlet air temperature fluctuations.                                                                                                                      c) CONTINUOUS (external) = if there is an external drain.
                                                                                                 Off                                  Compressor OFF
                                                                                                                                                                         set          esc
4.4 Stop                                                                                                                                                         Press    and               together at the same time to enter general
a) Stop the compressor or the air flow through the dryer and wait 2                              Lit up                               Dryer ON
                                                                                                                                                                 menu “PAr” .
  minutes before shutting down the dryer;                                                        Flashing                             Dryer OFF                          set
b) Close the inlet air valve to ensure compressed air does not enter the                                                                                         Press         to enter.
  dryer when disconnected or if an alarm occurs.                                                 Lit up                               Alarm present

                                                                                  !
                                                                                                                                                                 Use the arrows                 or       to find menu “ Cd “
            set                                                                                  Flashing                             Warning present
c) Press              to stop the dryer (for model 325-500).                                                                                                             set
                                                                                                                                                                 Press         to enter.
                                                                                                 Off                                  No alarm present
  Press           to stop the dryer (for model 700-1000).
                                                                                                                                                                 Use the arrows                 or       to find parameter “ d3 “
d) Turn the MAIN SWITCH “           &” to “O OFF” to switch power off.             q
                                                                                                 Lit up
                                                                                                 Off
                                                                                                                                      Condensate drain ON
                                                                                                                                      Condensate drain OFF
                                                                                                                                                                 Press
                                                                                                                                                                         set

                                                                                                                                                                 0 = external;
                                                                                                                                                                              to choose the type of the drain:

Y Wc version, close the water circuit with the dryer stopped.                    5.3 Unit of measurement settings                                                1 = timed;
                                                                                                                                                                 2 = capacitive.
5 Control (PSE325-500)                                                           How to set the temperature unit of measurement.
                                                                                          set            esc                                                             set
                                                                                                                                                                 Press           for five seconds to select the drain.
5.1 Control panel                                                                Press           and           together at the same time to enter general menu
Fig.1                                                                            “PAr” .
                                                                                                                                                                                     Y
                                                                                                                                                                               esc set

                                                                                 Press
                                                                                         set
                                                                                                to find menu “ CF9“ .
                                                                                                                                                                           Y
                                                                                          set                                                                                    PAr

                                                                                                                                                                                          Y
                                                                                 Press           to enter
                                                                                                                                                                           esc            set
                                                                                 Use the arrows                or     to find menu “ A1“.
                                                                                                                                                                         Y

                                                                                                                                                                                                 Y

                                                                                                                                                                                                                         Y
                                    1   2       1   2   3
                                                                                         set
                                                                                 Press          to choose: ON : Fahrenheit / OFF: Celsius.
                                                                                          set                                                                                     CF9                         ........               Cd
                                            I
                                                                                 Press
                                                                                         esc
                                                                                                 to confirm.
                                                                                                                                                                                                     Y                   Y
                              QS        O
                                                                                 Press          to exit.
                                                                                         esc set
                                                                                                Y                                                                                                                        Y     esc
                                                                                                                                                                                                                                      set
                                                                                                                                                                                                                                          Y
                                                                                     Y                                                                                                                                         Y

                                                                                                                                                                                                     Y
                                                                                          PAr                                                                                        d3                        d2                    d1
QS      Main power switch.
                                                                                                                                                                                                     Y                   Y
        UP button: press to increase the value of a selected
                                                                                   Y
                                                                                    esc
                                                                                                    Y
                                                                                                   set                                                                         esc
                                                                                                                                                                                           Y
                                                                                                                                                                                          set

                                                                                                                                                                               Y

                                                                                                                                                                                                                               Y
                                                                                                                                                                                                     Y
        editable parameter.
        DOWN button: press to decrease the value of a selected                            CF9                                                                                        0                               1                    2
        editable parameter.                                                                                                                                                                          Y                         Y
esc
        ESC button : to exit without saving/confirming the values;
                                                                                   Y
                                                                                    esc
                                                                                                    Y
                                                                                                   set
                                                                                                            Y

                     returns to the previous level;                                                                                                              For option (1) timed drain, users can set the ON/OFF time of the drain.
                     PRESSED FOR 5s. ALARM RESET.                                          ---                        A1                                         The following explains how:
set                                                                                                         Y                                                    On menu “ Cd “
        SET button : to exit and saving/confirming the value;
                     go to the next level;
                                                                                                                    esc

                                                                                                                    Y
                                                                                                                                 Y
                                                                                                                                set
                                                                                                                                                                 Use the arrows         or               to find parameter “d1” and set the open-
                                                                                                                                         Y

                     enter on Set Menu;                                                                                                                          ing time of the drain.
                     PRESSED FOR 5s. START DRYER.                                                                         OFF                         On                 set
                                                                                                                                          Y
                                                                                                                                                                 Press           to confirm.
esc         set
      and         .        : press together at the same time to enter into the                                                                                   Use the arrows         or               to find parameter “ d2 ” and set the clos-
                           parameter settings of the dryer.                                                                                                      ing time of the drain.

  English                                                                                                PSE 325-1000 60Hz                                                                                                                    3/12
PSE Refrigeration Dryer (60Hz) - Parker Hannifin
English                                                                                     PSE 325-1000 60Hz                                                                                                          4/12
        set                                                              5.6 Remote ON/OFF                                                       5.7 CYCLING function
Press          to confirm.
                                                                                 set          esc                                                        set         esc
        esc                                                              Press    and               together at the same time to enter general   Press    and               together at the same time to enter general
Press         to exit.
                                                                         menu “PAr” .                                                            menu “PAr” .
5.5 Viewing probe values                                                                                                                                 set
                                                                                 set                                                             Press         to enter on menu .
The dryer displays the dewpoint temperature by default.                  Press         to enter on menu “ CF9“
To view other temperatures:                                                                                                                      Use the arrows             or         to find parameter “ C4C“.
                                                                         Use the arrows             or         to find parameter “ A7 “.                 set
        set
Press          to enter the menu of direct parameters.                           set                                                             Press         to enter on menu .
                                                                         Press         to enter.
Use the arrows            or   to find parameter “ Ai“                                                                                           Use the arrows             or         to find parameter “ C7 “
                                                                         Use the arrows             or         to choose:                                set
        set
Press         to enter.                                                  ON : remote ON;                                                         Press      to choose:
                                                                         OFF: remote OFF.                                                        ON : non-cycling (continuous);
Use the arrows      or     chosse the sensor.                                    set                                                             OFF: cycling (energy saving).
b0 = dew point temperature sensor;                                       Press         to confirm.                                                       set
b2 = evaporation temperature sensor;                                             esc                                                             Press         to confirm.
b8 = condensation temperature sensor;                                    Press         to exit.                                                          esc
                                                                                                    esc set                                      Press         to exit.
Pi = High pressure sensor
                                                                                                          Y
                                                                                                  Y                                                                         esc set

                                                                                                                                                                          Y Y
Once chosen wait a few seconds and the value will probe value will ap-
pear.
        esc                                                                                             PAr

                                                                                                          Y
Press         to exit.                                                                                                                                                          PAr
                                   Y                                                              esc         set

                                                                                                                                                                                  Y
                                  set

                                                                                              Y                                                                           esc         set
                                              Y

                                                                                                                                                                      Y

                                                                                                                                                                                            Y
                                HiSt                     Al                                             CF9
                                              Y

                                                                                                              Y
                                                                                                              set
                                                                                                                                                                                CF9                   C4C
                                                                                                  esc

                                                                                                                                                                                                           Y
                                                                                              Y                                                                                             Y

                                                                                                                    Y
                                                                                                                                                                                                esc        set
                                              Y   esc
                                                               Y
                                                              set
                                                                                                        C_F                   A7                                                                Y
                                                  Y
                          Y

                                                                                                                                   Y
                                                                                                                Y
                                                                                                                                                                                                      C7
                                                                                                                Y       esc        set

                                                                                                                                                                                                           Y
               ....               b8                     b2
                                              Y                                                                        Y                                                                Y       esc        set

                                         Y
                                        set               set
                                                              Y                                    OFF                        0n                                                                Y
                                                                                                                    Y                                                      OFF                        On
                                  0.0                4.0                                                                                                                                    Y
PSE Refrigeration Dryer (60Hz) - Parker Hannifin
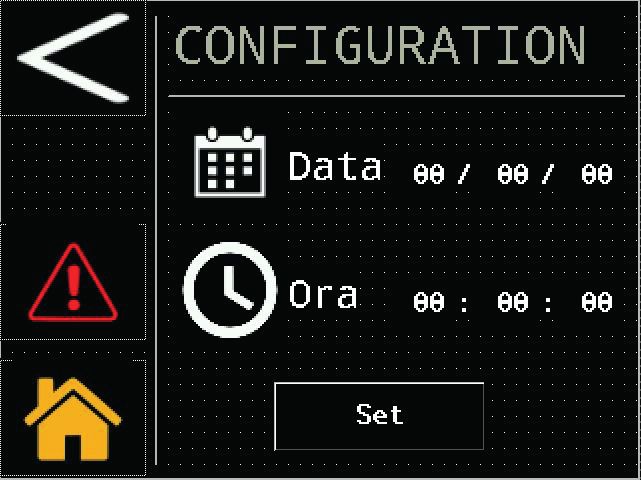
5.8 Alarm management                                                  5.9 Alarm history                                                5.10 Setting clock/date.
In an alarm/warning situation, follow the procedure below:            To see current or previous alarms, follow the procedure below:
        set                                                                   set                                                      1. Press “         ”“        ”, together at the same time to enter menu
Press         to enter menu of direct parameters.                     Press         to enter menu “ HiSt “ .
                                                                              set
                                                                                                                                         “FrEE”.
Use the arrows          or       to find parameter “ AL “ .           Press         to enter parameters :                                           set
        set
                                                                                                                                       2. Press “         ” to enter menu “Ai”.
Press         to see alarm code:                                       Menu         Code                         Description

                         Y
                                                                                                                                       3. Press “         ” to enter menu “CL”.
                        set                                                         HiSF     General alarm number                                   set
                                                                                                                                       4. Press “         ” to enter and view parameter “HOUr”.

                                   Y
                                                                                    HiSP     Alarm position                                         set
                                                                                                                                       5. Press “     ” until the screen flashes “HOUr”.
                      HiSt                     AL                                   HySC     Alarm code
                                    Y                                  HiSt
                                                                                    HySd
                                                                                             Alarm date
                                                                                                                                       6. Select the flashing parameter “HOUr”/“dAtE”/“4EAr” using the
                                                                                                                                                                          set
                                                                                             (if clock option is present)                button “         ” and press “         ” to enter.

                                 Y       esc
                                                 set
                                                    Y                               HySt
                                                                                             Alarm hour                                7. Change the flashing value using “                   ”and “   ” (up and down)

                                        Y                                                    (if clock option is present)                                 set
                                                                                                                                         and press “            ” to confirm.

                                                                                             Y
                                                                                                                                                    esc
                         .....                 Hd                                           set                                        8. Press “         ” to return to the menu “FrEE”.
                                    Y                                                                                                  9. Press “         ”“       ” together at the same time to exit.

Alarm list                                                                                 HiSt
                                                                                                                                       Fig.3
                                                                                                                                                                       Y

                                                                                                                                                                                Y
 Cod.     Description                                         Reset
                                                                                                                                                                  Y

                                                                                                                                                                                                       Y
                                                                                                                                                                                     Y
                                                                                                   Y
 Ld       Low dew point                                         M                                 set
                                                                                      esc                                                                                             set

                                                                                     Y
 Lt       Low evaporation temperature                           M

                                                                                                        Y
 Ht2      High discharge temperature                            M                                                                                         dr4             FrEE                Ai                 CL
                                                                                           HiSF                   HiSP                                              Y
                                                                                                        Y
 HP       High pressure                                         M                                                                                                                                          set

                                                                                                                                                                                                       Y
 LP       Low Pressure                                          M       HiSt

                                                                                                              Y
                                                                                                                        Y                                       Y                                           HOUr

                                                                                                                                                Y
 PI       Compressor Thermal protection                         M
                                                                                                                                                                                                           set
                                                                                                                                                                                                                  5 sec.

                                                                                                                                                                                                       Y
 PH       Inverted phases                                       M                                                 HiSC
                                                                                           HiSd                                                       FrEE
Warning list

                                                                                                                                                                                    Y

                                                                                                                                                                                                       Y
 Cod.         Description                                     Reset                                                                                  esc

                                                                                                                                                    Y
 FB0          B0 sensor warning                                 A                                                                                                         4EAr                dAtE          HOUr
                                                                                                                                                                         set                set            set
 FB2          B2 sensor warning                                 A

                                                                                                                                                                                                       Y
                                                                                                                                                                                        Y
                                                                                                                                                                       Y
                                                                                                                                                      18.20
 FB8          B8 sensor warning                                 A
 FB5          B5 sensor warning                                 A                                                                                                         2015              01.09           17.15
 FPI          PI sensor warning                                 A
 DrE          Condensate drain warning                          A                                                                                         set

                                                                                                                                                      Y
 Hd           High dew point warning                            A
 Ht1
 HB5
              High discharge temperature
              High evaporator temperature
                                                                A
                                                                A
                                                                                                                                       !     If the controller is left without power for more than three days,
                                                                                                                                       the time and date will be reset. The time and date will have to be
                                                                                                                                       reset during next start-up.

  English                                                                                   PSE 325-1000 60Hz                                                                                                          5/12
PSE Refrigeration Dryer (60Hz) - Parker Hannifin
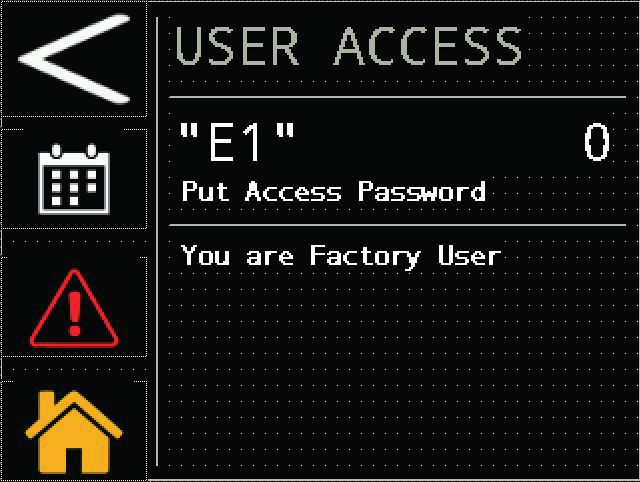
English                                                                       PSE 325-1000 60Hz                                                                                                  6/12
6 Control (PSE700-1000) Touch                                      6.3 Information menu                                                    6.3.1 Setting parameter date/time
                                                                   Touch   on home screen to enter information menu                        Touch      to enter
6.1 Control panel “Touch”
Fig.1                                                                                                                                       on menu User/service

                        3.0
                                                                                                                                           Touch      to enter on menu data/time
                                                                      Symbol     Function

6.2 Symbol                                                                       Touch to enter “service / Factory” menus (password
                                                                                 protected).
 Symbol Status symbol   Function                                                 access is allowed only to Parker qualified or certified
                                                                                 personnel.                                                                                        Set data
         -              Dew point temperature
  3.0                                                                            Touch to enter “parameter settings” menu: LB1,
                                                                                 HB1; C ° or F °; local or remote; Drain on / off times;
         Green          Dryer ON                                                 working hours.                                                                                    set time
         Red            Dryer OFF
         Red            Alarm present                                            Touch to see all available alarm / warning signals.
                                                                                                                                                                                   touch set to confirm
         Yellow         Warning present
         Absent         No alarm/warning present                                 Touch to return to home screen

         Local ON       Touch ON/OFF command
                                                                                 Touch to see probe data : B0, B2, B5, B8, P1,
                        Remote control with clean contact on
         rOFF
                        the terminal board
                                                                                 Touch to see digital input
         -              Touch to enter on information menu
                                                                                 Touch to see digital output

         -              Touch to manually activate the drain                     Touch to get dryer information: serial number, soft-
                                                                                 ware version of the PLC / HMI
                        Present when dryer is ON, compressor
         Present
                        is OFF and no alarm is present (cycling)

         Present        Present when fan is ON

         Present        Present when compressor is ON

         Present        Present when drain is ON
PSE Refrigeration Dryer (60Hz) - Parker Hannifin
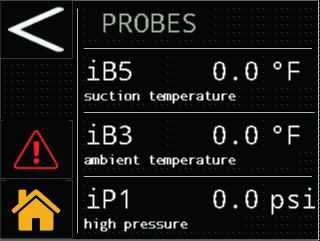
6.3.2 Setting parameter menu                                          Probes                                                                    Configuration

Touch    to eneter on menu 1                                          Touch             to enter                                                Touch              to enter

                                                                      these parameters are available for reading / writing, it is possible to
                                                                      change: the high dew point warning threshold and the delay                touch       to go ahead
                                                                      To modify the parameter, touch the value, as shown in the figure.
    Symbol      Function

                Touch to go back

                Touch to move forward to next screen

                Touch to view thresholds of analogue output of
                dew point “A6 / A8”,
                Touch to configure: unit of measure; local / remote
                start and alarm signaling,

                                                                      The keyboard used to dial the new desired value appears                   these parameters are all adjustable: unit of measure (°C or °F); local or
                Touch to configure drain                                                                                                        remote start; alarm warning and restoring the default parameters.
                Touch to see working hours and time of next                                                                                     Y   To manage REMOTE OFF mode, remove the bridge between
                scheduled maintenance.                                                                                                          terminals: 87-92 and connect the remote start/stop switch (to be
                                                                                                                                                provided for by the customer).
                Touch to configure dryer                                                                                                        To modify parameter, touch the value, as shown in the figure.

                Touch to reset alarm.

                                                                                                                                                Choose your options.
                                                                                                                                                 (eg “°C or °F”, or “Local on or rOFF”)

 English                                                                               PSE 325-1000 60Hz                                                                                                        7/12
PSE Refrigeration Dryer (60Hz) - Parker Hannifin
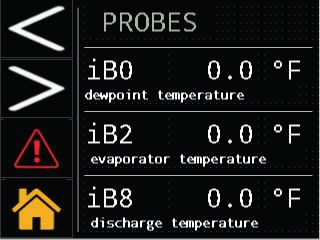
English                                                                                        PSE 325-1000 60Hz                                                                                               8/12
                                                                               Maintenance
Touch the box on the right and insert the flag         to change and con-
firm.
                                                                               Touch              to enter

                                          C

                                                                                                                                                   Touch       to see alarm page
To return to the default parameters, touch as indicated in the figure
                                                                               these data are read-only.
                                                                               Operating “cycling”

                                                                               Touch           to enter
                                                                               you can choose continuous or cycling mode by touching as shown in
                                                                               the figure

The parameters are reset automatically.                                                                                                            A description of the alarm appears only when an alarm is present.
Drain
                                                                                                                                                   Touch       to see warnings page

Touch              to enter

                                                                               Touch the box on the right and insert the flag   to change and
                                                                               confirm.
                                                                               6.3.3 Alarm menu

                                                                               Touch             to enter alarm menu.
                                                                               To see alarms/warnings or to do the reset.

                                                                                                                                                   A description of the warning appears only when a warning is present..
Touch as indicated to choose the type of the drain:                                                                                                Touch         to reset the alarm. Remember that the alarm reset can be
0 = external;                                                                                                                                      done only if the nominal operating conditions have been restored.
1 = timed;
2 = capacitive.
in the case of the choice of the timed discharger (1) it is also possible to
choose the closing and opening times “D1 / D2”.
6.3.4 Probe menu                               6.3.5 Digital input menu                                                 6.3.6 Digital output menu

Touch               to enter menu              Touch               to enter menu                                        Touch                to enter on menu

Touch      to go ahead

                                               Local ON/OF: green when remote start contact is closed, otherwise it     General alarm:green when general alarm contact is closed, otherwise
                                               is gray.                                                                 it is gray.
                                               Condensate level: green when there is condensation to drain, otherwise   Compressor: green when compressor start contact is closed, otherwise
real-time probe values are displayed:          it is gray.                                                              it is gray.
iB0       : Dew point temperature              Monitoring phase: green when phase sequence is correct, otherwise        Condensate drain: green when condensate drain contact is closed,
iB2       : Evaporator temperature             it is gray:                                                              otherwise it is gray.
iB8       : Discharge compressor temperature   Compressor protection: green when compressor protection is in the        Plan Status: green when dryer on contact is closed, otherwise it is gray.
iB5       : Suction compressor temperature     normal operating position, otherwise it is gray.                         Hot gas bypass valve: green when bypass valve contact is closed
iB3       : Ambient temperature                High Pressure switch: green when pressure switch protection is in the    (valve open), otherwise it is gray.
iP1       : High pressure (condenser)          normal operating position, otherwise it is gray.
                                               Low Pressure switch: green when pressure switch protection is in the
                                               normal operating position, otherwise it is gray.

  English                                                      PSE 325-1000 60Hz                                                                                                        9/12
English                                                                                    PSE 325-1000 60Hz                                   10/12
6.3.7 Serial number menu
                                                                           Touch the box on the right and insert the flag   to change and con-
Touch the button                   to enter on menu                        firm.
                                                                           View the probes

                                                                           Touch

                                                                           Touch
                                                                           Switch to cycling mode

                                                                           Touch

                                                                           Touch

                                                                           Touch

iVER: control version.                                                     Touch the box on the right and insert the flag   to change and con-
iHMI: touch version                                                        firm.
these data are read-only.
                                                                           Change the drain
6.4 Rapid menu
Reach the menu in short steps:                                             Touch
Change Data/time
                                                                           Touch
Touch
                                                                           Touch
Touch                                                                      Touch “0/1/2” to make the change.
                                                                           View serial number
Touch
Change of measurement unit from °C to °F                                   Touch

Touch                                                                      Touch
                                                                           Alarm reset
Touch
                                                                           Restore the nominal conditions.

Touch                                                                      Touch
                                                                           Touch “Reset”
Touch the box on the right and insert the flag        to change and con-
                                                                           Alarm history
firm.
Change Localon/rOFF
                                                                           Touch
Touch
                                                                           Touch
Touch
                                                                           Touch

Touch
7 Maintenance                                                              7.3 Preventive Maintenance Programme
                                                                           To maximize the machines efficiency, reliability and longevity follow the
                                                                                                                                                                             7.4 Dismantling
                                                                                                                                                                             The refrigerant and the lubricating oil contained in the circuit must be
a) The machine is designed and built to guarantee continuous opera-        preventative maintenance guide below:                                                             recovered in conformity with current local environmental regulations.
  tion; however, the life of its components depends on the mainte-                                                                                                           The refrigerant fluid is recovered before final scrapping of the equipment
  nance performed.                                                                     Maintenance                          Maintenance Interval
                                                                                                                                                                             ((EU) No. 517/2014 art.8).
b) When requesting assistance or spare parts,identify the machine’s                 Activity Description                 (standard operating condi-
  model number and serial number (located on the unit’s serial label)
  and provide to Parker or an authorized Parker distributor.
                                                                                                                                   tions)
                                                                                                                                                                                           %                   Recycling Disposal    Z
                                                                                           Activity

                                                                                                                                                     12 Months

                                                                                                                                                                 36 Months
c) Circuits containing 5t < xx < 50t of CO2 should be checked annu-                                                                                                          structural work                   steel/epoxy-polyester resins

                                                                                                                                          4 Months
                                                                                                                                 Weekly
  ally to identify any potential leaks.                                                                                                                                      exchanger                         aluminium

                                                                                                                         Daily
  Per European Regulation EU No. 517/2014 art. 4.3.a, 4.3.b) - Circuits                                                                                                      pipes/headers                     copper/aluminium/carbon steel
  containing 50t < xx < 50t of CO2 should be checked for leaks every        Check         Service                                                                            drain                             polyamide
  6 months.
                                                                           Check POWER ON indicator is lit.                                                                  exchanger insulation              EPS (sintered polystyrene)
d) Per European Regulation EU No. 517/2014 art. 6 - Machines con-
  taining 5t CO2 or more, the operator must keep a written record of                                                                                                         pipe insulation                   synthetic rubber
  the quantity and type of refrigerant used, added or recovered during     Check control panel indicators.                                                                   compressor                        steel/copper/aluminium/oil
  maintenance/repair and final disposal.                                                                                                                                     condenser                         copper/aluminium
7.1 General instructions                                                                                                                                                     refrigerant                       R513A
                                                                           Check condensate drain.
                                                                                                                                                                             valves                            brass
!    Before any maintenance, make sure:                                                                                                                                      electrical cables                 copper/PVC
• the pneumatic circuit is no longer pressurized;                          Clean condenser fins.
• the dryer is disconnected from the main power supply

Y In the event of refrigerant leakage, contact qualified and authorized    Verify that the crankcase heater is
                                                                           correctly positioned
personnel.

Y The Schrader valve must only be used in case of machine malfunc-         Check electrical absorption.
tion: otherwise any damage caused by incorrect refrigerant charging will
not be covered by the warranty.
                                                                           Check refrigerant leaks.
7.2 Refrigerant.
Charging: any damage caused by incorrect refrigerant replacement car-
ried out by unauthorized personnel will not be covered by the warranty.    Depressurize the dryer. Complete
                                                                           drain maintenance.
Z                                                                          Depressurize the dryer. Replace pre-

Y    The equipment contains fluorinated greenhouse gases.
                                                                           and post-filter elements.
                                                                           Check       temperature     sensors.
At normal temperature and pressure, the R513A refrigerant is a colorless
                                                                           Replace if necessary.
gas classified in SAFETY GROUP A1 - EN378 (group 2 fluid according to
Directive PED 2014/68/EU)
GWP (Global Warming Potential) = 573.

!    In the event of a refrigerant leakage, ventilate the room.
                                                                           Dryer maintenance kit.

                                                                           The following are available (see par. 9.4):
                                                                            a) 3 years preventive maintenance kits;
                                                                            b) service kit for
                                                                            • compressor;
                                                                            • fan;
                                                                            • hot gas valve;
                                                                            • water condenser;
                                                                            c) individual spare parts.

  English                                                                                    PSE 325-1000 60Hz                                                                                                                               11/12
English                                                                                               PSE 325-1000 60Hz                                                                                                                                12/12
8 Troubleshooting

                                                                                FAULT                                CAUSE                                REMEDY

                                                                         Lt Low evaporation              Low                         High dew point
       Compressor                  High current ab-                      temperature alarm                                                                                                                                                HP
                                                                                                    pressure alarm             refrigeration compressor                     Thermostat tripped
         noisy                         sorption                         Low dew point alarm.                                                                                                                                    Pressure switch tripped
                                                                                                                                       operating?

                                                                                                                             Replace
No Failed compressor                                                                                                 Yes
                             Condenser dirty or Yes         Clean                              Low pressure                  pressure                                                              Yes       Decrease         Yes    High cooling air
      components                                                                                                                                                           Cooling air high tem-
                                obstructed                condenser                             switch fault                  switch                                                                      cooling air tem-
                                                                                                                                                                                 perature                                            temp (ambient)
                                                                                                                                Z                                                                            perature

        Yes
                                                                                                                                                                                      No                                                      No
                                       No
                                                                  Yes                                   No
                                                                              Low
                                                     Increase
                                                                             cooling                                                                                                               Yes    Decrease com-       Yes Excessive thermal
                                                    cooling air                                                                                     Excessive thermal load
                                                                               air                                                                                                                        pressed air flow/       load (inlet air flow,
                                                   temperature                                                                                    (air flow, inlet temperature)
                                                                           temperature                                                                                                                      temperature              temperature)

                                                                                   No                                                No                                                    No                                                 No

                                                   Replace                                                                                                  Replace                Condenser
                                                                                 Fan                                                                                                               Yes        Clean           Yes Condenser dirty or
                                                  pressure        Yes                                                       pressure trans-      Yes        pressure               dirty or ob-
                                                                               always                                                                                                                       condenser
                                                 transmitter                                                                 mitter not set               transmitter               structed                                         obstructed
                                                                              working
                                                    Z                     (pressure trans-                                                                    Z
                                                                            mitter fault)
                                                                                                                                                                                                                                              No
                                                                                                                                     No                                                    No
                                                                                                 Liquid line
                                                                                    No         solenoid valve
                                                                                                   closed                                                                                                 Replace pres-                 Fan does
                                                                                                                                                               No                                                             Yes
        Repair or                                                   Yes        Hot gas                                                           Yes      refrigerant        Yes                         sure transmitter           not turn (pressure
                       Yes     Compressor                                                                                     Low current                                          Low current
         replace               winding with
                                                                                 valve
                                                                                                 Yes                          absorption                   recharge                absorption                  Z                    transmitter fault)
       compressor                                                           not calibrated
                               partial loss of                                                                                                                Z
              Z                 insulation
                                                                                             Replace                                                                                                                                          No
                                                        Calibrate
                                                                                             the coil                                No                                                    No
                                                         valve
                                                           Z                       No          Z                No                                                                                        Replace fan         Yes
                                                                                                                                                                                                                                        Fan fault
                                 No                                                                                                                                                                            Z
                                                                                                                           Consult a certified                                                                                                No
                                                                                                                              technician
Índice                                                         1 Seguridad                                                                 plimiento de las instrucciones dadas en este manual o inobservancia de
                                                                                                                                                                                        las normativas vigentes sobre la seguridad de la instalación.
1 Seguridad                                                                                             1                                                                               El fabricante no asume ninguna responsabilidad por daños debidos a
 1.1 Importancia del manual .................................................................1              1.1 Importancia del manual
                                                                                                                                                                                        alteraciones y/o modificaciones del embalaje.
 1.2 Señales de advertencia ..................................................................1             • Consérvelo durante toda la vida útil del equipo.                          El usuario es responsable que las especificaciones suministradas para
 1.3 Instrucciones de seguridad............................................................1                • Léalo antes de realizar cualquier operación.                              seleccionar la unidad o sus componentes y/o opciones sean exhausti-
 1.4 Riesgos residuales: .......................................................................1           • Puede sufrir modificaciones: para una información actualizada, con-       vas para un uso correcto o razonablemente previsible de la misma uni-
2 Introducción                                                                                          2     sulte la versión instalada en el equipo.                                  dad o de los componentes.
 2.1 Transporte ......................................................................................2
                                                                                                            1.2 Señales de advertencia
 2.2 Traslado..........................................................................................2                                                                                ! ATENCIÓN: El fabricante se reserva el derecho de modificar sin
 2.3 Inspección ......................................................................................2
 2.4 Almacenaje.....................................................................................2        !       Instrucción para evitar peligros personales                        previo aviso la información de este manual. Para que la información
                                                                                                                                                                                        resulte completa, se recomienda al usuario consultar el manual a
3 Instalación
 3.1 Modalidades ..................................................................................2
                                                                                                        2
                                                                                                             Y       Instrucción para evitar que se dañe el equipo                      pie de máquina.
                                                                                                                                                                                        1.4 Riesgos residuales:
 3.2 Espacio operativo ..........................................................................2
 3.3 Tipos de condensador ..................................................................2
                                                                                                             Z       Se requiere la intervención de un técnico experto y autorizado
                                                                                                                                                                                        Las operaciones de instalación, puesta en marcha, apagado y manteni-
 3.4 Entorno de instalación ..................................................................2                      El significado de los símbolos utilizados se indica en el apar-    miento del equipo deben realizarse de total conformidad con lo indicado
 3.5 Conexionado eléctrico ...................................................................2              ,       tado 8.                                                            en la documentación técnica del equipo y de manera tal que no se ge-
 3.6 Conexión del drenaje de condensados .........................................2                                                                                                     nere ninguna situación de riesgo. Los riesgos que no han podido elimi-
4 Puesta en Marcha                                                                                      2                                                                               narse con recursos técnicos de diseño se indican en la tabla siguiente
                                                                                                            1.3 Instrucciones de seguridad
 4.1 Comprobaciones previas ...............................................................2
 4.2 Arranque ........................................................................................2
 4.3 Funcionamiento .............................................................................3
                                                                                                            !    Antes de realizar cualquier operación de mantenimiento, desco-
                                                                                                                                                                                         parte
                                                                                                                                                                                         equipo
                                                                                                                                                                                                       del      riesgo
                                                                                                                                                                                                               residual
                                                                                                                                                                                                                                     modo                    precauciones

                                                                                                            necte siempre la máquina de la red eléctrica. Utilícelo siempre durante
 4.4 Parada ............................................................................................3                                                                               batería de           pequeñas        contacto                  evitar el contacto, usar
                                                                                                            el mantenimiento.
5 Control (PSE325-500)                                                                                  3                                                                               intercambio          heridas                                   guantes de protección
 5.1 Panel de control .............................................................................3
 5.2 Símbolo ..........................................................................................3
                                                                                                            !     Este manual de usuario está destinado a ayudar tanto al usuario       térmico              cortantes
                                                                                                            final como al técnico de servicio. Las operaciones que requieren la aper-
 5.3 Ajuste de parámetros .....................................................................3                                                                                        rejilla del          lesiones        introducción de           no introducir ni apoyar
                                                                                                            tura con herramientas deben ser efectuadas por personal experto y ca-       ventilador y                         objetos puntiagudos ningún objeto en la rejilla
 5.4 Configuración de la descarga de condensado ..............................3                             lificado.                                                                   ventilador                           en la rejilla mientras el de los ventiladores
 5.5 Visualización de las sondas de temperatura .................................4
 5.6 Encendido/apagado remoto ..........................................................4                   Y   No supere los límites de proyecto que se indican en la placa de
                                                                                                                                                                                                                             ventilador está funcio-
                                                                                                                                                                                                                             nando
 5.7 Función de CICLOS .......................................................................4             características.
 5.8 Gestión de alarmas ........................................................................5                                                                                       interior del         quemaduras contacto                       evitar el contacto, usar
 5.9 Historial de alarmas .......................................................................5          ! Y El usuario debe evitar cargas distintas de la presión estática in-      equipo:                                                        guantes de protección
 5.10 Ajuste del reloj/calendario. ...........................................................5             terna. En caso de riesgo de fenómenos sísmicos, es necesario proteger       compresor y
                                                                                                            adecuadamente la unidad.                                                    tubo de salida
6 Control (PSE700-1000) táctil                                                                          6
 6.1 Panel de control “táctil” .................................................................6
 6.2 Símbolo ..........................................................................................6
                                                                                                            !    Los dispositivos de seguridad en el circuito de aire comprimido es-    interior del
                                                                                                                                                                                        equipo: partes
                                                                                                                                                                                                             intoxicación,
                                                                                                                                                                                                             electro-
                                                                                                                                                                                                                             defecto de aislamiento
                                                                                                                                                                                                                             de los cables de ali-
                                                                                                                                                                                                                                                       protección eléctrica
                                                                                                                                                                                                                                                       adecuada de la línea de
                                                                                                            tán a cargo del usuario.
 6.3 Menú de información .....................................................................6                                                                                         metálicas y ca-      cución,         mentación que llegan      alimentación; conectar
                                                                                                            Los dispositivos de seguridad del circuito del aire comprimido se dimen-    bles eléctricos      quemaduras      al cuadro eléctrico del   cuidadosamente a tierra
 6.3.1 Menú Fecha/Tiempo ..................................................................6
                                                                                                            sionan teniendo en cuenta las características técnicas del sistema y las                         graves          equipo; partes metáli-    las partes metálicas
 6.3.2 Menú de configuración de parámetros .......................................7
                                                                                                            normas locales en vigor.                                                                                         cas en tensión
 6.3.3 Menú de alarmas ........................................................................8
                                                                                                            La unidad debe utilizarse exclusivamente para uso profesional y con el
 6.3.4 Menú de sondas .........................................................................9                                                                                        exterior del         intoxicación, incendio por cortocir-      sección de los cables y
                                                                                                            objeto para el cual ha sido diseñada.
 6.3.5 Menú de entrada digital ..............................................................9                                                                                          equipo: zona         quemaduras cuito o sobrecalen-            sistema de protección de
                                                                                                            El usuario debe analizar todos los aspectos de la aplicación en que el
 6.3.6 Menú de salida digital .................................................................9                                                                                        circundante          graves        tamiento de la línea        la línea de alimentación
                                                                                                            producto se ha instalado, seguir todas las normas industriales de seguri-
 6.3.7 Menú del número de serie ........................................................10                                                                                                                                 de alimentación del         eléctrica conformes a las
                                                                                                            dad aplicables y todas las prescripciones relativas al producto descritas                                      cuadro eléctrico del        normas vigentes
 6.4 Menú rápido .................................................................................10
                                                                                                            en el manual de uso y en la documentación redactada que se adjunta                                             equipo
7 Mantenimiento                                                                                       11
                                                                                                            a la unidad.
 7.1 Advertencias generales ................................................................11
                                                                                                            La alteración o sustitución de cualquier componente por parte del per-
 7.2 Refrigerante..................................................................................11
                                                                                                            sonal no autorizado, así como el uso inadecuado de la unidad eximen
 7.3 Programa de mantenimiento preventivo ......................................11
                                                                                                            de toda responsabilidad al fabricante y provocan la anulación de la ga-
 7.4 Desguace .....................................................................................11
                                                                                                            rantía.
8 Solución de problemas                                                                               12
                                                                                                            El fabricante declina toda responsabilidad presente o futura por daños
9 Apéndice                                                                                                  personales o materiales derivados de negligencia del personal, incum-

   Español                                                                                                                   PSE 325-1000 60Hz                                                                                                                           1/12
Español                                                                                      PSE 325-1000 60Hz                                                                                                                2/12
2 Introducción                                                               Y Conecte correctamente el secador a las conexiones de entrada /             3.5 Conexionado eléctrico
                                                                             salida de aire comprimido utilizando una tubería o manguera que cumpla       Utilice un cable homologado con arreglo a las reglamentaciones locales
Este manual hace referencia a los secadores de refrigeración Parker PSE                                                                                   (para la sección mínima del cable, vea el apartado 9.3).
                                                                             con los requisitos de temperatura y presión de la salida del compresor
325-1000 diseñados para eliminar el vapor de agua del aire comprimido.                                                                                    Instale un interruptor magnetotérmico diferencial aguas arriba del equipo
                                                                             de aire.
2.1 Transporte                                                                                                                                            (RCCB - IDn = 0,3 A) con distancia 3 mm entre los contactos cuando el
                                                                             3.2 Espacio operativo                                                        interruptor está abierto (consulte las disposiciones locales al respecto).
El equipo embalado debe mantenerse:
                                                                                                                                                          La corriente nominal “In” de dicho magnetotérmico debe ser igual a FLA
 • en posición vertical;
 • protegido de los agentes atmosféricos;
                                                                             Y     Deje un espacio libre de 1.5 m todo alrededor del equipo.              y la curva di intervención de tipo D.
                                                                             En los modelos con expulsión vertical del aire de condensación, deje 2       Seleccione la fuente de alimentación
 • protegido de golpes.
                                                                             m libres sobre el secador.                                                   e inserte un puente como se muestra
2.2 Traslado                                                                                                                                              a continuación:
                                                                             3.3 Tipos de condensador                                                     S7-S6 por 400/3/50
Utilice una carretilla elevadora con horquillas, adecuada para el peso del
                                                                             Versión refrigerada por aire (Ac)                                            S8-S6 por 460/3/60
equipo, y evite todo tipo de golpes.
                                                                             Tipo de condensador estándar para todos los modelos PSE. Nota: No            Dentro del cuadro eléctrico hay una
2.3 Inspección                                                               conduzca, cree situaciones de recirculación de aire de refrigeración ni      etiqueta de instrucciones.
a) Los equipos salen de fábrica ensamblados, cableados, cargados con         obstruya las rejillas de ventilación.
refrigerante y aceite, y probados en las condiciones de trabajo nomina-      Versión refrigerada por agua (Wc)
les.                                                                         Versión refrigerada por agua (Wc): Nota: Se recomienda instalar un filtro    3.6 Conexión del drenaje de condensados
b) Controle el equipo a su llegada y notifique inmediatamente al trans-      de malla en la entrada de agua de refrigeración (no se incluye con PSE
portista si nota algún inconveniente.                                        como estándar)
                                                                                                                                                          Y     Para conectar el equipo al sistema de drenaje, evite la conexión en
c) Para evitar manipulaciones innecesarias de la secadora, desembale
el equipo lo más cerca posible del lugar de instalación.                     Y, Características del agua de condensación utilizada:                       circuito cerrado en común con otras líneas de descarga presurizadas.
                                                                                                                                                          Compruebe que los condensados fluyan correctamente. Deseche los
2.4 Almacenaje                                                                Temperatura         ≥50°F (10°C)       CL-
trada. Deje que la secadora alcance la presión de la línea antes de abrir
completamente la válvula de entrada.                                         5 Control (PSE325-500)                                                                       Pulse
                                                                                                                                                                                   set
                                                                                                                                                                                            para acceder al menú “CF9”.
e) Una vez que el secador esté a presión de línea y la válvula de entrada    5.1 Panel de control                                                                                  set
                                                                                                                                                                          Pulse             para elegir:
esté completamente abierta, abra lentamente la válvula de salida de aire;    Fig.1
el secador ahora se está secando.                                                                                                                                         Utilice las flechas              o         para encontrar el menú“ A1”.
Monitor de fase                                                                                                                                                                    set
Si aparece una alarma en la pantalla durante el arranque del secador,                                                                                                     Pulse             para elegir: ON: Fahrenheit; / OFF: Celsius.
                                                                                                                                                                                   set
el usuario deberá revisar el cableado de los terminales de entrada del                                                                                                    Pulse             para confirmar.
interruptor de desconexión del secador.                                                                                                                                            esc
                                                                                                                    1   2         1   2   3
                                                                                                                                                                          Pulse           para salir.
4.3 Funcionamiento
• Deje siempre la secadora encendida cuando el compresor esté en-                                                                                                                     Y
                                                                                                                                                                                  esc set

  cendido y funcionando.
• El secador funciona en modo automático, por lo que no es necesario                                         QS         O
                                                                                                                              I

                                                                                                                                                                             Y
                                                                                                                                                                                   PAr
  realizar ajustes de campo constantes. Consulte la sección 5 para co-
  nocer los controles de navegación.
• En caso de producirse flujos de aire excesivos e inesperados, haga         QS      Interruptor               de                         alimentación       principal.     Y
                                                                                                                                                                             esc
                                                                                                                                                                                             Y
                                                                                                                                                                                            set

  una derivación para no sobrecargar el secador.
                                                                                         Botón ARRIBA: púlselo para incrementar el valor de un parámetro                           CF9
• Evite las fluctuaciones de temperatura en el aire de entrada.
4.4 Parada
                                                                                         editable seleccionado.

                                                                                                                                                                            Y
                                                                                                                                                                             esc
                                                                                                                                                                                             Y
                                                                                                                                                                                            set

                                                                                                                                                                                                  Y
a) Detenga el secador 2 minutos después de que se detenga el compre-                     Botón ABAJO: púlselo para reducir el valor de un parámetro edi-
sor de aire o, en todo caso, después de la interrupción del flujo de aire;               table seleccionado.                                                                        ---                        A1
b) asegúrese de que el aire comprimido no entra en el secador cuando         esc                                                                                                                  Y
este se encuentre desconectado o si ocurre una alarma.
                                                                                         Botón ESC: para       salir        sin       guardar;                                                          esc

                                                                                                                                                                                                        Y
                                                                                                                                                                                                                      Y
                                                                                                                                                                                                                     set

                                                                                                                                                                                                                            Y
                                                                                                    volver      al         nivel      anterior;
           set
c) Pulse         para detener el secador (modelo 325-500).                                          PULSADO DURANTE 5 s. RESTABLECER ALARMA.                                                                                          On
                                                                                                                                                                                                               OFF
Pulse       para detener el secador (modelo 700-1000).
                                                                             set
                                                                                         Botón SET: para    salir    y guardar/confirmar el   valor;                                                                         Y
                                          &
                                                                                                    ir            al        siguiente          nivel;
d) Gire el INTERRUPTOR PRINCIPAL “            ” a “O OFF” para desco-                               acceder         al   menú         de    ajustes;                      5.4 Configuración de la descarga de condensado
nectar la alimentación.                                                                             PULSADO DURANTE 5 s. ARRANCAR secador.                                Hay tres modos de funcionamiento:
Y Versión Wc: cierre el circuito de agua con el secador apagado.             esc         set                                                                              a) CAPACITIVO = Descarga automática con un sensor capacitivo;
                                                                                     y               : pulsarlos juntos para acceder a los parámetros del
                                                                                                       programa                                                           b) TEMPORIZADO = Intervalos de descarga programables;
                                                                                                                                                                          c) CONTINUO (externo) = Si hay una descarga externa.
                                                                             5.2 Símbolo                                                                                                                             esc
                                                                                                                                                                                                           set
                                                                                                                                                                          Pulse simultaneamente                  y         para acceder al menú general “PAr”.
                                                                              Símbo-
                                                                                               Estado del símbolo                         Función                                  set
                                                                                lo                                                                                        Pulse             para acceder.
                                                                                                                                                                          Utilice las flechas              o         para encontrar el menú “Cd”.
                                                                               k
                                                                                               Encendido                                  compresor ACT
                                                                                                                                                                                   set
                                                                                               Off                                        compresor DES                   Pulse             para acceder.
                                                                                                                                                                          Utilice las flechas              o         para encontrar el parámetro “d3”.
                                                                                               Encendido                                  secador ACT
                                                                                                                                                                                   set
                                                                                               Destellante                                secador DES                     Pulse       para elegir el tipo de descarga:
                                                                                                                                                                          0 = externa;

                                                                               !
                                                                                               Encendido                                  Alarma presente
                                                                                               Destellante                                Advertencia presente            1 = temporizada;
                                                                                               Off                                        No hay una alarma presente      2 = capacitiva.
                                                                                                                                                                                   set

                                                                               q
                                                                                               Encendido                                  Descarga de condensado ACT      Pulse             durante cinco segundos para seleccionar la descarga.
                                                                                               Off                                        Descarga de condensado DES
                                                                             5.3 Ajuste de parámetros
                                                                             Unidad de medida de temperatura
                                                                             Cómo ajustar la unidad de medida de temperatura.
                                                                                                             set        esc
                                                                             Pulse simultaneamente                  y         para acceder al menú general “PAr”.

  Español                                                                                             PSE 325-1000 60Hz                                                                                                                              3/12
Español                                                                                                  PSE 325-1000 60Hz                                                                                                                       4/12
                      Y
                esc set
                                                                                                                                Y
                                                                                                                               set                                         5.7 Función de CICLOS
              Y                                                                                                                                                                                                    esc

                                                                                                                                            Y
                                                                                                                                                                                                         set
                                                                                                                                                                           Pulse simultaneamente               y         para acceder al menú general “PAr”.
                                                                                                                           HiSt                             Al                     set
                    PAr
                                                                                                                                                 Y                         Pulse         para acceder al menú.

                           Y
              esc          set                                                                                                                                             Utilice las flechas         o       para encontrar el parámetro “C4C”.

          Y                                                                                                                                                                        set

                                 Y

                                                        Y
                                                                                                                                           Y          esc
                                                                                                                                                                   Y
                                                                                                                                                                  set      Pulse         para acceder al menú.
                    CF9                      ........              Cd
                                                                                                                                                     Y

                                                                                                                 Y
                                                                                                                                                                           Utilice las flechas         o       para encontrar el parámetro “C7”.
                                     Y                  Y                                                                                                                  Pulse
                                                                                                                                                                                   set
                                                                                                                                                                                      para elegir:
                                                                                                    ....                       b8                            b2
                                                                                                                                                 Y                         ON: continuo;
                                                        Y    esc
                                                                    set
                                                                        Y                                                             Y
                                                                                                                                     set                      set
                                                                                                                                                                  Y        OFF: en ciclos.

                                                            Y                                                                                                                      set
                                     Y

                                                                                                                                                                           Pulse         para confirmar.
                                              d2                                                                                                                                   esc
                      d3                                           d1                                                          0.0                          4.0
                                     Y                  Y
                                                                                                                                                                           Pulse         para salir.

                 Y
                esc        set                                                                                                                                                                         esc set

                                                                                                                                                                                                       Y Y
                                                                                     5.6 Encendido/apagado remoto
               Y                                            Y
                                     Y

                                                                                                                   set         esc
                                                                        2            Pulse simultaneamente                 y         para acceder al menú general “PAr”.
                      0                             1                                                                                                                                                    PAr
                                     Y                      Y                                set

                                                                                                                                                                                                               Y
                                                                                     Pulse         para acceder al menú “CF9”.
                                                                                                                                                                                                   esc         set
                                                                                     Utilice las flechas          o        para encontrar el parámetro “A7”.
Para la opción (1) de descarga temporizada, se puede ajustar el tiempo
                                                                                                                                                                                                  Y

                                                                                                                                                                                                                     Y
                                                                                             set
ON/OFF de la descarga.                                                               Pulse         para acceder.
En el menú “Cd”                                                                                                                                                                                          CF9                       C4C
                                                                                     Utilice las flechas  o                para seleccionar:

                                                                                                                                                                                                                                        Y
Utilice las flechas              o       para encontrar el parámetro “d1” y elegir   ON: encendido remoto;
                                                                                                                                                                                                           Y Y               esc        set

                                                                                                                                                                                                                            Y
la hora de apertura.                                                                 OFF: apagado remoto.
        set                                                                                  set
Pulse          para confirmar.                                                       Pulse         para confirmar.
                                                                                             esc                                                                                              C37                                  C7

                                                                                                                                                                                                                                        Y
Utilice las flechas              o       para encontrar el parámetro “d2” y elegir   Pulse         para salir.
la hora de cierre.                                                                                               esc set
                                                                                                                       Y                                                                                   YY                esc        set

Pulse
        set
        esc
               para confirmar.
                                                                                                            Y                                                                                                               Y
Pulse         para salir.                                                                                         PAr                                                                                  OFF                         On
                                                                                                                                                                                                                         Y
                                                                                                                         Y
5.5 Visualización de las sondas de temperatura                                                              esc          set

                                                                                                           Y
En la pantalla, aparece la temperatura del punto de condensación de
forma predeterminada.
Para ver otras temperaturas, proceda como sigue:                                                                                                                           “C37”mostrar el% de ahorro de energía.
                                                                                                                  CF9
        set
                                                                                                                         Y
Pulse          para acceder al menú de parámetros directos.                                                              set
                                                                                                            esc
Utilice las flechas              o       para encontrar el parámetro “Ai”.
                                                                                                           Y
                                                                                                                                Y
        set
Pulse          para acceder.                                                                                      C_F                            A7
Utilice las flechas    o    para elegir el sensor.
b0 = sensor de temperatura del punto de condensación;                                                                      Y
                                                                                                                           Y               esc        Y
                                                                                                                                                      set

b2 = sensor de temperatura de evaporación;
b8 = sensor de temperatura de condensado;
                                                                                                                                       Y
                                                                                                                 OFF                             0n
                                                                                                                                 Y
PI = sensor de Alta presión
Después de seleccionar, espere unos segundos para ver el valor leído.
        esc
Pulse         para salir.
5.8 Gestión de alarmas                                                           5.9 Historial de alarmas
                                                                                                                                                                         9. Pulse simultaneamente “       ”“              ” para salir.
En una situación con alarmas/advertencias, siga este procedimiento:              En una situación con alarmas/advertencias, siga este procedimiento
                                                                                                                                                                         Fig. 3
        set                                                                      para ver las alarmas actuales y anteriores que han ocurrido:
Pulse           para acceder al menú de parámetros directos.
                                                                                         set                                                                                               Y
                                                                                                                                                                                     esc set

Utilice las flechas
        set
                               o      para encontrar el parámetro “AL”.
                                                                                 Pulse
                                                                                 Pulse
                                                                                         set
                                                                                                para acceder al menú “HiSt”.
                                                                                                para acceder a los parámetros:
                                                                                                                                                                                  Y
Pulse          para ver el código de la alarma:                                                                                                                                         PAr
                              Y

                                                                                                                                                                                                Y
                             set
                                                                                  Menú Código                                   Descripción
                                                                                                                                                                                  esc           set

                                      Y
                                                                                               HiSF          Número de alarma general
                                                                                                                                                                                Y

                                                                                                                                                                                                      Y

                                                                                                                                                                                                                               Y
                        HiSt                       AL                                          HiSP          Posición de la alarma
                                        Y                                                                                                                                               CF9                    ........                         Cd
                                                                                                                                                                                                      Y
                                                                                               HySC          Código de alarma
                                                                                  HiSt
                                                                                                             Fecha de la alarma
                                                                                                                                                                                                                                 Y
                                                                                               HySd
                                      Y      esc
                                                    set
                                                        Y                                                    (con la opción de reloj presente)
                                                                                                                                                                                                                              Y                  set
                                                                                                                                                                                                                                                     Y
                                            Y                                                  HySt
                                                                                                             Hora de la alarma

                                                                                                                                                                                                                                      Y
                                                                                                                                                                                                                                          esc

                                                                                                                                                                                                      Y
                                                                                                             (con la opción de reloj presente)
                              .....                Hd
                                        Y                                                                                                                                                  d3                   d2                              d1
                                                                                                                                                                                                      Y                           Y
Lista de alarmas                                                                                             Y
                                                                                                            set                                                                      esc
                                                                                                                                                                                                 Y
                                                                                                                                                                                                set

                                                                                                                                                                                   Y

                                                                                                                                                                                                                                          Y
                                                                                                                                                                                                      Y
              Descripción                                                 Res-
 Cód.                                                                                                                                                                                                                                                2
                                                                          tab.                         HiSt                                                                                0                          1
 Ld           Punto de condensación bajo                                   M                                                                                                                          Y                               Y
 Lt           Temperatura de evaporación baja                              M
 Ht2          Temperatura de descarga alta                                 M                          esc
                                                                                                                   Y
                                                                                                                  set
                                                                                                                                                                         ! La memoria del “reloj / calendario” tiene una duración máxi-
                                                                                                 Y

                                                                                                                        Y
 HP           Alta presión                                                 M                                                                                             ma de tres días, por lo que si el controlador no recibe alimentación
                                                                                                                                                                         eléctrica durante más de tres días, se perderán los datos de hora /
 LP           Baja presión                                                 M                               HiSF                 HiSP
                                                                                                                        Y                                                mes / año.
                                                                                                                                                                         Ajuste el reloj cuando empiece a utilizar el dispositivo y siempre que sea

                                                                                                                                Y
 PI           Protección térmica del compresor                             M
                                                                                   HiSt                                                                                  necesario.
 PH           Fases invertidas
Lista de advertencias
                                                                           M
                                                                                                                              Y
                                                                                                           HiSd                  HiSC
               Descripción                                                Res-
 Cód.
                                                                          tab.
                                                                                 5.10 Ajuste del reloj/calendario.
 FB0           Advertencia del sensor B0                                   A
 FB2           Advertencia del sensor B2                                   A     1. Pulse ambos botones “                ”“     ” para acceder al menú “FrEE”.
                                                                                                set
 FB8           Advertencia del sensor B8                                   A     2. Pulse “           ” para acceder al menú “Ai”.
 FB5           Advertencia del sensor B5                                   A     3. Pulse “           ” para acceder al menú “CL”.
                                                                                                set
 FPI           Advertencia del sensor PI                                   A     4. Pulse “           ” para acceder y visualizar el parámetro “HOUr”.
 DrE           Advertencia de descarga de condensado                       A                    set
                                                                                 5. Pulse “           ” hasta que destelle el parámetro “HOUr”.
 Hd            Advertencia de temperatura de condensado alta               A
                                                                                 6. Seleccione el parámetro destellante “HOUr”/“dAtE”/“4EAr” con “
 Ht1           Temperatura de descarga alta                                A                         set
                                                                                   ” y pulse “             ” para acceder.
 HB5           Temperatura de evaporador alta                              A
                                                                                 7. Cambie el valor que destella con “                ”y“        ” (arriba y abajo), y
                                                                                               set
                                                                                   pulse “           ” para confirmar.
                                                                                               esc
                                                                                 8. Pulse “           ” para volver al menú “FrEE”.

  Español                                                                                                   PSE 325-1000 60Hz                                                                                                                            5/12
Español                                                                             PSE 325-1000 60Hz                                                                                                 6/12
6 Control (PSE700-1000) táctil                                          6.3 Menú de información                                                6.3.1 Menú Fecha/Tiempo
                                                                        Toque   en la pantalla de inicio para acceder al menú de información
6.1 Panel de control “táctil”                                                                                                                  Toque    para acceder al menú de “User/service”.
Fig.1

                                                                           Símbolo     Función
6.2 Símbolo                                                                            Toque para acceder a los menús “Servicio / Fábri-       Toque     para acceder al menú de “fecha/tiempo”
                                                                                       ca”: estos menús están protegidos por contraseña.
           Símbolo                                                                     El acceso solo se permite al servicio técnico de Par-
 Símbolo             Función
           de estado                                                                   ker o a personal certificado.

           -          Temperatura de punto de condensación                             Toque para acceder al menú de “configuración de
                                                                                       parámetros”: A6, A8; °C o °F; local o remoto; horas
           Verde      secador ACT                                                      de encendido / apagado de la descarga; horas de
                                                                                                                                                                                                  configuración
                                                                                       funcionamiento.
           Rojo       secador DES                                                                                                                                                                 fecha
                                                                                       Toque para ver todas los signos de alarmas / adver-
           Rojo       Alarma presente
                                                                                       tencias disponibles.
           Amarillo   Advertencia presente                                                                                                                                                        configuración
                                                                                                                                                                                                  tiempo
           Ausente    No hay una alarma/advertencia presente                           Toccare per tornare al pannello di controllo
           r e m o t e / Remote = remoto ON:
                                                                                                                                                                                                  Toque set to
           Local         Local = remoto OFF                                            Toque para ver las sondas: B0, B2, B5, B8, P1.                                                             confirm
           -          Fecha/Tiempo
                                                                                       Toque para ver la entrada digital.

           -          Toque para acceder al menú de información                        Toque para ver la salida digital.

                                                                                       Toque para obtener información sobre el secador:
           -          Toque para activar manualmente la descarga                       número de serie, versión de software del PLC / HMI.
                      Se ilumina con el secador encendido, el
           Acceso
                      compresor apagado y sin alarmas (por ciclos)

           Acceso     Se ilumina cuando el ventilador está encendido.

                      Se ilumina     cuando    el   compresor   está
           Acceso
                      encendido.

           Acceso     Se ilumina cuando la descarga está encendida.
6.3.2 Menú de configuración de parámetros                              Sondas                                                                    Configuración

Toque     para acceder al menú
                                                                      Toque el botón              para acceder.                                 Toque             para acceder.

                                                                      Estos parámetros son de lectura / escritura, es posible cambiar: el um-
                                                                      bral de advertencia del punto de condensación alto y el retraso.          Toque       para avanzar.
                                                                      Para modificar el parámetro, toque en el valor, como se muestra en la
    Símbolo     Función                                               figura.

                 Toque para retroceder

                 Toque para avanzar

                 Toque para ver los umbrales de la salida analógica
                 del punto de condensación “A6 / A8”.
                 Toque para configurar: unidades de medida;
                 arranque local / remoto y señalización de alarmas.

                 Toque para configurar la descarga.                                                                                             Estos parámetros son modificables: unidad de medida (°C o °F); arran-
                                                                      Aparece el teclado que se utiliza para introducir el nuevo valor.         que local o remoto; advertencia de alarmas, y restablecimiento de pará-
                 Toque para ver las horas de funcionamiento y la                                                                                metros predeterminados.
                 fecha del siguiente mantenimiento programado.
                                                                                                                                                Y    Para administrar el modo REMOTE OFF, retire el puente entre
                 Toque para configurar el secador.                                                                                              los terminales: 87-92 y conecte el interruptor de arranque / parada
                                                                                                                                                remoto (a ser proporcionado por el cliente).
                                                                                                                                                Para modificar el parámetro, toque en el valor, como se muestra en la
                 Toque para reiniciar la alarma.                                                                                                figura.

  Español                                                                               PSE 325-1000 60Hz                                                                                                     7/12
Español                                                                                 PSE 325-1000 60Hz                                                                                                       8/12
Seleccione sus opciones.                                                 En el caso de la opción de descarga temporizada (1) también es posible
(ej., “°C o °F” o “Local on o rOFF”)                                     elegir las horas de cierre y apertura “D1 / D2”.
                                                                         Mantenimiento
Toque en el cuadro de la derecha e inserte la marca     para confirmar
y cambiar. .
                                                                         Toque el botón             para acceder.

                                       C

                                                                                                                                                  Toque        para ver la página de alarmas.

Para volver a los parámetros predeterminados, toque como se indica
en la figura.                                                            Estos datos son de solo lectura.
                                                                         Funcionamiento “por ciclos”

                                                                         Toque             para acceder.
                                                                         Puede elegir el modo continuo o por ciclos si toca como se muestra en
                                                                         la figura.

                                                                                                                                                  El texto con la descripción solo aparece si hay una alarma presente.

                                                                                                                                                  Toque        para ver la página de advertencias.
Los parámetros se restablecen automáticamente.
Descarga

Toque              para acceder.

                                                                         Toque en el cuadro de la derecha e inserte la marca    para confirmar
                                                                         y cambiar.

                                                                         6.3.3 Menú de alarmas

                                                                         Toque              para acceder al menú de alarmas.                      El texto con la descripción solo aparece si hay una advertencia presente.
                                                                         Para ver las alarmas/advertencias o restablecerlas.
                                                                                                                                                  Toque        para reiniciar la alarma. Recuerde que la alarma se puede
                                                                                                                                                  restablecer solo si se han restaurado las condiciones de funcionamiento
                                                                                                                                                  nominales.
Pulse como se indica para elegir el tipo de descarga:
0 = externa;
1 = temporizada;
2 = capacitiva.
6.3.4 Menú de sondas                                    6.3.5 Menú de entrada digital                                            6.3.6 Menú de salida digital

Toque                para acceder al menú.              Toque                para acceder al menú.                               Toque                 para acceder al menú.

Toque       para avanzar.

                                                        Local ON/OFF (Act./Des. local): verde si el contacto de encendido re-    General alarm (Alarma general): verde si el contacto de alarma general
                                                        moto está cerrado; de lo contrario, atenuado.                            está cerrado; de lo contrario, atenuado.
                                                        Condensate level (Nivel de condensado): verde si no hay condensado       Compressor (Compresor): verde si el contacto de encendido del com-
Se muestran los valores de las sondas en tiempo real:   que descargar; de lo contrario, atenuado.                                presor está cerrado; de lo contrario, atenuado.
iB0      : Temperatura de punto de condensación         Monitoring phase (Fase de monitorización): verde si la secuencia de      Condensate drain (Descarga de condensado): verde si el contacto de
iB2      : Temperatura de evaporador                    fase es correcta; de lo contrario, atenuado.                             descarga de condensado está cerrado; de lo contrario, atenuado.
iB8      : Temperatura de descarga del compresor        Compressor protection (Protección del compresor): verde si la protec-    Plant Status (Estado de planta): verde si el contacto de encendido del
iB5      : Temperatura de aspiración del compresor      ción del compresor está en la posición de funcionamiento normal; de lo   secador está cerrado; de lo contrario, atenuado.
iB3      : Temperatura ambiente                         contrario, atenuado.                                                     Hot gas bypass valve (Válvula de derivación del gas caliente): verde si
iP1      : Alta presión (condensador)                   High Pressure switch (Conmutador alta presión): verde si la protección   el contacto de la válvula de derivación está cerrado (válvula abierta); de
                                                        del conmutador de presión está en la posición de funcionamiento nor-     lo contrario, atenuado.
                                                        mal; de lo contrario, atenuado.
                                                        Low Pressure switch (Conmutador baja presión): verde si la protección
                                                        del conmutador de presión está en la posición de funcionamiento nor-
                                                        mal; de lo contrario, atenuado.

  Español                                                                PSE 325-1000 60Hz                                                                                                        9/12
You can also read