Publisher Basics: Create Greeting Cards and More!
←
→
Page content transcription
If your browser does not render page correctly, please read the page content below
Better Technology, Onsite and Personal
Connecting NIOGA’s Communities
www.btopexpress.org www.nioga.org
[Type
Publisher Basics: Create Greeting Cards and More!
Overview: Introductory course to Microsoft Publisher, a program that is used to design many items,
including greeting cards, business cards, brochures, and more!
Requirements: Good mouse skills (ability to move the mouse on the computer screen and click or
double click as required with minimal assistance).
Length: 3 hours (with a 10 minute break)
Objectives
The student will be able to understand the basics of using Publisher
o Open the program from the Desktop
o Be familiar with the Ribbon
o Create a simple Publication for Print using the “New Publication” Wizard
o Make changes to the publication using the mouse (resizing) and keyboard (changing
words)
o Practice making various publications including a business card
o Understand how to print a Publisher file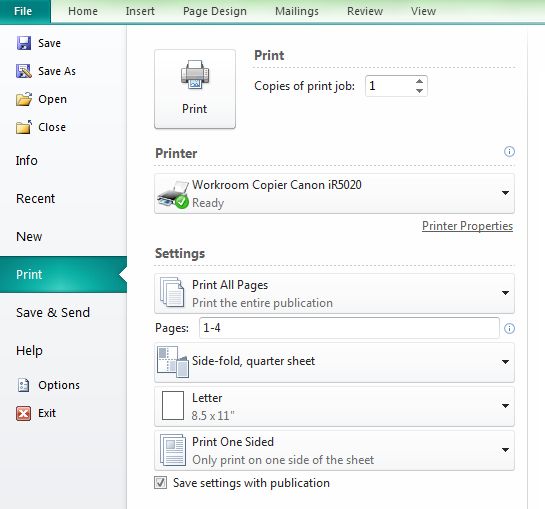
2
                                         What is Publisher?

“It is an entry-level desktop publishing application,
differing from Microsoft Word in that the emphasis is         Various Publisher Icons
placed on page layout and design rather than text
composition and proofing” (Wikimedia, 2008)
Came into being in 1991 as “Microsoft Publisher for
Windows”

“[L]ess expensive alternative to the ‘heavyweights’ (Adobe
InDesign and QuarkXPress) and also its focus on the
small business market where firms do not have dedicated
design professionals available to make marketing
materials and other documents (Wikimedia, 2008)”

                              Open Publisher – Use One of Two Ways

Locate the icon on the desktop and:

Use the mouse to double click on the icon

                    OR

Use the mouse to click once on the icon
then press the Enter key on the keyboard

                    Publication Templates – Your Gateway to Using Publisher

  There are hundreds of templates from
  which to choose.

  For this class, we will create a Greeting
  Card.

  Remember, you may use the templates to
  create any of the publication types listed –
  labels, flyers, brochures, envelopes, and
  more!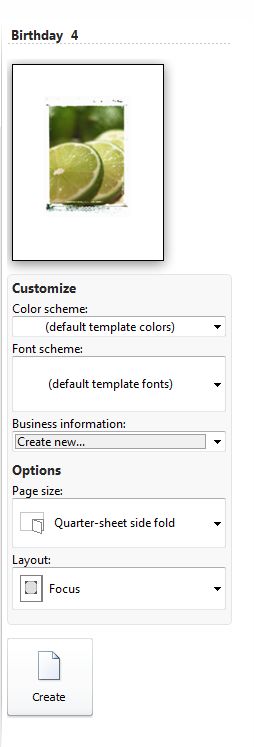
3

 Click on New (on the left) and
 under Available Templates,
 choose Greeting Cards.

 Here is where you may select
 the type of card you wish to
 make. Notice that the window
 has changed to display the
 various kinds of cards you may
 create – Birthday, Holiday,
 Occasions and Events, and
 more.

For this class, please click once
on Birthday 4.

Notice the Scroll Bar on
the right of the window –
that indicates that there’s
more available than what is
displayed on the screen.

You may also search for
more templates using the
search box, also on the
right.

                                    Scroll Bar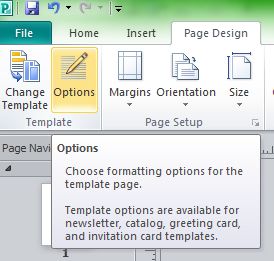
4
                                      Publication Options

Notice that once you choose a publication, the
right-hand pane changes to present new options
to you, including:

 Color scheme: The creators of Publisher
 have put together groups of colors that go
 together well. You may choose a color
 scheme by clicking on the upside-down
 triangle to the right.
 Font scheme: works the same as color
 scheme
 Business information: this is where you
 may enter in your name and address,
 amongst other information. This information
 is erased at the end of your session on
 library computers.
 Page size: choose the layout you like:
 quarter page side fold, quarter page top fold,
 or half page side fold. Whatever size you
 choose, your publication will print on a single
 8 ½ by 11 sheet of paper.
     Half-page side fold – 5 ½ x 8 ½ inches
     Quarter-page fold – 5 ½ x 4 ½ inches
 Layout: Change the entire look of your
 publication here. Click on the triangle and
 choose an option.

        EXAMPLE LAYOUT CHANGE:

                                                      Choose one Card and
                                                       Design Option now
Focus Layout
                                                      Click Create to begin
                          Juxtaposition Layout
                                                          the publication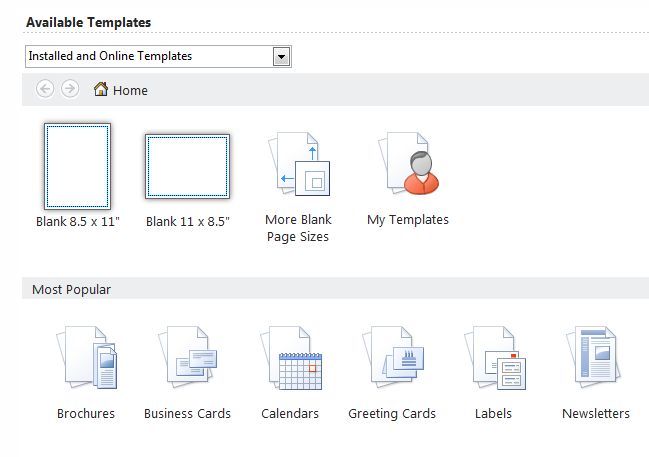
5
                                   A Word about Saving Your Work

SAVE your Publication – Save early and save often!

Click Save on the Quick Access Toolbar and the Save As Dialog Box will
appear. Note that Windows defaults to saving in Documents.
       Documents is fine for saving work on your personal computer
       On the library’s computers, you must save to the Removable Drive
       (usually the E: or F: drive). The removable drive is your personal USB
       drive that you own and bring along with you.

Type a file name
Click the Save button       Publication Options – Greeting Card Options

                                           Suggested Verses

 If you want to write your own verse for
 your card

 OR

 You may also look at Suggested Verses
 as well by clicking on the Page Design
 tab and choosing Options in the
 Template group.

  This is the Suggested Verses dialog box.
  You may choose a Category of verses
  (here it’s Happy Birthday).

  Once you have a Category, Available
  messages appear. To view an entire
  message, click on it. The First and
  Second message parts appear in the
  boxes.

  When you see a verse you want, click the
  OK button and Publisher will place the
  verse in your card.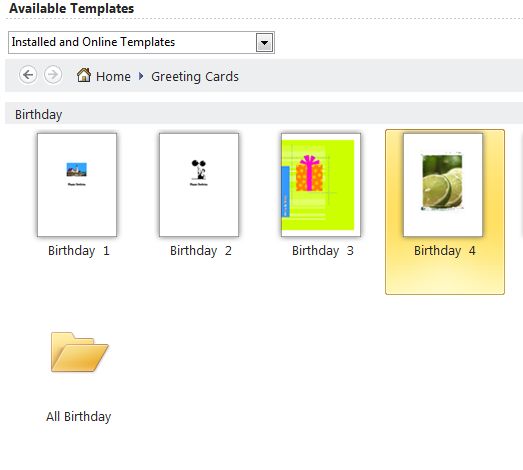
6
                                       Editing Your Publication

    On the right side of your screen, there is a place to
    “turn” the pages of your publication.
    Click on a page and see your publication change

  If you see something on a page you want to
  change:
        Move your mouse over the words currently
        printed there
        Click once (you will see the cursor)
        Use the Backspace and Delete keys to
        take out the text that is present
        Type in your new text

  SEE EXAMPLE LATER IN HANDOUT

                       Text and Picture Boxes – Keys to working in Publisher

When you work in Publisher, you are always working in text or picture boxes (also known as
frames). These boxes allow you to place words and pictures wherever you like on the page.

Just because your card is laid out one way doesn’t mean you are trapped with that text, picture, or
“look;” you can change any publication any way you like.

Here we will consider text and picture frames themselves and then move to editing text and
changing pictures in our publication.
Text boxes are squares or rectangles of varying shape and size. They are always bordered (whether
or not you can actually see the border is another option) and you may change the size of an
individual box using the mouse.

If you change something in one text box, it is only changed for that specific box (for example, if you
change font type in a box, it only applies to that box).

In any box the mouse is the key to changing size, shape, or font

The mouse will change shape depending on where it is in the Publisher program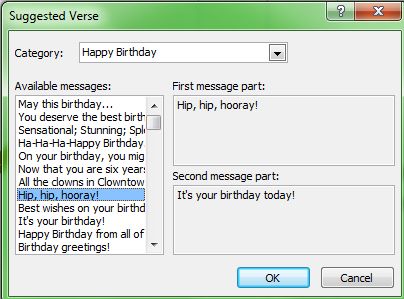
7
Arrow Double headed arrows 4-way arrow Busy Rotating Arrow I beam
Each of these mouse pointers means you may do something specific with the text or picture
box in your publication:
Arrow: A typical pointer for selecting something (like seeing what is in a particular drop-
down menu on the Menu Bar)
Double headed arrows: When you mouse over a specific area on a box your mouse will
change to this shape. Indicates you may click and hold your mouse and drag the box to
resize it.
4 Way arrow: Indicates that you may click and hold your mouse button to move a box
without changing its size.
Busy: The computer is processing your commands.
Rotating arrow: Indicates you may click and hold your mouse button to swivel a box –
picture or text
“I beam”: Generally indicates text (rather than pictures) will be inserted in an area. An “I
beam” can also be used to highlight or select text for change (cut, copy or paste) or
deletion (for example if you have typed your brochure in Word and want to copy the text
into Publisher, your mouse would be an I beam)
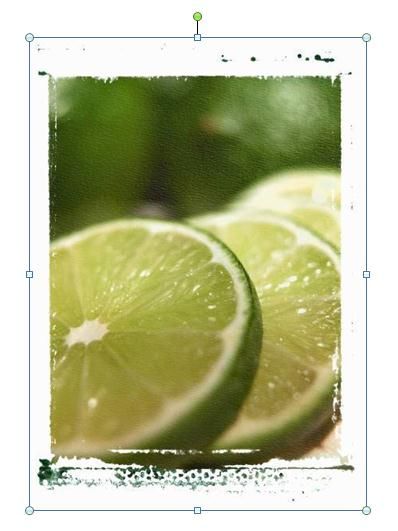
Click on the picture on page one of your card.
Notice that 8 white circles, one green circle,
and dotted lines appear around the picture.
Move your mouse over one white circle. It
will turn into a double headed arrow. Click
and hold your mouse button and move it
down or up – your picture will resize!
Move your mouse over the green circle. It
will change to a rotating arrow. Click and
hold your mouse button – your picture will
rotate!8
Example Editing (Text within a Text Box)
I don’t want Authorized User
Type Your Name in its place
Move the mouse over the words
Authorized User
Click once (see the cursor on the screen
– the blinking black line)
Use the Backspace and Delete keys to get
rid of Authorized User (the space is blank
now)
Type in Your Name9
Example Editing – Changing a Picture
Let’s say we don’t like the picture on
this page and we want to change it:
Click on the picture, then go to the
Insert Tab > Clip Art
The Clip Art Task Pane will appear on
the side of your screen
Click once in the search box
Type in your search term
Click Go
When you find the picture you want,
click on it and Publisher will insert it for
you
Remember you can resize any picture
or text box by using the mouse (it will
change shape as you move it around –
when you see the shape you need,
click and hold the mouse and drag it
where you want)10
Print Options
Click on the File
tab and choose
Print. This is
what your screen
will look like:
There are multiple choices for
you. Probably the most important
one is the fold option. Here it
says, “Side-fold, quarter sheet.”
Click on that and see what other
options are there for you.
All of these options apply to one 8 ½ by
11 sheet of paper. So, even though
Publisher is saying it’s printing all four
pages of the greeting card, it actually
will come out on one sheet of paper.
You may also take some time to look at the other Print Options: one-sided, paper choices, and
possible printer choices as well.11
Resources
**These items are available in the NIOGA Library System!**
**Contact your local library for assistance!**
Call Number Author Title Date
686.2254 MICR-DVD Pelton, S. “For Beginners” Series: Microsoft Publisher (DVD) 2008
686.2254 POSE Posey, B. Using Microsoft Publisher 2010 2011
005.5 SHOU Shoup, K. Office 2010 Simplified 2010
005.5 WEVE Weverka, P. Office All-In-One for Dummies 2010
Edited 8/27/13
Funding for computer training is provided by the Nioga Library SystemYou can also read