Angular No. 2 Quilt Block - APRIL 2021 - inspired by Modern Quilt Guild Retrospective exhibit - Brandywine Valley Quilters
←
→
Page content transcription
If your browser does not render page correctly, please read the page content below
QuiltMuseum.org/BlockOfTheMonth
                                                 APRIL 2021

Angular No. 2 Quilt Block
inspired by Modern Quilt Guild Retrospective exhibit
                                                    Quilt by: Audrey Esarey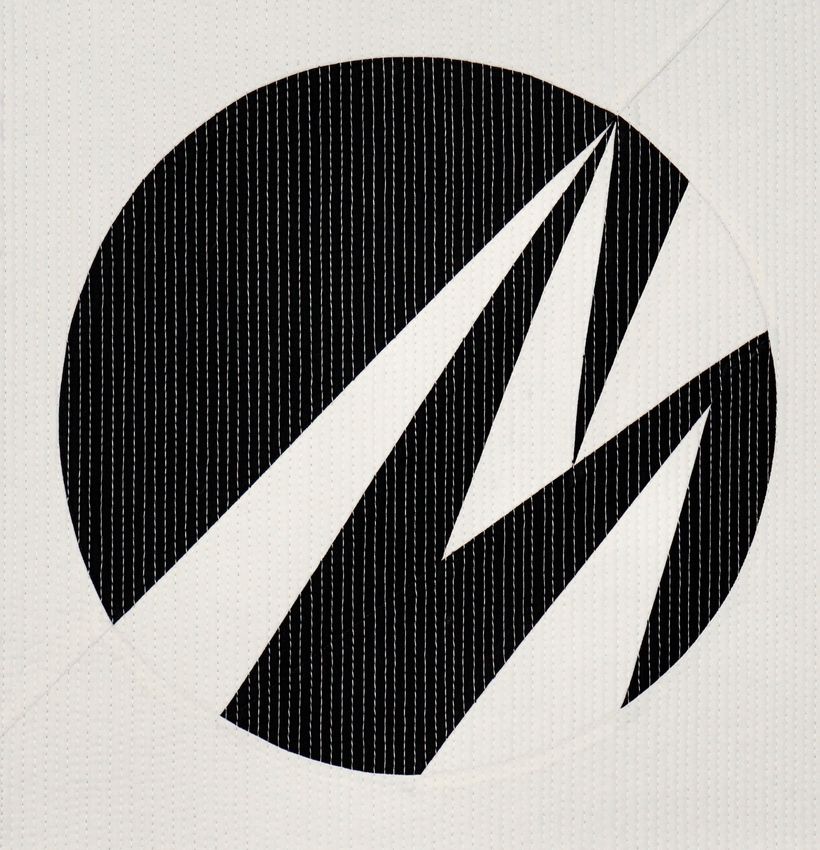
APRIL 2021

Featured Artist: Audrey Esarey
                         Audrey is a modern graphic quilt artist from
Audrey Esarey            Louisville, KY. Always a maker, she learned
                         to sew at a young age and made her first
                         quilt in 2005. In 2018, she set a personal
                         goal to exhibit her work in a juried quilt
                         show, which motivated her to design and
                         create a series of original quilts. She shares
                         her creative process and her patterns online.

                         Website: www.CottonandBourbon.com

                         Instagram: @CottonandBourbon

                                                               Page 2
APRIL 2021

Inspiration
"Sonder" by Terry Peart

                                  Modern quilting has existed in many forms
                                  for much of the 20th century. It wasn’t
                                  until the 2000’s that quilts with a modern
                                  aesthetic, the use of bold colors and prints,
                                  high contrast and graphic areas of solid
                                  color, improvisational piecing, minimalism,
                                  expansive negative space, and alternate
                                  grid work began to appear in greater num-
                                  bers and quilters began to describe them-
                                  selves as modern.

                                  This exhibition is a collection of quilts made
"Finger Paints" by Laura Loewen   by members of The Modern Quilt Guild
                                  over the first ten years of the organization.

                                                                         Page 3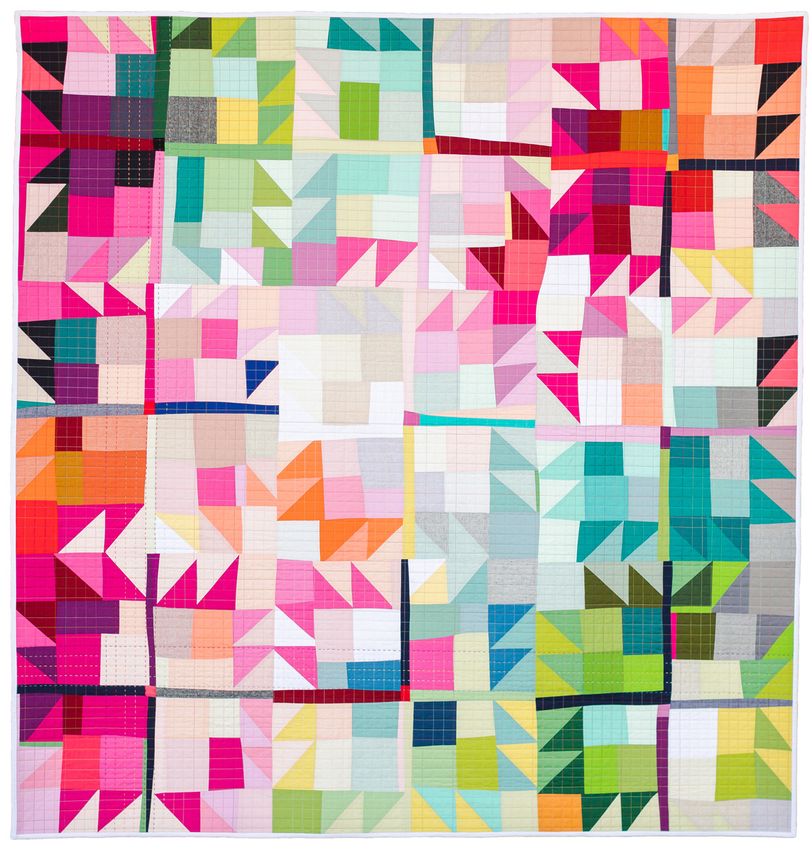
APRIL 2021
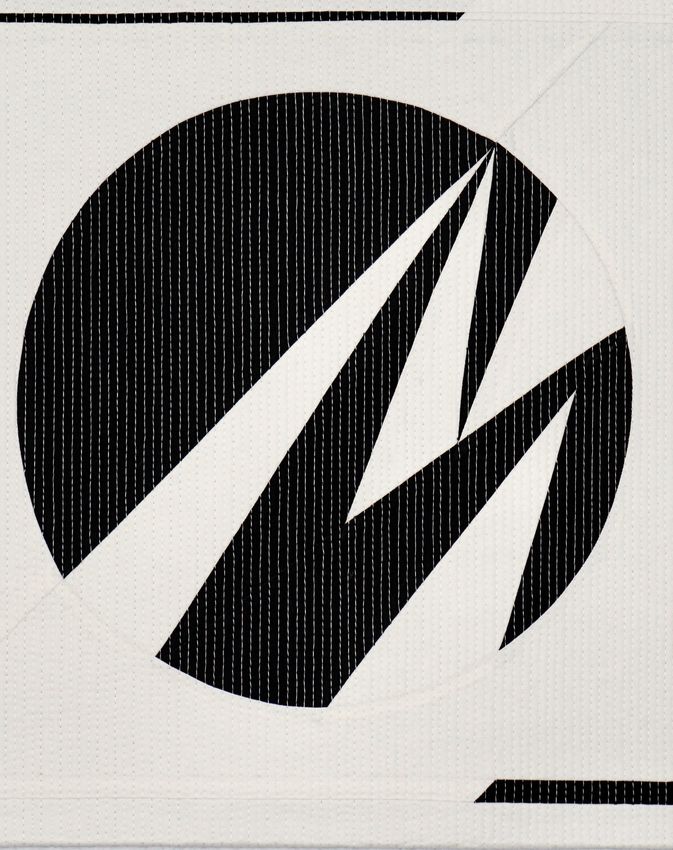
Sample Block
Sample by: Audrey Esarey
This block is part of my Angular Quilt Series, and it combines two of my favorite techniques: curved
piecing and foundation paper piecing. While I suggest using solids or prints that read as solid fabrics,
this block can be successful by using two colors, or by using many colors from your stash.
Fabric & Thread Requirements:
1 - FQ background color
1 - FQ (or equivalent scraps from your stash) of contrasting color
1 - 15 inch square backing fabric
1 - 15 inch square of batting
Quilting thread to coordinate with fabric
The sample quilt uses Kona Snow for the background and backing, Kona Black for the contrasting
color, and Aurifil 50 wt. 2021 for piecing and quilting thread.
Page 4
APRIL 2021

Color Selection
I find this pattern works best with high contrast fabrics. Below, see two alternate color vari-
ations to help you envision your color choices; one option has a dark background / white
accents, and the other block was made with a light background / dark accents, all in the teal
green hue family. There is a coloring sheet on page 6 to audition your color choices before
making the block. You may also choose to use this coloring sheet to place small scraps of your
chosen colors to assist with fabric placement while piecing the block.

                                                                                        Page 5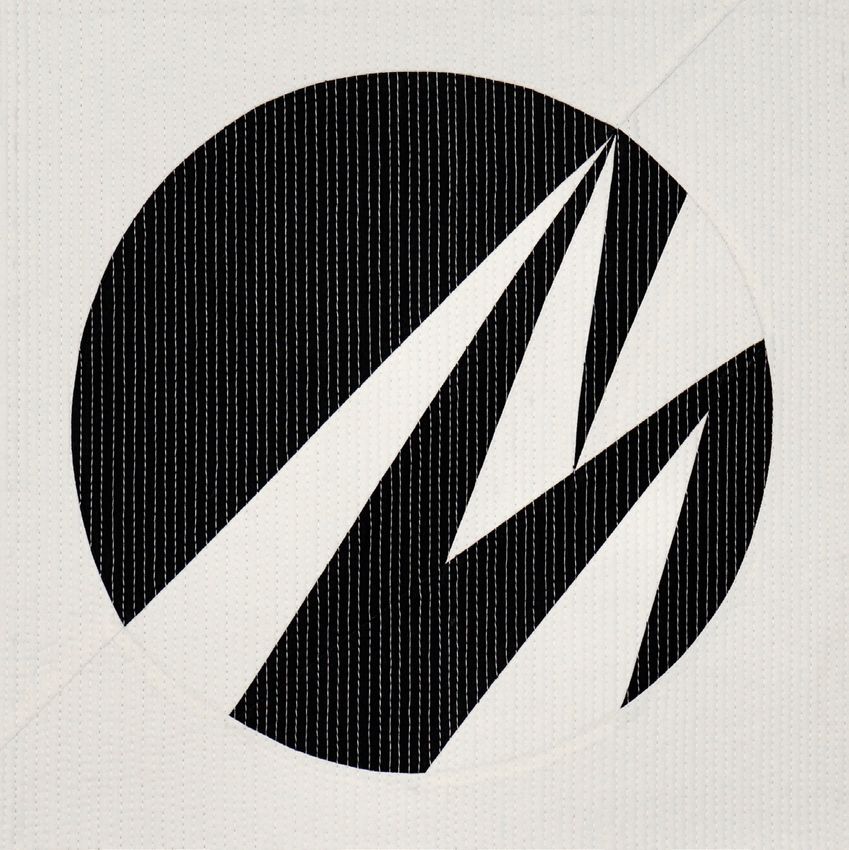
APRIL 2021

Coloring Sheet

                        Page 6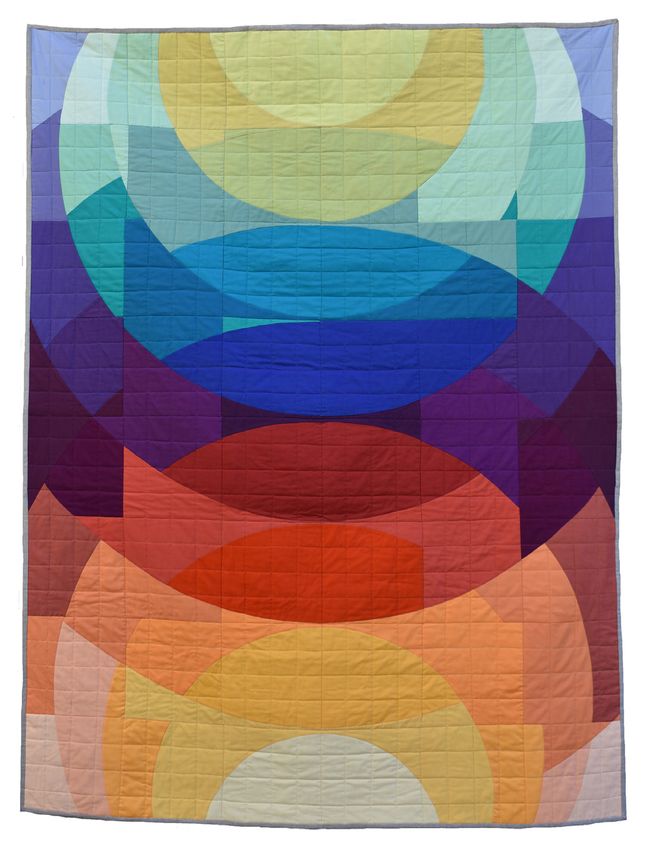
APRIL 2021

Instructions
                            1. Print the paper templates at 100% scale
Photo 1                        and check the 1 inch test block for accu-
                               racy.

                            2. See Template Pages for a template page
                               assembly reference.

                            3. Using a light box or a window on a sun-
                               ny day, carefully line up the guidelines
                               for each paper template and tape them
                               together using clear tape. Take care to
                               be very precise, as the future success of
                               your pattern depends on this accuracy.

                               Trace any pattern markings, letters, or
                               registration marks hidden by overlap-
                               ping pages from taping together the
                               pages.

                            4. Rough cut around the outer dashed line
   Click here to download      of each template to prepare for the next
                               stage, cutting the fabric (Photo 1)!
      the Angular No. 2
   Pattern template pages      Friendly Reminder: Templates are
                               printed in reverse as a paper piecing
         for printing!         standard. Since the fabric is sewn to the
                               back of the paper, the templates must
                               be printed in reverse to achieve the final
                               design. Consider this for fabric place-
                               ment.

                                                                  Page 7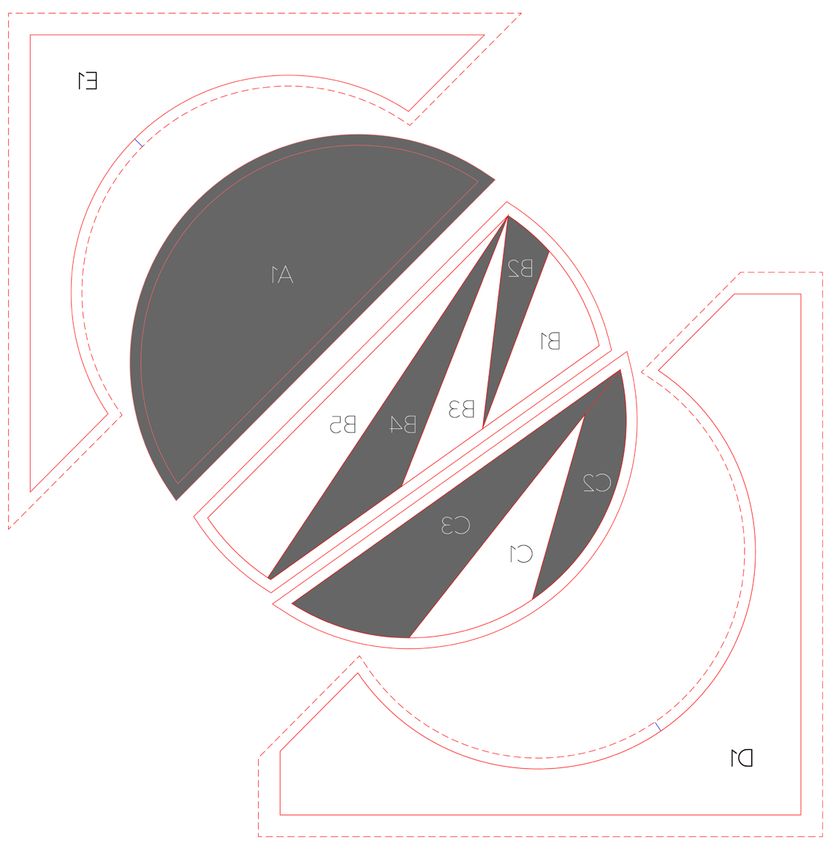
APRIL 2021

Cutting the Fabric  Cutting the Fabric:
Photo 2          5. Pair Templates A, D, and E with the appropriate
                    color fabric as indicated on the color placement
                    key (Photo 2).

                     You might notice the seam allowance on Tem-
                     plate D & E is larger around the outer perim-
                     eter edges (½ inch seam allowance) - this is
                     intentional. Quilting often shrinks the block;
                     this extra seam allowance is provided to ensure
                     the block measures at least 12 ½" × 12 ½" after
                     quilting. You will trim and square up the block
                     after quilting.

                 6. Position Templates A, D, and E with the straight
                    edge parallel with the selvage and the curved
                    edge traveling diagonally across the fabric (this
                    bias positioning allows the fabric to stretch a bit
                    while sewing the curved seam in a later step).

                     Note: When cutting Templates D & E, align
                     templates with the corners of the FQ and cut
                     those first. Use the remainder of the FQ to cut
                     the 4 pre-cut rectangles for paper piecing.

                 7. Tape the templates to the fabric (or use pattern
                    weights) to ensure the templates don’t shift
                    while cutting the fabric.

                 8. Cut the fabric using the outer dashed line on
                    the templates as the cutting line.

                                                              Page 8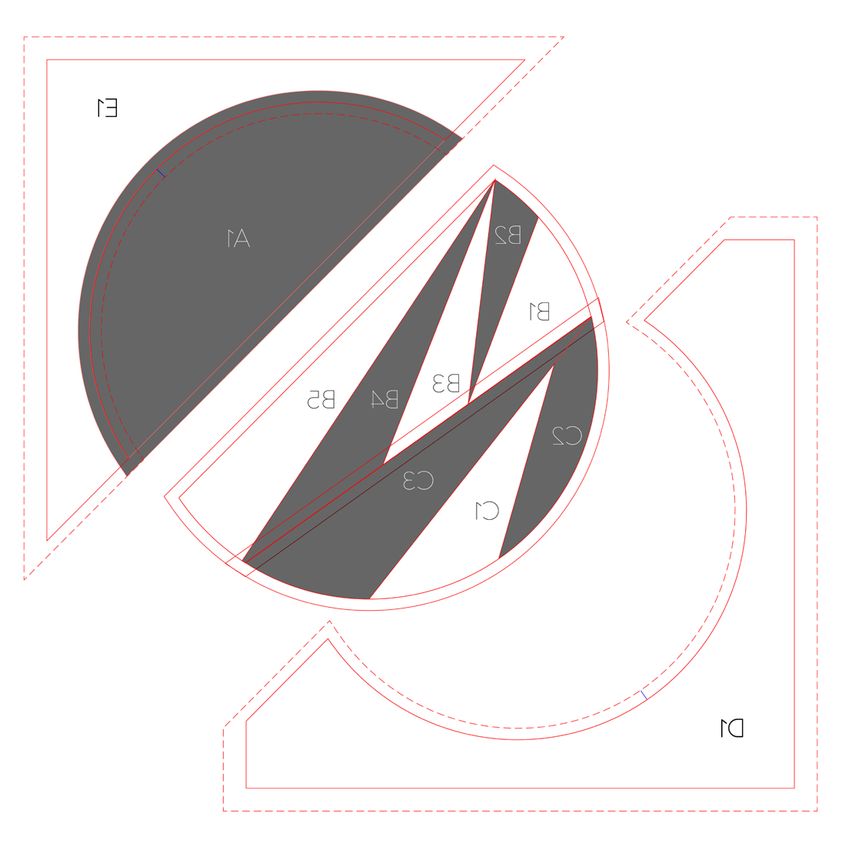
APRIL 2021

Piecing the Block
Photo 3             9. Using a marking tool, transfer registra-
                       tion marks to the fabric pieces by mak-
                       ing a small mark inside the seam allow-
                       ance of each fabric piece. To prevent
                       visible marking lines on the finished
                       quilt, avoid making a long mark that
                       extends past the seam allowance line on
                       the fabric.

                    10. Arrange the fabric pieces on a flat sur-
                       face or design wall to prepare for piec-
                       ing.

                    11. Select pre-cut fabric pieces from Tem-
                       plate A and Template E.

                    12. Place Template E on top of Template A
                       right sides together. Match and pin at
                       the corners and registration mark (blue
                       lines within the seam allowance on the
                       templates with curved seams).

                    13. Sew Template A to Template E. Press
                       seam open. Set aside (Photo 3).

                    14. Cut the fabric for paper piecing Tem-
                        plates B & C. Use the color placement
                        key as your guide.

                                                           Page 9
APRIL 2021

Piecing the Block   15. Reduce the stitch length to 1.5 for foun-
                       dation paper piecing. Using the marked
 Photo 4               numerical order, paper piece Templates
                       B and C. Use the Color Placement Key
                       as a guide.

                       Click here for a brief paper piecing tuto-
                       rial: Paper Piecing Tutorial Link

                    16. Sew Template B and Template C to-
                       gether on the marked Template Edge
                       BC. Press towards Template C (Photo
                       4).

                    17. Carefully remove the paper from Tem-
                       plates B & C and set the stitch length to
                       the normal length.

                    18. Place Template D on top of Template
Photo 5                BC right sides together. Match and pin
                       at the corners and registration mark.

                    19. Sew Template BC to Template D. Press
                       seam towards Template D (Photo 5).

                    20. Match and pin the block edges and
                       where the curved seams meet.

                                                         Page 10
APRIL 2021
Quilting
21. Sew Template Edge BCD to Template
Photo 6
Edge AE. Press seam towards Template
AE (Photo 6).
22. Press the overall block. Do NOT trim /
square up the block at this time.
23. Layer the quilt backing, batting, and
pieced quilt top. Baste.
24. Thread the sewing machine with thread
that coordinates with the fabric. Load a
bobbin with the same color thread.
Tip: I like to quilt straight lines with
thread that coordinates with the lightest
shade of fabric in the quilt.
25. Mark a vertical line down the center of
the block using a Hera marker or paint-
er’s tape.
26. Set the stitching length to 3.0.
27. Using a walking foot and the marked
line as a guide, stitch the first quilting
line vertically down the center of the
quilt.
Page 11APRIL 2021
Quilting
28. Starting from the center stitching line,
Photo 7
quilt additional straight lines in one inch
increments on both sides of the center
line.
29. Quilt halfway between the one inch
increments to create ½ inch spacing.
30. Quilt halfway between the ½ inch in-
crements to create ¼ inch spacing.
31. If you desire quilting that is more dense,
quilt halfway between the ¼ inch incre-
ments to create 1⁄8 inch spacing.
32. Trim the block to 12 ½ x 12 ½ inches
square (Photo 7).
33. The block is finished! Please share your
block on social media using hashtag
#AngularQuiltBlock
Finished?
Fantastic!
Page 12You can also read