CentraMist Tower Fan Manual - 360o Misting - PN: F10-01-020 - Big Fogg
←
→
Page content transcription
If your browser does not render page correctly, please read the page content below
CentraMist Tower Fan Manual
                                    360o Misting

PN: F10-01-020                     HydroMistUSA.com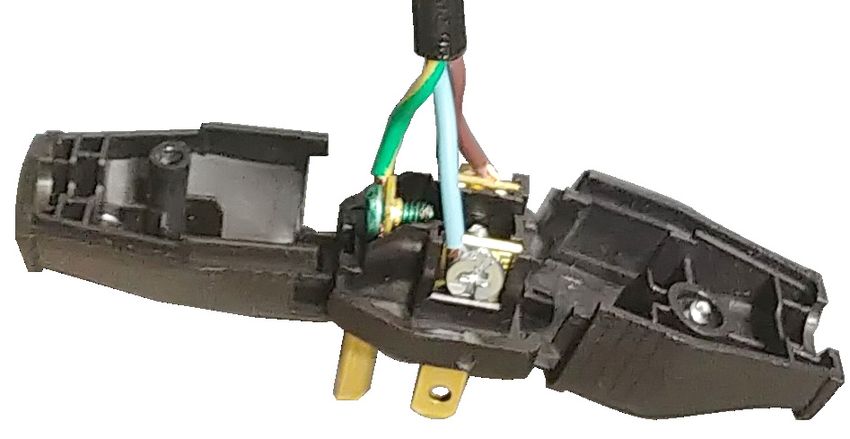
HydroMist™
a division of Flame Technologies, Inc.

         P.O. Box 1776
      Cedar Park, TX 78630
           Call: 512-225-0923
   Email: orders@hydromistusa.com
    http://www.HydroMistUSA.com
©2018 HydroMist. All rights reserved.

             Updated 09/27/18.

 The purpose of this document is to be informative,
 and as such is not guaranteed to be error-free.
 HydroMist takes steps to ensure that our information
 is correct and as error-free as is reasonable. Please
 let us know if you believe you found a typo or error.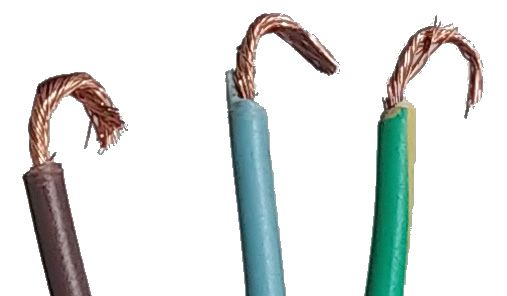
HydroMist                                                                      HydroMistUSA.com

Contents
Warnings . . . . . . . . . . . . . . . . . . . . . . . . . . . . . . . . . . . . . . . . . . . . . . . . . . 5

What’s In the Box . . . . . . . . . . . . . . . . . . . . . . . . . . . . . . . . . . . . . . . . . . . .  6

Assembly . . . . . . . . . . . . . . . . . . . . . . . . . . . . . . . . . . . . . . . . . . . . . . . . . .  8

Operation . . . . . . . . . . . . . . . . . . . . . . . . . . . . . . . . . . . . . . . . . . . . . . . .  10

    Power & Speed Control  . . . . . . . . . . . . . . . . . . . . . . . . . . . . . . . . . . . .  10

    Misting . . . . . . . . . . . . . . . . . . . . . . . . . . . . . . . . . . . . . . . . . . . . . . . .  10

Winterizing Instructions for Misting Fan Heads  . . . . . . . . . . . . . . . . . . . . . .  10

Replacement Parts  . . . . . . . . . . . . . . . . . . . . . . . . . . . . . . . . . . . . . . . . . .  10

Available CentraMist Fan Models . . . . . . . . . . . . . . . . . . . . . . . . . . . . . . . . . 11

HydroMist One (1) Year Limited Warranty . . . . . . . . . . . . . . . . . . . . . . . . . . . 11

                                                      3
HydroMist HydroMistUSA.com
4HydroMist HydroMistUSA.com
Warnings
Read and follow all instructions before operating fan. Do not use fan if any
parts are damaged or missing. Do not bend blades.
Do not expose the fans to water from a high-pressure cleaner (pressure
washer). Doing so could lead to electrical shock or damage to the motor.
Always disconnect fan from power outlet before cleaning, moving or
repositioning.
To clean, simply wipe down with soapy water & gently rinse with a hose.
Dry fan before reconnecting to power outlet.
Never insert fingers or any other objects through grills while fan is operating.
Do not operate mist in freezing weather conditions. Misting components must
be winterized to prevent damage.
Motor bearings are sealed and do not require additional lubrication.
When securing power cables on outdoor installations, loop them below and
back up to the power outlet. This makes any moisture collection on the cable
drip to the floor instead of into the outlet.
Included instructions are written for U.S. wiring standards and building
codes. Please refer to your local wiring standards and building codes to
avoid complications or personal injury.
5HydroMist HydroMistUSA.com
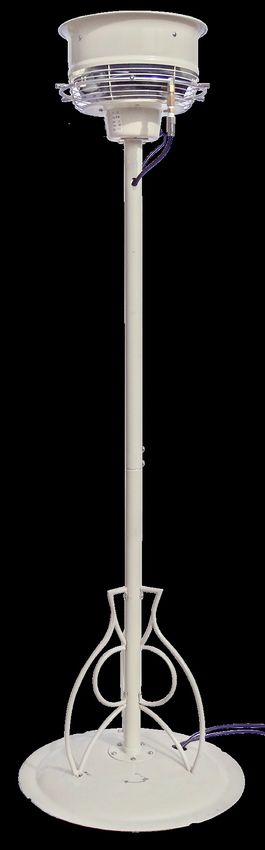
What’s In the Box
9
7 8
12
11
6
4
3 10
5
2
13
1
14
15
16
6HydroMist HydroMistUSA.com
# DESCRIPTION QTY
1 Pedestal Base 1
2 Pedestal Mounting Screw 4
3 Support Mounting Screw 6
4 Lower Support 3
5 Lower Pole 1
6 Pole Connecting Screw 2
7 Rubber Pole Grommets 2
8 Wire and Tube Routing Hole 2
9 Upper Pole 1
10 Upper Mounting Screws 4
11 Fan Head with Misting Nozzles 1
(nozzles already installed)
12 Power Cord 1
13 Misting Ring 1
14 1/4-Inch Nylon Tube 1
15 Wire and Tube Exit Hole 1
16 3/8-Inch x 1/4-Inch Reducer 1
7HydroMist HydroMistUSA.com
Assembly
1. Attach Lower Pole (5) to Tower Base (1), using Tower Mounting Screws
(2).
2. Attach Lower Supports (4) to the Lower Pole (5) using Support Mounting
Screws (3).
3. Attach Upper Pole (9) to Fan Head (11) using Upper Mounting Screws
(10).
4. Remove Pole Connecting Screws (6).
5. Slide Upper Pole (9) and attached Fan Head (11) onto Lower Pole (5),
and re-install the Pole Connecting Screws (6).
6. Hold the assembly by the Upper Pole (9) close to the Fan Head (11) and
SLOWLY tilt and lower the Fan Head (11) until the weight of the unit can
be gently placed onto the ground. Be careful not to damage the Misting
Ring (13) or any of its components
7. Push the Power Cord (12) through one of the Wire and Tube Routing
Holes (8) until it exits the bottom of the Tower Base (1).
8. Route the Power Cord (12) up through the Wire and Tube Exit Hole (15)
from the bottom side of the Tower Base (1).
9. Push the 1/4-Inch Nylon Tube (14) down through the unused Wire and
Tube Routing Hole (8) until it comes out of the Tower Base.
Note: Wire and tube should not both go into only one Tube Routing Hole (8).
Be sure Rubber Pole Grommets (7) are still covering the hole edges.
10. Route the 1/4-Inch Nylon Tube (14) up through the Wire and Tube Exit
Hole (15).
11. Connect the top end of the 1/4-Inch Nylon Tube (14) to the inlet fitting
on the Misting Ring (13). Be sure the tube is pushed in firmly to reduce
the possibility of leakage.
12. Remove any remaining slack of the 1/4-Inch Nylon Tube (14) and Power
8HydroMist HydroMistUSA.com
Cord (12) by pulling down on the free end underneath the Tower Base
(1), and then repeat for the Wire and Tube Exit Hole (15).
13. Press the other end (bottom) of the 1/4-Inch Nylon Tube (14) into the the 3/8-
Inch x 1/4-Inch Reducer fitting. Make sure to push the tube into the smaller
end of the fitting, ensuring that the tube is inserted completely into the fitting.
The 3/8-Inch side of the Reducer fitting connects to a misting pump.
14. Use needle nose pliers to bend the exposed wires of the power cord
into a hook shape.
15. Place the correct wire clockwise around each terminal, under the screw
head, so that tightening the screw draws the wire around the screw shaft.
The three wires should be installed as shown below:
a. GOLD screw = BROWN wire
b. SILVER screw = BLUE wire
c. GREEN (Ground/Bottom) screw = GREEEN/YELLOW wire
Green/Yellow Wire Brown Wire
Green Screw Blue Wire
Gold Screw
Silver Screw
16. Close the clamshell plug and tighten the center screw. Do not pinch the
wires when closing the clamshell.
9HydroMist HydroMistUSA.com
Operation
Power & Speed Control
The tower fan model has a built-in switch, but does not have speed controls.
It is not recommended to connect the fan power to a variable speed control
(rheostat), as the motor is not designed to handle that.
Misting
A high-pressure misting pump (sold separately) is required to use the misting
function. See the misting pump’s manual for operating instructions. HydroMist
recommends the quiet Digi-Pro pump.
Winterizing Instructions for Misting Fan Heads
1. Remove all nozzles from fan ring. This allows the nylon hose and rings to
completely drain, which prevents breakage due to freezing.
2. Clean the nozzles with 50/50 diluted vinegar and warm water. Do not
use harsh chemicals as they will harm the o-rings.
3. Store nozzles in a small container or baggie to prevent them from
collecting dust while not in use.
4. For harsh winter weather conditions, cover or store the fan heads to
prevent them from becoming damaged.
Replacement Parts
Please contact HydroMist for pricing and availability of replacement parts.
10HydroMist HydroMistUSA.com
Available CentraMist Fan Models
PART NO. DESCRIPTION
F10-14-018 20" Black Ceiling Misting Fan with 5 Nozzles
F10-14-019 20” White Ceiling Misting Fan with 5 Nozzles
F10-14-020 20” White Tower Misting Fan with 5 Nozzles
HydroMist One (1) Year Limited Warranty
All HydroMist products are warranted for a period of one (1) year for defects
in workmanship and materials under normal use and service. This warranty is
extended solely to the original purchaser. In order to initiate this warranty, the
product registration form must be completed and sent to HydroMist, along
with a copy of the purchase invoice, within 30 days of purchase.
In General: If a HydroMist product fails because of defect in material or
workmanship under normal use and maintenance within one year from date
of purchase, we will, at our option and after inspection, repair or replace the
defective product.
About Your Warranty: Fan products, like all mechanical devices, need
periodic parts and service to perform well. Normal use and service means
not to operate in excess of recommended maximum speeds, pressures,
temperatures or using fluids not recommended or compatible with component
materials.
11Document PN: F10-18-002
You can also read