WHAT'S NEW, COMMON FEATURES IN OFFICE 2010
←
→
Page content transcription
If your browser does not render page correctly, please read the page content below

WHAT’S NEW, COMMON FEATURES IN OFFICE 2010
2
Contents
Section 1: Ribbon Customization.............................................................................................................. 4
   Customizable Ribbon ............................................................................................................................ 4
Section 2: File is back ................................................................................................................................ 5
   Info Tab ................................................................................................................................................. 5
   Recent Documents Tab ......................................................................................................................... 7
   New Documents Tab ............................................................................................................................. 7
   Printing Tab ........................................................................................................................................... 8
   Save & Send Tab.................................................................................................................................... 8
   Help Tab ................................................................................................................................................ 8
Section 3: Enhanced Editing ..................................................................................................................... 9
   Live Preview Pasting.............................................................................................................................. 9
   Navigating and Reorganizing using Headings ....................................................................................... 9
   Search Using the Navigation Pane ...................................................................................................... 10
Section 4: Enhanced Graphic Options .................................................................................................... 11
   Capturing Screenshots ........................................................................................................................ 11
   Capturing Screen Clippings ................................................................................................................. 11
   Customizing Images ............................................................................................................................ 12
Section 5: Help ........................................................................................................................................ 13

                                                                            3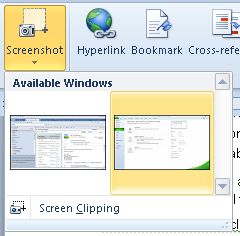
Section 1: Ribbon Customization
Office 2010 is very similar to Office 2007. Tools and options are still located on the Ribbon and it’s here
that you'll notice some changes. Notice the arrow on the far right end of the Ribbon, next to the help
button. This arrow control lets you minimize and maximize the Ribbon. In 2007, you double clicked a tab
to toggle the ribbon open or closed.

Customizable Ribbon
In Office 2007 there was no way to customize the ribbon. Office 2010 allows you to add, rearrange, or
remove tabs or command groups, and add or remove options from the command groups.
To customize the ribbon, go to File > Options > Customize Ribbon.
To hide any tab, uncheck the box next to it and click OK.
To add a customized command group, Under Customize the Ribbon, click the tab on which you want to
add a command. Here, a command group will be added to the Home ribbon:

Below, click New Group.
Click Rename…
Enter a Display name and click OK.

To add tools to your group, click the group in the right pane and the tool in the left pane. Click Add.
After you’ve selected all your preferred tools, click OK.
The new command group will appear on the ribbon.

                                                     4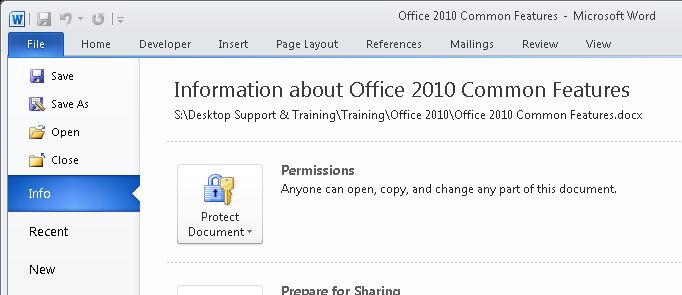
Section 2: File is back
The File tab in Microsoft Office 2010 replaces the Microsoft Office Button and File menu used in earlier
releases of Microsoft Office.
Office 2010's new File tab takes you to the “Backstage View,” which contains everything the Office 2007
menu and the earlier File menu did, and more. The File tab is colored to indicate its special status, and
can't be removed from the Ribbon like other tabs. Backstage view is different for every Office
application, but there are many common features.

Anytime you access the Backstage view, you will see the Info tab highlighted and it’s options displayed
to the right of it.
The tabs on the left of Word's Backstage view are very similar to – if not, identical – to that in all the
other applications within the Office 2010 suite.
The first four Backstage tabs are easy: Save, Save As, Open, and Close work just as they always have.

Info Tab
The Info tab has three buttons that provide access to various tasks.

Protect Document
The Protect Document button allows you to encrypt files, restrict access, and protect various portions of
a worksheet. Most of these options are also located on the Review tab of the Ribbon.

                                                      5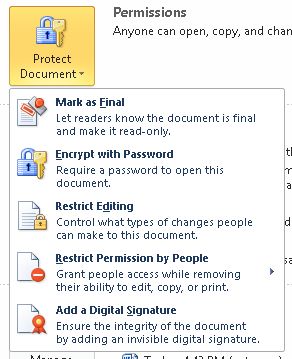
Check for Issues
The Check for Issues button provides tools for checking a document for accessibility and compatibility
issues, or looking for hidden content that you may want to remove.

The Accessibility Checker
The Accessibility Checker is available in Word, Excel and PowerPoint. It looks at your document and
reports any potential accessibility problems. It specifically looks for issues that might make it difficult for
someone who's visually impaired to read and understand your work. The Accessibility Checker is simple
to use, and it makes solving accessibility problems easy.
To check a document, go to File > Check for Issues > Check Accessibility. The Accessibility Checker task
pane will appear to the right edge of your window. Here you will find Errors in the document that are
not accessible and Warnings on items that may not be accessible.
As you click on each error, information will appear in the bottom portion of the task pane instructing
you how to fix it.

                                                       6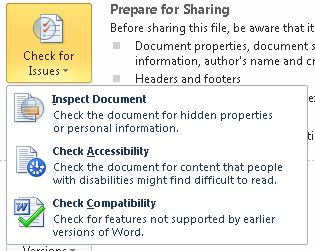
Manage Versions
The Manage Versions button lets you locate unsaved versions of a file.
Recent Documents Tab
The Recent tab lists files that you've recently worked on, along with locations where you've recently
saved files. You can also arrange to see recent files listed on the left side of Backstage view. Let's try
that.
Recover Unsaved Files
Notice the option to recover unsaved files in the lower right. This is the same as the Manage Versions
button on the Info tab.
New Documents Tab
Like Office 2007, Office 2010 provides a variety of templates for most applications, though Outlook lacks
this tab. When you select a template category, you see a number of variations of that template.
The nice thing about Backstage view is that you can choose to open a new file, select a template
category, specify which template you want, see an example, and create a new file all within the same
interface.
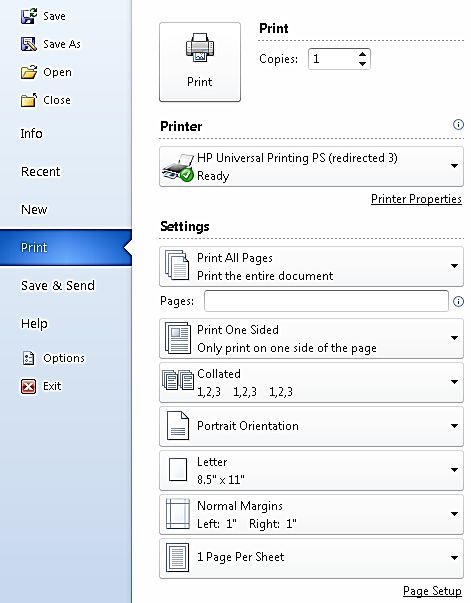
7Printing Tab
The Print option in the Backstage view combines the old page setup, print preview, and print functions
into a single pane. All the options you need for printing are here. The built-in preview immediately
shows how the page will look once you click the big Print button.
Save & Send Tab
The Save & Send tab combines several older features and adds important new ones. It lets you send a
file as an e-mail attachment, or change the file type. It lets you save a file as a PDF document and this
functionality is now built-in and doesn't require that you download an add-in program.
Help Tab
The Help tab provides access to the same help features as the Help icon on the Ribbon.
The Getting Started button takes you to a series of online tutorials online at Microsoft.com.
8Section 3: Enhanced Editing
Live Preview Pasting
With live preview pasting, you can see how copied content will look before you actually paste it into
your document.
With content copied to the clipboard, right-click where you want to paste. A sub menu will appear with
paste options.
Hover over the first option to see how your content will look if the source formatting is kept.
The second option will show you how the content will look if the formatting is merged with the
content destination.
The third option will paste the text only, without any formatting at all.
To make your selection, click the option of your choice.
Navigating and Reorganizing using Headings
Rearrange entire portions of your document using the Navigation task pane. As you apply styles to your
document, the headings will appear in the Navigation pane. Each major heading and all the content
associated with it can be dragged and dropped for easy reorganization of your document.
9Search Using the Navigation Pane
Easily search for specific content using the
navigation pane search field. When you enter a
search string and key Enter, the sections of the
document that contain the string will be
highlighted. You can easily click each section to
jump around the document.
10Section 4: Enhanced Graphic Options
The Office 2010 programs have added features to expand and enhance your graphics options.
Capturing Screenshots
Office 2010 PowerPoint, Word, and Excel all include a new feature that lets you capture and insert an
image of a complete program window or a partial clipping of your screen. You'll find this Screenshot
option on the Insert tab.
If you want to capture an entire application window, the application can't be minimized. It doesn't need
to be maximized to fill the screen, but you need some size of window to capture.
To add a Screenshot, click Insert > Screenshot.
The program takes a moment to capture all open windows, and then displays them in the Available
Windows gallery. To insert a captured window into your open file, you simply select the window you
want.
The window image is inserted into your file. This image is the same as any other, and you can use all of
Office 2010's image editing effects to modify it.
Capturing Screen Clippings
For many examples, you don't need an entire screen -- you need only a partial section, which Office calls
a clipping. The Screenshot option lets you make clippings easily.
To insert a clipping, to Insert > Screenshot > Screen Clipping. The last active window will appear and
your cursor will be a drawing tool. Click and drag the area to be clipped and as you let go, the clip will be
11inserted into your document. Note: If you want to clip the window you are working in, you will have to
open a second instance of your document by going to View > New Window.
Customizing Images
Removing Image Backgrounds
When you insert an image, you're probably most concerned with something in the center or foreground
of that image. There's something there that you want people to focus on, and the rest of the image is
just in the way. Office 2010 lets you hide those unwanted elements.
To remove the background of an image, click to select it. On the Picture Tools tab that appears, click
Remove Background > Keep Changes.
12Section 5: Help
The following resources are available for help with Office 2010:
CSULB Academic Technology Services Helpdesk
o x54959 or itss@csulb.edu
CSULB ITS Training Website
o http://training.csulb.edu
Microsoft Online Tutorials
o http://office.microsoft.com/en-us/support/getting-started-with-office-2010-FX1018
22272.aspx#1
Your local campus technical coordinator
o http://daf.csulb.edu/offices/its/networkservices/it_coordinators.html
13You can also read