The Login Screen may be accessed directly at the following link: Or by visiting Payality's website at www.payality.com
←
→
Page content transcription
If your browser does not render page correctly, please read the page content below

The Login Screen may be accessed directly at the following link:      Or by visiting Payality’s website at
                                                                               www.payality.com
    https://rpo.payality.cloud/RPO/Login/Login.aspx                then clicking on LOG IN, then EMPLOYER
                                                                         and finally the PAYROLL Link

                                                                                                             1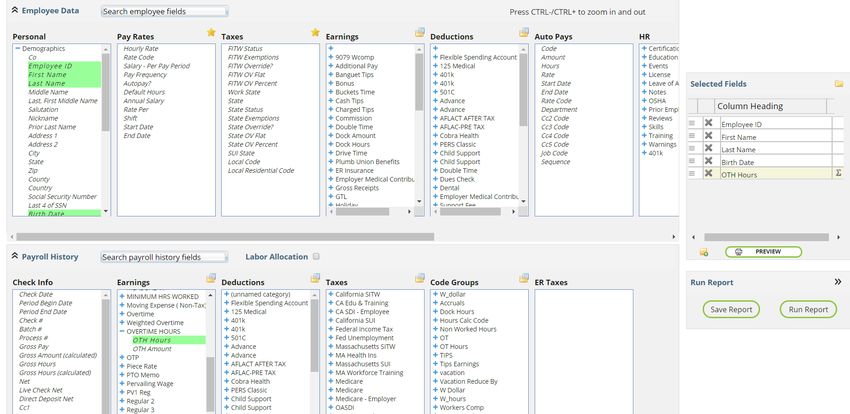
Home Page
   The Home Page provides
 navigation to the key areas of
          the system.

  All areas of the solution
may also be accessed from
    the top menu bar by
clicking on the desired link

                                              2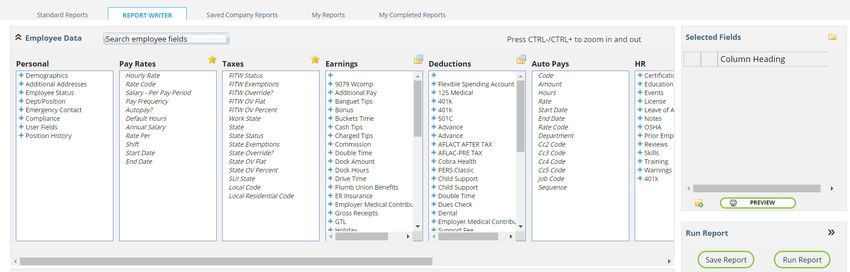
To add newly hired employees into the system
Click on the Add Employee Icon, then Click New
  Hire Wizard. You may add W2 employees or
  independent contractors from this screen by
         clicking on the appropriate icon

                                           3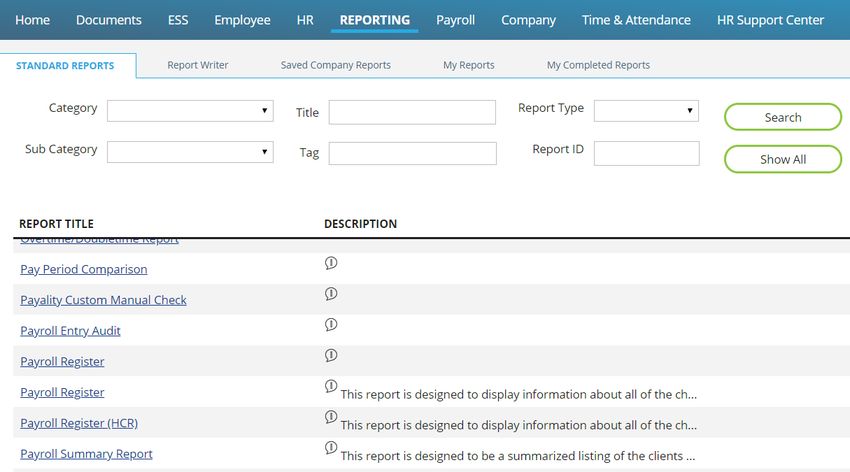
The next available Employee ID will automatically populate. You may change it if
desired. You will then fill in the fields listed by clicking on the icon in each area.

                                                                                         4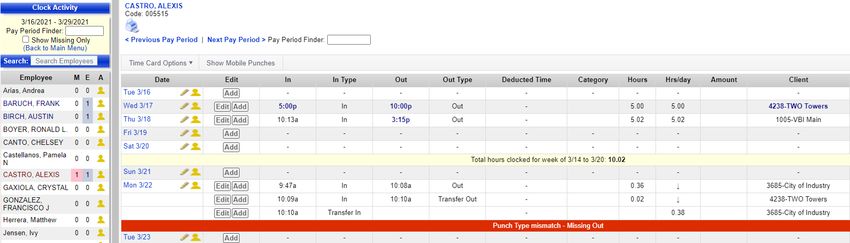
The email invitation will include the following link:
                        After entering all of the new     https://rpo.payality.cloud/Employee/Login/Register.aspx
                       hire’s information, go to Finish
                        and then click on the Create      Employees will then create their account. PLEASE NOTE
                                Employee Icon.              the value to be entered in the Company field is the
                                                                  Payality Client ID, NOT Company Name

                                                                                                    Payality Client ID

 We also recommend that you choose the option
  of sending an email invitation to the new hire
  with instructions for registering for their online
 employee portal where they may view paystubs,
tax forms and update their employee information
 as needed. Simply put a check mark next to the
 employee’s email address before clicking Create
                     Employee.                                                                              5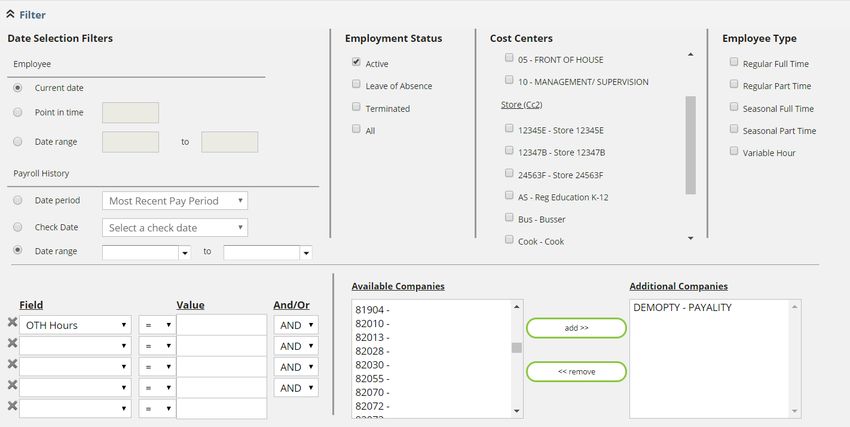
After adding the New Employee                                                               1
1. Click on Time and Attendance
2. Click on Employee Set-up
3. Click on the name of the New
    Employee

            2

                                                         3

        PLEASE DO NOT ADD ANY NEW EMPLOYEES THAT WILL RECEIVE WAGES USING THE “ADD NEW EMPLOYEE
                 OPTION”. NEW EMPLOYEES NEED TO BE ADDED DIRECTLY TO OUR PAYROLL SYSTEM
Add the Login ID and Password

1. Click on the Edit button next
   to Web Logins
2. Enter a Minimum 2-digit user
   code in Logins/Numbers Field
3. Click on Set/Reset Password
4. Type in the password in New
   Password and the enter again
   for verification fields. The                        1
   password must be 8 characters
   and have letters and numbers.
5. Click on Save and Exit
                                           2
                                                   3

                                       4       4

                                   5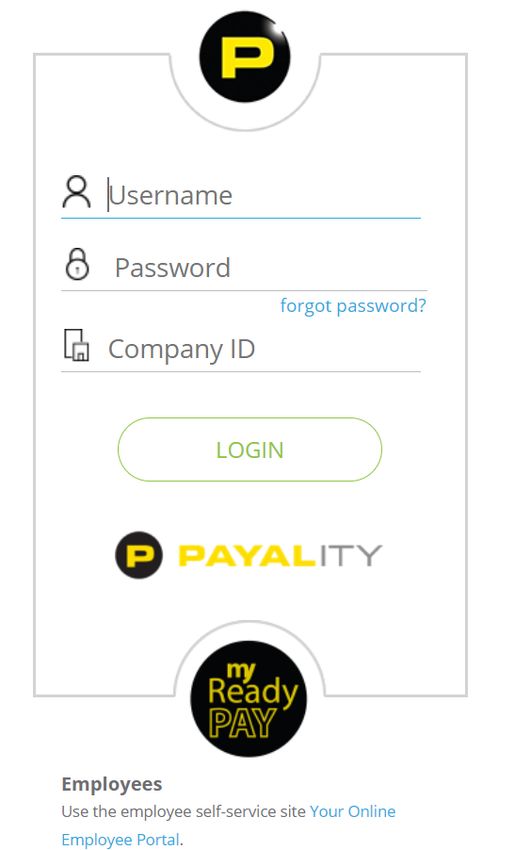
The Edit Employee icon allows
                                   for existing employees records
                                     to be viewed and edited as
                                               needed.

                                         After clicking on Edit
                                   Employee, a list of Employees
                                   will appear. Simply click on the
                                    employee’s name to access
                                       their employee records.

The employee list may be sorted,
   Filtered to include/exclude
certain employees and searched
          by name or ID.
                                                             8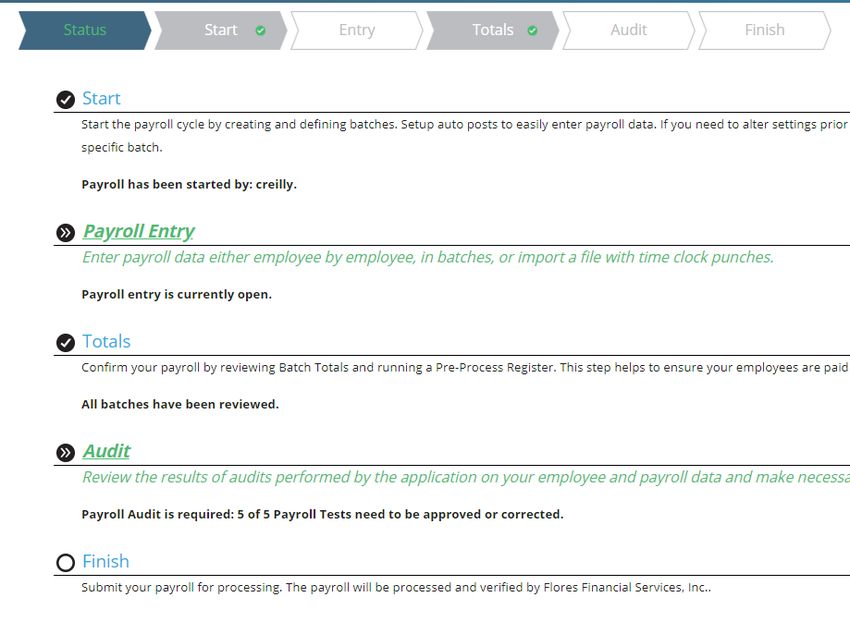
After clicking on the employee’s name, an information screen will appear. There are
 two options for editing employee information. One option is to click the >> icons
next to the desired category. Simply enter the updated information and then save.

                                                                              9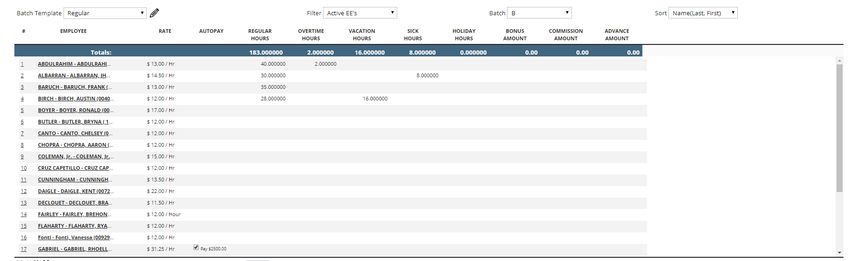
The second option for editing employee data is to click on
                                                          the Payroll Data link then the category you wish to update.

     For example, Click on Deductions to change or Add
Deductions. Click on Add , then choose a deduction from the
drop-down menu. Then enter the Rate/Amount and chose if
the deduction is a flat amount or percentage. Then enter the
   date you want the deduction to start or if stopping the
                   deduction the End Date.

                                                                                                              10
Employees may have their net pay direct deposited
to 1 or more accounts. In order to add a direct
deposit, click on Payroll Data, then Direct Deposit,
then Add. To edit existing direct deposits, click on
the account listed in the display.
The priority determines which direct deposit is first for employee with more than 1 direct deposit. The first
Enter the Bank Routing Number. direct deposit should have a priority of 1 then each one thereafter with a priority of 2, 3 etc.
Make sure to get this from an
actual check and not a deposit
slip
(the bank name will appear once saved)
Then enter and re-enter the
Account Number and choose If you would like the direct
account type deposit to be active
immediately, enter a date
Put a check mark if the earlier than today’s date in
employee wants their entire net the Prenote Date field.
pay deposited into this account
or enter the amount and choose
11
either flat or %-Percentage. 25Clicking on Run Payroll Link takes
you to the Payroll Entry section of
the system.
A new payroll may be started by
Clicking the Start link, then Start
Payroll.
If payroll has already been started,
then you may proceed to Payroll
Entry by Clicking on Payroll Entry
12There are two options for entering payroll
Batch Payroll Entry that displays all employees in an excel like grid
Single Payroll Entry for entry of one employee at a time
13If you are using our time and attendance solution and have finalized all timecard edits, simply clock the SwipeClock TWP button to import hours into the payroll grid
Batch Pay Entry

The Batch Payroll Entry screen allows you to enter
or edit imported hours/amounts on a single
screen for all employees.

Adding additional categories simply requires you
to click on the Pencil icon (in the red box above)
and then add the categories from the available
earnings or deduction codes.                         15
Batch Pay Entry

  Right Click on the Highlighted Employees Name to view employee
    details, existing time-off accrual balances being one example.

Clicking on Single pay entry allows for viewing of calculated pay or
for the wage detail from gross to net when clicking on View Details

                                                                       16
Control totals may be entered to
compare to actual batch entries
to identify differences. The
Preprocess Register may be
created to calculate each
employees pay from gross to net
to ensure payroll accuracy
The sort order may
be chosen and
then click Run
Report and it will
appear in a new
window
17If activated
for your
After verifying totals and company, you
payroll accuracy Click on will be
Lock Entry for all batches prompted to
until all batches change to run the audit
Entry Locked to review and
correct
common
entry errors
After the audits have
been reviewed and
approved, then click on
Finish and then the
Close and Submit Payroll
Link to transmit payroll
to Payality for processing
18Numerous reports are available for viewing/printing as needed. To access, click on Reporting, then
Standard Reports and then Click on the Report Name Link. You may search for reports by Category or Title
19The Standard Reports have options for selecting date ranges, filtering to specific categories,
and various outputs. Once entered, click Run Report to view and then save or print the report
The options chosen may be
saved and the Report saved
to the Saved Company
Reports or My Reports for
future use. 20The simple to use yet powerful Report Writer
allows for custom report creation as needed.
All of the database fields are available. To
Create a Custom Report, click on
REPORTING, then REPORT WRITER, then the
ADD Report Writer Report button.
21Clicks on the Fields you wish to appear on the Report. They will highlight as chosen and
appear dynamically in the Fields Grid.
22The Report content may be reviewed
by Clicking on the Preview Button
Additional Filters allow for custom date ranges, employee’s employee status,
cost centers and filters limiting data to certain values.
Once completed, enter the report
Title, choose the Output Format
and then Click Run Report. The
report will display and then be
available for download or printing.
231
Edit Timecards
1. Click on the
Time &
Attendance
Link at the top 3. Employees with
Missing Punches
2. Click on the will have a number
Current highlighted in pink.
Period Click on the
employee’s name
2
3The Missing Punch will have a red bar beneath it. Click on the Edit Button to add/edit punches.
1. Type in the
missing time (am is
keyed as 10a, pm           1
as 2p.

2. You can type a
comment                        2
3. then click Save

4. You may also
change the Client      3
Site location by
choosing from the                  4
Client Site codes in
the dropdown
menu.
1

After correcting all
timecards,

1. Click on Dashboard
                                        2
2. Click on the link that
says Last Finalized Pay
Period

3. Put a Check mark next
to pay period

4. Click Finalize
                            3

                                    4
To add or delete Client Sites 1. Click on the Maintenance Menu 2. Click on Manage Clock Prompts. 3. Click
1 on Labor Prompt X . 4. Delete or Type the 4-digit Client Code-Client Name 5. Click Save
2
3
4
5You can add Geofencing for your client sites to make sure employees are actually at the client site when clocking in.
1. Go to the Settings Menu
2. Click on GeoFence Management
3. On the Next Screen, Click
Create a New Fence
4. Enter a Name
(Enter Client Site Code and Name) 3
5. Enter the Address of the Client Site
6. Put a Check Mark in Email Manager
7. Click Save 4
1 5
2
7
6You can also read