Using Microsoft Picture Manager
←
→
Page content transcription
If your browser does not render page correctly, please read the page content below
Using Microsoft Picture Manager
Storing Your Photos
It is suggested that a county store all photos for use in the County CMS program in the
same folder for easy access. For the County CMS Web Project it is suggested that the
folder be called "Photos." Place all the original photos that may be used for the County
CMS in the folder. Then create a subfolder within the Photos folder to store all the
photos that have been prepared for the county web site (for instance, "Resized Photos.")
Getting Started
• To open Microsoft Picture Manager, from the Start menu, select Programs Æ
Microsoft Office Æ Microsoft Office Tools Æ Microsoft Office Picture Manager
• Picture Manager has an extensive help menu that can be found under Help Æ
Microsoft Picture Manager Help.
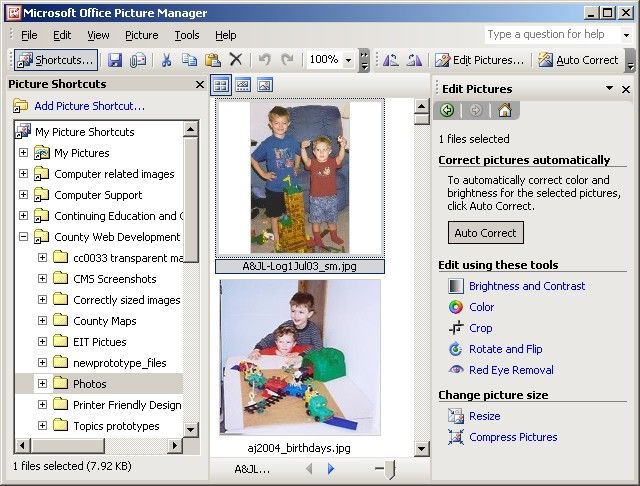
Picture Manager will have a menu bar across the top, followed by shortcut keys listed
below. Notice the three columns in the layout.
1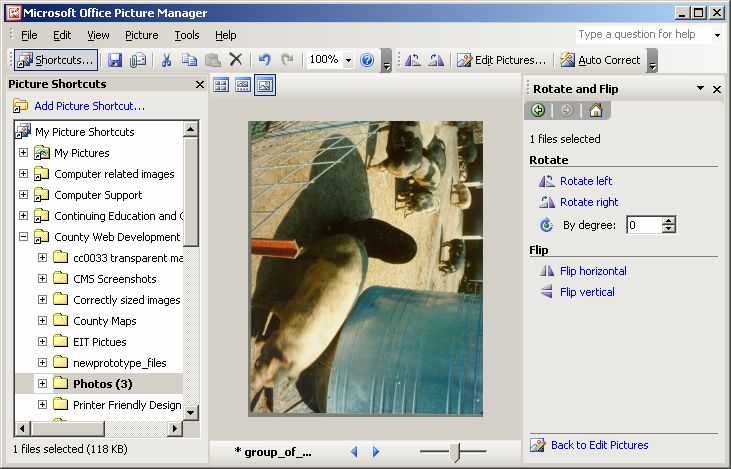
•   Left Column - Picture Shortcuts shows the folders that the user has selected as
       having photos. The column can be turned on or off by selecting the Shortcuts
       option located just above the section. If the Picture Shortcuts column is not
       showing on the screen, click on the Shortcuts option in the menu bar and it will
       appear.
   •   The middle column is the photos. The width of this is determined by the screen
       resolution and how the user has the screen sized. It may be several photos wide or
       just one.
   •   The right column will appear when Edit Pictures is selected from the menu bar.
       This will bring up all of Picture Manager's editing options.

At the top of the middle column three options appear
    • The first one is the thumbnail view that shows small snapshots of all the photos in
        the selected folder
    • The middle option is the Filmstrip view which will put the photos into a
        horizontal mode and allows the selection of one photo at a time as a larger image
    • The third and last option is a single image view.

Useful Options
Undo: Select File Æ Undo to undo the last change made.

Discard changes: To view changes that have not been saved, click the Unsaved Edits
folder in the Picture Shortcuts pane. To discard specific picture edits, select the picture,
right-click it, and then click Discard Changes. (To discard all the picture edits in the
Unsaved Edits folder, right-click the folder, and then click Discard all changes.)

Locating Pictures
Microsoft Office Picture Manager can help the user find folders with pictures stored on
the user's computer or a network location, and will automatically create picture shortcuts
for each access to the photos.

   1. On the File menu, click Locate Pictures.
   2. In the Locate Pictures task pane, if you know which drive or network location
      you want to search, click the arrow next to Look in, and then select it from the
      list. Note: If you are not sure which local drives may contain pictures, select
      Local drives to search all local drives.
   3. Click OK.

                                                                                             2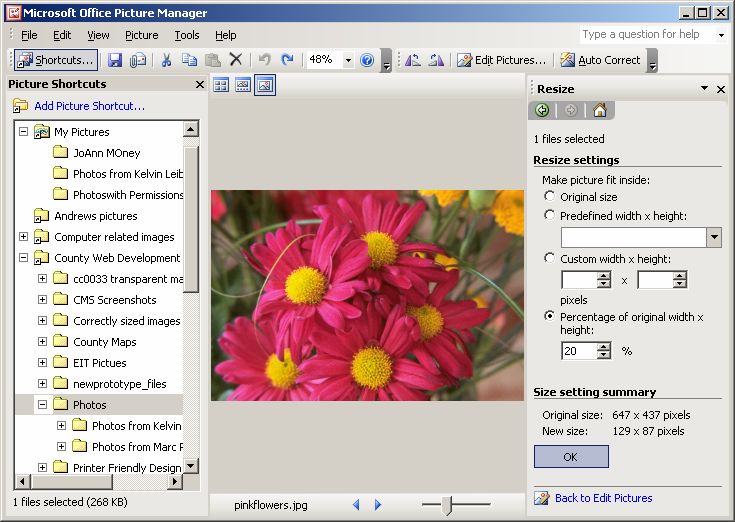
Adding a picture shortcut
If the user knows where the pictures are located, selecting Picture Shortcut will allow a
shortcut to be added. A picture shortcut is a link to a folder on the user's computer or at a
network location. (It is not the actual folder.) To view pictures in a folder, you must add a
picture shortcut that points to the folder.

       1. From the menu, Select File Æ Add Picture Shortcut or on the Shortcuts Menu
          bar, make sure the Picture Shortcuts listing is showing on the left side of your
          screen and then click Add Picture Shortcut.
       2. Browse to the folder that contains the desired pictures.
       3. Click Add.

Editing Your Picture
Most photos will require at least two editing steps—cropping and resizing. Note: If the
Edit Pictures menu does not appear on the right side of the screen, select the Edit Pictures
option on the menu bar to be the menu to appear.
Options for editing the photo include:

   •    Brightness and contrast Allows the adjustment between light and dark tones.
        This feature allows the user to correct pictures that appear too light or too dark.
   •    Color — Allows the adjustment in the hue and saturation. This feature corrects
        pictures with colors that are tinted or dull.
   •    Crop — Allows the cropping out unwanted parts of a picture. Cropping allows
        the user to cut out parts of the photo that contains distracting elements. Cropping
        is done to trim vertical or horizontal edges of an object. (Pictures are often
        cropped to focus attention on a particular area.)
   •    Rotate and Flip — Allows the rotating pictures or flip them on the current axis
        of the picture. It is used to correct pictures that have been taken sideways for a
        portrait orientation.
   •    Red eye removal — Allows for the removal of the red from the eyes of people in
        the photo caused by the camera's flash.
   •    Resize — Allows changes to the dimensions of a picture. Enlarge a picture for
        printing or reduce fit on a web page or in a publication or newsletter. Resizing
        also changes the file size making the image faster to load on the web.

                                                                                             3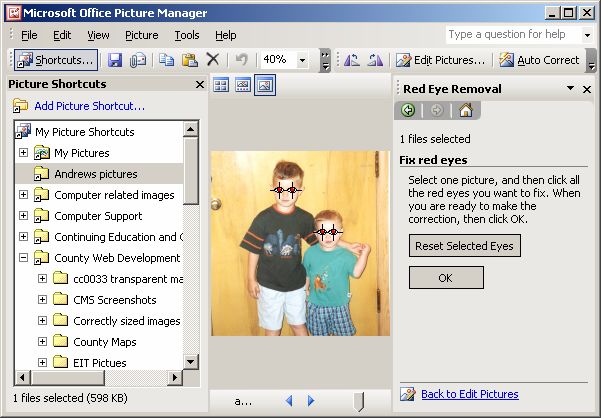
The main options that will be used to prepare photos for the County CMS and newsletters
will be crop, rotate and flip, red eye removal, resize and compress. This document will
cover those subjects. If more information is needed on brightness and contrast and color,
please use the help menu that is included with the Picture Manager Program.

Selecting a Photo
   •   Double click on the photo that needs editing and it will appear alone in the middle
       of the screen.
Auto Correct
The user may want to select the Auto Correct option in the top menu before any other
corrections are made. This option can sometimes lighten a dark picture or make other
corrections in a quick easy manner. Remember Edit Æ Undo Auto Correct can always
undo the correction immediately.

Cropping Your Photo

Once the photo has been selected, use the Edit menu on the right side of your screen and
select Crop. A new menu with cropping options will appear

                                   The black marks are
                                   crop handles

                                                                                           4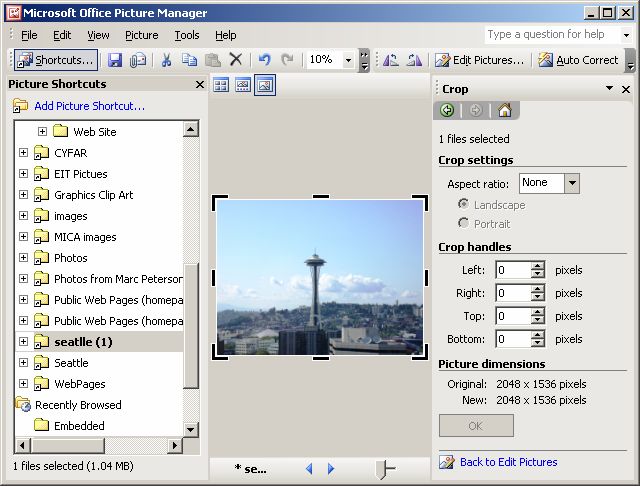
Crop Settings

     The Aspect Ratio can be used if one or more pictures are selected. If multiple
     pictures of different sizes are selected, this is the only way that all the images can
     be cropped at once. The Aspect Ratio has predetermined sizes listed, therefore if
     the user wanted all the photos as 4x6" photos, the Aspect Ratio can be used to
     change the photos. It is not a good option to use for County CMS images

  Picture dimensions

     Located at the bottom of the Crop options is a section entitled Picture
     Dimensions. In this example the original picture dimensions are 2048 x 1536
     pixels, once cropping the photo is started, the new dimensions area will change to
     reflect the changes.

  Crop Handles

     •   Mouse over any of the black "handles" until you receive a "t" shaped bar then
         click and drag to crop the picture. (The crop handles are the black marks
         around the outside of the photo.)
     •   Select OK to complete the cropping. (Remember, Edit Æ Undo will reverse
         the last correction.)
     •   Select the green left arrow at the top of the Crop menu box to return to the
         Edit menu or select "Back to Edit Pictures" located at the bottom of the edit
         pane.

Rotate and Flip

                                                                                          5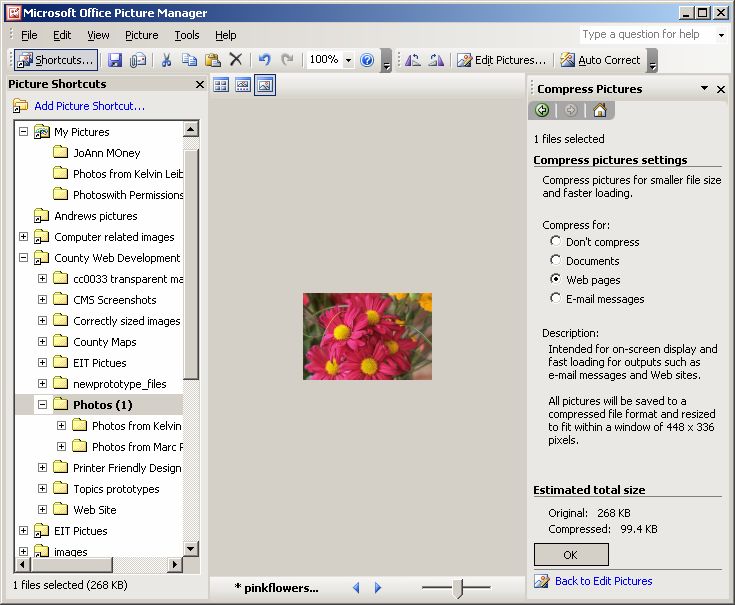
•   Rotating — Choices include rotating to the left, the right or by degree. Select
         the option that best suites your needs.
     •   Flip — This option will allow the photo to be flipped. Use caution when
         flipping a photo since this may cause shadows or elements in the picture to be
         incorrect.

Red Eye Removal

  Red eyes are a common problem with photos, especially photos of children. Picture
  Manager has a quick and easy way to fix red eye problems.

     •   From the Edit Pictures menu, select Red Eye Removal
     •   Mouse over the eyes you want to change. A circle (target) should appear
     •   Click on each eye once to add the red eye target to each area

     •   Select OK from the Fix Red Eye menu. (If some red eye is left in the photo,
         zoom in on the photo and try again.)

                                                                                       6
Resizing Pictures
Note: It is very important to resize photos properly for the web or newsletter. The
file size of the photo impacts the load time of a web page and the size of a newsletter.
There are several options available to resize your photos.
• Predefined width x height — dropdown box has predetermined sizes listed. As a
general rule, this is not a good option for resizing photos for newsletters or the
ISU Extension Content Management System.
• Custom width and height —If at least one of the dimensions is known for the
image (in pixels) it may be entered. Once one of the dimensions is entered look at
the "Size setting summary -- New size" to find the correct other dimension.
• Percentage of original width x height — If selected it will show 100%, change
the percentage to resize your photo. Once a number is typed in, notice how the
New Size (under Size setting summary) changes. Watching the new size, enables
the user to find out if the photo is being resized correctly.
• Select OK to finalize the changes.
7Compress Pictures
If a photo is compressed, newsletter documents save to a smaller more manageable size
and web pages load faster. This option allows the user to compress a photo. Four
options are listed for compressing as well as the "Estimated total size" of the original and
the compressed version of the file.
Saving your photo
Once all the changes have been made to the photo, the photo will need to be saved.
• Select File Æ Save As and rename the file. Note: If save is selected instead of
Save As and the file is not renamed, the original photo will be overwrote. It is
strongly suggested that the original photo file be preserved and new edited version
have a different name.
• Type in a new name and select Save. (If the user has set up a folder specifically
for resized photos, make sure that proper folder is selected before saving.)
8Other Options
Change a color picture to black and white
• Select the picture appropriate picture to work with and select Edit Pictures
• In the Edit Pictures task pane select Color
• Type -100 in the Saturation settings text box (or move the slide all the way to the
left).
Zoom
• On the menu bar at the top of the page (2nd row) there is a number with a
percentage (for example 100%) with a drop down arrow next to it. Change the
viewing size of the photo by changing the percentage (or selecting from the
options given). This is very helpful with detailed photos or if the red eye removal
is being used.
View Menu
• The View menu has a "Sort by" feature that will sort the photos that are showing
by file name, date, file type or file size.
Written for the County CMS project. MS Picture Manager is part of the MS Office 2003 package.
Using Microsoft Picture Manager.doc
June 18, 2004
9You can also read