Digital Camera & Photo Editing School for Teachers & Students using the Olympus D-535 Camera and Adobe Photoshop Elements v.3
←
→
Page content transcription
If your browser does not render page correctly, please read the page content below

Digital Camera & Photo Editing School
for Teachers & Students using the Olympus D-535
Camera and Adobe® Photoshop® Elements v.3
Start Digital Camera & Photo Editing Classes,
Clubs, Programs, Camps and Personal Use

Create Photo Projects for School & Personal
  4Reports – Essays – Science Projects
  4Flyers – Announcements – Awards
  4Signs – Photo of the week – Charts
  4Presentations – Calendars
  4Event Photo Montages – Banners
  4Posters – Year Books – Maps
  4Web pages – Ads – Books – Cards
  4Magazines – Newsletters – Invitations
  4Directories – Manuals – Menus
  4Resumes – Schedules – Video titles
  4Technical Sheets – Manuals – Menus
  4Special Events – Class Projects – Field Trips

Adobe Photoshop Elements for Editing Photos
  4Education   retail prices: Under $79 (check resellers for lowest pricing)
  4Education   resellers list at:
		 http://www.adobe.com/education/digkids
  4Free & easy file share – PDF allows viewing and printing on any computer
		 using Adobe Acrobat Reader with PDF Slideshow.
  4Easy type creation – headlines, titles & paragraphs with photos and artwork.
  4On-board artwork – use Shapes Library to apply artwork and common icons.
  4Printing made easy – on inkjet or laser with intuitive Print Preview for scaling.

Publisher: ADM Enterprises, Inc. • 8737 Larwin Lane • Orlando, FL 32817
Author: Douglas Mitchell • doug@trainingbrain.com • www.trainingbrain.com
Live Seminars: Authorized Olympus & Adobe Education Training Partner
•Photoshop Elements • Photoshop • Illustrator • InDesign • Digital Cameras
Copyright ©2005, Douglas Mitchell • 407.616.0854 virtual • 407.671.1178 fax
All rights reserved, including the right of reproduction in whole or in part in any form.
Photoshop®, Photoshop® Elements, PDF®, Acrobat Reader® Adobe Systems, Inc.,
Apple®, Olympus®, are registered trademarks.

                                                                                            1
Quick Start Course At A Glance
    Essential Digital Camera Features & Options
    Lesson 1: Shoot digital photos in (3) steps, safety
    4Charge rechargeable batteries overnight or insert AA batteries and carry extra batteries.
    4Insert the memory card, don’t force it – flip it over and make sure port door are closed.
    4Turn ON the camera, use the zoom control and start shooting using default settings.
    4Avoid blurred shots: grip, brace, breath, squeeze.
    4Take and review photos using the monitor window and delete unwanted photos.
    4Wear the wrist or neck strap ALWAYS, it’s easy to drop for adults and students.
    Lesson 2: Shoot using flash and exposure mode (light makers)
    4Control light using auto flash, red eye flash, flash on (called fill flash), flash off.
    4Control light using (+) plus exposure and minus (–) exposure settings.
    Lesson 3: Shoot using close up and shooting modes with movies
    4Use the close up mode to capture microscopic like detail and photograph documents.
    4Select a shooting mode: P-Auto, Portrait, Landscape, Night Scene, Self Portrait, Movie.
    Transfer Digital Photos from Digital Camera to Computer
    Lesson 4: Create a photo library filing system to manage volumes of photo files
    4Create a folders inside folders system to: rename, organize, store, retrieve and archive files to CD.
    4Use iPhoto (Mac only) or CAMEDIA Master (Mac and Windows) to organize and manage files.
    4Use Photoshop Elements File Browser (Mac and Windows) to organize and manage files.
    Lesson 5: Download digital photos from camera to computer
    4Install Windows reader file and CAMEDIA Master software on CD.
    4No reader installation needed for Macintosh OSX (auto reads all memory cards brands).
    4Attach the USB cable to the camera and computer after installing Windows reader.
    4Use software to manage the digital file transfer process (or don’t use any application).
    Essential Photographic Techniques to Shoot Great Photos
    Lesson 6: Use these top photographic techniques to shoot great photos
    4Shooting techniques, (50) tips for shooting events, study how others shoot – techniques project.
    4Ten criteria used to judge award winning photos.
    Essential Digital Photo Editing Using Photoshop Elements
    Lesson 7: Crop and straighten crooked digital photos
    Lesson 8: Enhance the color and brightness of photos
    4Use the easy-to-use Quick Edit feature buttons and sliders for all photo fixes.
    Lesson 9: Combine two or more photos into a photo montage
    4Use the move tool with layers to position photos and type around the page.
    Lesson 10: Combine specific parts of several photos by making selections
    4Use the various selection tools to isolate any part of a digital photo, then drag and drop.
    Lesson 11: Add type, drop shadows, bevels, special effect filter gallery
    4Add type, choose color, resize and at one-click effects.
    Lesson 13: Fix red eye with the one-click red eye tool
    Lesson 14: Prepare photos for print, web, e-mail, presentations, video
    4Use the crop tool width, height, resolution constrain options to prepare any file in one step.
    Lesson 15: Use free tutorials, tips, lessons, projects
    4www.adobe.com/education/digkids and download free PDF lessons and projects.
    4www.olympusamerica.com/education for education pricing and free PDF curriculum.

2
Table of Contents
Essential Digital Camera Features & Options

Lesson 1: Take digital photos in (3) steps,
safety tips, shooting steps check list,
A) Take Photos In (3) Steps
  1 Power the camera: charge batteries overnight and insert correctly............................. p 6
  2 Insert the memory card correctly (a mini hard drive for storage)................................ p 6
  3 Turn the power on and shoot with default settings............................................................ p 6
B) Safety Tips: Wrist or Neck Straps, Camera & Accessories
  1 Protect the camera from getting dropped, always wear wrist or neck strap.............. p 6
  2 Digital camera and accessory safety tips.............................................................................. p 6
C) Take Digital Photos
  1 Avoid blurred shots (camera, subject, low batteries)......................................................... p 7
  2 Use the zoom button to get close............................................................................................ p 7
D) Use the Monitor Window to Compose, Light, Shoot, Review, Delete
  How to use the monitor window as a digital photographer.................................................... p 8
E) Photo Practice
  Practice the techniques just learned.......................................................................................... p 8
Lesson 2: Shoot using Flash and Exposure
A) Auto Flash, Fill Flash, Red Eye Flash, Off Flash
 1 What you need to know............................................................................................................... p 9
 2 What you need to do.................................................................................................................... p 9
B) Plus (+) Exposure and Negative (–) Exposure Settings Explained
  1 What you need to know............................................................................................................... p 10
  2 What you need to do.................................................................................................................... p 10
Lesson 3: Shoot using close up and shooting modes
A) Close Up & Super Close Up Photography – called Macro
  1 What you need to know............................................................................................................... p 11
  2 What you need to do.................................................................................................................... p 11
B) Use the shooting modes dial for preset scene lighting and movies
  P-Auto, portrait, landscape, night scene, self portrait, movie.............................................. p 12
C) Use scene dial mode to record video clips
  Select, record, review..................................................................................................................... p 12

                                                                                                                                                     3
Table of Contents
    Transfer Digital Photos from Digital Camera to Computer

    Lesson 4: Create a photo library filing system
    to manage volumes of photo files
       1 Create a folder system to organize photos............................................................................ p 13
       2 Rename photos to be user-friendly using File Browser palette....................................... p 14
       3 Move photos to other folders using the File Browser palette.......................................... p 14
    Lesson 5: Transfer photos from camera to computer
       1 Digital photos are stored in build-in camera memory or on a memory card................. p 15
       2 The computer reads the camera memory or memory card............................................... p 15
       3 The camera or memory card must be physically connected to the computer.............. p 16
       4 Digital photo management software........................................................................................ p 16

    Essential Photographic Techniques to Shoot Great Photos

    Lesson 6: Essential photographic tips & techniques
    A) Shooting Techniques
     1 Get close, zoom in, walk close, fill the frame......................................................................... p 17
     2 Shooting faces............................................................................................................................... p 18
     3 Your point of view......................................................................................................................... p 19
     4 Create a picture frame around the photo.............................................................................. p 19
     5 Arrange your photo...................................................................................................................... p 20
     6 Shooting groups............................................................................................................................ p 21
    B) (50) Tips for Shooting Events
      Lots of things you need to know about shooting events......................................................... p 22
    C) Study How Others Shoot – Photography Techniques Project
      1 Collect your favorite photos...................................................................................................... p 23
      2 Choose the photo techniques and criteria that apply to your photos............................. p 23
    D) Ten Criteria used to Judge Award Winning Photos
      (10) criteria defined......................................................................................................................... p 23

    Essential Digital Photo Editing using Photoshop Elements
    Photo editing check list for Photoshop Elements
       Use this handy check list to process all your photos.............................................................. p 24
    Lesson 7: Crop and straighten crooked digital photos
       Make the photo look it’s best, delete unwanted areas & straighten if crooked.............. p 25
    Lesson 8: Color and brightness correction
       1 Set new default target black and white target values ONCE.......................................... p 26
       2 Use Quick Edit to correct color, bright or darken, reduce shadows.............................. p 26
       3 Use Quick Edit to saturate photo color.................................................................................. p 26

4
Table of Contents
Essential Digital Photo Editing using Photoshop Elements

Lesson 9: Combine several photos into a photo montage
 Use the move tool with layers to position photos and type around the page................... p 29
Lesson 10: Combine specific parts of several photos
by using selection tools
 Use various selection tools to isolate any part of a digital photo, then combine............ p 30
Lesson 11: Add type, drop shadows, bevels,
special effects, filter library effects
 1 Add type to photos (headlines, captions, symbols, shapes)............................................... p 29
 2 Add drop shadows and bevels to type or photos (2 clicks)................................................ p 29
 3 Add special effects to type or photos (2 clicks).................................................................. p 29
Lesson 12: Fix red eye with the one-click red eye tool
 Use the “one” click red eye removal tool to fix pesky red eye photos............................... p 35
Lesson 13: Prepare photos for print, web, email,
presentations, video
 Change the width, height, resolution of a photo to prepare of intended use................... p 21
Lesson 14: Photojournalism, creating projects
 Ask the right questions: who, what, when, where, why, how, URL for examples.............. p 34
Lesson 15: Use free PDF tutorials, tips, lessons,
projects from Olympus Education and Adobe Education
Digital Kids Club
 1 Create flyers, invitations, banners, calendars (free Adobe PDF Lessons)..................... p 35
 2 Lessons & activities on Adobe Education Digital Kids Club................................................ p 35
 3 Links collection for education.................................................................................................... p 36
 4 www.adobe.com/education/digkids > download free PDF lessons, projects................... p 36
 5 www.adobe.com/education > tutorials, lessons, tips............................................................. p 36
 6 www.olympus.com/education > tutorials, lessons, tips......................................................... p 36
 7 https://emporium.olympus.com/education (education purchases).................................... p 36

                                                                                                                                             5
Take Photos in (3) Steps
    1 Insert two (2) AA batteries into the battery chamber
      NOTE > Charger and rechargeable batteries are sold separately.
      Quick Charge Ni-MH B-90SU is recommended for it’s quick charge
      4Put the ends of batteries +/– in correctly or the camera will not   turn on.
      4RECHARGEABLE batteries DO NOT come in the box.
    		 Purchase at https://emporium.olympus.com/education or an electronic store.
      4Tip: purchase one (1) EXTRA SET of rechargeable batteries.
      4Do not mix rechargeable and regular batteries in the camera.
      4Keep batteries charged at all times (after each use, before events).
      4Rechargeable batteries MAY be charged repeatedly.
      4Carry extra charged batteries in your camera case.
      4Keep the extra batteries in a plastic sandwich bag.
    		 This makes them easy to locate and handle.
      4Batteries drain power without use (recharge often).
      4Never keep coins together with batteries (> heat).

    2 Use with built-in digital camera memory
      OR insert a memory card into the chamber
      4Built-in  memory and Memory cards store digital photos.
    		 Think of a memory card as a mini hard drive.
      4A memory card DOES NOT come with the D-535.
      4The D-535 has BUILT-IN memory,
    		 NO memory card needed to start.
      4Olympus D-535 uses xD Picture Card brand memory cards.
      4Purchase memory cards:
    		 https://emporium.olympus.com/education > accessories.
      4Purchase two or three extra memory cards.
      464MB cards are a handy size and are not expensive.
      4Insert ONLY the memory card type/brand for this camera.
      4Never force the memory card into the slot.
    		 If it is not going in easily, turn it over.
      4Insert the memory card according to the icon on the chamber.
      4To insert: push memory card down until it clicks.
      4To take out: push memory card down until it clicks, then release.
      4Store memory cards in a case to protect and keep clean (no dust).
      4Avoid extreme heat or cold exposure to the card.

    3 Turn power ON, zoom in, start shooting using default settings
      4ALWAYS WEAR the WRIST or NECK STRAP! (Adults &             Students)
      4It’s easy to drop a camera (distractions, bumps, etc.).
      4Turn power on – hold down the ON button for one second.
      4Compose the scene in the monitor window.
      4Use the Zoom button to get close.
      4Push your elbows into your sides to steady the camera.
      4Push the shutter button all the way down,
    		 you get a split second to adjust the scene within the camera monitor.
      4When the camera grabs the photo in the monitor – you can move.
      4Keep the camera lens clean.
      4Use a lint-free soft cotton cloth or lens cleaner pen.

6
Avoid Blurred Shots – IMPORTANT
What You Need To Know
1 Camera movement causes blurred photos
  4Squeezing the shutter button too fast or pushing
		 down with your hand will cause camera movement.
  4Avoiding camera movement is MOST IMPORTANT
		 technique to capture crisp sharp photos.
2 Subject movement causes blurred photos
  The digital camera can’t shoot fast enough
  4Examples: baby, cat, dog, people, plants (all move).
  4Delete a blurred photo, it cannot be fixed.
  4Wait for a still moment and be ready to shoot.
  4Use the SHOOT FASTER feature.
		 Hold the shutter button half way down, a green light
		 will appear telling you it’s ready to shoot.
		 Squeeze the shutter button all the way down to shoot.
  4When subjects move — keep shooting lots of photos.
3 Low batteries cause blurred photos
  4Check the battery power level often while shooting.
  4Tip: sometimes photos will start to blur just before
		 the battery power level shows low condition.
  4Recharge batteries after every use.
  4Recharge after one week of sitting without use.
  4Keep extra batteries ready in the camera bag.

What You Need To Do
Grip | Brace | Breathe | Squeeze
1 Grip the camera
  4Find your own special grip position for both horizontal
		 and vertical camera positions.
  4Experiment with several different grip positions.
  4Watch out! Don’t let your finger touch the lens.
2 Brace the camera, arms, body
  4Brace your arms by pushing your elbows inward
		 against your ribs and gently push down.
  4Brace arms, legs or back by leaning against a nearby wall,
		 tree, table, fence, chair, car window (anything for support).
3 Take a shallow breath
  4Take an shallow breath and hold it gently.
  4Holding your breath too tight causes camera shake.
4 Shoot faster using the shutter half way down feature
  4Push the shutter half way down, hold it, then push all the way down to shoot.
  4Holding 1/2 way down prepares the camera for taking the shoot faster.
  4See the green light, this means the subject is in focus.
5 Practice what you have learned
  4Start shooting, take photos everywhere, all the time, in every condition.

                                                                                   7
Use Monitor Window to Compose,
    Check Scene Lighting, Shoot,
    Review, Delete
    1 Compose the scene LIVE – like a video camera
      4Press the power button on.
      4Monitor window appears automatically on the back of the camera.
    2 See scene lighting immediately – light is critical
      to getting great digital photos
      4What you see is what you get.
      4Monitor window shows the scene realistically.
      4Use flash, exposure and shooting modes
    		 to control lighting.
    3 See instant scene possibilities by
      slightly moving the camera (important)
      4Move the camera slightly up/down
    		 and right/left SLOWLY.
      4Monitor window changes instantly.
      4Use the zoom button to get close.
      4Remember: take lots of photos.
    4 Brace your arms into your ribs while
      shooting with the monitor
      4Press the shutter button and take the photo.
      4Push the shutter half way down to focus,
    		 then full down to shoot.
      4Push the shutter all the way down, then steady the camera.
      4Take the 1/2 second delay to steady and reposition the camera
    		 after taking the photo.
    5 Review and delete the photos in review mode
      4Press the green review button.
      4Press the right arrow to move forward, left backward.
      4Press the trash button to delete, press the up arrow to yes, click OK.

    6 Get more details about digital camera options
      4Review the PDF Reference Manual.

8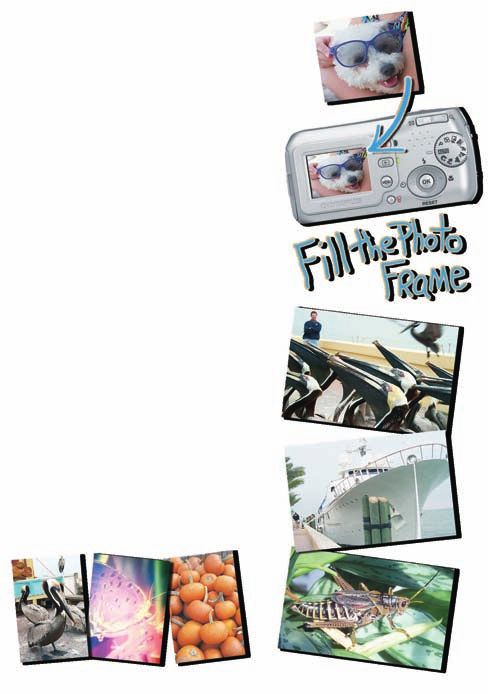
Using the Flash – Where is the Light
What You Need To Know
1 Good digital photos need lots of light
  4The sun produces outdoor light.
  4Light bulbs produce indoor light.
  4If the camera does not find enough sun
		 or indoor light it makes it’s own called flash.
2 How shadows are created
  4Any object that blocks light creates a shadow.
  4The suns rays from 11am to 2pm cast shadows
		 on faces and objects (flash fills up the shadows with light).
  4Examples: faces under hats, statues, flowers, objects.
   Look at the face of a person wearing
		 a sports cap on a sunny day. You will see
		 shadows under the cap on the face.
3 Flash options create light
  4Flash is a blast of artificial light from the camera.
  4Auto flash tells the camera to automatically flash
		 when light is too low. It works indoors and outdoors.
		 Auto flash is the default setting and works well.
  4Red-eye flash flashes twice, you must tell your
		 subject not to move after the first flash.
  4Flash ON tells the camera always flash
		 (also called fill flash).
  4Flash OFF tells the camera never flash.

What You Need To Do
1 Turn flash ON to create light
  4Push the flash icon button to get the flash options.
  4Push the button repeatedly to select each option.
  4Select flash ON to put light into shadows under trees,
		 overhangs, on any kind of object, vestibules, under hats.
2 Test flash ON to find the brightness range
  4Flash ON can be too    bright at close range (1 to 4 feet)
		 for people or pet faces, white cloths, white textures.
  4Make sure the subject is at least (4) feet away.
  4Test flash on at 4, 5, 6 feet to know the camera range.
  4If flash ON is too bright use auto flash.
  4If auto flash is too bright try exposure at +.3.
3 Set flash ON back to auto flash after use
  4Remember to set flash ON back to auto after shooting.
  4Some cameras automatically turn the flash off
		 when the camera is turned off (as a reset default).
4 Use flash OFF when
  4Shooting any reflective surface such as paintings, printed posters,
		 plexiglas cases, jewelry, mirrors, windows, metal objects.
  4Shinny surfaces reflect light back into the camera lens.
		 The light is captured as white spots on the photo.

                                                                         9
Using the Exposure
 What You Need To Know
 1 What is exposure
     4Exposure is the amount of light a camera allows inside.
 2 Good digital photos need lots of sun light
     4Exposure plus (+) allows morelight inside
 		 the camera when the sun is not bright enough
 		 (overcast or rainy days).
   4Exposure minus (-) allows less light inside
 		 the camera when the sun is too bright
 		 (beach or snow days).
 What You Need To Do
 1 If the sun is NOT bright enough,
   then allow more light inside the camera.
   Set exposure to plus (+) to allow more light
     4Plus settings are: +.3, +.7, +1.3, +1.7, +2.0.
     4+.3 works on cloudy overcast days (most used).
     4+.7 works on very heavy dark cloudy days.
 2 If the sun is TOO bright,
   then allow less light inside the camera.
   Set exposure to minus (–) to allow less light
     4Minus settings are: -.3, -.7, -1.3, -1.7, -2.0.
     4Often white or light colored objects become
 		 too bright in strong sun light.
   4-.3 works on very bright days (beach, snow).
 3 Test the new exposure setting
     4Take a photo and review it in the camera monitor.
     4Still too dark or bright, try the next setting.
 4 Set exposure on back to zero after use
     4Remember to turn exposure back to zero after use.
     4Some cameras automatically reset the exposure
 		 to zero when the camera is turned off
 		 (as a reset default).

10
Using Macro Photography
– Close Up Detail Like a Microscope
1 Macro photography defined
4Macro photography captures minute image detail
at a very close range. This is great for science projects
to get detail not apparent to the normal range of
the human eye.
2 Macro mode
4Captures minute image detail
at a close range of 8.5 inches.
W: 0.7 foot. to 1.6 foot. (20 cm to 50 cm)
T: 1.6 foot. to 3.0 foot. (50 cm to 90 cm)
3 Super macro mode
4Captures minute image detail
at a very close range of 1.0 inch.
4 Turn on & focus macro
4Push the macro button.
4Push the macro button again
to go the next option, continue
to push for each option.
4Push the shutter button half
way down to focus, if green
lamp on the monitor blinks
the distance to the subject
is too close, move back and
try again. Take the photo.
11Scene Modes Dial
1 Program Auto (P-AUTO)
4Use this as the default setting.
4Set other functions, such as the flash manually.
4Turn the dial to the respective icon, then shoot.
2 Portrait
4Use for taking a portrait photos.
4Optimal shooting conditions are automatically set.
3 Landscape
4Use for landscapes and other outdoor scenes.
4Optimal shooting conditions are automatically set.
4 Night Scene
4Use for taking photos for evening or night.
4A slower shutter speed and optimal shooting
conditions are automatically set to give
the dark enough light to get night looking photo.
4Use the flash to light the nearby subject,
and the auto settings will capture the
night background.
5 Self Portrait
4Use for taking a photo of yourself.
4Hold the camera in front of your face.
4Point the lens toward your eyes.
4The focus will auto lock on you as the subject
and set the optimal shooting conditions.
4The zoom is auto set to in the wide position
and cannot be changed.
6 Movie
4Use for recording a video movie.
4The focus and zoom are locked.
4Try to keep distance from the camera
to the subject constant, to keep the
focus consistent.
4Sound cannot be recorded with movies.
4Record time depends on remaining card memory.
4Steps to record and review movies:
–Turn on power switch.
–Turn the mode dial to movie.
–Use the zoom button to get close.
–Press the shutter all the way down to start recording.
–Hold the camera steady and make very slow movements.
–Keep the distance to the subject constant.
–Press the shutter button all the way down to stop recording.
–Press the preview button and locate the movie (icon).
-Press the OK button review (play) the movie.
12Transfer Photos from Camera
to Computer – the Process, Part 1
1 Create a photo library filing system to rename,
store, retrieve, archive to CD
2 Transfer photos from camera to computer – the process
Create a Photo Library Filing System
1 Create a folder system — to rename, store, retrieve,
archive files to CD
4Create one (1) Photo Library folder where ALL photos get stored.
4Everyone will find photos in the same place every time.
4Create folders inside folders in the Photo Library.
4Use easy-to-remember names by categories:
-Class, club, program, camp, year
-Student names
-Class events
Field trip science ctr, Xmas party
-School events
Variety show, Valentine dance
-Projects
Weather project, science fair
-Sort folders (name the folders sort)
Use sort folders to temporarily store photos
until you make time to organize: Sort Zoo Trip
4Archive – burn the entire Photo Library or sub-folders to CD
for easy identification, retrieval and archival.
4Network: if photos are downloaded to a network, allow the network folder
to be seen by all students on the network. Students must be able
download photos and copy them to their respective folders.
4Go over this procedure with the administrator and take notes.
4Note: helper software such as iPhoto on the Macintosh,
CAMEDIA Master for Mac or Windows, and Photoshop Elements
provide ways to help manage files.
4You may choose not to use any helper software and copy files
directly to your custom Photo Library. Quit the helper application which
automatically opens after the digital camera is detected via USB.
13Transfer – the Process, Part 1 (continued)
Rename, Store, Retrieve Photos in the
Photo Library using the Photoshop
Elements File Browser Palette
1 Re-name photos to be user-friendly
4When photos are taken and stored by the digital camera,
they are automatically named in a letter and number sequence,
for example: P0001000, P0001001, P0001003, etc.
4Use the Photoshop Elements File Browser palette to instantly
see a large icon of the each photo and to re-name with one click.
4First copy new photo files into the Photo Library folder system.
4Remember, if crunched for time, create a Sort folder (Sort Zoo Trip).
4Choose Window > File Browser.
4Double click any folder to view the contents.
4Rename photo files: click ONCE on the file name, it will highlight.
Type the new name over the highlight to replace the name.
2 Move photos to other folders
4Click on the photo icon and drag it to any other visible folder
in the File Browser window.
4Expand File Browser window to see longer names.
Move the window edge when see a double arrow icon.
14Transfer Photos from Camera
to Computer – the Process, Part 2
1 Digital photos are stored in built-in camera memory
OR on a memory card
4Olympus D-535 is defaulted to store using built-in memory.
4Olympus D-535 DOES NOT come with a xD memory card.
4Think of a memory card as a mini removable hard drive.
4Olympus D-535 uses xD Picture Card memory card brand.
4Purchase memory cards and accessories at:
www.olympusamerica.com > accessories button.
4Digital photos are saved as JPEG (.jpg) format by default
(.jpg compresses files to smaller storage sizes).
2 The computer reads the camera memory
or memory card
4The computer will detect the digital camera internal memory
or memory card, then use the USB cable as the transfer agent.
4Windows XP: install the reader file from the CD.
4Download reader versions at www.olympusamerica.com
> software downloads.
4Macintosh OSX automatically detects any built-in memory
or memory card without installation for a reader file.
15Transfer Photos from Camera
to Computer – the Process,
Part 2, (continued)
3 The digital camera or memory card must be
physically connected to the computer
4Turn the D-535 digital camera OFF.
4Connect the USB cable to the
digital camera USB port.
4USB stands for Universal Serial Bus.
4Connect the USB cable to the computer USB port.
4The computer will detect the camera while OFF
(need charged batteries).
4Press the OK button on the camera to select
USB for PC on the camera
(displayed in camera monitor).
4The computer will detect the camera
after OK is pressed.
4 Digital photo mangement software
4Digital camera and computer manufacturers provide
software to help import, organize, copy, and edit
digital photos coming from the camera.
It is NOT manditory to use this software, however
it automatically opens when it detects the
digital camera being connected via the USB.
4Macintosh OSX uses built-in iPhoto
(or Olympus CAMEDIA Master).
4Windows XP uses Olympus CAMEDIA Master.
16Essential Photographic Techniques to Shoot Great Photos
Get Close, Zoom In, Walk Up Close
What You Need To Know
1 Close up is easier to see and understand
4Tiny images make the eyes work to see
and understand the photo scene.
2 Close up makes you feel like you are there
4Closer is better.
3 Close up shows more interesting detail
4Close up photos have more impact and excitement.
4 Close up fills the photo frame with details
4Empty space and small objects makes the eye wonder.
5 Shoot some really interesting detail
of the subject (a part of the whole)
4Study your subject to find a detail you really like,
get close and shoot that detail (like the cats eyes).
4This is called shooting a part of the whole.
4Allow the imagination to fill in the unseen parts.
What You Need To Do
1 Push the ZOOM button to get close
4Shoot a test photo and review it on the monitor.
4Zooming changes the way the lens sees
and captures the subject. Get close.
4Use monitor mode to see the scene.
4If you have too much picture on top,
lower the camera just a little.
2 Walk toward to the subject
with the camera to get close
4Walk closer once you see the scene in the viewfinder.
4Watch the top/bottom and left/right of the scene.
3 Shoot an interesting detail (part)
of the subject (whole)
4Zoom in or walk close and capture only one part.
4Sometimes individual parts (details) are more
interesting than the whole subject.
4Look carefully! Develop your eye for detail.
17Essential Photographic Techniques to Shoot Great Photos
Shooting Faces
1 Shoot faces at eye level
4Raise the camera up to the subject’s eye level.
4Shoot the faces of babies, children, teens,
adults, animals and pets at their eye level.
4Stoop down to get at eye level position.
4Lay down with crawling infants and pets.
2 Vertical camera position usually
looks best with a single face
4Horizontal camera position looks better for groups.
3 Capture the eyes (very important)
4A good photo brings the eyes up close if possible.
4Eyes create expression.
4Eyes draw the viewer into the photo.
4Eyes tell a story.
4Capture eyes looking intently toward you.
4Shoot candid (when the person is not looking at you).
4Study newspaper face shots for free photo lessons.
4 Shoot natural smiles
4If you want a smile tell the subject to think
about their favorite food (pizza, ice cream).
4Do not tell your subject to say cheese.
You won’t get natural smile.
4Try candid shots with kids.
4Give adults a moment to prepare (OK get ready).
4Tell them you will count to three then shoot.
Shoot on two, they tense up by three.
5 Fill the photo frame with the
face and some hair when possible
4You do not have to show all the hair in every photo.
6 When the sun is too bright people squint
4Wait for a friendly cloud to hide the sun.
4Move the subject into the shade.
4Turn the subject so the sun is shining
on their back or shoulders.
7 Watch out for weird head crowns
4Objects should not appear sticking out of the head.
4Watch out for poles, lines, branches behind the head.
4Look before you shoot!
8 Break the rules
4Do things differently, experiment, it’s digital.
4It doesn’t cost extra to shoot lots of photos.
18Your Point of View
1 Shoot from different angles
4Different views (angles) make a big difference
in the way your photo looks.
4Shoot the same subject from several
different points of view.
2 Move at least two steps left or right
4Test shoot, then check in Quickview.
3 Shoot down from a high position
4Stand on a bench, chair or rock to shoot down.
4Be very alert and careful stepping up and down.
4Your attention is on shooting, be alert not to fall.
4Watch carefully for cars, bicycles, scooters and
skate boarders while shooting around streets.
4 Shoot up from a low position
4Stoop down, lay down, go to the bottom of a hill.
5 Shoot straight ahead facing the subject
4Test shoot at different distances.
4Zoom in and out.
4Walk close and back up.
6 Shoot a side view to gain width
4Test shoot at different distances.
4Zoom in and out.
4Walk close and look in the view finder
then back up and look again.
7 Shoot both vertical & horizontal positions
4Turn the camera vertically and take photos.
4Turn the camera horizontally and take photos.
Create a Picture Frame
1 Shoot a picture frame around the subject
4Think of it like picking out a real picture frame.
4Look for objects that create frame shapes
around the head and upper body.
4Use archways, pillars, a car window, toys,
playground equipment, plants, fences, tree trunks
(just look around your environment).
2 Frames make the eye go straight
to the subject (show off the subject)
4Use only frames that stand out strong.
4Not every shot looks good with a frame.
4Check your frame in Quickview or Preview mode.
19Essential Photographic Techniques to Shoot Great Photos
Arrange Your Photo
1 Arrange people and things by design
4Arrangement is also called composition
or
putting the photo together in an organized way.
4You want your viewing audience to get excited
about what they see in your photos.
2 Place objects into the scene to give
more meaning to the audience
4Place objects in the scene: add
flowers, books,
awards, plants, photos, sculptures, artwork and props
that relate to your subject or message.
Example: Place a pile of kids books in the background.
4The objects you place in the scene makes
the viewer want to study and enjoy your photo.
4Take things out that don’t relate to your photo.
4Take out wild backgrounds, they distract the eye.
3 Shoot vertical & horizontal camera positions
4Each position gives a different style, feel and depth.
4 Don’t always position a subject
in middle of the photo
4Test several photos by positioning the subject
to the left or right of the scene.
4Off center subjects work well when there is lots of
background space like an ocean, grass or a field.
4Off center subjects work well when people or things
are walking or moving in a direction. Leaving open space
gives the subject a sense of moving in that direction.
4Close up face photos usually do work well in the center.
5 Test different lighting effects using
flash and exposure settings
4Test fill flash at different distances.
4Test exposure settings.
4Add more light on the scene with a lamp.
6 Break all the rules
4Do things differently, experiment, it’s digital.
4It doesn’t cost extra to shoot lots of photos.
4Shoot everything in all types of conditions:
weather, stage lights, night lights, moving subjects.
4Plan for review time, don’t wait, images pile up.
20Shooting Groups
1 Shoot groups in the horizontal position
4Small groups work well in odd numbers (if possible).
4When you can, shoot smaller groups of 3, 5, 7 people.
2 Arrange groups into interesting positions
4Consider someone high, someone low.
4Consider arranging according to height, girls or boys.
4Consider front row kneeling and back row standing.
3 Ask people to move close to each other
4Ask adults to touch shoulder to shoulder.
4Ask close friends or kids to lean into each other.
4 Check to make sure no face is hidden
4It is easy for one person to block another.
4Take two or three photos. You will have a better
chance of getting everyone looking at the same time.
4Tell them to get ready and look at you.
5 When the sun is too bright people squint
4Wait for a friendly cloud to hide the sun.
4Move the group into the shade.
4Turn the group so the sun is shining
on their back or shoulders.
6 Check faces for pesky shadows
4If you see shadows, try using the fill flash.
7 Choose backgrounds and add props
to help identify the group
4Students in front of a map, math chart or posters.
4Club members with a sign, banner, logo or poster.
4Teams with an award or trophy.
4A pumpkin for fall or Halloween.
8 Test the flash and exposure settings
before the group photo
4Groups don’t like to wait.
4Be ready, test settings to save time.
4Get them arranged and shoot quickly.
9 Get natural smiles for the photo
4Talk to the group as you are preparing the photo.
4Tell them they are a great looking group.
4Tell them this will make a great photo.
4Give adults a moment to prepare (OK get ready).
4Tell someone they have a great smile,
it makes others want to smile as well.
4Tell them you will count to three and shoot,
then shoot on two. They tense up on three.
21Essential Photographic Techniques to Shoot Great Photos
(50) Tips for Shooting Events
1 Go early and get permission
4Ask or call ahead to get permission to shoot
prior to the event (recitals, variety shows, bands).
4Tell them you are the school photographer.
4Ask how early you can get in to set up and test.
4Ask the name of the person who gave you permission,
so you can tell security at the door.
2 Test to find the best shooting positions
4Walk around shoot from several positions and angles.
4Use the camera monitor for reviewing scenes.
4Shoot from low, high and eye level positions.
4Remember closer is better (zoom in).
4Ask permission to shoot in front or side of the stage.
3 Test fill and auto flash and review on the monitor
4Know which flash or exposure works ahead of time.
This allows you to concentrate on arranging photos.
4Test auto flash and review on the monitor.
4Test fill flash to make sure it’s not too bright.
4Look carefully to find those pesky shadows.
4Test some people photos, if you can find a willing person.
4Test several photos to get a feel for the lighting.
4Colorful stage lights produce some great photos.
Use auto flash, fill ON and exposure. Each one will produce
a different feeling. It depends on the stage lights intensity.
4Have extra charged batteries ready in your camera bag.
4Take a pocket size flash light in your camera bag.
Use this to see the features panel when the room is dark.
4 Test exposure and review on the camera monitor
4Depending on lighting, exposure may work better than flash.
4Test exposures of +.3 and +.7.
4Colorful stage lights produce some great shots
when you increase exposure and not use flash.
It depends on the stage lights intensity
4Don’t delete test shots immediately, compare exposure
to flash to see which is better (use Preview mode).
4Have extra charged batteries ready in your camera bag.
5 Find out how close you can get your subject
4Can you shoot in front, on or behind a stage? Ask.
4Can you squat in a walkway? Ask.
4Don’t be afraid to ask those in charge, they often help.
4Look around to see if obstacles are in your way.
4Can you stand on top of something for a better view?
4Be careful where you stand, don’t take a chance on falling.
4Find where can you take candid shots best?
22Study How Others Shoot
Photography Techniques
Study Project
Study newspapers, magazines, periodicals, movies,
National Geographic, Time Magazine, CD covers and
TV commercials to gain valuable lessons in photo techniques.
Start looking and searching for your favorite photos. Take a trip the local bookstore and
look everywhere: books, maps, CD, DVD’s, posters. You will be surprised at all the great
photos. Don’t forget the photography books.
1 Cut out ten of your favorite photos.
4Be sure to ask permission before you cut.
4Paste them down on paper, if you have time.
2 Study the photos, decide why you like each one.
4Let the photo hit you, why do you like it?
4Tell the class your reasons.
3 Study the photos and decide which photo techniques were used.
4 Below is a list of ten things (ideas or criteria) used to judge
photography contests.
4Memorize them and start using them to take great photos.
Ten Judges Criteria that Make an
Award Winning Photo
These ten criteria are used by judges in photography
contests to help determine winning photographs.
Memorize them and start thinking about the possibilities.
How far you can go with your photography?
1 Impact (does the photo really grab your attention)
2 Style (what sets your photo apart from others)
3 Creativity (did you keep and break key photo techniques)
4 Arrangement (did you create a unique and exciting layout)
5 Layout (how well does your subject work within the photo scene)
6 Lighting (how does lighting make your photo exciting)
7 Subject matter (did you make the subject look interesting)
8 Color quality (did you capture strong colors and tones)
9 Technique (do you have a special style or digital editing effect)
10 Story telling (does your photo show a message)
Thanks for this list: Becky Dailey, Photographic Craftsman, photo judge, wedding, family
and portrait photographer, digital retoucher, speaker, author, and member of Professional
Photographers of America (PPA).
23Photo Editing Check List
for Photoshop Elements v.3
1 Save a COPY of the original file for each project
4Choose File > Save As (DO NOT replace the same name).
4Choose Photoshop (.psd) format to keep photos and type.
4Choose JPEG (.jpg) format for all other photos or to flatten .psd.
4Save photo files as JPEG (.jpg) using these settings:
-Inkjet/laser: quality 12 maximum, baseline optimized.
-Web: quality 5 medium, baseline standard.
-Presentations: quality 8 high, baseline standard.
4Save often: choose File > Save (Com/Ctrl S).
2 Rotate and Crop the photo by design
4Choose > Image > Rotate.
4Select > crop tool (drag a diagonal, use resize handles).
4If you don’t like your crop – start over using:
File > Revert or Edit > Undo or Undo History.
3 Color balance, increase contrast, brighten,
darken, reduce shadows, saturate color
4Click > Quick Fix button (go to the work area).
4Click > Levels Auto button (to color balance).
4Click > Contrast Auto button (to increase detail distinction).
4Adjust > Lighten Shadows (brighten the photo).
4Adjust > Darken Highlights (darken the photo).
4Adjust > Midtone Contrast (slight movements).
4Adjust > Saturation (intensify the colors right side).
4Adjust > Saturation (take out color to create grayscale, left).
4Click > Standard Edit Icon to exit.
4 Combine several photos (photo montage)
4Drag and drop photos together using the move tool.
4Drag photos around the page and change the
stacking order in the layers palette.
5 Combine parts of other photos using selections
4Select parts of any photo with the marquee selection tool
or any of the other selection tools.
4Add feather to any selection to soften edges (before drag).
4Choose Select > Feather > 15.
6 Add type, styles, effects, filter effects
4Click the type tool to add words (press Return for next line).
4Click the Layer Styles palette to add drop shadows
and bevels to type and photos.
4Add a filter effect using Filters palette.
Draw a selection to effect only that area.
7 Prepare photos for inkjet, laser, web, presentation
4Select crop tool, use options bar to set height, width, resolution.
4Resolutions: inkjet/laser 150ppi, web 72ppi, presentations 100ppi.
4Crop the entire photo or the desired area (double click inside).
24Crop Off Parts of the Photo
and Straighten Crooked Photos
Open Adobe Photoshop Elements version 3
Open a photo > Choose > File menu > Open
4Welcome window will appear upon open, click close.
Crop Tool (digital scissors)
1 Select the crop tool on the tool palette.
2 Drag a box from upper left to lower right and release.
3 A crop box with handles appears.
4 Resize the crop box to identify the area you want.
4Move the mouse over a corner resizing handle.
4See a straight arrows icon, click and drag to resize.
4If you see the curved arrows don’t drag (it rotates).
4To start the crop over, press the Escape key.
5 Crop off the areas outside of the crop box.
4Click on the crop tool again and click the Crop button.
Shortcut: double click inside the crop box area.
6 If you don’t like the crop, you can start all over.
4Choose > Edit menu > Undo (or File menu > Revert).
Use the Crop Tool to Rotate a Crooked Photo
1 Select the crop tool on the tool palette.
2 Drag a box from upper left to lower right and release.
3 A crop box with handles appears.
4 Rotate first, then resize the box to form the keep area.
4Move the mouse a little away from a corner resizing
handle, see the curved arrows icon.
4Click and drag the handle when you see the
curved arrows. This will rotate the crop box.
4Rotate the crop box until one side of the crop box
is straight with an edge of an object within in the photo.
(or eyeball it, remember the lower leg will go straight)
5 Resize the now rotated box to form the area to keep.
4Move the mouse back over a corner resizing handle.
4Now see a straight arrow icon, click and drag to resize.
4If you see the curved arrows don’t drag (it rotates again).
4Move closer to the handle to see straight arrows.
4To start over click on the crop tool, click on Don’t Crop.
6 Crop off the area outside of the crop box.
4Click on the crop tool again > click the Crop button.
Shortcut: double click inside the crop box area.
7 If you don’t like the crop, you can start over.
4Go to > Edit menu > Undo (or File menu > Revert).
25Set New Defaults ONCE for Levels IMPORTANT! To get best quality color correction results using Levels Auto button, when using Quick Edit or Levels, it’s necessary to change the Levels default target black and white point settings only ONCE. 1 Choose Enhance > Brightness/Contast > Levels. 2 Double click the black eye dropper. 3 Type in these new RGB black target values: R = 10, G = 10, B = 10, click OK. 4 Double click the white eye dropper. 5 Type in these new RGB white target values: R = 245, G = 245, B = 245, click OK. 6 Click OK to the Levels dialogue box. 4DO NOT change any other Levels values, just click OK. 7 Click YES, when Save New Target Colors Defaults box appears. 8 These are the new Levels target default values and will NOT change. 26
Color Balance, Contrast Adjust,
Lighten Shadows, Darken Highlights,
using Quick Fix
Be sure to set the new black and white
target defaults ONCE for Levels from
the previous page to get the best results.

Open Quick Fix
1 Click the Quick Fix button, upper right corner.
2 Exit Quick Fix by clicking Standard Fix button.

Lighting Tab
A) Color Balance with Levels
1 Click > Levels > Auto button.
  4Auto uses the default black and white
		 default target values set for
  4Levels (10, 10, 10, 245, 245, 245)
B) Contrast Adjust
1 Click > Contrast > Auto button.
  4Contrast is the distinction between
		 tonal regions. Use this slider to
		 increase or decrease contrast.

C) Lighten Shadows
1 Drag the Lighten Shadows slider slightly right.
  4Make small adjustments to shadows,
		 dark makes a good contrast to the light.
  4The shadows should not over power the photo.
		 If it is lightened too much, it will show
		 in the print like a haze.
D) Darken Highlights
1 Drag the Darken Highlights slider slightly right.
  4This is good for very sunny days at the beach,
		 snow days or white fabrics.

E) Midtone Contrast
1 Drag the Darken Highlights slider right slightly.
  4Midtones are those color or gray values
		 between highlights and shadows, the midtones.
  4Use this slider to increase or decrease contrast
		 within the midtones range only.

		 (continued next page)

                                                      27
Color Adjustments and Sharpen the Photo using Quick Fix Open Quick Fix 1 Click the Quick Fix button, upper right corner. 2 Exit Quick Fix by clicking Standard Fix button. Color Tab A) Saturation 1 Drag the Saturation slider right slightly. 4 Saturating makes color more vivid and intense. 4 Hue is the color of a thing – that is a red apple. 4 Saturation is how much color is in the thing; that is a very deep red apple. B) Hue (completely switches colors) 1 Drag the Hue slider right slightly either way. 4 Hue is the color of a thing – that is a red apple. 4 Hue changes (switches) colors (be careful). 4 Do not use Hue, unless you want color swap. C) Temperature 1 Drag the Temperature slider slightly right. 4 Temperature makes color warmer (red) or cooler (blue). Use this control to enhance skin tones and sunsets or to adjust the color balance setting from a camera. D) Tint 1 Drag the Tint slider slightly left or right. 4 Makes colors more green (slide left) or magenta (slide right). Use this to fine tune skin tones after using temperature. Sharpen Tab A) Sharpen Auto 1 Click the Sharpen > Auto button. 4 Definition: sharpen increases the distinction of detail along edges of tonal ranges. 4 Some values get brighter, some darker to create contrast. B) Sharpen Amount Slider 1 Drag the Sharpen slider right slightly. 4 Make subtle changes in sharpen. 4 If you see a grainy appearance, it’s over sharpened (pull back a little). Grainy will show up as specs in the print. 28
Combine Two or More
Photos Together
Drag a photo from one file to the other,
this is called drag and drop
1 Open two or more photos.
2 Select the Move tool (upper right on the tool palette).
3 Drag and drop (from one file to the other).
  4The Move tool must be selected to drag and drop.
  4Click on one file and drag it to the other file.
  4Watch for the highlight on the other file then let go.
4 Reposition the new image any where you like.
  4Move over the box to see the black arrow,
		 then click and drag the image to reposition.
5 Resize the new image either larger or smaller.
  4Notice the dotted lines and resize handles.
  4Click on the lower right corner resize handle,
		 press the SHIFT KEY and drag in or out.
6 Tell the box you are finished resizing (IMPORTANT).
  4Double click inside the box when finished resizing.
Save As Photoshop file format to keep
each photo and type separate and moveable
1 Reposition photos, add new photos, add type.
  4Save As a Photoshop file format to create layers.
		 Layers hold photos and words as separate items.
  4Choose > File menu > Save As > Photoshop file format.
  4Saving files: name + .psd (Cheerleaders.psd).
  4Print with the Photoshop (.psd) format.
2 Convert (.psd) files to JPEG (.jpg) for other purposes.
  4Choose > File menu > Save As > JPEG (.jpg).
  4Saving as (.jpg) flattens all layers into one background.
  4Use JPEG for web photos, email, and presentations.

                                                               29
Select Just Part of a Photo Selection tools allow you to select just one part of a photo, then drag and drop it to another photo while using the move tool. Marquee select part of an photo 1 Open two or more photos. 2 Select the rectangular marquee selection tool. Upper left on the tool palette. 3 Click and drag a rectangle marquee around the part of the image you want. 4 If you draw a mistake. 4Choose > Select > Deselect (Com/Ctrl D). 4Redraw the marquee. Drag and drop with the move tool 1 Switch to the move tool to drag and drop the selection. 4If you try to drag and drop while still selected on the marquee tool, you will see only the selection and no photo. 2 Soften edges with the feather command before drag and drop. 4First create a selection with any selection tool. 4Now, soften edges (like the edge of a feather). 4Choose > Select > Feather > type in 10. 4Feather must be applied before you drag and drop. If no feather appears, go back and apply feather. 30
Use Layers to Store Photos, Type, Shapes
IMPORTANT: Stay on the move tool using layers
Combine photos using drag and drop
1 One layer stores one photo or type independently.
2 Open the layers palette > Choose Window > Layers.
  4Tip: click the layers palette tab on the tool bar.
3 Click on a layer to select (see the brush icon).
  4Tip: click on a photo to select the layer as well.
4 Click on eye icon, far left to turn a photo OFF/ON.
5 Reposition a photo that sits on top of the other.
  4Click the top photo layer, then drag it down.
6 Move two or more photos or type together.
  4Link them together by clicking in middle column.
7 Fade one photo that is on top of the another with opacity.
  4Click the photo or layer you want to fade.
  4Move the opacity slider at the top of the layers palette.
8 Delete a photo: drag the highlighted layer to the trash.
Add Type (headlines, captions, symbols, shapes)
1 Add type: select type tool, click in the middle of
  the page and start typing.
  4Press return to type a new line below.
  4Reposition type by using the move tool
		 (click and drag).
2 Add type options: use the options bar on top.
  4Choose a font from the options bar.
3 Add type styles: drop shadow and bevel.
  4Choose layer styles palette tab,
		 click on pop up menu and
		 choose drop shadow or bevel,
		 choose style, click Apply.

                                                               31
Fix Red Eye Photos
Why Do Eyes Look Red in Photos
Red eye happens in LOW light conditions,
such as dim lights indoors or at night.
When people or animals are in dim light the pupils
in their eyes are open wide to allow more light inside.
When the camera flashes it captures the eyes open wide
and takes photo of the red blood vessels in the back of the eye.
Warning: The red eye flash setting on a digital camera
flashes two times. After the first flash, people move
thinking the photo is over. This sudden movement causes
blurred photos. You have to tell the subjects not to
move that the camera will flash twice.
Tip: Turn On More Lights in the Room
When taking photo indoors in low light, turn on more
room lights to avoid red eye.
Fix Red Eye with just ONE click
1 Zoom in close to see the red area
2 Select the Red Eye tool and click
on anywhere on the red
4The red is removed and the darkness
of the pupil is automatically adjusted
to look natural.
32Prepare Files for Inkjet, Laser, Web,
Email, Presentations, Video – in 2 Steps
1 Change the width, height, and resolution in
the crop tool options bar inside Photoshop Elements
1 Overview: prepare any file by changing (4) aspects:
4Width (in inches)
4Height (in inches)
4Resolution (in ppi – which stands for pixels per inch)
All digital photos are measured in pixels, short for picture elements.
4File format (all color photo files end up being JPEG or .jpg)
2 Width
4Select the crop tool.
4Type the desired width into the crop tool options bar (on top).
4Move the crop box around to position as desired
3 Height
4Use the Preset Options on the options bar for settings.
4Type the desired height into the crop tool options bar (on top).
4 Resolution
4Select the crop tool.
4Type the desired resolution into the crop tool options bar (on top).
5 Crop the photo to the new width, height, and resolution.
4Note: use this method to crop the SAME existing w x h, but new resolution.
4Drag the crop tool from upper left to lower right of the photo
– as far as it will to go (it will constrain to the new width x height set).
4Move the crop box around to position as desired
(use arrow keys to nudge up/down/left/right).
4Note: to redraw the crop box – press the Escape key.
4Note: if you don’t like the new crop – choose Edit > Undo.
2 Change the photo file format and options
1 File formats
4Choose > File > Save As
–Save a different file for each use from the original.
4Choose Photoshop (.psd) format to keep layers separate for
photos, type and shape (allows for adjustments).
4Choose JPEG (.jpg) format (flattens Photoshop layers).
4Choose these JPEG (.jpg) options:
•Inkjet or Laser Printing
.jpg, Quality 12, Maximum, Baseline Optimized
•Web
.jpg, Quality 5, Medium, Baseline Standard
•Email
.jpg, Quality 5, Medium, Baseline Standard
•Presentations (Keynote, Powerpoint, etc.)
.jpg, Quality 5, Medium, Baseline Standard
•Video
.jpg, Quality 5, Medium, Baseline Standard
4Name the file – never save over the original.
4Use the (.jpg) suffix with the file (always).
33You can also read