QGIS Documentation Guidelines - QGIS Project - 24 set 2020
←
→
Page content transcription
If your browser does not render page correctly, please read the page content below
QGIS Documentation Guidelines

                    QGIS Project

                        24 set 2020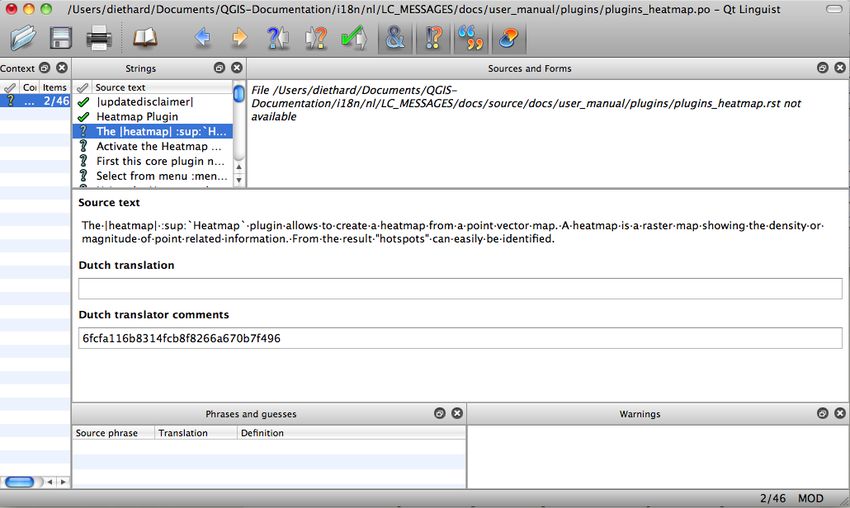
Indice

1 Una contribuzione passo dopo passo                                                                                                                                                3
  1.1 Using the GitHub web interface . . . . . . . . . .                       .   .   .   .   .   .   .   .   .   .   .   .   .   .   .   .   .   .   .   .   .   .   .   .   .    4
       1.1.1 1. Fork QGIS-Documentation . . . . . . .                          .   .   .   .   .   .   .   .   .   .   .   .   .   .   .   .   .   .   .   .   .   .   .   .   .    4
       1.1.2 2. Make changes . . . . . . . . . . . . . .                       .   .   .   .   .   .   .   .   .   .   .   .   .   .   .   .   .   .   .   .   .   .   .   .   .    5
       1.1.3 3. Modify files . . . . . . . . . . . . . . .                      .   .   .   .   .   .   .   .   .   .   .   .   .   .   .   .   .   .   .   .   .   .   .   .   .    6
       1.1.4 4. Share your changes via Pull Request . .                        .   .   .   .   .   .   .   .   .   .   .   .   .   .   .   .   .   .   .   .   .   .   .   .   .    6
       1.1.5 5. Delete your merged branch . . . . . . .                        .   .   .   .   .   .   .   .   .   .   .   .   .   .   .   .   .   .   .   .   .   .   .   .   .    9
  1.2 Using Git command line tools . . . . . . . . . . .                       .   .   .   .   .   .   .   .   .   .   .   .   .   .   .   .   .   .   .   .   .   .   .   .   .    9
       1.2.1 Local repository . . . . . . . . . . . . . .                      .   .   .   .   .   .   .   .   .   .   .   .   .   .   .   .   .   .   .   .   .   .   .   .   .   10
       1.2.2 Add another remote repository . . . . . .                         .   .   .   .   .   .   .   .   .   .   .   .   .   .   .   .   .   .   .   .   .   .   .   .   .   11
       1.2.3 Update your base branch . . . . . . . . .                         .   .   .   .   .   .   .   .   .   .   .   .   .   .   .   .   .   .   .   .   .   .   .   .   .   11
       1.2.4 Contribute to your production branch . . .                        .   .   .   .   .   .   .   .   .   .   .   .   .   .   .   .   .   .   .   .   .   .   .   .   .   12
       1.2.5 Share your Changes . . . . . . . . . . . .                        .   .   .   .   .   .   .   .   .   .   .   .   .   .   .   .   .   .   .   .   .   .   .   .   .   12
       1.2.6 Clean-up your local and remote repository                         .   .   .   .   .   .   .   .   .   .   .   .   .   .   .   .   .   .   .   .   .   .   .   .   .   12
  1.3 Ulteriori letture . . . . . . . . . . . . . . . . . . .                  .   .   .   .   .   .   .   .   .   .   .   .   .   .   .   .   .   .   .   .   .   .   .   .   .   13

2 Writing Guidelines                                                                                                                                                               15
  2.1 Writing Documentation . . . . . . .      .   .   .   .   .   .   .   .   .   .   .   .   .   .   .   .   .   .   .   .   .   .   .   .   .   .   .   .   .   .   .   .   .   16
        2.1.1 Headlines . . . . . . . . .      .   .   .   .   .   .   .   .   .   .   .   .   .   .   .   .   .   .   .   .   .   .   .   .   .   .   .   .   .   .   .   .   .   16
        2.1.2 Lists . . . . . . . . . . . .    .   .   .   .   .   .   .   .   .   .   .   .   .   .   .   .   .   .   .   .   .   .   .   .   .   .   .   .   .   .   .   .   .   16
        2.1.3 Inline Tags . . . . . . . . .    .   .   .   .   .   .   .   .   .   .   .   .   .   .   .   .   .   .   .   .   .   .   .   .   .   .   .   .   .   .   .   .   .   16
        2.1.4 Labels/references . . . . .      .   .   .   .   .   .   .   .   .   .   .   .   .   .   .   .   .   .   .   .   .   .   .   .   .   .   .   .   .   .   .   .   .   17
        2.1.5 Figures and Images . . . .       .   .   .   .   .   .   .   .   .   .   .   .   .   .   .   .   .   .   .   .   .   .   .   .   .   .   .   .   .   .   .   .   .   18
        2.1.6 Index . . . . . . . . . . .      .   .   .   .   .   .   .   .   .   .   .   .   .   .   .   .   .   .   .   .   .   .   .   .   .   .   .   .   .   .   .   .   .   21
        2.1.7 Special Comments . . . . .       .   .   .   .   .   .   .   .   .   .   .   .   .   .   .   .   .   .   .   .   .   .   .   .   .   .   .   .   .   .   .   .   .   21
        2.1.8 Code Snippets . . . . . . .      .   .   .   .   .   .   .   .   .   .   .   .   .   .   .   .   .   .   .   .   .   .   .   .   .   .   .   .   .   .   .   .   .   22
        2.1.9 Footnotes . . . . . . . . .      .   .   .   .   .   .   .   .   .   .   .   .   .   .   .   .   .   .   .   .   .   .   .   .   .   .   .   .   .   .   .   .   .   22
  2.2 Managing Screenshots . . . . . . .       .   .   .   .   .   .   .   .   .   .   .   .   .   .   .   .   .   .   .   .   .   .   .   .   .   .   .   .   .   .   .   .   .   22
        2.2.1 Add new Screenshots . . .        .   .   .   .   .   .   .   .   .   .   .   .   .   .   .   .   .   .   .   .   .   .   .   .   .   .   .   .   .   .   .   .   .   22
        2.2.2 Translated Screenshots . .       .   .   .   .   .   .   .   .   .   .   .   .   .   .   .   .   .   .   .   .   .   .   .   .   .   .   .   .   .   .   .   .   .   23
  2.3 Documenting Processing algorithms        .   .   .   .   .   .   .   .   .   .   .   .   .   .   .   .   .   .   .   .   .   .   .   .   .   .   .   .   .   .   .   .   .   23

3 Writing code in the PyQGIS Cookbook                                                                                                                                              27
  3.1 How to write testable code snippets . . . .          .   .   .   .   .   .   .   .   .   .   .   .   .   .   .   .   .   .   .   .   .   .   .   .   .   .   .   .   .   .   27
        3.1.1 Doctest sphinx directives . . . .            .   .   .   .   .   .   .   .   .   .   .   .   .   .   .   .   .   .   .   .   .   .   .   .   .   .   .   .   .   .   27
        3.1.2 Grouping tests . . . . . . . . . .           .   .   .   .   .   .   .   .   .   .   .   .   .   .   .   .   .   .   .   .   .   .   .   .   .   .   .   .   .   .   29
  3.2 How to test snippets on your local machine           .   .   .   .   .   .   .   .   .   .   .   .   .   .   .   .   .   .   .   .   .   .   .   .   .   .   .   .   .   .   29

4 Linee guida per la traduzione                                                                                                                                                    31
  4.1 Processo di traduzione . . . . . . . . . . . . . . . . . . . . . . . . . . . . . . . . . . . . . . . .                                                                       31
  4.2 Traduci un file . . . . . . . . . . . . . . . . . . . . . . . . . . . . . . . . . . . . . . . . . . . .                                                                       32

                                                                                                                                                                                    i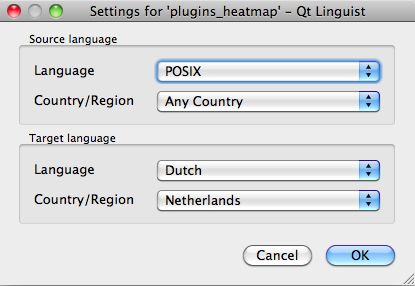
4.2.1   Traduzione in Transifex . . . . . . . . .    .   .   .   .   .   .   .   .   .   .   .   .   .   .   .   .   .   .   .   .   .   .   .   .   .   .   32
          4.2.2   Traduzione in QT Linguist . . . . . . .      .   .   .   .   .   .   .   .   .   .   .   .   .   .   .   .   .   .   .   .   .   .   .   .   .   .   33
          4.2.3   Traduci il manuale . . . . . . . . . . . .   .   .   .   .   .   .   .   .   .   .   .   .   .   .   .   .   .   .   .   .   .   .   .   .   .   .   35
          4.2.4   Sommario delle regole per la traduzione      .   .   .   .   .   .   .   .   .   .   .   .   .   .   .   .   .   .   .   .   .   .   .   .   .   .   37

5 Sostituzioni                                                                                                                                                         39
  5.1 Uso . . . . . . . . . . . . . . . . . . . . . . . . .        .   .   .   .   .   .   .   .   .   .   .   .   .   .   .   .   .   .   .   .   .   .   .   .   .   40
  5.2 Sostituzioni comuni . . . . . . . . . . . . . . . . .        .   .   .   .   .   .   .   .   .   .   .   .   .   .   .   .   .   .   .   .   .   .   .   .   .   40
        5.2.1 Icone di piattaforma . . . . . . . . . . . .         .   .   .   .   .   .   .   .   .   .   .   .   .   .   .   .   .   .   .   .   .   .   .   .   .   40
        5.2.2 Oggetti del menu . . . . . . . . . . . . .           .   .   .   .   .   .   .   .   .   .   .   .   .   .   .   .   .   .   .   .   .   .   .   .   .   41
  5.3 Icone nel menu della barra degli strumenti . . . . .         .   .   .   .   .   .   .   .   .   .   .   .   .   .   .   .   .   .   .   .   .   .   .   .   .   42
        5.3.1 Gestione layer e panoramica . . . . . . . .          .   .   .   .   .   .   .   .   .   .   .   .   .   .   .   .   .   .   .   .   .   .   .   .   .   42
        5.3.2 File . . . . . . . . . . . . . . . . . . . .         .   .   .   .   .   .   .   .   .   .   .   .   .   .   .   .   .   .   .   .   .   .   .   .   .   43
        5.3.3 Modifica . . . . . . . . . . . . . . . . . .          .   .   .   .   .   .   .   .   .   .   .   .   .   .   .   .   .   .   .   .   .   .   .   .   .   43
        5.3.4 Identity result . . . . . . . . . . . . . . .        .   .   .   .   .   .   .   .   .   .   .   .   .   .   .   .   .   .   .   .   .   .   .   .   .   43
        5.3.5 Digitalizzazione e digitalizzazione avanzata         .   .   .   .   .   .   .   .   .   .   .   .   .   .   .   .   .   .   .   .   .   .   .   .   .   44
        5.3.6 Orientazione della mappa e attributi . . . .         .   .   .   .   .   .   .   .   .   .   .   .   .   .   .   .   .   .   .   .   .   .   .   .   .   45
        5.3.7 Selection and Expressions . . . . . . . . .          .   .   .   .   .   .   .   .   .   .   .   .   .   .   .   .   .   .   .   .   .   .   .   .   .   45
        5.3.8 Labels and Diagrams . . . . . . . . . . .            .   .   .   .   .   .   .   .   .   .   .   .   .   .   .   .   .   .   .   .   .   .   .   .   .   46
        5.3.9 Decorazioni . . . . . . . . . . . . . . . .          .   .   .   .   .   .   .   .   .   .   .   .   .   .   .   .   .   .   .   .   .   .   .   .   .   46
        5.3.10 Guida . . . . . . . . . . . . . . . . . . .         .   .   .   .   .   .   .   .   .   .   .   .   .   .   .   .   .   .   .   .   .   .   .   .   .   47
        5.3.11 Colori . . . . . . . . . . . . . . . . . . .        .   .   .   .   .   .   .   .   .   .   .   .   .   .   .   .   .   .   .   .   .   .   .   .   .   47
  5.4 Altre icone di base . . . . . . . . . . . . . . . . .        .   .   .   .   .   .   .   .   .   .   .   .   .   .   .   .   .   .   .   .   .   .   .   .   .   47
  5.5 Tabella degli attributi . . . . . . . . . . . . . . . .      .   .   .   .   .   .   .   .   .   .   .   .   .   .   .   .   .   .   .   .   .   .   .   .   .   48
  5.6 Proiezioni e Georeferenziatore . . . . . . . . . . .         .   .   .   .   .   .   .   .   .   .   .   .   .   .   .   .   .   .   .   .   .   .   .   .   .   48
  5.7 Layout di stampa . . . . . . . . . . . . . . . . . .         .   .   .   .   .   .   .   .   .   .   .   .   .   .   .   .   .   .   .   .   .   .   .   .   .   48
  5.8 Layer Properties . . . . . . . . . . . . . . . . . .         .   .   .   .   .   .   .   .   .   .   .   .   .   .   .   .   .   .   .   .   .   .   .   .   .   50
  5.9 Plugin . . . . . . . . . . . . . . . . . . . . . . . .       .   .   .   .   .   .   .   .   .   .   .   .   .   .   .   .   .   .   .   .   .   .   .   .   .   51
        5.9.1 Processing . . . . . . . . . . . . . . . . .         .   .   .   .   .   .   .   .   .   .   .   .   .   .   .   .   .   .   .   .   .   .   .   .   .   51
        5.9.2 Various Core Plugins . . . . . . . . . . .           .   .   .   .   .   .   .   .   .   .   .   .   .   .   .   .   .   .   .   .   .   .   .   .   .   51
        5.9.3 Integrazione con GRASS GIS . . . . . . .             .   .   .   .   .   .   .   .   .   .   .   .   .   .   .   .   .   .   .   .   .   .   .   .   .   52
        5.9.4 Plugin eVis . . . . . . . . . . . . . . . .          .   .   .   .   .   .   .   .   .   .   .   .   .   .   .   .   .   .   .   .   .   .   .   .   .   52

ii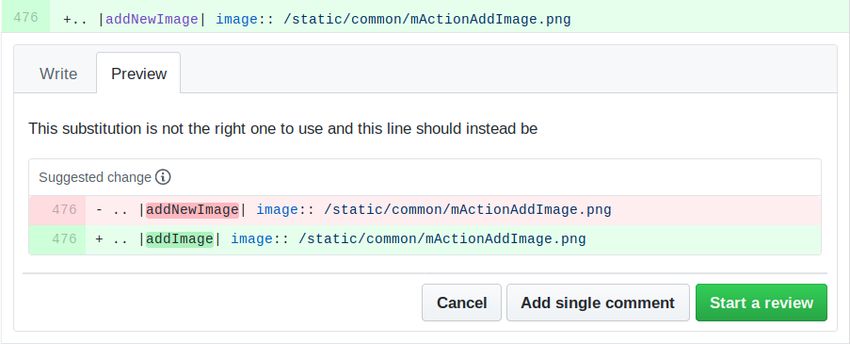
QGIS Documentation Guidelines

La documentazione di QGIS verrà compilata automaticamente sul server alle ore 0, 8 del mattino, 4 del pomeriggio
del fuso UPT (USA/Pacifico). Lo stato attuale è disponibile all’indirizzo https://docs.qgis.org.
I file sorgente della documentazione di QGIS sono disponibili all’indirizzo https://github.com/qgis/
QGIS-Documentation. Sono principalmente scritti usando la sintassi del formato reStructuredText (reST),
assieme ad alcuni script dal set di strumenti Sphinx per post processare l’HTML in uscita. Per informa-
zioni generali su questi strumenti, vedere http://docutils.sourceforge.net/docs/ref/rst/restructuredtext.html o
https://www.sphinx-doc.org/en/master/usage/restructuredtext/basics.html.
I seguenti capitoli ti guideranno per imparare:
    • come gestire i file sorgente della documentazione usando git sistema e su GitHub piattaforma in cui sono
      memorizzate
    • come modificare testi, fornire screenshot… in modo conforme
    • come condividere e garantire che le tue modifiche siano inserite nei documenti ufficiali.
Se stai cercando le informazioni generali su come contribuire al progetto QGIS, puoi trovare aiuto in Get Involved in
the QGIS Community.

Indice                                                                                                             1
QGIS Documentation Guidelines 2 Indice
CAPITOLO            1

                                                          Una contribuzione passo dopo passo

     • Using the GitHub web interface
           – 1. Fork QGIS-Documentation
           – 2. Make changes
                ∗ Alternative 1: Use the Edit on GitHub shortcut
                ∗ Alternative 2: Create an ad hoc branch in your documentation repository
           – 3. Modify files
           – 4. Share your changes via Pull Request
                ∗ 1. Start a new pull request
                ∗ 2. Compare changes
                ∗ 3. Describe your pull request
                ∗ 4. Review and comment pull request
                ∗ 5. Make corrections
           – 5. Delete your merged branch
     • Using Git command line tools
           – Local repository
           – Add another remote repository
           – Update your base branch
           – Contribute to your production branch
           – Share your Changes
           – Clean-up your local and remote repository
     • Ulteriori letture

Nota: Sebbene la documentazione QGIS sia utilizzata per dimostrare il processo, tutti i comandi e i passaggi illustrati

                                                                                                                     3
QGIS Documentation Guidelines
di seguito si applicano anche al sito Web QGIS.
If you are reading these lines, it is certainly because you are willing to contribute to writing QGIS documentation
and are looking for a how-to. You have come to the right place! The current document will guide you through the
different ways to achieve this objective, showing you the main steps to follow, the tricks you can use and the traps you
should be aware of.
For any help, do not hesitate to either ask in a comment on the issue report you are trying to fix or write to the
QGIS-community-team list. More details at Get involved in documentation.
Let’s now dive into the process.
Documentation sources are stored using the git version control system and are available on GitHub at https://github.
com/qgis/QGIS-Documentation. There are two main ways, not mutually exclusive, to modify the files:
1. Using the GitHub web interface
2. Using Git command line tools.
1.1 Using the GitHub web interface
The GitHub web interface allows you to do the following:
• modifica file
• preview and commit your changes
• make a pull request to have your changes inserted into the main repository
• create, update, or delete branches
If you are not yet familiar with git and GitHub vocabulary, you may want to read the GitHub Hello-world project to
learn some basic vocabulary and actions that will be used below.
Nota: If you are fixing a reported issue
If you are making changes to fix an issue, add a comment to the issue report to assign it to yourself. This will prevent
more than one person from working on the same issue.
1.1.1 1. Fork QGIS-Documentation
Assuming you already have a GitHub account, you first need to fork the source files of the documentation.
Navigate to the QGIS-Documentation repository page and click on the button in the upper right corner.
In your GitHub account you will find a QGIS-Documentation repository (https://github.com/
/QGIS-Documentation). This repository is a copy of the official QGIS-Documentation
repository where you have full write access and you can make changes without affecting the official documentation.
4 Capitolo 1. Una contribuzione passo dopo passoQGIS Documentation Guidelines
1.1.2 2. Make changes
There are different ways to contribute to QGIS documentation. We show them separately below, but you can switch
from one process to the other without any harm.
Alternative 1: Use the Edit on GitHub shortcut
Pages on the QGIS website can be edited quickly and easily by clicking on the Edit on GitHub link at the top
right of each page.
1. This will open the file in the qgis:master branch with a message at the top of the page telling you that you
don’t have write access to this repo and your changes will be applied to a new branch of your repository.
2. Do your changes. Since the documentation is written using the reStructureText syntax, depending on your
changes, you may need to rely on the writing guidelines.
3. When you finish, make a short comment about your changes and click on Propose file change. This will generate
a new branch (patch-xxx) in your repository.
4. After you click on Propose file change github will navigate to the Comparing changes page.
• If you’re done making changes, skip to Compare changes in the Share your changes via Pull Request
section below.
• If there are additional changes that you want to make before submitting them to QGIS, follow these steps:
1. Navigate to your fork of QGIS-Documentation (https://github.com//
QGIS-Documentation)
2. Click on and search for the patch-xxx branch. Select this patch branch. The
button will now say Branch: patch-xxx
3. Jump down to Modify files below.
Nota: The Edit on GitHub shortcut is also available in the drop-down menu at the bottom of the left sidebar.
Alternative 2: Create an ad hoc branch in your documentation repository
You can edit files directly from your fork of the QGIS Documentation.
Click on in the upper left corner of your forked QGIS- Documentation repository and enter a
unique name in the text field to create a new branch . The name of the new branch should relate to the problem you
intend to fix. The button should now say Branch: branch_name
Suggerimento: Do your changes in an ad hoc branch, never in the master branch
By convention, avoid making changes in your master branch except when you merge the modifications from the
master branch of qgis/QGIS-Documentation into your copy of the QGIS-Documentation repository. Se-
parate branches allow you to work on multiple problems at the same time without interfering with other branches. If
you make a mistake you can always delete a branch and start over by creating a new one from the master branch.
1.1. Using the GitHub web interface 5QGIS Documentation Guidelines
1.1.3 3. Modify files
1. Browse the source files of your fork of QGIS-Documentation to the file that needs to be modified
2. Make your modifications following the writing guidelines
3. When you finish, navigate to the Commit Changes frame at the bottom of the page, make a short comment
about your changes, and click on Commit Changes to commit the changes directly to your branch. Make sure
Commit directly to the branch_name branch. is selected.
4. Repeat the previous steps for any other file that needs to be updated to fix the issue
1.1.4 4. Share your changes via Pull Request
You need to make a pull request to integrate your changes into the official documentation.
Nota: If you used an Edit on GitHub link
After you commit your changes GitHub will automatically open a new page comparing the changes you made in your
patch-xxx branch to the qgis/QGIS-Documentation master branch.
Skip to Step 2 below.
1. Start a new pull request
Navigate to the main page of the QGIS-Documentation repository and click on New pull request.
2. Compare changes
If you see two dialog boxes, one that says base:master and the other compare:branch_name (see figure),
this will only merge your changes from one of your branches to your master branch. To fix this click on the compare
across forks link.
Fig. 1.1: If your Comparing changes page looks like this, click on the compare across forks link.
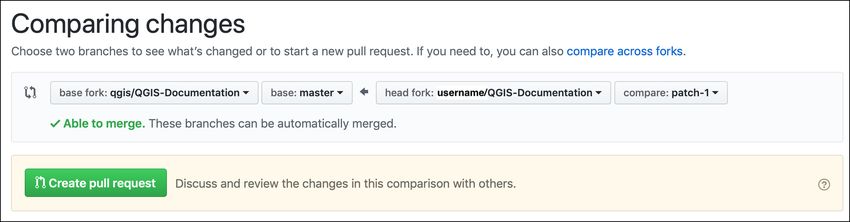
You should see four drop-down menus. These will allow you to compare the changes that you have made in your
branch with the master branch that you want to merge into. They are:
• base fork: the fork that you want to merge your changes into
• base: the branch of the base fork that you want to merge your changes into
• head fork: the fork that has changes that you want to incorporate into the base fork
• compare: the branch with those changes
Select qgis/QGIS-Documentation as the base fork with master as base, set the head fork to your repository
/QGIS-Documentation, and set compare to your modified branch.
A green check with the words Able to merge shows that your changes can be merged into the official documentation
without conflicts.
Click the Create pull request button.
6 Capitolo 1. Una contribuzione passo dopo passoQGIS Documentation Guidelines
Fig. 1.2: Comparing changes between qgis/QGIS-Documentation and your repository
Avvertimento: If you see
This means that there are conflicts. The files that you are modifying are not up to date with the branch you are
targeting because someone else has made a commit that conflicts with your changes. You can still create the pull
request but you’ll need to fix any conflicts to complete the merge.
Suggerimento: Though released and being translated, the documentation of QGIS 3.10 is still maintained and
existing issues are fixed. If you are fixing issues for a different release, change base from master to the appropriate
release_... branch in the steps above.
3. Describe your pull request
A text box will open: fill in any relevant comments for the issue you are addressing.
If this relates to a particular issue, add the issue number to your comments. This is done by entering # and the issue
number (e.g. #1234). If preceded by terms like fix or close, the concerned issue will be closed as soon as the
pull request is merged.
Add links to any documentation pages that you are changing.
Click on Create pull request.
4. Review and comment pull request
As seen above, anyone can submit modifications to the documentation through pull requests. Likewise anyone can
review pull requests with questions and comments. Perhaps the writing style doesn’t match the project guidelines, the
change is missing some major details or screenshots, or maybe everything looks great and is in order. Reviewing helps
to improve the quality of the contribution, both in form and substance.
To review a pull request:
1. Navigate to the pull requests page and click on the pull request that you want to comment on.
2. At the bottom of the page you will find a text box where you can leave general comments about the pull request.
3. To add comments about specific lines,
1. Click on and find the file you want to comment on. You may have to click on Display
the source diff to see the changes.
2. Scroll to the line you want to comment on and click on the . That will open a text box allowing you
to leave a comment.
1.1. Using the GitHub web interface 7QGIS Documentation Guidelines
Specific line comments can be published either:
• as single comments, using the Add single comment button. They are published as you go. Use this only if you
have few comments to add or when replying to another comment.
• or as part of a review, pressing the Start a review button. Your comments are not automatically sent after
validation, allowing you to edit or cancel them afterwards, to add a summary of the main points of the review
or global instructions regarding the pull request and whether you approve it or not. This is the convenient way
since it’s more flexible and allows you to structure your review, edit the comments, publish when you are ready
and send a single notification to the repository followers and not one notification for each comment. Get more
details .
Fig. 1.3: Commenting a line with a change suggestion
Line comments can embed suggestions that the pull request writer can apply to the pull request. To add a suggestion,
Insert a suggestion
click the button on top of the comment text box and modify the text within the suggestion block.
Suggerimento: Prefer committing suggestions to your pull request as a batch
As a pull request author, when directly incorporating reviewers” feedback in your pull request, avoid using the Commit
suggestion button at the bottom of the comment when you have many suggestions to address and prefer adding them
as a batch commit, that is:
1. Switch to the tab
2. Press Add suggestion to batch for each rewording you’d like to include. You will see a counter increasing as you
go.
3. Press any of the Commit suggestions button when you are ready to apply the suggestions to your pull request,
and enter a message describing the changes.
This will add all the modifications to your branch as a single commit, resulting in a more legible history of changes
and less notifications for the repository followers. Incidentally, proceeding as this will also save you many clicks.
8 Capitolo 1. Una contribuzione passo dopo passoQGIS Documentation Guidelines
5. Make corrections
A new pull request will automatically be added to the Pull requests list. Other editors and administrators will review
your pull request and they may make suggestions or ask for corrections.
A pull request will also trigger a Travis CI build which automatically checks your contribution for build errors. If
Travis CI finds an error, a red cross will appear next to your commit. Click on the red cross or on Details in the
summary section at the bottom of the pull request page to see the details of the error. You’ll have to fix any reported
errors or warnings before your changes are committed to the qgis/QGIS-Documentation repository.
You can make modifications to your pull request until it is merged with the main repository, either to improve your
request, to address requested modifications, or to fix a build error.
To make changes click on the tab in your pull request page and click the pencil button next
to the filename that you want to modify.
Any additional changes will be automatically added to your pull request if you make those changes to the same branch
that you submitted in your pull request. For this reason, you should only make additional changes if those changes
relate to the issue that you intend to fix with that pull request.
If you want to fix another issue, create a new branch for those changes and repeat the steps above.
An administrator will merge your contribution after any build errors are corrected, and after you and the
administrators are satisfied with your changes.
1.1.5 5. Delete your merged branch
You can delete the branch after your changes have been merged. Deleting old branches saves you from having unused
and outdated branches in your repository.
Navigate to your fork of the QGIS-Documentation repository (https://github.com//QGIS-
Documentation). Click on the Branches tab. Below Your branches you’ll see a list of your branches. Click on the
Delete this branch
icon to delete any unwanted branches.
1.2 Using Git command line tools
The GitHub web interface is an easy way to update the QGIS-documentation repo with your contributions, but it
doesn’t offer tools to:
• group your commits and clean your change history
• fix possible conflicts with the main repo
• build the documentation to test your changes
You need to install git on your hard drive in order to get access to more advanced and powerful tools and have a local
copy of the repository. Some basics you may often need are exposed below. You’ll also find rules to care about even
if you opt for the web interface.
In the code samples below, lines beginning with $ show commands you should type while # are comments.
1.2. Using Git command line tools 9QGIS Documentation Guidelines
1.2.1 Local repository
Now you are ready to get a local clone of your QGIS-Documentation repository.
You can clone your QGIS repository using the web URL as follows:
# move to the folder in which you intend to store the local repository
$ cd ~/Documents/Development/QGIS/
$ git clone https://github.com//QGIS-Documentation.git
The former command line is simply an example. You should adapt both the path and the repository URL, replacing
with your user name.
Check the following:
# Enter the local repository
$ cd ./QGIS-Documentation
$ git remote -v
origin https://github.com//QGIS-Documentation.git (fetch)
origin https://github.com//QGIS-Documentation.git (push)
$ git branch
* master
• origin is the name of the remote repository of your QGIS-Documentation repository.
• master is the default main branch. You should never use it to contribute! Never!
Alternatively you can clone your QGIS repository using the SSH protocol:
# move to the folder in which you intend to store the local repository
$ cd ~/Documents/Development/QGIS/
$ git clone git@github.com:/QGIS-Documentation.git
Suggerimento: Permission denied (publickey) error?
If you get a Permission denied (publickey) error with the former command, there may be a problem with your SSH
key. See GitHub help for details.
Check the following if you used the SSH protocol:
# Enter the local repository
$ cd ./QGIS-Documentation
$ git remote -v
origin git@github.com:/QGIS-Documentation.git (fetch)
origin git@github.com:/QGIS-Documentation.git (push)
$ git branch
* master
You can start to work here but in the long terme process you will get a lot of issue when you will push your contribution
(called Pull Request in github process) as the master branch of the QGIS-Documentation repository will diverge from
your local/remote repository. You then need to keep track of the main remote repository and work with branches.
10 Capitolo 1. Una contribuzione passo dopo passoQGIS Documentation Guidelines
1.2.2 Add another remote repository
To be able to follow the work in the main project, add a new remote repository in your local repository. This new
remote repository is the QGIS-Documentation repository from QGIS project:
$ git remote add upstream https://github.com/qgis/QGIS-Documentation.git
$ git remote -v
origin https://github.com//QGIS-Documentation.git (fetch)
origin https://github.com//QGIS-Documentation.git (push)
upstream https://github.com/qgis/QGIS-Documentation.git (fetch)
upstream https://github.com/qgis/QGIS-Documentation.git (push)
Similarly, you can use the SSH protocol to add a remote repository in your local repository:
$ git remote add upstream git@github.com:qgis/QGIS-Documentation.git
$ git remote -v
origin git@github.com:/QGIS-Documentation.git (fetch)
origin git@github.com:/QGIS-Documentation.git (push)
upstream git@github.com:qgis/QGIS-Documentation.git (fetch)
upstream git@github.com:qgis/QGIS-Documentation.git (push)
So now you have the choice between two remote repository:
• origin to push your local branch in your remote repository
• upstream to merge (if you have right to do so) your contribution to the official one OR to update your master
branch of local repository from the master branch of the official repository.
Nota: upstream is just a label, a kind of standard name but you can call it as you want.
1.2.3 Update your base branch
Before working on a new contribution, you should always update your master branch in your local repository.
Assuming you are willing to push changes to the testing documentation, run the following command lines:
# switch to master branch (it is easy to forget this step!)
$ git checkout master
# get "information" from the master branch in the upstream repository
# (aka qgis/QGIS-Documentation's repository)
$ git fetch upstream master
# merge update from upstream/master to the current local branch
# (which should be master, see step 1)
$ git merge upstream/master
# update **your** remote repository (aka /QGIS-Documentation)
$ git push origin master
Now you have your local and remote repositories which both have their master branch up to date with the official
master branch of QGIS-Documentation. You can start to work on your contribution.
Nota: Switch the branch if you wish to contribute to released doc
Along with the testing documentation, we continue to fix issues in QGIS 3.10 doc, meaning that you can also contri-
bute to it. Follow the previous section sample code, replacing master with the corresponding branch of the latest
documentation.
1.2. Using Git command line tools 11QGIS Documentation Guidelines
1.2.4 Contribute to your production branch
Now that your base branch is updated, you need to create a dedicated branch in which you add your contribution.
Always work on a branch other than the base branch! Always!
# Create a new branch
$ git checkout -b myNewBranch
# checkout means go to the branch
# and -b flag creates a new branch if needed, based on current branch
# Let's check the list of existing branches (* indicates the current branch)
$ git branch
master
release_2.18
...
* myNewBranch
# You can now add your contribution, by editing the concerned file(s)
# with any application (in this case, vim is used)
$ vim myFile
# once done
$ git add myFile
$ git commit
Few words about commit/push commands:
• try to commit only one contribution (atomic change) i.e. address only one issue
• try to explain carefully what you change in the title of your commit and in the description. The first line is a
title and should start by an upper case letter and have 80 characters length, don’t end with a .. Be concise. Your
description can be longer, end with a . and you can give much more details.
• use a # with a number to refer to an issue. Prefix with Fix if you fix the ticket: your commit will close the
ticket.
Now that your changes are saved and committed in your local branch, you need to send them to your remote repository
in order to create pull request:
$ git push origin myNewBranch
1.2.5 Share your Changes
Now you can go to your github repository and create a Pull Request as exposed in a previous section. Ensure you
create a PR from your branch to the remote branch you are targetting in the official QGIS-Documentation repository.
1.2.6 Clean-up your local and remote repository
After your PR has been merged into the official QGIS-Documentation, you can delete your branch. If you work a lot
this way, in few weeks you will get a lot of unuseful branches. So keep your repository clean this way:
# delete local branch
$ git branch -d myNewBranch
# Remove your remote myNewBranch by pushing nothing to it
$ git push origin :myNewBranch
E non dimenticare di aggiornare il ramo principale nella tua repository locale!
12 Capitolo 1. Una contribuzione passo dopo passoQGIS Documentation Guidelines
1.3 Ulteriori letture
• Other than the Github web interface and the git command line tools exposed above, there are also GUI
applications you can use to create and manage your contributions to the documentation.
• When the changes in the pull request are conflicting with recent changes pushed to the target branch, the
conflicts need to be resolved before a merge is possible:
– if the conflict relates to few competing lines, a Resolve conflicts button is available in the Github pull
request page. Press the button and resolve the issue as explained at https://help.github.com/articles/
resolving-a-merge-conflict-on-github/
– if the conflict involves files renaming or removal, then you’d need to resolve the conflict using git command
lines. Typically, you have to first rebase your branch over the target branch using git rebase tar-
getBranch call and fix the conflicts that are reported. Read more at https://help.github.com/articles/
resolving-a-merge-conflict-using-the-command-line/
• Sometimes, at the end of the proofreading process, you may end up with changes split into multi-
ple commits that are not necessarily worth it. Git command lines help you squash these commits to a
smaller number and more meaningful commit messages. Some details at https://help.github.com/articles/
using-git-rebase-on-the-command-line/
1.3. Ulteriori letture 13QGIS Documentation Guidelines 14 Capitolo 1. Una contribuzione passo dopo passo
CAPITOLO           2

                                                                                  Writing Guidelines

     • Writing Documentation
          – Headlines
          – Lists
          – Inline Tags
          – Labels/references
          – Figures and Images
               ∗ Pictures
               ∗ Replacement
               ∗ Figure
               ∗ Tabelle
          – Index
          – Special Comments
          – Code Snippets
          – Footnotes
     • Managing Screenshots
          – Add new Screenshots
          – Translated Screenshots
     • Documenting Processing algorithms

In general, when creating reST documentation for the QGIS project, please follow the Python documentation style
guidelines. For convenience, we provide a set of general rules we rely on for writing QGIS documentation below.

                                                                                                            15
QGIS Documentation Guidelines
2.1 Writing Documentation
2.1.1 Headlines
To each webpage of the documentation corresponds a .rst file.
Sections used to structure the text are identified through their title which is underlined (and overlined for the first
level). Same level titles must use same character for underline adornment. In QGIS Documentation, you should use
following styles for chapter, section, subsection and minisec.
********
Chapter
********
Section
=======
Subsection
----------
Minisec
.......
Subminisec
^^^^^^^^^^
2.1.2 Lists
Lists are useful for structuring the text. Here are some simple rules common to all lists:
• Start all list items with a capital letter
• Do not use punctuation after list items that only contain a single simple sentence
• Use period ( . ) as punctuation for list items that consist of several sentences or a single compound sentence
2.1.3 Inline Tags
You can use tags to emphasize items.
• Menu GUI: to mark a complete sequence of menu selections, including selecting submenus and choosing a
specific operation, or any subsequence of such a sequence.
:menuselection:`menu --> submenu`
• Dialogs and Tab titles: Labels presented as part of an interactive user interface including window titles, tab
titles, button and option labels.
:guilabel:`title`
• Filenames and directories
:file:`README.rst`
• Icons with popup text
|icon| :sup:`popup_text`
(see image below).
16 Capitolo 2. Writing GuidelinesQGIS Documentation Guidelines
• Keyboard shortcuts
:kbd:`Ctrl+B`
will show Ctrl+B
When describing keyboard shortcuts, the following conventions should be used:
– Letter keys are displayed using uppercase: S
– Special keys are displayed with an uppercase first letter: Esc
– Key combinations are displayed with a + sign between keys, without spaces: Shift+R
• User text
``label``
2.1.4 Labels/references
Anchors inside the text can be used to create hyperlinks to sections or pages.
The example below creates the anchor of a section (e.g., Label/reference title)
.. _my_anchor:
Label/reference
---------------
To call the reference in the same page, use
see my_anchor_ for more information.
which will return:
see my_anchor for more information.
Notice that it will jump to the line/thing following the “anchor”. You do not need to use apostrophes, but you do need
to have empty lines after the anchor.
Another way to jump to the same place from anywhere in the documentation is to use the :ref: role.
see :ref:`my_anchor` for more information.
which will create a link with the caption instead (in this case the title of this section!):
see Labels/references for more information.
So, reference 1 (my_anchor) and reference 2 (Labels/references). Because the reference often displays a full caption,
it is not really necessary to use the word section. Note that you can also use a custom caption to describe the reference:
see :ref:`Label and reference ` for more information.
which returns:
see Label and reference for more information.
2.1. Writing Documentation 17QGIS Documentation Guidelines
2.1.5 Figures and Images
Pictures
To insert an image, use
.. figure:: /static/common/logo.png
:width: 10 em
which returns
Replacement
You can put an image inside text or add an alias to use everywhere. To use an image inside a paragraph, first create
an alias in the source/substitutions.txt file:
.. |nice_logo| image:: /static/common/logo.png
:width: 1 em
and then call it in your paragraph:
My paragraph begins here with a nice logo |nice_logo|.
This is how the example will be displayed:
My paragraph begins here with a nice logo .
To allow preview rendering in GitHub that is as close as possible to HTML rendering, you will also need to
add the image replacement call at the end of the file you changed. This can be done by copy-pasting it from
substitutions.txt or by executing the scripts/find_set_subst.py script.
Nota: Currently, to ensure consistency and help in the use of QGIS icons, a list of aliases is built and available in the
Sostituzioni chapter.
Figure
.. _figure_logo:
.. figure:: /static/common/logo.png
:width: 20 em
:align: center
A caption: A logo I like
The result looks like this:
18 Capitolo 2. Writing GuidelinesQGIS Documentation Guidelines
Fig. 2.1: A caption: A logo I like
To avoid conflicts with other references, always begin figure anchors with _figure_ and use terms that easily
connect to the figure caption. While only the centered alignment is mandatory for the image, feel free to use any
other options for figures (such as width, height, scale…) if needed.
The scripts will insert an automatically generated number before the caption of the figure in the generated HTML
and PDF versions of the documentation.
To use a caption (see My caption) just insert indented text after a blank line in the figure block.
A figure can be referenced using the reference label like this:
see :numref:`figure_logo`
renders like this:
see Fig. 2.1
This is the preferred way of referencing figures.
Nota: For :numref: to work, the figure must have a caption.
It is possible to use :ref: instead of :numref: for reference, but this returns the full caption of the image.
see :ref:`figure_logo`
renders like this:
see A caption: A logo I like
It is also possible (but not recommended) to use the following mechanism:
(see Figure_logo_).
It will render like this:
(see Figure_logo).
You can use uppercase if you want. This mechanism can only be used in the same .rst file.
2.1. Writing Documentation 19QGIS Documentation Guidelines
Tabelle
A simple table can be coded like this
======= ======= =======
x y z
======= ======= =======
1 2 3
4 5
======= ======= =======
It will render like this:
x y z
1 2 3
4 5
Use a \ (backslash) followed by an empty space to leave an empty space.
You can also make more complicated tables and reference them:
.. _my_drawn_table:
+---------------+--------------------+
| Windows | macOS |
+---------------+--------------------+
| |win| | |osx| |
+---------------+--------------------+
| and of course not to forget |nix| |
+------------------------------------+
My drawn table, mind you this is unfortunately not regarded as a caption
You can reference it like this: my_drawn_table_.
The result:
Windows macOS
and of course not to forget
My drawn table, mind you this is unfortunately not regarded as a caption
You can reference to it like this my_drawn_table.
For even more complex tables, it is easier to use list-table:
.. list-table::
:header-rows: 1
:widths: 20 20 20 40
* - What
- Purpose
- Key word
- Description
* - **Test**
- ``Useful test``
- complexity
- Geometry. One of:
(continues on next page)
20 Capitolo 2. Writing GuidelinesQGIS Documentation Guidelines
(continua dalla pagina precedente)
* Point
* Line
The result:
What Azione Key word Descrizione
Test Useful test complexity Geometry. One of:
• Punto
• Line
2.1.6 Index
An index is a handy way to help the reader find information in a document. QGIS documentation provides some
essential indices. There are a few rules that help us provide a set of indices that are really useful (coherent, consistent
and really connected to each other):
• An index should be human readable, understandable and translatable; an index can be made from many words
but you should avoid any unneeded _, -… characters to link them i.e., Loading layers instead of
loading_layers or loadingLayers.
• Capitalize only the first letter of the index unless the word has a particular spelling. E.g., Loading layers,
Atlas generation, WMS, pgsql2shp.
• Keep an eye on the existing Index list in order to reuse the most convenient expression with the right spelling
and avoid unnecessary duplicates.
Several index tags exist in RST. You can use the inline :index: tag within normal text:
QGIS can load several :index:`Vector formats` supported by GDAL/OGR ...
Or you can use the .. index:: block-level markup which links to the beginning of the next paragraph. Because
of the rules mentioned above, it is recommended to use the block-level tag:
.. index:: WMS, WFS, Loading layers
It is also recommended to use index parameters such as single, pair and see, in order to build a more structured
and interconnected index table. See Index generating for more information on index creation.
2.1.7 Special Comments
Sometimes, you may want to emphasize some points of the description, either to warn, remind or give some hints to
the user. In QGIS Documentation, we use reST special directives such as .. warning::, .. seealso::`,
``.. note:: and .. tip::. These directives generate frames that highlight your comments. See Paragraph
Level markup for more information. A clear and appropriate title is required for both warnings and tips.
.. tip:: **Always use a meaningful title for tips**
Begin tips with a title that summarizes what it is about. This helps
users to quickly overview the message you want to give them, and
decide on its relevance.
2.1. Writing Documentation 21QGIS Documentation Guidelines
2.1.8 Code Snippets
You may also want to give examples and insert code snippets. In this case, write the comment below a line with the
:: directive inserted. For a better rendering, especially to apply color highlighting to code according to its language,
use the code-block directive, e.g. .. code-block:: xml. More details at Showing code.
Nota: While texts in note, tip and warning frames are translatable, be aware that code block frames do not allow
translation. So avoid comments not related to the code and keep comments as short as possible.
2.1.9 Footnotes
Please note: Footnotes are not recognized by any translation software and it is also not converted to pdf format
properly. So, if possible, don’t use footnotes within any documentation.
This is for creating a footnote (showing as example1 )
blabla [1]_
Which will point to:
2.2 Managing Screenshots
2.2.1 Add new Screenshots
Here are some hints to create new, nice looking screenshots. The images should be placed in an image (img/) folder
that is located in the same folder as the referencing .rst file.
• You can find some prepared QGIS-projects that are used to create screenshots in the ./qgis-projects
folder of this repository. This makes it easier to reproduce screenshots for the next version of QGIS. These
projects use the QGIS Sample Data (aka Alaska Dataset), which should be placed in the same folder as the
QGIS-Documentation Repository.
• Reduce the window to the minimal space needed to show the feature (taking the whole screen for a small modal
window > overkill)
• The less clutter, the better (no need to activate all the toolbars)
• Don’t resize them in an image editor; the size will be set into the .rst files if necessary (downscaling the
dimensions without properly upping the resolution > ugly)
• Cut the background
• Make the top corners transparent if the background is not white
• Set print size resolution to 135 dpi (e.g. in Gimp set the print resolution Image ‣ Print size and save). This way,
images will be at original size in html and at a good print resolution in the PDF. You can also use ImageMagick
convert command to do a batch of images:
convert -units PixelsPerInch input.png -density 135 output.png
• Save them as .png (to avoid .jpeg artifacts)
• The screenshot should show the content according to what is described in the text
Suggerimento: If you are on Ubuntu, you can use the following command to remove the global menu function and
create smaller application screens with menus:
1 Updates of core plugins
22 Capitolo 2. Writing GuidelinesQGIS Documentation Guidelines
sudo apt autoremove appmenu-gtk appmenu-gtk3 appmenu-qt
2.2.2 Translated Screenshots
Here are some additional hints for those that want to create screenshots for a translated user guide:
Translated images should be placed in a img// folder. Use the same filename as the english
“original” screenshot.
2.3 Documenting Processing algorithms
If you want to write documentation for Processing algorithms, consider these guidelines:
• Processing algorithm help files are part of QGIS User Guide, so use the same formatting as User Guide and
other documentation.
• Each algorithm documentation should be placed in the corresponding provider folder and group file,
e.g. the algorithm Voronoi polygon belongs to the QGIS provider and to the group vectorgeometry. So the
correct file to add the description is: source/docs/user_manual/processing_algs/qgis/
vectorgeometry.rst.
Nota: Prima di iniziare a scrivere la guida, controllare se l’algoritmo è già descritto. In tal caso, è possibile
migliorare la descrizione esistente.
• It is extremely important that each algorithm has an anchor that corresponds to the provider name + the unique
name of the algorithm itself. This allows the Help button to open the Help page of the correct section. The
anchor should be placed above the title, e.g. (see also the Labels/references section):
.. _qgisvoronoipolygons:
Voronoi polygons
----------------
To find out the algorithm name you can just hover the mouse on the algorithm in the Processing toolbox.
• Avoid using «This algorithm does this and that…» as the first sentence in the algorithm description. Try to use
more general expressions like:
Takes a point layer and generates a polygon layer containing the...
• Avoid describing what the algorithm does by replicating its name and please don’t replicate the name of the
parameter in the description of the parameter itself. For example if the algorithm is Voronoi polygon
consider to describe the Input layer as Layer to calculate the polygon from.
• Indicate in the description whether the algorithm has a default shortcut in QGIS or supports in-place editing.
• Add images! A picture is worth a thousand words! Use .png format and follow the general guidelines for
documentation (see the Figures and Images section for more info). Put the image file in the correct folder, i.e.
the img folder next to the .rst file you are editing.
• If necessary, add links in the «See also» section that provide additional information about the algorithm (e.g.,
publications or web-pages). Only add the «See also» section if there is really something to see. As a good
practice, the «See also» section can be filled with links to similar algorithms.
• Give clear explanation for algorithm parameters and outputs: take inspiration from existing algorithms.
• Avoid duplicating detailed description of algorithm options. Add this information in the parameter description.
2.3. Documenting Processing algorithms 23QGIS Documentation Guidelines
• Avoid adding information about the vector geometry type in the algorithm or parameter description, as this
information is already available in the parameter descriptions.
• Add the default value of the parameter, e.g.:
* - **Number of points**
- ``NUMBER_OF_POINTS``
- [number]
Default: 1
- Number of points to create
• Describe the type of input supported the parameters. There are several types available you can pick one from:
Parameter/Output type Descrizione Visual indicator
Point vector layer vector: point
Line vector layer vector: line
Polygon vector layer vector: polygon
Generic vector layer vector: any
Vector field numeric tablefield: numeric
Vector field string tablefield: string
Vector field generic tablefield: any
Raster layer raster
Raster band raster band
HTML file html
Table layer table
Expression expression
Point geometry coordinates
Estensione extent
CRS crs
Enumeration enumeration
List list
Numero number
Stringa string
Booleano boolean
Folder path folder
File file
Matrix matrix
Layer layer
Same output type as input type same as input
Definition definition
Punto point
MultipleLayers multipleLayers
Intervallo range
AuthConfig authconfig
Mesh mesh
Layout layout
LayoutItem layoutitem
Color color
Scale scale
• Study an existing and well documented algorithm, and copy all the useful layouts.
24 Capitolo 2. Writing GuidelinesQGIS Documentation Guidelines
• When you are finished, just follow the guidelines described in Una contribuzione passo dopo passo to commit
your changes and make a Pull Request
Here is an example of an existing algorithm to help you with the layout and the description:
.. _qgiscountpointsinpolygon:
Count points in polygon
-----------------------
Takes a point and a polygon layer and counts the number of points from the
point layer in each of the polygons of the polygon layer.
A new polygon layer is generated, with the exact same content as the input
polygon layer, but containing an additional field with the points count
corresponding to each polygon.
.. figure:: img/count_points_polygon.png
:align: center
The labels in the polygons show the point count
An optional weight field can be used to assign weights to each point.
Alternatively, a unique class field can be specified. If both options
are used, the weight field will take precedence and the unique class field
will be ignored.
``Default menu``: :menuselection:`Vector --> Analysis Tools`
Parameters
..........
.. list-table::
:header-rows: 1
:widths: 20 20 20 40
* - Label
- Name
- Type
- Description
* - **Polygons**
- ``POLYGONS``
- [vector: polygon]
- Polygon layer whose features are associated with the count of
points they contain
* - **Points**
- ``POINTS``
- [vector: point]
- Point layer with features to count
* - **Weight field**
Optional
- ``WEIGHT``
- [tablefield: numeric]
- A field from the point layer.
The count generated will be the sum of the weight field of the
points contained by the polygon.
* - **Class field**
Optional
- ``CLASSFIELD``
- [tablefield: any]
- Points are classified based on the selected attribute and if
several points with the same attribute value are within the
polygon, only one of them is counted.
(continues on next page)
2.3. Documenting Processing algorithms 25QGIS Documentation Guidelines
(continua dalla pagina precedente)
The final count of the points in a polygon is, therefore, the
count of different classes that are found in it.
* - **Count field name**
- ``FIELD``
- [string]
Default: 'NUMPOINTS'
- The name of the field to store the count of points
* - **Count**
- ``OUTPUT``
- [vector: polygon]
Default: [Create temporary layer]
- Specification of the output layer type (temporary, file,
GeoPackage or PostGIS table).
Encoding can also be specified.
Outputs
.......
.. list-table::
:header-rows: 1
:widths: 20 20 20 40
* - Label
- Name
- Type
- Description
* - **Count**
- ``OUTPUT``
- [vector: polygon]
- Resulting layer with the attribute table containing the
new column with the points count
26 Capitolo 2. Writing GuidelinesCAPITOLO 3
Writing code in the PyQGIS Cookbook
• How to write testable code snippets
– Doctest sphinx directives
– Grouping tests
• How to test snippets on your local machine
If you are planning to add or update some chapters of the PyQGIS-Developer-Cookbook, then you should follow
some rules to enable automatic testing of the code snippets.
Testing is really important because it allows automatic checking of the code. Code snippets with errors or code that
uses outdated methods will fail and the notification will help you fix the problems.
For testing, we use the Sphinx doctest extension. Refer to the extension documentation for more detailed information.
3.1 How to write testable code snippets
Writing testable code snippets is not so different from the old method. Basically, you need to use a different Sphinx
directive.
3.1.1 Doctest sphinx directives
Instead of embedding the code in a .. code-block:: python directive (which would highlight the code syntax
automatically), you now need to embed it in a .. testcode::. That is, instead of this:
.. code-block:: python
crs = QgsCoordinateReferenceSystem(4326, QgsCoordinateReferenceSystem.
,→ PostgisCrsId)
assert crs.isValid()
You now use this:
27QGIS Documentation Guidelines
.. testcode::
crs = QgsCoordinateReferenceSystem(4326, QgsCoordinateReferenceSystem.
,→ PostgisCrsId)
assert crs.isValid()
After you wrote the example code, you should add some assertion that will evaluate the code and that will be run
automatically.
In the above example, you are creating a crs and with assert crs.isValid() you test if it is valid. If the code
has a wrong python syntax or the crs.isValid() returns False, this code snippet will fail during testing.
To successfully run the tests on snippets, you must import all the classes and declare any variables used in the code
snippets. You can include those in the code snippet itself (visible in the HTML pages) or you can add them to a ..
testsetup:: directive (hidden in the HTML pages). The .. testsetup:: needs to be placed before the ..
testcode:::
.. testsetup::
from qgis.core import QgsCoordinateReferenceSystem
.. testcode::
crs = QgsCoordinateReferenceSystem(4326, QgsCoordinateReferenceSystem.
,→ PostgisCrsId)
assert crs.isValid()
If the code snippet doesn’t create objects (and therefore you cannot use something like assert object.
isValid()), you can test the code using the print() method, then add the expected results within a ..
testoutput:: directive to compare the expected output:
.. testcode::
print("QGIS CRS ID:", crs.srsid())
print("PostGIS SRID:", crs.postgisSrid())
.. testoutput::
QGIS CRS ID: 3452
PostGIS SRID: 4326
By default, the content of .. testoutput:: is shown in the HTML output. To hide it from the HTML use the
:hide: option:
.. testoutput::
:hide:
QGIS CRS ID: 3452
PostGIS SRID: 4326
Nota: If the code snippet contains any print statements, you MUST add a testoutput with the expected outputs;
otherwise the test will fail.
28 Capitolo 3. Writing code in the PyQGIS CookbookQGIS Documentation Guidelines
3.1.2 Grouping tests
For each rst document, the code snippets are tested sequentially, which means you can use one .. testsetup::
for all the following code snippets and that later snippets will have access to variables declared in earlier ones in the
document.
Alternatively, you can use groups to break down the examples on the same page in different tests.
You add the code snippet to groups by adding one or more group names (separated by commas) in the respective
directive:
.. testcode:: crs_crsfromID [, morenames]
crs = QgsCoordinateReferenceSystem(4326, QgsCoordinateReferenceSystem.
,→ PostgisCrsId)
assert crs.isValid()
The doctest will pick each group snippets and run them independently.
Nota: Use group names that make sense with the related content. Use something similar to _,
for example: crs_intro, crs_fromwkt. In case of failures, this will help identifying where the failures occur.
If you don’t declare any group, the code snippet will be added to a group named default. If instead, you use * as
a group name, the snippet will be used in all testing groups, something normally usefull to use in the test setup:
.. testsetup:: *
from qgis.core import QgsCoordinateReferenceSystem
3.2 How to test snippets on your local machine
Nota: Instructions are valid for Linux system.
To test Python code snippets, you need a QGIS installation. For this, there are many options. You can:
• Use your system QGIS installation with Sphinx from a Python virtual environment:
make -f venv.mk doctest
• Use a manually built installation of QGIS. You’d need to:
1. Create a custom Makefile extension on top of the venv.mk file, for example a user.mk file with
the following content:
# Root installation folder
QGIS_PREFIX_PATH = /home/user/apps/qgis-master
include venv.mk
Or
# build output folder
QGIS_PREFIX_PATH = /home/user/dev/QGIS-build-master/output
include venv.mk
2. Then, use it to run target doctest:
3.2. How to test snippets on your local machine 29QGIS Documentation Guidelines
make -f user.mk doctest
• Run target doctest inside the official QGIS docker image:
make -f docker.mk doctest
You have to install Docker first because this uses a docker image with QGIS in it.
30 Capitolo 3. Writing code in the PyQGIS CookbookCAPITOLO 4
Linee guida per la traduzione
• Processo di traduzione
• Traduci un file
– Traduzione in Transifex
– Traduzione in QT Linguist
– Traduci il manuale
– Sommario delle regole per la traduzione
This manual is aiming to help the translator. First the general process of how technically a translation is done is
explained. Later the translation is explained from an actual English rst document that is translated to Dutch. Finally
a summary of Rules of translation is given.
Nota: Sebbene queste linee guida si focalizzino sulla documentazione di QGIS, i metodi e le regole descritte in
seguito sono applicabili anche alle traduzioni dell’applicazione QGIS e del sito web.
4.1 Processo di traduzione
QGIS Documentation is written in English with .rst files. In order to provide translations:
1. A prebuild script creates translation files named .po files for the English language in the folder /QGIS-
Documentation/locale/en.
2. These «originals» are then copied by the script to the locale folders for other languages.
3. The sentences in the .po files are pushed to the Transifex web platform, and made available for translators
who can begin to translate from English to their language with the editor.
4. At the end of the day, a script pulls back all validated translations
5. At the next build of the documentation (which occurs at least once a day), a script reuses the sentences to create
translated output
31QGIS Documentation Guidelines
6. When afterwards an .rst document is updated a new .po file is created in the English part. The contents of
this new file will be merged with already existing .po files for each language. This means that when a new line
is added to an .rst document that was already translated, only the new/updated sentences are added in the
translated .po file and needs to be translated. The amount of work for updating translations for next release
should be relatively small.
Nota: The process above is the same followed to translate QGIS website, QGIS Desktop and QGIS Server. The
difference with the applications is that instead of .po files, all the translatable strings in the .py, .cpp, .yaml and
others… files that shape the application are pushed to and pulled from transifex as a single .ts file.
Due diversi strumenti sono attualmente utilizzati per la traduzione di QGIS:
• The Transifex web platform, the easiest and recommended way to translate QGIS, transparently does the pro-
cess described above and pulls all the translatable texts in one place for the translator. Just pick the files you
want and translate. Translated files are stored in the platform until another release is pushed.
• Qt Linguist, a Qt development tool, requires the translator to pull locally the .po (or .ts) files from the source
code, translate and then push back.
Note that whatever tool you choose, rules of translations are the same.
4.2 Traduci un file
Per spiegare come funziona la traduzione, useremo il plugin Mappa di concentrazione come esempio. In questo
esempio, tradurremo da Inglese a Olandese, ma sarà praticamente lo stesso per gli altri documenti in tutte le lingue.
The source of the document can be found here:
QGIS-Documentation/source/docs/user_manual/plugins/plugins_heatmap.rst
Perché o scelto questo documento?
1. It includes images, captions, headers, references and replacements.
2. L’ho scritto perché così è più facile per me tradurre ;-)
The build process has created the English .po file which can be found here:
QGIS-Documentation/locale/en/LC_MESSAGES/docs/user_manual/plugins/plugins_heatmap.
,→po
The equivalent Dutch .po file (basically a copy) can be found here:
QGIS-Documentation/locale/nl/LC_MESSAGES/docs/user_manual/plugins/plugins_heatmap.
,→po
Along this file you will see a tiny .mo file which indicates that it does not hold any translations yet.
4.2.1 Traduzione in Transifex
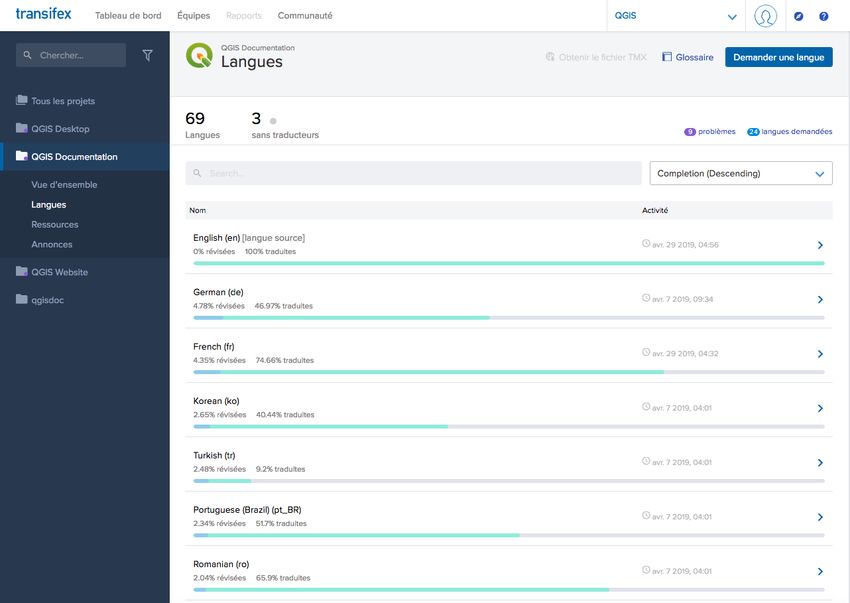
In order to translate using Transifex, you need to:
1. create an account on Transifex and join the QGIS project.
2. Once you are part of a language team, click on the corresponding project (in this case QGIS
Documentation). A list of available languages with their ratio of translation is displayed.
3. Hover over your language and click either:
• View resources: translatable .po files with their ratio of translation, number of strings and some more
metadata are now displayed.
32 Capitolo 4. Linee guida per la traduzioneYou can also read