Quick Step Studio Laminate Flooring Installation Instructions Tools Required for Installation
←
→
Page content transcription
If your browser does not render page correctly, please read the page content below
Quick•Step® Studio™ Laminate Flooring Installation Instructions
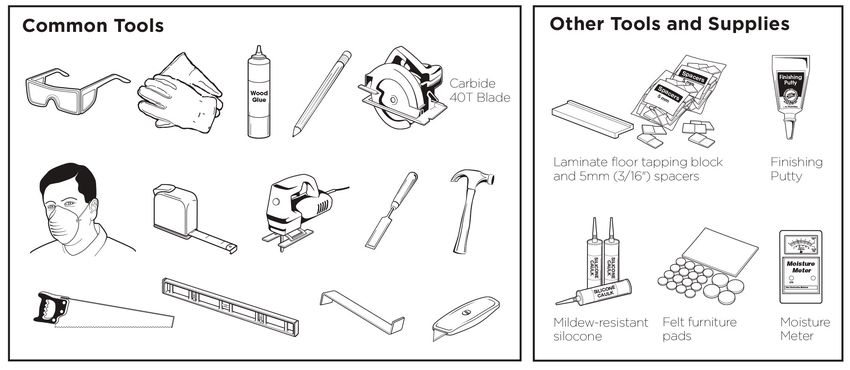
Tools Required for Installation
Job Site
Site Requirements
Laminate is a durable floor covering, not intended as structural material. Laminate requires a clean, dry,
secure subfloor that meets building codes.
2018_0202_QS_INST
The following requirements are not intended to supersede federal, state or local building codes, but as
with many other interior finish products, may require modifying existing structural components for
successful installation. Owner assumes responsibility for compliance with all building codes.

Laminate floor is suitable for use in climate controlled (35-65% RH and 60-85° F) indoor installations only
and should not be installed in rooms with floor drains or sump pumps. Laminate floor can be installed
above, on or below grade.

A moisture test is strongly recommended to determine if high moisture exists in the subfloor. When using
a calcium chloride moisture test for concrete subfloors (ASTM 1869), values must be ≤ 5 lbs/1000ft²/24-hr
or
B)   Undercut door frame and wallbase. Slide the flooring at least 1/4" underneath the door frame
     and wallbase. Also leave a concealed 3/8" minimum expansion space under each.
C)   Remove bumps or peaks in subfloor and fill depressions with floor leveling compound to
     ensure no more than 3/16" unevenness per 10-foot span.
D)   Acclimate unopened product before installation. If there is no time for acclimation, there
     should be no more than a difference of 25° F and 20% relative humidity between the
     stocking/transportation environment of the flooring and the final installation
     environment of the flooring.
E)   Clean debris from subfloor before installation.
F)   For concrete subfloors, install vapor barrier with overlapped seams of 8" or more.
G)   For planks without attached underlayment, install over single layer of underlayment
     appropriate for laminate floors. For planks with attached underlayment, it is acceptable to
     install Pergo Gold™ underlayment prior to flooring installation if desired. Make sure to follow
     the Pergo Gold installation instructions, taking special care to seal all foam edges with
     sealing tape and repair all rips and perforations in the underlayment vapor barrier prior to
     flooring installation. A separate vapor barrier should not be used in conjunction with Pergo
     Gold.

                                                                                2018_0202_QS_INST
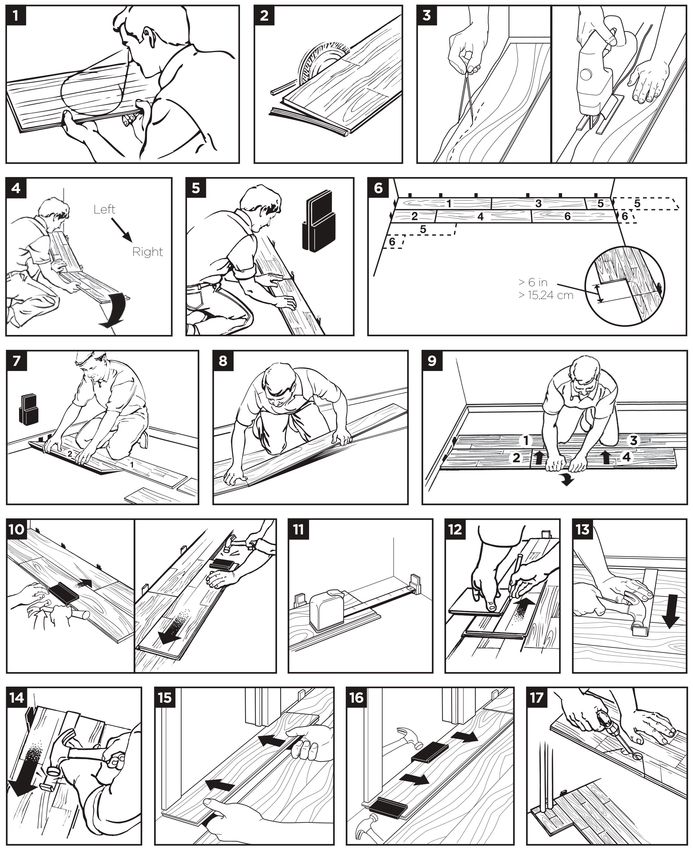
Flooring Installation

   1)    Inspect each plank. Floor should be installed blending planks from several cartons at the
         same time to ensure good color and shade mixture throughout the installation.
   2)    For the first row along straight walls, remove the tongue on all long side joints and on the
         short side of the 1st plank only.
   3)    For uneven walls, trace contour on tongue-side of plank and cut.

                                                                                     2018_0202_QS_INST
4) Assemble the first row tongue side toward wall. Insert the end tongue into the end groove and
rotate downward to assemble. Keep the planks aligned and the joints closed.
5) Two spacers thick side to thick side = 3/8".
6) Provide a 3/8" space for expansion on all sides. First piece must be at least 8" long. Start new
rows with pieces trimmed from previous row. Ensure at least a 6" end joint offset.
7) At a slight angle, insert the tongue of plank 2 into the groove of plank 1 until the laminate
edges meet, and then rotate down until the joints lock.
8) Join the short end of the plank first. There will be a gap on the long side joints when the plank
is rotated down.
9) Raise the outside edge of the plank upward approximately 1". Maintain this angle as you
push the plank in until the laminate edges meet. Rotate downward on the plank until the joint
locks. Repeat these steps to complete the installation. Installation Tip: Place a carton of
planks across the end of the row being installed to keep installed planks in place during
installation.
10) Alternate Tap Method: Align the tongues into the grooves of the long and short sides of the
planks. Install the long side first by placing a tapping block no closer than 8" from either end
and tap lightly along the long side until the joint is closed tightly. Then tap the end using the
tapping block into a locked position. Note: Uneven tapping or use of excessive force may
damage the joint.
11) Ensure there will be a 3/8" gap (after the joint is closed) to the wall for expansion.
12) For the last row, align the plank to be used on top of the 2nd to last row. Using a full width
plank as a spacer, trace wall contour and cut plank.
13) For the last row, install the long side tongue into the groove with the end joint aligned. Using
a pull bar and hammer, work evenly along the length of the plank and lightly tap the joint
closed.
14) After tapping the long side joint closed, tap the short side closed, using a tapping block or a
pull bar.
Installation Under Doorway Frames
15) Slide plank under pre-cut door frame.
16) Tap the long side joint closed first. Then tap the end joint closed.
Installation Around Fixed Objects (such as Pipes)
17) Allow 3/8" expansion space around pipes or other fixed objects.
Care and Cleaning
A) Place felt floor protectors under legs of movable furniture. Chair casters should be rubber —
not plastic or metal.
B) Place walk-off mats at entrances.
C) Dust mop or damp mop only. NO wet mopping. Use 1 cup of vinegar per gallon of water
OR 1/3 cup ammonia per gallon of water. DO NOT use abrasive cleaners, detergents, soaps,
waxes or polishes. Use correct hard surface vacuum tools. DO NOT use rotating beater bars,
floor scrubbers, steamers, jet mops or similar products. DO NOT allow liquids to stand on the
floor. Wipe up spills immediately. DO NOT allow moisture to be on the floor for longer
than 30 minutes.
IMPORTANT HEALTH NOTICE FOR MINNESOTA RESIDENTS ONLY:
THESE BUILDING MATERIALS EMIT FORMALDEHYDE. EYE, NOSE, AND THROAT IRRITATION,
HEADACHE, NAUSEA AND A VARIETY OF ASTHMA-LIKE SYMPTOMS, INCLUDING SHORTNESS
2018_0202_QS_INSTOF BREATH, HAVE BEEN REPORTED AS A RESULT OF FORMALDEHYDE EXPOSURE. ELDERLY
PERSONS AND YOUNG CHILDREN, AS WELL AS ANYONE WITH A HISTORY OF ASTHMA,
ALLERGIES, OR LUNG PROBLEMS, MAY BE AT GREATER RISK. RESEARCH IS CONTINUING ON
THE POSSIBLE LONG-TERM EFFECTS OF EXPOSURE TO FORMALDEHYDE. REDUCED
VENTILATION MAY ALLOW FORMALDEHYDE AND OTHER CONTAMINANTS TO ACCUMULATE IN
THE INDOOR AIR. HIGH INDOOR TEMPERATURES AND HUMIDITY RAISE FORMALDEHYDE
LEVELS. WHEN A HOME IS TO BE LOCATED IN AREAS SUBJECT TO EXTREME SUMMER
TEMPERATURES, AN AIR-CONDITIONING SYSTEM CAN BE USED TO CONTROL INDOOR
TEMPERATURE LEVELS. OTHER MEANS OF CONTROLLED MECHANICAL VENTILATION CAN BE
USED TO REDUCE LEVELS OF FORMALDEHYDE AND OTHER INDOOR AIR CONTAMINANTS. IF
YOU HAVE ANY QUESTIONS REGARDING THE HEALTH EFFECTS OF FORMALDEHYDE,
CONSULT YOUR DOCTOR OR CALL LOCAL HEALTH DEPARTMENT.
Warning! Do not mechanically chip or pulverize existing resilient flooring, backing, lining felt, asphaltic
“cutback” adhesives or other adhesives. Previously installed resilient flooring may contain either asbestos
fibers or crystalline silica. The products in this box do not contian asbestos.
PROPOSITION 65 WARNING
Produced wood dust when cut. Wood dust is known in California to cause cancer.
We continuously make technological advancements that improve product performance or installation
techniques or methods. To confirm you have the most recent installation instructions, please visit our
website at us.quick-step.com.
2018_0202_QS_INSTYou can also read