Science of Sports Educator Guide - The Franklin ...
←
→
Page content transcription
If your browser does not render page correctly, please read the page content below
GSK Science in the Summer™

Science of Sports
Educator Guide
GSK Science in the Summer™

Science of Sports
Table of Contents

Note to Educators                                             2
Introduction                                                  4
Session 1: Physically Fit – Part 1 – Balance & Stability      5
Session 2: Physically Fit – Part 2 – Nutrition                16
Session 3: Mentally Fit                                       23
Session 4: Equipped to be Fit                                 30
Optional Activities                                           37
Background Information                                        42

The Franklin Institute in Philadelphia, Pennsylvania is proud to support
the implementation of the national GSK Science in the SummerTM program.

Questions about the Science of Sports content or about the program?
Contact: NationalSIS@fi.edu

                                                                           Page 1
GSK Science in the Summer™

Science of Sports
Note to Educators
The curriculum for this topic is divided into four parts with discussions and hands-on activities. Each
day’s content builds on the previous day. You can differentiate the activities to meet the readiness
and capabilities of the age levels within your class where needed. You can extend an activity if there
is interest from the students and skip other activities if you run out of time. The goal of the program
is to engage student interest and provide an enriching experience. If students want to continue with
a particular activity, by all means let them, even if it means another activity is missed.

An estimated time to complete each activity has been provided. Level one students tend to need
more time to complete the activities than the level two students. Please alter these times as needed
for your group of students. These times are to assist you with planning the day’s activities and allow
for time management.

We encourage you to ask the students open-ended questions and guide conversations so the
students are interacting instead of being passive listeners. If the students have an interest in a
particular subject that relates to the overall topic, feel free to extend the activity and discussion if
you feel comfortable with the information. If you are not knowledgeable about a particular subject in
which the students are interested, please ask the children’s librarian to find a book about it for the
students to learn more or visit a reputable website for additional information that you can share with
the students.

Important Safety Notice

GSK has adopted a set of safety standards, one of which deals with the requirement that eye
protection be worn in all laboratories. The GSK Science in the SummerTM program aligns with these
standards and strives to instill an appropriate awareness of the importance of safety by providing
program participants with safety glasses. A goggle icon will be next to the activities that require the
use of safety glasses. Please enforce student use of safety glasses when noted in this guide.

At the end of part four, students should be encouraged to create their own thank you note to
express what they enjoyed about the program. This is intended not just as a way to express gratitude
to GSK, but also to provide the program administrators with information about which activities were
more memorable for the students.

Your feedback is also welcomed, of course. Please contact the program administrator at
NationalSIS@fi.edu with comments and suggestions.

Thank you for all your hard work to make the GSK Science in the Summer™ program a success.

                                                                                                   Page 2
MASTER SUPPLY LIST
• Safety poster
• Poster paper & markers for teacher use
• Safety goggles & labels
• Student bags & pencils
• “What is a Scientist?” book by Barbara Lehn
• Masking tape for taped Y pattern (20 feet)
• Masking tape for Starting line (20 feet)
• Masking tape for Finish line (20 feet)
• Blocks (16)
• Timers (8)
• Tape measures (8)
• Yard sticks (8)
• Data sheets
• Profile Cards 1, 2, 3, 4, 5, 6, 7, & 8
• Small beverage cups – 4 oz. (16)
• Pitchers of drinking water
• Bucket for dumping unwanted liquid (if sink is not available)
• Fruit juice
• Honey
• Sea salt
• Liquid measuring cups marked FOOD ONLY (8)
• Measuring spoons marked FOOD ONLY (8)
• Measuring spoons (8)
• Stir sticks (16)
• Aluminum foil sheets
• Colored paper clips (240)
• Yarn or string (16 pieces, each 8-10 inches long)
• Pony Beads or beads big enough to go on yarn (240)
• Construction paper strips (64)
• Tape (4 rolls)
• Baseball bat cards (8)
• Bean bags – 6 per pair of students – 2 of each color/style (48)
• Bean bag holders (8)
• Decks of Profile Cards (8)
• Paper/wax cups – 8 oz. (16)
• Plastic bowls (16)
• Popsicle sticks (16)
• Warm water – 8 cups
• Borax – 16 tablespoons
• Corn starch – 16 tablespoons
• White glue – 32 tablespoons
• Food coloring – variety of colors
• Paper towels
• Baseballs (8)
• Tennis balls (8)
• Ping-pong balls (8)
Note: Supplies for the optional activities are NOT included on this list or in the kit. Refer to each optional activity for its required supplies.
Page 3GSK Science in the Summer™
Science of Sports
Introduction
The Science of Sports content is intended to be presented in four, one-hour blocks. Each
session is designed to serve a group of sixteen children at the same level—either level one or
level two. Level one children are entering grades two or three. Level two children are
entering grades four, five, or six.
The content invites children to explore this big idea:
How does science help athletes perform in their sports?
While exploring this idea, children will learn that:
Science is a tool that can be used to better understand and advance performance in
sports.
Athletes need to be physically fit, mentally fit, and be properly equipped in order to
excel in their sports.
Athletes are supported by a large network of people with a range of expertise in
science, technology, engineering, and math. These include biologists, chemists,
engineers, psychologists, neuroscientists, physicians, material scientists,
technologists, mathematicians, nutritionists, trainers, and physical therapists, among
others.
Athletes are a diverse group of individuals with respect to gender, race, ethnicity,
body shape, age, and people with disabilities.
The Science of Sports content is designed with this presentation plan in mind.
Science of Sports Session – Level 1 or 2 – 16 children
Part 1 – 60 minutes Part 2 – 60 minutes Part 3 – 60 minutes Part 4 – 60 minutes
Physically Fit Physically Fit Mentally Fit Equipped to be Fit
Balance & Stability Nutrition
STEM Showcase – Featured Roles for STEM Professionals
Page 4GSK Science in the Summer™
Science of Sports
Part 1 – Physically Fit – Balance & Stability
OVERVIEW
Part one begins with an introduction to the concept of being scientific, thinking like a scientist, and
doing so safely. Next, students will apply scientific strategies to an exploration of physical fitness with
a focus on balance and stability. Finally, students will consider some of the scientific professionals
involved in physical fitness as it relates to sports.
TIME MANAGEMENT
Introduction & Safety Guidelines = 10 minutes
What is a Scientist? = 10 minutes
What is Physical Fitness? = 5 minutes
Physical Challenges = 25 minutes
Balance Challenge #1
Balance Challenge #2
Balance Challenge #3
Standing Long Jump Challenge
Block Run Challenge
STEM Showcase = 10 minutes
MATERIALS & SUPPLIES
• Safety poster
• Safety goggles & labels
• Student bags
• “What is a Scientist?” book by Barbara Lehn
• Poster paper & marker for teacher use
• Taped Y pattern
• Starting line (tape on floor)
• Finish line (tape on floor)
• Blocks (2)
• Timers (8)
• Tape measures (8)
• Data sheets
• Pencils
• Profile Cards 1 & 2
Page 5PREPARATION & SET-UP
Arrange the classroom so that there is an area for students to sit and listen as well as open space for
the physical activities.
In the open space, use the masking tape to create two lines on the floor. If possible, the lines should
be 20’ long and 10’ apart. If there is extra space, make the lines farther apart. If there is less space,
shorten the length before moving them closer together.
In the open space, use the masking tape to create the uppercase Y pattern for balance challenge #2.
For level one students, the open ends of the Y should be about 2 feet apart. For level two students, 3
feet apart. Taper the two arms of the Y to a point and extend the trunk proportionally.
During the run challenge, students will run along a line’s 20’ length from end to end.
During the jump challenge, students will jump away from a line, out to the side.
Gather the other materials—the poster, the book, the profile cards, poster paper & marker—near
where you will be instructing. You will distribute the goggles to the students during the safety
overview. You will distribute the data sheets and pencils during the physical challenges.
At the end of the day, the masking tape lines and pattern can be removed from the floor and
discarded. Used data sheets can also be discarded. If it is not possible to keep the safety and
scientific behaviors posters in place for tomorrow, carefully remove it and save it for replacement
tomorrow. All other supplies should be returned to the kit for later use.
Page 6Introduction & Safety Guidelines = 10 minutes
Begin by introducing yourself to the students and share with them why you enjoy science. Orient
them to their surroundings. Establish appropriate rules. These will vary according to the space.
Give students a general overview of the four-part program. By the end, we hope that the students
will find science interesting and will consider science as a possible career. Also, we hope to
encourage students to visit your museum to learn more about science or visit their local library to
take out books about science and attend future programing.
Safety First
• Safety Poster
• Safety Goggles
• Labels
1. Talk to the students about the importance of following laboratory safety rules and directions.
Discuss, without frightening them, the dangers of working with certain materials such as
borax.
2. Distribute safety goggles to the students and show them how to vent them. Show the
students how to adjust the straps to fit their face comfortably. Attach a label to each pair of
goggles and write the student’s name/initials as a way to identify them.
3. Remind the students that during some of the activities, the safety goggles will need to be
over their eyes for protection. Tell them that you will instruct them when goggles need to be
worn. Throughout this guide, note the times when goggles are required to be worn.
4. Tell students that scientists never put their noses into cups to smell. Instead, they use an
action called “wafting,” which is moving the air over the beaker towards their noses, to
detect odors. Have the students practice this motion. On days two and four, students may
be tempted to smell the contents of their cups. Be sure to remind them about wafting.
5. Scientists do not taste substances even when they may look like food because the substances
could be harmful or even poisonous.
6. Discuss the need for closed-toed shoes and remind them not to wear sandals or flip flops
during the program.
Page 7What is a Scientist? = 10 minutes
• “What is a Scientist?” book by Barbara Lehn
• Poster paper & marker for teacher use
Engage students in a conversation about being a scientist.
1. Read the book to the students.
2. When finished, ask students to name some of the behaviors mentioned in the book. These
should be emphasized:
Asks questions Measures Observes
Learns from senses Counts Records
Draws Sorts Keeps trying
Writes Experiments Makes & tests predictions
Notices details Thinks logically Has fun
3. Explain that this week, we will practice these behaviors as we work like scientists.
4. Ask students what they think a scientist is and does. Hold a brief discussion, eliciting
students’ preconceptions about science. Have students share why they like or don’t like
science or how this program can help improve their opinion of science. Explain to students
that they will use these behaviors as they learn about the science of sports.
5. Write the above behaviors on poster paper and display during all the classes to remind
students and refer to them. Help students continue to identify scientific behaviors
throughout the week as the class works on different activities.
Page 8What is Physical Fitness? = 5 minutes
Prepare students for the challenges to come by explaining that exercising helps people become
physically fit. In particular, exercising their bodies helps them have better balance and stability. To
prevent injuries, athletes start slowly and allow time to stretch their muscles before beginning to
play. Let’s start stretching our muscles.
1. Ask students to stand with their feet flat on the floor.
2. Lead them in simple stretching movements for just two or three minutes.
3. Have then bend over to touch their toes and hold position.
4. Extend your arms at shoulder height. Touch left knee with right hand. Touch right knee with
left hand. Touch left foot with right hand. Touch right foot with left hand. Continue
repetitions.
5. Extend arms above your head. Alternate clasping elbow of one arm with opposite hand.
Page 9Physical Challenges = 25 minutes
Balance Challenge #1
Students will test their balance and stability. Now that blood is flowing to our muscles because we
stretched, let’s work on our balance.
1. Have the students stand with both feet together and look forward with arms at their side.
Hold this position for the count of 10.
2. Have the students lift one foot off the floor keeping their hands at their side and hold that
position for the count of 10.
3. Have the students repeat the above, but close their eyes for a count of 10.
4. Ask the students to discuss what happened each time.
5. Ask the students which stance allowed them to stay balanced. Why do they think that stance
was the best? What factors are needed to have balance?
Page 10Balance Challenge #2
• Taped uppercase Y pattern
1. Invite the students to the area where the taped Y has been placed on the floor.
2. Invite one student to start at the wide end of the Y with one foot on each end.
3. Have the student walk slowly from the open end of the Y towards the stem with his/her arms
at the side of the body.
4. Challenge the same student to walk down the Y again with his/her their arms in a different
position such as straight out at shoulder height.
5. Have all students take turns walking down the Y both ways.
6. Ask the students to reflect:
a. What happens as you get closer to the bottom of the Y?
b. What happened when you walked with your arms in different positions?
c. Why does using your arms make balancing easier?
d. Which sports require athletes to have good balance?
e. How can we improve our balance?
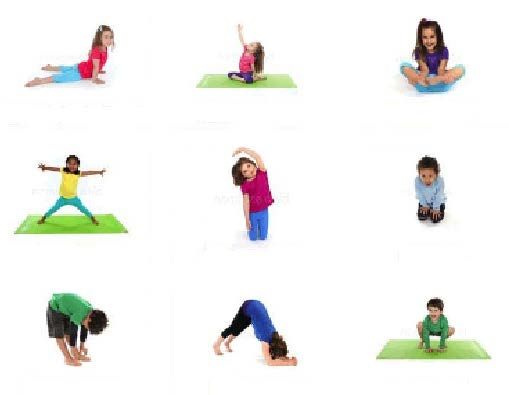
Page 11Balance Challenge #3
Demonstrate a few easy yoga positions that require balance and don’t require a yoga mat. If time
allows, students can repeat the poses each day to see if their balance improves by the end of the
session.
Did you know that many football players do yoga and take ballet lessons to improve their balance
and flexibility? These abilities come in handy while running on the field avoiding the other team.
Dog Mermaid Flower
Star Rainbow Lion
Ragdoll Dolphin Frog
Page 12Standing Long Jump Challenge
• Starting line (tape on floor)
• Yard sticks (8)
• Measuring tapes (8)
• Data sheets
• Pencils
1. Now that we’ve worked on our balance and stability, let’s add movement. Invite students to
work with a partner to measure each other’s long jumps past the starting line. Demonstrate
for the students how to use the measuring tape or the yard sticks, whichever you choose.
2. One partner will start as the Jumper and the other will be the Measurer and then switch.
3. Demonstrate the activity for students: the Jumper stands on the starting line with feet
shoulder width apart, rocking their feet and swinging their arms to build energy. Then when
ready, jump with both feet at once. They must land on both feet and not take any steps, or
the jump won’t count. They need to “stick the landing” like in gymnastics. Use your balance
skills to help you stand still.
4. The Jumper stays still while the Measurer measures.
5. The Measurer measures the distance from the starting line to the partner’s heels with yard
stick or measuring tape and records the distance on the data sheet.
6. Repeat three times and record all the distances.
7. Switch roles to let the other partner jump.
Level 2 students could also find the average, mode, and median of the distances for each student and
across the group.
8. Discuss as a whole group:
a. Was there anything we did to help our jump?
b. What do you think would help us get better at this?
c. What sports need this skill?
9. Reflect on activities: Why are balance and jumping helpful skills in sports?
Page 13Block Run Challenge
• Starting line (tape on floor)
• Finish line (tape on floor)
• Blocks (16)
• Timers (8)
• Data sheets
• Pencils
1. Continuing to work with a partner, each student will take a turn as the Runner and as the
Data Recorder. Demonstrate how to use the timer and explain the activity:
a. The Runner runs from the one end of the line to the other end to collect two
blocks—one at a time—from the opposite end and return each of them to the
starting line. Blocks must be placed down on the starting line and cannot be thrown
or tossed.
b. The Data Collector will record the time it takes to complete the task on the data
sheet. The Runner should return the blocks back to the finish line before starting the
next trial.
2. Repeat three times and then switch roles.
Level 2 students could also find the average, mode, and median of the times for each student and
across the group.
3. Discuss as a whole group:
a. How did our first times compare to our second and third? Why do you think it
changed?
b. Are there any things that could change to make you faster?
c. What do you think would help us get better at this?
Page 14STEM Professionals = 10 minutes
• Profile Cards 1 & 2
Throughout the week, students will learn about STEM professionals involved in sports.
1. Explain to students that many different kinds of people work in sports, not just athletes and
coaches. Many people help make sure that the players and teams can succeed. Today, we
will look at two of the jobs that people do behind the scenes in sports.
2. Display and read aloud profile cards 1 and 2. Ask students to think about why that job is
important. Ask students if they know anyone with those jobs.
Wrap-Up
1. Ask the students to recall the activities from today involving safety and other topics.
2. Discuss what it means to be a good scientist and how the students were like scientists today.
Refer back to the list of scientific behaviors.
3. If the program is happening at a library, show the students the books the children’s librarian
has collected for them.
4. Distribute the student bags. Tell them that they will carry their goggles and pencils in it.
Remind them that they need to bring their bag with them tomorrow.
Page 15GSK Science in the Summer™
Science of Sports
Part 2 – Physically Fit – Nutrition
OVERVIEW
Part two continues to focus on why athletes need physical fitness. Students will explore how the food
they eat contributes to their fitness and ability to perform physical activities. Roles for STEM
professionals will be highlighted.
TIME MANAGEMENT
Introduction & Review = 5 minutes
Nutrition Activities = 45 minutes
Food Breakdown
Hydration
STEM Showcase = 10 minutes
MATERIALS & SUPPLIES
• Safety poster
• Small beverage cups – 4 oz. (16)
• Pitcher of drinking water
• Bucket for disposing of unwanted liquid if a sink is not available
• Fruit juice
• Honey
• Sea salt
• Poster paper & marker for teacher
• Measuring cups (8)
• Measuring spoons (8)
• Stir sticks (16)
• Aluminum foil sheets
• Data sheets
• Pencils
• Colored paper clips (240)
• Yarn or string (16 pieces, each 8-10 inches long)
• Pony Beads or beads big enough to go on yarn (240)
• Construction paper strips (64)
• Tape (4 rolls)
• Profile cards 3 & 4
Page 16PREPARATION & SET-UP
Today the students will be working at tables. Prepare the chart with the recipe for the hydration
activity in advance. If you removed the safety and scientific behaviors posters yesterday, return them
to view for your discussion.
Prepare the materials for the Food Breakdown activity. Cut the construction paper along the long
side so that each strip is about 11 inches long. Make sure to cut enough pieces so that each
student can have 4 pieces. Cut yarn/string into 8-10 inch segments that are able to hold 15
beads. Pre-tie one end of the string if you don’t want to have students tie their own.
Prepare the materials for the hydration activity. Each student will need a cup.
At the end of the session, if the safety and scientific behaviors posters cannot be left in place for
tomorrow’s session, remove them carefully for storage overnight. The plastic cups and plastic spoons
should be discarded. Opened containers of fruit juice should be refrigerated for safety.
Page 17Introduction & Review = 5 minutes
Welcome students back and explain that they are going to learn a little bit about nutrition today.
They are going to investigate healthy food and beverages. Athletes need to pay attention to what
they eat and drink to make sure they are staying physically fit in order to perform at their best.
Ask students if they have ever heard of protein, fats, and carbohydrates? What kind of foods have
protein? What about fats? What about carbs? Athletes eat all of these kinds of foods because our
bodies break them down to provide energy. We’re going to learn today about how our body breaks
food down into its parts.
Ask students if they like to drink sports drinks like Gatorade. Why do they drink it? Why do athletes
drink it? Besides hydrating your body with water, it also has salt and sugar in it to help nourish you.
Remind students about scientific behaviors. Today students are going to experiment with model
foods and make a sports drink.
Page 18Nutrition Activities = 45 minutes
Food Breakdown = 20 minutes ►GOGGLES ON◄
• Colored paper clips (240 total – 15 per student)
• Yarn or string (16 pieces, each 8-10 inches long)
• Pony Beads or beads big enough to go on yarn (240 total – 15 per student)
• Construction paper strips (64 pieces total – 4 per student)
• Tape (4 rolls – 1 roll shared per 4 students)
1. Make a chain of the colored paper clips by hooking them together. Each paper clip
represents a sugar and the whole chain is called a carbohydrate.
2. Next grab your yarn and beads to make a different chain. Tie a knot at one end of a piece of
yarn so that a bead will stay on. Now string beads onto the piece of yarn. Do not tie the other
end! This chain is like a protein and each bead represents an amino acid.
3. The strips of construction paper represent fats.
4. Now for the breakdowns:
a. For the carbohydrate, unhook paper clips. How can you do this? At what places can
you break the chain? Can you put pieces back together?
Explain to the students that carbohydrates are long chains of sugars that can be
easily broken down at any point in the chain and can also be reassembled by the
body. This process of breaking down and reassembling these chains releases energy
that the body uses to function. The chain of paperclips represents this as they can
easily be hooked and unhooked at any point in their chain.
b. For protein, take off individual beads. Can you do this from different places? Can you
add pieces back on?
Explain to the students that proteins are long chains of amino acids and act as the
body’s “building blocks” with a variety of uses such as building or repairing muscles.
Unlike carbs and fats they cannot be broken down at any point in the chain, the
beads on the string are a great example of this since the beads can only be removed
at one end.
c. For fats, rip pieces off of the strip. At what places can you rip the strips? Do this for 2
of the fat strips, tearing to make halves of different lengths. Can you put the ripped
pieces back together? Use a small piece of tape to make a new fat strip. Use half of
one strip and half of another.
Explain to students that fats are long chains of fatty acids. Like the construction
paper they can be broken down anywhere but cannot be easily put back together.
The body must first modify the fatty acids before they can be broken down and used
as energy. Our tape is helping us “modify” the paper pieces to put them back
together. Breaking down fatty acids takes much longer to break down than
carbohydrates but releases more energy.
Page 19Hydration = 20 minutes ►GOGGLES ON◄
Students will learn about hydration by making their own sports drink.
NOTE: BE ALERT FOR POSSIBLE FOOD ALLERGIES
• Small beverage cups – 4 oz. (16)
• Pitcher of drinking water
• Bucket for disposing of unwanted liquid if a sink is unavailable
• Fruit juice
• Honey
• Sea salt
• Poster paper & marker for teacher
• Measuring cups (8)
• Measuring spoons (8)
• Stir sticks (16)
• Aluminum foil sheets
• Data sheets
• Pencils
1. Introduce the activity by asking students about their experience with sports drinks: How
many of you have ever had a sports drink like Gatorade or Powerade? Why do athletes drink
these kinds of drinks instead of water?
2. Explain to the students what electrolytes are and why they are important.
3. Invite students to make their own sports drink by combining key ingredients: water, fruit
juice, honey, and sea salt.
4. Show the standard recipe on poster paper.
INGREDIENT AMOUNT
Fruit juice/Water ½ cup
Honey ½ teaspoon
Sea salt ½ pinch
5. Remind students about wafting! While these ingredients are unlikely to cause problems,
good scientific practice requires that students not smell the contents of their cups directly.
6. Hand out the ingredients, cups, measuring cups, stir sticks, and measuring spoons.
7. Show the students which measuring devices to use and how to measure accurately.
8. Allow students to sample their drink (beware of allergies), and discuss:
a. What do you taste? Is it too sweet, too salty?
b. How would we change it to taste different?
Page 209. If desired, students can start again and create a new recipe with different ratios, taste, and
modify. Students should use the recipe data sheet to keep track of the different ingredients
and measurements they tried.
10. Encourage students to share their recipes with one another—but NOT their cups!
11. If time permits, tell the story of Gatorade which is included in the background information
section of this guide.
Page 21STEM Professionals = 10 minutes
• Profile Cards 3 & 4
Throughout the week, students will learn about STEM professionals involved in sports.
1. Explain to students that many different kinds of people work in sports, not just athletes and
coaches. Many people help make sure that the players and teams can succeed. Today, we
will look at two of the jobs that people do behind the scenes in sports.
2. Display and read aloud profile cards 3 and 4. Ask students to think about why that job is
important. Ask students if they know anyone with those jobs.
Wrap-Up
5. Ask the students to recall the activities from today involving protein, fats, carbohydrates, and
hydration. Suggest that they read the labels on food and sports drinks to see these
ingredients.
6. Recall what it means to be a good scientist and how the students were like scientists today.
Refer back to the list of scientific behaviors.
7. If the program is happening at a library, remind the students that books are available to learn
more.
8. Remind the students to put their things in their bags before they go.
Page 22GSK Science in the Summer™
Science of Sports
Part 3 – Mentally Fit
OVERVIEW
Part three turns attention to mental fitness as students explore aspects of physical activity that are
controlled by the brain. Reaction time and hand-eye coordination are the two main concepts for this
hour. Students will also continue to encounter roles for STEM professionals in sports.
TIME MANAGEMENT
Introduction & Review = 5 minutes
Reaction Time Challenge = 15 minutes
Hand-Eye Coordination Challenge = 20 minutes
Memory Game = 10 minutes
STEM Showcase = 10 minutes
MATERIALS & SUPPLIES
• Safety Poster
• Baseball bat cards (8)
• Data sheets
• Pencils
• Bean bags – 6 per pair of students – 2 of each color/style (48)
• Decks of Profile Cards (8)
• Profile Cards 5 & 6
PREPARATION & SET-UP
Today’s activities require students to move around. Make sure that there is open space available for
them. If you removed the safety and scientific behaviors posters yesterday, return them to view for
your discussion.
At the end of the session, if the safety and scientific behaviors posters cannot be left in place for
tomorrow’s session, remove them carefully for storage overnight. The data sheets can be discarded.
All other supplies should be returned to the kit.
Page 23Introduction & Review = 5 minutes
Welcome students back and explain that they are going to learn about mental fitness today. They are
going to test reaction time, hand-eye coordination, and memory. Athletes need to stay mentally
sharp in order to perform at their best level in their chosen sports.
Explain to students that our brains determine our reaction time, our coordination, and our ability to
remember things. The more we use our brains, the better we get. At first, we may struggle with the
challenges today and that’s okay. If we keep trying, we’ll see that our brains learn and adapt very
quickly so that we get better almost right away.
Remind students about scientific behaviors. Today’s activities will particularly challenge them to keep
trying. Persistence is an important part of being scientific.
Page 24Reaction Time Challenge = 15 minutes
• Baseball bat cards (8)
• Data sheets
• Pencils
This challenge will test reaction time and show how practicing something over and over again can
help improve skills needed including those needed in sports.
1. Students will work in pairs, taking turns between being the dropper and the catcher.
2. The dropper holds the paper strip overhead, counts down from three, and releases the card
on one.
3. The catcher stops the card’s fall by grabbing it between their thumb and pointer finger as
soon as they can after it’s dropped. The catcher holds still until the dropper can record the
measurement on the data sheet.
4. Repeat the drop 5 times, recording each result.
5. Then, the dropper and catcher switch roles and repeat.
Level 2 students could also find the average, mode, and median of the distances for each student and
across the group.
6. Discuss as whole group:
a. How did your times compare on the first and last tries? Why do you think it
changed?
b. What do you think would help us get better at this?
7. Ask the students which sports need the players to have a fast reaction time.
Page 25Hand-Eye Coordination Challenges = 20 minutes ►GOGGLES ON◄
• Paper
• Pencils
• Bean bags – 6 per pair of students – 2 of each color/style (48)
Drawing
1. Give each student a piece of paper and a pencil. Tell them to draw a star on the page. Then,
tell them to turn the paper over. Now, with their eyes closed, draw a star again.
2. Ask them if it was hard to draw with their eyes closed. Explain that with practice, they could
get better.
Level two students could also be challenged to draw the star with their “opposite” hand. While hard
at first, with practice the task does become easier as the brain adapts.
Tossing & Catching
1. Next, have students work with a partner. Pick any one of their six bean bags. (Style doesn’t
matter for this activity.)
2. Level 1 students should stand about 4’ apart. Level 2 students should stand about 6’ apart.
3. Tell the students that they are going to have an easy catch, tossing the bag back and forth.
However, they can only use one hand.
4. First, put your left hand behind your back. One partner tosses the bag (with right hand) and
opposite partner catches it with right hand. As soon as you toss the bag, switch hands and
put your right hand behind your back. In this way, students are alternating the
tossing/catching hand back and forth.
5. Keep going until you can catch at least two bags in a row. If time allows, have students
challenge themselves to get three or more in a row.
Deciding to Catch
1. For this activity, one student will toss all six bean bags to the other before they switch roles.
Emphasize that they should be easy, underhand tosses. The receiver should be able to catch
the bags easily. Everyone can use both hands for this activity.
2. The student throwing the bean bags decides the order of the colors/styles to throw so that
the receiver doesn’t know what to expect.
3. You should announce one color/style that will be the “no catch” color. So, the student
receiving the throws should NOT catch those two bean bags. After all six bags have been
thrown, the players switch roles.
Page 264. When you notice that all of the students have had at least one turn as the catcher, stop play
and reset. This time announce a different color/style as the “no catch” color/style.
5. This activity challenges the brain to process information very quickly to make a decision
about whether or not to move your hands into position to catch the bag. Hand eye
coordination is an important skill in many sports, like tennis. When the ball is near the line,
the player needs to make a split second decision about whether or not to hit it or let it go out
of bounds.
Page 27Memory Game = 10 minutes
• Decks of small Profile Cards (8)
1. Explain that playing games that test your memory can help you improve your mental fitness.
2. Students should work with a partner. Have students spread the cards face-down in a four by
four grid.
3. Students take turns turning over one card and then a second. If the cards match, they are
removed from the grid. If not, they are turned back over and left in place. The player who
makes more matches “wins” the game. If time allows, have students shuffle the cards, reset
the grid, and play again.
4. Explain to students that many athletes need good memories. In football, players need to
memorize formations and plays. In baseball, players memorize coaching signals that change
frequently.
Page 28STEM Professionals = 10 minutes
• Profile Cards 5 & 6
Throughout the week, students will learn about STEM professionals involved in sports.
1. Explain to students that many different kinds of people work in sports, not just athletes and
coaches. Many people help make sure that the players and teams can succeed. Today, we
will look at two of the jobs that people do behind the scenes in sports.
2. Display and read aloud profile cards 5 and 6. Ask students to think about why that job is
important. Ask students if they know anyone with those jobs.
Wrap-Up
1. Ask the students to recall the activities from today involving mental fitness. Ask about
reaction time, hand-eye coordination, and memory.
2. Recall what it means to be a good scientist and how the students were like scientists today.
Refer back to the list of scientific behaviors.
3. If the program is happening at a library, remind the students that books are available to learn
more.
4. Remind students to take their bags.
Page 29GSK Science in the Summer™
Science of Sports
Part 4 – Equipped to be Fit
OVERVIEW
Part four focuses on the science behind sports equipment. Students make their own bouncy balls.
The Bounce Challenge requires students to apply concepts from earlier parts—they’ll need balance
and stability as well as good hand-eye coordination as they bounce the balls they made from scratch.
Finally, the end of session activities bring their week of science exploration to a close.
TIME MANAGEMENT
Introduction & Review = 5 minutes
Bouncy Balls = 20 minutes
Bounce Challenge = 15 minutes
STEM Showcase = 10 minutes
Conclusion = 10 minutes
MATERIALS & SUPPLIES
• Safety Poster
• Plastic cups – 8 oz. (16)
• Plastic bowls (16)
• Plastic spoons (16)
• Pitcher of warm water – 64 tablespoons
• Borax – 8 teaspoons
• Corn starch – 48 tablespoons
• White glue – 16 tablespoons
• Food coloring – variety of colors
• Aluminum foil sheets
• Paper towels
• Measuring spoons
• Markers
• Baseballs (8)
• Tennis balls (8)
• Ping-pong balls (8)
Page 30• Yard sticks
• Data sheets
• Pencils
• Profile cards 7 & 8
PREPARATION & SET-UP
Today’s activities may be messy. Be sure to have paper towels handy in case of spills. If you removed
the safety and scientific behaviors posters yesterday, return them to view for your discussion.
At the end of the session, the scientific behaviors poster can be discarded as your next group of
students should make their own. The safety poster should be returned to the kit with all other
supplies. The used cups, bowls, and spoons should be discarded.
Page 31Introduction & Review = 5 minutes
Welcome students back and explain that they are going to learn about sports equipment today. They
are going to make bouncy balls and learn about materials. Different materials have different
properties that determine whether they bounce a lot, a little, or not at all. In many cases, sports are
designed around a ball’s (or other equipment’s) properties.
Remind students about scientific behaviors. Today’s activities will particularly challenge them to be
precise. Measuring the ingredients to make their polymer balls requires just the right amount—too
much or too little of an ingredient changes the formula and the ball might not bounce. Scientists
have to be very precise with their measurements to make sure their experiments succeed.
Page 32Bouncy Balls = 20 minutes ►GOGGLES ON◄
• Paper/wax cups – 8 oz. (16)
• Plastic bowls (16)
• Popsicle sticks (16)
• Warm water – 8 cups
• Borax – 16 tablespoons
• Corn starch – 16 tablespoons
• White glue – 32 tablespoons
• Food coloring – variety of colors
• Paper towels
• Measuring spoons
• Markers
1. Remind students about wafting! They may be tempted to smell the contents of their cups
and bowls.
2. In the cup, combine ½ cup of warm water, 1 tablespoon of borax, and 1 tablespoon of
cornstarch. Use the popsicle stick to mix well. Have paper towels handy in case of spills.
3. In the bowl, combine 2 tablespoons of white glue with a few drops of food coloring. One
drop will result in a pale shade, three drops a darker shade, etc. Use the popsicle stick to mix
well. (Use your discretion as to whether or not your students should be allowed to mix
colors. Limiting to the primary colors ensures pleasant outcomes. Mixing colors risks
unappealing colors at the end, although mixing, if managed carefully, can result in fun
colors.)
4. Slowly pour the warm water mixture from the cup into the glue mixture in the bowl. Mix well
with the stick. The mixture will begin to clump. Keep mixing until all clumps make one big
ball.
5. Use bare hands to take the big ball out of any residual liquid in the bowl and roll the ball
between your palms. It will be sticky at first and a little messy. Keep rolling until it is no
longer sticky. It should become smooth and dry.
6. Bounce the ball!
7. If desired, use a marker to write each student’s name on the balls to avoid confusion as
similar balls are bouncing.
Page 33Bounce Challenge = 10 minutes ►GOGGLES ON◄
• Bouncy balls (16)
• Baseballs (8)
• Tennis balls (8)
• Ping-pong balls (8)
• Yard sticks
• Data sheets
• Pencils
1. Invite students to compare the “bounciness” of their new balls with one another and with
standard baseballs, tennis balls, and ping-pong balls. Invite hypotheses about which balls will
be bounciest.
2. This activity works best on a hard surface, so move to a hard floor if possible. If not, have the
students use the tabletops as their floor.
3. Working with a partner, take turns collecting data about each ball’s bounce. One student will
be dropper while the other is the measurer. After collecting data on all four balls, the
students should rotate and repeat.
4. The measurer should hold the yard stick vertically (with the lowest number at the bottom) by
placing one end flat on the floor/tabletop. Instruct the measurers to keep their eyes focused
on the floor/tabletop as the bounce will be fast.
5. The dropper selects one of the four balls (the testing order doesn’t matter) and holds it level
at the top of the stick, counts down to the release, and then simply releases the ball. (The
dropper should not be adding force to the drop.) The measurer watches the ball hit the
floor/tabletop and then notes how high it bounces. If the measurer “misses” the bounce, the
dropper should repeat the drop.
6. If times remains, encourage the students to keep repeating as scientists always try to collect
more data before they draw conclusions.
7. Once all students have had at least one chance to be both dropper and measurer, invite the
students to share their data.
8. Which ball bounced highest? Lowest? What are the characteristics of the balls that bounced
higher/lower? What result surprised you? Why are these balls good for the sports that use
them?
Page 34STEM Professionals = 10 minutes
• Profile Cards 7 & 8
Throughout the week, students have been learning about STEM professionals involved in sports.
3. Explain to students that many different kinds of people work in sports, not just athletes and
coaches. Many people help make sure that the players and teams can succeed. Today, we
will look at two of the jobs that people do behind the scenes in sports.
4. Display and read aloud profile cards 7 and 8. Ask students to think about why that job is
important. Ask students if they know anyone with those jobs.
Wrap-Up
9. Ask the students to recall the activities from today involving bounce.
10. Recall what it means to be a good scientist and how the students were like scientists today.
Refer back to the list of scientific behaviors. Go through the list and ask students to volunteer
examples of each behavior that they used throughout the sessions.
11. If the program is happening at a library, remind the students that books are available to learn
more.
Page 35Conclusion = 10 minutes
• Paper
• Pencils
• Crayons
Invite level one students to draw a picture of their favorite part of the week.
Invite level two students to write a thank-you note to GSK about their favorite part of the week.
Collect the pictures/notes at the end of the session for return to The Franklin Institute.
Distribute certificates, take-home activity books, and Family Day flyers. Encourage the students to
show the flyers to their parents so that they can come to the event. Remind the students to take
their goggles, pencils, and bags with them.
Thank the students and anyone else who is present for participating in the GSK Science in the
SummerTM program. See you next year!
Page 36GSK Science in the Summer™
Science of Sports
Optional Activities
See the Beat = 10 minutes
Balancing Act = 15 minutes
Balloon Launch = 10 minutes
Multitasking = 20 minutes
Page 37See the Beat = 10 minutes
Note that this activity may be too difficult for level one students. You can use it as a demonstration
for them instead.
• Toothpick (16)
• Mini-marshmallow (16)
1. First, show students how to find the pulse point. Hold two fingers (not your thumb) to the
inside of your wrist until you feel your pulsing blood.
2. Put the marshmallow on the spot where you feel your pulse is the strongest, and gently push
the toothpick partially into it. What happens? Now take off the marshmallow and toothpick
and do 25 jumping jacks or run in place for a minute. What happens when you put the
marshmallow and toothpick back on your pulse point?
3. Your heart is a muscle that sends blood rushing through your body when it beats. The surge
of blood at each beat is called your pulse. You can feel it in your wrist, neck, and ankles. Your
pulse makes the stick move every time your heart beats. When you exercise, your heart
beats faster.
Page 38Balancing Act = 15 minutes
Gravity seems to pull an object downward from just one point, its center of gravity. In order for a
gymnast to balance on a beam or a surfer to ride a wave, they must understand their own center of
gravity. Let’s find the center of gravity of an uneven object!
• Large piece of cardboard
• Modeling clay (or other weight)
• String
• Scissors
• Paper clip
• Tape
• Ruler
• Pencil
1. On the cardboard, draw and cut out an uneven shape. Be creative.
2. With the tip of the pencil, punch two small holes on opposite edges of the shape.
3. Take the piece of string, and on one end, make a loop and wrap a lump of clay around the
other end. This is known as a plumb line.
4. Unbend the paperclip, make a hook, and tape it onto the edge of a table.
5. Hang the shape and then the plumb line on the hook.
6. Wait until the string stops swaying and mark an “X” where the string is resting against the
lower edge of the cardboard.
7. Take the plumb line and cardboard off the hook and draw a line with the ruler from the hole
to the “X.”
8. Hang the shape from the other hole and repeat steps 5 to 7.
9. Place the shape on your finger at the point where the two lines cross.
10. Does your shape balance where the two lines cross? If yes, was the center of gravity for the
shape where you thought it would be? If no, why do you think it doesn’t balance at that
point? What could you do to find the true center of gravity?
Page 39Balloon Launch = 10 minutes
This activity can be completed in 10 minutes or it can be extended with multiple balloon releases to
last much longer.
• String
• Tape
• Balloon (oblong balloons work better than circular ones)
• Paper clamp
• Three paper clips
1. Run string across the room. Pull taut and attach securely to opposite walls.
2. Inflate the balloon. Instead of tying a knot, secure the open end of the balloon with the
paper clamp. Sometimes it helps to fold the end once or twice before clamping it.
3. Bend the paper clips into “L” shapes and tape them in a straight line on top of the balloon.
Use these clips as hooks to hang the balloon on the string.
4. Have a countdown and then release the clamp from the balloon.
5. The escaping air pushing against the inside of the balloon provides propulsion. As the air
escapes in one direction, the balloon is pushed in the opposite direction. This is an example
of Newton’s Third Law of Motion, which states that “For every action, there is an equal and
opposite reaction.” For an extra challenge, try building a model rocket!
Page 40Multitasking = 15 minutes
• Masking tape
• Calculators (8)
1. Use the masking tape to make 8 straight lines on the floor, each about 12 feet long.
2. Students take turns being the walker and the watcher. The walker begins by walking along
the taped line. The challenge is to make it to the end without stepping off the tape. The
watcher looks for any steps off the line. It should be fairly easy to stay on the line.
3. When the walker makes it to the end, the watcher hands the walker a calculator. Now, the
walker’s challenge is to walk to the end while calculating the numbers that the watcher calls
out. Post this for the watchers to read to their partners:
For level one students: 4 + 6 + 2 + 9 + 10 + 3 + 15 + 7 = ? [56]
For level two students: 18 + 6 – 4 + 22 + 8 – 25 ÷ 5 × 7 = ? [35]
4. While the watcher is calling out the numbers, (s)he is also looking for any steps off the line.
When the walker steps off the line, (s)he returns to the beginning and clears the calculator to
reset. It will be very difficult at first to stay on the line while calculating. With repeated
attempts it should get easier.
5. Multitasking is a myth. The brain is not capable of focusing on two things at once. When we
attempt to do two things at the same time, the brain switches between the tasks. As a result,
controlling balance on the line competes with thinking about the buttons on the calculator
and causes you to do neither perfectly.
Note: If your classroom is small, you may not be able to have eight watchers calling out the numbers
at the same time. If your room is small, you may want to reduce the number of lines so that students
can be far enough apart so as to concentrate on hearing their own numbers. For example, you might
have four students taking turns on four lines or else eight students taking turns on two lines.
Page 41GSK Science in the Summer™
Science of Sports
Background Information
The following information is provided to help you prepare to teach the Science of Sports content and
to help you respond to student questions.
Athletes & STEM Professionals
A variety of STEM professionals and athletes are featured on the profile cards that you will use with
the students. They represent the diversity of ethnicity, gender, age, body shape, and people with
disabilities. Examples include Simone Biles who is a 4’8” Olympic gymnast who has won the most
world gymnastics medals in US history (14), and the most world gold medals (10) of any female
gymnast ever. Michael Phelps is a 6’4” Olympic swimmer who has competed in five Olympics and
has won 28 Olympic medals, making him the most decorated Olympian of all time. Danica Patrick is a
5’2” female NASCAR driver, and is the only woman who has led in both the Daytona 500 and
Indianapolis 500 races. Misty Copeland is a 5’2” ballet dancer, and is the first African American
woman to ever become the Principal Dancer in the American Ballet Theater. Serena Williams is a
5’9” tennis champion, who has won 23 Grand Slam titles, the second most of all time. Lionel Messi is
a 5’6” soccer player from Argentina who has become one of the greatest soccer players in the world.
Sidney Crosby is a 5’11” ice hockey player, who is the youngest captain in NHL history. Stephen
“Steph” Curry is a 6’3” professional basketball player in the NBA, with a record of making 90% of his
free throw attempts and 44% of his 3-point attempts. J.J. Watt is a 6’5” football player who plays
defensive end in the NFL. Tatyana McFadden is a 5’3” Paralympic champion wheelchair racer and
Nordic skier, who has won 16 medals and placed first in numerous marathon races across the world.
Richard Browne is a 6’2” Paralympic track & field sprinter and high jumper who lost his right leg
below the knee, and has broken numerous world records for various races in disability athletics.
Ibtihaj Muhammad is a 5’7” fencer, who was the first American woman to wear a hijab during an
Olympic competition in which she won a bronze medal in 2016.
There are many people involved in sports, besides athletes, who use science to contribute to and
enhance sports. Coaches and trainers use knowledge of how the body works, health, and practice to
keep athletes strong and effective. Nutritionists help athletes understand how a healthy diet with
proper nutrients can maximize their body’s effectiveness in their sport. Sports medicine doctors,
team doctors, and physical therapists help athletes recover from injuries in ways that protect their
bodies and maximize performance. Psychologists and neuroscientists study and treat the impact of
sports on athletes’ brains, often helping them to develop healthy mindsets for competition.
Designers, engineers, material scientists, and chemists design and create the equipment, gear, and
tools used by athletes and coaches in playing sports. Technologists and computer scientists develop
proper technology needed to track and show data during sporting events. Mathematicians and
statisticians record and analyze data that takes place across sporting events that help interpret
Page 42performance of individual athletes and teams. All of these STEM professionals play important roles in
making sports what they are today.
Physical Fitness
Balance and stability are important skills for most sports. Our bodies balance by evenly distributing
weight around a center of gravity, which is usually slightly above one’s waist depending on each
person’s height and weight. A lower center of gravity of maximizes balance and stability. This is why
being short is an advantage in sports like gymnastics. Race cars are also designed low to the ground,
to minimize risk of turning over while going at high speeds. A wider stance and bent knees, like that
used by a surfer, also improve stability and mobility by widening one’s base of support.
Speed, agility, and reaction time all involve the ability to move quickly and easily while maintaining
control of one’s body. These skills require changes in one’s center of gravity while experiencing quick
and coordinated muscle movements. Though agility and speed seem to come naturally to some,
these are skills that develop through numerous repetitions and practice. Practice allows muscles get
stronger and the brain’s neural pathways involved in these skills to get faster, allowing the body to
more easily perform with little thought needed. Improvement in speed and agility take a long time to
build and maintain through ongoing practice and conditioning.
Energy is key for successful performance in sports. When athletes exert themselves physically, they
expend a great amount of energy (and sweat) and need to replenish what is lost in order to continue
playing and recover afterwards. Electrolytes are minerals that are necessary for specific functions in
the body which are lost through sweating, including calcium, sodium, potassium, magnesium,
phosphate, and chloride. These electrolytes help to regulate nerve and muscle function, hydration,
the pH of blood, rebuilding damaged tissue, and determining blood pressure, and are important to
replenish after they are lost when playing sports. Athletes often drink sports drinks with high
concentrations of electrolytes like Gatorade or PowerAde to replenish the body’s concentration of
important nutrients and water.
History of Gatorade
www.gatorade.com/company/heritage
In early summer of 1965, a University of Florida assistant coach sat down with a team of university
physicians and asked them to determine why so many of his players were being affected by heat and
heat-related illnesses.
The researchers—Dr. Robert Cade, Dr. Dana Shires, Dr. H. James Free and Dr. Alejandro de Quesada
—soon discovered two key factors that were causing the Gator players to “wilt:” the fluids and
electrolytes the players lost through sweat were not being replaced, and the large amounts of
carbohydrates the players’ bodies used for energy were not being replenished.
The researchers then took their findings into the lab, and scientifically formulated a new, precisely
balanced carbohydrate-electrolyte beverage that would adequately replace the key components lost
by Gator players through sweating and exercise. They called their concoction “Gatorade.”
In the summer of 1969, Coach Ray Graves of the Florida Gators suggested to the Kansas City Chiefs
that they use Gatorade to combat the staggering effects of a blistering Missouri sun during training
camp. The Chiefs were so impressed with the “Gator coach’s aid” that they kept it on their sidelines
Page 43throughout the entire season…which concluded with a stunning victory over the heavily favored
Minnesota Vikings in Super Bowl IV.
In the years that followed, more and more NFL teams began placing Gatorade on the sidelines of
their games and practices, and in 1983, Gatorade became the official sports drink of the NFL—a title
it holds to this day.
Two decades after Dr. Cade and his team worked diligently to develop the optimum hydration
formula that would become Gatorade, the Gatorade Sports Science Institute was founded in
Barrington, Illinois, to conduct scientific research in the areas of exercise science, hydration, and
sport nutrition. Three years later, the lab would be expanded to provide advanced testing for
athletes and new Gatorade products and flavors and develop education materials for sports health
professionals around the world. Gatorade is now also the official sports drink of the NBA, AVP, and
PGA, Major League Baseball, Major League Soccer, and numerous other elite and professional
organizations and teams.
Mental Fitness
Competitive sports require significant mental focus and resilience in order to perform well.
Disappointments and losses are inevitable, so finding a way to cope with and bounce back from loss
is essential. Injuries and time away from one’s sport are also common, especially with the intensive
training that athletes experience. Coaches, trainers, and psychologists help athletes remember to
have fun and not let the stress of winning hinder the ability to enjoy and play the sport to their best
ability. Like building physical skills through practice, mental skills require practice as well. It can be
hard to bounce back from loss, but through repeated practice in a positive and proactive mindset,
these skills and approaches become easier to embrace.
Sports Equipment
Sporting equipment and gear are purposefully engineered to keep athletes safe, comfortable, and
able to move quickly and easily. Examples of sporting equipment include balls, sticks, nets, surfaces,
racquets, etc. Examples of sporting gear include clothing, pads, shoes, helmets, gloves, mouth
guards, etc. Scientists and engineers carefully design, test, and revise these items to maximize
performance as well as safety.
A polymer is a substance made up of several similar molecules that form a long chain. Some
polymers are rubbery in texture and bounce, such as the one students create in the Bouncy Balls
activity. This bounciness is a result of the long chain of molecules staying together even when thrown
with force.
Sports balls are engineered differently depending on their function in a particular sport. For example,
a football has a prolate spheroid shape which makes it easy to carry and throw. A tennis ball has a
fuzzy surface, which allows for controlled bounce so that it doesn’t move too high or too fast to stay
within the space of a tennis court. A golf ball has dimples on it, which allow the ball to glide farther
through the air. The stitches on a baseball allow pitchers to put spin on the ball, and the height of the
stitches impact how it flies through the air. Softballs are bigger (but not softer) than baseballs, since a
softball field is smaller and the ball doesn’t need to travel as far. A basketball has dimples like a golf
ball which helps with grip, and a soccer ball’s black and white pattern helps athletes see it easily from
far away.
Page 44You can also read