Self-care skills - Northumbria Healthcare NHS Foundation Trust
←
→
Page content transcription
If your browser does not render page correctly, please read the page content below

Self-care skills

Issued by children’s occupational therapy

                    1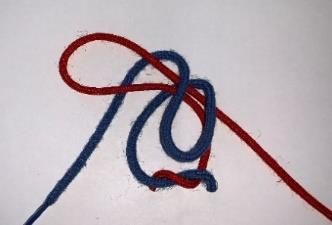
Contact us

You can contact us Monday to Friday 8.30am – 5.00pm. Please
choose the team according to where you live.

Northumberland
Children’s Physical Disability Occupational Therapy Service
Northumbria Healthcare NHS Foundation Trust
Child Health
Woodhorn Lane
Ashington
NE63 9JJ
Tel: 01670 564 050

North Tyneside
Children’s Occupational Therapy Service
Northumbria Healthcare NHS Foundation Trust
Riverside Centre
Minton Lane
North Shields
Tyne & Wear
NE29 6DQ
Tel: 0191 6434160

Alternatively, you can visit our website:
https://www.northumbria.nhs.uk/our-services/childrens-
services/childrens-occupational-therapy/

                                 2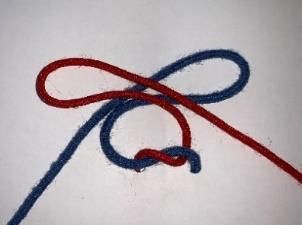
We have included the developmental process for each key area of
selfcare skill development. This pack contains tips and advice for you
to support your child in developing their independence. Focus on one
task at a time so not to overwhelm yourselves.

Dressing skills

Dressing and undressing skills are very much a part of everyday life
for all of us. The act of dressing and undressing oneself completely
independently can be a complicated and difficult process. Pre-
requisite skills for dressing are:

•   Motor skills – balance, co-ordinating movements, fine motor skills.

•   Sensory skills – discriminate differences in size and shape,
    handle different textures and identify objects by touch only.

•   Body scheme – knowing where each body part relates in space,
    knowing the body has two sides and a midline

                                   3
Development of dressing skills (Mary Sheridan –
Developmental progress)
          • Helps with dressing by holding out arm for sleeve &
            foot for shoe
12
months • Cooperative in dressing
          • Likes to pull shoes off

18     • Takes off shoes, socks, hat but rarely able to put back
months   on

          • Puts on hat and shoes
          • Removes unfastened coat
2 years
          • Helps push down garment
          • Finds arm holes in t-shirt

2½        • Tries to put on socks
years     • Undresses loose pull-down garments

          • Able to put on shoes without fastening (may be wrong
            foot)
3 years
          • Can pull zips up and down, but unable to insert or
            separate shank

          • T-Shirt on/off independently but may be back to front
4 years
          • Pull up garments on independently

          • Dresses and undresses independently but may still
5 years     need help with small buttons, zips and laces
          • Clothing may still be put on back-to front on occasion

These ages are a guide only but can help determine a young child’s
readiness for dressing independently.
                                 4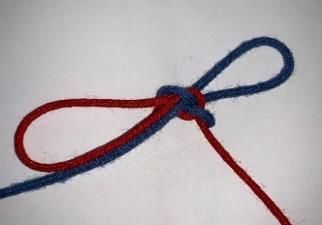
Methods of learning how to dress:
•   Backward chaining - This is where the adult begins a task and
    the child completes the last step. As the child gets better the adult
    then does less of the task. E.g. child may initially just pull t-shirt
    down at front once parent has placed this over their head.
•   Forward chaining - This is where the child starts the task (e.g.
    putting t-shirt overhead) and the adult helps with the later stages.

Always demonstrate the correct dressing technique first and talk
through what you are doing when you are helping a child.

Helpful strategies to promote dressing skills:
•   Try and do each dressing task the same so a routine can be
    established.
•   For the child to be able to learn new skills the environment must
    be appropriate. Think about the noise levels and distractions;
    other children in the room, computers, pictures on walls, toys and
    smells, e.g. from the kitchen.
•   Allow extra time for the child to be able to learn the new
    techniques. Progress at the child’s pace and give lots of praise for
    practicing skills even if they are not successful at completing the
    task.
•   Dress in front of the mirror to provide visual cues and use to
    check all is correct before going out.
•   Start with undressing. Undressing before bed and helping to put
    on pyjamas is a good time to start as you have more time at night
    than in the morning.
•   Success is important; therefore, begin with breaking the dressing
    activity into small, straightforward steps. Tackle one step at a time
    and give help where needed with the other steps of the task, e.g.
    help the child to pull the t-shirt over their head and then allow
    them to put their arms through the sleeves.
                                    5
•   Practice independence with dressing at less stressful times, such
    as at bath time, weekends or school holidays.
•   Encourage the child to sit on a chair or on the floor to support with
    balance.
•   Elasticised waistbands and minimal fastenings are helpful when
    first learning to dress. For girls wearing trousers rather than tights
    is easier on days when PE is planned.
•   Verbally reinforce the dressing process. For example, when
    dressing into trousers talk through the trouser going over the foot,
    ankle and knee etc.
•   Having a dressing sequencing chart can be useful to provide
    visual cues for the order of dressing.

Socks
• For socks, practice the movements required by using a hair band
  whilst sitting, encourage your child to place their foot through the
  hair band so that it fits around the ankle
• Place socks partly over your child’s foot, then encourage them to
  perform the last part.
• Sport tubular socks are easier than those with a heel.
• Socks with coloured heels and toes make it easier to work out the
  correct way around. Alternatively mark the back of the sock with
  thread on the inside top edge.
• Prompt your child to use their “magic thumbs” to help pull the
  socks on. i.e. isolating their thumbs to get them under the socks to
  pull up.
• Roll down the top of the sock to make it easier to get the foot in.
  Use a loop on the back of the sock for the child to hold as they pull
  them up

                                    6
Buttons
• Give plenty of practice time.
• Show the child how to grasp a button with one hand and the fabric
around the opposite hole with the other. Help to push the bottom
of the button through the hole.
• While the child holds the button, tell them to use the other hand to
pull the hole wider, (this is tricky, so go slow and be patient). Lend
a hand to slip the rest of the button through the hole. Practice
using a pincer grip by putting fingers through the buttonhole.
• Clothing with big, bright buttons and large holes will help to get
started and so will practicing on dolls, toys or your clothes laid out
on a table.
• Ensure that you always begin with the bottom buttons so that it is
possible to see the hands working.
• Practice holding the button with a pincer grip and pulling it through
the buttonhole. Practice pulling button through enough for it to lie
flat.
• For undoing buttons talk about pinching and ‘posting’ the button
back through the hole.
• Start with larger, flat buttons and then progress onto smaller ones.
• Dressing in front of a mirror can assist a child in matching up their
buttons with buttonholes.
7Laces
• For laces, choose one method of lace tying, and teach it
consistently.
• Make sure that you and the child are side by side rather than
opposite each Place a shoe on the child’s lap to practice initially
and then make sure their foot is up on a small stool in front of
them, other when you demonstrate.
• Lace a shoe using two different coloured laces before moving
onto the same coloured laces. Add an extra ‘twist’ at stage 1 to
keep laces tight.
• Split up the entire process and teach it in steps, making sure the
child is confident in each step before moving on.
8Zips
• Unzipping is easier to master than zipping up, so start here.
• Practice on a jacket with a large plastic zip.
• Start the process – you zip up and encourage the child to zip
down. Then encourage the child to zip up.
• Help by fitting the two sides of the zip together (at the bottom) and
create a game. Example - pretend the zip is a road – the child is
the driver and it’s their job to get the car to the top.
• When buying a coat with an open-ended zip, test the zip
thoroughly as the ease of fastening can vary a lot.
• Attach a key ring or curtain ring to the zip to aid grip.
• A better time to practice might be a slower-paced weekend
morning or practicing buttons on pyjamas in the evening.
Feeding and cutlery
Mealtimes are an important aspect of family life. Children begin to
develop self-feeding skills from birth. Self-feeding is a very complex
task and it is common for children to have difficulty using cutlery to
feed themselves. It usually takes until a child is 7 years old before
they can successfully use cutlery to feed themselves without being
too messy. Using a knife and fork together requires bilateral co-
ordination (co-ordination of left and right side of the body).
9Development of feeding skills (Mary Sheridan -
Developmental progress)
• Holds, bites and chews a biscuit.
9 months
• Puts hands round bottle or cup when drinking.
• Picks up small crumbs, raisins with pincer grasp.
12 months
• Holds spoon but cannot yet use by themselves.
• Holds spoon, brings to mouth and licks, but usually
cannot prevent it from tipping over.
15 months
• Holds and drinks from cup when an adult holds and
tips the cup back.
• Holds spoon, gets food safely to mouth, chews well.
18 months • Holds cup between both hands, drinks without
much spillage, but may be unable to place back on
table.
• Spoon feeds without spilling, chews competently.
2 years • Lifts cup and replaces on table without difficulty.
• Asks for food and drink.
2 ½ years • Eats skillfully with spoon and may start to use fork.
3 years • Eats independently with fork and spoon.
4 years • Eats skillfully with fork and spoon 5 years.
• Uses fork competently and beginning to use knife
5 years for cutting but may still need help with tougher
textures i.e. meats.
These ages are a guide only but can help determine a young child’s
readiness for eating and drinking independently.
10Helpful tips
• Allow plenty of time and give regular praise for achievement,
otherwise they will soon lose interest and be happy to continue to
let you feed.
• Ensure your child has adequate sitting balance, with feet firmly
supported rather than dangling and ensure that both hands are
free to move.
• Ensure that the spoon is held with the thumb going under the
handle.
• Assist your child to load the spoon effectively. If they are having
difficulty, place your own hand over theirs and help them to
complete the task. Make sure that the non-feeding arm is
supporting the bowl, to ensure that it does not move.
• To assist with hand to mouth feeding, support the feeding arm at
the elbow, this will assist with the effort required to elevate the
arm.
• Use non-slip matting under the bowl to keep it steady.
• Mealtimes should be enjoyable – try not to become over-anxious
as your child may sense this and become anxious.
• Once your child is becoming proficient in feeding with your
assistance, gradually reduce the amount of assistance.
• Start with allowing the child to become confident in using a spoon
before progressing onto a fork.
• Start with foods, which are easy to scoop up. This includes those
which stick easily to the spoon such as yoghurt, custard, porridge,
mashed and sticky foods.
• Shorter handled wide grip cutlery will be easier to manage at first.
• Start by encouraging the child to stab pieces of pre-cut foods with
a fork to practice the skill.
11Cutting with a knife
• Moving onto using both a knife and fork will require more practice.
Play-dough is a good food substitute to use when practicing this
skill.
• Various thicknesses of dough can be produced to encourage
being able to cut through varying thicknesses/ textures of food.
Material can be added to the dough, such as grains, seeds and/or
rice.
• Practice placing the knife and fork in the correct hands and talk-
through what is expected. Remember to talk about 'left' and 'right'
as there may be some confusion- knowing which hand which is
very useful to tasks such as using knives and forks.
• Encourage pushing the fork in the dough first, then cutting with the
knife. Try cutting large and small pieces.
• Ensure the child is sitting at a suitable table and chair (with feet
supported on the floor or a box). Arms should be able to rest
supported on the table.
• Try using blue tac to hold the plate still initially.
• Encourage the child to practise cutting in other situations first and
let them decide when they are ready to try at mealtimes.
• Ensure the cutlery is held appropriately (this does not have to be
perfect in the first instance, but it does need to be effective, e.g.
knife the correct way up).
12Mealtime equipment
The following equipment, can be helpful when a child is learning to
use cutlery, making some tasks a little easier, not only enabling them
to develop their skills but also their confidence and independence. A
number of places stock it, an online search will reveal companies that
sell it.
Equipment Purpose
This mat provides effective double-sided grip on
Non-slip mat smooth surfaces without sticking to it. Helping to
stabilise the plate / bowl.
The guard can be used as a barrier to push food
Plate guard
against when scooping food onto a spoon or fork.
Kura cutlery / Contoured handles to support grip, indents to
Junior caring provide a cue for index isolation. Great for
cutlery learning to hold cutlery correctly.
Moulded and shaped handles to support little
Nanna
hands to support little hands in holding cutlery
manners
independently.
The head of cutlery is angled so that limited
Easi Eater movement is required to bring the food up to the
Cutlery mouth. Some are in a set position and other
options are mouldable
Toilet training
When to start potty training will depend on the individual child. Every
child is different; they learn to walk and talk at different times and
they learn how to use the toilet at different times too. There are many
skills involved in the process of going to the toilet independently
including balance, coordination, body awareness, hand function,
dressing skills and language skills.
13Strategies to support
• Consider whether child is physically ready:
- Can they sit on the potty and stand up?
- Are they able to follow simple instructions?
- Do they show awareness that their nappy is wet or soiled?
• Get your child involved with the process when changing their
nappy. Change them standing up and practice pulling up/down
trousers. Encourage the routine of washing your hands together
when you've finished.
• Make it fun. Introduce books about potty training. Incorporate their
favourite teddy so it can be practiced in play.
• Talk about wee and poo. Tell them if their nappy is wet or dry
when you change them and talk it.
• Keep the nappies in the toilet and change your child in there so
they associate wees and poos with that room.
• Show them that you do wees and poos too. Watching other family
members using the toilet helps the child see the process and
routines. Leave the toilet door open. Young children learn by
watching and copying.
• Demonstrate how the toilet flush works. Let them watch and then
practice.
• Empty the content of the potty in the toilet so they can see where it
goes.
• Keep the potty or trainer seat in an accessible place.
• Plan a reward system like a sticker chart. Reward every little step
towards potty training i.e. pulling down trousers or washing their
hands.
14• Keep a plastic step to hand so that the child can rest their feet
when sat on the toilet. This will support their balance and help
getting on and off.
• Some children may benefit from using pictures in the
bathroom/toilet to help them learn the toilet routine. You could use
photos of your child or symbols which you can access online via
Boardmaker, Communicate in Print etc. (many offer free trials).
Further advice can be found from the children’s bowel and bladder
charity website. www.eric.org.uk
Bottom wiping
Many children with co-ordination problems have difficulty with bottom
wiping and the process of going to the toilet. This can often cause
high levels of anxiety for both child and parent. The following
strategies can be used to learn bottom wiping and assist with
toileting.
• Encourage your child to get into a rhythm of going to the toilet so
they don’t feel rushed. After a meal there is a gastro-colic reflex
that stimulates the bowel, so this may be a good time to try and
set up a routine. Encouraging your child to go after breakfast may
reduce the anxiety of needing to go at school.
• Be aware of the impact of your child’s diet on their stools and
ability to sense they need the toilet. Avoiding drinking can cause
constipation. The fibre in fruit and vegetables makes stools bulkier.
• Support your child to sit in a good position on the toilet. If your
child’s feet don’t touch the floor, they would benefit from a step
under their feet to help them maintain their posture.
• Use a mirror in the bathroom to give the child an additional visual
cue when wiping their bottom.
15• Provide opportunities and allow the child times to practice when
he/ she is not in a rush for school etc.
• Wet wipes are good to use when learning bottom wiping as they
wipe more easily and cover a larger surface area.
• Getting undressed independently may be difficult for your child,
encourage and practice the fastening on your child’s trousers.
• To assist with the twisting skills needed for bottom wiping, play
games with a ball where the child passes it round their body
swapping hands as it passes behind their back.
• Play games with clothes pegs where pegs are placed on the back
of the child’s clothes including around their bottom area. The child
must keep their feet still whilst twisting and reaching to find and
remove the pegs.
Sleep
Often children will have difficulty getting to sleep if they are not in a
routine or have difficulty ‘switching off’ at night. Lack of sleep can
cause social and behavioural difficulties and can affect learning and
development. Improving sleep patterns can improve daytime
functioning and decrease stress.
Possible difficulties children may experience:
• Getting into a night-time routine
• Settling to sleep
• Going to sleep and staying asleep in their own bed
• Bed wetting
Establish a regular evening routine leading up to a consistent
bedtime.
16The key points to consider:
• Encourage quieter activities at the end of the day to lower activity
levels - reading, colouring or drawing.
• Introduce opportunities for calming activities such as sitting on or
lying on their tummy on a large beanbag to colour or do homework
etc.
• Use calming background music.
• Warm baths before bed help maintain calm.
• Use deep massage/firm drying after bath time.
• Avoid activities, which will cause excitement leading up to bedtime
e.g. spinning, running around, jumping, and climbing and high
activity television.
• Sit with your child and read books before bedtime and consider
allowing the use of bedtime story tapes or calming music.
• In cold weather, use a beanie warmer before getting into bed to
warm the sheets and make it nice and cosy.
• In hot weather open the window prior to bedtime or put a fan on to
keep the room cool.
• Use a sleep diary to record sleep problems and note any routines,
activities or foods/drinks that disrupt sleep.
• Avoid daytime naps and oversleeping at weekends.
• Some children may like to have a sleep chart or record where they
are rewarded for going to bed and getting up on time for a certain
period.
17Reduce visual distractions:
• Consider the bedroom environment, lots of visual distractions with
pictures, patterned wallpaper and toys can be distracting for some
children. Consider a neutral colour on the walls and toys
organized into boxes.
• Use black out blinds
• Minimise clutter at bedtime i.e. tidying toys into box
• Bed tent to block out distractions, noise and light
• Dim lighting as getting ready for bed
Specific strategies for children with poor body awareness:
• Use a heavy duvet or even a sleeping bag (with supervision)
• Use a double sheet and tuck it in tightly around your child and/or
swaddle them
• Onesie pyjamas
• Massage/back rubs/bear hugs before bed
• Some children like to squeeze into places, consider placing the
bed against the wall and placing cushions there. Sleeping with a
body pillow or large soft toy can help by giving pressure and also
a sense of the boundary in a big bed.
• Place the mattress on the floor if your child is afraid of heights.
18Specific strategies for children with touch sensitivities:
• High cotton count sheets for smoother surface
• Ensure bedding is smooth – e.g. no beads, iron-on prints etc
• Try different types of pyjamas – seamless (wear inside out), silky,
fleecy
• Experiment with different types of pyjamas; try tight and loose to
see which your child prefers.
• Remove any labels in sleepwear
• Massage/back rubs/bear hugs before bed
Specific strategies for children with noise sensitivities:
• Some children who are sensitive to noise have found listening to
a constant sound such as soft music or white noise can help to
remove any unpredictable noise and also be calming e.g.
classical pieces, baby Mozart (can be found at:
www.youtube.com), white noise apps etc.
Further advice can be found from the children’s sleep charity
website: www.thechildrenssleepcharity.org.uk
19Alternative Formats
If you would like a copy of this information in large print, another
language, audio tape or other format please call the Contact
Centre on 03 44 811 8118.
Other sources of information
NHS 111
NHS Choices
www.nhs.uk/pages/homepage.aspx
NICE (National Institute for Health and Clinical Excellence)
www.nice.org.uk
Patient Advice and Liaison Service (PALS)
Freephone: 0800 032 0202
Text: 07815 500015
Email: northoftynepals@nhct.nhs.uk
Northumbria Healthcare NHS Foundation Trust
General Enquiries 03 44 811 8111
www.northumbria.nhs.uk
PIN 950/V1
Review date: October 2023
© This material is the copyright of the Northumbria Healthcare NHS Foundation Trust.
20You can also read