SELF-SERVICE STUDENT GUIDE - Microsoft Labs Online
←
→
Page content transcription
If your browser does not render page correctly, please read the page content below
2022

           SELF-SERVICE
            STUDENT GUIDE

Welcome to XtremeLabs, a service of XtremeLabs, LLC. This document
provides Students step-by-step instructions on how to:

•   Create an account.
•   Add course codes.
•   Use your virtual labs through the self-service portal.
•   Troubleshoot connectivity issues.

    +1 855-510-0488             support@xtremelabs.io        www.xtremelabs.io
Contents

System Requirements                                  3
Create an XtremeLabs Online Account                  4
Add Access Codes                                     8
Lab Tiles (Progress Status)                          9
Classroom Chat Feature                              10
Release Notification Pop-up                         10
Request a new Feature                               15
Update History                                      17
Take a Lab                                          19
Launching a Lab from Learning Partner’s LMS (LTI)   19
Lab Launching                                       20
How to Navigate the Lab Environment                 22
Lab Steps Overlay                                   23
Top Bar                                             23
Lab Steps/Instruction Manual                        25
Virtual Machine (VM) Operations                     26
Lab Information Menu                                27
Lab Actions Menu                                    31
Save Lab                                            32
Virtual Machine Window                              35
Footer                                              37
Account Settings                                    39
Troubleshooting                                     42
Support                                             43

                                    2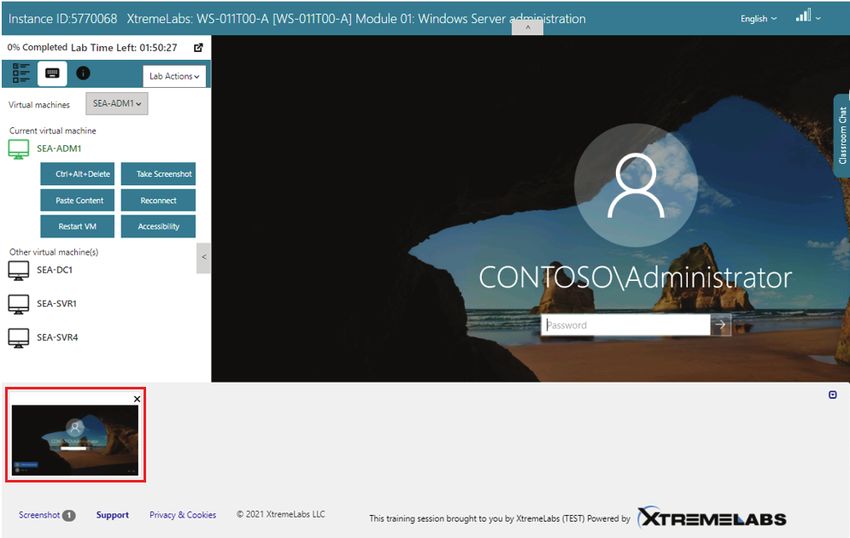
System Requirements
To access the lab hosting system, your client system must meet the
following requirements:

                                            ActiveX             HTML5
                                         Requirements        Requirements

 Windows XP SP3 or later (Windows               x                x
 RT is not supported)

 .NET Framework 3.5 or later                    x                x

                                           Internet        Microsoft Edge
 Browser                                  Explorer 7+   Internet Explorer 10+
                                                         Google Chrome 39+
                                                              Safari 7+

 Minimum KBps per user network               128 KBps        256 KBps
 bandwidth

 Ideal screen resolution is above               x                x
 1280 x 1024

 Viewer Installation                     Local Admin            N/A

 TCP ports 80 and 443 open with
 inbound/outbound access to the                 x                x
 Internet

 For some corporate firewalls, a proxy
 client (such as Forefront TMG Client)          x               N/A
 may be required

                                         3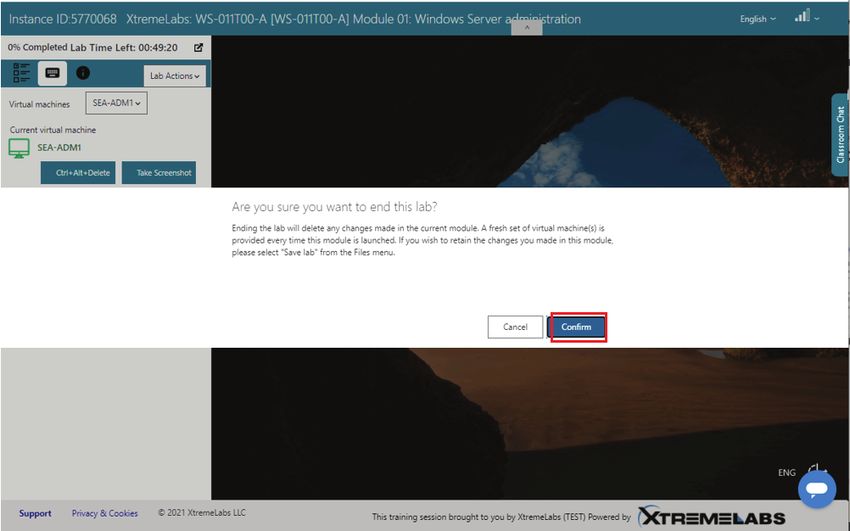
Create a XtremeLabs Online Account
The first step to accessing your virtual labs will be to create an account on
XtremeLabs portal.
1.    In your browser, navigate to http://labs.xtremelabs.io.

 If you have an account, you can sign in. If you do not yet have an account,
 click Register.

                                       4
2.      To create your account, fill in the fields on the Create an account page.

     Note: The email address used to create your account is also used for
     password reminders. It is important to use a valid email address.

3.     Click Sign Up.
4.     You will be redirected to the View Labs page. Before you have access
to any labs, this is what the View Labs page will look like the following:

You can find instructions about adding Course Codes on the next pages.
Once you have added Course Codes to your account, the labs which you can
access will be listed on the View Labs page:

                                       5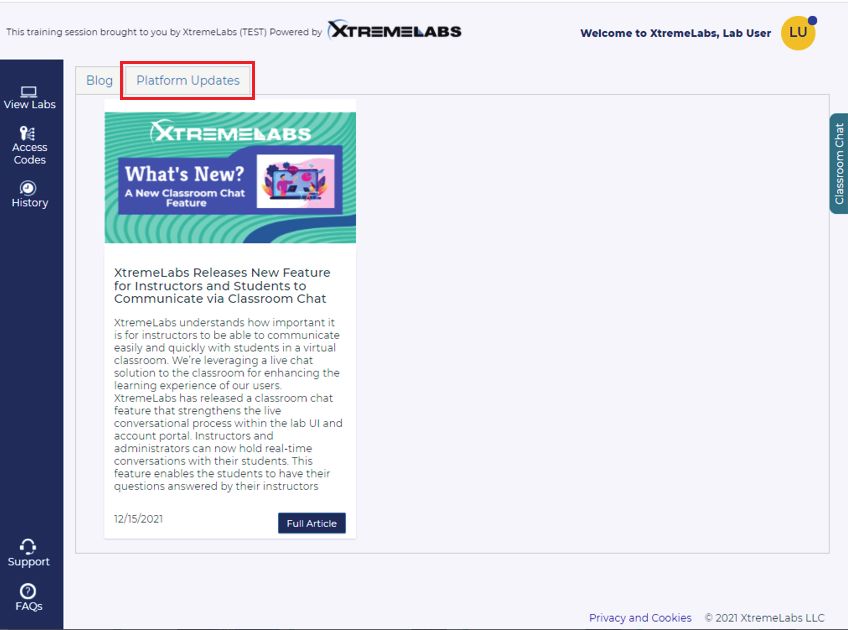
The names of labs available to you are listed in the left column. You can
search for required courses by simply typing the name of that course in the
search text box adjacent to the View Labs option. When a lab is selected (in
this case, the 10265A lab), the lab modules in that Lab will be displayed as
tiles on the center and right areas of the window. Each lab module tile will
display the lab module’s Lab ID, Lab Title, and the Duration of the lab
module.
On some pages, you can find the chat button at the bottom left of the
screen. with XtremeLabs Support by clicking on the Chat Icon . By clicking
the live chat Icon following chat window will appear before:

                                     6
Add Access Codes
1.    To get access to labs, you’ll need to add Access Codes to your account.
You may be provided Access Codes by your instructor, depending on your
course.
To add the codes to your account, on the View Labs page, click the Access
Codes icon

to open the Access Codes page.

2.    Enter your access code in the box and click Add code. Your course will
be added to the My codes listing.

  Note: In the MY CODES section, users will see the status of their access
  codes. (Active, Pending, and Expired)

                                     7
Users can quickly check the status of their codes for different labs. They can
request to redeem their new codes after checking the status of their existing
access codes.

3.    Note that your new Lab will now be displayed on the View Labs page.

                                      8
Lab Tiles (Progress Status)
Users are able to check the status of their lab completion from the account
portal. The lab tiles will display the following status to the users:
•      Completed
•      Completed and Relaunched
•      In Progress (XX% Completed)

This functionality is beneficial for the users to get a quick overview of their
lab progress without having to launch the lab to check the lab completion
status in lab UI.

                                       9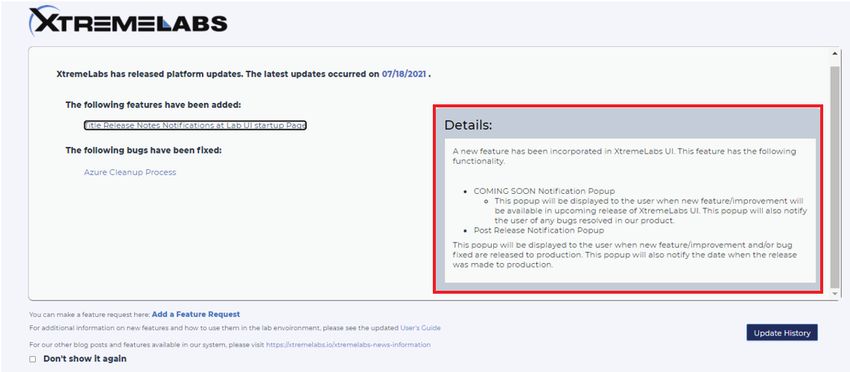
Classroom Chat Feature

This feature enables the students to have personalized learning
communication with their instructors while having an experiential learning
experience.
The classroom chat feature will be visible to the users after redeeming their
lab access codes in the account portal (https://labs.xtremelabs.io/)

   Note: Your instructor may have enabled/disabled this feature for your
   classroom.

 Release Notification Pop-up
 A new notification feature has been incorporated in XtremeLabs’ UI. This
 feature has the following pop-up menus.
 •      Pre-Release Notification
                      sum
                                 Pop-up (Coming Soon Reminder)
 •      Post Release Notification Pop-up (Latest updates Reminder)
 •      Request a new Feature

                                      10
Pre-Release Notification Pop-up
1. This pop-up is displayed to the user when they access the
XtremeLabs login page (https://labs.xtremelabs.io/).
2. The pop-up is shown to the users as a reminder of any
features/bugs (platform updates) included in the impending release of
XtremeLabs’ UI.
3. It enables the users to get the required information about the
upcoming changes and be informed about the platform updates.
Note: This pop-up will only be shown before the actual release of the latest
features/bugs
11Post-Release Notification Pop-up
1. This pop-up is displayed to the user when they access the
XtremeLabs login page (https://labs.xtremelabs.io/).
2. The pop-up is shown to the users as a reminder of any latest
features/bugs (platform updates) which XtremeLabs’ UI releases.
3. It also contains the release date of the latest updates (features/bugs).
4. Users can click on any feature/bug to read more details about the
released platform updates.
Note: This pop-up will only be shown after the release of the latest
features/bugs.
12Users can also see the Latest updates page through the account portal by
clicking on the What’s New option on the top right side.
By clicking on the What’s New option, users can see the following user
information page:
13Users can access the Latest Updates page by clicking on the Platform
Updates button adjacent to the Blog button.
The Latest Updates page contains details of the recently released
features/improvements of XtremeLabs UI.
14Request a New Feature
XtremeLabs allows its users to request new features/improvements in
XtremeLabs UI to make their learning experience more effective. The pre and
post-release pop-up notifications allow users to request their choice's
features and details (screenshots).
15By clicking on the Add a Feature Request link, users are shown the following
feature request submission form:
The comprehensive New Feature Request Form allows the users to provide a
detailed description of the proposed feature update (by attaching the
screenshots for reference) to communicate their needs better. It includes the
following requirements:
1. Full Name
2. Email Address
3. Feature Name
4. Details
5. Attachments (any relevant files)
This feature allows the users to contact XtremeLabs’ teams via New Feature
Request Form directly.
Note: Users will be notified once XtremeLabs ‘ team has received their
request
16Update History
Users can access the history of all released features/improvements of
XtremeLabs UI by clicking on the Update History link on the post-release
pop-up notification.
Users can access the Update History page from the account portal by clicking on the
What’s New option on the top right side of the account portal.
17By clicking on the What’s New option, users can see the following user information
page:
Users can access the Update History page by clicking on the Platform Updates
button adjacent to the Blog button.
The Update History page contains the details of all recently released
features/improvements of XtremeLabs UI. The page refreshes after three months to
show the most updated information to users about the newly released
features/improvements of the XtremeLabs UI.
18Take a Lab
1. On the View Labs page, select an active course that is listed in the left
column (see above). Then select the lab module that you want to launch by
clicking on the lab module’s ‘Take Lab’ box on the lab module’s tile:
This will open the lab module’s Lab Description box:
2. To launch the lab module, click on the ‘Continue’ button.
Launching a Lab from learning partner’s LMS (LTI)
You can launch a lab directly from the Learning Partner’s LMS (Learning
Management System) with LTI.
You can get the required information for lab launching from your specific
Learning Partner.
19Lab Launching
While your lab environment is being prepared, a “spinner” will be displayed.
Typically, it takes fewer than 30 seconds to create your unique lab
environment. A large lab environment might take up to 2 minutes.
Note: If your lab takes longer than five minutes to load, refresh your
browser page by pressing the F5 key. If you still cannot access your lab,
please alert your instructor.
20Note: Some labs have been modified from the on-premises version to
operate correctly in an online environment. If a lab has been altered, a “Lab
Notice” message will appear after the lab loads. Clicking the Notes tile will
launch a Lab Notes document that contains additional information
regarding the changes made to the lab steps.
5. Once the lab loads and the environment is ready, your lab view will be
displayed.
This is how your Lab looks when you launch it.
21How to Navigate the Lab Environment
Once your lab view is displayed, several options are available to allow you to
interact with the virtual machines provided for each lab scenario. Please
note that some parts of the user interface, such as the Lab Steps Overlay, will
not be available in all labs.
The lab view page has seven parts:
• Top bar
• Virtual machine window
• Lab Steps Overlay
• VM Operations
• Lab Information
• Lab Actions Menu
• Detachable Lab Steps
• Footer
• Live Support Chat
22Lab Steps Overlay
Most labs hosted by XtremeLabs include an overlay that contains the official
lab steps and other information provided by the course authors. Most lab
steps are organized into Tasks, and Tasks are organized into Exercises. Each
Task is presented on a single panel, and the navigation links at the bottom of
each panel move you sequentially through all the panels in the Lab.
Checkboxes are provided to mark your position in the sequence of lab steps.
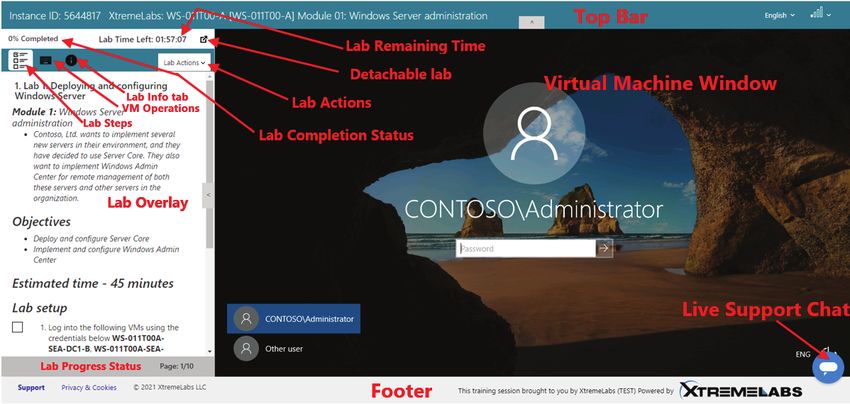
Top Bar
The elements in the top bar are called out and described here:
23Name of running lab − This displays the name of the open lab module. If
requesting support, this information will be included in the screenshot that
will be send to the support team.
Hide/Reveal Top Bar button − Click this button to hide or reveal the top bar.
Hide Reveal
Language Menu − This menu allows you to change the language according
to your preference and understanding. The default language is usually
English, depending on the course and your location.
Network performance indicator − The bars in this indicator show the
response speed between the user’s browser and the virtual machine server.
The fuller the bars, the better the network performance. A drop-down
arrow displays the last ping’s round-trip in milliseconds and includes a
Refresh text link that initiates a new ping. The round-trip timing of the new
ping is then displayed in the drop-down box and is shown in the indicator.
Detachable Lab Steps − This icon allows you to move lab instructions
set to another tab and another available monitor.
Lab Steps/Instruction Manual − This icon allows you to move lab
instructions set to another tab and another available monitor.
24Instance ID − It contains the Instance of the open lab module. If requesting
support, this information will be included in the screenshot that will be send
to the support team.
Lab Completion Status − This status allows the users to see their
lab progress in the form of percentage. The lab completion percentage
increases as users move forward with their lab. When the users end their lab
session and rejoin after a pause, the lab completion status remain the same.
Lab Steps/Instruction Manual − This button contains the detailed lab
steps for you and a lab completion summary in the footer, which shows your
progress in the current lab module.
25Virtual Machine (VM) Operations − This is a button that displays the
name of the current virtual machine in the running lab module. Alongside it
contains all the VM operations that can be performed in the running lab
module. The most common VM operations are listed below:
The action choices are:
i. Ctrl+Alt+Delete − Sends this command to the virtual machine.
ii. Take Screenshot – Enable users to take a screenshot of their
current VM.
iii. Paste Content − Pops up a window that the user can input text
onto to paste into the environment.
iv. Reconnect – Enables the users to reconnect the VM if it gets
disconnected due to several reasons.
v. Reset VM – Enables the users to restart their current VMs.
vi. Accessibility – Enables the users to Invoke Narrator and starts the
screen reader functionality within the current VM.
By clicking on the Accessibility Button, users will see the below shown
pop-up menu:
Note: Please note that there might be other options in some specific labs,
e.g., Revert VM, Reset VM, Windows Charm Window Keys, Add/Join
Classroom.
26Click a specific virtual machine to open it in the virtual machine window. The
virtual machine's name currently in the virtual machine window is displayed
above the VM operations (actions buttons). Users can choose between the
other VMs as per their lab module requirements.
Lab Information Menu− This Menu contains the following information
related to the running Lab module:
1. Cloud Credentials
2. Classroom Details
3. Files
4. Lab Network Information
271. Cloud Credentials
i. Cloud Express Pass (Azure) – This link will appear when the launched
Lab requires cloud services credentials. Clicking on the [xxxx] Credential’s
link will open a pop-up window that displays the Username and Password
that you will need to sign in to the cloud service that has been created for
your instance of this Lab:
The Cloud Express Pass for Azure automatically generates a set of Azure
credentials for you to access an Azure subscription from within the
XtremeLabs Viewer UI. The Azure subscription is fully managed by
XtremeLabs and does not require you to sign up for your Azure credentials.
ii. Cloud Express Pass (AWS) – This link will appear when the launched
Lab requires cloud services credentials. Clicking on the [xxxx] Credential’s
link will open a pop-up window that displays the Username and Password
that you will need to sign in to the cloud service that has been created for
your instance of this Lab:
28The Cloud Express Pass for AWS automatically generates a set of AWS
credentials for you to access an AWS subscription from within the
XtremeLabs Viewer UI. The AWS subscription is fully managed by
XtremeLabs and does not require you to sign up for your own AWS
credentials.
XtremeLabs assigns these credentials to you for the duration of your lab
session. When you end your lab session, your cloud resources will be torn
down and deleted.
Note: Any work you have performed in your cloud subscription during
your lab session will then be lost when you click End Lab. It is
recommended that you use the Save Lab feature.
This pop-up also enables you to change your password. Click on the
I forgot my password button.
iii. Other Credentials – When the launched lab includes an Office 365
Tenant or a Dynamics 365 Tenant, this link will appear. Clicking on the O365
Credentials link will open a pop-up window that displays the Tenant’s Email
and Password that you will need to use this O365 Tenant that has been
assigned to you for use in this lab:
Depending on the tenant, the credential will expire in 14 to 25 days from the
date it is assigned to users.
292. Classroom Details – It contains the necessary information about
the classroom created by instructors for a student, such as:
• Classroom Code
• Instructor’s name
• Lab Tenure (Start Date – End Date)
• Cloud meeting details
• Cloud file sharing details
Or
3. Learning Partner – It contains the logo image of the user’s
affiliated organization, e.g., educational institute, training organization, or
any publisher, etc.
4. Files Menu – It contains the logo image of the user’s affiliated
organization, e.g., educational institute, training organization, or any
publisher, etc
i. User Guide − Clicking on the User Guide link opens a separate window
where the XtremeLabs Student User Guide (this document) can be displayed
and downloaded from within XtremeLabs.
ii. Lab Manual – When the launched Lab includes a downloadable lab
manual, this link will appear. Clicking on the Lab Manual link enables the
downloading of the subject lab manual.
30Note: Not all labs contain the downloadable lab manual.
iii. Lab Notes – It contains the special notes for the students provided
by the XtremeLabs Content Team.
5. Lab Network Info – It contains the necessary information on
the network used in the current VM operations.
Lab Actions Menu – This Menu has the following options for the
users:
• End Lab
• Save Lab
31End Lab − Click End Lab to close the lab and terminate the virtual
machines in the lab module.
You will be prompted to confirm that you want the lab to end. Clicking on
the OK button will end the lab.
Click Confirm to close the lab’s browser tab and return to the course player.
Note: Ending a lab means that your lab session will end, and your progress will
not be saved.
Save Lab
If you want to save your work and complete a lab later, click on the Lab
Actions Menu besides the Lab information Button at the top of the Lab
Overlay and click Save Lab from the top-down menu. This will save your lab
for the duration of your classroom, up to 120 hours, before expiring. When
you resume the lab, this option allows an additional 120 hours save duration.
32Click Confirm to close the lab’s browser tab and return to the course player.
Note: The Save lab function is not available on some labs and is only
possible for labs that are associated with active classrooms. The Save lab
link will only appear in the Lab Action drop-down menu if this feature is
available in your particular course for your launched lab module.
Saving the Lab will take you to the View Labs page, where a tile of your saved
lab module is displayed.
During the saving process, you will see the following Lab Saving pop-up
description:
Once the saving process has been completed, the Lab Saving pop-up will
state the date and time that your saved Lab will be available until.
Note: The Save Lab function allows users to save their labs for a
maximum of 120 hours. Users can utilize this functionality for ten
attempts per lab.
33When you click the Take Lab button, you will be able to launch your saved
Lab within the lab saving duration(maximum 120 hours). Clicking the Take
Lab button will restart the Lab at the place where you left off. Whereas, by
clicking the End Lab button, you will lose your saved progress.
If you have saved a lab and sign out of http://labs.xtremelabs.io and then
sign back into the site within the Lab save timeline, the View Labs page will
open with the Saved Labs entry pre-selected to remind you that you have a
saved lab waiting for you:
34Note: Only one Lab can be saved at a time. If you already have a saved lab
and then save another,www.xtremelabs.io
it will overwrite the first saved Lab.
Virtual Machine Window
This is the large window that fills most of the lab view. This window allows
interaction with the virtual machines that form the virtual labs.
Only one virtual machine can be active in this window at a time. Use the
virtual machine selector (identified earlier in this guide) to switch between
virtual machines in a lab module.
If the focus is within this window, the keyboard and pointing device will
control the virtual machine.
Note: Instructions for logging into and interacting with the VMs should be
in the lab manual documentation. You can also find these instructions
within the Labs environment on the left-hand side. However, the most
used Administrator passwords used for Lab VMs are Pa$$w0rd and
Pa55w.rd.
35Once launched, labs will run for their stated durations. At the end of this
period the lab will be disconnected, and a message will be displayed. This
message informs you that the lab is about to expire, and it gives you an
opportunity to either end the lab or extend the lab for an additional 30
minutes:
5 minutes before the lab period ends, the pop up will appear asking you to
extend the Lab. Extend Lab button will help you to extend the lad duration
to 30 minutes before the lab is automatically ended.
You can end the lab at any time while this message is displayed by clicking
on the End Lab button.
Footer
The footer has four elements: The Screenshot (Count), Support link, the Privacy &
Cookies link, XtremeLabs link and the Live Chat Icon.
Screenshots (Count) – click Screenshot (count) to see all the captured
Screenshots of your current VM. All these screenshots will be visible to your
instructors as well.
36Support − Click Support to open a menu with two text links: General FAQs
and Contact us.
Click General FAQs to view a .pdf file of the Frequently Asked Questions.
Click Contact us to open a pop-up form for sending email to the XtremeLabs
support team. This form also provides the toll-free number to contact the
XtremeLabs support team member who are available 24/7.
37To send an email to the XtremeLabs support team, fill in the text input boxes
with the appropriate information and click Submit. You need to check the
Attach Screenshot checklist button if you want to report any error in your
current VM. This option will automatically select the most recent machine
captured screenshot.
Note: that the text input boxes denoted with a red asterisk (*) cannot be
left blank.
After you click Submit, you will see an acknowledgment that the email has
been sent. The XtremeLabs support team will contact you shortly.
If an issue is urgent, call the XtremeLabs support team using the toll-free
number provided on the form during the listed support hours. (The listed
support hours are in the Pacific Time zone.)
Privacy & Cookies – This links to the Privacy Statement web page.
XtremeLabs – This links to the home page of XtremeLabs, LLC, an interactive
platform where you can find much more about XtremeLabs and its offerings.
Chat Icon – XtremeLabs Live chat support allows you to request support
assistance from within the account portal.
38Account Settings
To make changes to your account settings, click on the Account Settings
option on the top right side of the account portal:
39This will allow the user to make the following changes to their XtremeLabs
User Account:
• Password − This allows you to change the password that you use to
log-in to the XtremeLabs platform.
40• Name −This allows you to change the name that the XtremeLabs
platform knows you as
• Delete User −If you are done using the XtremeLabs platform and are
concerned about your privacy rights, you can have all your records deleted
from the XtremeLabs platform by clicking the Delete Account button found
here.
Note: This option will permanently delete your account and the access to
all linked resources will be lost. This cannot be undone.
41Troubleshooting
If you have trouble connecting to the lab images once they have launched,
the information in this section may help identify the issue.
Advanced Firewall Configuration
By default, the lab hosting system offers connections to lab virtual machine
console sessions from an end user’s web browser via the embedded HTML5
protocol.
• Internet proxy/firewall client
First, install a client proxy agent on your machine and then configure that
client to connect to the Internet via the proxy/firewall server. If your network
is protected by Forefront TMG, for example, you will need to install the
Forefront TMG client on your machine and configure it to connect to the
Internet via the gateway. The TMG client can be downloaded from the
Microsoft Download Center. Other firewall/proxy products typically have an
equivalent client agent.
• Firewall configuration
If the firewall has been configured for packet inspection (that is, the rules are
sensitive to the protocols running over certain ports), then the outbound
rules on the firewall need to be altered to allow the RDP protocol to run over
port 443 to the specific addresses used by the lab portal. Namely:
Destination IP address ranges:
67.21.174.1 through 67.21.174.25
67.21.175.69 through 67.21.175.88
67.21.173.141 through 67.21.173.150
Destination port: TCP 443
Protocol: RDP
Note: Configuration of access to port 443 for RDP traffic is beyond the
scope of Internet Explorer proxy settings.
42Support
If you have technical issues with the online labs, you can contact the
XtremeLabs support team. Examples of technical issues include:
• The virtual desktop does not display.
• The online lab runs slowly or is non-responsive.
If an issue is urgent, call the XtremeLabs support team using the toll-free
number provided on the form or click the link to initiate a chat session with
a team member. Chat and phone support are available during business
hours. Email is available 24/7
XtremeLabs - Support Contact Details
Phone +1 855-510-0488
Email support@xtremelabs.io
Hours 24 hours - 7 days a week
© 2022 XtremeLabs, LLC. All rights reserved.
43You can also read