SessionM Loyalty for Service Cloud Administration Guide - Version 2.1.2: October 2021
←
→
Page content transcription
If your browser does not render page correctly, please read the page content below
SessionM Loyalty for Service
Cloud Administration Guide
Version 2.1.2: October 2021
Overview                                                               2
  Note on this Documentation                                            2
  What Is SessionM Loyalty for Service Cloud?                           2
  Use Cases                                                             2
Installation                                                           4
  Requirements                                                          4
  Install the SessionM Loyalty Package                                  4
Configuration                                                          6
  Remote Site Settings                                                  6
  Custom Package Settings                                               7
  Salesforce to SessionM Field Mapping                                 10
Customizing the User Interface                                         12
  Add SessionM Loyalty Components to Lightning Record Pages            12
     Lightning Experience Layout Examples                              16
  Add SessionM Loyalty Components to Experience Cloud Pages            20
  Configure SessionM Loyalty Lightning Web Components                  23
     SessionM Customer Profile                                         23
     SessionM Customer Profile                                         24
     SessionM Points                                                   25
     SessionM Tier Progress                                            25
     SessionM Available Offers                                         25
     SessionM Issued Offers                                            25
     SessionM Redeemed Offers                                          26
     SessionM Expired Offers                                           26
     SessionM Reward Store                                             26
     SessionM Loyalty Components in Experience Cloud                   26
  Add SessionM Loyalty Components to Salesforce Classic                27
     Salesforce Classic Layout Examples                                28
  Overriding UI Labels and Messages                                    30
Providing SessionM Permissions to Users                                32
  Provide Full-Access Permission to Users                              32

SessionM, A Mastercard Company                                Page 1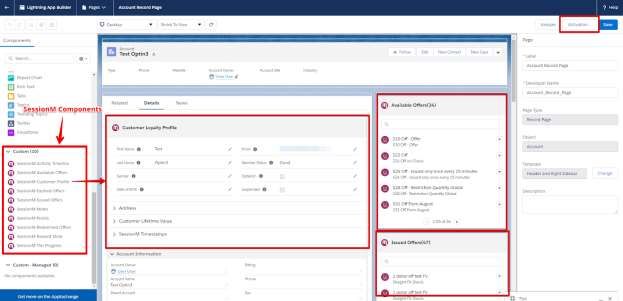
Provide Read-Only Permission to Users                                                         34
  Provide Feature Permission to Users                                                           34
SessionM Loyalty Package Services                                                           36
  Internal User Activity Log                                                                    36
  Cleanup Service                                                                               37
  Custom Debug Logs                                                                             37

Overview

Note on this Documentation
This administration guide describes the installation and configuration process for the SessionM
Loyalty for Service Cloud managed package v2.1.2, released in October 2021.

If your Salesforce instance already has v1.x of the package installed and you are planning to
upgrade to v2.x, please follow the instructions in our migration guide instead: SessionM
Loyalty for Service Cloud Migration Guide.

What Is SessionM Loyalty for Service Cloud?
The SessionM Loyalty Cloud empowers the world’s most innovative brands to forge stronger,
more loyal and more profitable customer relationships by combining the benefits of the
SessionM platform and Salesforce Service Cloud to provide customer service agents with a
robust set of capabilities.

Service Cloud is Salesforce’s enterprise customer service solution enabling customer service
agents to handle incoming cases filed by customers with a variety of specialized tools.
SessionM syncs with Service Cloud to provide a customer’s profile information, recent purchase
transactions and behaviors, as well as the ability to enroll new customers into a loyalty
program and award loyalty points or issue offers as compensation.

Use Cases
There is a wide variety of tasks supported by SessionM Loyalty for Service Cloud, including
enrolling a customer in SessionM, updating customer information, awarding loyalty points, or
offering a loyalty program to a customer.

SessionM, A Mastercard Company                                                    Page 2
Please check our Salesforce Service Cloud Use Case document for more details on how to
manage SessionM loyalty data for a customer from Salesforce Service Cloud.

SessionM, A Mastercard Company                                                Page 3
Installation

Requirements
Before you install the SessionM Loyalty managed package, please check that the following
requirements are met:

   1. Your Salesforce Edition must be Enterprise or Unlimited.
   2. You must have the package installation link for the managed package.
   3. You must have the API settings for configuring the connection to SessionM platform.
      Contact your SessionM Integration Engineer or Project Manager to ensure you have the
      correct API settings.
   4. You must deploy My Domain in your org to use the Lightning Web Components of the
      SessionM Loyalty package. For more information please refer to the official Salesforce
      documentation: My Domain Is Required to Use Lightning Components in Your
      Salesforce Org.

Install the SessionM Loyalty Package
Once you meet all the requirements you can install the SessionM Loyalty managed package
into your Salesforce org:

   1. Open the package installation URL in your browser. SessionM Loyalty can be installed in
      both production and sandbox environments. Use the production or sandbox installation
      URL depending upon your target environment.
   2. If you are asked to login, log into your Salesforce org as a System Administrator.
   3. Select Install for Admins Only on the installation page and click Install. This
      ensures that only System Administrators are provided access to the package during
      installation. You will be able to provide access to additional users in a later step.

SessionM, A Mastercard Company                                                    Page 4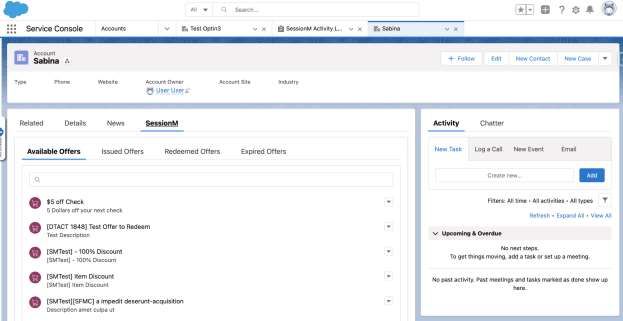
4. Click Done once installation is complete. You are redirected to the Installed Packages
      page. The package now appears in the list of installed packages in your org.

SessionM, A Mastercard Company                                                   Page 5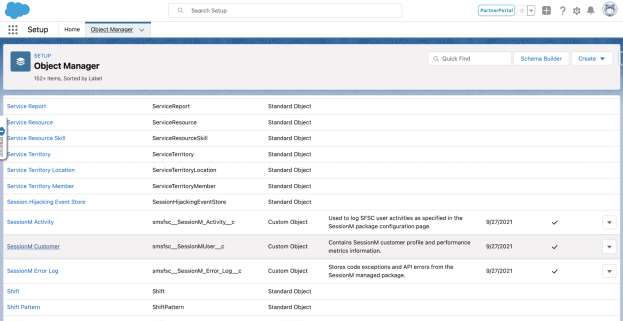
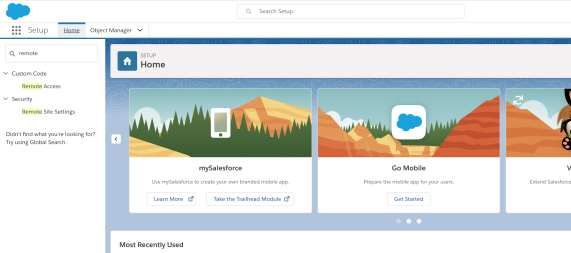
Configuration

Remote Site Settings
Remote site settings specify a list of endpoints that are trusted by your organization.

Contact your SessionM Integration Engineer or Project Manager to ensure you have the
correct endpoints for Users API and Incentives/Offers API.

To configure the remote site settings:

   1. Go to      Setup.
   2. Go to the Quick Find box and search for “remote”. Select Remote Site Settings.

   3. Click New Remote Site to add a new endpoint for Users API.

   4. Provide the Name, URL and Description for the new endpoint and click Save.

SessionM, A Mastercard Company                                                     Page 6
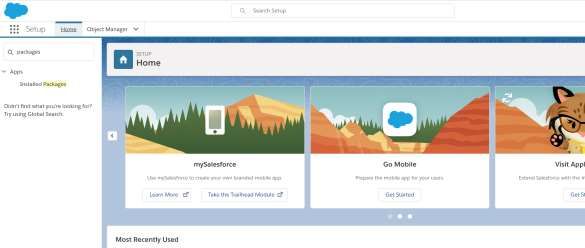
5. Repeat steps 3 and 4 to add the endpoint for Incentives/Offers API.

Custom Package Settings
Use the custom SessionM Loyalty configuration page to add SessionM API credentials and
configure the package for your org.

   1. Go to      Setup.
   2. Go to the Quick Find box and search for “packages”. Select Installed Packages.

   3. Click the Configure link next to the SessionM Loyalty package.

SessionM, A Mastercard Company                                                Page 7
4. Click Edit on the configuration page.

   5. In the API Settings section, update the API endpoint settings provided by your
      SessionM Integration Engineer or Project Manager. In the General Settings section,
      update the values following the guidelines below:
           a. Debug Mode: Enable Debug Mode to use the SessionM Loyalty package custom
              error logging service, used to collect more information than the standard debug
              logs offer when an error occurs. Recommended during testing in sandbox orgs.
           b. Auto-Access to Loyalty Data: By default, users who can access the parent
              records (Account or Contact) will not be able to access the related SessionM
              Customer record, storing data from the SessionM Platform. Enable Auto-Access

SessionM, A Mastercard Company                                                  Page 8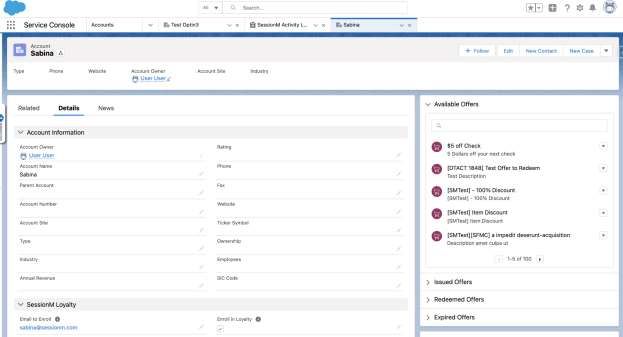
to Loyalty Data to sync record sharing between SessionM Customer and the
               related parent records.
           c. Activity Log: Enable logging of Salesforce user activity based on what
              SessionM-related actions they take within the package. These logs can be used
              for auditing purposes.
           d. Choose one object: Select the Salesforce object where the main customer data
              is stored (also known as the parent object). Supported objects: Account or
              Contact.
           e. Sync Account Changes with Loyalty: Enable Sync Account Changes with
              Loyalty to automatically sync customers from Salesforce to the SessionM
              Platform.
           f. API Name of Email Field in Parent Object: Enter the parent object’s field
              (API name) storing the customer’s email address. For example, if you are using
              Person Accounts, this field can be PersonEmail.
           g. Lookup User with Custom External ID: Enable Lookup User with Custom
              External ID to search for customers in the SessionM Platform by their external
              ID. This is recommended if 1) the customers have only one external ID that
              never changes; 2) Salesforce is not the primary source of customer data; 3) the
              customer data is imported from a third party service.
           h. API Name of External ID Field in Parent Object: Enter the parent object’s
              field (API name) storing the customer's external ID. For example, if Commerce
              Cloud is the primary source of customer data, you can use the Commerce Cloud
              user ID.
           i. External ID Type: Enter the keyword used to associate the external ID with its
              source on the SessionM Platform.
           j. Parent Access Check Frequency: Set the frequency (in minutes) at which to
              check and sync record sharing between SessionM Customer and the related
              parent records. Set only if Auto-Access to Loyalty Data is enabled.
           k. Comp Point Reference Type: Enter an identifier to be displayed as reference
              type in the SessionM Platform’s Point Audit Logs whenever customer points are
              added or deducted in Salesforce.
           l. SessionM Timeout: Set a timeout (in milliseconds) for SessionM API callouts.
              Between 1 and 120,000.
   6. Click Save to save the configuration.

SessionM, A Mastercard Company                                                   Page 9
Salesforce to SessionM Field Mapping
You can choose what data to sync from Salesforce to SessionM by mapping SessionM
Customer object fields to Users API attributes. The mapping is stored as JSON strings.
Example:
{
"SmToSfFieldMappings": {
"Mappings": [
{
"smApiName": "external_id",
"sfApiName": "smsfsc__ExternalID__c",
"attributeType": "standard"
},
{
"smApiName": "birthday",
"sfApiName": "smsfsc__CustomDate1__c",
"attributeType": "custom"
}
]
}
}
This object contains an array of “Mapping” objects. To add a new mapping, you must specify
the following three attributes:
1. smApiName: Provide the name of the field as it appears in the response received from
SessionM API.
2. sfApiName: Provide the API name of the field in SessionM Customer object to which
the API field should be mapped. Ensure that the data type between the source and
target field is compatible.
3. attributeType: This can be:
a. standard → to map a standard attribute from SessionM Users API
b. custom → to map a custom attribute from the SessionM Users API
c. customer_scores → to map a CLV attribute from the SessionM Users API
To add field mapping:
1. Go to Setup.
2. Go to the Quick Find box and search for “metadata”. Select Custom Metadata
Types.
SessionM, A Mastercard Company Page 103. Click Manage Records next to SessionM Field Mappings. 4. Select SessionM to Salesforce API Mapping and click Edit. 5. Click Save. SessionM, A Mastercard Company Page 11
Customizing the User Interface
Add SessionM Loyalty Components to Lightning Record Pages
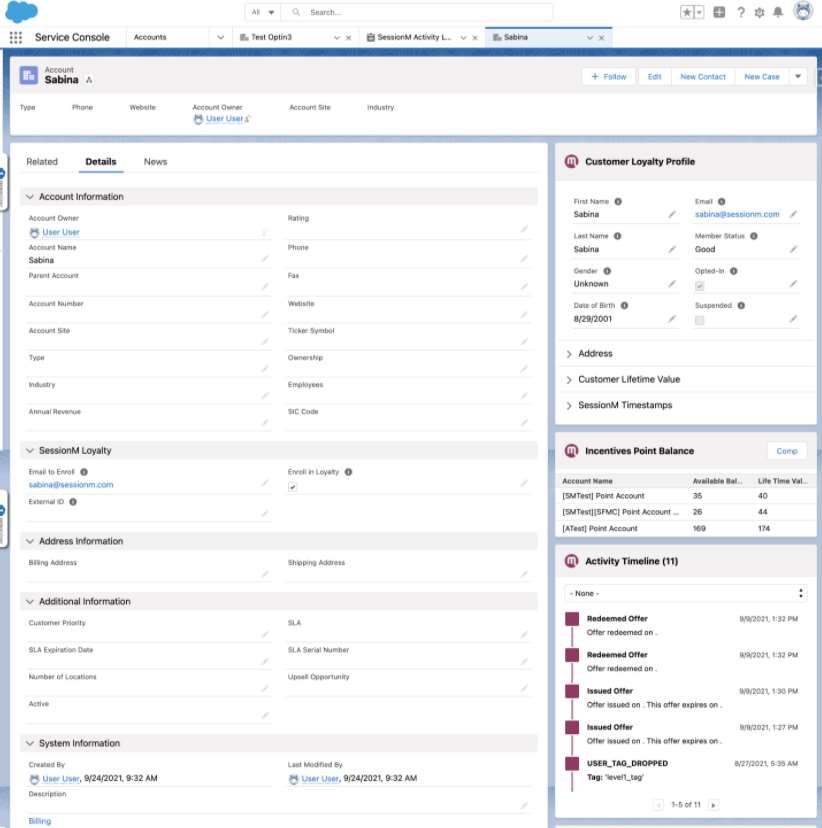
Use the SessionM components on parent record pages (Account or Contact, as selected in
Custom Package Settings) to create a unified, loyalty focused customer profile.
The following is a step-by-step guide on how to add SessionM Loyalty components to a
Lightning Record Page for Account records. The same steps can be followed to customize
Contact record pages:
1. If you are already viewing an Account record page, click and then Edit Page.
Continue with step 10.
Otherwise go to Setup.
2. Click the Object Manager tab and select Account.
SessionM, A Mastercard Company Page 123. Click Lightning Record Pages.
4. If the Lightning Record Page exists, continue with step 8.
Otherwise, if the Lightning Record Page for the account does not exist, click New.
5. Click Record Page and then click Next.
6. Type in a label and Account. Click Next.
SessionM, A Mastercard Company Page 137. Select a template and click Finish.
8. Click the Account Lightning Record Page to which you want to add SessionM
components.
9. Click Edit to open the record page for editing in Lightning App Builder.
SessionM, A Mastercard Company Page 1410. Drag and drop SessionM components anywhere on your page as needed.
11. Click the Activation button in the top right corner.
12. Choose whether to make this page as org default for all Account pages in the org, or
activate it only for one app, or for a combination of app + record type + user profile
(for example, you can set this page to display only for Person Accounts when viewed by
service agents in the Service Console).
SessionM, A Mastercard Company Page 1513. Choose the form factors and click Next. 14. Click Save to save the page. Then click Back to exit. Lightning Experience Layout Examples Besides record details: simply drag and drop individual SessionM components onto the sidebar. SessionM, A Mastercard Company Page 16
Within a tab on the main page area: add a new tab to the Tabs component and drag and
drop individual SessionM components under the new tab.

SessionM, A Mastercard Company                                          Page 17
The components can be grouped in tabs. Drag and drop a Tabs component onto the page,
define its tabs, then drag and drop the components under the tabs.

The components can be grouped in accordion sections. Drag and drop an Accordion
component onto the page, define its sections, then drag and drop the components under the
section headers.

SessionM, A Mastercard Company                                                Page 18
On mobile devices, the SessionM components are displayed as expandable sections.

SessionM, A Mastercard Company                                             Page 19
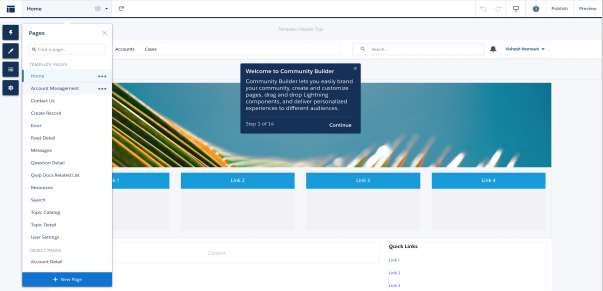
Add SessionM Loyalty Components to Experience Cloud
Pages
The SessionM components can be added to Experience Cloud (formerly known as Community
Cloud) pages to be accessed by external and guest users.

The following is a step-by-step guide on how to add SessionM Loyalty components to an
Experience Cloud Page for Account records. The same steps can be followed to customize
Contact record pages:

   1. Go to      Setup.
   2. Go to the Quick Find box and search for “sites”. Select All Sites under Digital
      Experiences. Finally, click the Builder link next to the site that you want to edit.

   3. Click Pages Menu. Then click New Page if you need to create a new page for
      Account in Experience Cloud. Otherwise, skip to step 6.

SessionM, A Mastercard Company                                                    Page 20
4. Select Object Pages. 5. Select Account. 6. Click Pages Menu, then click Account Detail. SessionM, A Mastercard Company Page 21
7. Click the Components menu. Then drag and drop SessionM components onto the
      page in the same way as described in the Adding SessionM Components to Lightning
      Record Pages section.

   8. Click Publish to publish your changes.

SessionM, A Mastercard Company                                              Page 22
Configure SessionM Loyalty Lightning Web Components
You can control when a component appears on a Lightning page by adding filter conditions
and logic to its properties, such as parent record field values, current user or device.
Each SessionM component has its own set of custom properties, as follows:
SessionM Customer Profile
• Show Header: Shows the title bar on top for desktop view and as a stacked section's
header for mobile view. Disabling the header is recommended when the component is
placed under a tab or accordion section with the same name.
SessionM, A Mastercard Company Page 23• Enable Profile Update: Allows users with SessionM Update permission to update
customer profiles in the SessionM Platform directly from this component.
• Auto Enroll Enabled: Enables automatic enrollment of new customers to the
SessionM Platform.
You can control which sections and fields appear in the Customer Profile component by editing
the page layout for the SessionM Customer object:
1. Go to Setup.
2. Click the Object Manager tab and select SessionM Customer.
3. Click Page Layouts. Then select SessionM Customer Layout.
4. Modify the page layout as needed. Then click Save to save and exit.
SessionM Customer Profile
• Number of Notes per Page: The number of notes to be displayed at once in the
component.
SessionM, A Mastercard Company Page 24• Enable adding notes: Allows users with SessionM Add Notes permission to add notes
to customer profiles in the SessionM Platform directly from this component.
• Admin Id: The ID of the SessionM Platform admin user who will be displayed as
author of these notes when they are viewed in the SessionM Platform.
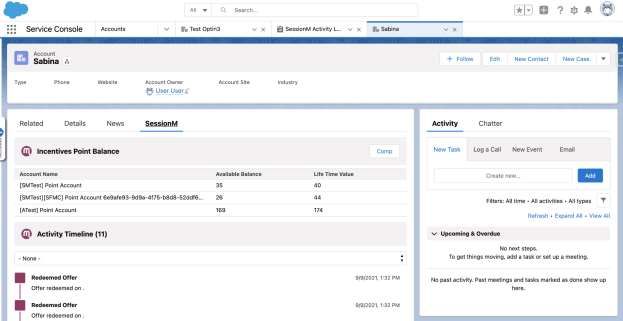
SessionM Points
• Enable Point Comp Action: Allows users with SessionM Comp Points permission to
add points to or deduct points from customer point accounts in the SessionM Platform
directly from this component.
SessionM Tier Progress
• Show Header: Shows the title bar on top for desktop view and as a stacked section's
header for mobile view. Disabling the header is recommended when the component is
placed under a tab or accordion section with the same name.
SessionM Available Offers
• Show Header: Shows the title bar on top for desktop view and as a stacked section's
header for mobile view. Disabling the header is recommended when the component is
placed under a tab or accordion section with the same name.
• Enable Offer Issuance: Allows users with SessionM Manage Offers permission to
issue offers to customers in the SessionM Platform directly from this component.
• Check Purchase Restrictions: Hides offers that can't be issued to the customer
because of inventory or frequency restrictions. Warning – feature in beta: enabling this
could impact the performance of the component.
• Number of Offers per Page: The number of offers to be displayed at once in the
component.
SessionM Issued Offers
• Show Header: Shows the title bar on top for desktop view and as a stacked section's
header for mobile view. Disabling the header is recommended when the component is
placed under a tab or accordion section with the same name.
• Enable Offer Actions: Allows users with SessionM Manage Offers permission to
redeem or revoke offers for customers in the SessionM Platform directly from this
component.
• Number of Offers per Page: The number of offers to be displayed at once in the
component.
SessionM, A Mastercard Company Page 25SessionM Redeemed Offers
• Show Header: Shows the title bar on top for desktop view and as a stacked section's
header for mobile view. Disabling the header is recommended when the component is
placed under a tab or accordion section with the same name.
• Number of Offers per Page: The number of offers to be displayed at once in the
component.
SessionM Expired Offers
• Show Header: Shows the title bar on top for desktop view and as a stacked section's
header for mobile view. Disabling the header is recommended when the component is
placed under a tab or accordion section with the same name.
• Enable Offer Actions: Allows users with SessionM Manage Offers permission to issue
offers to customers in the SessionM Platform directly from this component.
• Number of Offers per Page: The number of offers to be displayed at once in the
component.
SessionM Reward Store
• Show Header: Shows the title bar on top for desktop view and as a stacked section's
header for mobile view. Disabling the header is recommended when the component is
placed under a tab or accordion section with the same name.
• Enable Offer Purchase: Allows users with SessionM Manage Rewards permission to
purchase offers for customers in the SessionM Platform directly from this component.
• Check Purchase Restrictions: Hides offers that can't be purchased to the customer
because of inventory or frequency restrictions. Warning – feature in beta: enabling this
could impact the performance of the component.
• Number of Offers per Page: The number of offers to be displayed at once in the
component.
SessionM Loyalty Components in Experience Cloud
All the SessionM components have an additional property in Experience Cloud: Record ID.
Please leave the default value {!recordId} for the component to have access to the parent
record ID.
SessionM, A Mastercard Company Page 26Add SessionM Loyalty Components to Salesforce Classic
If you are still using Salesforce Classic, you can customize parent object page layouts to
display SessionM components.
The following is a step-by-step guide on how to add SessionM Loyalty components to a
Salesforce Classic page layout for Account records. The same steps can be followed to
customize Contact page layouts:
1. Go to Setup.
2. Click the Object Manager tab and then select Account.
3. Click Page Layouts. Then click the account page layout to which you want to add
SessionM components.
1. Select Visualforce Pages, then drag and drop the SessionM components as needed
in the layout.
SessionM, A Mastercard Company Page 27Salesforce Classic Layout Examples The SessionM components can be added to existing sections on the page layouts or grouped into new sections. Simply drag and drop the Section item anywhere on the layout. Name the section (for example, SessionM Loyalty Data), deselect Edit Page and choose the layout. Click OK. One-column layout example: SessionM, A Mastercard Company Page 28
Two-column layout example:

SessionM, A Mastercard Company   Page 29
Overriding UI Labels and Messages
To override or translate package contents in the SessionM Loyalty package, go to  Setup,
click Quick Find and then type “translate”, then click Translate under Translation
Workbench. The translatable contents of the package are stored as:

   •   Field labels and help texts (configuration page and customer profile component)

SessionM, A Mastercard Company                                                  Page 30
•   Custom labels

SessionM, A Mastercard Company   Page 31
Providing SessionM Permissions to Users
When you installed the SessionM package, only System Administrators were provided access
to the application. In this section you learn how to provide SessionM access to additional users
in your organization.
SessionM Loyalty includes pre-packaged permission sets, which can be used to quickly provide
permissions to your internal and external users.
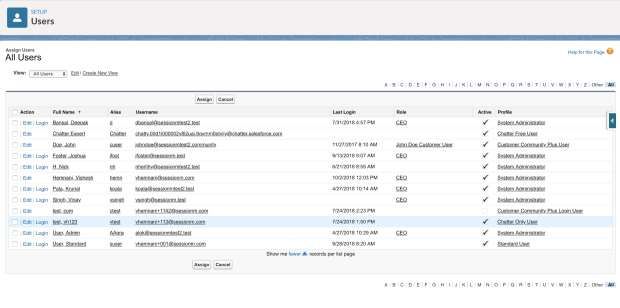
To see the list of permission sets assigned to a user:
2. Go to Setup.
3. Click Quick Find and search for “users”. Click Users.
4. Select the desired username in the list of users.
5. Scroll down to Permission Set Assignments on the user page. Example of
assignments for a user with access to multiple, but not all, features:
Provide Full-Access Permission to Users
The SessionM Admin permission set provides full access to all SessionM features. This is the
recommended permission set for managers or superusers who need to manage all the
SessionM Loyalty data.
1. Go to Setup.
2. Click Quick Find and search for “permission”. Click Permission Sets.
SessionM, A Mastercard Company Page 323. Select SessionM Admin in the list of permission sets. 4. Click Manage Assignments on the SessionM Admin permission set page. 5. Click Add Assignments. 6. Select all the users to whom you want to assign the permission, then click Assign. SessionM, A Mastercard Company Page 33
7. Review the assignment on the next screen and then click Done.

Provide Read-Only Permission to Users
The SessionM Viewer permission set provides read-only access to limited SessionM features.
This is the recommended permission set for users who only need to view a user’s loyalty data.
Users with this permission set (and no other SessionM permission set) can view loyalty user
information, activity, notes, user offers, reward store, tier progress, and point balance. They
cannot edit customer profiles, add notes, manage user offers, or comp points.

To assign the SessionM Viewer permission set to your users, follow the same steps as in the
previous section, but choose the SessionM Viewer permission set instead.

Provide Feature Permission to Users
In case a user needs to have access to a limited number of features (for example, they should
be able to comp points and add notes, but not to manage offers), SessionM provides feature
permission sets to allow for customized access:

   •   SessionM Comp Points – permission to add and deduct points
   •   SessionM Add Notes – permission to add notes to the customer profile
   •   SessionM Manage Offers – permission to issue, redeem, and revoke offers
   •   SessionM Manage Rewards – permission to purchase offers from the reward store
   •   SessionM Update – permission to update customer profiles

SessionM, A Mastercard Company                                                    Page 34
!!! The SessionM Viewer permission set is required to read loyalty data. Without it,
users will not be able to access any SessionM Loyalty components, even if they
have feature permissions.

Users with the SessionM Admin permission set automatically have access to all features -
SessionM Viewer permission set is needed.

To assign the SessionM feature permission sets to your users, follow the same steps as in the
previous section, but choose the feature permission set instead.

SessionM, A Mastercard Company                                                   Page 35
SessionM Loyalty Package Services

Internal User Activity Log
The SessionM package can log Salesforce user activity based on what SessionM-related actions
they take, to be used for auditing purposes. Check Custom Package Settings on how to enable
these logs.

To see the internal activity logs, navigate to the pre-packaged report:

   1. Go to the Reports tab, select All Folders on the left side and choose SessionM
      Reports.

   2. Choose SessionM Activity Log. A pre-configured report with all activity logs opens.
      You can edit the report to customize which fields to display.

SessionM, A Mastercard Company                                                Page 36
Cleanup Service
The cleanup service removes old SessionM-related custom object records daily. The service is
disabled by default. To configure it:
1. Go to Setup.
2. Next to SessionM Cleanup Service, click Manage Records.
3. Click New.
4. Type a label of your choice for the service. The name should be automatically
populated.
5. Choose the custom object and the age (in days) of the records that need to be deleted.
In the example below, age 30 means that every day at midnight SessionM Error Log
records older than 30 days are deleted.
6. Click Save.
7. Repeat steps 3-6 for each object you want to clean.
Custom Debug Logs
The SessionM Loyalty package offers a custom error logging service to capture errors from the
package code and from the API responses. Debug Mode needs to be enabled, please check
Custom Package Settings.
The custom debug logs can be viewed after creating a custom report:
SessionM, A Mastercard Company Page 371. Go to the Reports tab and click New Report.
2. Choose the report type “SessionM Error Logs” and click Continue.
3. Add and arrange fields as needed in the Columns section under the Outline tab in the
sidebar.
SessionM, A Mastercard Company Page 384. Click the Filters tab in the sidebar and choose to show All sessionm error logs. 5. Click Save & Run. SessionM, A Mastercard Company Page 39
You can also read